2011 MERCEDES-BENZ SLK55AMG height
[x] Cancel search: heightPage 11 of 312

Glove box
........................................... 174
Gross Axle Weight Rating see GAWR
Gross Vehicle Weight
see GVW
Gross Vehicle Weight Rating
see GVWR
GVW (Gross Vehicle Weight) ............218
GVWR (Gross Vehicle Weight
Rating) ................................................ 218H
Halogen headlamps see Headlamps
Hard plastic trim items, cleaning ....231
Hazard warning flasher ....................... 74
Headlamp cleaning system ................ 74
Headlamps
Active Bi-Xenon headlamps ............. 71
Automatic headlamp mode .............. 71
Bi-Xenon .................................. 71, 269
Cleaning lenses ............................. 229
Cleaning system .............................. 74
Daytime running lamp mode ............72
Delayed shut-off ............................ 107
Halogen ......................................... 269
High-beam flasher ............................ 74
High-beam headlamps .....................74
Low-beam headlamps ...................... 71
Replacing bulbs ............................. 267
Switch .............................................. 71
Headliner, cleaning and care of .......231
Head restraints .................................... 62
Adjustment ...................................... 62
Head-thorax air bags ........................... 36
Heated steering wheel ........................67
Height adjustment
Seats ............................................... 62
High-beam flasher ............................... 74
High-beam headlamps ................74, 269
Indicator lamp .................................. 26
High-performance brake system .....223
Hood ................................................... 192
Messages in the multifunction
display ........................................... 245
Horn ...................................................... 25
Hydroplaning ..................................... 224 I
Identification labels ..........................292
Identification number, vehicle
(VIN) ................................................... 293
Ignition ........................................... 61, 80
Immobilizer .......................................... 51
Infant and child restraint systems see Children in the vehicle
Inflation pressure
see Tires, Inflation pressure
Inside door handle ........................30, 58
Instrument cluster ........................26, 92
Illumination ...................................... 93
Lamps ............................................ 256
Multifunction display .......................95
Instrument lighting
see Instrument cluster, Illumination
Instrument panel
see Instrument cluster
Instruments and controls
see Cockpit
Interfere with radio reception .......... 141
Interior lighting ................................... 75
Delayed shut-off ............................ 107
Emergency lighting .......................... 76
Reading lamps ................................. 75
Interior rear view mirror .....................68
Auto-dimming rear view mirrors ....... 69
Interior storage spaces
see Storage compartments
Intermittent wiping ............................. 76
Rain sensor ...................................... 76
iPod ®
(media interface) ....................139 J
Jack ..................................................... 235
Jump starting ..................................... 283 K
Key, Mechanical
Loss of ............................................. 58
Replacing
......................................... 58 Index
9 171_AKB; 3; 60, en-US
d2ureepe,
Version: 2.11.8.1 2009-05-11T16:00:23+02:00 - Seite 9
Page 49 of 312
A child’s risk of serious or fatal injuries is
significantly increased if the child restraints
are not properly secured in the vehicle and/
or the child is not properly secured in the child
restraint.
Children too big for a toddler restraint must
ride in seats using regular seat belts. Position
shoulder belt across chest and shoulder, not
face or neck. A booster seat may be
necessary to achieve proper seat belt
positioning for children over 41 lb (18 kg) until
they reach a height where a lap/shoulder belt
fits properly without a booster.
When the child restraint is not in use, remove
it from the vehicle or secure it with the seat
belt to prevent the child restraint from
becoming a projectile in the event of an
accident.
Panic alarm
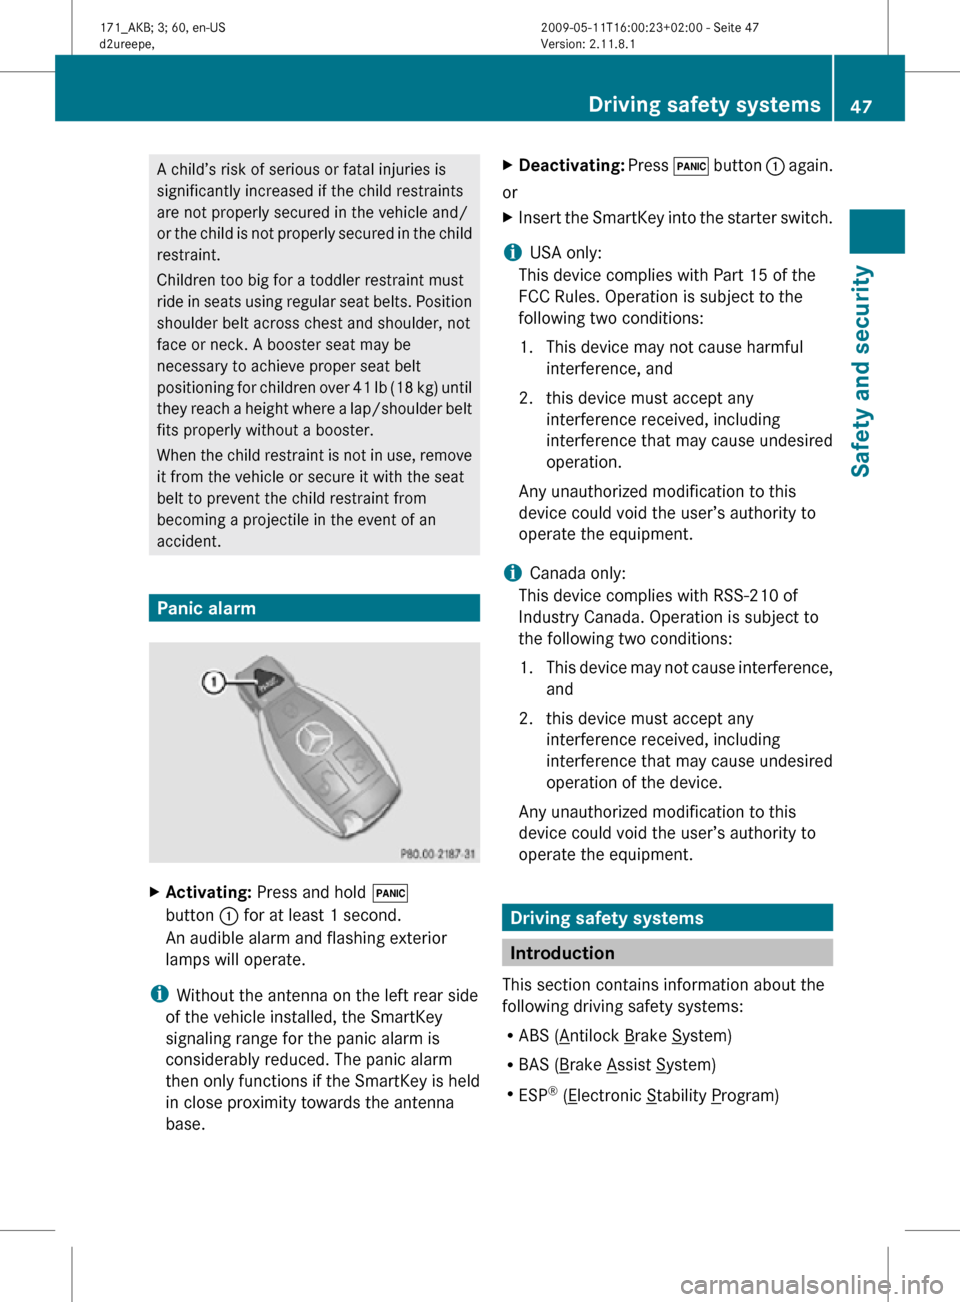
X
Activating: Press and hold !
button : for at least 1 second.
An audible alarm and flashing exterior
lamps will operate.
i Without the antenna on the left rear side
of the vehicle installed, the SmartKey
signaling range for the panic alarm is
considerably reduced. The panic alarm
then only functions if the SmartKey is held
in close proximity towards the antenna
base. X
Deactivating: Press ! button : again.
or
X Insert the SmartKey into the starter switch.
i USA only:
This device complies with Part 15 of the
FCC Rules. Operation is subject to the
following two conditions:
1. This device may not cause harmful interference, and
2. this device must accept any interference received, including
interference that may cause undesired
operation.
Any unauthorized modification to this
device could void the user’s authority to
operate the equipment.
i Canada only:
This device complies with RSS-210 of
Industry Canada. Operation is subject to
the following two conditions:
1. This device may not cause interference, and
2. this device must accept any interference received, including
interference that may cause undesired
operation of the device.
Any unauthorized modification to this
device could void the user’s authority to
operate the equipment. Driving safety systems
Introduction
This section contains information about the
following driving safety systems:
R ABS ( Antilock Brake System)
R BAS ( Brake Assist System)
R ESP ®
( Electronic Stability Program)Driving safety systems
47Safety and security
171_AKB; 3; 60, en-US
d2ureepe, Version: 2.11.8.1 2009-05-11T16:00:23+02:00 - Seite 47 Z
Page 62 of 312
You can open the trunk when the vehicle is
stationary and the retractable hardtop is fully
opened or closed.
A minimum height clearance of 5.78 ft
(1.76 m) is required to open the trunk lid.
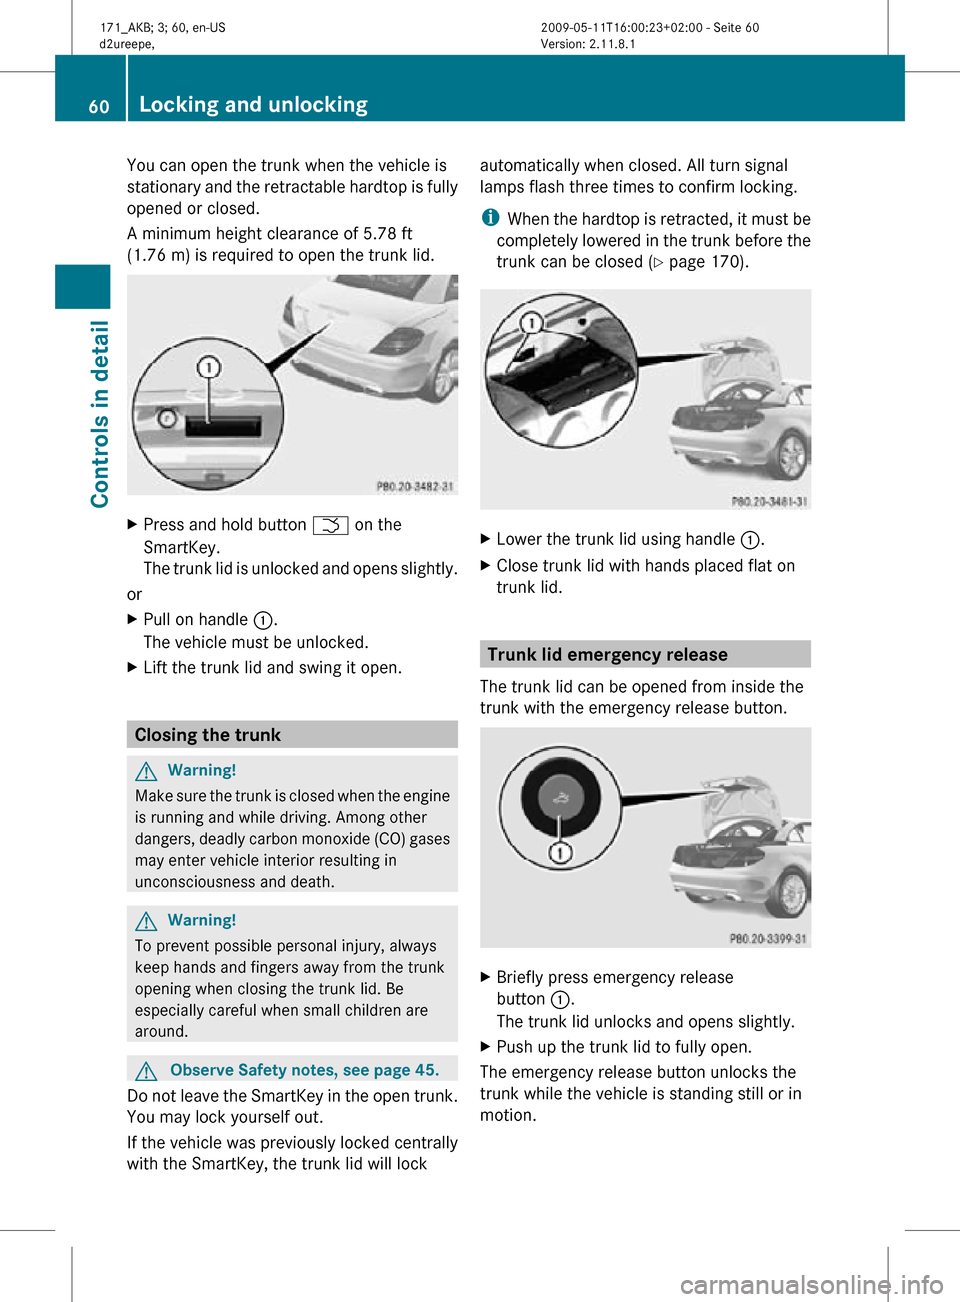
X
Press and hold button F on the
SmartKey.
The trunk lid is unlocked and opens slightly.
or
X Pull on handle :.
The vehicle must be unlocked.
X Lift the trunk lid and swing it open. Closing the trunk
G
Warning!
Make sure the trunk is closed when the engine
is running and while driving. Among other
dangers, deadly carbon monoxide (CO) gases
may enter vehicle interior resulting in
unconsciousness and death. G
Warning!
To prevent possible personal injury, always
keep hands and fingers away from the trunk
opening when closing the trunk lid. Be
especially careful when small children are
around. G
Observe Safety notes, see page 45.
Do not leave the SmartKey in the open trunk.
You may lock yourself out.
If the vehicle was previously locked centrally
with the SmartKey, the trunk lid will lock automatically when closed. All turn signal
lamps flash three times to confirm locking.
i
When the hardtop is retracted, it must be
completely lowered in the trunk before the
trunk can be closed ( Y page 170). X
Lower the trunk lid using handle :.
X Close trunk lid with hands placed flat on
trunk lid. Trunk lid emergency release
The trunk lid can be opened from inside the
trunk with the emergency release button. X
Briefly press emergency release
button :.
The trunk lid unlocks and opens slightly.
X Push up the trunk lid to fully open.
The emergency release button unlocks the
trunk while the vehicle is standing still or in
motion. 60
Locking and unlockingControls in detail
171_AKB; 3; 60, en-US
d2ureepe,
Version: 2.11.8.1 2009-05-11T16:00:23+02:00 - Seite 60
Page 65 of 312
are not properly secured in the vehicle and/
or the child is not properly secured in the child
restraint.
G
Warning!
For your protection, drive only with properly
positioned head restraints.
Adjust the head restraint so that it is as close
to the head as possible and the center of the
head restraint supports the back of the head
at eye level. This will reduce the potential for
injury to the head and neck in the event of an
accident or similar situation.
Do not drive the vehicle without the seat head
restraints. Head restraints are intended to
help reduce injuries during an accident. Seat adjustment
The seats can be adjusted either manually or
electrically, depending on the vehicle’s
equipment.
! When moving the seats, make sure there
are no items in the footwell or behind the
seats. Otherwise, you could damage the
seats and/or the items.
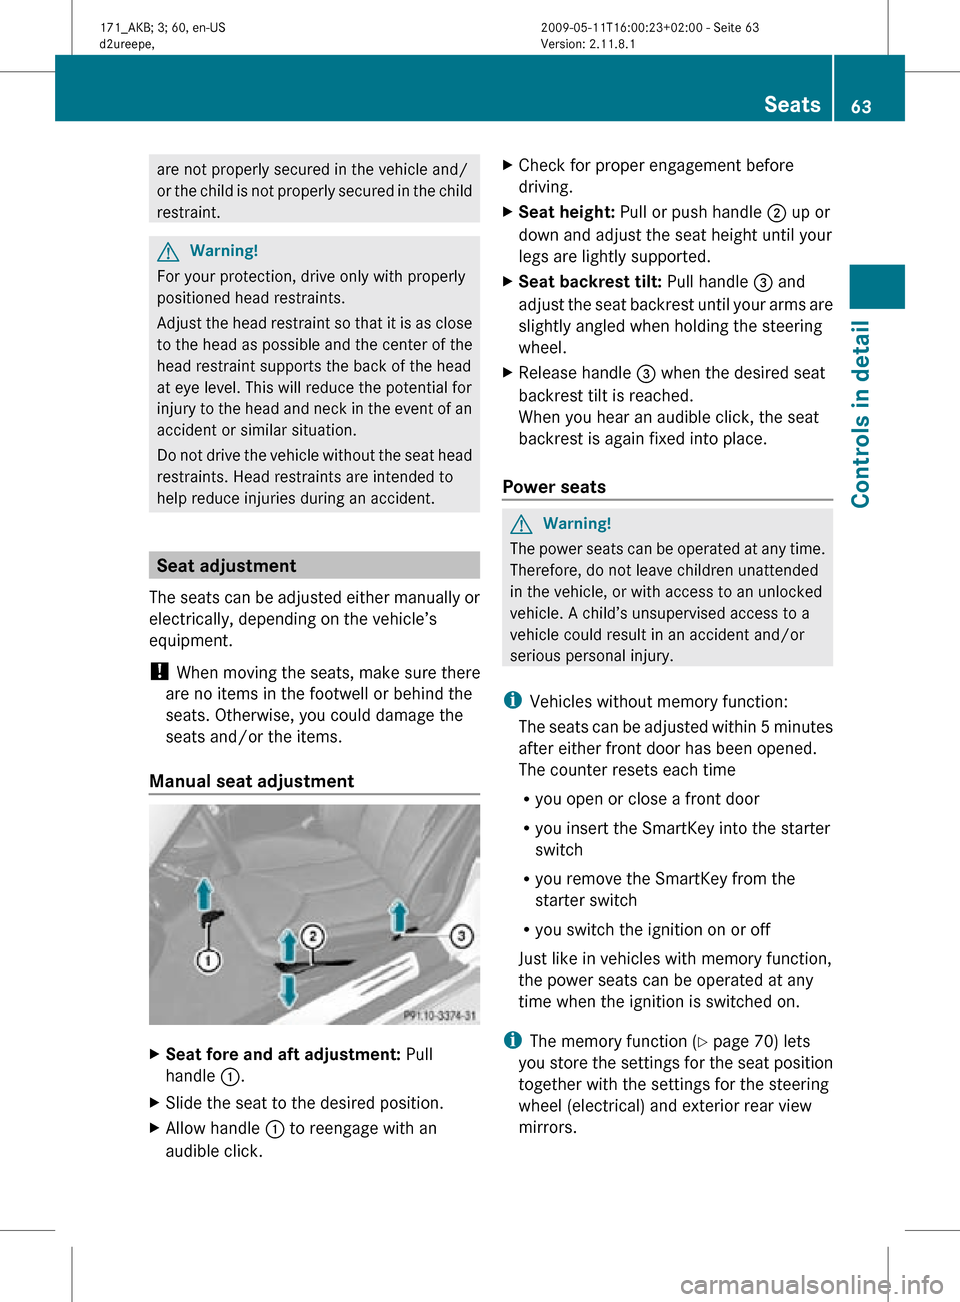
Manual seat adjustment X
Seat fore and aft adjustment: Pull
handle :.
X Slide the seat to the desired position.
X Allow handle : to reengage with an
audible click. X
Check for proper engagement before
driving.
X Seat height: Pull or push handle ; up or
down and adjust the seat height until your
legs are lightly supported.
X Seat backrest tilt: Pull handle = and
adjust the seat backrest until your arms are
slightly angled when holding the steering
wheel.
X Release handle = when the desired seat
backrest tilt is reached.
When you hear an audible click, the seat
backrest is again fixed into place.
Power seats G
Warning!
The power seats can be operated at any time.
Therefore, do not leave children unattended
in the vehicle, or with access to an unlocked
vehicle. A child’s unsupervised access to a
vehicle could result in an accident and/or
serious personal injury.
i Vehicles without memory function:
The seats can be adjusted within 5 minutes
after either front door has been opened.
The counter resets each time
R you open or close a front door
R you insert the SmartKey into the starter
switch
R you remove the SmartKey from the
starter switch
R you switch the ignition on or off
Just like in vehicles with memory function,
the power seats can be operated at any
time when the ignition is switched on.
i The memory function (Y page 70) lets
you store the settings for the seat position
together with the settings for the steering
wheel (electrical) and exterior rear view
mirrors. Seats
63Controls in detail
171_AKB; 3; 60, en-US
d2ureepe, Version: 2.11.8.1 2009-05-11T16:00:23+02:00 - Seite 63 Z
Page 66 of 312
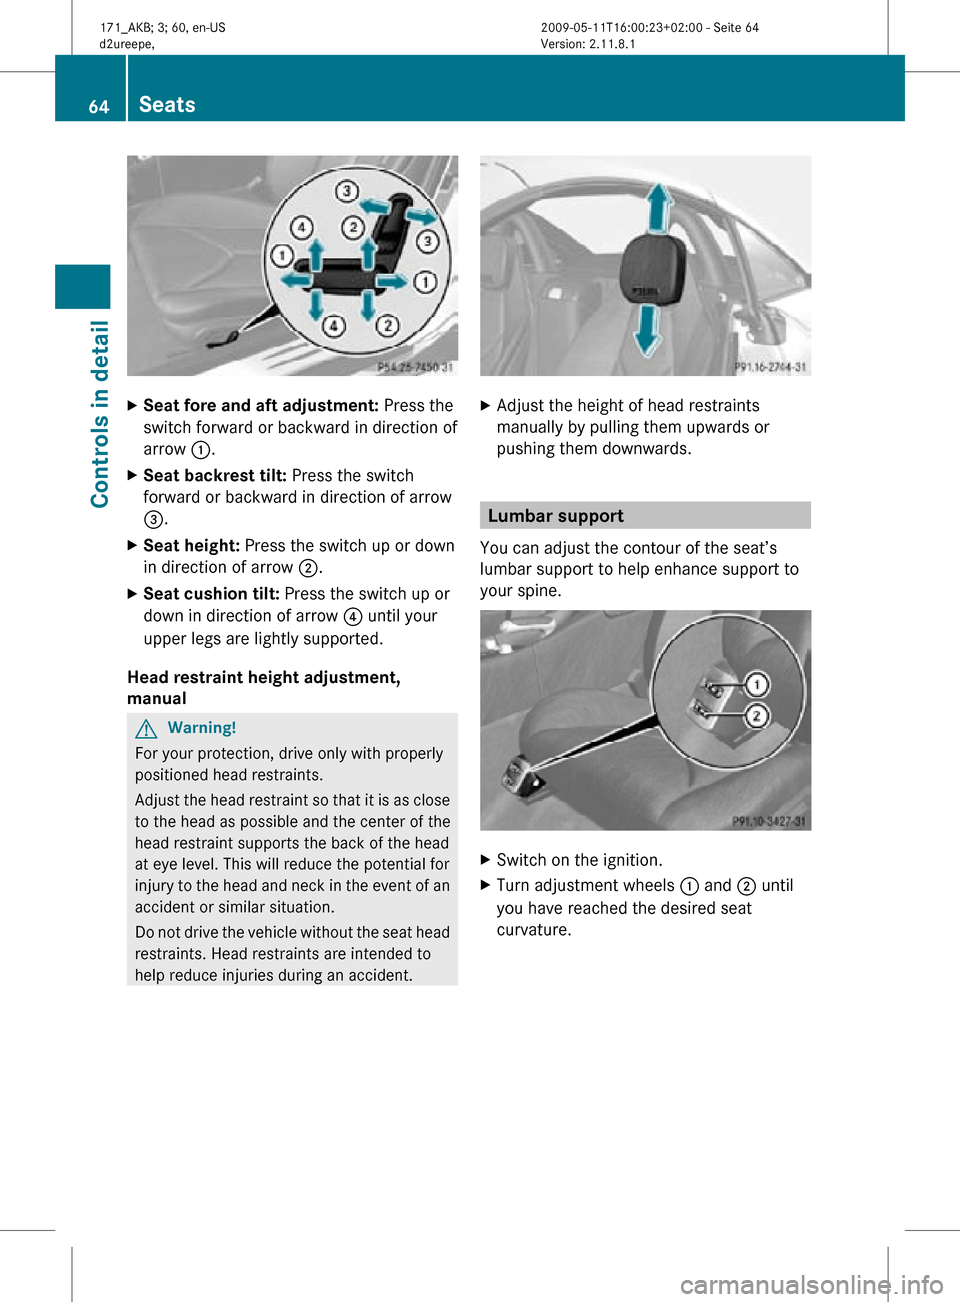
X
Seat fore and aft adjustment: Press the
switch forward or backward in direction of
arrow :.
X Seat backrest tilt: Press the switch
forward or backward in direction of arrow
=.
X Seat height: Press the switch up or down
in direction of arrow ;.
X Seat cushion tilt: Press the switch up or
down in direction of arrow ? until your
upper legs are lightly supported.
Head restraint height adjustment,
manual G
Warning!
For your protection, drive only with properly
positioned head restraints.
Adjust the head restraint so that it is as close
to the head as possible and the center of the
head restraint supports the back of the head
at eye level. This will reduce the potential for
injury to the head and neck in the event of an
accident or similar situation.
Do not drive the vehicle without the seat head
restraints. Head restraints are intended to
help reduce injuries during an accident. X
Adjust the height of head restraints
manually by pulling them upwards or
pushing them downwards. Lumbar support
You can adjust the contour of the seat’s
lumbar support to help enhance support to
your spine. X
Switch on the ignition.
X Turn adjustment wheels : and ; until
you have reached the desired seat
curvature. 64
SeatsControls in detail
171_AKB; 3; 60, en-US
d2ureepe,
Version: 2.11.8.1 2009-05-11T16:00:23+02:00 - Seite 64
Page 173 of 312
G
Warning!
Before operating the retractable hardtop,
make sure there is no danger of anyone being
injured by the moving parts (retractable
hardtop, roof frame, and trunk lid).
Hands must never be placed near the roof
frame, upper windshield area, hardtop, shelf
behind roll bars, or trunk lid while the
retractable hardtop is being raised or
lowered. Serious personal injury may occur.
If potential danger exists, release the
retractable hardtop switch or button % or
& on the SmartKey. This immediately
interrupts the raising or lowering procedure.
You then can operate the retractable hardtop
switch or press button % or & on the
SmartKey to raise or lower the retractable
hardtop away from the danger zone
! Never sit or place heavy objects on the
rear shelf. Doing so could cause damage to
the retractable hardtop and the rear shelf.
! Please keep in mind that weather
conditions can sometimes change rapidly.
Make sure to close the retractable hardtop
when leaving the vehicle. If water enters
the vehicle interior, vehicle electronics
could be damaged which is not covered by
the Mercedes-Benz Limited Warranty.
! When opening and closing the retractable
hardtop, make sure
R there is sufficient clearance for the
retractable hardtop to move up and for
the trunk lid to move back
R the luggage cover is installed, extended
and closed
R the trunk is loaded only to the height of
the luggage cover
R the luggage/cargo does not push up the
closed luggage cover R
the trunk lid is closed
R the outside temperature is above +5‡
(-15†)
Otherwise the retractable hardtop and
trunk as well as other parts of the vehicle
could be damaged. Opening and closing
With the retractable hardtop switch G
Observe Safety notes, see page 170.
X Engage the parking brake.
X Close the luggage cover ( Y page 173).
X Close the trunk lid.
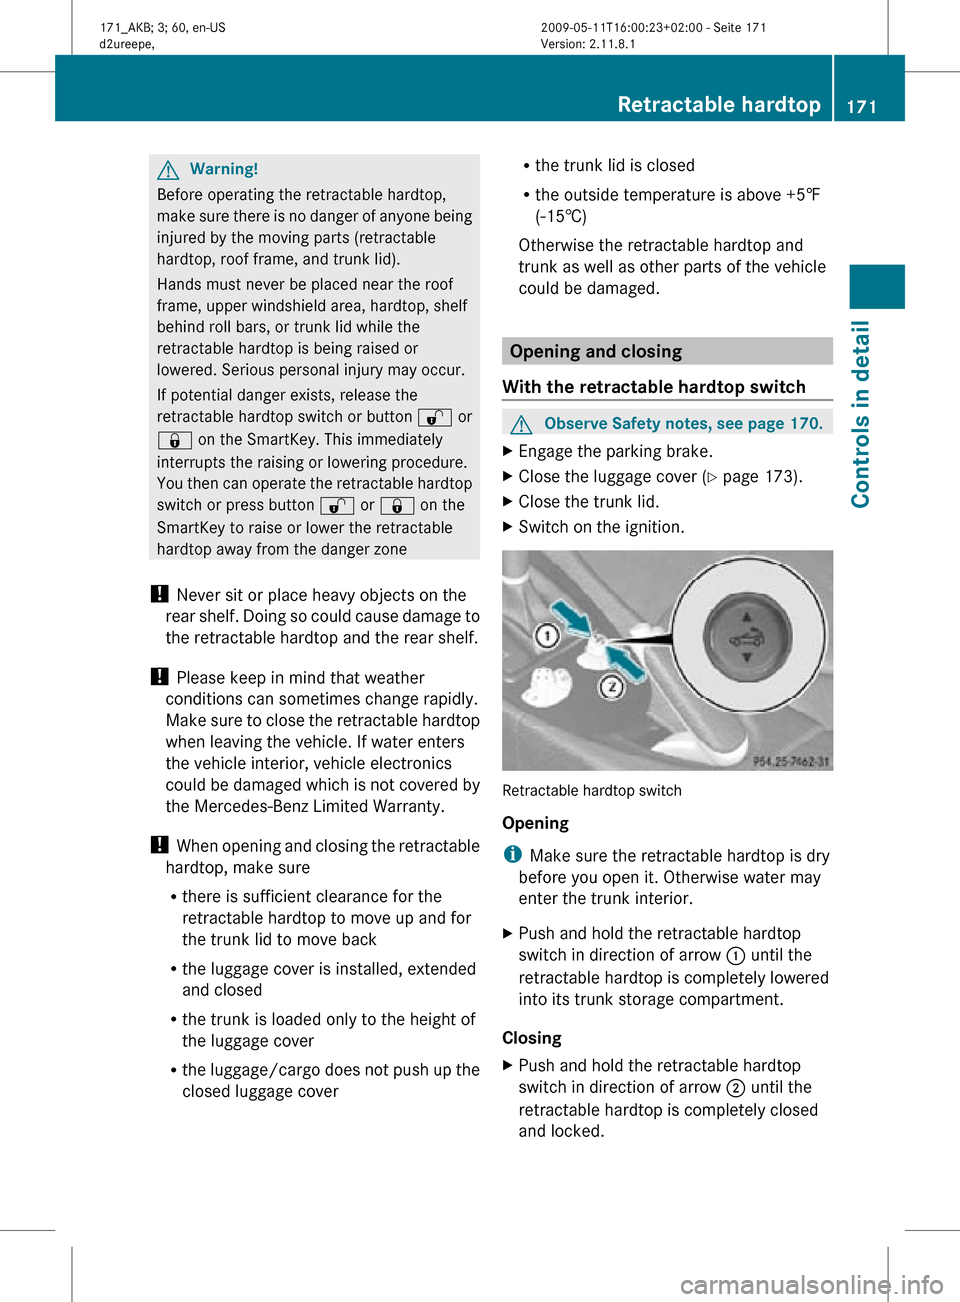
X Switch on the ignition. Retractable hardtop switch
Opening
i
Make sure the retractable hardtop is dry
before you open it. Otherwise water may
enter the trunk interior.
X Push and hold the retractable hardtop
switch in direction of arrow : until the
retractable hardtop is completely lowered
into its trunk storage compartment.
Closing
X Push and hold the retractable hardtop
switch in direction of arrow ; until the
retractable hardtop is completely closed
and locked. Retractable hardtop
171Controls in detail
171_AKB; 3; 60, en-US
d2ureepe, Version: 2.11.8.1 2009-05-11T16:00:23+02:00 - Seite 171 Z
Page 176 of 312
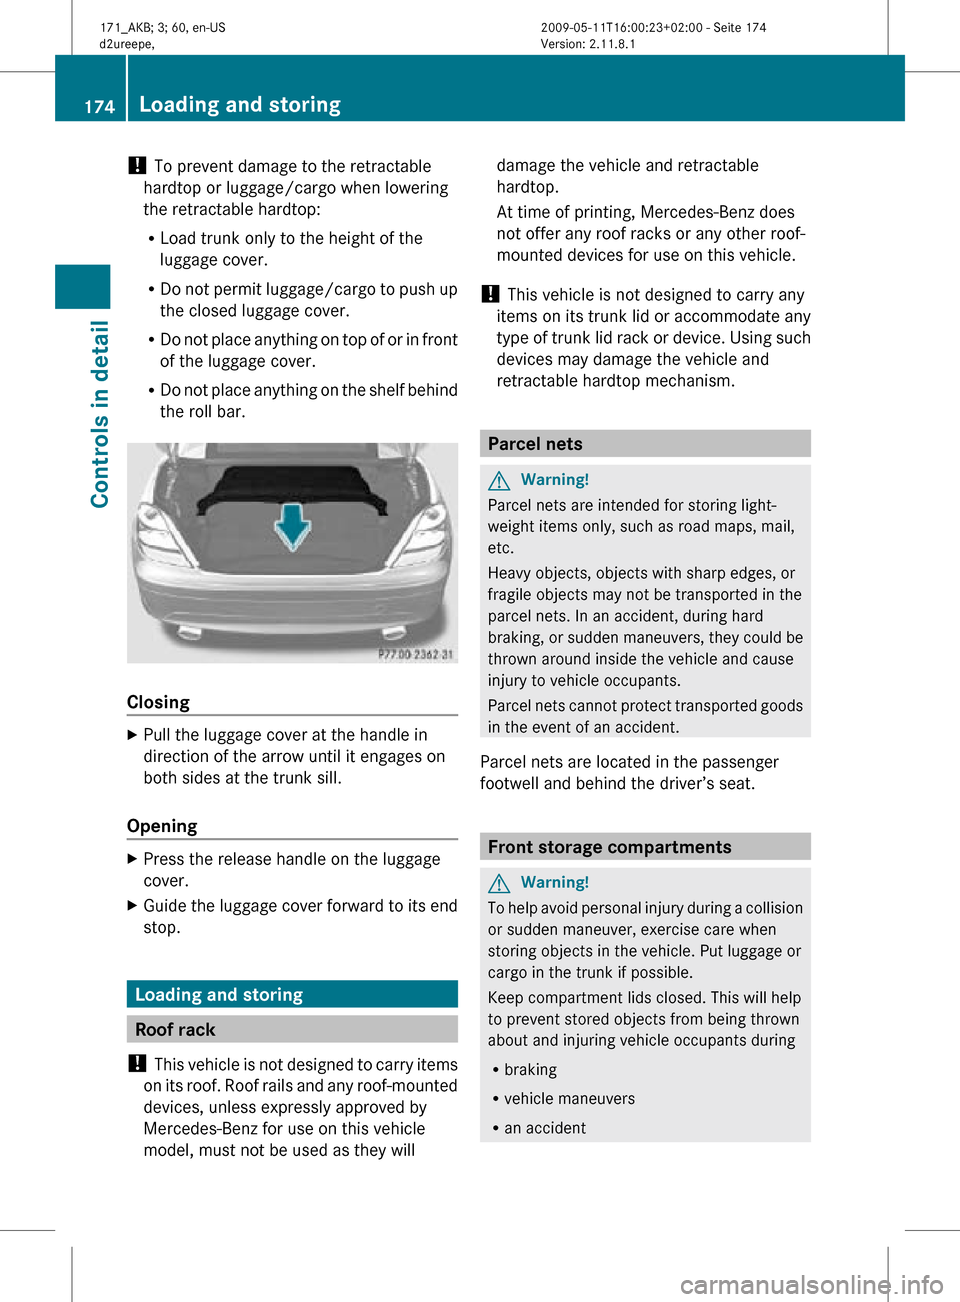
!
To prevent damage to the retractable
hardtop or luggage/cargo when lowering
the retractable hardtop:
R Load trunk only to the height of the
luggage cover.
R Do not permit luggage/cargo to push up
the closed luggage cover.
R Do not place anything on top of or in front
of the luggage cover.
R Do not place anything on the shelf behind
the roll bar. Closing
X
Pull the luggage cover at the handle in
direction of the arrow until it engages on
both sides at the trunk sill.
Opening X
Press the release handle on the luggage
cover.
X Guide the luggage cover forward to its end
stop. Loading and storing
Roof rack
! This vehicle is not designed to carry items
on its roof. Roof rails and any roof-mounted
devices, unless expressly approved by
Mercedes-Benz for use on this vehicle
model, must not be used as they will damage the vehicle and retractable
hardtop.
At time of printing, Mercedes-Benz does
not offer any roof racks or any other roof-
mounted devices for use on this vehicle.
! This vehicle is not designed to carry any
items on its trunk lid or accommodate any
type of trunk lid rack or device. Using such
devices may damage the vehicle and
retractable hardtop mechanism. Parcel nets
G
Warning!
Parcel nets are intended for storing light-
weight items only, such as road maps, mail,
etc.
Heavy objects, objects with sharp edges, or
fragile objects may not be transported in the
parcel nets. In an accident, during hard
braking, or sudden maneuvers, they could be
thrown around inside the vehicle and cause
injury to vehicle occupants.
Parcel nets cannot protect transported goods
in the event of an accident.
Parcel nets are located in the passenger
footwell and behind the driver’s seat. Front storage compartments
G
Warning!
To help avoid personal injury during a collision
or sudden maneuver, exercise care when
storing objects in the vehicle. Put luggage or
cargo in the trunk if possible.
Keep compartment lids closed. This will help
to prevent stored objects from being thrown
about and injuring vehicle occupants during
R braking
R vehicle maneuvers
R an accident 174
Loading and storingControls in detail
171_AKB; 3; 60, en-US
d2ureepe,
Version: 2.11.8.1 2009-05-11T16:00:23+02:00 - Seite 174
Page 178 of 312
Useful features
Cup holder
G
Warning!
In order to help prevent spilling liquids on
vehicle occupants and/or vehicle equipment,
only use containers that fit into the cup
holder. Use lids on open containers and do
not fill containers to a height where the
contents, especially hot liquids, could spill
during braking, vehicle maneuvers, or in an
accident. Liquids spilled on vehicle occupants
may cause serious personal injury. Liquids
spilled on vehicle equipment may cause
damage not covered by the Mercedes-Benz
Limited Warranty.
When not in use, keep the cup holder closed.
An open cup holder may cause injury to you
or others when contacted during braking,
vehicle maneuvers, or in an accident.
Keep in mind that objects placed in the cup
holder may come loose during braking,
vehicle maneuvers, or in an accident and be
thrown around in the vehicle interior. Objects
thrown around in the vehicle interior may
cause an accident and/or serious personal
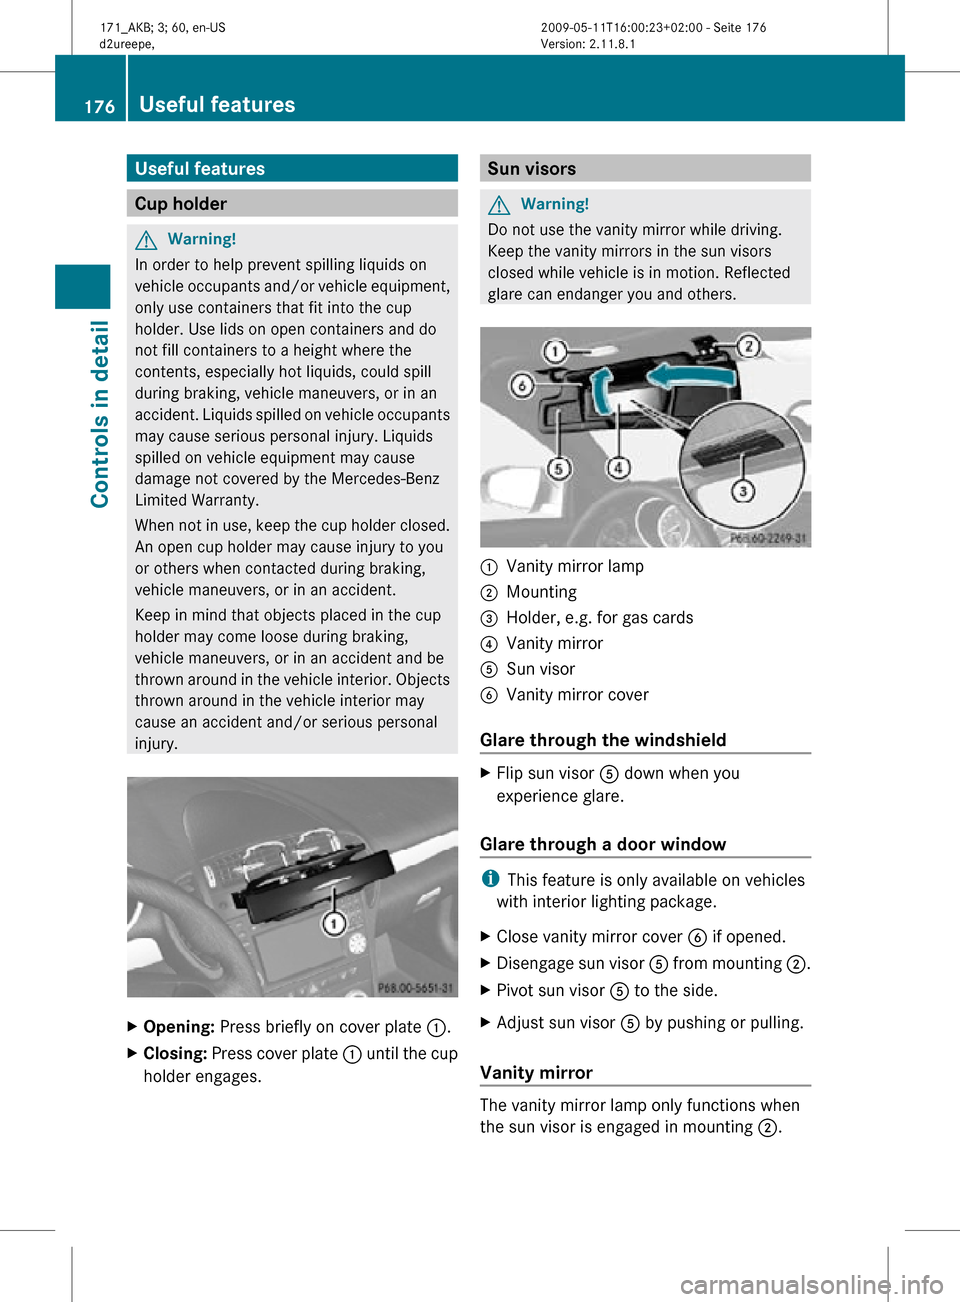
injury. X
Opening: Press briefly on cover plate :.
X Closing: Press cover plate : until the cup
holder engages. Sun visors
G
Warning!
Do not use the vanity mirror while driving.
Keep the vanity mirrors in the sun visors
closed while vehicle is in motion. Reflected
glare can endanger you and others. :
Vanity mirror lamp
; Mounting
= Holder, e.g. for gas cards
? Vanity mirror
A Sun visor
B Vanity mirror cover
Glare through the windshield X
Flip sun visor A down when you
experience glare.
Glare through a door window i
This feature is only available on vehicles
with interior lighting package.
X Close vanity mirror cover B if opened.
X Disengage sun visor A from mounting ;.
X Pivot sun visor A to the side.
X Adjust sun visor A by pushing or pulling.
Vanity mirror The vanity mirror lamp only functions when
the sun visor is engaged in mounting ;.176
Useful featuresControls in detail
171_AKB; 3; 60, en-US
d2ureepe,
Version: 2.11.8.1 2009-05-11T16:00:23+02:00 - Seite 176