2011 MERCEDES-BENZ SLK300 climate control
[x] Cancel search: climate controlPage 167 of 312
The air conditioning will not engage (no
cooling) if the A/C
mode (Y page 165) is
deactivated. G
Warning!
Follow the recommended settings for heating
and cooling given on the following pages.
Otherwise the windows could fog up,
impairing visibility and endangering you and
others.
X Keep the air intake grille in front of the
windshield free of snow and debris.
When the retractable hardtop is closed, do
not obstruct air flow by placing objects on the
air flow-through exhaust slots below the rear
window.
i If the vehicle interior is hot, ventilate the
interior before driving off. The climate
control will then adjust the interior
temperature to the set value much faster. Deactivating the climate control
system
G
Warning!
When the climate control system is
deactivated, the outside air supply and
circulation are also deactivated. Only choose
this setting for a short time when the
retractable hardtop is closed. Otherwise the
windows
could fog up, impairing visibility and
endangering you and others.
Climate control X
Deactivating: Set air volume control ;
(Y page 162) to position 0.
X Reactivating:
Set air volume control ; to
any speed.
The previous settings are once again in
effect. Automatic climate control X
Deactivating: Press button ^.
The
indicator lamp in the button comes on.
X Reactivating: Press button ^.
The indicator lamp in the button goes out.
The previous settings are once again in
effect.
or
X Press button Ã.
The
indicator lamp in the button comes on.
Air volume and air distribution are adjusted
automatically. Air conditioning
The air conditioning is operational while the
engine
is running and cools the interior air to
the temperature set by the operator. In
addition, the air conditioning dehumidifies
the interior air and helps prevent window
fogging. G
Warning!
If you deactivate the air conditioning, the
vehicle will not be cooled when weather
conditions
are warm. The windows can fog up
more quickly. Window fogging may impair
visibility and endanger you and others.
i Condensated water may drip out from
underneath the vehicle. This is normal and
not an indication of a malfunction.
The air conditioning uses the refrigerant
R134a. This refrigerant is free of CFCs which
are harmful to the ozone layer.
Deactivating It is possible to deactivate the air
conditioning. The interior air will then no
longer be cooled or dehumidified.
X
Press button Á 10
/¿ 11
.
The indicator lamp in the button goes out.
10 Vehicles with climate control
11 Vehicles with automatic climate control Climate control system
165
Controls in detail
171_AKB; 3; 60, en-US
d2ureepe, Version: 2.11.8.1 2009-05-11T16:00:23+02:00 - Seite 165 Z
Page 168 of 312
The cooling function switches off after a
short delay.
Activating Moist air can fog up the windows. You can
dehumidify the interior air with the air
conditioning.
X
Press button Á 10
/¿ 11
.
The indicator lamp in the button comes on. Automatic mode
The automatic mode is available in vehicles
with automatic climate control only.
When
operating the climate control system in
automatic mode, the interior air temperature,
air volume and air distribution are adjusted
automatically.
In automatic mode, cooling with
dehumidification is switched on. This function
can be switched off if necessary. G
Warning!
If you deactivate the air conditioning, the
vehicle will not be cooled when weather
conditions
are warm. The windows can fog up
more quickly. Window fogging may impair
visibility and endanger you and others.
X Set the desired temperature
(Y page 166).
X Activating: Press button Ã.
The
indicator lamp in the button comes on.
The air volume and air distribution are
adjusted automatically.
X Deactivating: Press button à again.
The indicator lamp in the button goes out.
The air volume changes to level 2 and the
air distribution changes to Q. Setting the temperature
You can adjust the air temperature on each
side of the passenger compartment. You
should
raise or lower the temperature setting
in small increments, preferably starting at
72‡ (22†).
Climate control X
Increasing/decreasing: Turn
temperature control : and/or ?
(Y page 162) slightly clockwise or
counterclockwise.
Automatic climate control X
Increasing/decreasing: Press button
9
or : until the desired temperature
appears in display H (Y page 163). Adjusting air vents
G
Warning!
When operating the climate control, the air
that enters the passenger compartment
through the air vents can be very hot or very
cold
(depending on the set temperature). This
may cause burns or frostbite to unprotected
skin in the immediate area of the air vents.
Always keep sufficient distance between
unprotected parts of the body and the air
vents. If necessary, use the air distribution
adjustment to direct the air to air vents in the
vehicle interior that are not in the immediate
area of unprotected skin.
For best possible performance of the climate
control:
X Keep the air intake grille in front of the
windshield
free of snow, leaves, sticks, and
any other debris.
X Always keep all air vents and grilles in the
passenger compartment free from
obstruction.
10 Vehicles with climate control
11 Vehicles with automatic climate control 166
Climate control system
Controls in detail
171_AKB; 3; 60, en-US
d2ureepe,
Version: 2.11.8.1 2009-05-11T16:00:23+02:00 - Seite 166
Page 169 of 312
i
For draft-free ventilation, move the
adjustable center and side air vents to the
middle position.
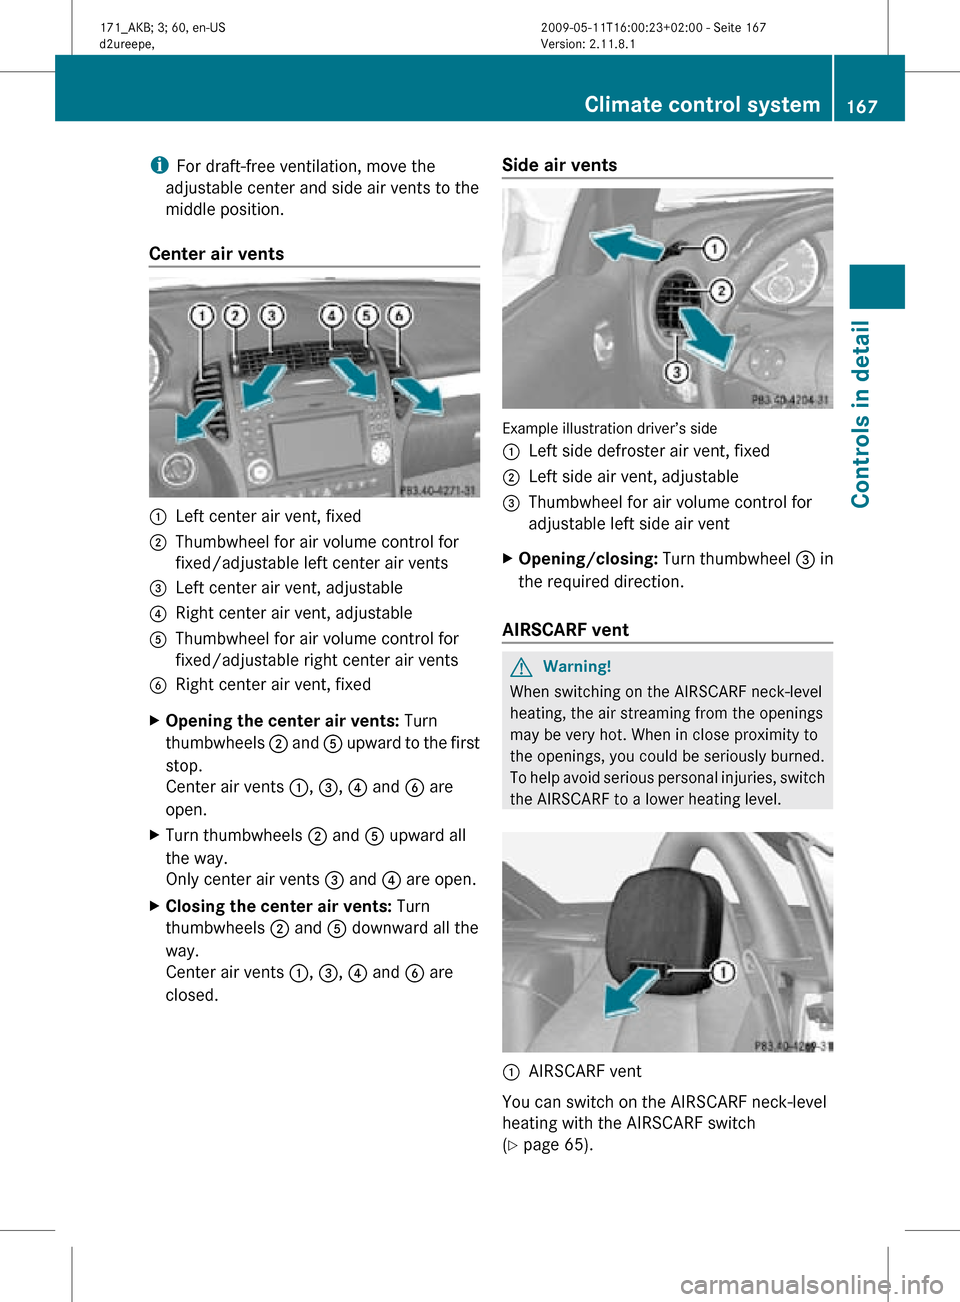
Center air vents :
Left center air vent, fixed
; Thumbwheel for air volume control for
fixed/adjustable left center air vents
= Left center air vent, adjustable
? Right center air vent, adjustable
A Thumbwheel for air volume control for
fixed/adjustable right center air vents
B Right center air vent, fixed
X Opening the center air vents: Turn
thumbwheels ; and A upward to the first
stop.
Center air vents :, =, ? and B are
open.
X Turn thumbwheels ; and A upward all
the way.
Only center air vents = and ? are open.
X Closing the center air vents: Turn
thumbwheels ; and A downward all the
way.
Center air vents :, =, ? and B are
closed. Side air vents Example illustration driver’s side
:
Left side defroster air vent, fixed
; Left side air vent, adjustable
= Thumbwheel for air volume control for
adjustable left side air vent
X Opening/closing: Turn thumbwheel = in
the required direction.
AIRSCARF vent G
Warning!
When switching on the AIRSCARF neck-level
heating, the air streaming from the openings
may be very hot. When in close proximity to
the openings, you could be seriously burned.
To help avoid serious personal injuries, switch
the AIRSCARF to a lower heating level. :
AIRSCARF vent
You can switch on the AIRSCARF neck-level
heating with the AIRSCARF switch
(Y page 65). Climate control system
167Controls in detail
171_AKB; 3; 60, en-US
d2ureepe, Version: 2.11.8.1 2009-05-11T16:00:23+02:00 - Seite 167 Z
Page 170 of 312
Adjusting air distribution
The symbols on the control represent the
following functions: Symbol Function
M
Directs air to the windshield and
through the side defroster air
vents
Q
Directs air into the entire
vehicle interior
O
Directs air to the footwells and
through the side air vents
P
Directs air through the center
and side air vents
Climate control
The air distribution can be adjusted manually.
X
Turn air distribution control =
(Y page 162) to the desired symbol.
The
air distribution is adjusted according to
the chosen setting.
You can also turn the control to a position
between two symbols.
Automatic climate control X
Turn air distribution control D
(Y page 163) to the desired symbol.
The
air distribution is adjusted according to
the chosen setting.
You can also turn the control to a position
between two symbols. Adjusting air volume
Climate control X
Decreasing/increasing: Turn air volume
control ; (Y page 162) clockwise or
counterclockwise. Automatic climate control X
Decreasing/increasing: Turn air volume
control : (Y page 163) clockwise or
counterclockwise. Front defroster
You can use this setting to defrost the
windshield, for example if it is iced up.
You can also defog the windshield and the
door windows.
i Keep this setting selected only until the
windshield or the door windows are clear
again.
X Activating: Press button ¬.
The
indicator lamp in the button comes on.
The climate control switches to the
following functions automatically:
R most efficient blower speed and heating
power, depending on outside
temperature
R air flows onto the windshield and the
door windows (side air vents must be
open)
R the air conditioning compressor
switches on at outside temperatures
above approximately 41‡ (5†) for air-
drying
R the air recirculation mode is switched off
X Deactivating: Press button ¬ again.
The indicator lamp in the button goes out.
The previous settings are once again in
effect.
i The cooling remains switched on. 168
Climate control systemControls in detail
171_AKB; 3; 60, en-US
d2ureepe,
Version: 2.11.8.1 2009-05-11T16:00:23+02:00 - Seite 168
Page 171 of 312
Windshield fogged on the outside
X
Switch the windshield wipers on
(Y page 76).
X Press button à 12
.
The indicator lamp in the button comes on.
Air distribution and air volume are adjusted
automatically.
or
X Turn air distribution control to P or
O. Maximum cooling MAX COOL
MAX COOL is only available in U.S. vehicles
with automatic climate control.
MAX COOL is only operational when the
engine is running.
If the air distribution controls as well as the
air volume control are set to à and there
is a high demand for cooling, MAX COOL is
activated. MAX COOL appears in display H
(Y page 163).
This provides the fastest possible cooling of
the
vehicle interior (when retractable hardtop
is closed). Air recirculation mode
Switch to air recirculation mode to prevent
unpleasant odors from entering the vehicle
from the outside (e. g. before driving through
a tunnel). This setting cuts off the intake of
outside air and recirculates the air in the
passenger compartment. G
Warning!
Fogged windows impair visibility,
endangering you and others. If the windows
begin to fog on the inside, switching off the
air recirculation mode immediately should
clear interior window fogging. If interior
window fogging persists, make sure the air conditioning is activated, or press button
¬.
X Activating: Press button g.
The
indicator lamp in the button comes on.
i The air recirculation mode is activated
automatically at high outside
temperatures.
The
indicator lamp in button g is not lit
when the air recirculation mode is switched
on automatically.
A quantity of outside air is added after
approximately 30 minutes.
X Deactivating: Press button g again.
The indicator lamp in the button goes out.
i The manually selected air recirculation
mode is deactivated automatically:
R after 5 minutes if the outside
temperature is below approximately
41‡ (5†)
R after 5 minutes if the air conditioning is
turned off
R after 30 minutes if the outside
temperature is above approximately
41‡ (5†) Residual heat and ventilation
With the engine turned off, it is possible to
continue to heat or ventilate the interior for
up to 30 minutes. This feature makes use of
the residual heat produced by the engine.
i If
you switch on the residual heat function
when outside temperatures are high, only
the ventilation will be switched on.
i How long the system will provide heating
depends on the coolant temperature and
the selected temperature. The blower will
run at speed setting 1 regardless of the air
volume control setting.
12 Vehicles with automatic climate control Climate control system
169
Controls in detail
171_AKB; 3; 60, en-US
d2ureepe, Version: 2.11.8.1 2009-05-11T16:00:23+02:00 - Seite 169 Z
Page 172 of 312
X
Activating: Switch off the ignition.
X Press button Á 13
/Ì 14
.
The indicator lamp in the button comes on.
X Deactivating: Press button Á 13
/
Ì 14
.
The indicator lamp in the button goes out.
The residual heat is deactivated
automatically:
R when the ignition is switched on
R after approximately 30 minutes
R if the battery voltage drops
R if the coolant temperature is too low Rear window defroster
G
Warning!
Any accumulation of snow and ice should be
removed
from the rear window before driving.
Visibility could otherwise be impaired,
endangering you and others.
The rear window defroster uses a large
amount of power. To keep the battery drain
to a minimum, switch off the defroster as
soon as the rear window is clear. The
defroster is switched off automatically after
some time of operation depending on the
outside temperature.
X Switch on the ignition.
X Switching on: Press button ¤ on the
respective climate control panel.
The
indicator lamp in the button comes on.
! The rear window defroster cannot be
switched on when the retractable hardtop
is open. The indicator lamp will start
flashing if the hardtop is open.
R Close the retractable hardtop.
The rear window defroster can then be
switched on. X
Switching off: Press button ¤ again.
The rear window defroster switches off when
the battery voltage is too low. The indicator
lamp in button ¤ flashes. Too many
electrical consumers may be operating
simultaneously.
X Switch off consumers that are currently not
needed if required. Retractable hardtop
Safety notes
For safety reasons, the retractable hardtop
can only be opened and closed when the
vehicle is standing still. G
Observe Safety notes, see page 45. G
Warning!
To prevent possible accidents, only drive the
vehicle with the retractable hardtop either
completely
closed and locked, or fully lowered
into its storage compartment.
If the retractable hardtop does not completely
open or close, the roof hydraulics will lose
pressure and the retractable hardtop is
lowered
R after approximately 7 minutes when the
ignition is switched on
R after approximately 15 seconds when the
ignition is switched off
Shortly before the retractable hardtop is
lowered, a warning will sound. In the
multifunction display you will see K and
the message Retractable Roof Lowering .
Properly lock the retractable hardtop before
continuing to drive. Otherwise, the unlocked
hardtop could open while the vehicle is in
motion and cause you to lose control of the
vehicle. You or others could be injured as a
result.
13 Vehicles with climate control
14 Vehicles with automatic climate control 170
Retractable hardtop
Controls in detail
171_AKB; 3; 60, en-US
d2ureepe,
Version: 2.11.8.1 2009-05-11T16:00:23+02:00 - Seite 170
Page 213 of 312
based on three performance factors:
treadwear
:, traction ;, and temperature
resistance =.
Although not a Government of
Canada requirement, all tires made for sale in
North America have these grades branded on
the sidewall.
i For illustration purposes only. Actual data
on tires are specific to each vehicle and
may vary from data shown in above
illustration.
Quality grades can be found, where
applicable, on the tire sidewall between tread
shoulder and maximum section width. For
example: Treadwear Traction Temperature
200 AA A
All passenger car tires must conform to
federal safety requirements in addition to
these grades.
Treadwear
The treadwear grade is a comparative rating
based
on the wear rate of the tire when tested
under controlled conditions on a specified
U.S. Government test course. For example, a
tire graded 150 would wear one and one-half
(1 1
/ 2) times as well on the government
course as a tire graded 100.
The relative performance of tires depends
upon the actual conditions of their use,
however, and may depart significantly from
the norm due to variations in driving habits,
service practices and differences in road
characteristics and climate.
Traction G
Warning!
The traction grade assigned to this tire is
based on straight-ahead braking traction
tests, and does not include acceleration, cornering, hydroplaning, or peak traction
characteristics.
The traction grades, from highest to lowest,
are AA, A, B, and C. Those grades represent
the tire’s ability to stop on wet pavement as
measured under controlled conditions on
specified
government test surfaces of asphalt
and concrete. A tire marked C may have poor
traction performance. G
Warning!
If ice has formed on the road, tire traction will
be
substantially reduced. Under such weather
conditions, drive, steer and brake with
extreme caution.
The safe speed on a wet, snow covered or icy
road is always lower than on a dry road.
You should pay particular attention to the
condition of the road whenever the outside
temperature is close to the freezing point.
Mercedes-Benz recommends winter tires
(Y page 219) with a minimum tread depth of
approximately 1
/ 6 in (4 mm) on all four wheels
for the winter season to ensure normal
balanced handling characteristics. On
packed snow, they can reduce your stopping
distance compared to summer tires.
Stopping distance, however, is still
considerably greater than when the road is
not covered with snow or ice. Exercise
appropriate caution.
! Avoid spinning of a drive wheel. This may
cause serious damage to the drivetrain
which is not covered by the Mercedes-Benz
Limited Warranty.
Temperature G
Warning!
The temperature grade for this tire is
established for a tire that is properly inflated
and not overloaded. Excessive speed,
underinflation, or excessive loading, either
separately or in combination, can cause Tires and wheels
211
Operation
171_AKB; 3; 60, en-US
d2ureepe, Version: 2.11.8.1 2009-05-11T16:00:23+02:00 - Seite 211 Z
Page 230 of 312
Scratches, corrosive deposits, corrosion or
damage due to negligent or incorrect care
cannot always be removed or repaired with
the vehicle-care products recommended
here.
In such cases it is best to seek aid at an
authorized Mercedes-Benz Center.
The following topics deal with the cleaning
and care of your vehicle and give important
“how-to” information as well as references to
Mercedes-Benz approved vehicle-care
products.
Power washer !
Follow the instructions provided by the
power washer manufacturer on
maintaining
a distance between the vehicle
and the nozzle of the power washer.
Never use a round nozzle to power-wash
tires. The intense jet of water can result in
damage to the tire.
Always replace a damaged tire.
Always keep the jet of water moving across
the surface. Do not aim directly at electrical
parts, electrical connectors, seals, or other
rubber parts.
Tar stains Quickly remove tar stains before they dry and
become more difficult to remove. A tar
remover is recommended.
Paintwork, painted body components
!
Affixing stickers, magnets, adhesive tape
or similar materials to painted body
components may damage the paintwork.
Mercedes-Benz approved Paint Care should
be applied when water drops on the paint
surface do not “bead up”. This should
normally be done every 3 to 5 months,
depending on the climate and washing
detergent used.
Mercedes-Benz approved Paint Cleaner
should be applied if the paint surface shows
signs of embedded dirt (i.e. loss of gloss). Do not apply any of these products or wax if
your
vehicle is parked in the sun or if the hood
is still hot.
X Use the appropriate MB-Touch-Up Stick for
quick
and provisional repairs of minor paint
damage (i.e. chips from stones, vehicle
doors, etc.).
Engine cleaning Prior to cleaning the engine compartment,
make sure to protect electrical components
and connectors from contact with water and
cleaning agents.
Corrosion protection, such as MB
Anticorrosion Wax should be applied to the
engine compartment after every engine
cleaning. Before applying, all control linkage
bushings
and joints should be lubricated. The
poly-V-belt and all pulleys should be
protected from any wax.
Vehicle washing In the winter, thoroughly remove all traces of
road salt as soon as possible.
When
washing the vehicle underbody, do not
forget to clean the inner sides of the wheels.
Hand-wash
X Do not use hot water or wash your vehicle
in direct sunlight.
X Only use a soft, wet cloth or sponge to
clean the vehicle.
X Only use a mild vehicle wash detergent,
such as Mercedes-Benz approved Car
Shampoo.
X Thoroughly spray the vehicle with a
diffused jet of water.
X Do not spray directly towards the
ventilation intake.
X Use plenty of water and rinse the sponge
and chamois frequently.
X Rinse with clean water and dry with a
chamois thoroughly. 228
Vehicle care
Operation
171_AKB; 3; 60, en-US
d2ureepe,
Version: 2.11.8.1 2009-05-11T16:00:23+02:00 - Seite 228