2011 MERCEDES-BENZ S-Class key
[x] Cancel search: keyPage 120 of 524

Assigning the programmable button
(favorites):Programmable button
You can assign the following predefined
functions to the h programmable button:
RECO: you can activate or deactivate the ECO
start/stop function.
RMassage, driver's seat: you can switch
the massage function for the driver's seat
on and off.
RMassage, front-passenger's seat:
you can switch the massage function for
the front-passenger seat on and off.
RMassage, driver's and front
passenger seat: you can switch the
massage function for the driver's and front-
passenger seats on and off.
RDisplay off: you can switch the
COMAND display off or on.
RTow-away protection: you can arm or
deactivate tow-away protection.
RInterior motion sensor: you can arm or
deactivate the interior motion sensor.
RTow-away protection/interior
motion sensor: you can arm or deactivate
tow-away protection and the interior
motion sensor.
RRepeat navigation command: you can
have the most recent recommendation by
the navigation system repeated.
XTo assign the programmable button:
select Vehicle by sliding VÆ and turning
cVd the COMAND controller and press
W to confirm.
XSelect System and press W to confirm.XSelect Favorites Button and press W to
confirm.
The list of predefined functions appears.
The # dot in front of the list entry indicates
the current setting.
XTo change the setting: turn cVd the
COMAND controller and select the desired
function.
XTo store the setting and exit the menu:
press W the COMAND controller.
Telephone keypad
:Telephone keypad;Folding cover118At a glanceCOMAND
Page 123 of 524

DVD function can be viewed from the front
passenger side.
Use the SPLITVIEW remote control to operate
COMAND from the front passenger side.
Points to remember:
RYour vehicle may be equipped with
SPLITVIEW. The use of SPLITVIEW is
currently not permitted in the following
states: AL, CO, IL, LA, MA, MD, NH, PA, VA,
VT, WA, WI, and WV as well as in the
Canadian provinces Manitoba,
Newfoundland, New Brunswick, and Prince
Edward Island. The driver is responsible for
complying with ALL regional laws. If your
vehicle is registered in a state or province
where SPLITVIEW is not permitted, this
function must be deactivated. Please
consult an authorized Mercedes-Benz
center to verify if the use of SPLITVIEW is
permitted in your state/province.
RThe SPLITVIEW remote control can be used
to adjust the volume of the front-passenger
side headphones. Before putting on the
headphones, make certain that the volume
has not been set too high.
RYou can only use media from the driver's
and front-passenger sides separately if the
media are from different sources. Example:
on the driver's side, an audio CD is being
played on the DVD changer. This means
that on the front-passenger side, the DVD
changer cannot be used to play a different
medium, for instance a video DVD.
However, other media can be used at the
same time on the front-passenger side,
including radio, memory card, MUSIC
REGISTER, Media Interface, USB or AUX.
RIf you use the same medium on both sides,
you can both carry out the respective
settings.
RThere must be clear line of sight between
the headphones and the display so that
COMAND can optimally transmit music and
speech via the infrared signal on the front-
passenger's headphones. For this reason,
please also observe that the headphones
have left and right sides, and use them
correctly.
RUsing SPLITVIEW you can only use
entertainment functions separately, such
as audio and video functions.
RThe multifunction steering wheel can only
used for functions which relate to the
driver's side.
Switching SPLITVIEW on/off
XTo switch on SPLITVIEW: select
Vehicle from the main function bar by
turning cVd the COMAND controller and
press W to confirm.
The "Vehicle" menu appears.
XSelect SPLITVIEW on.
SPLITVIEW symbol : appears in the
display, and display ; switches to
SPLITVIEW off.
XTo switch off SPLITVIEW: select
Vehicle from the main function bar by
turning cVd the COMAND controller and
press W to confirm.
The "Vehicle" menu appears.
XSelect SPLITVIEW off.
Display ; switches to SPLITVIEW on.
iIf COMAND has already been switched
on, you can also use the remote control to
switch SPLITVIEW on and off
(Y page 123).
The SPLITVIEW screen remains on for
approximately 30 minutes after the key has
been turned to position 0 in the ignition lock.
After this time or after the key has been
At a glance121COMANDZ
Page 126 of 524

ECOMAND: e.g. to select a station from
presets, select a track, enter directly,
enter a phone number. Rear Seat
Entertainment System: to select a
track, enter directlyFTo leave the menu (back)XPoint the remote control at the
corresponding screen and execute the
functions by pressing the corresponding
button.
i The remote control's function may be
restricted depending on the angle at which
it is pointed at the respective screen.
Selecting the screen for the remote
control
XTurn thumbwheel = until the desired
display is highlighted in the window.
Switching the screen on/off (Rear Seat
Entertainment System only)
If the key is in position 0 or 1 in the ignition
lock (see vehicle Operator's Manual), or the
key is not inserted, the screens in the rear will
switch off after 30 minutes. Before the
screens switch off, they show a message to
this effect.
You can switch the screens back on,
However, this will discharge the starter
battery.
XPoint the remote control at the rear-
compartment screen which has been
selected for remote operation.XPress button : on the remote control.
The respective rear screen switches on or
off.
i You can only switch the screens on using
the remote control if the ignition is
switched on.
Switching button lighting on/offXPress button ; on the remote control.
Depending on the previous status, the
button lighting is switched on or off.
i If you do not use the remote control for
about 15 seconds, the button lighting
switches off automatically.
Mute
XPress button B on the remote control.
The sound is switched on/off.
Adjusting the volume
This function is available for COMAND and for
the Rear Seat Entertainment System in
conjunction with corded headphones.
XPress one of buttons C on the remote
control.
The volume of the currently selected audio
or video source changes.
For COMAND, you can also adjust the
volume for phone calls and navigation
announcements.
Selecting a menu/menu item and
confirming your selection
XSelect a menu/menu item using the
=;9: buttons and press
the 9 button to confirm.124At a glanceCOMAND
Page 130 of 524

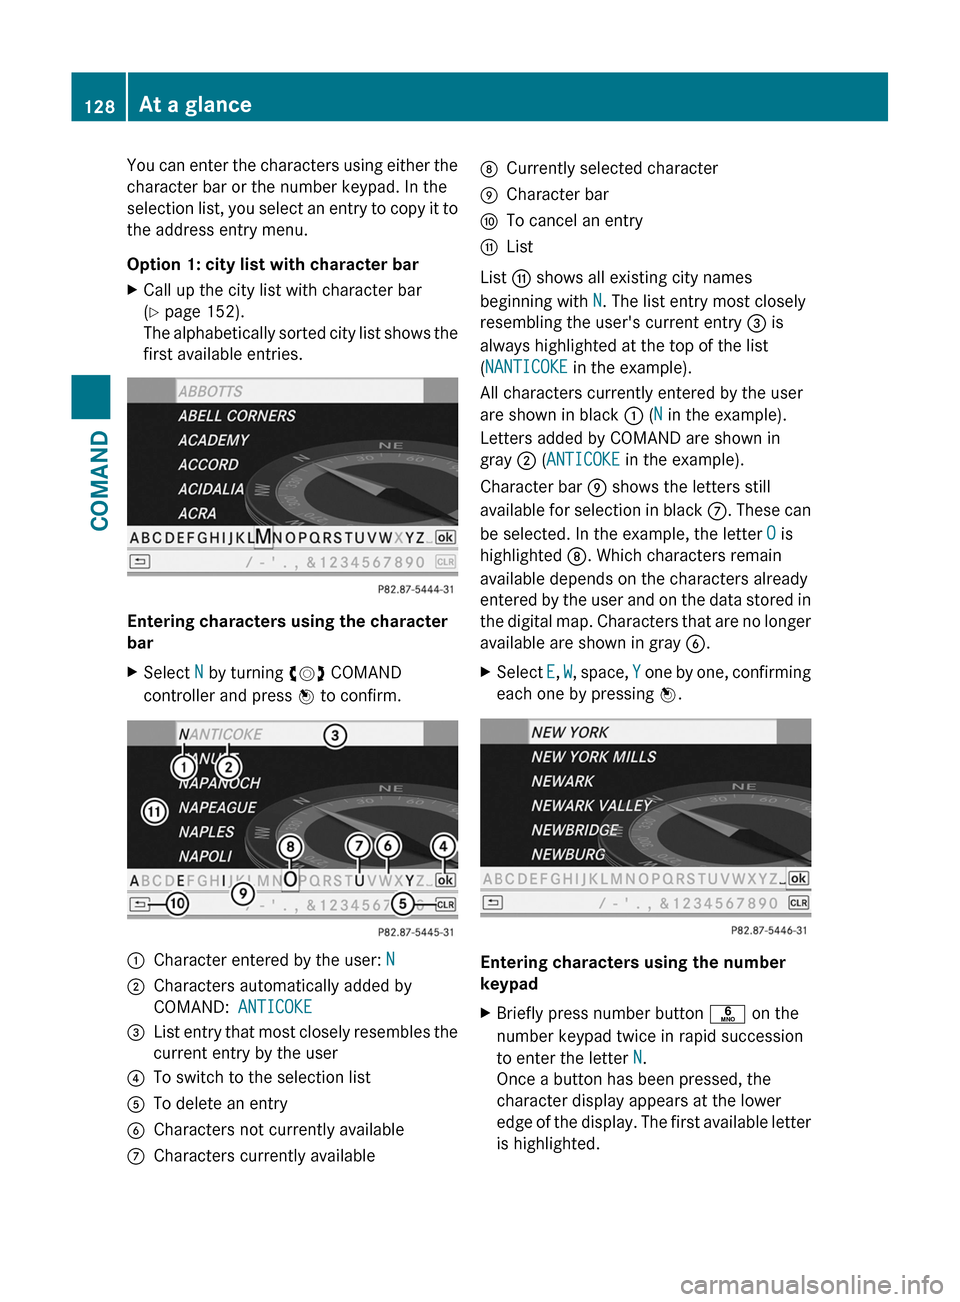
You can enter the characters using either the
character bar or the number keypad. In the
selection list, you select an entry to copy it to
the address entry menu.
Option 1: city list with character bar
XCall up the city list with character bar
(Y page 152).
The alphabetically sorted city list shows the
first available entries.
Entering characters using the character
bar
XSelect N by turning cVd COMAND
controller and press W to confirm.
:Character entered by the user: N;Characters automatically added by
COMAND: ANTICOKE
=List entry that most closely resembles the
current entry by the user
?To switch to the selection listATo delete an entryBCharacters not currently availableCCharacters currently availableDCurrently selected characterECharacter barFTo cancel an entryGList
List G shows all existing city names
beginning with N. The list entry most closely
resembling the user's current entry = is
always highlighted at the top of the list
(NANTICOKE in the example).
All characters currently entered by the user
are shown in black : (N in the example).
Letters added by COMAND are shown in
gray ; (ANTICOKE in the example).
Character bar E shows the letters still
available for selection in black C. These can
be selected. In the example, the letter O is
highlighted D. Which characters remain
available depends on the characters already
entered by the user and on the data stored in
the digital map. Characters that are no longer
available are shown in gray B.
XSelect E, W, space, Y one by one, confirming
each one by pressing W.
Entering characters using the number
keypad
XBriefly press number button p on the
number keypad twice in rapid succession
to enter the letter N.
Once a button has been pressed, the
character display appears at the lower
edge of the display. The first available letter
is highlighted.
128At a glanceCOMAND
Page 131 of 524

You see which character can be entered with
the button. Each time the button is pressed,
the next character is selected.
Example: key p:
Rpress once = M
Rpress twice = N
Rpress three times = O
XWait until the character display goes out.
The entries matching your input are shown
in the list.
XEnter E, W, space, Y using the corresponding
buttons.
iEnter the space using number button 9.
Further functions in the list with
character bar
XTo delete characters: select F by sliding
VÆ and turning cVd the COMAND
controller and press W to confirm.
XTo delete an entry: select F and press
and hold W the COMAND controller until
the entire entry has been deleted.
XTo switch the character set: select
B and press W to confirm.
XTo cancel an entry: select the & symbol
in the bottom left of the character bar and
press W to confirm.
or
XPress the % back button.
The address entry menu appears.
XTo accept the first list entry: press and
hold the COMAND controller W until the
address entry menu appears.
The accepted list entry is shown there.
Calling up the list as a selection list
Select the desired city from the selection list.
If there are several entries for a city or if
several cities of the same name are stored,
then ¬ is highlighted in the character bar.
XPress the W COMAND controller.It is also possible to switch the city list to the
selection list at any time during character
input.
XSlide the COMAND controller W
repeatedly until the city list appears as a
selection list.
or
XSelect ¬ in the character bar by turning
cVd the COMAND controller and press
W to confirm.
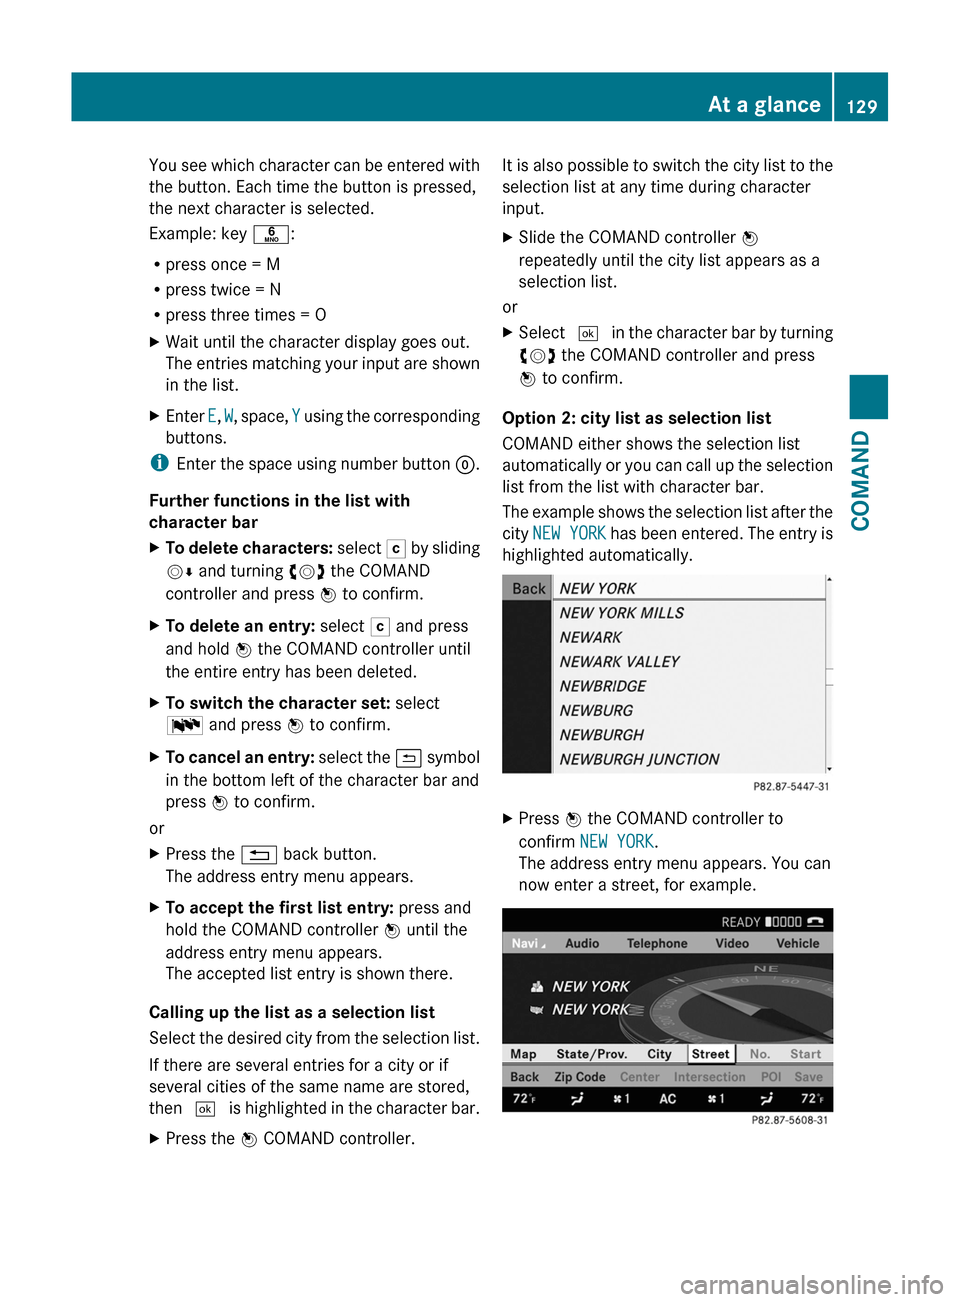
Option 2: city list as selection list
COMAND either shows the selection list
automatically or you can call up the selection
list from the list with character bar.
The example shows the selection list after the
city NEW YORK has been entered. The entry is
highlighted automatically.
XPress W the COMAND controller to
confirm NEW YORK.
The address entry menu appears. You can
now enter a street, for example.
At a glance129COMANDZ
Page 140 of 524

Remote control
Overview
:To switch the screen on/off;To switch button lighting on/off=To select the screen for remote control
operation (COMAND, SPLITVIEW, L
REAR and REAR R can be selected)
?To select a menu or menu itemATo confirm a selection or settingBTo switch sound on/off (for corded
headphones)
CTo adjust the volume (for corded
headphones)
DTo skip, fast-forward/fast-rewindETo select a track, to enter directlyFTo leave the menu (back)Selecting the screen for the remote
control
You can use the remote control to operate
one of the two rear screens at a time. To do
so, you must switch the remote control to the
desired screen.
XTo select the left-hand screen: turn
thumbwheel = until "L REAR" is
highlighted in the window.
XTo select the right-hand screen: turn
thumbwheel = until "REAR R" is
highlighted in the window.
Switching the screen on/off
If the key in the ignition lock is in position 0
or 1 or if the key is not in the ignition lock, the
rear screens will switch off after 30 minutes.
Before the screens switch off, they show a
message to this effect.
You can switch the screens back on,
However, this will discharge the starter
battery.
XPoint the remote control at the rear-
compartment screen which has been
selected for remote operation.
XPress button : on the remote control.
The respective rear screen switches on or
off.
iYou can only switch the screens on using
the remote control if the ignition is
switched on.
Switching button lighting on/off
XPress button ; on the remote control.
Depending on the previous status, the
button lighting is switched on or off.
iIf you do not use the remote control for
about 15 seconds, the button lighting
switches off automatically.
Switching the sound on/off (corded
headphones only)
XPress button B on the remote control.
The sound is switched on/off.
138At a glanceCOMAND
Page 149 of 524

XTo enter a passcode in COMAND: press
the number keys in sequence.
¬ is highlighted after the first number
has been entered.
or
XSelect the digits one by one by turning
cVd the COMAND controller and press
W to confirm.XTo confirm an entry in COMAND: select
¬ using the COMAND controller and
press W to confirm.XEnter the same passcode into the
Bluetooth ®
device (see the operating
instructions for the respective device).
The device is authorized.
External authorization
If COMAND does not detect your
Bluetooth ®
device, this may be due to
particular security settings on your
Bluetooth ®
device. In this case, check
whether your Bluetooth ®
device can locate
the COMAND system. The Bluetooth ®
device
name of COMAND is "MB Bluetooth".
XIn the Bluetooth ®
device list, select the
desired device by turning cVd the
COMAND controller.XSelect Options by sliding VY the
COMAND controller and press W to
confirm.XSelect External authorization and
press W to confirm.XStart the Bluetooth ®
scan process on the
Bluetooth ®
device (see separate operating
instructions of the respective device).XSelect COMAND ("MB Bluetooth").XWhen prompted, enter the passcode on the
Bluetooth ®
device and then on COMAND.Displaying the details of a Bluetooth ®
deviceXIn the Bluetooth ®
device list, select the
desired device by turning cVd the
COMAND controller.XSelect Options by sliding VY the
COMAND controller and press W to
confirm.XSelect Details and press W to confirm.
The detailed view for this device appears.XTo close the detailed view: turn cVd or
slide XVY the COMAND controller.
De-authorizing (de-registering) a
Bluetooth ®
device
Mercedes-Benz USA, LLC recommends that
you de-authorize devices, e.g. mobile phones,
both in COMAND and on the respective
Bluetooth ®
device itself. Subsequent
authorization may otherwise fail.
XIn the Bluetooth ®
device list, select the
authorized device by turning cVd the
COMAND controller.XSelect Options by sliding VY the
COMAND controller and press W to
confirm.XSelect De-authorize and press W to
confirm.
A prompt appears asking whether you
really wish to revoke authorization for this
device.XSelect Yes or No and press W to confirm.
If you select Yes, the authorization for the
device will be revoked.
If you select No, the process will be aborted.
i
If a Bluetooth ®
device has been de-
authorized and is no longer in range, it will
no longer be shown in the Bluetooth ®
device list after the next search.
System settings147COMANDZ
Page 151 of 524

COMAND calculates the route to the
destination without taking account of the
following:
R Traffic lights
R Stop and right-of-way-signs
R Lane merging
R Parking or stopping prohibited areas
R Other road and traffic rules and regulations
R Narrow bridgesGWarning
COMAND may give incorrect navigation
commands if the data in the digital map does
not correspond with the actual road/traffic
situation. Digital maps do not cover all areas
nor all routes within an area. For example, if
the traffic routing has been changed or the
direction of a one-way road has been
reversed.
For this reason, you must always observe
applicable road and traffic rules and
regulations during your journey. Road and
traffic rules and regulations always have
priority over the navigation commands
generated by the system.
GWarning
Navigation announcements are intended to
direct you while driving without diverting your
attention from the road and driving.
Please always use this feature instead of
consulting the map display for directions.
Looking at the icons or map display can
distract you from traffic conditions and
driving, and increase the risk of an accident.
General information
Operational readiness of the navigation
system
The navigation system must determine the
position of the vehicle before first use or
whenever operational status is restored.
Therefore, you may have to drive for a while
before precise route guidance is possible.
GPS reception
Among other things, correct functioning of
the navigation system depends on GPS
reception. In certain situations, GPS
reception may be impaired, there may be
interference or there may be no reception at
all, e.g. in tunnels or parking garages.
Input restriction
On vehicles for certain countries, there is a
restriction on entering data.
The restriction is active at vehicle speeds
above approximately 3 mph (5 km/h). The
restriction is deactivated as soon as the
speed falls below 2 mph (3 km/h).
When the restriction is active, certain entries
cannot be made. This will be indicated by the
fact that certain menu items are grayed out
and cannot be selected.
The following entries are not possible, for
example:
R entering the destination city and street
R entering a destination via the map
R entering in the vicinity of a city or via a
name search
R editing entries
R direct entry using the number keypad
Other entries are still possible, such as
entering points of interest in the vicinity of the
destination or current position.
Switching on navigation modeXPress the S function button once or
twice.
or
XSelect Navi in the main function bar by
sliding ZV and turning cVd the COMAND
controller and press W to confirm.
In both cases, you will see the map either
with or without the menu shown.Navigation149COMANDZ