2011 MERCEDES-BENZ S-Class ESP
[x] Cancel search: ESPPage 173 of 524
XTo show the menu: press the COMAND
controller W.
XSelect Position in the navigation menu
bar by turning cVd the COMAND
controller and press W to confirm.
XSelect Where am I? and press W to
confirm.
Off-road and off-map
Important safety notes
GWarning
The COMAND navigation system may direct
you to off-road routes that your vehicle may
not be capable of traversing through without
damaging your tires, wheels or vehicle. It is
the driver’s sole responsibility to determine
the suitability of the route. Off-road routes
may be of varying conditions and their
appropriateness for use may be affected by
various factors such as time of day, time of
year and immediate weather conditions that
cannot be judged or taken into consideration
by the COMAND system.
Route guidance to a destination that is on
a non-digitized road
COMAND can guide you to destinations
which are within the area covered by the
digital map, but which are not themselves
recorded on the map.
These destinations are known as off-road
destinations, which you can enter using the
map, for example. In these cases, COMAND
guides you for as long as possible with
navigation announcements and displays on
roads known to the system.
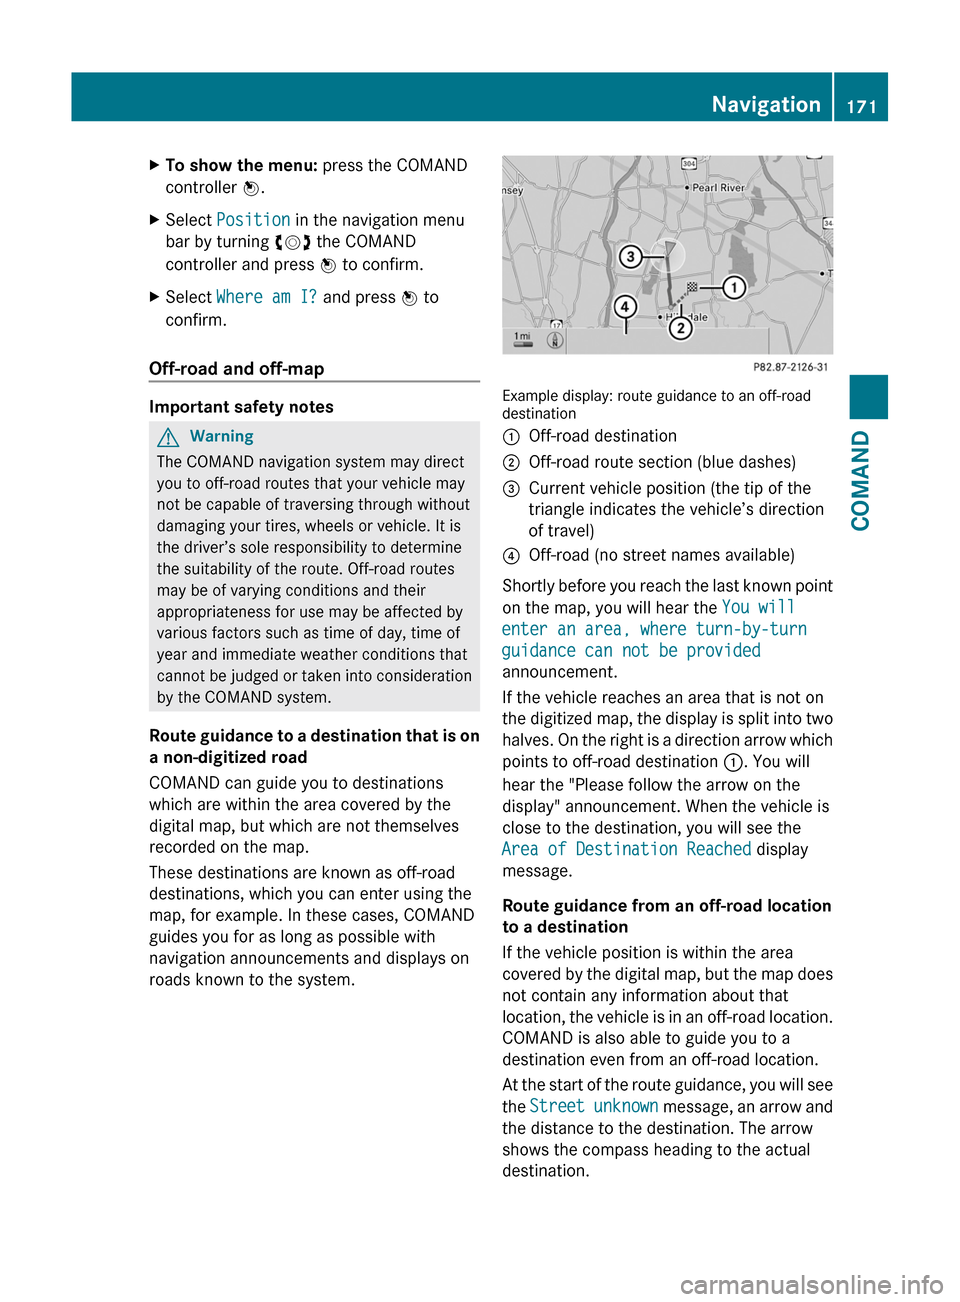
Example display: route guidance to an off-roaddestination
:Off-road destination;Off-road route section (blue dashes)=Current vehicle position (the tip of the
triangle indicates the vehicle’s direction
of travel)
?Off-road (no street names available)
Shortly before you reach the last known point
on the map, you will hear the You will
enter an area, where turn-by-turn
guidance can not be provided
announcement.
If the vehicle reaches an area that is not on
the digitized map, the display is split into two
halves. On the right is a direction arrow which
points to off-road destination :. You will
hear the "Please follow the arrow on the
display" announcement. When the vehicle is
close to the destination, you will see the
Area of Destination Reached display
message.
Route guidance from an off-road location
to a destination
If the vehicle position is within the area
covered by the digital map, but the map does
not contain any information about that
location, the vehicle is in an off-road location.
COMAND is also able to guide you to a
destination even from an off-road location.
At the start of the route guidance, you will see
the Street unknown message, an arrow and
the distance to the destination. The arrow
shows the compass heading to the actual
destination.
Navigation171COMANDZ
Page 180 of 524
will appear asking whether you wish to
overwrite the existing data.XSelect Yes or No and press W to confirm.
If you select Yes, COMAND stores the data.
Deleting a destination or the home
address from the destination memory
XTo switch on navigation mode: press the
S function button once or twice.XTo show the menu: press W the COMAND
controller.XSelect Destination in the navigation
menu bar by turning cVd the COMAND
controller and press W to confirm.XSelect From Memory and press W to
confirm.
You will see the destination memory list
either with the character bar (option 1) or
as a selection list (option 2).XOption 1 – destination memory list with
character bar: proceed as described in the
"Entering characters using the character
bar" section ( Y page 127).XOption 2 - destination memory list as a
selection list: select the destination by
turning cVd the COMAND controller and
press W to confirm.
The address data appears for the selected
entry.XSelect Delete and press W to confirm.
A prompt appears asking whether you wish
to delete the destination.XSelect Yes or No and press W to confirm.
If you select Yes, COMAND deletes the
destination. You see a message to this
effect.
If you select No, the process will be
canceled.
i If the navigable address data for the
destination being deleted is also assigned
to an address book entry, COMAND will
also delete this data from there. If the
corresponding address book entry does
not contain any further data, such as
telephone numbers, COMAND deletes the
entire address book entry.
Last destinations
Introduction
COMAND automatically stores the previous
destinations for which the route calculation
was started. If the memory is full, COMAND
deletes the oldest destination. You can also
store one destination from the list of previous
destinations in the destination memory. It will
be stored there permanently.
Storing a destination permanently in
the destination memory
XProceed as described in the "From the list
of previous destinations" section
( Y page 176).
Storing the vehicle position in the list of
previous destinations
XTo switch on navigation mode: press the
S function button once or twice.XTo show the menu: press W the COMAND
controller.XSelect Position in the navigation menu
bar by turning cVd the COMAND
controller and press W to confirm.XSelect Store Vehicle Position and
press W to confirm.
COMAND stores the current vehicle
position as a destination in the list of
previous destinations.178NavigationCOMAND
Page 181 of 524
Storing the crosshair position in the list
of previous destinations
Route guidance not active
A crosshair appears on the map if you have
moved the map manually. You can store the
crosshair position as a destination in the list
of previous destinations.
XTo show the menu: press the COMAND
controller W.XSelect Position in the navigation menu
bar by turning cVd the COMAND
controller and press W to confirm.XSelect Save Crosshair Position and
press W to confirm.
Route guidance is active
XTo show the menu: press the COMAND
controller W.XSelect Position in the navigation menu
bar by turning cVd the COMAND
controller and press W to confirm.XSelect Destination Map and press W to
confirm.
You will see the map with a crosshair at the
destination.XTo show the menu: press the COMAND
controller W.XSelect Position in the navigation menu
bar by turning cVd the COMAND
controller and press W to confirm.XSelect Save Crosshair Position and
press W to confirm.
COMAND stores the crosshair position as
a destination in the list of previous
destinations.
Deleting one of the previous
destinations
XTo switch on navigation mode: press the
S function button once or twice.XTo show the menu: press the COMAND
controller W.XSelect Destination in the navigation
menu bar by turning cVd the COMAND
controller and press W to confirm.XSelect From Last Destinations and
press W to confirm.
The list of previous destinations appears.XSelect the desired destination and press
W to confirm.
The destination address appears.XSelect Delete and press W to confirm.
A prompt appears, asking whether the
entry should be deleted.XSelect Yes or No and press W to confirm.
If you select Yes, the entry is deleted.
If you select No, the process will be
canceled.
Map usage and settings
Note
Company logos displayed on the map are
trademarks of the respective companies and
used solely for the purpose of indicating the
location of these companies. The use of such
logos for the map does not indicate approval,
support or advertisement of the navigation
system by the respective companies.
Adjusting the map scale
XTo hide the menu: slide ZV the COMAND
controller and press W when the Full
Screen menu item is shown.XTo call up the scale bar: as soon as you
turn cVd the COMAND controller, scale
bar = appears.XTurn cVd until the desired scale is
selected.Navigation179COMANDZ
Page 182 of 524
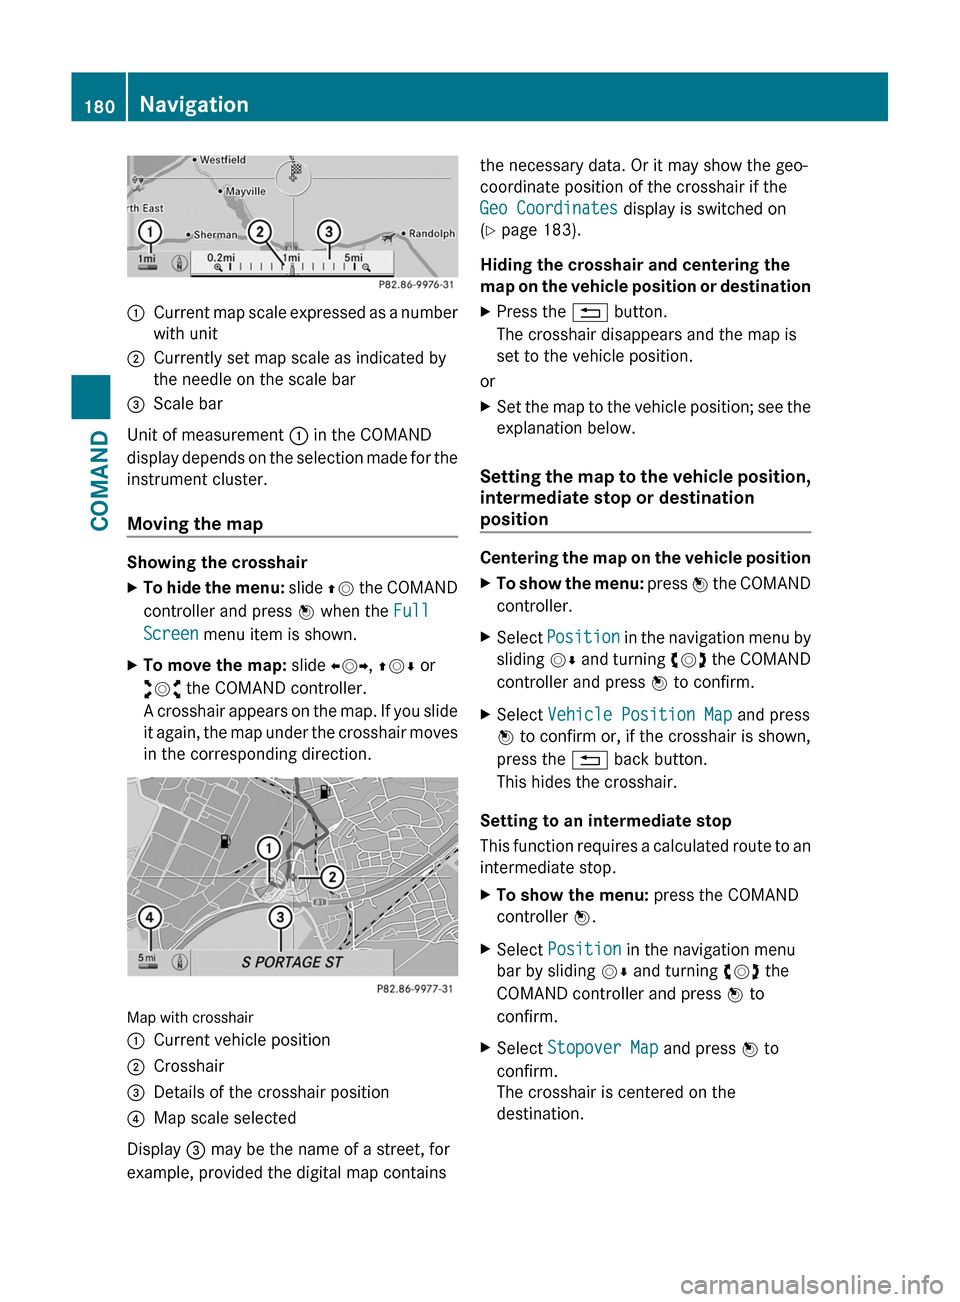
:Current map scale expressed as a number
with unit
;Currently set map scale as indicated by
the needle on the scale bar
=Scale bar
Unit of measurement : in the COMAND
display depends on the selection made for the
instrument cluster.
Moving the map
Showing the crosshair
XTo hide the menu: slide ZV the COMAND
controller and press W when the Full
Screen menu item is shown.
XTo move the map: slide XVY, ZVÆ or
aVb the COMAND controller.
A crosshair appears on the map. If you slide
it again, the map under the crosshair moves
in the corresponding direction.
Map with crosshair
:Current vehicle position;Crosshair=Details of the crosshair position?Map scale selected
Display = may be the name of a street, for
example, provided the digital map contains
the necessary data. Or it may show the geo-
coordinate position of the crosshair if the
Geo Coordinates display is switched on
(Y page 183).
Hiding the crosshair and centering the
map on the vehicle position or destination
XPress the % button.
The crosshair disappears and the map is
set to the vehicle position.
or
XSet the map to the vehicle position; see the
explanation below.
Setting the map to the vehicle position,
intermediate stop or destination
position
Centering the map on the vehicle position
XTo show the menu: press W the COMAND
controller.
XSelect Position in the navigation menu by
sliding VÆ and turning cVd the COMAND
controller and press W to confirm.
XSelect Vehicle Position Map and press
W to confirm or, if the crosshair is shown,
press the % back button.
This hides the crosshair.
Setting to an intermediate stop
This function requires a calculated route to an
intermediate stop.
XTo show the menu: press the COMAND
controller W.
XSelect Position in the navigation menu
bar by sliding VÆ and turning cVd the
COMAND controller and press W to
confirm.
XSelect Stopover Map and press W to
confirm.
The crosshair is centered on the
destination.
180NavigationCOMAND
Page 185 of 524
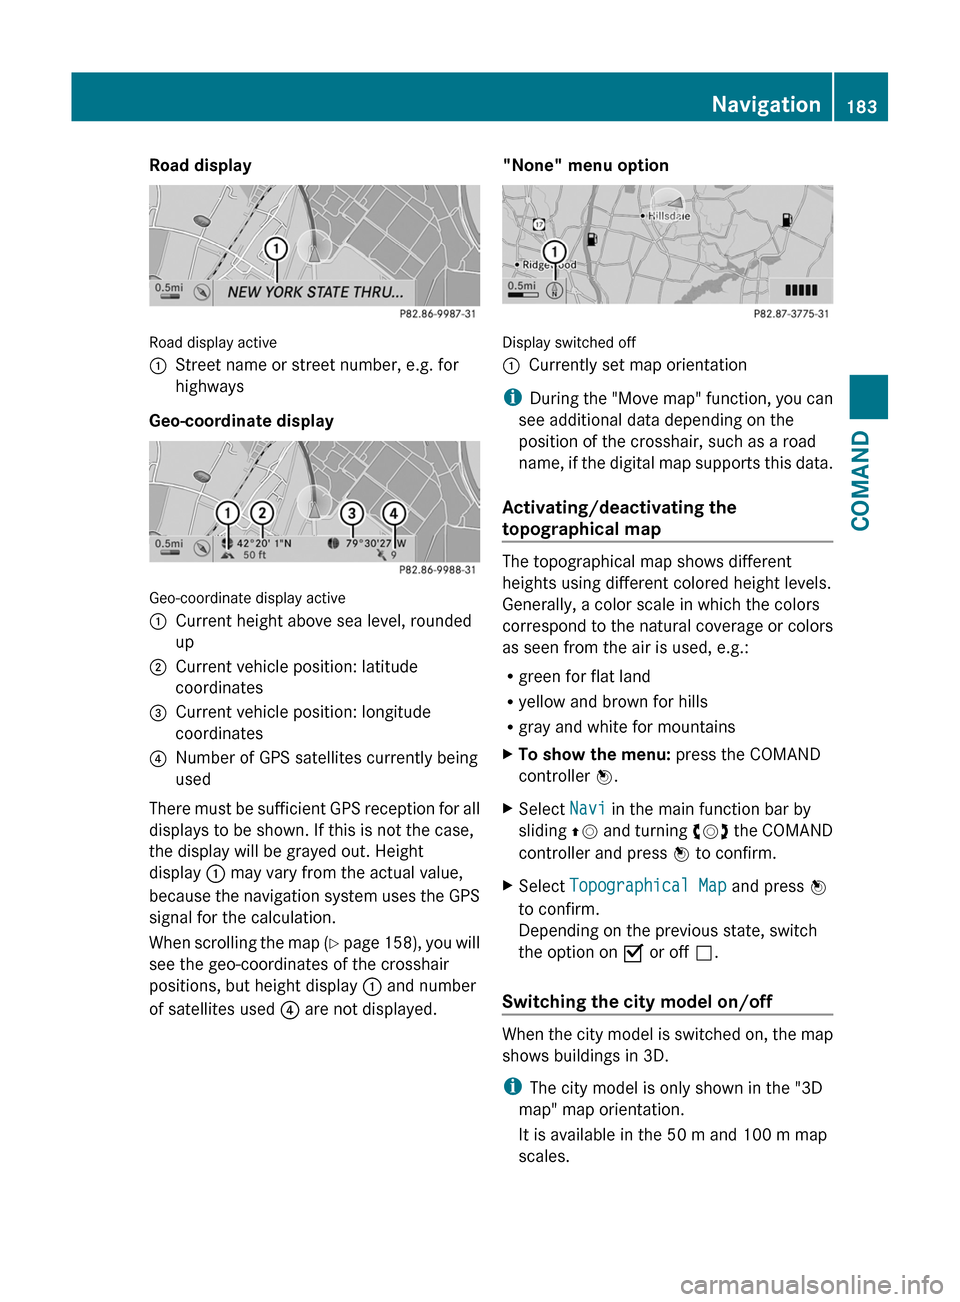
Road display
Road display active
:Street name or street number, e.g. for
highways
Geo-coordinate display
Geo-coordinate display active
:Current height above sea level, rounded
up
;Current vehicle position: latitude
coordinates
=Current vehicle position: longitude
coordinates
?Number of GPS satellites currently being
used
There must be sufficient GPS reception for all
displays to be shown. If this is not the case,
the display will be grayed out. Height
display : may vary from the actual value,
because the navigation system uses the GPS
signal for the calculation.
When scrolling the map (Y page 158), you will
see the geo-coordinates of the crosshair
positions, but height display : and number
of satellites used ? are not displayed.
"None" menu option
Display switched off
:Currently set map orientation
iDuring the "Move map" function, you can
see additional data depending on the
position of the crosshair, such as a road
name, if the digital map supports this data.
Activating/deactivating the
topographical map
The topographical map shows different
heights using different colored height levels.
Generally, a color scale in which the colors
correspond to the natural coverage or colors
as seen from the air is used, e.g.:
Rgreen for flat land
Ryellow and brown for hills
Rgray and white for mountains
XTo show the menu: press the COMAND
controller W.
XSelect Navi in the main function bar by
sliding ZV and turning cVd the COMAND
controller and press W to confirm.
XSelect Topographical Map and press W
to confirm.
Depending on the previous state, switch
the option on O or off ª.
Switching the city model on/off
When the city model is switched on, the map
shows buildings in 3D.
iThe city model is only shown in the "3D
map" map orientation.
It is available in the 50 m and 100 m map
scales.
Navigation183COMANDZ
Page 189 of 524
is supplied on a DVD (all other countries). You
do not need an activation code for the map
software that is delivered with your vehicle.
You also do not need to enter an activation
code if map software has already been
installed in the vehicle and must be installed
again.
Installation processXLoad the map software DVD in the DVD
drive ( Y page 217).
COMAND checks the DVD and shows a
corresponding message in the display.
The map software is not compatible with
the navigation system
A message appears informing you that it is
not possible to install the map software.
XTo confirm the message: press W.
COMAND ejects the DVD.XTake the DVD out of the slot.XLoad a DVD that is compatible with the
vehicle's navigation system.
The map software is not compatible with
the current system software
A message appears informing you that the
system software and the map software are
not compatible.
XTo confirm the message: press W.
COMAND ejects the DVD.XTake the DVD out of the slot.XHave the system software updated at an
authorized Mercedes-Benz Center.
It is only possible to install the map software
after the system software has been updated.
The map software is compatible with the
navigation system and the current
system software
COMAND checks whether the DVD map data
has already been installed.
The map data has already been installed
A message appears informing you that the
map data has already been installed, and a
prompt asks you whether the map software
should be installed anyway.XSelect Yes or No.
If you select Yes, the existing map data is
overwritten.
If you select No, COMAND ejects the DVD
automatically and the installation of the
map software is canceled.XTake the DVD out of the slot.
Map data is not yet installed
The version data of the map software DVD
and the map software installed on COMAND
are shown in the display for comparison. A
prompt then appears, asking whether the
map software should be installed.
XSelect Yes or No.
If you select Yes, the map data is saved.
If you select No, COMAND ejects the DVD
automatically and the installation of the
map software is not continued.XTake the DVD out of the slot.
If an activation code is required for the map
software, a prompt appears in the display
asking you to enter it.
XEnter the activation code and press ! to
confirm.
The software is installed.
If you enter an incorrect activation code, a
prompt appears asking you to enter the
activation code again. After the activation
code has been entered incorrectly three
times, there is a time-delay before the prompt
to enter the activation code appears again.
The time delay increases every time the
activation code is entered incorrectly, from
five minutes up to a maximum of five hours.
Installing map data
COMAND restarts the system immediately
before copying the data.
Navigation187COMANDZ
Page 190 of 524
While the installation is running, a
corresponding message and a progress bar
appear.XTo cancel the installation process: eject
the DVD.XTake the DVD out of the slot.
i If you cancel the installation process, the
navigation system is no longer operational.
An installation process that has been
canceled can be continued at a later point
in time.
XInstallation process for multi-DVD map
data: after the first DVD has been installed,
a message appears asking you to insert the
second DVD. Follow the instructions on the
display.XTo leave the installation process
running to the end without canceling: do
not carry out any further operations.
If the installation process has been
completed successfully, you will see a
message to this effect.XTo confirm the message: press W.
COMAND ejects the DVD.XTake the DVD out of the slot.
The installation process is completed.
If the installation process has not been
completed successfully, you will see a
message to this effect.
XTo confirm the message: press W.
COMAND ejects the DVD.XTake the DVD out of the slot.188NavigationCOMAND
Page 199 of 524

Using the telephone
Incoming call
Rejecting or accepting a call
When there is an incoming call, you see a
corresponding window in the display.
XTo reject: select Reject by turning cVd
the COMAND controller and press W to
confirm.
or
XPress the ~ button on the telephone
keypad or on the multifunction steering
wheel.
XTo accept: confirm Accept by pressing
W.
or
XPress the 6 button on the telephone
keypad or on the multifunction steering
wheel.
Once you have accepted the call, you can use
hands-free mode. The call volume can be
adjusted (Y page 132). For more information,
see the "Functions during a single call
connection" section (Y page 198).
The display shows the phone number or the
name and phone number (if the entry is stored
in the address book) or shows the Unknown
(phone number withheld) message.
iYou can also accept a call as described
above when COMAND is showing the
display of a different main application. The
display switches to the telephone display
after you accept the call. After the call is
finished, you see the display of the previous
main application again.
Making a call
Entering a telephone number using the
telephone keypad
XCall up the telephone basic menu
(Y page 196).
XEnter the digits using the telephone
keypad.
XTo make a call: press the 6 button on
the telephone keypad or on the
multifunction steering wheel.
Entering a telephone number using the
telephone basic menu
XCall up the telephone basic menu
(Y page 196).
XSelect the digits one by one by turning
cVd and sliding ZVÆ the COMAND
controller and press W to confirm.
XTo connect a call: select ° in the
character bar and press W to confirm.
or
XPress the 6 button on the telephone
keypad or on the multifunction steering
wheel.
Redialing
XCall up the telephone basic menu
(Y page 196).
XPress the 6 button on the telephone
keypad.
or
XSelect SEND from the telephone basic menu
and press W to confirm.
In both cases, the calls dialed list appears.
The most recently dialed number is at the
top.
Telephone197COMANDZ