2011 MERCEDES-BENZ S-Class ECO mode
[x] Cancel search: ECO modePage 253 of 524

DVD playback conditions
There may be playback problems when
playing copied discs. There are a large variety
of discs, DVD authoring software, disc writing
software and writers available. This variety
means that there is no guarantee that the
Rear Seat Entertainment System will be able
to play video DVDs that you have copied
yourself.
You will find further information in the Video
section (Y page 237). Information regarding
COMAND also applies to the Rear Seat
Entertainment System.
Function restrictions
Depending on the DVD, it is possible that
certain functions or actions described in this
section will be temporarily blocked or may not
function at all. As soon as you try to activate
these functions or actions, you will see the
K symbol in the display.
Inserting and removing a CD/DVD
XProceed as described in the "Audio CD/
DVD and MP3 mode" section
(Y page 247).
Activating video DVD mode
XInsert a video DVD.
The Rear Seat Entertainment System loads
the disc.
If disc mode was the last mode selected, it
will now be active.
If it was not, switch on video DVD mode as
described in the following instruction.
XSelect Disc in the menu using the
9=; buttons on the remote
control and press the 9 button to confirm.
If the video DVD fulfills the playback
criteria, the film either starts automatically
or the menu saved on the DVD appears. If
the DVD menu appears, you must start the
film manually.
XSelect the corresponding menu item in the
DVD menu.
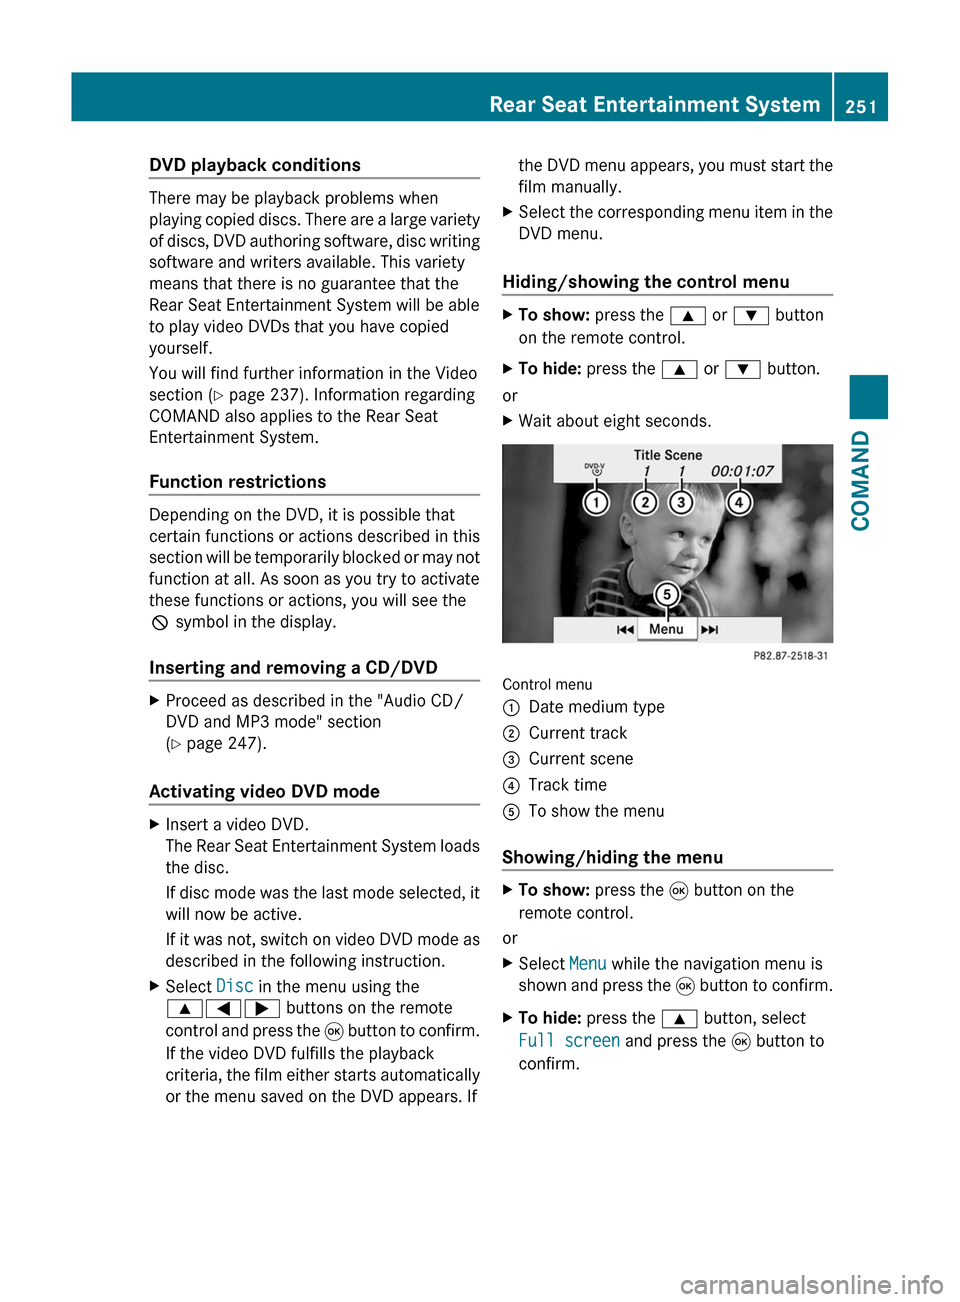
Hiding/showing the control menu
XTo show: press the 9 or : button
on the remote control.
XTo hide: press the 9 or : button.
or
XWait about eight seconds.
Control menu
:Date medium type;Current track=Current scene?Track timeATo show the menu
Showing/hiding the menu
XTo show: press the 9 button on the
remote control.
or
XSelect Menu while the navigation menu is
shown and press the 9 button to confirm.
XTo hide: press the 9 button, select
Full screen and press the 9 button to
confirm.
Rear Seat Entertainment System251COMANDZ
Page 257 of 524

XSelect Subtitles or Camera angle and
press the 9 button to confirm.
In both cases, a menu appears after a few
seconds. The # dot in front of an entry
indicates the current setting.XSelect a setting using the 9:
buttons and press the 9 button to confirm.XTo exit the menu: press the =
or ; button.
Interactive content
DVDs can also contain interactive content
(e.g. a video game). In a video game, you may
be able to influence events by selecting and
triggering actions. The type and number of
actions depend on the DVD.
XSelect an action using the
9;:= buttons on the
remote control and press the 9 button to
execute it.
A menu appears and the first entry,
Select , is highlighted.XPress the 9 button.
AUX mode
Introduction
You can connect one external video source to
each of the displays of the Rear Seat
Entertainment System (AUX display) and also
one external video source to the rear-seat
CD/DVD drive (AUX drive) with a sound and
video signal.
Please see the corresponding operating
instructions for information on how to
operate the external video source.
For further details about external video
sources, please consult an authorized
Mercedes-Benz Center.
Connecting AUX equipment
AUX drive
The AUX drive jacks are located on the CD/
DVD drive on the right next to the CD/DVD
eject button ( Y page 139).
Display AUX
The AUX display jacks are located on the side
of the screen ( Y page 137).
Audio and video connection
XInsert the audio plugs for the left and right
signals into the corresponding L and R
jacks.XInsert the video plug into the V jack.
Activating AUX mode
AUX drive
XSelect Aux in the menu using the
9=; buttons on the remote
control and press the 9 button to confirm.
The AUX menu appears.XSelect Source from the AUX menu and
press the 9 button to confirm.XSelect Disk drive Aux and press the 9
button to confirm.
You will hear and see the content of the
external video source if it is connected to
the CD/DVD drive and switched to
playback. If no video image is available
from the AUX source connected, you will
see an audio menu.
Display AUX
XSelect the screen to which the external
video source is connected using the remote
control ( Y page 123).XSelect Aux in the menu using the
9=; buttons on the remote
control and press the 9 button to confirm.Rear Seat Entertainment System255COMANDZ
Page 266 of 524

cVd the COMAND controller and press
W to confirm.
The climate control menu opens.
XTo switch on: select Æ and press W.XTo switch off: select Æ and press W.
A tick appears.
Controlling climate control centrally
You can use the Mono function to set all the
air-conditioning zones in the vehicle to the
same settings. If the Mono function is
switched on and you adjust climate control
on the driver’s side, these changes will also
be made in all the air-conditioning zones.
XSelect the climate control main menu in the
air-conditioning function bar by turning
cVd the COMAND controller and press
W to confirm.
The climate control menu opens.
XSelect Mono and press W.
A tick appears when the function is
selected.
The Mono function is automatically switched
off if you:
Rchange settings for automatic climate
control on the front-passenger side using
COMAND
Rpress one of the rocker switches to operate
automatic climate control on the front-
passenger side
Rpress one of the rocker switches on the
rear-compartment control panel
Adjusting the footwell temperature
You can use the Footwell temperature
function to set the temperature difference
between the footwell and the rest of the
vehicle interior.
iThis setting is quite effective in automatic
mode, especially at low outside
temperatures.
The greater the value you set, the higher the
temperature in the footwell.
XSelect the climate control main menu in the
air-conditioning function bar by turning
cVd the COMAND controller and press
W to confirm.
The climate control menu opens.
XSelect Footwell temperature and press
W.
A scale appears.
XTo change the temperature difference:
slide ZVÆ or turn cVd.
XTo confirm your selection: press W.264VehicleCOMAND
Page 267 of 524

Adjusting the blower settings for the air
vents
This function allows you to determine the way
the air is blown through the air vents in
automatic mode.
You can select:
RFocused (high blower setting)
RMedium (standard setting)
RDiffuse (low blower setting)
iThis setting is quite effective in automatic
mode, especially at high outside
temperatures.
If the vehicle has become very warm and the
automatic climate control is cooling the
interior, the blower settings are briefly
canceled.
XSelect the climate control main menu in the
air-conditioning function bar by turning
cVd the COMAND controller and press
W to confirm.
The climate control menu opens.
XSelect Airflow and press W.
A menu appears.
The current setting is indicated by a # dot.
XTo change the airflow: slide ZVÆ or turn
cVd.
XTo confirm your selection: press W.
Operating the rear-compartment air-
conditioning system from the front
The rear-compartment air-conditioning
system is operated in the same way as
climate control for the driver and front
passenger.
Switching on operation of the rear-
compartment air conditioning from the
front
XSelect the climate control main menu in the
air-conditioning function bar by turning
cVd the COMAND controller and press
W to confirm.
The climate control menu opens.
XSelect Rear Y and press W.
Rear appears in the main menu on the air-
conditioning function bar. The rear-
compartment air-conditioning system can
be controlled from the front.
Main menu for the rear-compartment air-
conditioning system
In the main menu for the rear-compartment
air-conditioning system, you can:
Rswitch back to front-compartment climate
control operation
Rswitch off the rear-compartment air
conditioning
Rswitch automatic mode for the rear-
compartment air conditioning on/off
XTo open the main menu: select the
climate control main menu in the air
conditioning function bar and press W.
The current setting is indicated by a # dot.
Vehicle265COMANDZ
Page 268 of 524

To switch back from operation of the rear-
compartment air-conditioning system from
the front:
XIn the climate control main menu, select
Front climate control and press W.
The air conditioning function bar shows the
climate control settings for the driver and
front passenger.
To switch off the rear-compartment air-
conditioning system:
XIn the climate control main menu, select
Rear climate control off and press
W.
To switch on automatic mode for the rear-
compartment air-conditioning system:
XIn the climate control main menu, select
Rear automatic and press W.
Automatic mode for the rear-compartment
air-conditioning system is switched on.
Seats
Lumbar supports
The lumbar support in the backrest of the
driver's and front-passenger seats can be
adjusted to provide optimum support for your
back.
XTo select the seat: press the T
function button.
The main area of the COMAND display is
active. A scale appears.
XTo move to the lower menu bar: select
by sliding ZVÆ the COMAND controller
and press W to confirm.
iWhen you press the T function button,
the previously adjusted seat is active.
XTo adjust the lumbar support: select by
sliding XVY or turning cVd the COMAND
controller and press W to confirm.
Multicontour seat
iInformation about the components and
operating principles of COMAND can be
found on (Y page 116).
The contour of the driver's seat and front-
passenger seat backrests can be individually
adjusted to provide optimum support for your
back. This is achieved by controlling the
pressure in the air chambers in the
multicontour seat.
The adjustments are made using the
COMAND display.
iWhen you adjust the multicontour seat,
you may hear the air being pumped in or
released.
You can adjust the following air cushions:
Rseat side bolsters
Rseat backrest side bolsters
Rbackrest curvature in the lumbar region
Rbackrest curvature in the upper back
region
XMake sure that the key is in position 2 in
the ignition lock.
XPress the T function button.
Selecting the seat
You must first select the seat for which you
wish to make adjustments.
XPress the T function button.
The main area is active.
XTo move to the lower menu bar: select
by sliding ZVÆ the COMAND controller
and press W to confirm.
266VehicleCOMAND
Page 274 of 524

Vehicle equipment
iThis manual describes all the standard
and optional equipment of your vehicle
which was available at the time of
purchase. Country-specific differences are
possible. Bear in mind that your vehicle
may not feature all functions described
here. This also refers to safety-related
systems and functions.
Exterior lighting
Important safety notes
For reasons of safety, Mercedes-Benz
recommends that you drive with the lights
switched on even during the daytime. In some
countries, operation of the headlamps varies
due to legal requirements and self-imposed
obligations.
Notes on driving abroad
Convert to symmetrical low beam when
driving abroad: switch the headlamps to
symmetrical low beam in countries in which
traffic drives on the opposite side of the road
from the country where the vehicle is
registered. This prevents oncoming traffic
from being dazzled. Symmetrical lights do not
illuminate as large an area of the edge of the
road.
Have the headlamps converted at a qualified
specialist workshop, e.g. an authorized
Mercedes-Benz Center, as close to the border
as possible before driving in these countries.
Convert to asymmetrical low beam after
returning: have the headlamps converted
back to asymmetrical low beam at a qualified
specialist workshop, e.g. an authorized
Mercedes-Benz Center, as soon as possible
after crossing the border when returning.
Light switch
Operation
1WLeft-hand standing lamps2XRight-hand standing lamps3$Lights off/daytime running lamps4cAutomatic headlamp mode/daytime
running lamps
5TSide lamps, license plate and
instrument lighting
6LLow-beam/high-beam headlamps7NFog lamps148RRear fog lamps
The turn signals, high-beam headlamps and
the high-beam flasher are operated using the
combination switch (Y page 274).
! Switch off the parking lamps and standing
lamps when you leave the vehicle. This
prevents the battery from discharging.
The exterior lighting (except the side lamps/
standing lamps) switches off automatically if
you:
Rremove the key from the ignition lock
Ropen the driver's door with the key in
position 0
If you hear a warning tone when you leave the
vehicle, the lights may still be switched on.
XTurn the light switch to $ or c.
or
XIf the rear fog lamp is switched on: press
the light switch in to the stop.14Only vehicles with Bi-Xenon headlamps without Intelligent Light System* are equipped with front fog lamps.272Exterior lightingLights and windshield wipers* optional
Page 292 of 524

Automatic mode will achieve optimal
operation if cooling with air dehumidification
is also activated. If desired, cooling with air
dehumidification can be deactivated.
Controlling the front climate control
using the front control panel
XTurn the key to position 2 in the ignition
lock.
XSet the desired temperature.X To switch on: press the à rocker
switch up or down.
The indicator lamp in the à rocker
switch lights up.
XTo switch off: press the K rocker
switch up or down.
The indicator lamp in the à rocker
switch goes out.
or
XSet the air distribution using COMAND
(Y page 262).
The indicator lamp in the à rocker
switch goes out.
Controlling the rear-compartment
climate control automatically using the
front control panel
XTurn the key to position 2 in the ignition
lock.
XActivate the Y rear compartment
function via COMAND (Y page 265).
Rear-compartment climate control can be
controlled via the front control panel using
the Y rear compartment function.
XSet the desired temperature.X To switch on: press the à rocker
switch up or down.
The indicator lamp in the à rocker
switch lights up.
XTo switch off: press the K rocker
switch up or down.
The indicator lamp in the à rocker
switch goes out.
or
XSet the air distribution using COMAND
(Y page 262).
The indicator lamp in the à rocker
switch goes out.
iTo return to the standard display, activate
the "front climate control" function via
COMAND (Y page 265).
iThe rear display changes to the standard
display automatically after five seconds.
Controlling the rear-compartment
climate control automatically using the
rear control panel
XTurn the key to position 2 in the ignition
lock.
XSet the desired temperature.X To activate: press rocker switch K up or
down and select AUTO (Y page 287).
XTo deactivate: press rocker switch K up
or down and select MAN or
OFF (Y page 287).
Setting the temperature
Climate control climate zones
You can select different temperature settings
for the driver's and front-passenger sides as
290Operating the climate control systemsClimate control
Page 315 of 524

Problems with the transmissionProblemPossible causes/consequences and M SolutionsThe acceleration ability
is deteriorating.
The transmission no
longer changes gear.The transmission is in emergency mode.
It is only possible to shift into 2nd gear and reverse gear.XStop the vehicle.XShift the transmission to position P.XSwitch off the engine.XWait at least 10 seconds before restarting the engine.XShift the transmission to position D or R.
If D is selected, the transmission shifts into 2nd gear; if R is
selected, the transmission shifts into reverse gear.XHave the transmission checked at a qualified specialist
workshop immediately.Transfer case
This section is only valid for vehicles with 4-
wheel drive (4MATIC). Power is always
transmitted to both axles.
! Performance tests may only be carried
out on a 2-axle dynamometer. The brake
system or transfer case could otherwise be
damaged. Contact an authorized
Mercedes-Benz Center for a performance
test. Mercedes-Benz recommends that you
use an authorized Mercedes-Benz Center
for this purpose.
! To prevent ESP ®
from intervening, the
ignition must be switched off (SmartKey or
the Start/Stop button in position 0 or 1) if:
R the electric parking brake is being tested
on a brake dynamometer.
R the vehicle is being towed with only one
axle raised (not permitted for vehicles
with 4MATIC).
The brake system could otherwise be
damaged.Refueling
Important safety notes
GWarning
Gasoline is highly flammable and poisonous.
It burns violently and can cause serious
personal injury.
Never allow sparks, flames or smoking
materials near gasoline.
Turn off the engine before refueling.
Whenever you are around gasoline, avoid
inhaling fumes and any skin or clothing
contact.
Direct skin contact with fuels and the
inhalation of fuel vapors are damaging to your
health.
GWarning
Overfilling of the fuel tank may create
pressure in the system which could cause a
gas discharge. This could cause the gasoline
to spray back out when removing the fuel
pump nozzle, which could cause personal
injury.
Refueling313Driving and parkingZ