2011 MERCEDES-BENZ S-Class Condition
[x] Cancel search: ConditionPage 102 of 524
Vehicle equipment
i This manual describes all the standard
and optional equipment of your vehicle
which was available at the time of
purchase. Country-specific differences are
possible. Bear in mind that your vehicle
may not feature all functions described
here. This also refers to safety-related
systems and functions.
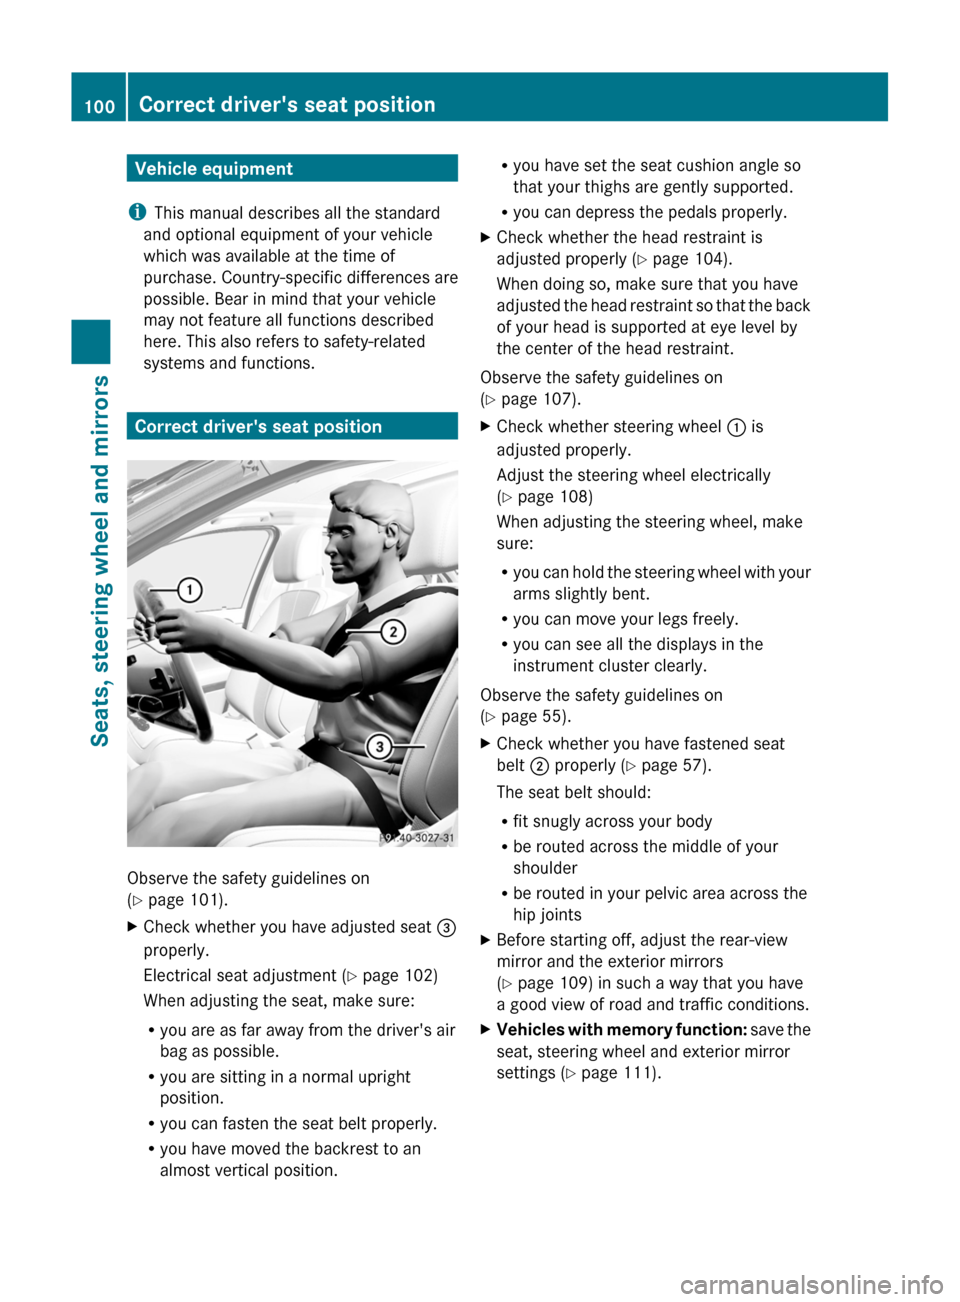
Correct driver's seat position
Observe the safety guidelines on
( Y page 101).
XCheck whether you have adjusted seat =
properly.
Electrical seat adjustment ( Y page 102)
When adjusting the seat, make sure:
R you are as far away from the driver's air
bag as possible.
R you are sitting in a normal upright
position.
R you can fasten the seat belt properly.
R you have moved the backrest to an
almost vertical position.R you have set the seat cushion angle so
that your thighs are gently supported.
R you can depress the pedals properly.XCheck whether the head restraint is
adjusted properly ( Y page 104).
When doing so, make sure that you have
adjusted the head restraint so that the back
of your head is supported at eye level by
the center of the head restraint.
Observe the safety guidelines on
( Y page 107).
XCheck whether steering wheel : is
adjusted properly.
Adjust the steering wheel electrically
( Y page 108)
When adjusting the steering wheel, make
sure:
R you can hold the steering wheel with your
arms slightly bent.
R you can move your legs freely.
R you can see all the displays in the
instrument cluster clearly.
Observe the safety guidelines on
( Y page 55).
XCheck whether you have fastened seat
belt ; properly ( Y page 57).
The seat belt should:
R fit snugly across your body
R be routed across the middle of your
shoulder
R be routed in your pelvic area across the
hip jointsXBefore starting off, adjust the rear-view
mirror and the exterior mirrors
( Y page 109) in such a way that you have
a good view of road and traffic conditions.XVehicles with memory function: save the
seat, steering wheel and exterior mirror
settings ( Y page 111).100Correct driver's seat positionSeats, steering wheel and mirrors
Page 112 of 524

XMake sure that the SmartKey is in position
1 or 2 in the ignition lock.XPress button ; for the right-hand exterior
mirror or button = for the left-hand
exterior mirror.
The indicator lamp lights up in the button
that has been pressed.XPress adjustment button : up, down, to
the right or to the left until the exterior
mirror is set in a way which provides you
with a good overview of traffic conditions.
Folding the exterior mirrors in or out
electrically
XMake sure that the SmartKey is in position
1 or 2 in the ignition lock.XBriefly press button :.
Both exterior mirrors fold in or out.
i Make sure that the exterior mirrors are
always folded out fully while the vehicle is
in motion, as they may otherwise vibrate.
Folding the exterior mirrors in or out
automatically
When the "Automatic mirror folding" function
is activated in COMAND ( Y page 258):
R the exterior mirrors fold in automatically as
soon as you lock the vehicle from the
outside.
R the exterior mirrors fold out again
automatically as soon as you unlock the
vehicle and then open the driver's or front-
passenger door.
i The mirrors do not fold out if they have
been folded in manually.
Exterior mirror out of position
If an exterior mirror has been pushed out of
position, proceed as follows:
XPress the mirror-folding button
( Y page 110) repeatedly until you hear the
mirrors engage in position.
The mirror housing is engaged again and
you can adjust the exterior mirrors as usual
( Y page 109).
Automatic anti-glare mirrors
GWarning!
The auto dimming function does not react if
incoming light is not aimed directly at sensors
in the interior rear view mirror.
The interior rear view mirror and the exterior
rear view mirror on the driver's side do not
react, for example, if the rear window
sunshade is in raised position.
Light hitting the mirror(s) at certain angles
(incident light) could blind you. As a result,
you may not be able to observe traffic
conditions and could cause an accident.
The rear-view mirror and the exterior mirror
on the driver's side automatically go into anti-
glare mode if the ignition is switched on and
incident light from headlamps strikes the
sensor in the rear-view mirror.
110MirrorsSeats, steering wheel and mirrors
Page 116 of 524

Vehicle equipment
i This manual describes all the standard
and optional equipment of your vehicle
which was available at the time of
purchase. Country-specific differences are
possible. Bear in mind that your vehicle
may not feature all functions described
here. This also refers to safety-related
systems and functions.
Introduction
Operating safety
General notes
GRisk of accident and injury
Vehicles with HYBRID: ensure that you read
the "HYBRID" supplement. You may otherwise
fail to recognize dangers.
GWarning
Any alterations of electronic components or
software can cause malfunctions.
Radio, satellite radio, amplifier, DVD changer,
navigation module, telephone and Voice
Control systems are interconnected.
Therefore, if one of the components is not
operational, or has not been removed/
replaced properly, the function of other
components could be impaired.
Such conditions might seriously impair the
operating safety of your vehicle.
We recommend to have any service work on
electronic components carried out by an
authorized Mercedes-Benz Center.
GWarning
In order to avoid distraction which could lead
to an accident, the driver should enter system
settings while the vehicle is at a standstill, and
operate the system only when permitted by
road, weather and traffic conditions.
Bear in mind that at a speed of just 30 mph
(approximately 50 km/h), your car covers a
distance of 44 feet (approximately 14 m) every
second.
COMAND supplies you with information to
help you select your route more easily and
guide you conveniently and safely to your
destination. For safety reasons, we
encourage the driver to stop the vehicle in a
safe place before answering or placing a call,
or consulting the COMAND screen to read
navigational maps, instructions, or
downloaded information.GWarning
While the navigation system provides
directional assistance, the driver must remain
focused on safe driving behavior, especially
attention to traffic and street signs, and
should utilize the system’s audio cues while
driving.
The navigation system does not supply any
information on stop signs, yield signs, traffic
regulations or traffic safety rules. Their
observance always remains in the driver’s
personal responsibility. DVD maps do not
cover all areas nor all routes within an area.
This device complies with Part 15 of the FCC
Rules. Both of the following conditions must
be fulfilled to be approved for use:
(1) This device may not cause harmful
interference, and(2) This device must accept all external
interference, including interference that may
cause undesired operating problems.GWarning
Change or modification not expressly
approved by the party responsible for
compliance could void the user's authority to
operate this equipment.
! Note: This equipment has been tested
and found to comply with the limits for a
Class A digital device, pursuant to Part 15
of the FCC Rules. These limits are designed
to provide reasonable protection against
harmful interference when the equipment
114IntroductionCOMAND
Page 121 of 524
COMAND display
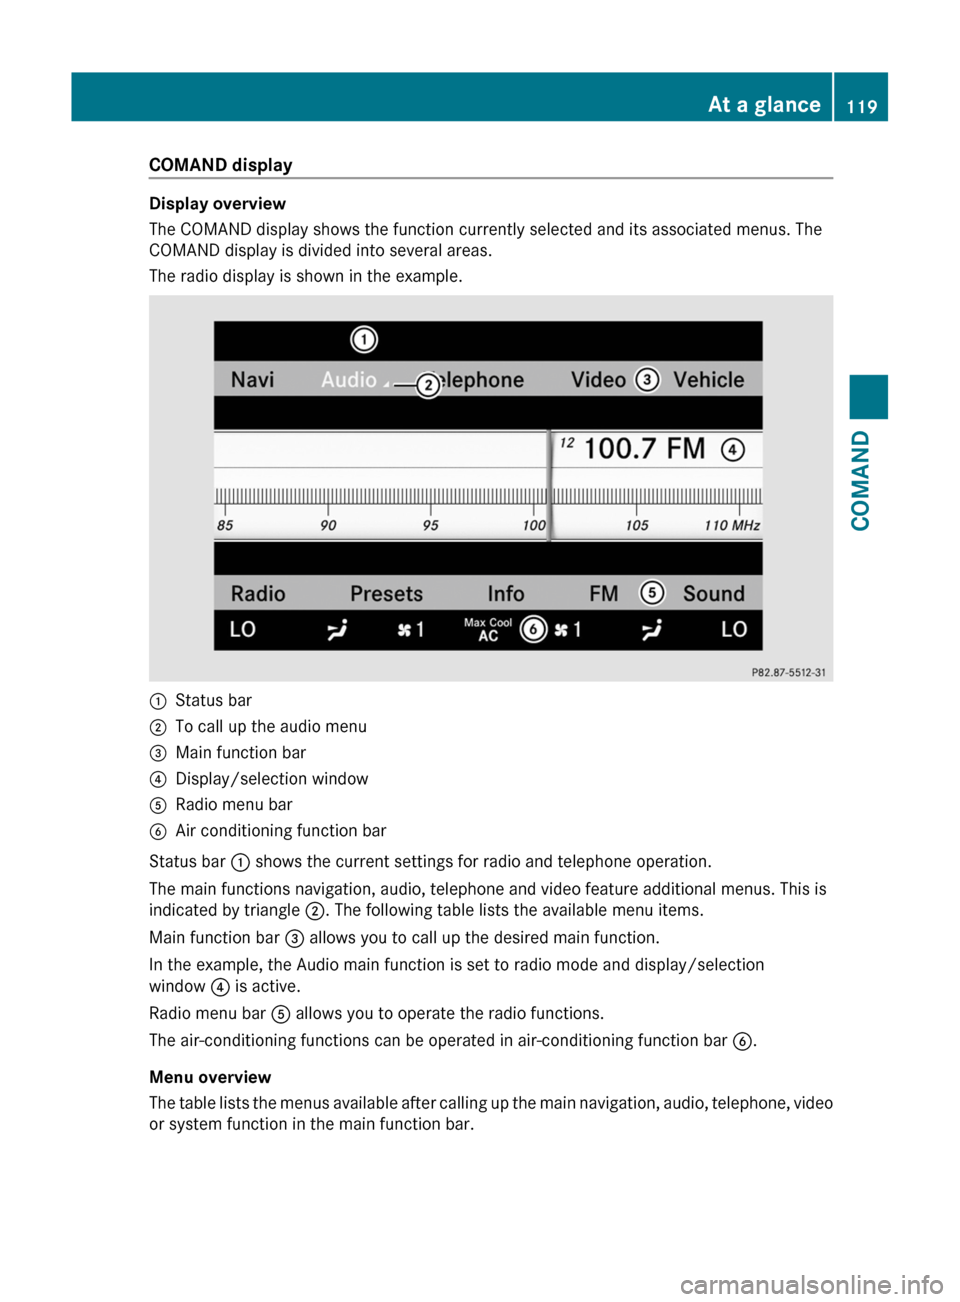
Display overview
The COMAND display shows the function currently selected and its associated menus. The
COMAND display is divided into several areas.
The radio display is shown in the example.
:Status bar;To call up the audio menu=Main function bar?Display/selection windowARadio menu barBAir conditioning function bar
Status bar : shows the current settings for radio and telephone operation.
The main functions navigation, audio, telephone and video feature additional menus. This is
indicated by triangle ;. The following table lists the available menu items.
Main function bar = allows you to call up the desired main function.
In the example, the Audio main function is set to radio mode and display/selection
window ? is active.
Radio menu bar A allows you to operate the radio functions.
The air-conditioning functions can be operated in air-conditioning function bar B.
Menu overview
The table lists the menus available after calling up the main navigation, audio, telephone, video
or system function in the main function bar.
At a glance119COMANDZ
Page 147 of 524

XSelect Yes or No and press W to confirm.
If you select No, the process will be aborted.
If you select Yes, the individualization is
deleted. You will see a message to this
effect.
Bluetooth® settings
General information about Bluetooth®
Bluetooth® technology is the standard for
short-range wireless data transmission of up
to approximately 10 meters. Bluetooth®
allows, for example, the exchange of vCards.
Bluetooth® is a registered trademark of
Bluetooth Special Interest Group (SIG) Inc.
Requirements for a Bluetooth®
connection
You can connect mobile phones and
notebooks with COMAND.
To do so, the following conditions need to be
met:
RBluetooth®-capable devices, e.g. mobile
phones, must comply with a certain profile
in order to be connected to COMAND.
Every Bluetooth® device has its own
specific Bluetooth® name.
RBluetooth® must be activated in COMAND
and on the respective Bluetooth® device;
see the separate operating instructions.
Rthe Bluetooth® device must be "visible" to
COMAND in order for COMAND to find and
display it. For the setting procedures,
please see the operating instructions for
the Bluetooth® device.
iOnce a mobile phone has been
connected, reception and transmission
volume may change.
Activating/deactivating Bluetooth®
XSelect Vehicle in the main function bar by
turning cVd the COMAND controller and
press W to confirm.
XSelect System by turning cVd the
COMAND controller and press W to
confirm.
XSelect Bluetooth by turning cVd the
COMAND controller and press W to
confirm.
XSelect Bluetooth activated and press
W to confirm.
This switches Bluetooth® on O or off ª.
Connecting Bluetooth® devices
General information
Before using your Bluetooth® device with
COMAND for the first time, you will need to
connect it.
Connecting is comprised of:
Rsearching for a Bluetooth® device and
Rsubsequently authorizing it
iYou can connect up to ten devices to
COMAND.
For more information on suitable mobile
phones and on connecting a Bluetooth®-
capable mobile phone to COMAND, visit
http://www.mbusa-mobile.com or call
the Mercedes-Benz Customer Assistance
Center at
1-800-FOR-MERCedes(1-800-367-6372)
(US) or Customer Service at
1-800-387-0100 (Canada).
System settings145COMANDZ
Page 151 of 524
COMAND calculates the route to the
destination without taking account of the
following:
R Traffic lights
R Stop and right-of-way-signs
R Lane merging
R Parking or stopping prohibited areas
R Other road and traffic rules and regulations
R Narrow bridgesGWarning
COMAND may give incorrect navigation
commands if the data in the digital map does
not correspond with the actual road/traffic
situation. Digital maps do not cover all areas
nor all routes within an area. For example, if
the traffic routing has been changed or the
direction of a one-way road has been
reversed.
For this reason, you must always observe
applicable road and traffic rules and
regulations during your journey. Road and
traffic rules and regulations always have
priority over the navigation commands
generated by the system.
GWarning
Navigation announcements are intended to
direct you while driving without diverting your
attention from the road and driving.
Please always use this feature instead of
consulting the map display for directions.
Looking at the icons or map display can
distract you from traffic conditions and
driving, and increase the risk of an accident.
General information
Operational readiness of the navigation
system
The navigation system must determine the
position of the vehicle before first use or
whenever operational status is restored.
Therefore, you may have to drive for a while
before precise route guidance is possible.
GPS reception
Among other things, correct functioning of
the navigation system depends on GPS
reception. In certain situations, GPS
reception may be impaired, there may be
interference or there may be no reception at
all, e.g. in tunnels or parking garages.
Input restriction
On vehicles for certain countries, there is a
restriction on entering data.
The restriction is active at vehicle speeds
above approximately 3 mph (5 km/h). The
restriction is deactivated as soon as the
speed falls below 2 mph (3 km/h).
When the restriction is active, certain entries
cannot be made. This will be indicated by the
fact that certain menu items are grayed out
and cannot be selected.
The following entries are not possible, for
example:
R entering the destination city and street
R entering a destination via the map
R entering in the vicinity of a city or via a
name search
R editing entries
R direct entry using the number keypad
Other entries are still possible, such as
entering points of interest in the vicinity of the
destination or current position.
Switching on navigation modeXPress the S function button once or
twice.
or
XSelect Navi in the main function bar by
sliding ZV and turning cVd the COMAND
controller and press W to confirm.
In both cases, you will see the map either
with or without the menu shown.Navigation149COMANDZ
Page 153 of 524
XSelect the route option(s) and press W to
confirm.
The route options are switched on O or off
ª , depending on the previous status.
i
If you change the route type and/or the
route options while route guidance is active
(the route has been calculated), COMAND
will calculate a new route.
If you change the route type and/or the
route options while route guidance is
inactive (no destination has been entered
yet), COMAND uses the new setting for the
next route guidance.
i The route calculated may, for example,
include ferry connections, even if the
Minimize Ferries route option is
switched on.
In some cases, e.g. when calculating
particularly long routes, COMAND may not
be able to take all the selected route
options into account.
XTo exit the menu: slide XVY the COMAND
controller.
Entering destinations
Introduction to destination input
GWarning!
For safety reasons, only enter a new
destination when the vehicle is stationary.
You could otherwise be distracted from the
traffic conditions, cause an accident and
injure yourself and others.
The following destination input options are
available:
R entering a destination by address
R entering a destination from the destination
memory
R entering a destination from the list of last
destinations
R entering a destination using the map
Rentering an intermediate stop
R entering a point of interest
Entering a destination by address
Introduction
When entering an address as the destination,
you have the following options:
R entering the state/province, city/ZIP code
and street
R entering the state/province, town/ZIP
code and center
R entering the state/province, town/ZIP
code, street and house number
R entering the state/province, town/ZIP
code, street and intersection
R entering the state/province, street, city
and house number
R entering the state/province, street and
house number
R entering the state/province, street and
intersection
i You can only enter those cities, streets,
ZIP codes etc. that are stored in the digital
map. This means that for some countries
you cannot enter ZIP codes, for example.
Example: entering an address
The following is a step-by-step example of
how to enter an address. The destination
address is as follows:
New York (state)
New York (city)
40 Broadway
You can of course enter any country, city,
street and house number desired and enter,
for example, your home address (My
address).
Calling up the address entry menu
XTo switch on navigation mode: press the
S function button once or twice.XTo show the menu: press the W COMAND
controller.Navigation151COMANDZ
Page 169 of 524
Display and description of lane recommendations
The colors used in the lane recommendation display vary depending on whether day or night
design is switched on.
LaneDay designNight designRecommended lane C
In this lane, you will be able to complete the
next two changes of direction without
changing lanes.
Dark blueLight bluePossible lane B
In this lane, you will only be able to complete
the next change of direction without
changing lanes.
Light blueDark blueLane not recommended D
In this lane, you will not be able to complete
the next change of direction without
changing lanes.
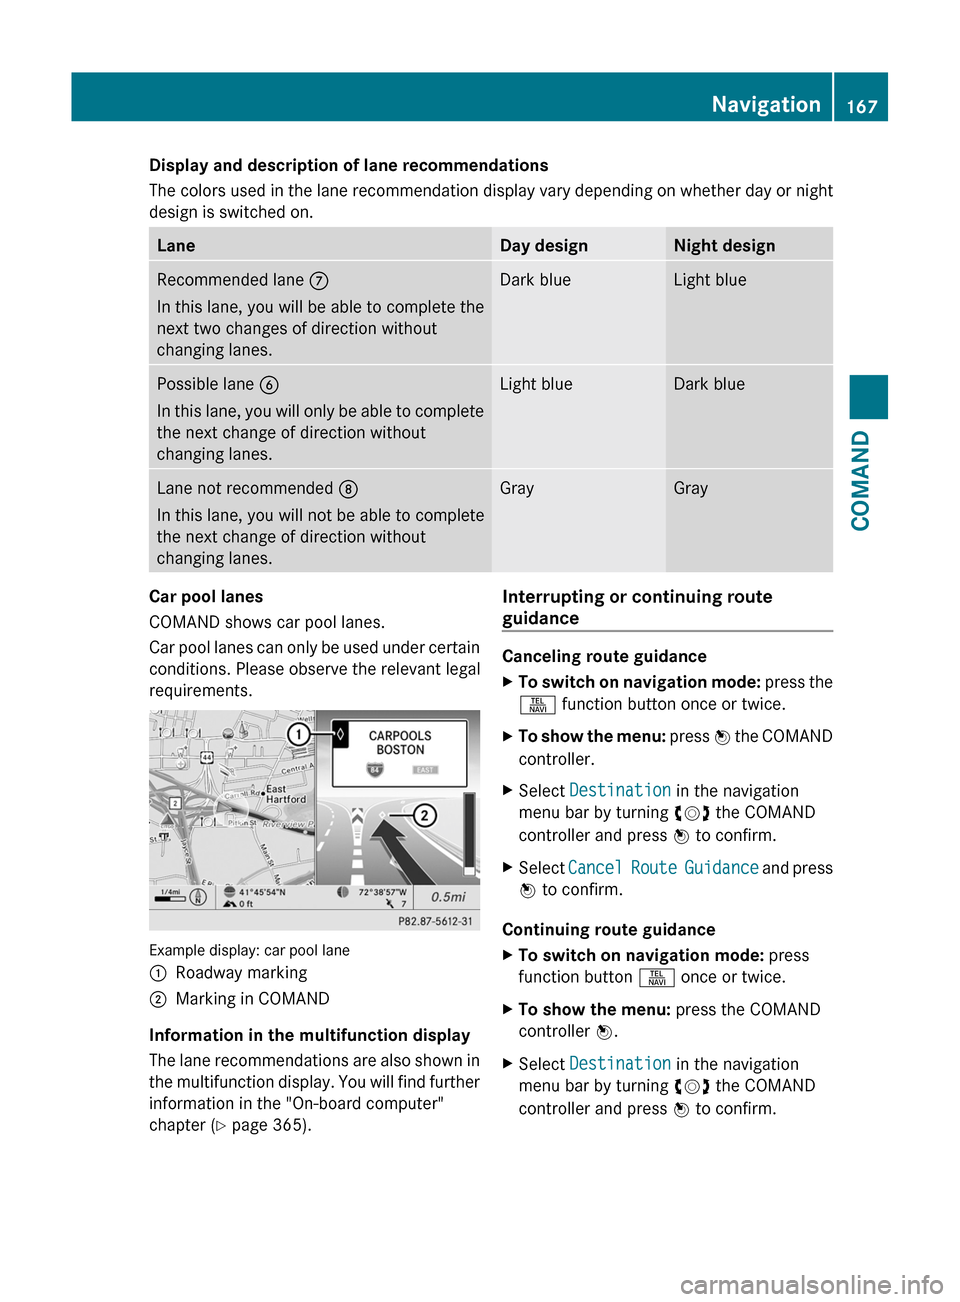
GrayGrayCar pool lanes
COMAND shows car pool lanes.
Car pool lanes can only be used under certain
conditions. Please observe the relevant legal
requirements.
Example display: car pool lane
:Roadway marking;Marking in COMAND
Information in the multifunction display
The lane recommendations are also shown in
the multifunction display. You will find further
information in the "On-board computer"
chapter (Y page 365).
Interrupting or continuing route
guidance
Canceling route guidance
XTo switch on navigation mode: press the
S function button once or twice.
XTo show the menu: press W the COMAND
controller.
XSelect Destination in the navigation
menu bar by turning cVd the COMAND
controller and press W to confirm.
XSelect Cancel Route Guidance and press
W to confirm.
Continuing route guidance
XTo switch on navigation mode: press
function button S once or twice.
XTo show the menu: press the COMAND
controller W.
XSelect Destination in the navigation
menu bar by turning cVd the COMAND
controller and press W to confirm.
Navigation167COMANDZ