2011 MERCEDES-BENZ S-Class tool kit
[x] Cancel search: tool kitPage 464 of 524

Vehicle equipment
i This manual describes all the standard
and optional equipment of your vehicle
which was available at the time of
purchase. Country-specific differences are
possible. Bear in mind that your vehicle
may not feature all functions described
here. This also refers to safety-related
systems and functions.
Where will I find...?
First-aid kit
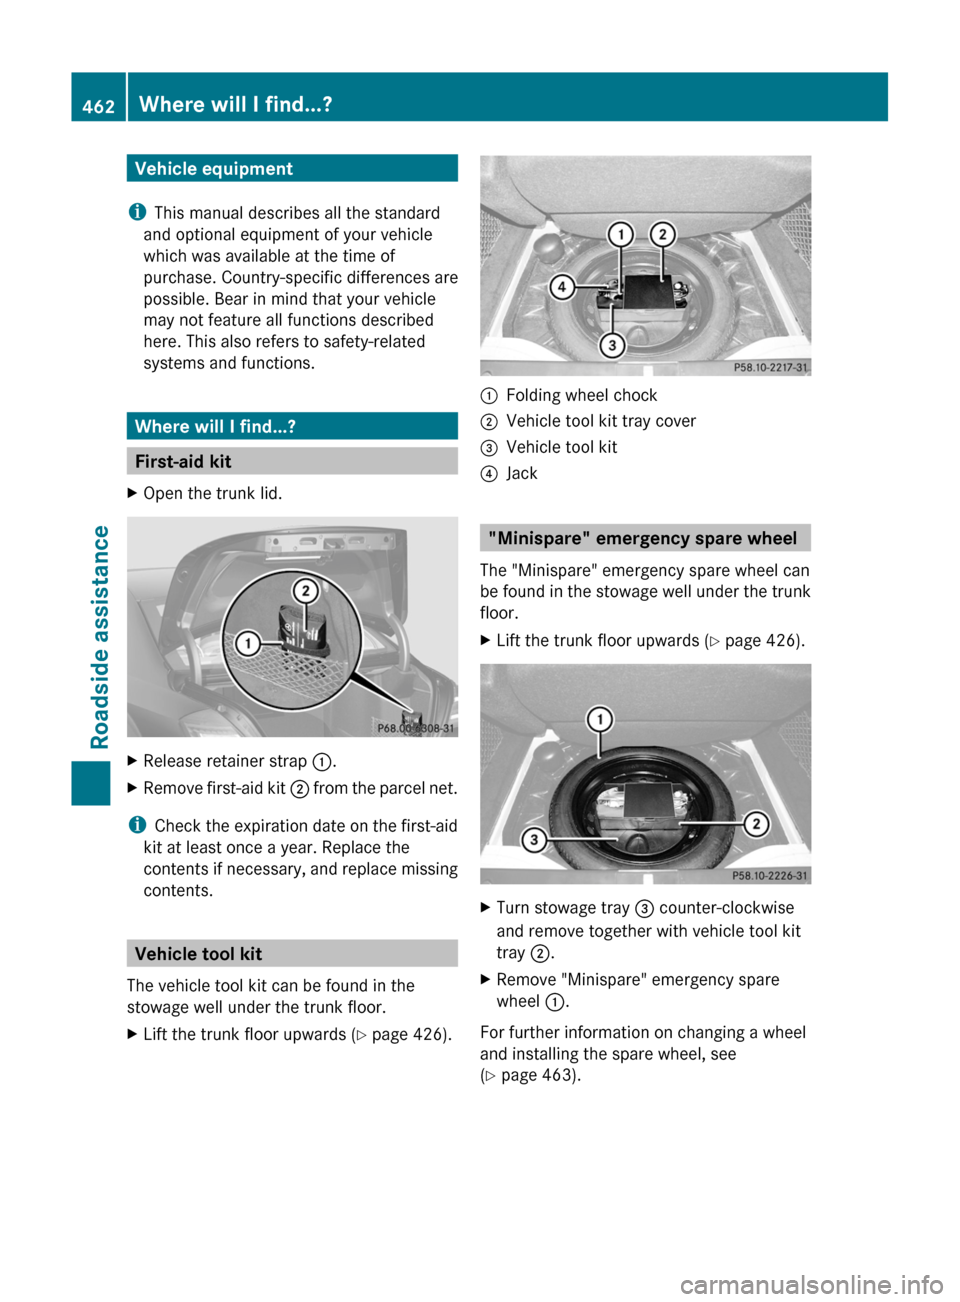
XOpen the trunk lid.XRelease retainer strap :.XRemove first-aid kit ; from the parcel net.
i
Check the expiration date on the first-aid
kit at least once a year. Replace the
contents if necessary, and replace missing
contents.
Vehicle tool kit
The vehicle tool kit can be found in the
stowage well under the trunk floor.
XLift the trunk floor upwards ( Y page 426).:Folding wheel chock;Vehicle tool kit tray cover=Vehicle tool kit?Jack
"Minispare" emergency spare wheel
The "Minispare" emergency spare wheel can
be found in the stowage well under the trunk
floor.
XLift the trunk floor upwards ( Y page 426).XTurn stowage tray = counter-clockwise
and remove together with vehicle tool kit
tray ;.XRemove "Minispare" emergency spare
wheel :.
For further information on changing a wheel
and installing the spare wheel, see
( Y page 463).
462Where will I find...?Roadside assistance
Page 465 of 524

Flat tire
Preparing the vehicle
Your vehicle may be equipped with a
"Minispare" emergency spare wheel or the
MOExtended run-flat system. ( Y page 467)
i Vehicle preparation is not necessary on
vehicles with the MOExtended run-flat
system.
XStop the vehicle as far away as possible
from traffic on solid, non-slippery and level
ground.XSwitch on the hazard warning lamps.XEngage the electric parking brake manually
( Y page 317).XBring the front wheels into the straight-
ahead position.XMove the DIRECT SELECT lever to P.XSwitch off the engine.XVehicles without KEYLESS-GO: remove
the key from the ignition lock.XVehicles with KEYLESS-GO: open the
driver's door.
The on-board electronics have status 0,
which is the same as the key having been
removed.XVehicles with KEYLESS-GO: remove the
Start/Stop button from the ignition lock
( Y page 299).XAll occupants must get out of the vehicle.
Make sure that they are not endangered as
they do so.XMake sure that no one is near the danger
area whilst a wheel is being changed.
Anyone who is not directly assisting in the
wheel change should, for example, stand
behind the barrier.XGet out of the vehicle. Pay attention to
traffic conditions when doing so.XClose the driver's door.Changing a wheel and mounting the
spare wheel
Preparing the vehicleGWarning
The wheel and tire size of the emergency
spare wheel/spare wheel may differ to that of
the damaged wheel. When using an
emergency spare wheel/spare wheel the
handling characteristics of the vehicle may
change.
Adapt your style of driving accordingly.
Never operate the vehicle with more than one
emergency spare wheel/spare wheel that
differs in size.
Only use an emergency spare wheel/spare
wheel of a differing size briefly and do not
switch off ESP ®
.
When using an emergency spare wheel, you
must not exceed the maximum speed of
50 mph (80 km/h).
GWarning
Have the different-sized emergency spare
wheel/spare wheel replaced with a new
wheel as soon as possible at a qualified
specialist workshop that has the necessary
specialist knowledge and tools to carry out
the work required. Mercedes-Benz
recommends that you use an authorized
Mercedes-Benz Center for this purpose. In
particular, work relevant to safety or on
safety-related systems must be carried out at
a qualified specialist workshop.
i Vehicles without an emergency spare
wheel/spare wheel are not equipped with
a tire-change tool kit at the factory. For
more information on which tools are
required to perform a wheel change on your
vehicle, e.g. wheel chock, alignment bolt,
or lug wrench, consult an authorized
Mercedes-Benz Center.
Flat tire463Roadside assistanceZ
Page 466 of 524

XPrepare the vehicle as described
(Y page 463).
XRemove the following items from the
stowage well under the trunk floor:
XSecure the vehicle to prevent it from rolling
away.
Securing the vehicle to prevent it from
rolling away
GWarning
Only jack up the vehicle on level ground or on
slight inclines/declines. The vehicle could
otherwise fall off the jack and injure you or
others.
If your vehicle is equipped with a wheel chock,
it can be found in the vehicle tool kit
(Y page 462).
The folding wheel chock is an additional
securing measure to prevent the vehicle from
rolling away, for example when changing a
wheel.
XFold both plates upwards :.XFold out lower plate ;.XGuide the lugs on the lower plate fully into
openings in base plate =.
Securing the vehicle on level ground
XOn level ground: place chocks or other
suitable items under the front and rear of
the wheel that is diagonally opposite the
wheel you wish to change.
Securing the vehicle on slight downhill gradients
XOn downhill gradients: place chocks or
other suitable items in front of the wheels
of the front and rear axle.
Raising the vehicle
GWarning
When jacking up the vehicle, only use the jack
which has been specifically approved by
Mercedes-Benz for your vehicle.
The jack is designed exclusively for jacking up
the vehicle at the jacking points built into both
sides of the vehicle. The jack saddle must be
placed centrally under the jacking point. The
jack must always be vertical when in use,
especially on inclines or declines.
The jack is intended only for lifting the vehicle
briefly for wheel changes. It is not suited for
464Flat tireRoadside assistance
Page 469 of 524

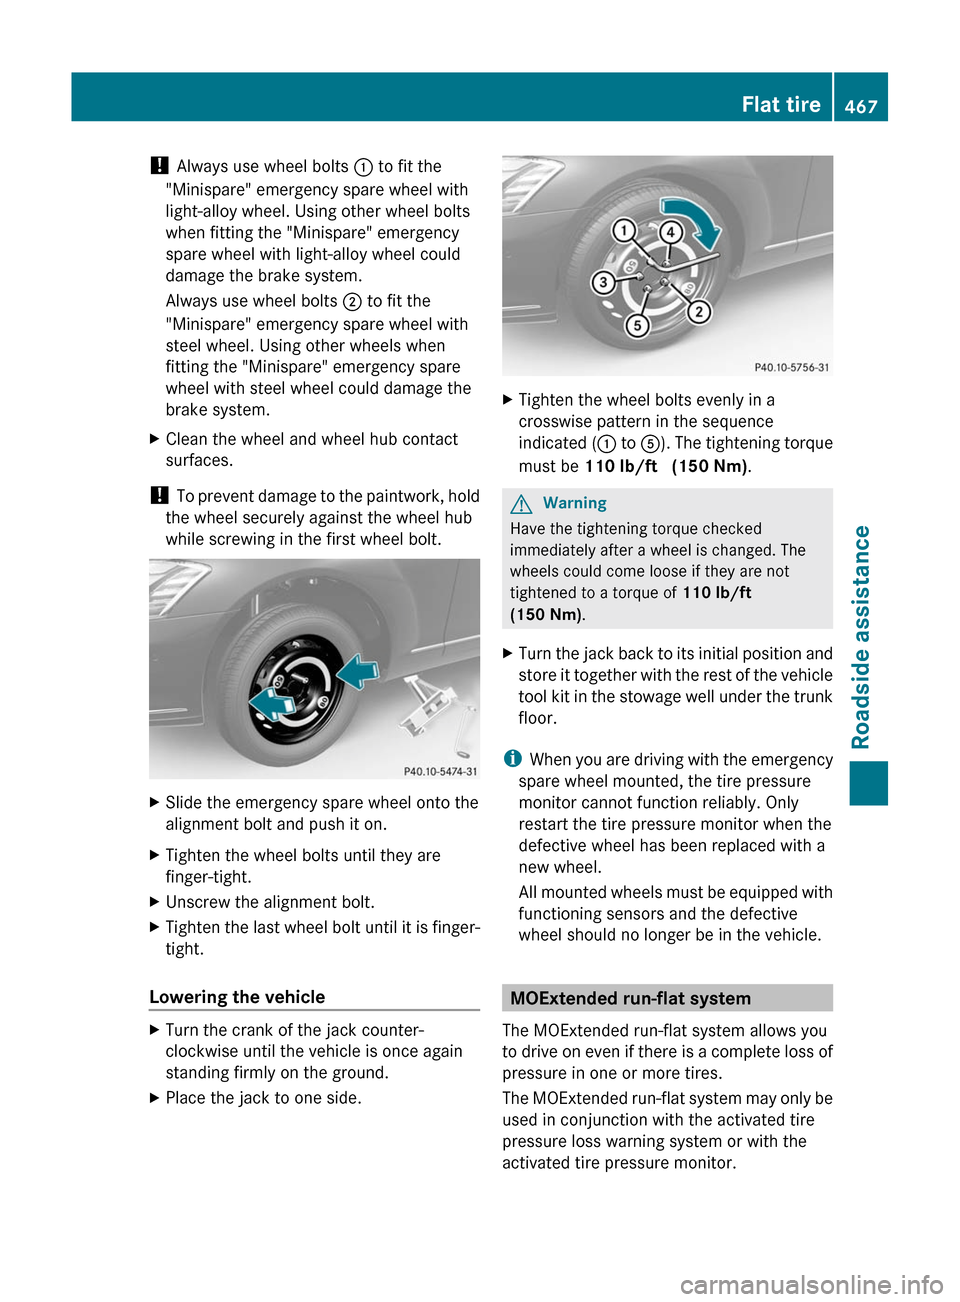
! Always use wheel bolts : to fit the
"Minispare" emergency spare wheel with
light-alloy wheel. Using other wheel bolts
when fitting the "Minispare" emergency
spare wheel with light-alloy wheel could
damage the brake system.
Always use wheel bolts ; to fit the
"Minispare" emergency spare wheel with
steel wheel. Using other wheels when
fitting the "Minispare" emergency spare
wheel with steel wheel could damage the
brake system.
XClean the wheel and wheel hub contact
surfaces.
! To prevent damage to the paintwork, hold
the wheel securely against the wheel hub
while screwing in the first wheel bolt.
XSlide the emergency spare wheel onto the
alignment bolt and push it on.
XTighten the wheel bolts until they are
finger-tight.
XUnscrew the alignment bolt.XTighten the last wheel bolt until it is finger-
tight.
Lowering the vehicle
XTurn the crank of the jack counter-
clockwise until the vehicle is once again
standing firmly on the ground.
XPlace the jack to one side.XTighten the wheel bolts evenly in a
crosswise pattern in the sequence
indicated (: to A). The tightening torque
must be 110 lb/ft (150 Nm).
GWarning
Have the tightening torque checked
immediately after a wheel is changed. The
wheels could come loose if they are not
tightened to a torque of 110 lb/ft
(150 Nm).
XTurn the jack back to its initial position and
store it together with the rest of the vehicle
tool kit in the stowage well under the trunk
floor.
iWhen you are driving with the emergency
spare wheel mounted, the tire pressure
monitor cannot function reliably. Only
restart the tire pressure monitor when the
defective wheel has been replaced with a
new wheel.
All mounted wheels must be equipped with
functioning sensors and the defective
wheel should no longer be in the vehicle.
MOExtended run-flat system
The MOExtended run-flat system allows you
to drive on even if there is a complete loss of
pressure in one or more tires.
The MOExtended run-flat system may only be
used in conjunction with the activated tire
pressure loss warning system or with the
activated tire pressure monitor.
Flat tire467Roadside assistanceZ
Page 476 of 524

Installing/removing the towing eye
Installing the towing eye
XRemove the towing eye from the vehicle
tool kit (Y page 462).
GWarning
The exhaust tail pipe may be hot. You could
burn yourself if you touch the tail pipe. Be
particularly careful when removing the rear
cover.
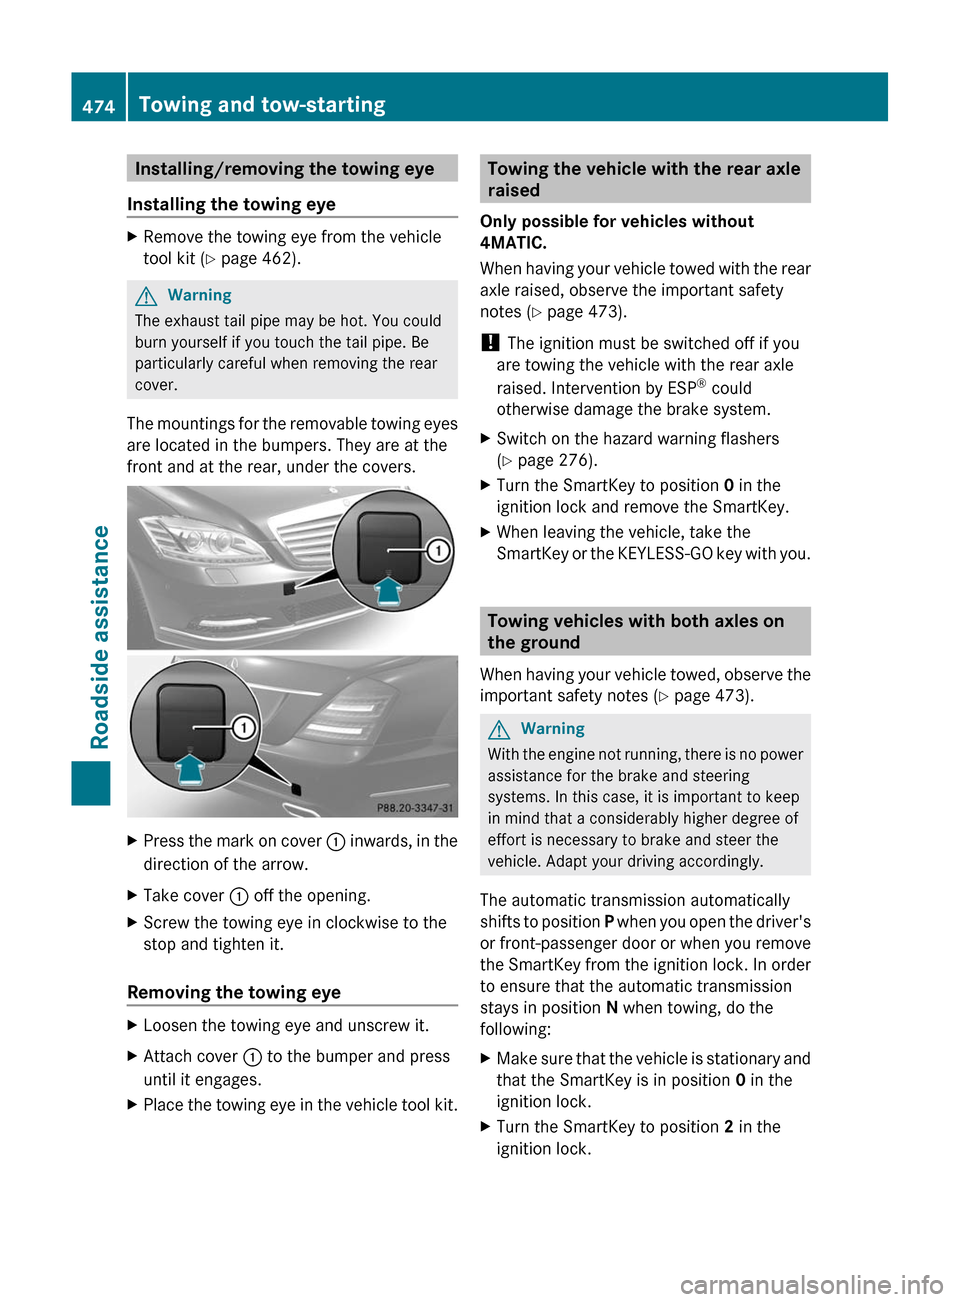
The mountings for the removable towing eyes
are located in the bumpers. They are at the
front and at the rear, under the covers.
XPress the mark on cover : inwards, in the
direction of the arrow.
XTake cover : off the opening.XScrew the towing eye in clockwise to the
stop and tighten it.
Removing the towing eye
XLoosen the towing eye and unscrew it.XAttach cover : to the bumper and press
until it engages.
XPlace the towing eye in the vehicle tool kit.Towing the vehicle with the rear axle
raised
Only possible for vehicles without
4MATIC.
When having your vehicle towed with the rear
axle raised, observe the important safety
notes (Y page 473).
! The ignition must be switched off if you
are towing the vehicle with the rear axle
raised. Intervention by ESP® could
otherwise damage the brake system.
XSwitch on the hazard warning flashers
(Y page 276).
XTurn the SmartKey to position 0 in the
ignition lock and remove the SmartKey.
XWhen leaving the vehicle, take the
SmartKey or the KEYLESS-GO key with you.
Towing vehicles with both axles on
the ground
When having your vehicle towed, observe the
important safety notes (Y page 473).
GWarning
With the engine not running, there is no power
assistance for the brake and steering
systems. In this case, it is important to keep
in mind that a considerably higher degree of
effort is necessary to brake and steer the
vehicle. Adapt your driving accordingly.
The automatic transmission automatically
shifts to position P when you open the driver's
or front-passenger door or when you remove
the SmartKey from the ignition lock. In order
to ensure that the automatic transmission
stays in position N when towing, do the
following:
XMake sure that the vehicle is stationary and
that the SmartKey is in position 0 in the
ignition lock.
XTurn the SmartKey to position 2 in the
ignition lock.
474Towing and tow-startingRoadside assistance