2011 MERCEDES-BENZ S-Class starting
[x] Cancel search: startingPage 24 of 524

U
Unlocking Emergency unlocking .......................84
From inside the vehicle (central
unlocking button) ............................. 83
Using the telephone .......................... 197
V
Vanity mirror Sun visor ........................................ 429
Vehicle
Data acquisition ............................... 28
Emergency unlocking .......................84
Equipment ....................................... 24
Exterior view .................................... 30
Individual settings (on-board
computer) ...................................... 377
Loading .......................................... 490
Lowering ........................................ 467
Maintenance .................................... 25
Parking up ..................................... 318
Raising ........................................... 464
Reporting problems .........................27
Towing away .................................. 473
Tow-starting ................................... 473
Transporting .................................. 475
Vehicle data
see Technical data
Vehicle dimensions ........................... 516
Vehicle identification number see VIN
Vehicle identification plate .............. 509
Vehicle level ...................................... 336
Active Body Control .......................338
Vehicle level (display message) ....... 402
Vehicle tool kit .................................. 462
Vehicle weights ................................. 516
Video (DVD) ........................................ 371
Video DVD Fast forward/rewind ...................... 238
Operation ....................................... 236
Pause function ............................... 239
Selecting ........................................ 238
Selecting a film/title ...................... 239
Selecting a scene/chapter ............239
Stop function ................................. 239
Video DVD (on-board computer) ...... 371
Video DVD mode Switching to ................................... 237
VIN ...................................................... 509
Voice Control System Settings ......................................... 143
Volume
Adjusting ....................................... 132
Navigation announcements ...........132
Phone calls .................................... 132
W
Warning and indicator lamps ABS ................................................ 415
Brakes ........................................... 413
Check Engine ................................. 418
ESP ®
.............................................. 416
ESP ®
OFF ....................................... 417
Fuel tank ........................................ 418
Overview .......................................... 33
Reserve fuel ................................... 418
Seat belt ........................................ 414
SRS ................................................ 417
Tire pressure monitor ....................419
Warranty ............................................ 508
Waveband Switching (radio) ............................ 209
Wheel bolt tightening torque ........... 467
Wheel chock ...................................... 464
Wheels Changing/replacing .......................502
Changing a wheel .......................... 463
Checking ........................................ 480
Cleaning ......................................... 454
Mounting a wheel .......................... 466
Removing a wheel ..........................466
Storing ........................................... 503
Tightening torque ........................... 467
Wheel size/tire size .......................503
Window curtain air bag
Display message ............................ 384
Operation ......................................... 47
Windows
see Side windows
Windows (cleaning instructions) ..... 455
22Index
Page 72 of 524

! Vehicles with 4MATIC: switch off the
ignition when the electric parking brake is
being tested on a brake dynamometer.
Application of the brakes by ESP ®
may
otherwise destroy the brake system.
i Only use wheels with the recommended
tire sizes. Only then will ESP ®
function
properly.
ETS/4ETS (Electronic Traction System)GWarning
Observe "Important safety notes"
( Y page 66).
Traction control is part of ESP ®
.
Traction control brakes the drive wheels
individually if they spin. This enables you to
pull away and accelerate on slippery surfaces,
for example if the road surface is slippery on
one side. On vehicles with 4MATIC, more
drive torque is also transferred to the wheel
or wheels with traction.
Traction control remains active if you
deactivate ESP ®
.
Activating/deactivating ESP ®
GWarning!
The ESP should not be switched off during
normal driving other than in the
circumstances described below. Disabling
the system will reduce vehicle stability in
driving maneuvers.
Do not switch off the ESP when a spare wheel
is mounted.
GWarning
S 63 AMG: ESP ®
should not be deactivated
during normal driving.
Deactivating the system results in the
following:
R no restriction to the engine torque
R loss of system-supported traction control
"ESP OFF" is designed for driving on closed
tracks when the vehicle's own oversteering
and understeering characteristics are desired
and requires an extremely qualified and
experienced driver who is able to handle
these critical driving situations.
You could lose control of your vehicle and
cause an accident.
Beware of these limits if you deactivate
ESP ®
.
Do not deactivate ESP ®
when the emergency
or spare wheel is mounted.
ESP ®
is activated automatically when the
engine is running.
It may be best to deactivate ESP ®
in the
following situations:
R when using snow chains
R in deep snow
R on sand or gravelGWarning!
Switch on the ESP immediately if the
aforementioned circumstances do not apply
anymore. Otherwise the ESP will not stabilize
the vehicle when it is starting to skid or a
wheel is spinning.
When you deactivate ESP ®
:
R ESP ®
no longer improves driving stability.
R the engine's torque is no longer limited and
the drive wheels can spin. The spinning of
the wheels results in a cutting action, which
provides better grip.
R traction control is still activated.
R ESP ®
still provides support when you
brake.
If ESP ®
is deactivated and one or more wheels
start to spin, the ÷ warning lamp in the
instrument cluster flashes. In such situations,
ESP ®
will not stabilize the vehicle.
XTo deactivate: (Y page 375).
The å warning lamp in the instrument
cluster lights up.70Driving safety systemsSafety
Page 80 of 524

Important information about using
KEYLESS-GO
RYou can use the KEYLESS-GO key as a
conventional SmartKey.
RYou can combine KEYLESS-GO functions
with those of a conventional SmartKey, e.g.
you can open the vehicle with KEYLESS-GO
and close it with the & button.
RAlways carry your KEYLESS-GO key on your
person.
RNever store the KEYLESS-GO key together
with:
-electronic devices, such as a mobile
phone or other SmartKey
-metal objects, such as coins or metal foil
Doing so may impair the function of
KEYLESS-GO.
RTo open or close the vehicle, the KEYLESS-
GO key should not be more than 3 ft (1 m)
from the door or trunk.
RIf the vehicle is parked for more than
72 hours, the KEYLESS-GO function is
deactivated. Pull an outer door handle and
switch on the ignition to reactivate the
KEYLESS-GO function.
RIf the KEYLESS-GO key is removed from the
vehicle, the system may not be able to
recognize the SmartKey anymore. The
vehicle can then no longer be locked or
started with KEYLESS-GO.
RIf the KEYLESS-GO key has been removed
from the vehicle, e.g. when another vehicle
occupant with a KEYLESS-GO key leaves
the vehicle:
-when the Start/Stop button is pressed,
or when trying to lock the vehicle using
the locking button on the outside door
handle, the Key Not Detected message
appears in the multifunction display.
-when the engine is running, the red Key
Not Detected message appears in the
multifunction display as you pull away.
Look for the KEYLESS-GO key and place
it somewhere else in the vehicle. Place
the KEYLESS-GO key on the front-
passenger seat, for example, or in your
shirt pocket.
RIf you have switched on the engine with the
Start/Stop button, you can switch it off
again by:
-pressing the Start/Stop button
-inserting the KEYLESS-GO key into the
ignition lock while the vehicle is at a
standstill and the automatic
transmission is in park position P.
RYou may inadvertently unlock the vehicle if
the KEYLESS-GO key is less than 3 ft (1 m)
from the vehicle and:
-an exterior door handle is hit by a jet of
water, or
-you clean an exterior door handle
RPlease note that any vehicle occupant can
start the engine when there is a KEYLESS-
GO key in the vehicle.
Scenario 1: There is a KEYLESS-GO key in
the vehicle and a second one outside the
vehicle. If you leave the KEYLESS-GO key
in the vehicle when you leave and lock the
vehicle, no message appears in the
multifunction display.
Scenario 2: There is a KEYLESS-GO key in
the vehicle, but none outside the vehicle. If
you get out of the vehicle and attempt to
lock it, the Key Detected In Vehicle
message appears in the multifunction
display. The vehicle is not then locked.
When starting the engine and whilst driving,
KEYLESS-GO also checks whether a valid
SmartKey is in the vehicle by periodically
establishing radio contact.
78SmartKeyOpening and closing
Page 102 of 524

Vehicle equipment
i This manual describes all the standard
and optional equipment of your vehicle
which was available at the time of
purchase. Country-specific differences are
possible. Bear in mind that your vehicle
may not feature all functions described
here. This also refers to safety-related
systems and functions.
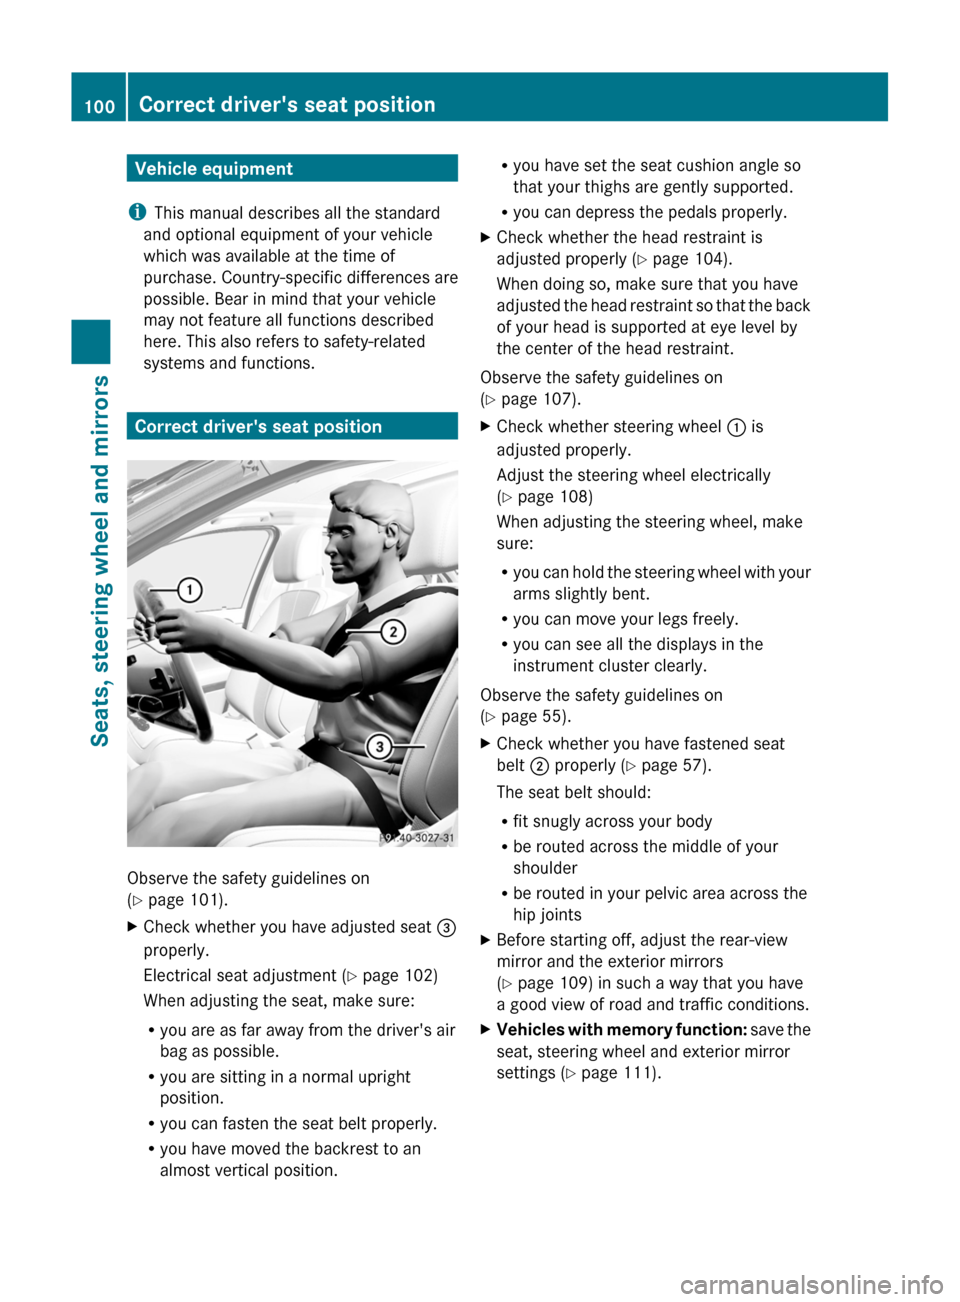
Correct driver's seat position
Observe the safety guidelines on
( Y page 101).
XCheck whether you have adjusted seat =
properly.
Electrical seat adjustment ( Y page 102)
When adjusting the seat, make sure:
R you are as far away from the driver's air
bag as possible.
R you are sitting in a normal upright
position.
R you can fasten the seat belt properly.
R you have moved the backrest to an
almost vertical position.R you have set the seat cushion angle so
that your thighs are gently supported.
R you can depress the pedals properly.XCheck whether the head restraint is
adjusted properly ( Y page 104).
When doing so, make sure that you have
adjusted the head restraint so that the back
of your head is supported at eye level by
the center of the head restraint.
Observe the safety guidelines on
( Y page 107).
XCheck whether steering wheel : is
adjusted properly.
Adjust the steering wheel electrically
( Y page 108)
When adjusting the steering wheel, make
sure:
R you can hold the steering wheel with your
arms slightly bent.
R you can move your legs freely.
R you can see all the displays in the
instrument cluster clearly.
Observe the safety guidelines on
( Y page 55).
XCheck whether you have fastened seat
belt ; properly ( Y page 57).
The seat belt should:
R fit snugly across your body
R be routed across the middle of your
shoulder
R be routed in your pelvic area across the
hip jointsXBefore starting off, adjust the rear-view
mirror and the exterior mirrors
( Y page 109) in such a way that you have
a good view of road and traffic conditions.XVehicles with memory function: save the
seat, steering wheel and exterior mirror
settings ( Y page 111).100Correct driver's seat positionSeats, steering wheel and mirrors
Page 145 of 524

XSelect Time zone and press W to confirm.
A list of time zones appears. The # dot
indicates the current setting.
XSelect the time zone and press W to
confirm.
XTo switch automatic changeover on/
off: select Automatic summer/winter
time changeover or Automatic summer/
winter time changeover by turning
cVd the COMAND controller and press
W to confirm.
The # dot indicates the current setting.
Read-aloud settings
Setting the text reader speed
XSelect Vehicle by turning cVd the
COMAND controller and press W to
confirm.
XSelect System and press W to confirm.XSelect Text reader and press W to
confirm.
XSelect Set text reader speed and press
W to confirm.
A list appears. The # dot indicates the
current setting.
XSelect a setting by turning cVd the
COMAND controller and press W to
confirm.
Voice Control System settings
Opening/closing the help window
The help window shows you additional
information during individualization and voice
control operation.
XSelect Vehicle in the main function bar by
turning cVd the COMAND controller and
press W to confirm.
XSelect System by turning cVd the
COMAND controller and press W to
confirm.
XSelect Voice Control by turning cVd the
COMAND controller and press W to
confirm.
XSelect Help window and press W to
confirm.
You have switched the help window on
O or off ª.
Individualization
Introduction
Using individualization, you can fine tune the
Voice Control System to your own voice and
thus improve voice recognition. This means
that other users' voices will not be recognized
as easily and, therefore, this function can be
switched off.
Individualization comprises two parts and
takes approximately five minutes. It consists
of training the system to recognize a certain
number of digit sequences and voice
commands.
Starting new individualization
Individualization can only be started when the
vehicle is stationary. Before starting, switch
off all devices or functions which could
interfere, such as the radio or the navigation
system. After starting the session, the system
System settings143COMANDZ
Page 156 of 524

XEnter a house number. Instructions for
entering characters using city input as an
example can be found in the "Entering
characters in navigation mode (entering a
city)" section (Y page 127).
XConfirm the entry with W.
The address entry menu reappears. The
house number has now been entered.
Starting route calculation
You can now have COMAND calculate the
route to the address entered or save the
address first, e.g. as your home address (My
address) (Y page 154).
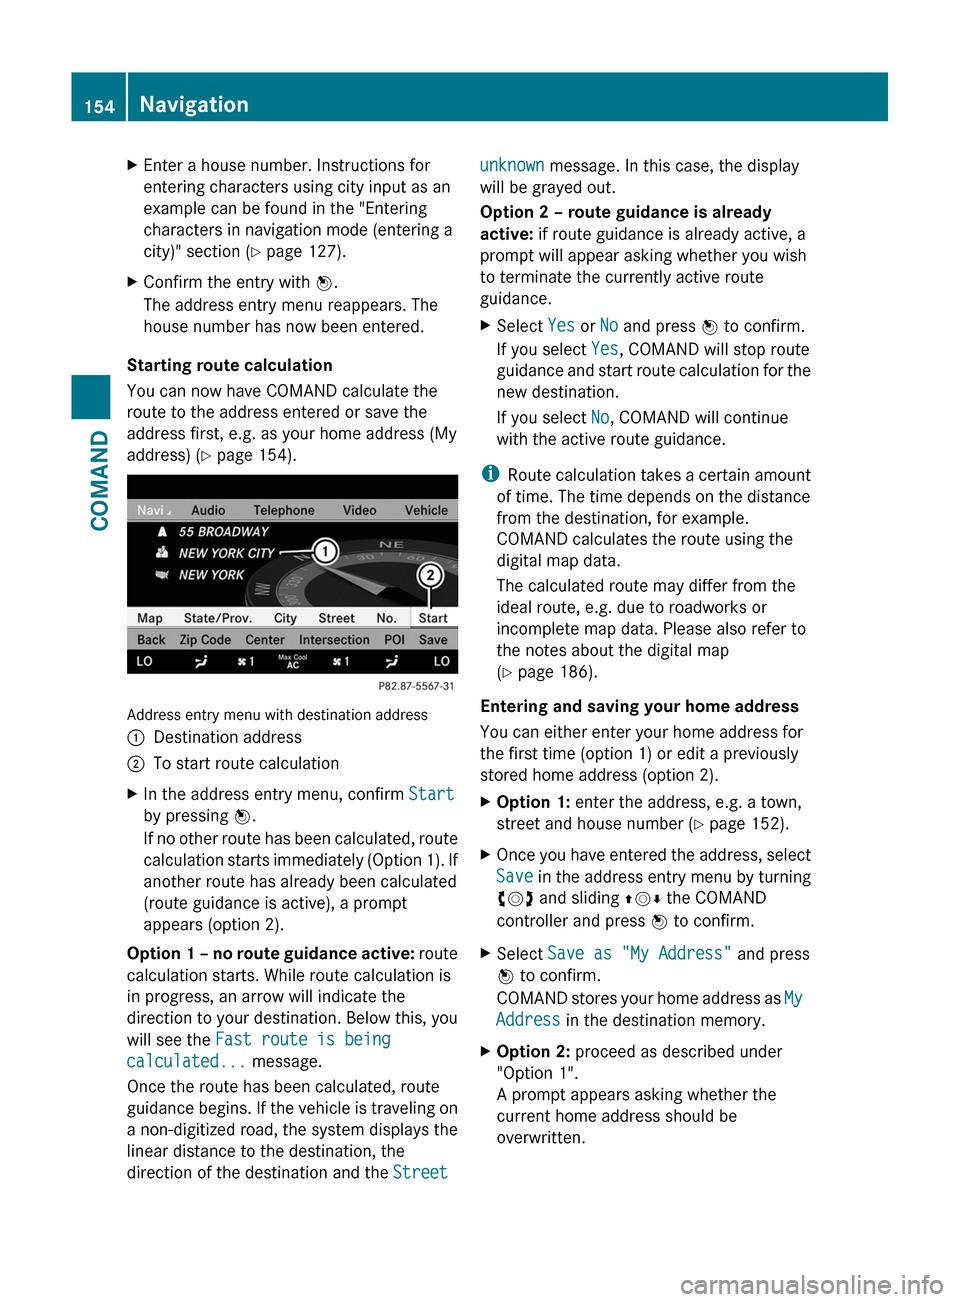
Address entry menu with destination address
:Destination address;To start route calculationXIn the address entry menu, confirm Start
by pressing W.
If no other route has been calculated, route
calculation starts immediately (Option 1). If
another route has already been calculated
(route guidance is active), a prompt
appears (option 2).
Option 1 – no route guidance active: route
calculation starts. While route calculation is
in progress, an arrow will indicate the
direction to your destination. Below this, you
will see the Fast route is being
calculated... message.
Once the route has been calculated, route
guidance begins. If the vehicle is traveling on
a non-digitized road, the system displays the
linear distance to the destination, the
direction of the destination and the Street
unknown message. In this case, the display
will be grayed out.
Option 2 – route guidance is already
active: if route guidance is already active, a
prompt will appear asking whether you wish
to terminate the currently active route
guidance.
XSelect Yes or No and press W to confirm.
If you select Yes, COMAND will stop route
guidance and start route calculation for the
new destination.
If you select No, COMAND will continue
with the active route guidance.
iRoute calculation takes a certain amount
of time. The time depends on the distance
from the destination, for example.
COMAND calculates the route using the
digital map data.
The calculated route may differ from the
ideal route, e.g. due to roadworks or
incomplete map data. Please also refer to
the notes about the digital map
(Y page 186).
Entering and saving your home address
You can either enter your home address for
the first time (option 1) or edit a previously
stored home address (option 2).
XOption 1: enter the address, e.g. a town,
street and house number (Y page 152).
XOnce you have entered the address, select
Save in the address entry menu by turning
cVd and sliding ZVÆ the COMAND
controller and press W to confirm.
XSelect Save as "My Address" and press
W to confirm.
COMAND stores your home address as My
Address in the destination memory.
XOption 2: proceed as described under
"Option 1".
A prompt appears asking whether the
current home address should be
overwritten.
154NavigationCOMAND
Page 177 of 524

4Report 1 of 8 for the road affected5Last exit/intersection before the affected
route section starts
6Text of reportCFirst exit/intersection after the affected
route section ends
XTo scroll within a report or to access
the next report: turn cVd the COMAND
controller.
XTo return to the list of messages: press
W or slide XVY the COMAND controller.
Read-aloud function
The read-aloud function is only available
when route guidance is active. You can set
the language (Y page 148) and the text reader
speed (Y page 143).
XTo switch on navigation mode: press the
S function button once or twice.
XTo show the menu: press the COMAND
controller W.
XSelect TMC in the navigation system menu
bar by turning cVd the COMAND
controller and press W to confirm.
XSelect Read Aloud All Messages on
Route and press W to confirm.
COMAND reads out the messages in
sequence.
iThe Read Aloud All Messages on
Route menu item has no function if there
are no reports relating to the route.
XTo end the read-aloud function: select
Cancel Read-aloud Function and press
W to confirm.
or
XPress the 8 button briefly.
The read-aloud function automatically
interrupts COMAND as it recalculates the
route following a new traffic
announcement.
Destination memory
Home address (My address)
Entering the home address via address
entry
XEnter the home address as a destination,
e.g. as a city, street and house number
(Y page 151). Then, save the home address
without starting route guidance
(Y page 154).
Adopting an address book entry as a
home address
XTo switch on navigation mode: press the
S function button once or twice.
XTo show the menu: press the COMAND
controller W.
XSelect Destination in the navigation
menu bar by turning cVd the COMAND
controller and press W to confirm.
XSelect From Memory and press W to
confirm.
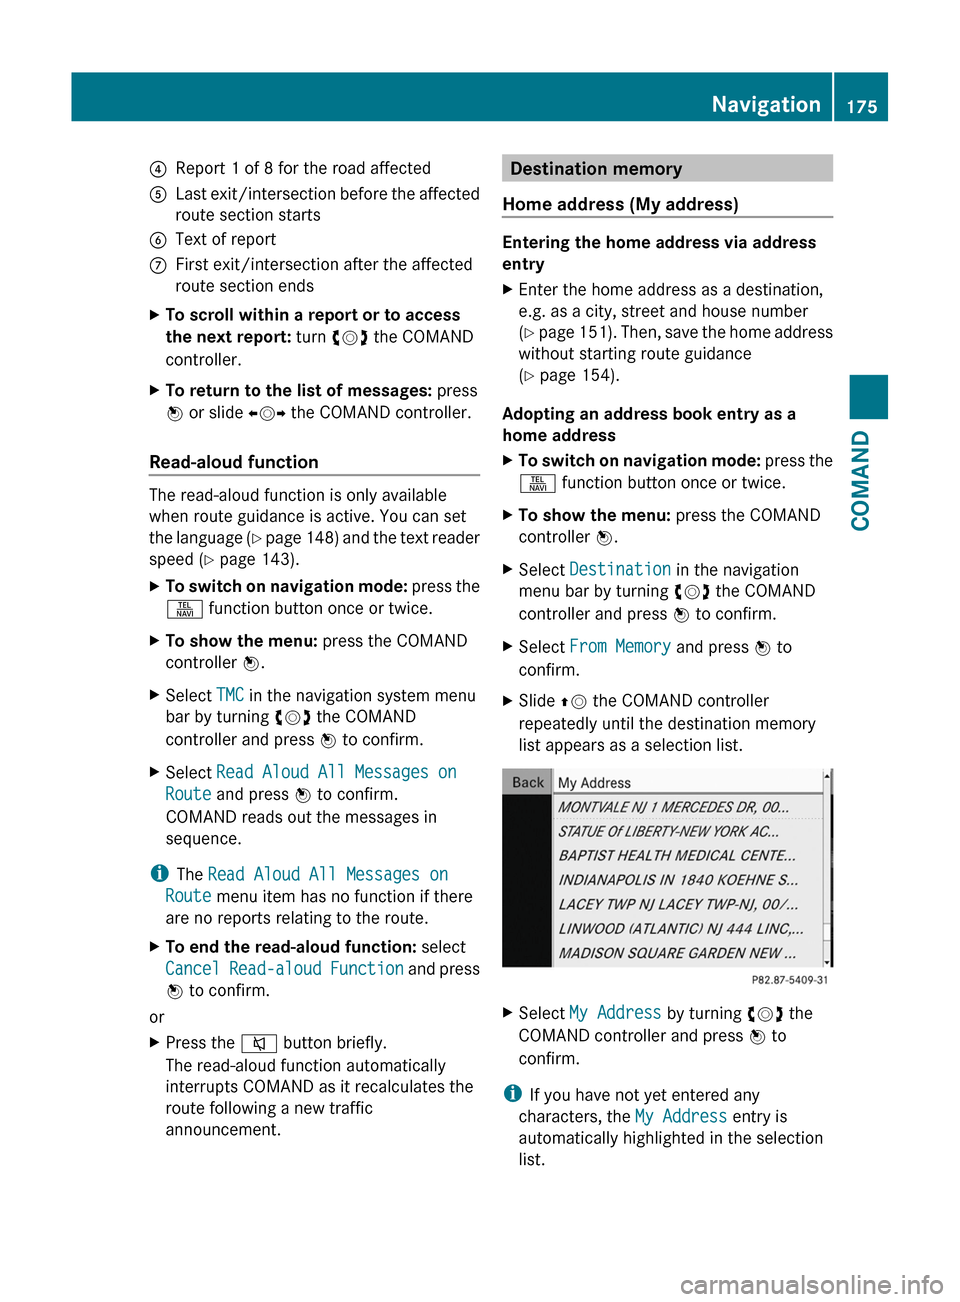
XSlide ZV the COMAND controller
repeatedly until the destination memory
list appears as a selection list.
XSelect My Address by turning cVd the
COMAND controller and press W to
confirm.
iIf you have not yet entered any
characters, the My Address entry is
automatically highlighted in the selection
list.
Navigation175COMANDZ
Page 178 of 524

If no home address has been stored yet, you
can now assign an address book entry. If a
home address already exists, it is displayed
and you can alter it.
i If you select New Entry, you are also
offered the option of entering the home
address for the first time. You can then
save the home address without starting
route guidance.XTo enter the home address for the first
time: select Assign Address Book
Entry and press W to confirm.XSelect Home or Work and press W to
confirm.XTo change the home address: select
Change and press W to confirm.XSelect Assign Address Book Entry and
press W to confirm.
i
If you select New Entry, you are also
offered the option of changing the home
address by entering an address. You can
then save the home address without having
to start route guidance.
XSelect Home or Work and press W to
confirm.
In both cases, you will see the address book
either with the character bar or as a
selection list.XTo select an address book entry:
proceed as described in the "Searching for
an address book entry" section
( Y page 201).XTo confirm the selection: press W the
COMAND controller.
If no home address has been stored,
COMAND saves the entry. You will see a
message and then the address menu with
the selected address. Start is highlighted
automatically.
If a home address has already been stored,
you will see a prompt asking you whether
the My Address entry should be
overwritten.XSelect Yes or No and press W to confirm.
If you select Yes, COMAND overwrites the
destination. You will see a message and
then the address menu with the selected
address. Start is highlighted
automatically.
If you select No, the list will reappear.
Selecting the home address for route
guidance
XProceed as described in the "Selecting a
destination from the destination memory"
section ( Y page 156).
Saving a destination in the destination
memory
Note
This function also stores the destination in
the address book.
After destination entry
XThe destination has been entered and is
shown in the address entry menu
( Y page 154).XSelect Save by sliding VÆ and turning
cVd the COMAND controller and press
W to confirm.
You can now select storage options
( Y page 177).
During route guidance
XTo show the menu: press W the COMAND
controller.XSelect Destination in the navigation
menu bar by turning cVd the COMAND
controller and press W to confirm.XSelect Save Destination and press W to
confirm.
You can now select storage options
( Y page 177).
From the list of previous destinations
XTo show the menu: press W the COMAND
controller.176NavigationCOMAND