2011 MERCEDES-BENZ S-Class Video in
[x] Cancel search: Video inPage 121 of 524

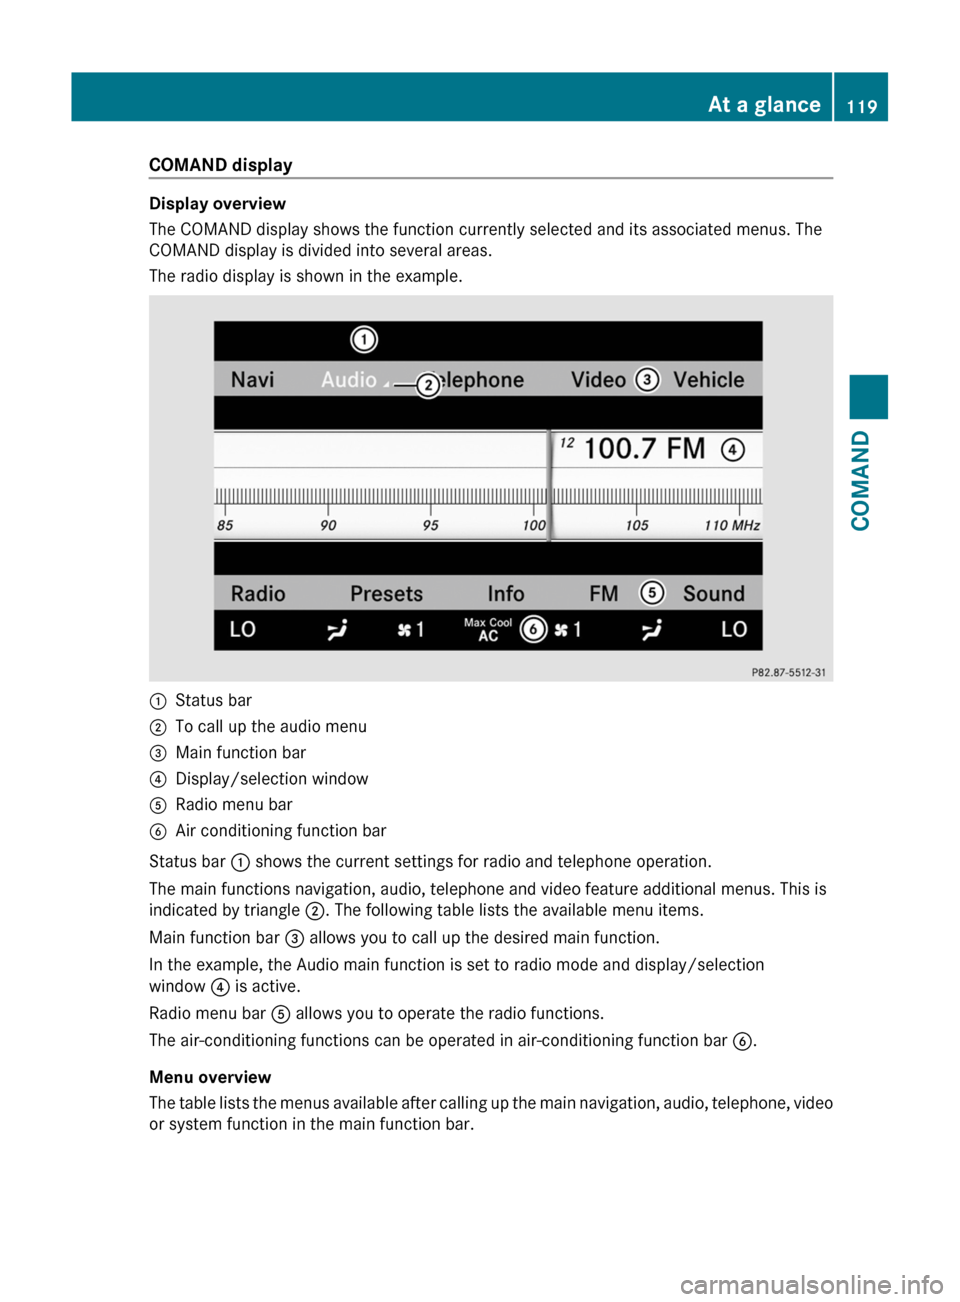
COMAND display
Display overview
The COMAND display shows the function currently selected and its associated menus. The
COMAND display is divided into several areas.
The radio display is shown in the example.
:Status bar;To call up the audio menu=Main function bar?Display/selection windowARadio menu barBAir conditioning function bar
Status bar : shows the current settings for radio and telephone operation.
The main functions navigation, audio, telephone and video feature additional menus. This is
indicated by triangle ;. The following table lists the available menu items.
Main function bar = allows you to call up the desired main function.
In the example, the Audio main function is set to radio mode and display/selection
window ? is active.
Radio menu bar A allows you to operate the radio functions.
The air-conditioning functions can be operated in air-conditioning function bar B.
Menu overview
The table lists the menus available after calling up the main navigation, audio, telephone, video
or system function in the main function bar.
At a glance119COMANDZ
Page 122 of 524

NaviAudioTelephoneVideoVehicleModeFM/AM radioVideo DVDECOMap orientationSatRadioAUXMulticontour
seat/lumbar
settingsPoint of interest
symbols on the mapDiscVideo offRear window
blindRoad signs on the
mapMemory cardEASY-ENTRY/
EXIT systemText information on
mapMUSIC
REGISTERExterior
lighting
delayed
switch-off timeO Speed Limit AssistMedia
InterfaceInterior
lighting
delayed
switch-offO Topographical
mapUSBAmbient
lightingO City viewRearO Automatic
mirror fold-in
functionO Freeway
informationAUXO Locator
lightingO Audio fadeoutAudio offO Automatic
lockingSIRIUS serviceO Interior
motion sensorMap versionO Tow-away
protectionO Trunk lid
opening height
restrictionSPLITVIEW
SPLITVIEW allows the driver and front
passenger to use separate COMAND
functions at the same time. Depending on the
viewing angle of the display (from the driver's
seat or from the front passenger seat), you
will see two different displays.
For example, the "Navi" function can be
viewed from the driver's side while the video120At a glanceCOMAND
Page 123 of 524

DVD function can be viewed from the front
passenger side.
Use the SPLITVIEW remote control to operate
COMAND from the front passenger side.
Points to remember:
RYour vehicle may be equipped with
SPLITVIEW. The use of SPLITVIEW is
currently not permitted in the following
states: AL, CO, IL, LA, MA, MD, NH, PA, VA,
VT, WA, WI, and WV as well as in the
Canadian provinces Manitoba,
Newfoundland, New Brunswick, and Prince
Edward Island. The driver is responsible for
complying with ALL regional laws. If your
vehicle is registered in a state or province
where SPLITVIEW is not permitted, this
function must be deactivated. Please
consult an authorized Mercedes-Benz
center to verify if the use of SPLITVIEW is
permitted in your state/province.
RThe SPLITVIEW remote control can be used
to adjust the volume of the front-passenger
side headphones. Before putting on the
headphones, make certain that the volume
has not been set too high.
RYou can only use media from the driver's
and front-passenger sides separately if the
media are from different sources. Example:
on the driver's side, an audio CD is being
played on the DVD changer. This means
that on the front-passenger side, the DVD
changer cannot be used to play a different
medium, for instance a video DVD.
However, other media can be used at the
same time on the front-passenger side,
including radio, memory card, MUSIC
REGISTER, Media Interface, USB or AUX.
RIf you use the same medium on both sides,
you can both carry out the respective
settings.
RThere must be clear line of sight between
the headphones and the display so that
COMAND can optimally transmit music and
speech via the infrared signal on the front-
passenger's headphones. For this reason,
please also observe that the headphones
have left and right sides, and use them
correctly.
RUsing SPLITVIEW you can only use
entertainment functions separately, such
as audio and video functions.
RThe multifunction steering wheel can only
used for functions which relate to the
driver's side.
Switching SPLITVIEW on/off
XTo switch on SPLITVIEW: select
Vehicle from the main function bar by
turning cVd the COMAND controller and
press W to confirm.
The "Vehicle" menu appears.
XSelect SPLITVIEW on.
SPLITVIEW symbol : appears in the
display, and display ; switches to
SPLITVIEW off.
XTo switch off SPLITVIEW: select
Vehicle from the main function bar by
turning cVd the COMAND controller and
press W to confirm.
The "Vehicle" menu appears.
XSelect SPLITVIEW off.
Display ; switches to SPLITVIEW on.
iIf COMAND has already been switched
on, you can also use the remote control to
switch SPLITVIEW on and off
(Y page 123).
The SPLITVIEW screen remains on for
approximately 30 minutes after the key has
been turned to position 0 in the ignition lock.
After this time or after the key has been
At a glance121COMANDZ
Page 126 of 524

ECOMAND: e.g. to select a station from
presets, select a track, enter directly,
enter a phone number. Rear Seat
Entertainment System: to select a
track, enter directlyFTo leave the menu (back)XPoint the remote control at the
corresponding screen and execute the
functions by pressing the corresponding
button.
i The remote control's function may be
restricted depending on the angle at which
it is pointed at the respective screen.
Selecting the screen for the remote
control
XTurn thumbwheel = until the desired
display is highlighted in the window.
Switching the screen on/off (Rear Seat
Entertainment System only)
If the key is in position 0 or 1 in the ignition
lock (see vehicle Operator's Manual), or the
key is not inserted, the screens in the rear will
switch off after 30 minutes. Before the
screens switch off, they show a message to
this effect.
You can switch the screens back on,
However, this will discharge the starter
battery.
XPoint the remote control at the rear-
compartment screen which has been
selected for remote operation.XPress button : on the remote control.
The respective rear screen switches on or
off.
i You can only switch the screens on using
the remote control if the ignition is
switched on.
Switching button lighting on/offXPress button ; on the remote control.
Depending on the previous status, the
button lighting is switched on or off.
i If you do not use the remote control for
about 15 seconds, the button lighting
switches off automatically.
Mute
XPress button B on the remote control.
The sound is switched on/off.
Adjusting the volume
This function is available for COMAND and for
the Rear Seat Entertainment System in
conjunction with corded headphones.
XPress one of buttons C on the remote
control.
The volume of the currently selected audio
or video source changes.
For COMAND, you can also adjust the
volume for phone calls and navigation
announcements.
Selecting a menu/menu item and
confirming your selection
XSelect a menu/menu item using the
=;9: buttons and press
the 9 button to confirm.124At a glanceCOMAND
Page 127 of 524

Functions of the E and F button
You can use the remote control to execute the same functions as the COMAND control panel.
ModeFunctionAudio modeSelecting a station using the station search function (Y page 209)Selecting a track by skipping to a track (Y page 221)Fast forward/rewind (Y page 222)Video modeSelecting a scene or chapter (video DVD mode) (Y page 239)Fast forward/rewind (video DVD mode) (Y page 238)
Functions of the number pad
You can use the remote control to execute the same functions as the COMAND control panel.
ModeFunctionAudio modeSelecting channels via the channel presets (Y page 209)Setting stations by entering the frequency manually (Y page 209)Storing channels manually (Y page 210)Selecting a track (Y page 221)Selecting a data medium via the media list (Y page 221)Telephone modeTelephone number entry (Y page 197)Character entryEntering characters (direct entry) (Y page 128)Operating COMAND
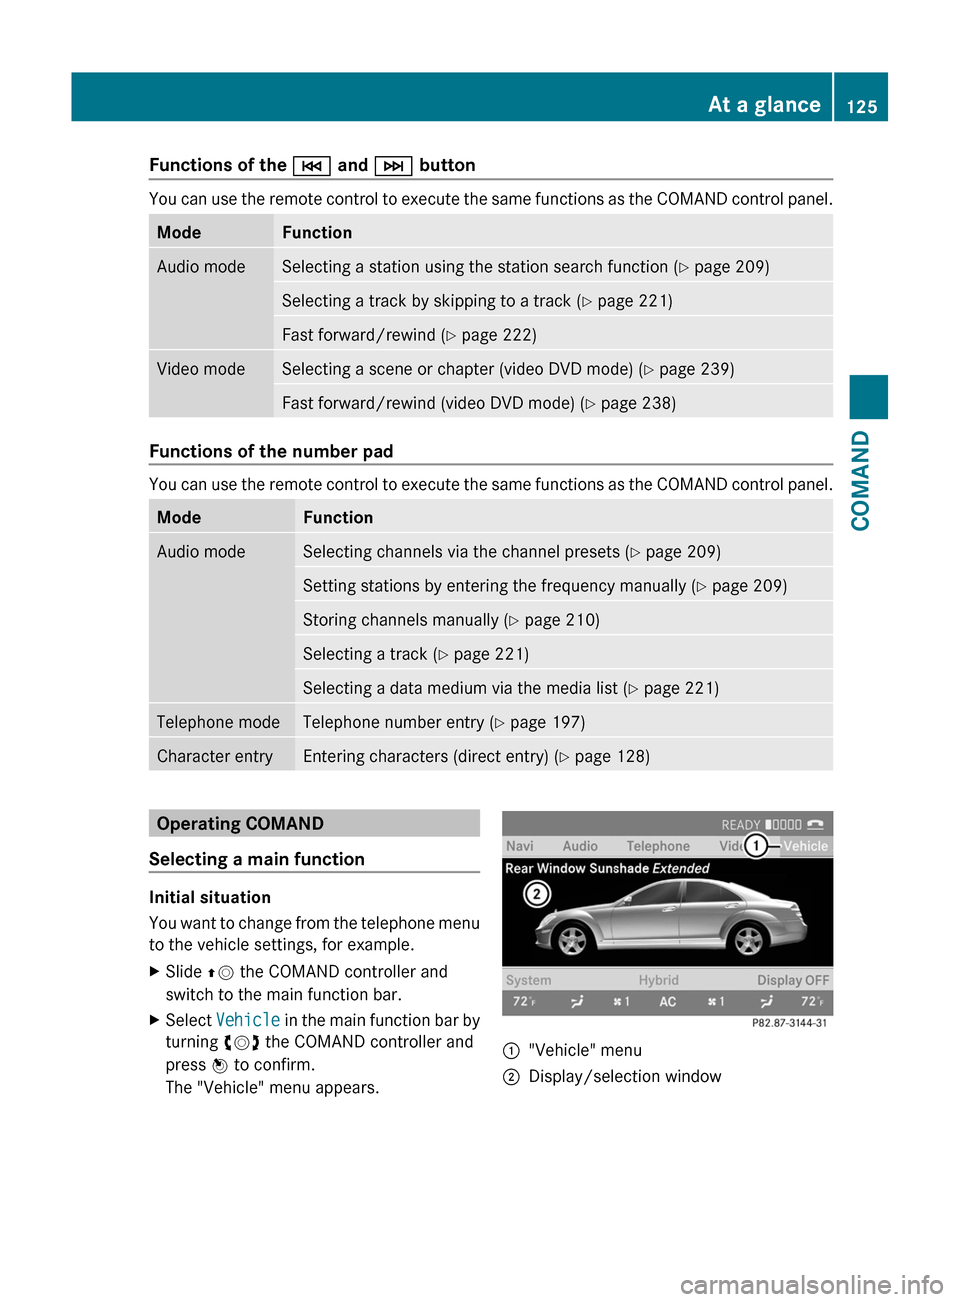
Selecting a main function
Initial situation
You want to change from the telephone menu
to the vehicle settings, for example.
XSlide ZV the COMAND controller and
switch to the main function bar.
XSelect Vehicle in the main function bar by
turning cVd the COMAND controller and
press W to confirm.
The "Vehicle" menu appears.
:"Vehicle" menu;Display/selection windowAt a glance125COMANDZ
Page 128 of 524

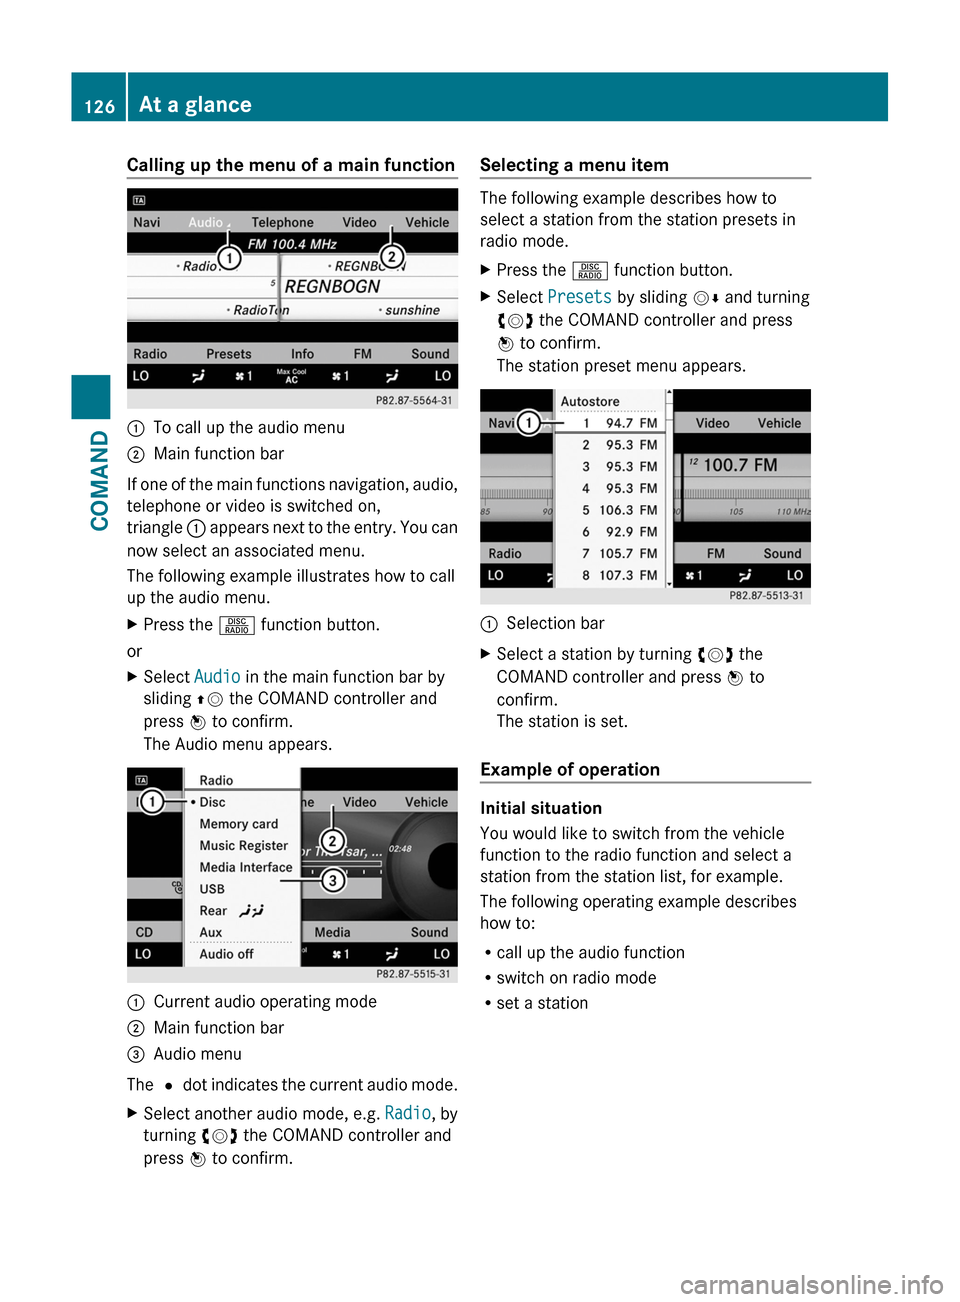
Calling up the menu of a main function:To call up the audio menu;Main function bar
If one of the main functions navigation, audio,
telephone or video is switched on,
triangle : appears next to the entry. You can
now select an associated menu.
The following example illustrates how to call
up the audio menu.
XPress the R function button.
or
XSelect Audio in the main function bar by
sliding ZV the COMAND controller and
press W to confirm.
The Audio menu appears.
:Current audio operating mode;Main function bar=Audio menu
The # dot indicates the current audio mode.
XSelect another audio mode, e.g. Radio, by
turning cVd the COMAND controller and
press W to confirm.
Selecting a menu item
The following example describes how to
select a station from the station presets in
radio mode.
XPress the R function button.XSelect Presets by sliding VÆ and turning
cVd the COMAND controller and press
W to confirm.
The station preset menu appears.
:Selection barXSelect a station by turning cVd the
COMAND controller and press W to
confirm.
The station is set.
Example of operation
Initial situation
You would like to switch from the vehicle
function to the radio function and select a
station from the station list, for example.
The following operating example describes
how to:
Rcall up the audio function
Rswitch on radio mode
Rset a station
126At a glanceCOMAND
Page 133 of 524

Option 1XSelect 4 or 5 in the character bar and
press W to confirm.
The input menu shows the data field
selected.
:Cursor in next data field;To store an entry=4 and 5 icons to select a data field
Option 2
XSlide ZV the COMAND controller
repeatedly until the character bar
disappears.
XSelect the data field by sliding ZVÆ and
press W to confirm.
Storing an entry
XSelect ¬ in the character bar by turning
cVd the COMAND controller and press
W to confirm.
The entry is stored in the address book.
Further functions available in the
character bar
XTo switch the character bar to upper/
lower-case characters: select * or
E and press W to confirm.
XTo switch the character set: select
p and press W to confirm.
The character set switches between
upper/lower-case letters and digits.
XTo change the language of the
character bar: select B and press W
to confirm.
XSelect the language by turning cVd the
COMAND controller and press W to
confirm.
XTo reposition the cursor within the data
field: select 2 or 3 and press W to
confirm.
:Cursor (repositioned);2 and 3 icon to reposition the cursorXDelete the character/entry (Y page 129).
Basic functions of COMAND
Switching COMAND on/off
XPress the u function button on the
center console.
iIf you switch off COMAND, playback of
the current audio or video source will also
be switched off. You cannot switch off
COMAND while making a call via COMAND.
You can also make phone calls using the
buttons on the multifunction steering
wheel when COMAND is switched off
(Y page 365).
At a glance131COMANDZ
Page 134 of 524

Mute
Switching audio and video sources on/off
XPress the 8 button on the multifunction
steering wheel.
The sound from the respective audio or
video source is switched on or muted.
iWhen the sound is off, the system
displays the , symbol in the status line.
When you change the audio or video
source, or adjust the volume, the sound
automatically switches on again.
iEven if the sound is switched off, you will
still hear traffic and navigation system
announcements.
Switching off Traffic program and
navigation announcements completely
XTraffic program: press and hold the
8 button until the . display
disappears from the status bar of the
display.
A confirmation tone sounds.
XNavigation announcements: during an
announcement, press the 8 button on
the multifunction steering wheel.
Switching Traffic program and navigation
announcements on again
XTraffic program: press and hold down the
8 button until the . display in the
status bar appears.
A confirmation tone sounds.
XNavigation announcements: press the
8 button again.
iThe navigation announcements are
activated again if you switch COMAND off
and on again or start a new route guidance.
Adjusting the volume
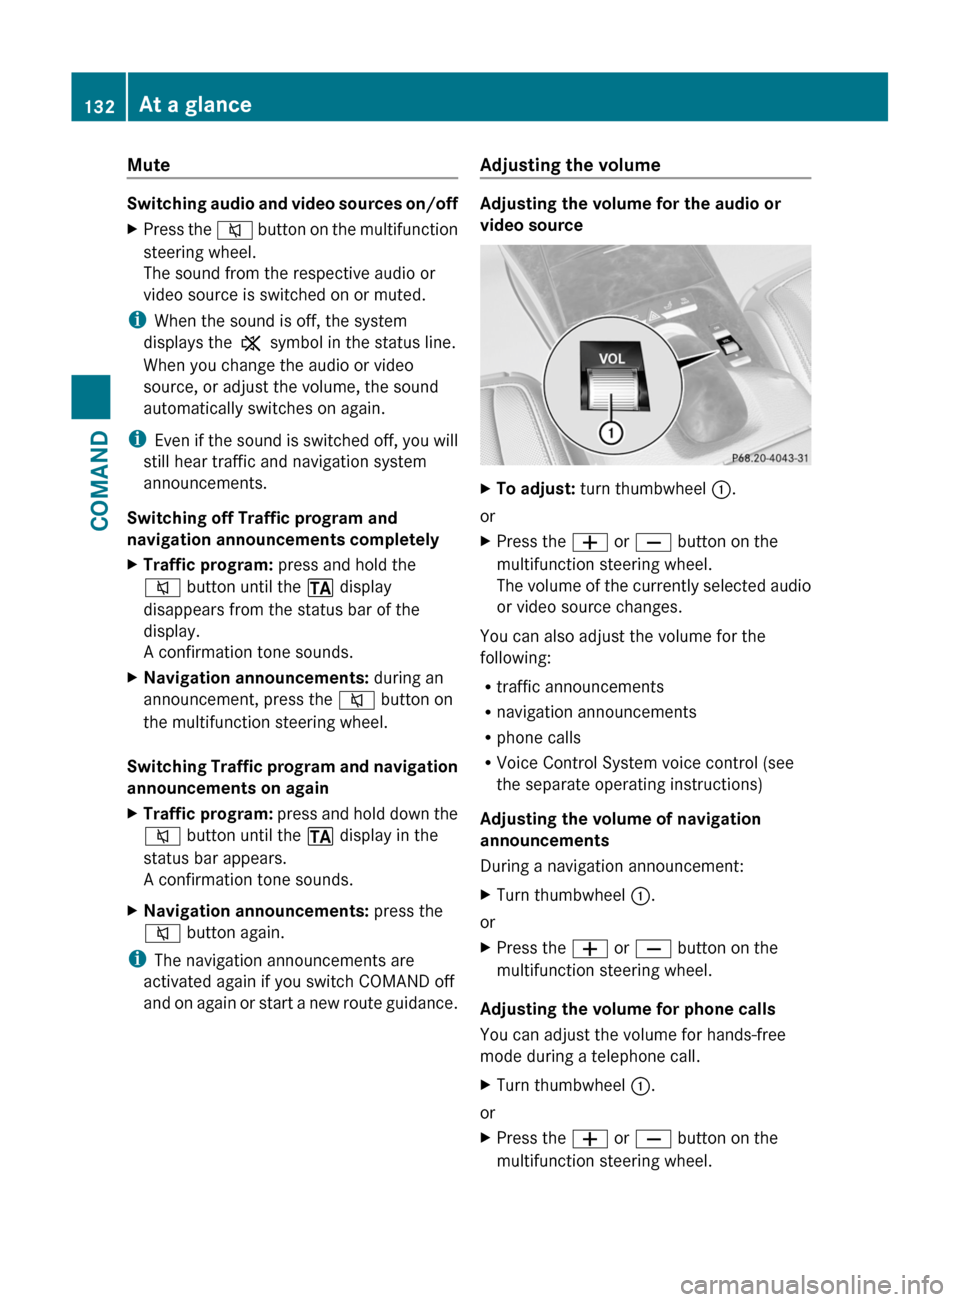
Adjusting the volume for the audio or
video source
XTo adjust: turn thumbwheel :.
or
XPress the W or X button on the
multifunction steering wheel.
The volume of the currently selected audio
or video source changes.
You can also adjust the volume for the
following:
Rtraffic announcements
Rnavigation announcements
Rphone calls
RVoice Control System voice control (see
the separate operating instructions)
Adjusting the volume of navigation
announcements
During a navigation announcement:
XTurn thumbwheel :.
or
XPress the W or X button on the
multifunction steering wheel.
Adjusting the volume for phone calls
You can adjust the volume for hands-free
mode during a telephone call.
XTurn thumbwheel :.
or
XPress the W or X button on the
multifunction steering wheel.
132At a glanceCOMAND