2011 MERCEDES-BENZ S-Class ADJUSTING THE HEAD
[x] Cancel search: ADJUSTING THE HEADPage 105 of 524

:Seat cushion angle;Backrest angle=To fold the head restraint up or back?Head restraint angleASeat fore-and-aft adjustment
Adjusting the front-passenger seat
from the driver’s seat
GWarning!
When adjusting the front passenger seat,
make sure the seat, if occupied, is as far from
the front passenger front air bag as possible.
Otherwise, the passenger could be seriously
or even fatally injured in the event of an
accident or braking maneuver.
Make sure no one is caught or injured while
the seat is being adjusted.
Even with the SmartKey or SmartKey with
KEYLESS-GO removed from the starter switch
or the SmartKey with KEYLESS-GO removed
from the vehicle, the power seats can be
operated. Therefore, do not leave children
unattended in the vehicle, or with access to
an unlocked vehicle. A child’s unsupervised
access to a vehicle could result in an accident
and/or serious personal injury.
! Do not move the front-passenger seat
fully forwards if there are objects in the
parcel net in the front-passenger footwell.
The objects could otherwise be damaged.
You can use the seat switches on the driver's
side to adjust the front-passenger seat.
XTo activate/deactivate: press button :.
If the indicator lamp in button : is lit, you
can access the following functions for the
front-passenger seat:
Rseat adjustment
Rseat heating/ventilation
Rmemory function
Adjusting the front-passenger seat
from the rear
GWarning!
When adjusting the front passenger seat,
make sure the seat, if occupied, is as far from
the front passenger front air bag as possible.
Otherwise, the passenger could be seriously
or even fatally injured in the event of an
accident or braking maneuver.
Make sure no one is caught or injured while
the seat is being adjusted.
Even with the SmartKey or SmartKey with
KEYLESS-GO removed from the starter switch
or the SmartKey with KEYLESS-GO removed
from the vehicle, the power seats can be
operated. Therefore, do not leave children
unattended in the vehicle, or with access to
an unlocked vehicle. A child’s unsupervised
access to a vehicle could result in an accident
and/or serious personal injury.
! Do not move the front-passenger seat
fully forwards if there are objects in the
parcel net in the front-passenger footwell.
The objects could otherwise be damaged.
Seats103Seats, steering wheel and mirrorsZ
Page 106 of 524

You can use the override button to disable
this function (Y page 65).
The button is located in the rear door on the
front-passenger side.
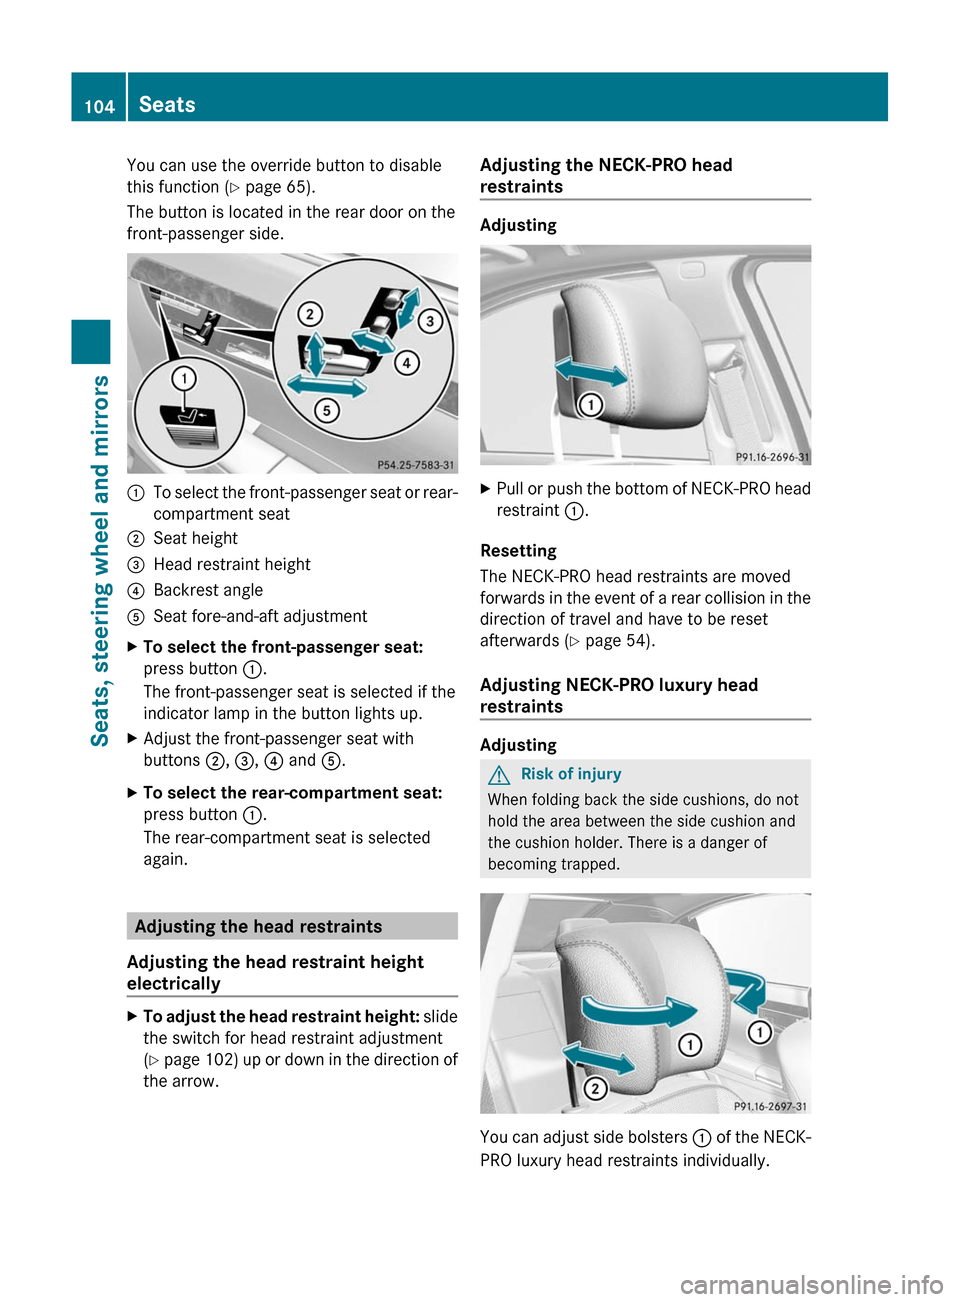
:To select the front-passenger seat or rear-
compartment seat
;Seat height=Head restraint height?Backrest angleASeat fore-and-aft adjustmentXTo select the front-passenger seat:
press button :.
The front-passenger seat is selected if the
indicator lamp in the button lights up.
XAdjust the front-passenger seat with
buttons ;, =, ? and A.
XTo select the rear-compartment seat:
press button :.
The rear-compartment seat is selected
again.
Adjusting the head restraints
Adjusting the head restraint height
electrically
XTo adjust the head restraint height: slide
the switch for head restraint adjustment
(Y page 102) up or down in the direction of
the arrow.
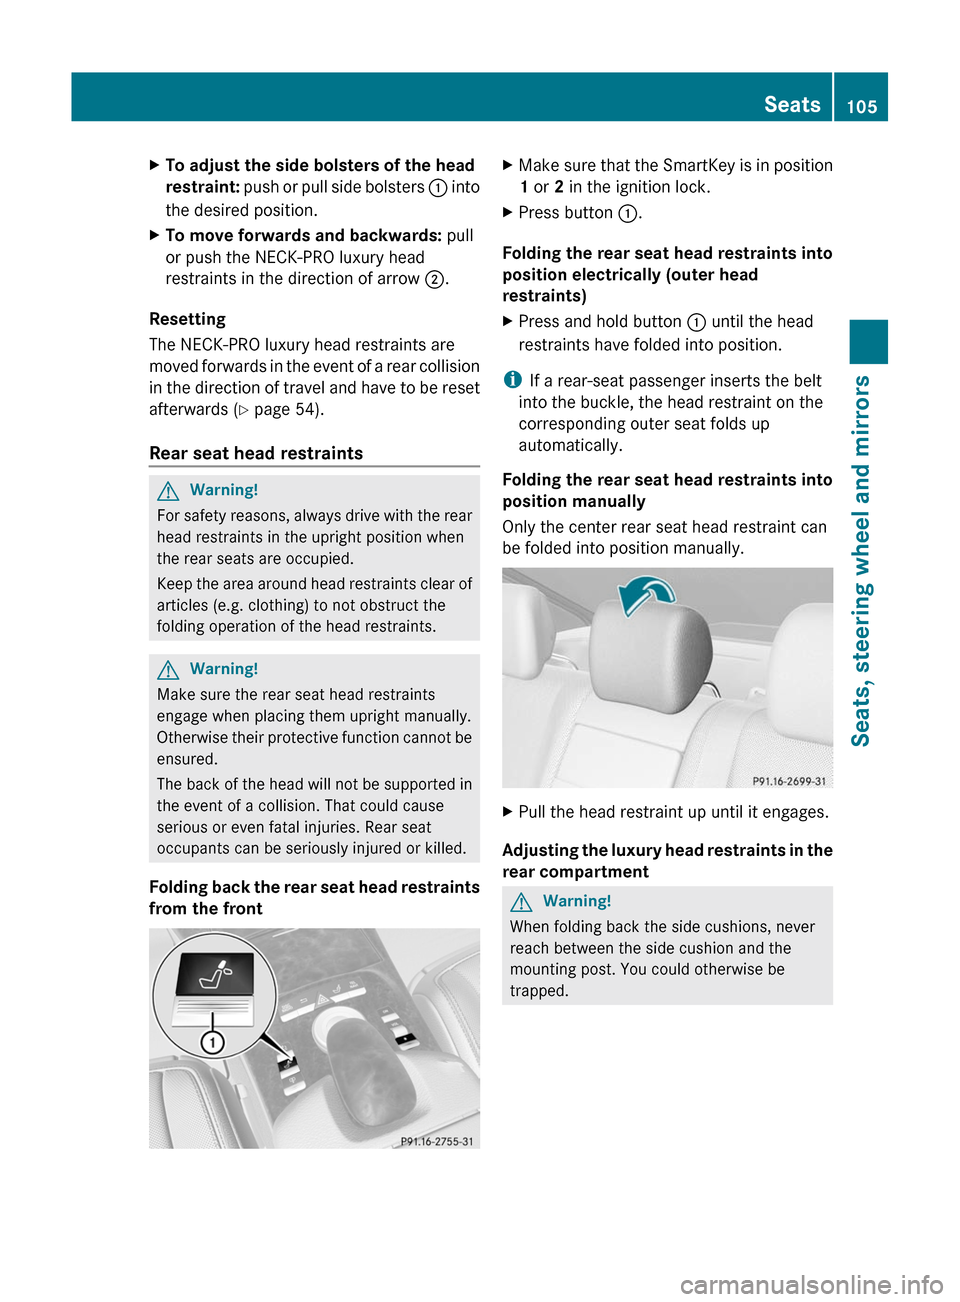
Adjusting the NECK-PRO head
restraints
Adjusting
XPull or push the bottom of NECK-PRO head
restraint :.
Resetting
The NECK-PRO head restraints are moved
forwards in the event of a rear collision in the
direction of travel and have to be reset
afterwards (Y page 54).
Adjusting NECK-PRO luxury head
restraints
Adjusting
GRisk of injury
When folding back the side cushions, do not
hold the area between the side cushion and
the cushion holder. There is a danger of
becoming trapped.
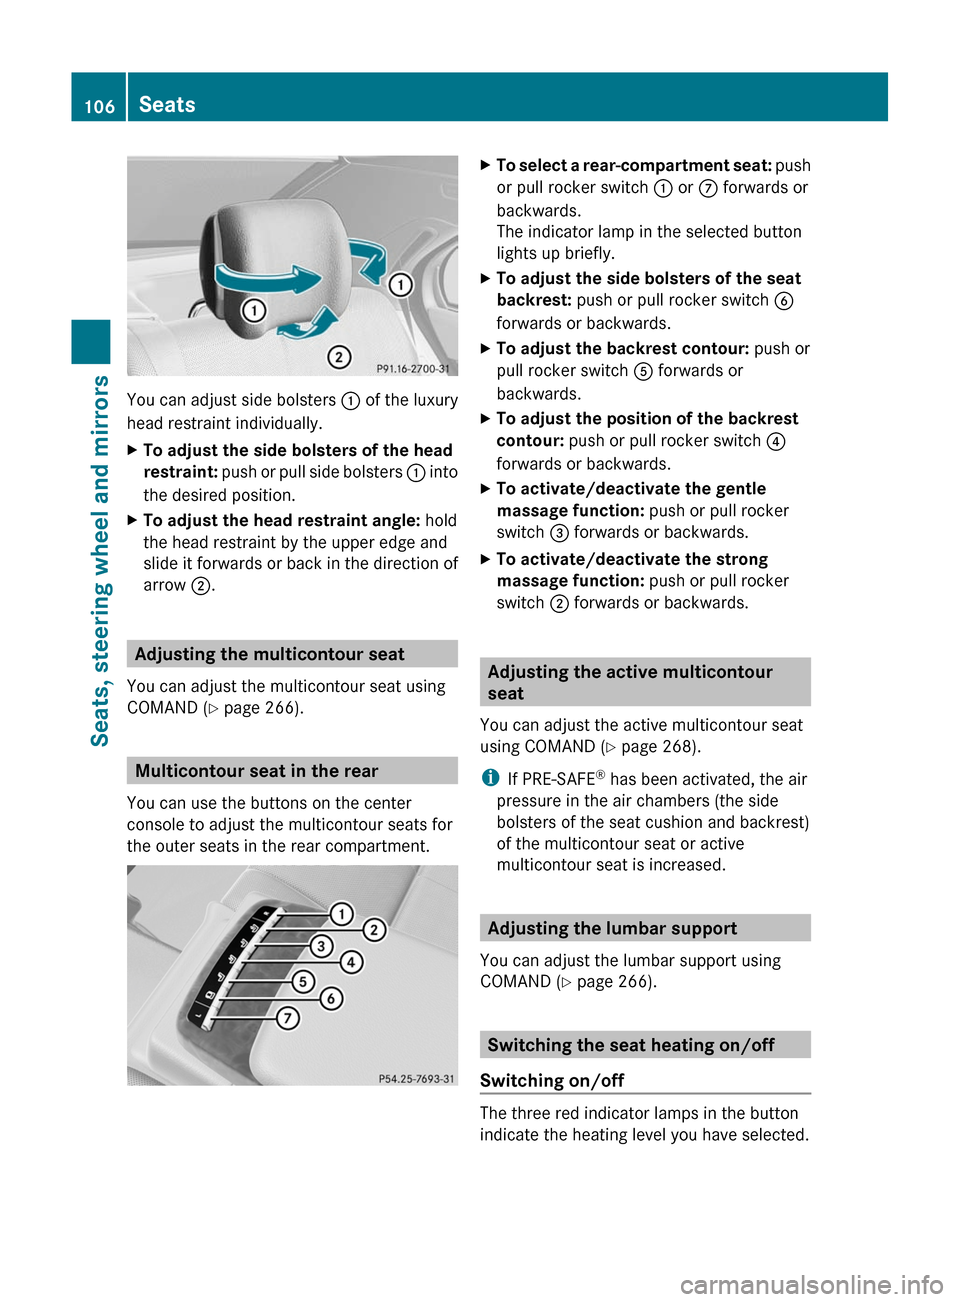
You can adjust side bolsters : of the NECK-
PRO luxury head restraints individually.
104SeatsSeats, steering wheel and mirrors
Page 107 of 524

XTo adjust the side bolsters of the head
restraint: push or pull side bolsters : into
the desired position.
XTo move forwards and backwards: pull
or push the NECK-PRO luxury head
restraints in the direction of arrow ;.
Resetting
The NECK-PRO luxury head restraints are
moved forwards in the event of a rear collision
in the direction of travel and have to be reset
afterwards (Y page 54).
Rear seat head restraints
GWarning!
For safety reasons, always drive with the rear
head restraints in the upright position when
the rear seats are occupied.
Keep the area around head restraints clear of
articles (e.g. clothing) to not obstruct the
folding operation of the head restraints.
GWarning!
Make sure the rear seat head restraints
engage when placing them upright manually.
Otherwise their protective function cannot be
ensured.
The back of the head will not be supported in
the event of a collision. That could cause
serious or even fatal injuries. Rear seat
occupants can be seriously injured or killed.
Folding back the rear seat head restraints
from the front
XMake sure that the SmartKey is in position
1 or 2 in the ignition lock.
XPress button :.
Folding the rear seat head restraints into
position electrically (outer head
restraints)
XPress and hold button : until the head
restraints have folded into position.
iIf a rear-seat passenger inserts the belt
into the buckle, the head restraint on the
corresponding outer seat folds up
automatically.
Folding the rear seat head restraints into
position manually
Only the center rear seat head restraint can
be folded into position manually.
XPull the head restraint up until it engages.
Adjusting the luxury head restraints in the
rear compartment
GWarning!
When folding back the side cushions, never
reach between the side cushion and the
mounting post. You could otherwise be
trapped.
Seats105Seats, steering wheel and mirrorsZ
Page 108 of 524

You can adjust side bolsters : of the luxury
head restraint individually.
XTo adjust the side bolsters of the head
restraint: push or pull side bolsters : into
the desired position.
XTo adjust the head restraint angle: hold
the head restraint by the upper edge and
slide it forwards or back in the direction of
arrow ;.
Adjusting the multicontour seat
You can adjust the multicontour seat using
COMAND (Y page 266).
Multicontour seat in the rear
You can use the buttons on the center
console to adjust the multicontour seats for
the outer seats in the rear compartment.
XTo select a rear-compartment seat: push
or pull rocker switch : or C forwards or
backwards.
The indicator lamp in the selected button
lights up briefly.
XTo adjust the side bolsters of the seat
backrest: push or pull rocker switch B
forwards or backwards.
XTo adjust the backrest contour: push or
pull rocker switch A forwards or
backwards.
XTo adjust the position of the backrest
contour: push or pull rocker switch ?
forwards or backwards.
XTo activate/deactivate the gentle
massage function: push or pull rocker
switch = forwards or backwards.
XTo activate/deactivate the strong
massage function: push or pull rocker
switch ; forwards or backwards.
Adjusting the active multicontour
seat
You can adjust the active multicontour seat
using COMAND (Y page 268).
iIf PRE-SAFE® has been activated, the air
pressure in the air chambers (the side
bolsters of the seat cushion and backrest)
of the multicontour seat or active
multicontour seat is increased.
Adjusting the lumbar support
You can adjust the lumbar support using
COMAND (Y page 266).
Switching the seat heating on/off
Switching on/off
The three red indicator lamps in the button
indicate the heating level you have selected.
106SeatsSeats, steering wheel and mirrors
Page 126 of 524

ECOMAND: e.g. to select a station from
presets, select a track, enter directly,
enter a phone number. Rear Seat
Entertainment System: to select a
track, enter directlyFTo leave the menu (back)XPoint the remote control at the
corresponding screen and execute the
functions by pressing the corresponding
button.
i The remote control's function may be
restricted depending on the angle at which
it is pointed at the respective screen.
Selecting the screen for the remote
control
XTurn thumbwheel = until the desired
display is highlighted in the window.
Switching the screen on/off (Rear Seat
Entertainment System only)
If the key is in position 0 or 1 in the ignition
lock (see vehicle Operator's Manual), or the
key is not inserted, the screens in the rear will
switch off after 30 minutes. Before the
screens switch off, they show a message to
this effect.
You can switch the screens back on,
However, this will discharge the starter
battery.
XPoint the remote control at the rear-
compartment screen which has been
selected for remote operation.XPress button : on the remote control.
The respective rear screen switches on or
off.
i You can only switch the screens on using
the remote control if the ignition is
switched on.
Switching button lighting on/offXPress button ; on the remote control.
Depending on the previous status, the
button lighting is switched on or off.
i If you do not use the remote control for
about 15 seconds, the button lighting
switches off automatically.
Mute
XPress button B on the remote control.
The sound is switched on/off.
Adjusting the volume
This function is available for COMAND and for
the Rear Seat Entertainment System in
conjunction with corded headphones.
XPress one of buttons C on the remote
control.
The volume of the currently selected audio
or video source changes.
For COMAND, you can also adjust the
volume for phone calls and navigation
announcements.
Selecting a menu/menu item and
confirming your selection
XSelect a menu/menu item using the
=;9: buttons and press
the 9 button to confirm.124At a glanceCOMAND
Page 142 of 524

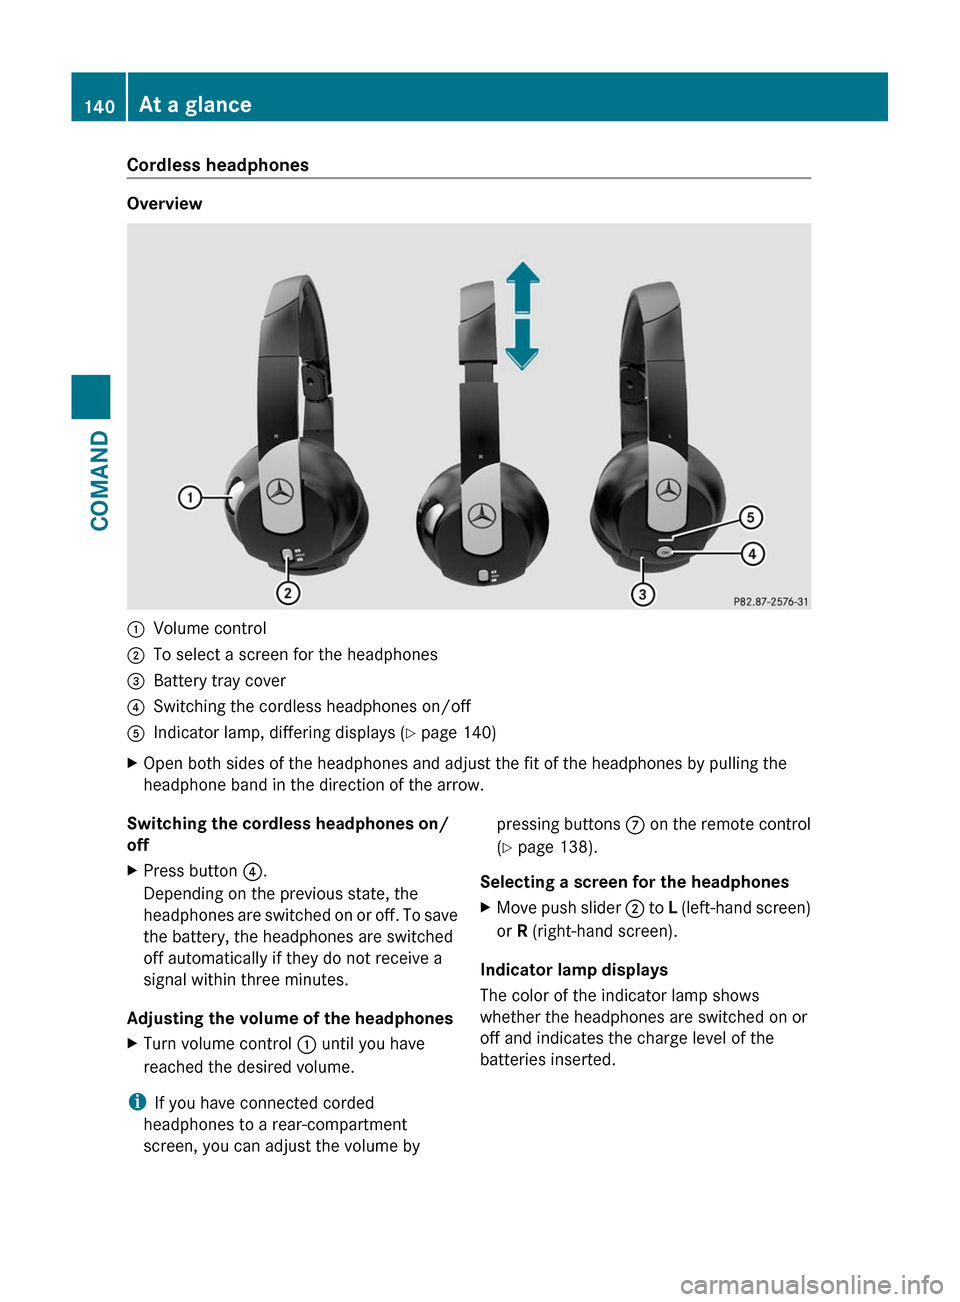
Cordless headphones
Overview
:Volume control;To select a screen for the headphones=Battery tray cover?Switching the cordless headphones on/offAIndicator lamp, differing displays (Y page 140)XOpen both sides of the headphones and adjust the fit of the headphones by pulling the
headphone band in the direction of the arrow.Switching the cordless headphones on/
offXPress button ?.
Depending on the previous state, the
headphones are switched on or off. To save
the battery, the headphones are switched
off automatically if they do not receive a
signal within three minutes.
Adjusting the volume of the headphones
XTurn volume control : until you have
reached the desired volume.
i If you have connected corded
headphones to a rear-compartment
screen, you can adjust the volume by
pressing buttons C on the remote control
( Y page 138).
Selecting a screen for the headphonesXMove push slider ; to L (left-hand screen)
or R (right-hand screen).
Indicator lamp displays
The color of the indicator lamp shows
whether the headphones are switched on or
off and indicates the charge level of the
batteries inserted.
140At a glanceCOMAND
Page 246 of 524

XInsert new batteries. Observe the polarity
marking on the batteries and in the battery
compartment when doing so.
Left-hand battery: the positive pole (+)
must face upwards.
Right-hand battery: the positive pole (+)
must face downwards.
XTo close the battery compartment: first
place battery compartment cover = into
the battery compartment with retaining
lugs ? and allow lug ; to clip into place.
In the wireless headphones
The battery compartment cover is located on
the left headphone.
:Battery compartment cover
The wireless headphones contain 2 type AAA
1.5 V batteries.
XTo open the battery compartment: fold
the battery compartment cover :
upwards. When doing so, hold the left
headphone as shown to prevent the
inserted batteries from falling out.
XRemove the discharged batteries from the
compartment.
XInsert new batteries. Observe the polarity
marking on the batteries and in the battery
compartment when doing so.
Left-hand battery: the positive pole (+)
must face upwards.
Right-hand battery: the positive pole (+)
must face downwards.
XTo close the battery compartment:
press the battery compartment lid
downwards until it clips into place.
If the batteries have been inserted
correctly, the indicator lamp will light up
green when the headphones are switched
on.
Basic functions
Operating with headphones
iVehicles intended for sale in the USA are
equipped with cordless headphones.
Corded headphones are available for the
Canadian market and other markets.
You can use the cordless headphones
supplied and/or up to two sets of corded
headphones connected to the corresponding
jack of the rear-compartment screens
(Y page 137).
Information on:
Rswitching the cordless headphones on/off
Radjusting the volume of the headphones
Rselecting a screen for the headphones
can be found in the "cordless headphones"
section (Y page 140).
Using the main loudspeakers
This function is available in conjunction with
COMAND.
You can use the vehicle loudspeakers to
listen to a disc inserted in the rear-
compartment drive. To do so, at least one of
the rear-compartment screens must be set to
disc mode.
244Rear Seat Entertainment SystemCOMAND
Page 247 of 524

XTo set on COMAND: press the R
function button once or twice to switch on
an audio mode.XSelect Audio by sliding ZV the COMAND
controller and press W to confirm.
The Audio menu appears.XSelect Rear by turning cVd the COMAND
controller and press W to confirm.
i
The headphones' volume setting does not
affect the main loudspeakers.
Adjusting the sound settings
You can select the sound settings in the audio
CD/DVD/MP3, video DVD and AUX modes.
XSwitch on an operating mode (e.g. audio
CD mode) ( Y page 248).XSelect Treble or Bass using
the :=; buttons on the remote
control and press the 9 button to confirm.
An adjustment scale appears.XSelect a setting using the 9:
buttons and press the 9 button to confirm.
Multiple users
Simultaneous use of the rear-
compartment disc drive
The two rear screens can be operated more
or less independently of one another.
However, there can be a conflict in some
menus if the two screens are used
simultaneously.
If the rear-compartment disc drive is being
used for both screens simultaneously,
selecting certain menus or settings on one of
the screens also affects the other screen.
The following functions affect both screens:
R changing playback options
R selecting a track (from a track list or folder)
R using the play, pause and stop functions
R fast forwarding/rewinding or scrolling
R calling up the DVD menu and navigating
within it
R setting the language, subtitles and camera
angle
R calling up interactive DVD content
The following functions affect only one
screen:
R audio and video functions as well as picture
settings
R switching between full screen and the
menu
Switching between operating modes
When you exit an operating mode (e.g. audio
CD mode), the current setting is saved. If you
call up this operating mode again later, there
are two possibilities:
R the operating mode has been changed on
the other screen.
R the operating mode has not been changed.
In the first case, the operating mode appears
as it is on the other screen.
In the second case, the setting appears on the
screen as it was when you last exited the
operating mode.
Picture settings
Overview
You can select these settings in video DVD
and AUX mode. Instructions for AUX mode
are detailed later ( Y page 139).
Adjusting the brightness, contrast and
color
XSwitch on video DVD mode ( Y page 250).XTo show the menu: press the 9 button
on the remote control.
or
XSelect Menu while the navigation menu
( Y page 237) is shown and press the 9
button to confirm.XIn both cases, select DVD-V using
the :=; buttons and press the
9 button to confirm.Rear Seat Entertainment System245COMANDZ