2011 MERCEDES-BENZ S-Class change
[x] Cancel search: changePage 412 of 524

Display messagesPossible causes/consequences and M SolutionsService Required
Do Not Shift GearsYou cannot change the transmission position due to a malfunction.
A warning tone also sounds.
If transmission position D is selected:XDrive to a qualified specialist workshop without shifting the
transmission from position D.
If transmission position R, N or P is selected:
XConsult a qualified specialist workshop or breakdown service.Only Shift to 'P'
when Vehicle is
StationaryThe vehicle is moving.XPull over and stop the vehicle safely as soon as possible, paying
attention to road and traffic conditions.XShift the transmission to position P.NThe trunk lid is open.XClose the trunk lid.MGRisk of accident
The hood is open.
XPull over and stop the vehicle safely as soon as possible, paying
attention to road and traffic conditions.XEngage the parking brake.XClose the hood.CAt least one door is open.XClose all doors.D
Power Steering
Malfunction See
Oper. ManualGRisk of accident
The power steering assistance is faulty. You will need to use more
force to steer.
XCheck whether you are able to apply the extra force required.XIf you are able to steer safely: carefully drive on to a qualified
specialist workshop.XIf you are unable to steer safely: do not drive on. Contact the
nearest qualified specialist workshop.¥
Top up washer fluidThe washer fluid level in the washer fluid reservoir has dropped
below the minimum.XAdd washer fluid ( Y page 450).410Display messagesOn-board computer and displays
Page 413 of 524
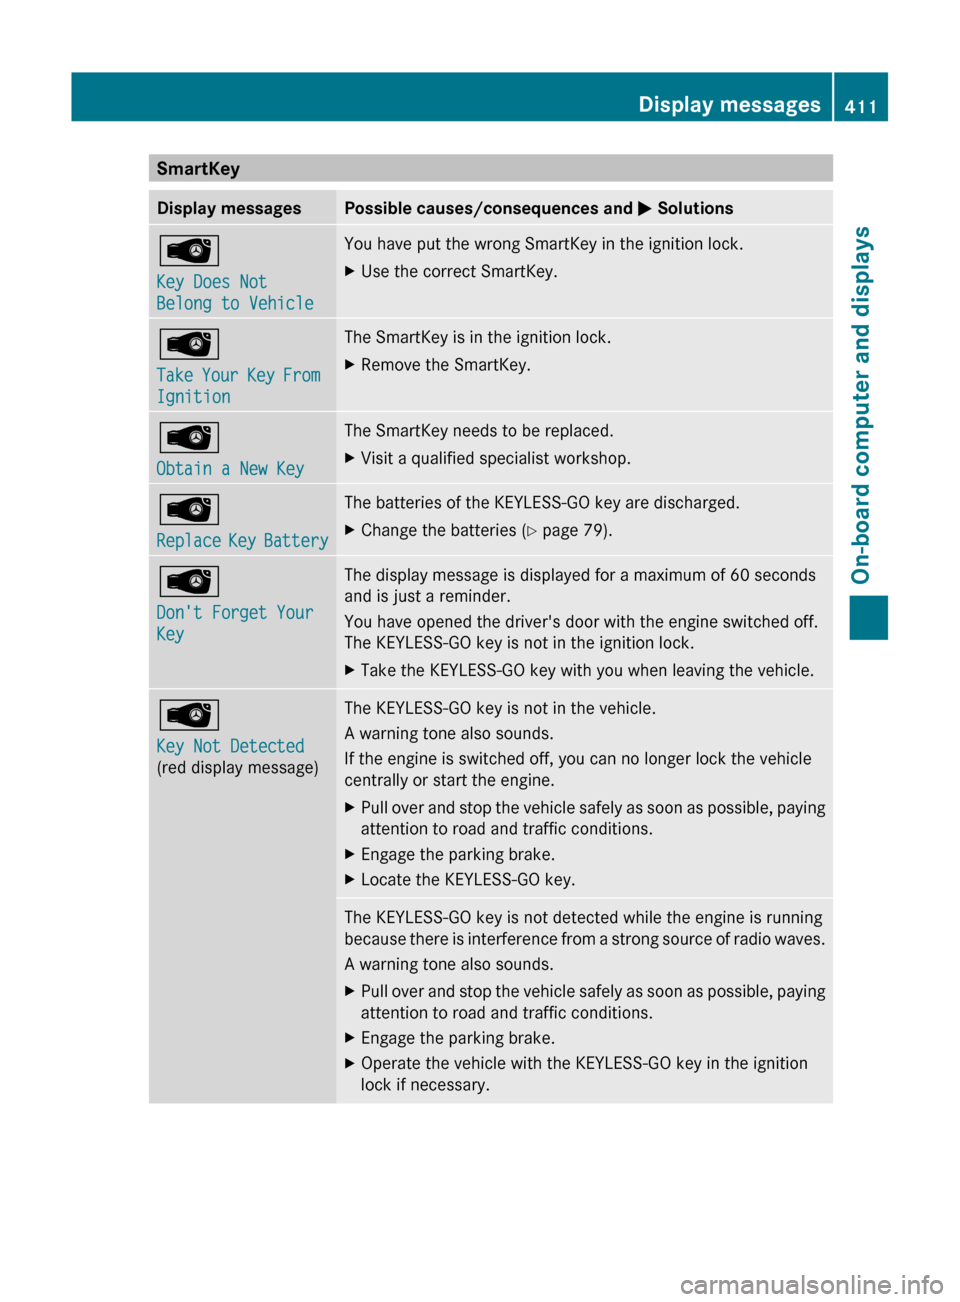
SmartKeyDisplay messagesPossible causes/consequences and M SolutionsÂ
Key Does Not
Belong to VehicleYou have put the wrong SmartKey in the ignition lock.XUse the correct SmartKey.Â
Take Your Key From
IgnitionThe SmartKey is in the ignition lock.XRemove the SmartKey.Â
Obtain a New Key The SmartKey needs to be replaced.XVisit a qualified specialist workshop.Â
Replace Key BatteryThe batteries of the KEYLESS-GO key are discharged.XChange the batteries ( Y page 79).Â
Don't Forget Your
KeyThe display message is displayed for a maximum of 60 seconds
and is just a reminder.
You have opened the driver's door with the engine switched off.
The KEYLESS-GO key is not in the ignition lock.XTake the KEYLESS-GO key with you when leaving the vehicle.Â
Key Not Detected
(red display message)The KEYLESS-GO key is not in the vehicle.
A warning tone also sounds.
If the engine is switched off, you can no longer lock the vehicle
centrally or start the engine.XPull over and stop the vehicle safely as soon as possible, paying
attention to road and traffic conditions.XEngage the parking brake.XLocate the KEYLESS-GO key.The KEYLESS-GO key is not detected while the engine is running
because there is interference from a strong source of radio waves.
A warning tone also sounds.XPull over and stop the vehicle safely as soon as possible, paying
attention to road and traffic conditions.XEngage the parking brake.XOperate the vehicle with the KEYLESS-GO key in the ignition
lock if necessary.Display messages411On-board computer and displaysZ
Page 414 of 524
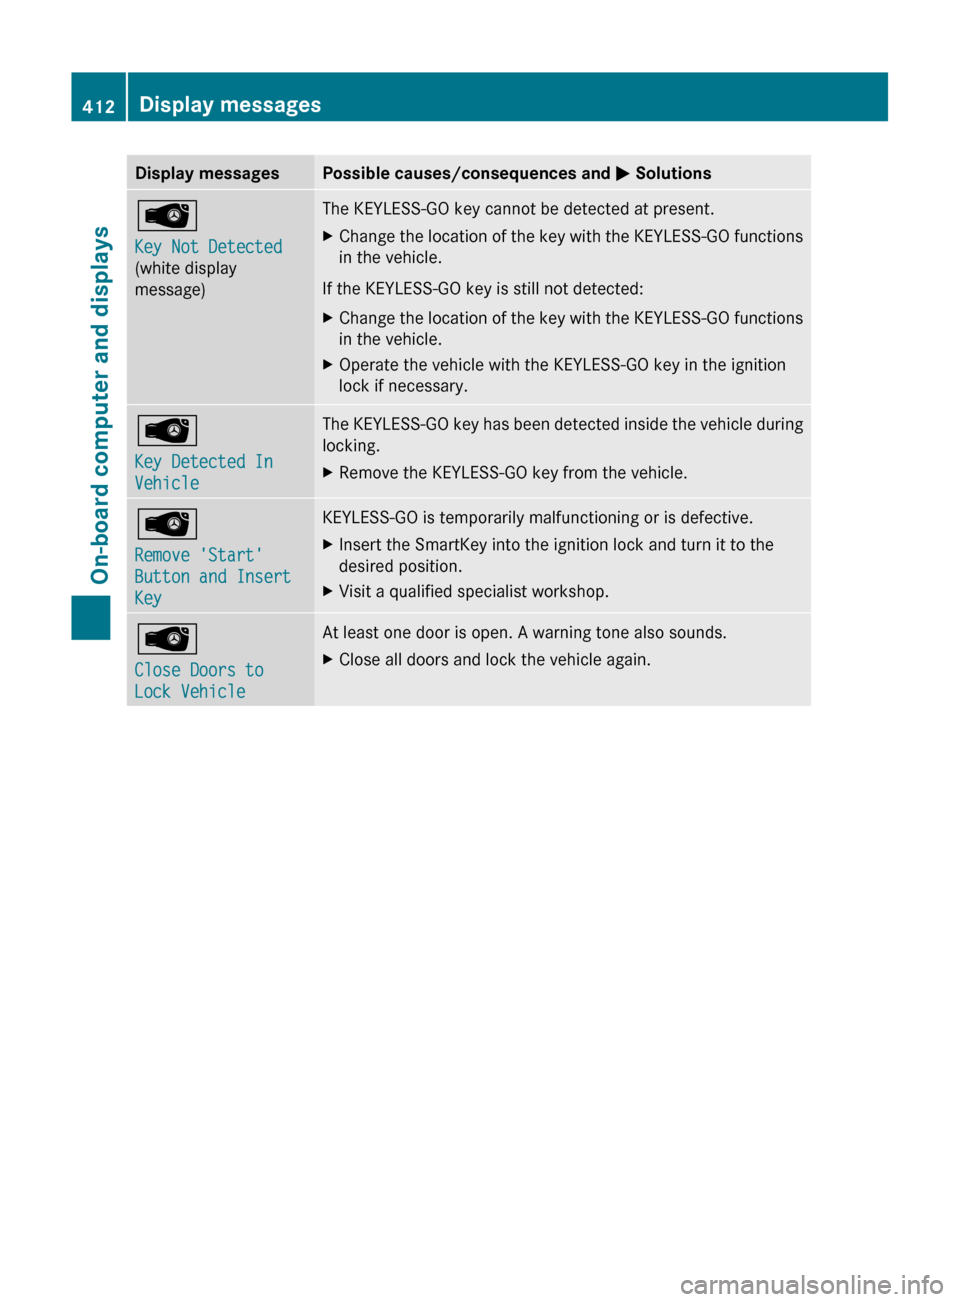
Display messagesPossible causes/consequences and M SolutionsÂ
Key Not Detected
(white display
message)The KEYLESS-GO key cannot be detected at present.XChange the location of the key with the KEYLESS-GO functions
in the vehicle.
If the KEYLESS-GO key is still not detected:
XChange the location of the key with the KEYLESS-GO functions
in the vehicle.XOperate the vehicle with the KEYLESS-GO key in the ignition
lock if necessary.Â
Key Detected In
VehicleThe KEYLESS-GO key has been detected inside the vehicle during
locking.XRemove the KEYLESS-GO key from the vehicle.Â
Remove 'Start'
Button and Insert
KeyKEYLESS-GO is temporarily malfunctioning or is defective.XInsert the SmartKey into the ignition lock and turn it to the
desired position.XVisit a qualified specialist workshop.Â
Close Doors to
Lock VehicleAt least one door is open. A warning tone also sounds.XClose all doors and lock the vehicle again.412Display messagesOn-board computer and displays
Page 421 of 524
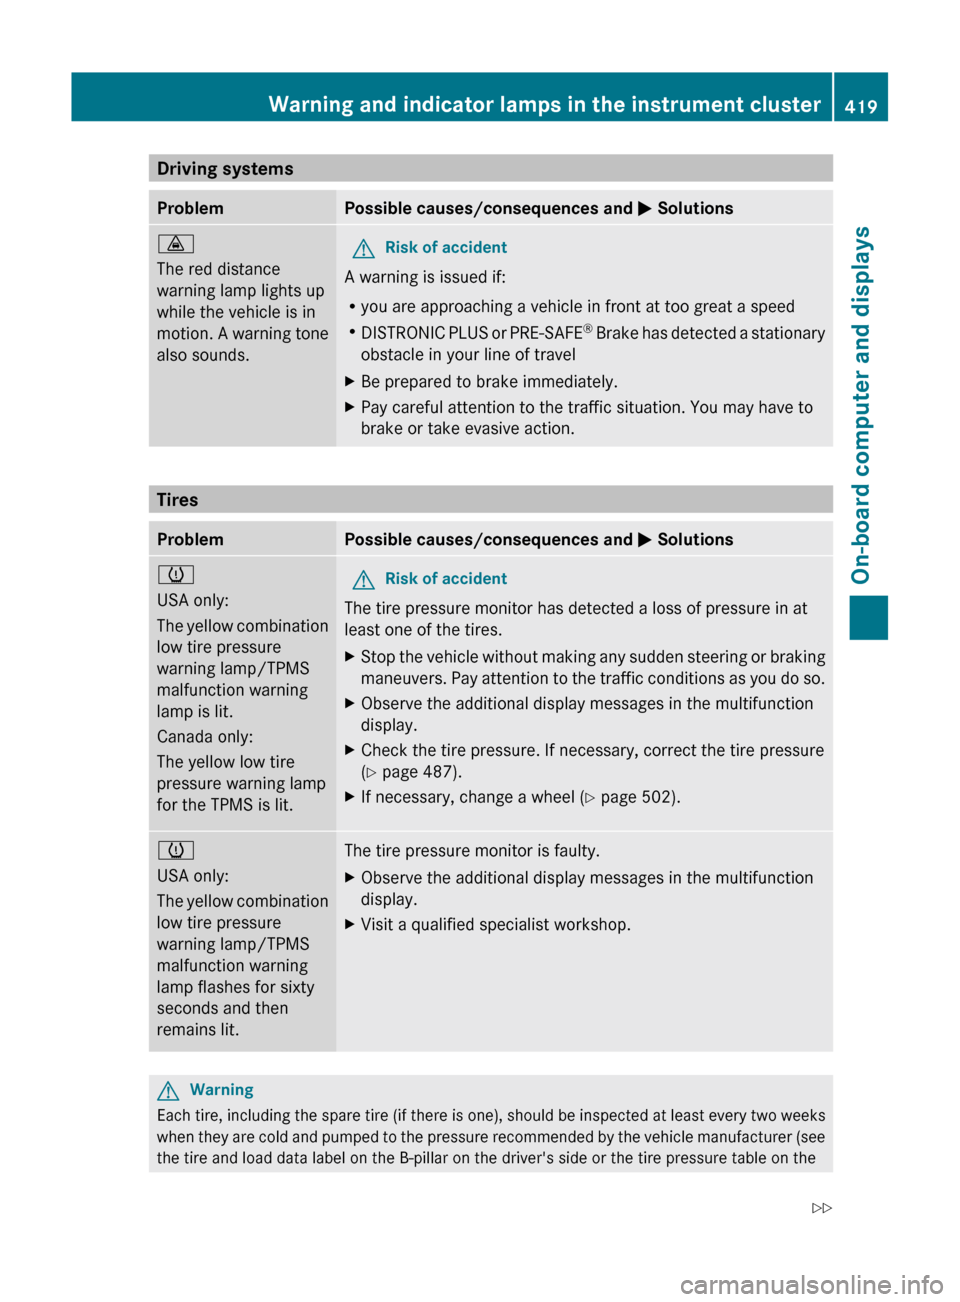
Driving systemsProblemPossible causes/consequences and M Solutions·
The red distance
warning lamp lights up
while the vehicle is in
motion. A warning tone
also sounds.GRisk of accident
A warning is issued if:
R you are approaching a vehicle in front at too great a speed
R DISTRONIC PLUS or PRE-SAFE ®
Brake has detected a stationary
obstacle in your line of travel
XBe prepared to brake immediately.XPay careful attention to the traffic situation. You may have to
brake or take evasive action.
Tires
ProblemPossible causes/consequences and M Solutionsh
USA only:
The yellow combination
low tire pressure
warning lamp/TPMS
malfunction warning
lamp is lit.
Canada only:
The yellow low tire
pressure warning lamp
for the TPMS is lit.GRisk of accident
The tire pressure monitor has detected a loss of pressure in at
least one of the tires.
XStop the vehicle without making any sudden steering or braking
maneuvers. Pay attention to the traffic conditions as you do so.XObserve the additional display messages in the multifunction
display.XCheck the tire pressure. If necessary, correct the tire pressure
( Y page 487).XIf necessary, change a wheel ( Y page 502).h
USA only:
The yellow combination
low tire pressure
warning lamp/TPMS
malfunction warning
lamp flashes for sixty
seconds and then
remains lit.The tire pressure monitor is faulty.XObserve the additional display messages in the multifunction
display.XVisit a qualified specialist workshop.GWarning
Each tire, including the spare tire (if there is one), should be inspected at least every two weeks
when they are cold and pumped to the pressure recommended by the vehicle manufacturer (see
the tire and load data label on the B-pillar on the driver's side or the tire pressure table on the
Warning and indicator lamps in the instrument cluster419On-board computer and displaysZ
Page 439 of 524
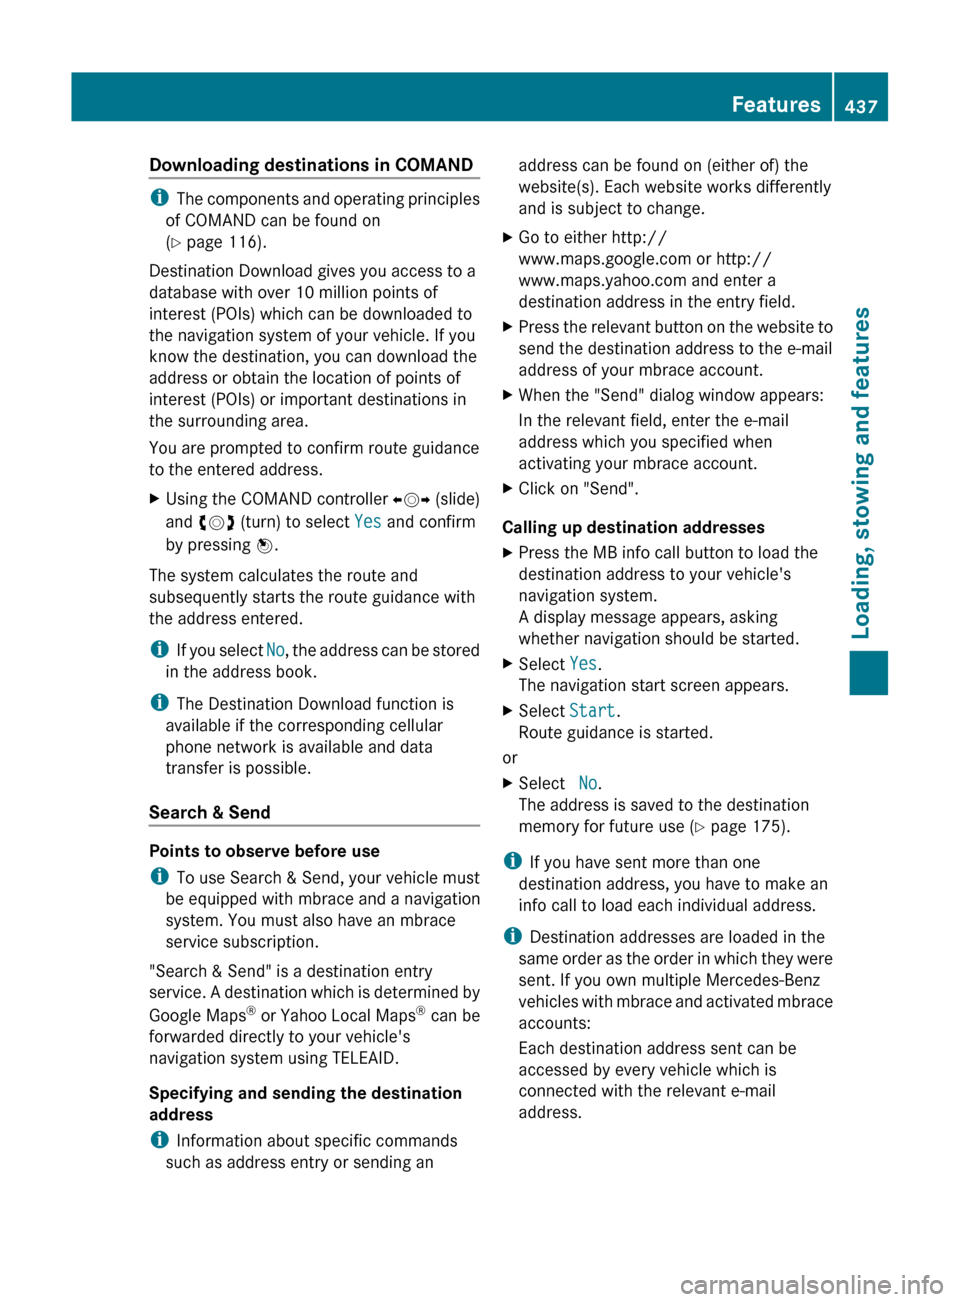
Downloading destinations in COMAND
iThe components and operating principles
of COMAND can be found on
( Y page 116).
Destination Download gives you access to a
database with over 10 million points of
interest (POIs) which can be downloaded to
the navigation system of your vehicle. If you
know the destination, you can download the
address or obtain the location of points of
interest (POIs) or important destinations in
the surrounding area.
You are prompted to confirm route guidance
to the entered address.
XUsing the COMAND controller XVY (slide)
and cVd (turn) to select Yes and confirm
by pressing W.
The system calculates the route and
subsequently starts the route guidance with
the address entered.
i If you select No, the address can be stored
in the address book.
i The Destination Download function is
available if the corresponding cellular
phone network is available and data
transfer is possible.
Search & Send
Points to observe before use
i To use Search & Send, your vehicle must
be equipped with mbrace and a navigation
system. You must also have an mbrace
service subscription.
"Search & Send" is a destination entry
service. A destination which is determined by
Google Maps ®
or Yahoo Local Maps ®
can be
forwarded directly to your vehicle's
navigation system using TELEAID.
Specifying and sending the destination
address
i Information about specific commands
such as address entry or sending an
address can be found on (either of) the
website(s). Each website works differently
and is subject to change.XGo to either http://
www.maps.google.com or http://
www.maps.yahoo.com and enter a
destination address in the entry field.XPress the relevant button on the website to
send the destination address to the e-mail
address of your mbrace account.XWhen the "Send" dialog window appears:
In the relevant field, enter the e-mail
address which you specified when
activating your mbrace account.XClick on "Send".
Calling up destination addresses
XPress the MB info call button to load the
destination address to your vehicle's
navigation system.
A display message appears, asking
whether navigation should be started.XSelect Yes.
The navigation start screen appears.XSelect Start.
Route guidance is started.
or
XSelect No.
The address is saved to the destination
memory for future use ( Y page 175).
i
If you have sent more than one
destination address, you have to make an
info call to load each individual address.
i Destination addresses are loaded in the
same order as the order in which they were
sent. If you own multiple Mercedes-Benz
vehicles with mbrace and activated mbrace
accounts:
Each destination address sent can be
accessed by every vehicle which is
connected with the relevant e-mail
address.
Features437Loading, stowing and featuresZ
Page 460 of 524
Cleaning the plastic trimGWarning
When cleaning the steering wheel boss and
dashboard, do not use cockpit sprays or
cleaning agents containing solvents. Cleaning
agents containing solvents cause the surface
to become porous, and as a result, plastic
parts may break away and be thrown around
the interior when an air bag is deployed, which
may result in severe injuries.
! Do not affix the following to plastic
surfaces:
R stickers
R films
R scented oil bottles or similar items
You can otherwise damage the plastic.
! Do not allow cosmetics, insect repellent
or sunscreen to come into contact with the
plastic trim. This maintains the high-quality
look of the surfaces.
XWipe the plastic trim with a damp, lint-free
cloth, e.g. a microfiber cloth.XHeavy soiling: use car care and cleaning
products recommended and approved by
Mercedes-Benz.
The surface may change color temporarily.
Wait until the surface is dry again.
Cleaning the steering wheel and gear or
selector lever
XWash thoroughly with a damp cloth or use
a leather care agent that has been
recommended and approved by Mercedes-
Benz.
Cleaning real wood and trim strips
XWipe the wooden trim and trim strips with
a damp, lint-free cloth, e.g. a microfiber
cloth.XHeavy soiling: use car care and cleaning
products recommended and approved by
Mercedes-Benz.! Do not use solvent-based cleaning agents
such as tar remover, wheel cleaners,
polishes or waxes. There is otherwise a risk
of damaging the surface.
! Do not use chrome polish for trim strips.
The trim strips have a chrome look but are
mostly made of anodized aluminum and
can lose their shine if chrome polish is
used. Use a damp, lint-free cloth instead
when cleaning the trim strips.
Chrome polish can be used to remove very
heavy soiling from trim strips which you are
sure are made of chrome. If you are unsure
as to whether a trim strip is chrome-plated
or not, consult an authorized Mercedes-
Benz Center.
Cleaning the seat covers
! Do not use microfiber cloths to clean
genuine leather, artificial leather or
Alcantara® covers. If used often, these can
damage the cover.
! Observe the following when cleaning:
R clean genuine leather covers carefully
with a damp cloth and then wipe the
covers down with a dry cloth. Make sure
that the leather does not become
soaked. It may otherwise become rough
and cracked. Only use leather care
agents that have been tested and
approved by Mercedes-Benz. You can
obtain these from a qualified specialist
workshop, e.g. an authorized Mercedes-
Benz Center.
R clean artificial leather covers with a cloth
moistened with a solution containing 1%
detergent (e.g. dish washing liquid).
R clean cloth covers with a microfiber cloth
moistened with a solution containing 1%
detergent (e.g. dish washing liquid). Rub
carefully and always wipe entire seat
sections to avoid leaving visible lines.
Leave the seat to dry afterwards.
458CareMaintenance and care
Page 465 of 524

Flat tire
Preparing the vehicle
Your vehicle may be equipped with a
"Minispare" emergency spare wheel or the
MOExtended run-flat system. ( Y page 467)
i Vehicle preparation is not necessary on
vehicles with the MOExtended run-flat
system.
XStop the vehicle as far away as possible
from traffic on solid, non-slippery and level
ground.XSwitch on the hazard warning lamps.XEngage the electric parking brake manually
( Y page 317).XBring the front wheels into the straight-
ahead position.XMove the DIRECT SELECT lever to P.XSwitch off the engine.XVehicles without KEYLESS-GO: remove
the key from the ignition lock.XVehicles with KEYLESS-GO: open the
driver's door.
The on-board electronics have status 0,
which is the same as the key having been
removed.XVehicles with KEYLESS-GO: remove the
Start/Stop button from the ignition lock
( Y page 299).XAll occupants must get out of the vehicle.
Make sure that they are not endangered as
they do so.XMake sure that no one is near the danger
area whilst a wheel is being changed.
Anyone who is not directly assisting in the
wheel change should, for example, stand
behind the barrier.XGet out of the vehicle. Pay attention to
traffic conditions when doing so.XClose the driver's door.Changing a wheel and mounting the
spare wheel
Preparing the vehicleGWarning
The wheel and tire size of the emergency
spare wheel/spare wheel may differ to that of
the damaged wheel. When using an
emergency spare wheel/spare wheel the
handling characteristics of the vehicle may
change.
Adapt your style of driving accordingly.
Never operate the vehicle with more than one
emergency spare wheel/spare wheel that
differs in size.
Only use an emergency spare wheel/spare
wheel of a differing size briefly and do not
switch off ESP ®
.
When using an emergency spare wheel, you
must not exceed the maximum speed of
50 mph (80 km/h).
GWarning
Have the different-sized emergency spare
wheel/spare wheel replaced with a new
wheel as soon as possible at a qualified
specialist workshop that has the necessary
specialist knowledge and tools to carry out
the work required. Mercedes-Benz
recommends that you use an authorized
Mercedes-Benz Center for this purpose. In
particular, work relevant to safety or on
safety-related systems must be carried out at
a qualified specialist workshop.
i Vehicles without an emergency spare
wheel/spare wheel are not equipped with
a tire-change tool kit at the factory. For
more information on which tools are
required to perform a wheel change on your
vehicle, e.g. wheel chock, alignment bolt,
or lug wrench, consult an authorized
Mercedes-Benz Center.
Flat tire463Roadside assistanceZ
Page 466 of 524

XPrepare the vehicle as described
(Y page 463).
XRemove the following items from the
stowage well under the trunk floor:
XSecure the vehicle to prevent it from rolling
away.
Securing the vehicle to prevent it from
rolling away
GWarning
Only jack up the vehicle on level ground or on
slight inclines/declines. The vehicle could
otherwise fall off the jack and injure you or
others.
If your vehicle is equipped with a wheel chock,
it can be found in the vehicle tool kit
(Y page 462).
The folding wheel chock is an additional
securing measure to prevent the vehicle from
rolling away, for example when changing a
wheel.
XFold both plates upwards :.XFold out lower plate ;.XGuide the lugs on the lower plate fully into
openings in base plate =.
Securing the vehicle on level ground
XOn level ground: place chocks or other
suitable items under the front and rear of
the wheel that is diagonally opposite the
wheel you wish to change.
Securing the vehicle on slight downhill gradients
XOn downhill gradients: place chocks or
other suitable items in front of the wheels
of the front and rear axle.
Raising the vehicle
GWarning
When jacking up the vehicle, only use the jack
which has been specifically approved by
Mercedes-Benz for your vehicle.
The jack is designed exclusively for jacking up
the vehicle at the jacking points built into both
sides of the vehicle. The jack saddle must be
placed centrally under the jacking point. The
jack must always be vertical when in use,
especially on inclines or declines.
The jack is intended only for lifting the vehicle
briefly for wheel changes. It is not suited for
464Flat tireRoadside assistance