2011 MERCEDES-BENZ M-CLASS SUV automatic transmission
[x] Cancel search: automatic transmissionPage 283 of 389

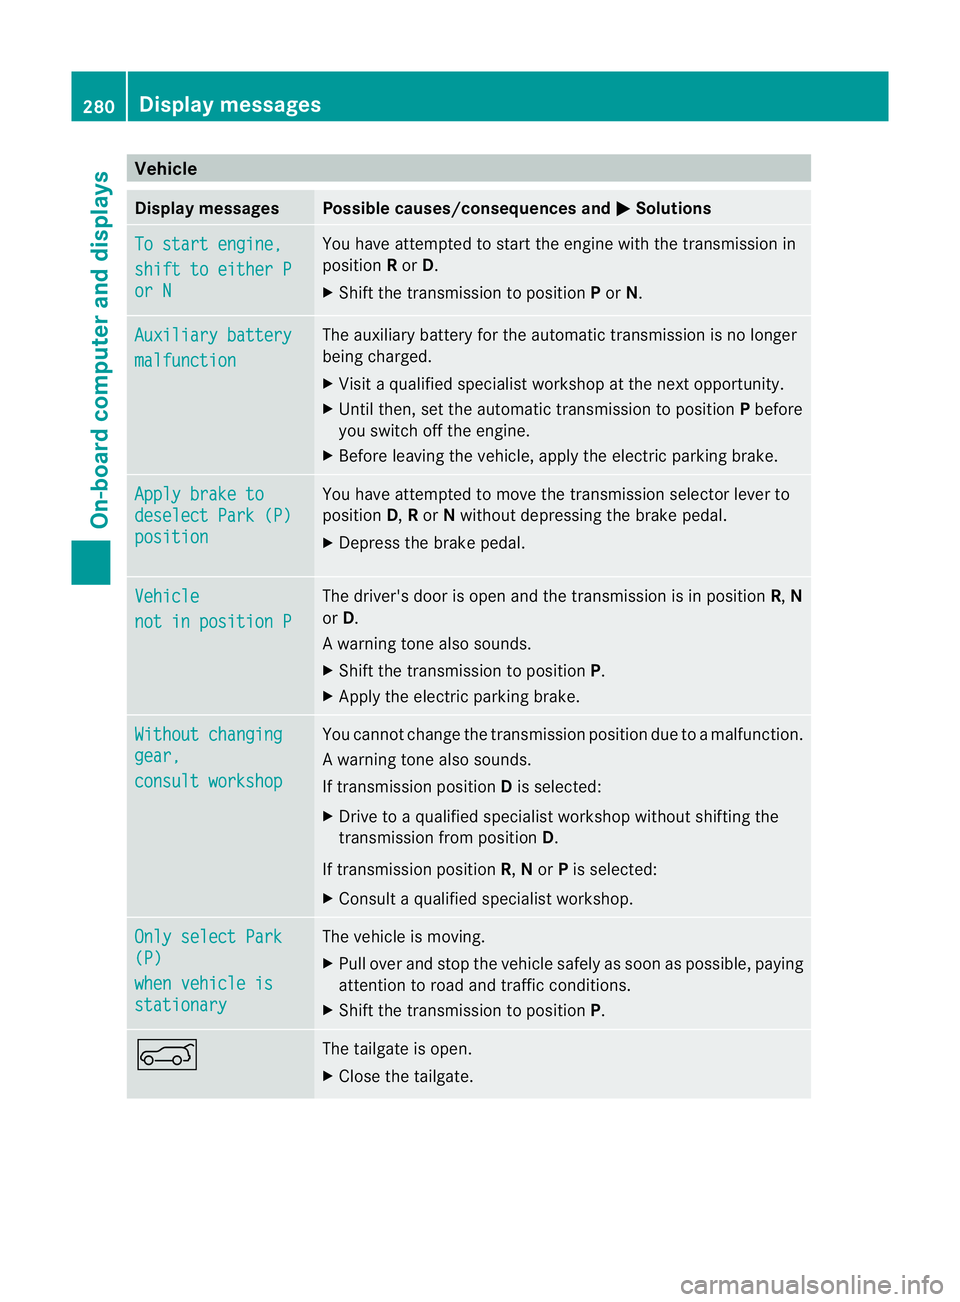
Vehicle
Display messages Possible caus
es/consequences and M Solutions
To start engine,
shift to either P
or N Yo
uh avea ttempte dtostart the engine with the transmission in
position Ror D.
X Shift the transmission to position Por N. Auxiliary battery
malfunction The auxiliary battery for the automatic transmission is no longer
being charged.
X Visit aquali fied sp ecialist worksho patthe nex toppor tunity.
X Until then, set the automatic transmission to position Pbefore
yo us witch off the engine.
X Before leaving the vehicle, appl ythe electr ic parking bra ke. Apply brake to
deselect Par
k(P) position Yo
uh ave attempted to mov ethe transmission selector lever to
position D,Ror Nwithout depressing the brake pedal.
X Depress the brake pedal. Vehicle
no
tinp osition P Th
ed river's door is open and th etransmission is in position R,N
or D.
Aw arning ton ealso sounds.
X Shift th etransmissio ntoposition P.
X Apply th eelectric parking brake. Wi
thoutc hanging gear,
consul
tworkshop Yo
uc annot change the transmission position due to amalfunction.
Aw arning ton ealso sounds.
If transmission position Dis selected:
X Drive to aqualified specialist workshop without shiftin gthe
transmissio nfromp osition D.
If transmission position R,Nor Pis selected:
X Consult aqualified specialist workshop. On
ly select Park (P)
whe
nv ehicl eis stationary Th
ev ehicle is moving.
X Pull ove rand sto pthe vehicle safel yassoonasp ossible, paying
attention to roa dand traffic conditions.
X Shift the transmissio ntoposition P. A The tailgate is open.
X Close the tailgate. 280
Display messagesOn-board computer and displays
Page 315 of 389

the separate mobil
ephone operating
instructions).
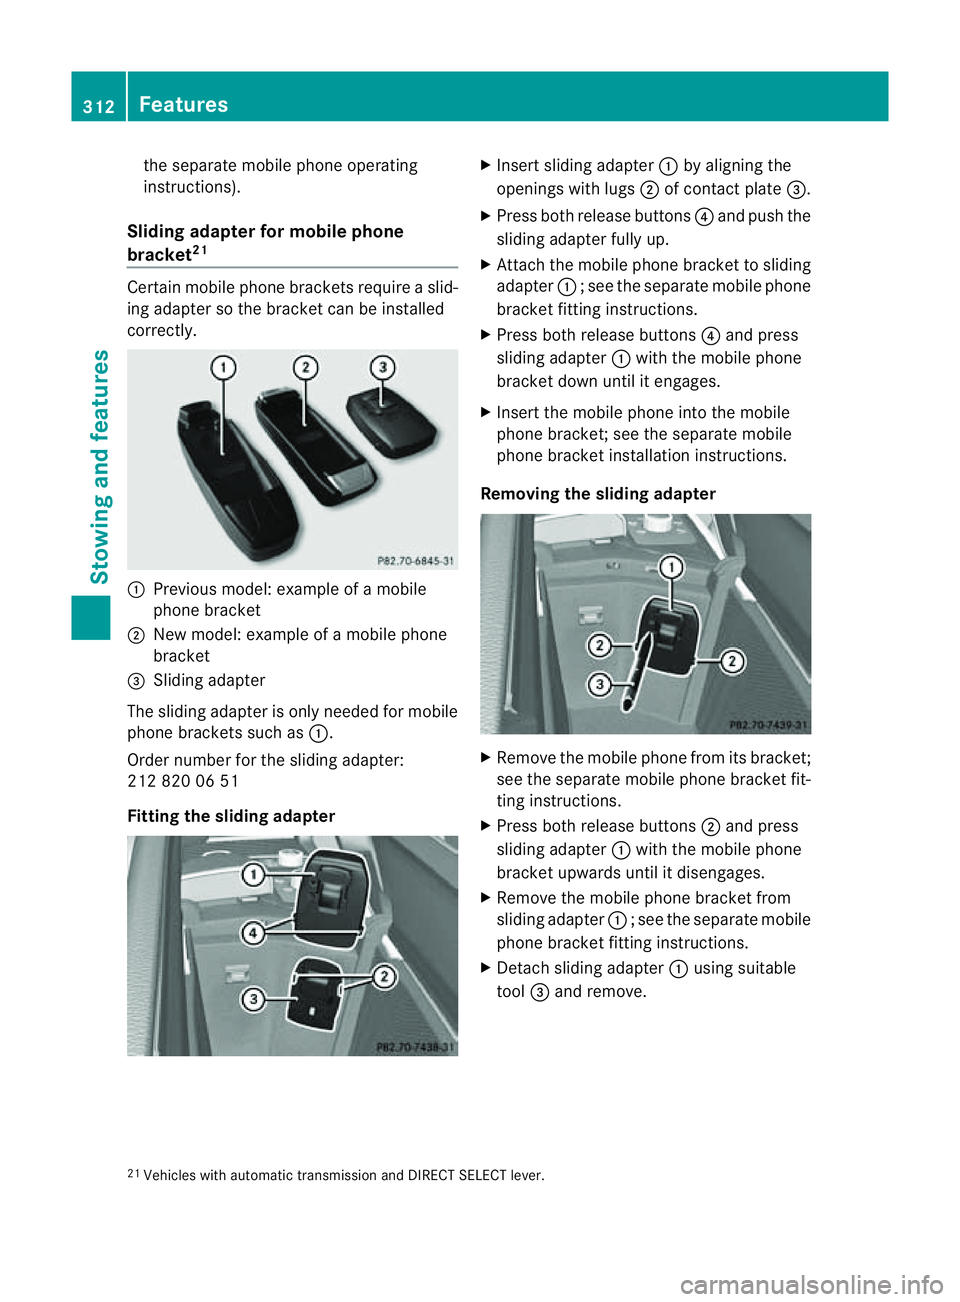
Sliding adapte rfor mobil ephone
bracket 21 Certain mobil
ephone brackets require aslid-
ing adapter so the bracket can be installed
correctly. :
Previou smodel :examp leof am obile
phone bracket
; New model :examp leof am obile phone
bracket
= Sliding adapter
The sliding adapter is only neede dfor mobile
phone brackets such as :.
Order number for the sliding adapter:
212 820 06 51
Fittin gthe sliding adapter X
Insert sliding adapter :by aligning the
openings wit hlugs ;of contact plate =.
X Press both release buttons ?and push the
sliding adapter fully up.
X Attach the mobile phone bracket to sliding
adapter :;see the separate mobile phone
bracket fit ting instructions.
X Pres sboth release buttons ?and press
slidin gadapter :with the mobile phone
bracket down unti litengages.
X Insert the mobil ephone int othe mobile
phone bracket ;see the separate mobile
phone bracket installation instructions.
Removing th esliding ada pter X
Remove the mobile phone from its bracket;
see the separate mobile phone bracket fit-
ting instructions.
X Press both release buttons ;and press
sliding adapter :with the mobile phone
bracket upwards until it disengages.
X Remove the mobile phone bracket from
sliding adapter :;see the separate mobile
phone bracket fit ting instructions.
X Detach sliding adapter :using suitable
tool =and remove.
21 Vehicles with automatic transmission and DIRECT SELECT lever. 312
FeaturesStowin
gand features
Page 327 of 389

You can obtain fur
ther information about
BlueTE Cexhaus tgas aftertreatmen tand
AdBlue ®
from any Mercedes-Benz Service
Centre. Care
Note
sonc are
Regular care of your vehicle is aconditio nfor
retaining th equalit yint he long term.
Us ec arep roducts and cleani ngagent srec-
ommended and approved by Mercedes-Benz.
! For cleanin gyour vehicle ,donot useany
of the following:
R dry ,rough or hard cloths
R abrasive cleanin gagents
R solvents
R cleanin gagents con taining solvents
Do not scrub.
Do not touch the surfaces or protective
film swith hard objects, e.g. aring or ice
scraper .You coul dotherwis escratch or
damag ethe surfaces and protective film. H
Environmenta
lnote
Dispose of empty packaging and cleaning
cloths in an environmentally responsible man-
ner.
! Do not park up the vehicle for an extended
period straight after cleaning it, particular ly
after having cleaned the wheels with wheel
cleaner. Whee lcleaners could cause
increased corrosion of the brake discs and
brake pads/linings. For this reason, you
should drive for afew minutes after clean-
ing. Brakin gheats the brak ediscs and the
brake pads/linings, thus drying them. The
vehicle can then be parked up. Care of the exterior
Automatic car wash G
WARNING
Braking efficiency is reduced after washing
the vehicle. This could cause an accident. For
this reason, following acar wash, drive with
particular care until the brakes are dry.
You can wash the vehicle in an automatic car
wash from the very start.
If the vehicle is very dirty, pre-wash it before
cleaning it in an automatic car wash.
! In car washe swithatowing mechanism,
make sure that the automatic transmission
is in transmission position N,otherwis ethe
vehicle could be damaged.
R Vehicles with akey:
do not remove the key from the ignition
lock. Do not open the driver' sdoor or
front-passenger door when the engin eis
switched off .Otherwise, the automatic
transmission selects park position P
automaticall yand locks the wheels .You
can prevent this by shifting the auto-
matic transmission to Nbeforehand.
R Vehicles with KEYLE SS-GO:
do not ope nthe driver's door or front-
passenger door when the engin eis
switched off .Otherwise, the automatic
transmission selects park position P
automaticall yand locks the wheels.
Observe the following to make sure that the
automati ctransmission stays in position N:
X Make sure th evehicle is stationary and the
ignition is switched off.
X Turn the key to position 2(Y page 139) in
the ignition lock.
Use the key instead of the Start/Stop but-
ton on vehicles with KEYLE SS-GO.
X Depres sand hol dthe brake pedal.
X Shif tthe automatic transmission to posi-
tion N.
X Release the brake pedal. 324
CareMaintenance and care
Page 349 of 389

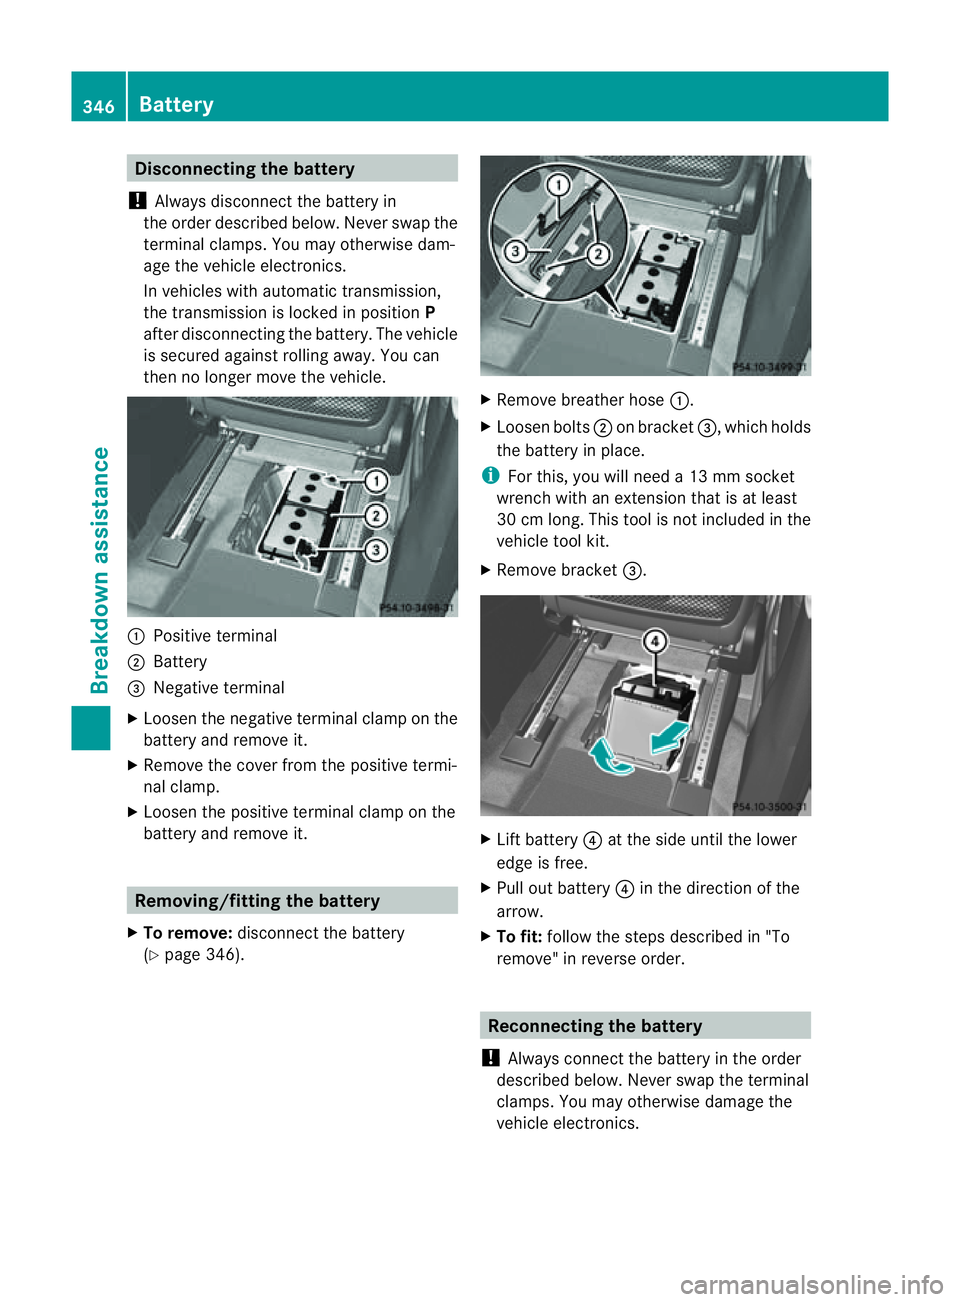
Disconnecting th
ebattery
! Always disconnect the battery in
the order described below. Never swap the
terminal clamps. You ma yotherwis edam-
age the vehicle electronics.
In vehicles with automatic transmission,
the transmission is locked in position P
after disconnecting the battery. The vehicle
is secured against rolling away .You can
then no longer mov ethe vehicle. :
Positive termi nal
; Battery
= Negative terminal
X Loosen the negative terminal clamp on the
battery and remove it.
X Remove the cover from the positive termi-
nal clamp.
X Loosen the positive terminal clamp on the
battery and remove it. Removing/fitting the battery
X To remove: disconnect the battery
(Y pag e346). X
Remove breather hose :.
X Loose nbolts ;on bracket =,which holds
the battery in place.
i For this, you will need a13mmsocket
wrenc hwith an extension that is at least
30 cm long. This tool is not included in the
vehicle tool kit.
X Remove bracket =. X
Lif tb attery ?at the side until the lower
edge is free.
X Pull out battery ?in the direction of the
arrow.
X To fit: follow the steps described in "To
remove" in reverse order. Reconnecting the battery
! Always connect the battery in the order
described below. Never swap the terminal
clamps. You may otherwise damage the
vehicle electronics. 346
BatteryBreakdown assistance
Page 353 of 389

R
the engine is not running.
R there is abrake syst emmalfunction.
R there isam alfunction in the power supply
or the vehicle' selectrical system.
The power assistance for the steering and the
brake forc ebooster do not work when the
engin eisnot running. You will need more
force to steer and brake, you may have to
depress the brake pedal with maximu mforce.
Before towin gaway ,make sure that the steer-
ing can be moved and is not locked.
If you tow or tow-star tanothe rvehicle, its
weight must not exceed the maximu mper-
missible gross vehicle weight of your vehicle. G
WARNING
The vehicle is braked when the HOL Dfunction
or DISTRONIC PLUS is activated. Therefore,
deactivate HOLD and DISTRONIC PLUS if the
vehicle is to be towed.
It is better to have the vehicle transported
than to have it towed.
! You may tow the vehicle for amaximum
of 50 km. Atowing speed of 50 km/h must
not be exceeded.
For towin gdistances over 50 km, the entire
vehicle must be lifted up and transported.
! Make sure that the electric parkin gbrake
is released. If th eelectric parkin gbrake is
faulty, visit aqualified specialist workshop.
! Only secure the tow rope or towing bar to
the towing eyes. The vehicle may otherwise
be damaged.
! Do not use the towing eye for recovery,
as this could damage the vehicle. If in
doubt, recover the vehicle with acrane.
! When towing, pull awa yslowly and
smoothly. If the trac tivepower is too high,
the vehicles could be damaged.
! To tow vehicles with KEYLESS-GO, use
the key instead of the Star t/Stop button.
Th ea utomatic transmission may otherwise switch to position
Pwhen you open the
driver' sorfront-passenger door which
could damag ethe transmission.
! Vehicles with differential locks: make
sur ethe differential lock sare in automatic
mode. Th edifferential locks must not be
switched on by hand when towing the vehi-
cle. The transmission may otherwise be
damaged.
If the vehicle has suffered transmission dam-
age, have it transported on atransporter or
trailer.
Th ea utomatic transmission must be in posi-
tion Nwhen the vehicle is being towed.
The battery must be connected and charged.
Otherwise, you:
R cannot turn the key in the ignition lock to
position 2
R cannot shift the automatic transmission to
position N
i Before the vehicle is towed, switch off the
automatic locking feature (Y page 249).
You could otherwis ebelockedout when
pushing or towing the vehicle.
Deactivate tow-away protection
(Y page 69) before the vehicle is towed. Fitting/removing the towing eye
Fitting the towing eye Vehicles with
atrailer to whitch: if you intend
to use the vehicle for towing, fold out the ball
coupling and connect the towbar to it
(Y page 228).
X Remove the towing eye from the vehicle
tool kit (Y page 333).
The mountings for the removable towing eyes
are located in the bumpers. They are at the
front and at the rear ,under the covers. 350
Towing and tow-startingBreakdow
nassistance
Page 354 of 389

X
To ope nthe cove ratthe front: press the
mark on cover :inw ards in the direction
of the arrow.
X To open the cover at the rear: insert a
flat ,blunt object into the cutout and lever
cover ;out of the bumper.
X Take cover :or; off the opening.
X Screw the towing eye in clockwise to the
stop and tighten it.
Removin gthe tow inge ye X
Loose nthe towing eye and unscrew it.
X Attach cover :or; to the bumper and
press until it engages.
X Plac ethe towing eye in the vehicle tool kit. Towing th
evehicle with both axles on
the ground
It is importan tthat you observe the safety
instructions when towing away your vehicle
(Y page 349). G
WARNING
The power assistanc efor the steering and the
brake force booster do not work when the
engin eisnot running. You will then need much mor
eeffort to brak eand stee rthe vehi-
cle. Adap tyour style of driving accordingly.
The automatic transmission automatically
shifts to position Pwhen you open the driver's
or front-passenger door or when you remove
the key from the ignition lock. In order to
ensur ethat the automatic transmission stays
in position Nwhen towing the vehicle, you
must observe the followin gpoints:
X Make sure that the vehicle is stationar yand
that the key in the ignition lock is in position
0.
X Turn the key to position 2in the ignition
lock.
On vehicles with KEYLESS-GO, use the key
instead of the Start/Stop button
(Y pag e139).
X Depres sand hol dthe brake pedal.
X Shif tthe automatic transmission to posi-
tion N.
X Release the brake pedal.
X Release the electric parkin gbrake.
X Switch on th ehazard warning lamps
(Y page 109).
X Leave the key in position 2in the ignition
lock.
i When towing with the hazard warning
lamps switched on, use the combination
switch as usua ltosignal achange of direc-
tion .Int his case ,only the turn signals for
the desired direction flash .When the com-
bination switc hisreset, the hazar dwarning
lamps start flashing again. Transporting the vehicle
The towing eyes or trailer tow hitch can be
used to pull the vehicle onto atrailer or trans-
porter if yo uwish to transport it.
X Turn the key to position 2in the ignition
lock.
X Shift the automatic transmission to posi-
tion N. Towing and tow-starting
351Breakdownassis tance Z
Page 355 of 389

As soon as th
evehicle is loaded:
X Preven tthe vehicle from rolling away by
applying the electric parkin gbrake.
X Shift th eautomatic transmission to posi-
tion P.
X Turn the key in the ignition lock to position
0 and remove the key from the ignition
lock.
X Secure the vehicle.
! Only lash the vehicle down by the wheels
or wheel rims, not by parts of the vehicle
such as axle or steering components. Oth-
erwise, the vehicle could be damaged. Notes for 4MATIC vehicles
! Vehicles with 4MATIC must not be towed
with the front or rear axle raised; otherwise,
the transmission may be damaged.
If the vehicle has transmission damage or
damage to the front or rear axle, have it trans-
ported on atransporter or trailer.
In the even tofdamage to the ele ctrical
system
If the battery is defective, the automatic
transmission will be locked in position P.To
shif tthe automatic transmission to position
N,y ou must provide power to the vehicle's
electrical system in the same way as when
jump-startin g(Ypage 348).
Hav ethe vehicle transported on atransporter
or trailer. Recovering
avehicle that ha sbecome
stuck
! When recovering atrapped vehicle ,donot
je rk the vehicle or pull it at an angle. If the
tractive powe rist oo high, th evehicles
could be damaged.
If th edrive wheels ge ttrapped on loose or
muddy ground, recover th evehicle with the
utmost care, especially so if the vehicle is
laden. Never attempt to recover
avehicle with a
trailer atta ched.
Pull out the vehicle backwards, if possible,
using the tracks it made when it became
stuck. Tow-starting (emergency engine
starting)
! Vehicles with automatic transmission
must not be tow-star ted. The tra nsmission
ma yotherwise be damaged. Electrical fuses
Important safet
ynotes G
WARNING
Only use fuses that have been approved for
Mercedes-Benz vehicles and which have the
correct fuse ratin gfor the system scon-
cer ned. Do not attempt to repair or bridge
faulty fuses. Usin gfuses which have not been
approved or attempting to repair or bridge
faulty fuses could cause the fuse to be over-
loaded and result in afire. Have the cause
traced and rectified at aqualified specialist
workshop.
The fuses in your vehicle serve to close down
faulty circuits. If afuse blows, all the compo-
nen tson the ci rcuit and their functions stop
operating.
Blown fuses must be replaced with fuses of
the same rating, which you can recognise by
the colour and fuse rating. The fuse ratings
are listed in the fuse allocation chart.
If the newly inser tedf use also blows ,have the
cause traced and rectified at aqualified spe-
cialist workshop, e.g. aMercedes-Benz
Servic eCentre.
! Only use fuses that have been approved
for Mercedes-Ben zvehicles and which
have the cor rect fuse rating for the system
concerned. For the fuse boxes in the engine
compartment and unde rthe rea rbench 352
Electrical fusesBreak
down assistance