2011 MERCEDES-BENZ M-CLASS SUV headlamp
[x] Cancel search: headlampPage 115 of 389

X
Drive with the headlamps switched on.
Th elevel of moisture diminishes, depend-
ing on the length of the journey and the
weather conditions (humidity and tem per-
ature).
If th elevel of moisture does not diminish:
X Have the headlamps checked at aquali fied
specialis tworkshop. Interior lighting
Overview of interior lighting
Overhead con
trol panel
: p To switch the left-hand front reading
lamp on/off
; c To switch the front interior lighting
on
= v To switch the rear interior lighting
on/off
? | To switch the front interior lighting/
automatic interior lighting control off
A p To switch the right-hand front read-
ing lamp on/off
B To switch the automatic interior lighting
control on Interio
rlighting control
Impor tant notes In order to prevent the vehicle'
sbattery from
discharging, the interior lighting functions are
automatically deactivated after some time except for when the key is in position
2in the
ignition lock.
The colour and brightness of the ambient
lighting may be set using the on-board com-
puter (Y page 248).
Automatic interior lighting control X
To switch on: set the rocker switch to
centre position B.
X To switch off: set the rocker switch to the
| position.
The interior lighting automatically switches
on if you:
R unlock the vehicle
R open adoor
R remove the key from the ignition lock
The interior light is activated for ashort while
when the key is removed from the ignition
lock .You can activate this delayed switch-off
using the on-boar dcomputer (Y page 249).
Manua linterior lighting control X
To switc hthe fron tinterior lighting on:
set the roc kers witch to the cposition.
X To switch the front interior lighting off:
set the rocker switch to the |position.
X To switch the rear interior lighting on/
off: press the ubutton.
X To switch the reading lamp son/off:
press the pbutton. Crash-responsive emergency lighting
The interior lightin gisactivate dautomatically
if the vehicle is involved in an accident.
X To switch off the crash-responsive
emergency lighting: press the hazard
warning lamp button.
or
X Lock and then unlock the vehicle using the
key. 112
Interior lightingLights and windscreen wipers
Page 116 of 389

Changing bulbs
Important safety notes
Xenon bulbs If your vehicle is equipped wit
hxenon bulb s,
you ca nrecognise this by th efollowing: the
cone of light from th exenon bulbs moves
from th etop to the bottomand back again
whe nyou star tthe engine. Fo rthis to be
observed ,the lights must be switched on
before startin gthe engine. G
DANGER
Xenon bulb scarry ahigh voltage. You could
get an electric shock and be seriously or even
fatally injured if you touch the electric con-
tacts on xenon bulbs. Therefore, never
remov ethe cover from xenon bulbs.
Do not change xenon bulbs yourself, but have
them replaced at aqualified specialist work-
sho pwhich has the necessar yspecialist
knowledge and tools to carry out the work
required.
Mercedes-Ben zrecom mends that you use a
Mercedes-Benz Service Centre for this pur-
pose. In particular, work relevant to safety or
on safety-related systems must be carried out
at aq ualified specialist workshop.
Bulbs and lamps are an important aspect of
vehicle safety. You must therefore make sure
that thes efunction correctly at all times.
Have the headlamp setting checked regularly.
Other bulbs There are bulbs other than the xenon bulbs
that you cannot replace. Replace only the
bulbs listed (Y page 113). Have the bulbs that
you cannot replace yourself changed at a
qualified specialist workshop.
Mercedes -Benz recommends that you use a
Mercedes-Benz Ser vice Centre for thi spur-
pose .Inp articular, work relevant to safety or
on safety-related systems must be carried out
at aq ualified specialist workshop. If you require assistanc
echangi ngbulbs, con-
sult aqualified specialist workshop.
Do not touch the glass tube of new bulbs with
your bare hands. Even minor contamination
can burn into the glass surface and reduce
the servic elife of the bulbs. Always use alint-
free cloth or only touch the base of the bulb
when fitting.
Only use bulbs of the correct type.
If the new bulb still does not light up, consult
aq ualified specialist workshop.
Bulbs and lamps are an important aspect of
vehicle safety. You must therefore make sure
that these function correctly at all times.
Have the headlamp setting checked regularly. G
WARNING
Bulbs and lights can become very hot. For this
reason, allow them to cool down before
changin gthem. Otherwise, you coul dburn
yourself when you touch them.
Keep bulbs out of the reach of children. Oth-
er wise ,they could damage them, for example,
and inj uret hemselves.
Never use abulbw hich ha sbeend ropped.
Suc hab ulbm ay explod eand injure you.
Halogen bulb sare pressu rised and could
explode when yo uchange them, especiall yif
the yarever yhot. Yo ushould therefor ewear
eye protec tion and gloves when you are
changing them. Overview of bulb replacement
–bulbs
Yo uc an replace the following bulbs. The
details for the bul btype can be found in the
legend. Changing bulbs
113Lightsand windsc reenwipers Z
Page 117 of 389

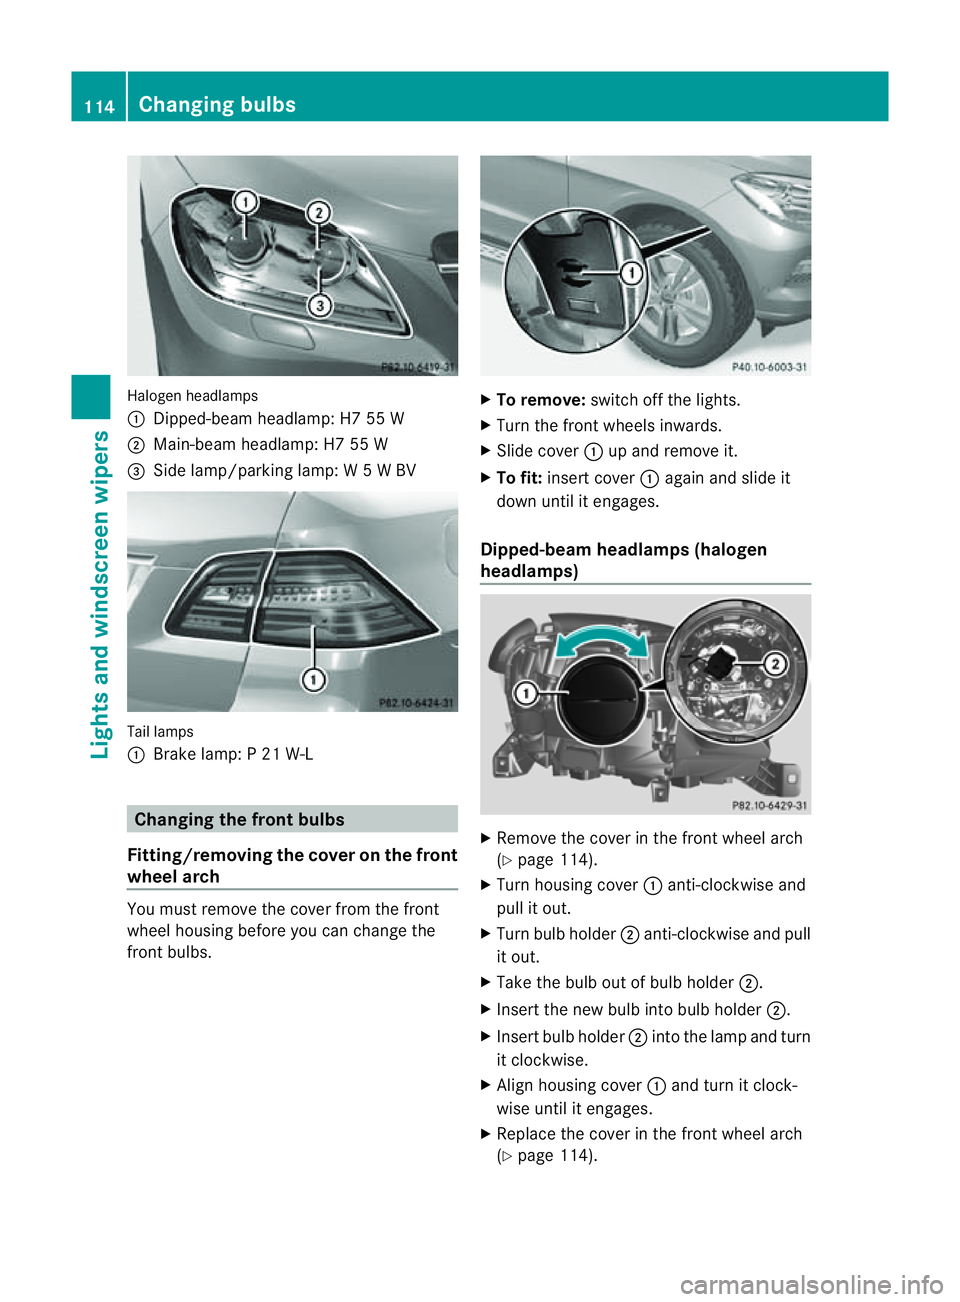
Halogen he
adlamps
: Dipped-bea mheadlamp: H7 55 W
; Main-beam headlamp: H7 55 W
= Side lamp/parkin glamp: W5WBV Tail lamps
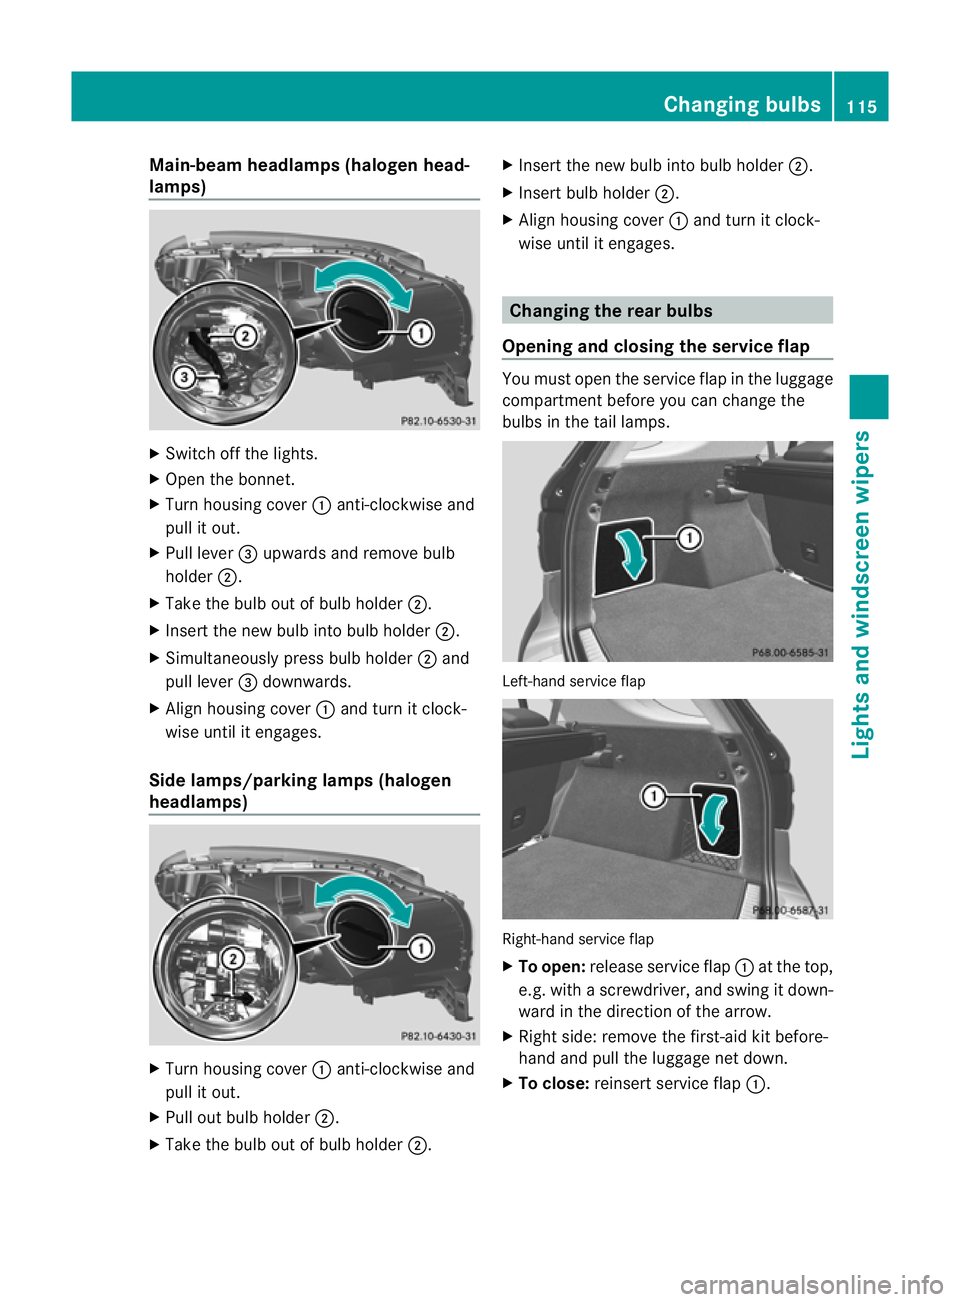
:
Brak elamp: P21W -L Changing the front bulbs
Fitting/removing the cover on the front
wheel arch You must remove the cover from the front
wheel housing before you can chang ethe
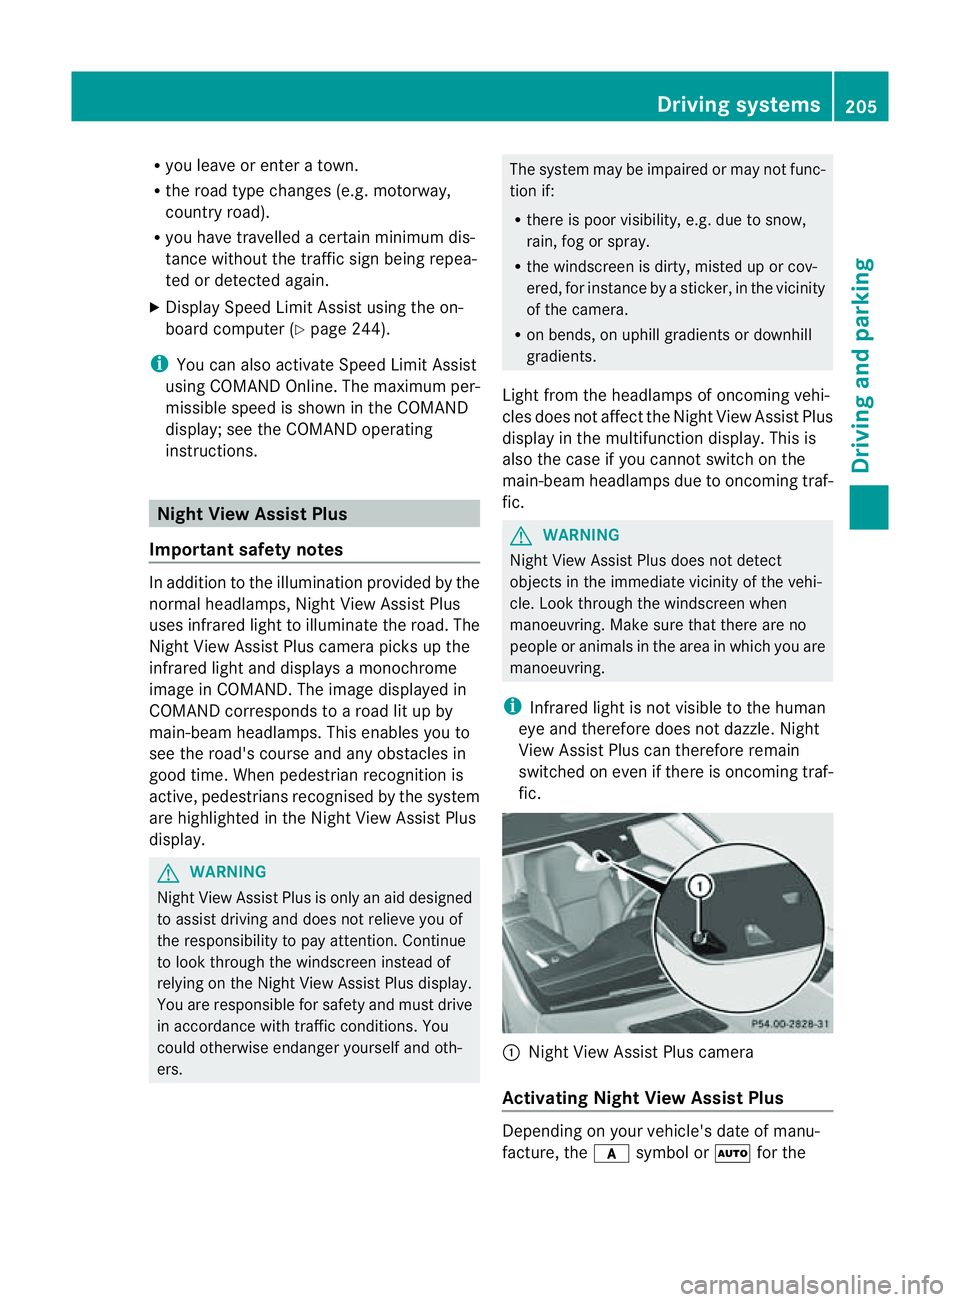
fron tbulbs. X
To remove: switchoff the lights.
X Turn the front wheels inwards.
X Slide cover :up and remove it.
X To fit: insert cover :again and slide it
down until it engages.
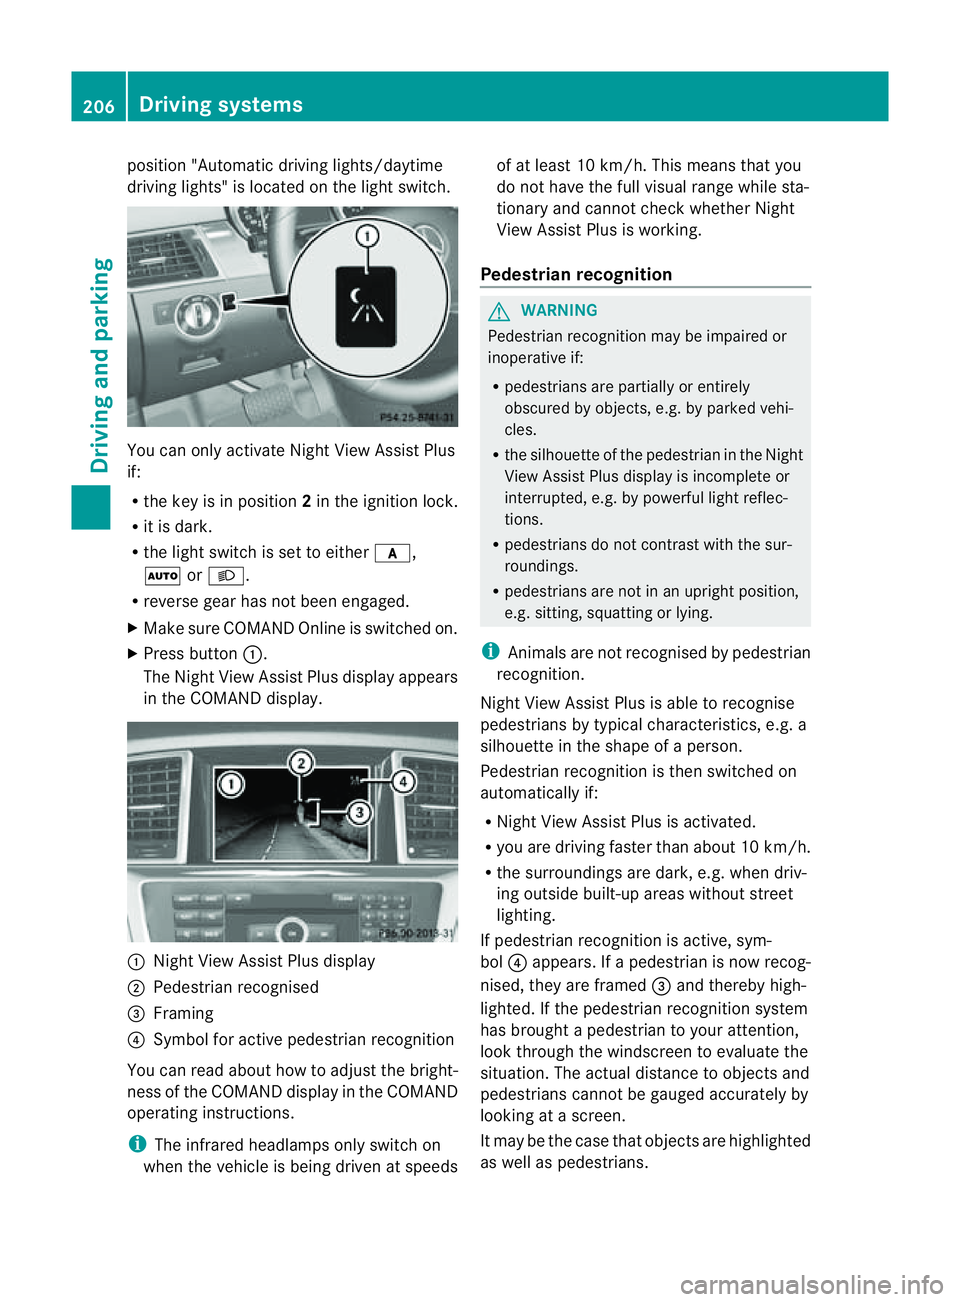
Dipped-beam headlamps (halogen
headlamps) X
Remove the cover in the front wheel arch
(Y page 114).
X Turn housing cover :anti-clockwise and
pull it out.
X Turn bulb holder ;anti-clockwise and pull
it out.
X Take the bulb out of bulb holder ;.
X Insert the new bulb into bulb holder ;.
X Insert bulb holder ;into the lamp and turn
it clockwise.
X Align housing cover :and turn it clock-
wise until it engages.
X Replace the cover in the front wheel arch
(Y page 114). 114
Changin
gbulbsLight sand windscreen wipers
Page 118 of 389

Main-beam headlamps (hal
ogen head-
lamps) X
Switch off the lights.
X Open the bonnet.
X Turn housing cover :anti-clockwis eand
pul lito ut.
X Pul llever =upwards and remove bulb
holder ;.
X Take the bulb out of bulb holder ;.
X Insert the new bulb into bulb holder ;.
X Simultaneously press bulb holder ;and
pull lever =downwards.
X Align housing cover :and tur nitclock-
wis euntil it enga ges.
Side lamps/parking lamps (halogen
headlamps) X
Tur nhousing cover :anti-clockwise and
pull it out.
X Pull out bulb holder ;.
X Take the bulb out of bulb holder ;.X
Insert the new bulb int obulbh older ;.
X Insert bulb holder ;.
X Align housing cover :and tur nitclock-
wis euntil it enga ges. Changing th
erear bulbs
Opening and closin gthe serv icef lap You must open the service flap in the luggage
compartm entb efor eyou can change the
bulbs in the tail lamps. Left-hand service flap
Right-han
dservice flap
X To open: release servic eflap :at the top,
e.g. with ascrewdriver, and swing it do wn-
ward in the direction of the arrow.
X Right side :remov ethe first-ai dkit before-
hand and pull the luggage net down.
X To close: reinsertservice flap :. Changing bulbs
115Lightsand windscreen wipers Z
Page 170 of 389

safety reasons, get out of the vehicle first
and survey the off-road route.
R chec kthe depth of water before fording
river sand streams.
R loo kout for obstacle ssuch as rocks, holes,
tree stumps and furrows.
R take care when turning on an uphil lor
downhill slope and when turning at sharp
angles. The vehicle could otherwise tip
over.
R always keep the side windows and the pan-
oram asliding sunroof closed during the
journey.
R do not stray from marked routes or paths.
i Information abou tretrofitting special all-
ter rain tyres is available from any
Mercedes-Benz Service Centre. H
Environmental note
Protection of the environmen tisofprimary
importance .Trea tnature with respect.
Observe all prohibiting signs.
Checklist before drivin goff-road X
Engine oi llevel: checkthe engin eoil and
top it up if necessary.
When drivin gonsteep gradients, the oil
level must be sufficiently hig htoensure a
correct oil supply in the vehicle.
X AdBlue ®
tank (BlueTEC vehicl es):check
the fluid leve land, if necessary, refill to the
maximum (13 l) (Y page157).
X Tyre-chang etool kit: check that the jack
is working and make sure you have the
wheelbrace, arobust tow cabl eand afold-
ing spade in the vehicle.
X Wheels and tyres: checkthe tyr etread
depth and tyre pressure.
X Check for damag eand remove any foreign
objects, e.g. small stones, from the
wheels/tyres.
X Repl acea ny missing valve caps. X
Repl aced ented or damaged wheels.
X Wheels: dented or bent wheels can lead to
al oss of tyr epressure and damag etot he
tyr eb ead. Before driving off-road, check
the wheels and replace them if necessary.
Checklist after driving off-road !
If you detect damage to the vehicle after
driving off-road, have the vehicle checked
immediately at aqualified specialist work-
shop.
Driving over rough terrain places greater
demands on your vehicle than driving on nor-
mal roads. After driving off-road, check the
vehicle. This allow syou to detec tdamage
promptly and reduce the risk of an accident
to yourself and other road users.
X Vehicles with the ON&OFFROAD pack-
age: activate the on-road program
(Y page 222).
X Vehicles without the ON&OFFROAD
package: deactivate the on-road program
(Y page 222).
X Deactivate the LOW RANGE off-road gear
(Y page 223).
X Deactivate DSR (Y page 220).
X Lower the vehicle level again to alevel suit-
able to the road conditions, e.g. to the high-
way/high-speed level.
X Clean the headlamps and rear lights and
check for damage.
X Clean the front and rear licence plates.
X Clean the wheels/tyres with awater jet and
remove any foreign objects.
X Clea nthe wheels, wheel arches and the
vehicle underside with awater jet; check
for any foreign objects and damage.
X Check whethe rtwigs or other parts of
plants have become trapped. These
increase the risk of fire and can damage
fuel pipes, brake hose sorthe rubber bel-
lows of the axl ejoint sand propeller shafts.
X After the trip, examine without fail the
entire undercarriage, wheels ,tyres, brakes, Driving tips
167Drivingand park ing Z
Page 208 of 389

R
you leave or enter atow n.
R the roa dtypec hanges (e.g. mot orway,
country road).
R yo uh avet ravelle dacertainminimum dis-
tance withou tthe traffic sign being repea-
ted or detected again.
X Display Speed Limi tAssist usin gthe on-
boar dcomputer (Y page 244).
i You can also activat eSpeed Limit Assist
using COMAND Online. The maximum per-
missible speed is shown in the COMAND
display; see the COMAND operating
instruc tions. Nigh
tView Assist Plus
Important safet ynotes In addition to the illumination provided by the
normal headlamps, Night View Assist Plus
uses infrared light to illuminat
ethe road. The
Night View Assist Plus camer apicksupt he
infrared light and displays amonochrome
image in COMAND. The image displayed in
COMAN Dcorresponds to aroad lit up by
main-beam headlamps. This enables you to
see the road's course and any obstacles in
good time. When pedestrian recognition is
active, pedestrians recognised by the system
ar eh ighlighted in the Night View Assist Plus
display. G
WARNING
Night View Assist Plus is only an aid designed
to assist driving and does not relieve you of
the responsibility to pay attention. Continue
to look through the windscreen instead of
relyin gont he Night View Assist Plus display.
You ar eresponsible for safet yand must drive
in accordance with traffic conditions .You
coul dotherwis eendange ryoursel fand oth-
ers. The system may be impaired or may not func-
tion if:
R there is poo rvisibility, e.g. due to snow,
rain, fog or spray.
R the windscreen is dirty, misted up or cov-
ered, for instance by asticker, in the vicinity
of the camera.
R on bends ,onuphill gradients or downhill
gradients.
Light from the headlamps of oncoming vehi-
cles does not affect the Night View Assist Plus
display in the multifunction display. This is
also the case if you cannot switch on the
main-beam headlamps due to oncomin gtraf-
fic. G
WARNING
Night View Assis tPlus does not detect
object sinthe immediat evicinity of the vehi-
cle. Look through the windscreen when
manoeuvring. Make sure that there are no
people or animals in the area in which you are
manoeuvring.
i Infrared light is not visible to the human
eye and therefore does not dazzle. Night
View Assist Plus can therefore remain
switched on even if there is oncomin gtraf-
fic. :
Night Vie wAssist Plus camera
Activating Nigh tView Assist Plus Depending on your vehicle'
sdate of manu-
facture, the csymbol or Ãfor the Driving systems
205Drivingand parking Z
Page 209 of 389

position "Automatic drivin
glights/daytime
drivin glights" is located on the light switch. You can only activat
eNight View Assist Plus
if:
R the key is in position 2in the ignition lock.
R it is dark.
R the light switc hisset to either c,
à orL.
R rev ers egear has not been engaged.
X Make sure COMAND Onlin eisswitched on.
X Press button :.
The Night View Assist Plus display appears
in the COMAN Ddisplay. :
Night View Assist Plus display
; Pedestrian recognised
= Framing
? Symbol for active pedestrian recognition
You can read abou thow to adjust the bright-
nes soft he COMAND displa yinthe COMAND
operating instructions.
i The infrared headlamps only switc hon
when the vehicle is being drive natspeeds of at least 10 km/h. This mean
sthat you
do not hav ethe full visual range while sta-
tionar yand cannot check whether Night
View Assist Plus is working.
Pedestrian recognition G
WARNING
Pedestrian recognition may be impaired or
inoperative if:
R pedestrians are partiall yorentirely
obscured by obje cts, e.g. by parked vehi-
cles.
R the silhouett eofthe pedestrian in the Night
View Assist Plus displa yisincomplete or
interrupted, e.g. by powerful ligh treflec-
tions.
R pedestrians do not contrast with the sur-
roundings.
R pedestrians are not in an upright position,
e.g. sitting, squattin gorlying.
i Animals are not recognised by pedestrian
recognition.
Night View Assist Plus is able to recognise
pedestrians by typical characteristics, e.g. a
silhouette in the shape of aperson.
Pedestrian recognition is then switched on
automatically if:
R Night View Assist Plus is activa ted.
R you are driving faster than about 10 km/ h.
R the surrounding sare dark ,e.g.w hen driv-
ing outside built-up areas without street
lighting.
If pedestrian recognition is active ,sym-
bol ?appears. If apedestrian is now recog-
nised, they are framed =and thereby high-
lighted. If the pedestrian recognition system
has brought apedestrian to your atten tion,
look through the windscreen to evaluate the
situation .The actual distanc etoobjectsand
pedestrians cannot be gauged accurately by
looking at ascreen.
It may be the case that objects are highlighted
as wel laspedestrians. 206
Driving systemsDriving and parking
Page 250 of 389
![MERCEDES-BENZ M-CLASS SUV 2011 Owners Manual X
Press :or9 to select the Perma‐ nent display function.
You will see the selected setting: outsidetemperat
ure or
Dig. speedo m[mph] .
X Press the abuttontos ave the setting.
Lights Switching the d MERCEDES-BENZ M-CLASS SUV 2011 Owners Manual X
Press :or9 to select the Perma‐ nent display function.
You will see the selected setting: outsidetemperat
ure or
Dig. speedo m[mph] .
X Press the abuttontos ave the setting.
Lights Switching the d](/manual-img/4/55578/w960_55578-249.png)
X
Press :or9 to select the Perma‐ nent display function.
You will see the selected setting: outsidetemperat
ure or
Dig. speedo m[mph] .
X Press the abuttontos ave the setting.
Lights Switching the day
time drivin glights on/
off
If you have activated the Daytime driving
lights function and the light switch is set to
Ã,t he daytim edriving lights are automat-
icall yswitched on during daylight hours when
the engine is running. When it is dark, the side
lamps and the dipped-beam headlamps are
also switched on automatically.
X Switc hoff th eengine.
X Pres sthe = or; button on the steer-
ing wheel to selec tthe Settings menu.
X Press the :or9 button to selec tthe
Light submenu.
X Press the abutton to con firm.
X Press the :or9 buttontos elect the
Daytim edriving lights function.
Yo uw ill see the selected setting: on or
off .
X Press the abutton to save the setting.
Switching the Intelligent Light System
on/off
If you activat ethe Intell .Light Sys‐ tem: function
,you activa te thefollowing
func tions:
R motorwa ymode
R active light func tion
R cornering light func tion
R exte nded range foglamps
X Press the =or; button on the steer-
ing wheel to select the Settings menu.
X Press the :or9 button to select the
Light submenu.
X Press the abutton to confirm. X
Press :or9 to select the Intell. Ligh
tSys. function.
Yo uw ill see the selected setting: on or
off .
X Press the abutton to save the setting.
If you set the dipped-bea mheadlamps for
driving on the right/left (Y page 247),the
multifunction displa yshows the Intell. Ligh
tSystem: System inoperative Inactiv
efor left-side traffic or
Intell. Light System: System inoper‐
ative Inactiv
efor right-side traf‐ fic displa
ymessage instead of the Intell. Ligh
tSystem: functio
nintheLight sub-
menu.
Setting th edipped-bea mheadlamp sfor
driving on the left/right
This function is only available on vehicles with
the Intelligent Light System.
You can use this function to switch between
symmetrical beam and asymmetrical dipped
beam (Y page 106).
If you set the dipped-beam headlamps for
driving on the right/left, then motorway
mode and the extended range foglamps are
not available.
X Press the =or; button on the steer-
ing wheel to select the Settings menu.
X Press the :or9 buttontos elect the
Light submenu.
X Press the abutton to confirm.
X Press :or9 to select the Dipped beam
sSetting for function.
Yo uw ill see the selected setting: Right- side traffic or
Left-s idet raffic .
X Press the abuttontos ave the setting.
When you change the setting, conversion
does not take place until the nex ttime the
vehicle is stationary.
You can also have the dipped-beam head-
lamps set for drivin gonthe right or lef tata
qualified specialist workshop. Menus and submenus
247On-board comp uter and displays Z