2011 MERCEDES-BENZ M-CLASS SUV belt
[x] Cancel search: beltPage 57 of 389
:
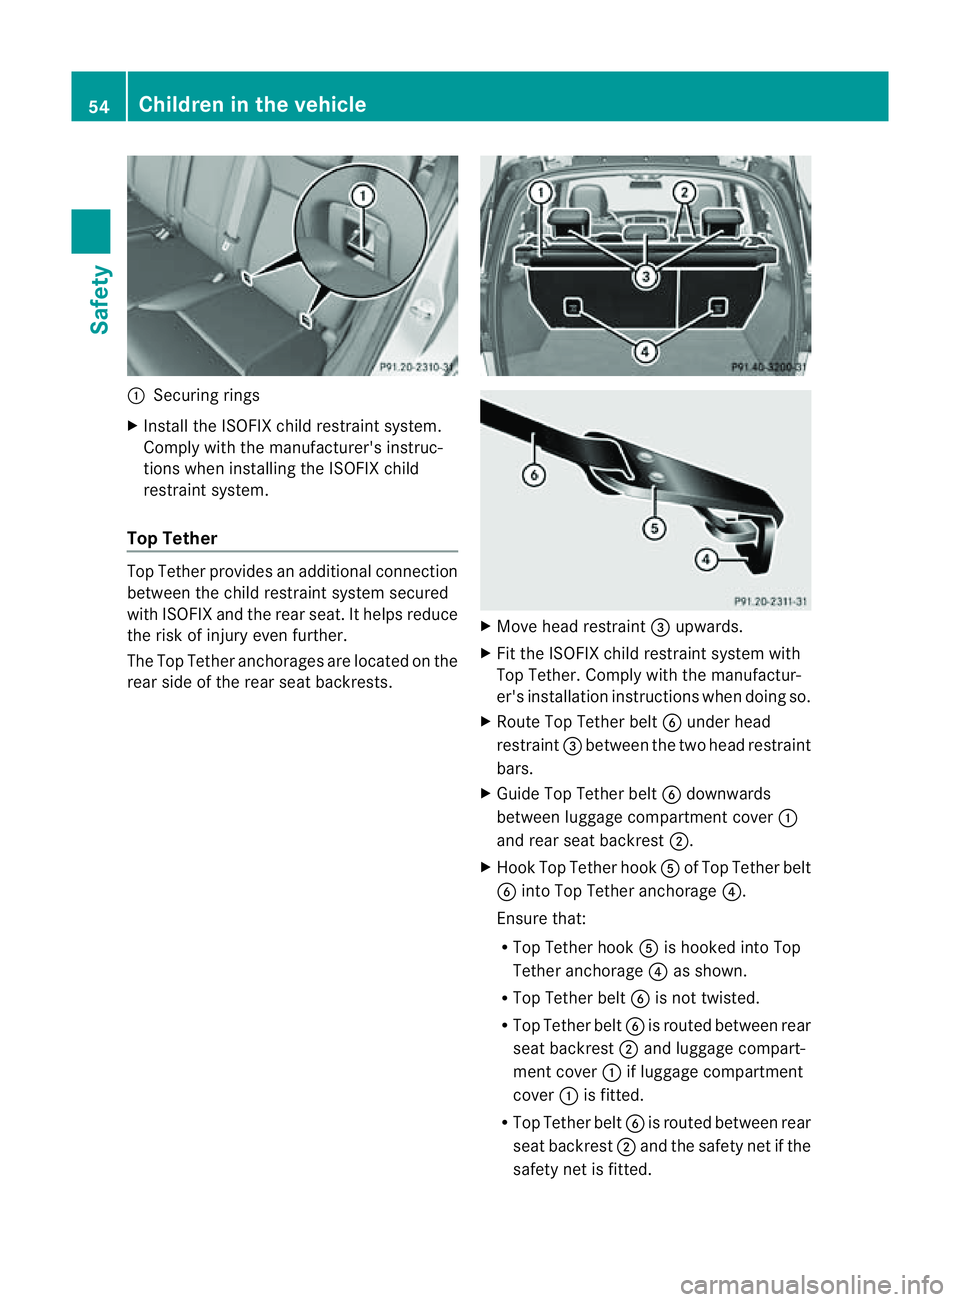
Securing rings
X Install the ISOFIX child restraint system.
Compl ywitht he manufact urer's instruc-
tions when installing the ISOFI Xchild
restra ints ystem.
Top Tether Top Tether provides an additiona
lconnection
between the child restra ints ystem se cured
with ISOFIX and the rea rseat. It helps reduce
the risk of injury even further.
The Top Tether anchorages are located on the
rear side of the rear seat back rests. X
Move head restraint =upwards.
X Fit the ISOFIX chil drestraint system with
Top Tether .Compl ywith the manufactur-
er' sinstallatio ninstructions whe ndoing so.
X Rout eTop Tether belt Bunder head
rest raint = between the two head restraint
bars.
X Guide Top Tether belt Bdownwards
between luggage compar tment cover:
and rear seat backrest ;.
X Hook Top Tethe rhook Aof Top Tether belt
B intoT op Tether anchorage ?.
Ensure that:
R Top Tether hook Ais hooked int oTop
Tether anchorage ?as shown.
R Top Tether belt Bis not twisted.
R Top Tether belt Bis routed between rear
seat backrest ;and luggage compart-
men tcover :if luggage compartment
cover :is fit ted.
R Top Tether belt Bis routed between rear
seat backrest ;and the safety net if the
safety net is fit ted. 54
Children in the vehicleSafety
Page 58 of 389

X
Tension Top Tether belt B.Complywith
the manufacturer's installation instruc-
tions when doing so.
X Move head restraint =back down again
slightly if necessary (Y page 95). Make
sure that you do not interfere with the cor-
rect routing of Top Tether belt B. Children in the vehicle
55Safety Z
Page 69 of 389

G
WARNING
If EBD ha smalfunctioned, the braking system
remains available with full brake boosting
effect. However, the rear wheels can still lock,
e.g. under full braking. This coul dcaus eyou
to lose control of your vehicle and cause an
accident. You shoul dtherefore adapt your
drivin gstyle to the different handling charac-
teristics.
X Observe the notes on warning and indica tor
lamps (Y page 286) as well as display mes-
sages (Y page 256). ADAPTIV
EBRAKE
ADAPTI VEBRAKE enhances braking safety
and offers increased braking comfort. In addi-
tion to the braking function, ADAPTIV EBRAKE
als oh as the HOLD function (Y page187) and
hi ll st art assist (Y page141). For further
information, se eDriving tip s(Ypage 162). PRE-SAFE
®
Brake
PRE-SAFE ®
Brake is only available in vehic les
with DISTRONIC PLUS.
i Observe the "Important safety notes" sec-
tion (Y page61).
PRE-SAFE ®
Brake can help you to minimise
the ris kofaf rontal collision wit havehicle
ahead or reduce the effects of such acolli-
sion. If PRE-SAFE ®
Brake has detected arisk
of collision, you wil lbewarned visuall yand
acoustically as wel lasbyautomatic braking.
PRE-SAFE ®
Brake cannot prevent acollision
withou tyou rintervention.
Thi sfun ctio nwill issue awarnin gats peeds of
arou nd 30 km/h or moreif:
R for aperiod of several seconds ,the dis-
tance to the vehi cleinf ront is to oshor tfor
the speed at which you ar etravelling .The ·
distanc ewarning lamp then lights up
in the instrument cluster.
R you are rapidly approaching the vehicle in
front .Ani ntermittent warning tone will
then sound and the ·distance warning
lamp will light up in the instrument cluster.
X Brake immediately in order to increas ethe
distanc efrom th evehicle in front.
or
X Take evasiv eactio nprovide ditiss afe to do
so.
If the driver and passengers have fastened
their seat belts, PRE-SAFE ®
Brake can also
can also perform the following at speeds of
above approximately 30 km/h:
R brake the vehicle automatically from a
spee dofuptoa pproximately 20 0km/h
R trigge rpreventative passenger protection
measures (PRE-S AFE®
)( Ypage 45)
Due to the nature of the system, particularly
complicated driving conditions may cause
unnecessar ywarnings or the unnecessary
intervention of PRE-SAFE ®
Brake. To end this,
you can either depress the accelerator pedal
further, activate kickdown or release the
brake pedal.
The braking action of PRE-SAFE ®
Brake is
ended automatically if:
R you drive slowe rthan approximately
15 km /h.
R you manoeuvre to avoid the obstacle.
R there is no longe rany danger of arear-end
collision.
R there is no longer an obstacl edetected in
front of your vehicle.
If you have activated DSR (Y page 220), PRE-
SAFE ®
brak eisd eactivated.
With the help of the rada rsensor system,
PRE- SAFE ®
Brake can detect obstacles that
are in front of your vehicle for an exte nded
period of time.
At speeds up to approximately 70 km /h,
PRE- SAFE ®
Brake may als odetect stationary 66
Driving safet
ysystemsSafety
Page 89 of 389
lead to serious or even fatal injury. Make sure
that nobody can becom etrapped when clos-
ing the side windows.
If as ide window is obstructed during closing
and reopen sagain slightly:
X Im me diately after the window blocks, pull
the correspondin gswitc hagain until the
side window has closed.
The side window is close dwith increased
force.
If as ide window is obstructed again during
closing and reopen sagain slightly:
X Im me diately after the window blocks, pull
the correspondin gswitc hagain until the
side window has closed.
The side window is close dwithout the anti-
entrapmen tfeature. Sliding sunroof
Important safet
ynotes
Your vehicle may be fitted with asliding sun-
roof or apanorama sliding sunroof. In the fol-
lowing section, the ter m"slidin gsunroof"
refers to both types of sliding sunroof. G
WARNING
Make sure that nobody can become trapped
when opening and closing the sliding sunroof.
If there is arisk of entrapment ,release the
switch immediately. Durin gautomatic opera-
tion ,push the switc hbriefly in any direction
to stop the sliding sunroof. G
WARNING
Th eg lass in th epanoram asunroof could
brea kinana ccident. If yo uare not wearin ga
seat belt ,there is arisk that you could be
thrown through the opening in the event of the
vehicle overturning. Therefore, always wear a
seat belt to reduce the risk of injuries. G
WARNING
Children could injur ethemselves if they oper-
ate the slidin gsunroof.
Never leave children unsupervised in the vehi-
cle. Always take the key with you when leaving
the vehicle, even if you are only leaving it for
as hort time.
! Only open the panoram asliding sunroof
if it is free of snow and ice. Otherwise, mal-
func tions ma yoccur.
Do not allo wanything to protrude from the
sliding sunroof. Otherwise, the seals could
be damaged.
i Resonance noises can occur in addition
to the usual airflow noises whe nthe sliding
sunroof is open. They ar ecaused by minor
pressure fluctuations in the vehicle interior.
Change the position of the sliding sunroof
or open aside window slightly to reduce or
eliminat ethese noises. Operating th
esliding sunroof
Opening and closing i
You can continue to operate the sliding
sunroof after switching off the engine or
removing the key. This function remains
activ efor fiv eminutes or until the driver's
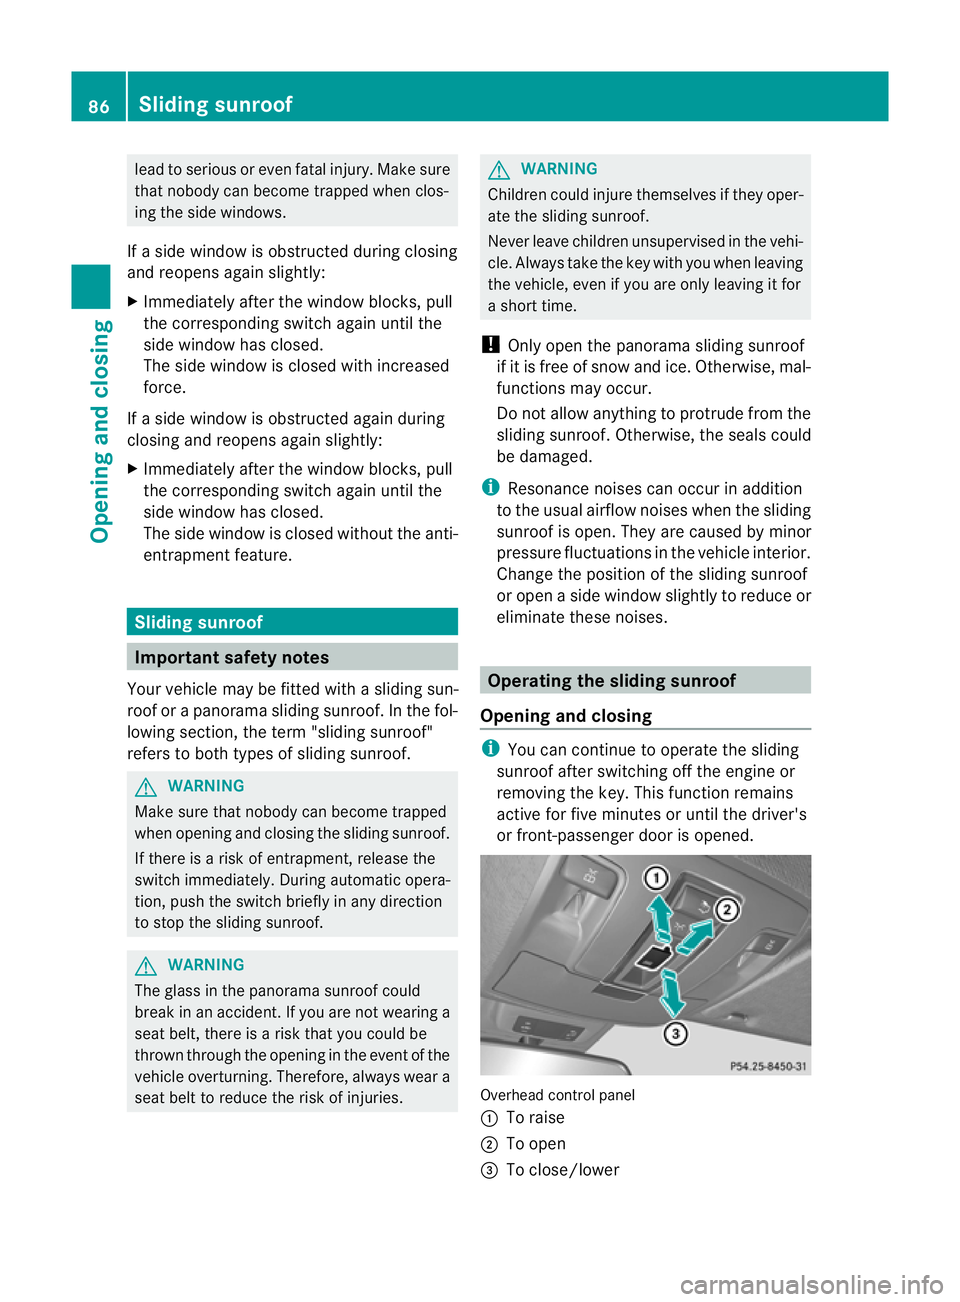
or front-passenger door is opened. Overhead control panel
:
To raise
; To open
= To close/lower 86
Slidin
gsunroofOpenin gand closing
Page 95 of 389
Usefu
linfor mati on
i This Owner's Manual describes all models
and all standard and optional equipment
available to your vehicle at the time of pub-
lication of the Owner's Manual. Country-
specific deviation sare possible .Please
not ethat your vehicle ma ynot be equipped
with all featur es described. This also
applies to safety-releva ntsystems and
functions.
i Please read the information on qualified
specialist workshops (Y page 24).Correct driver'
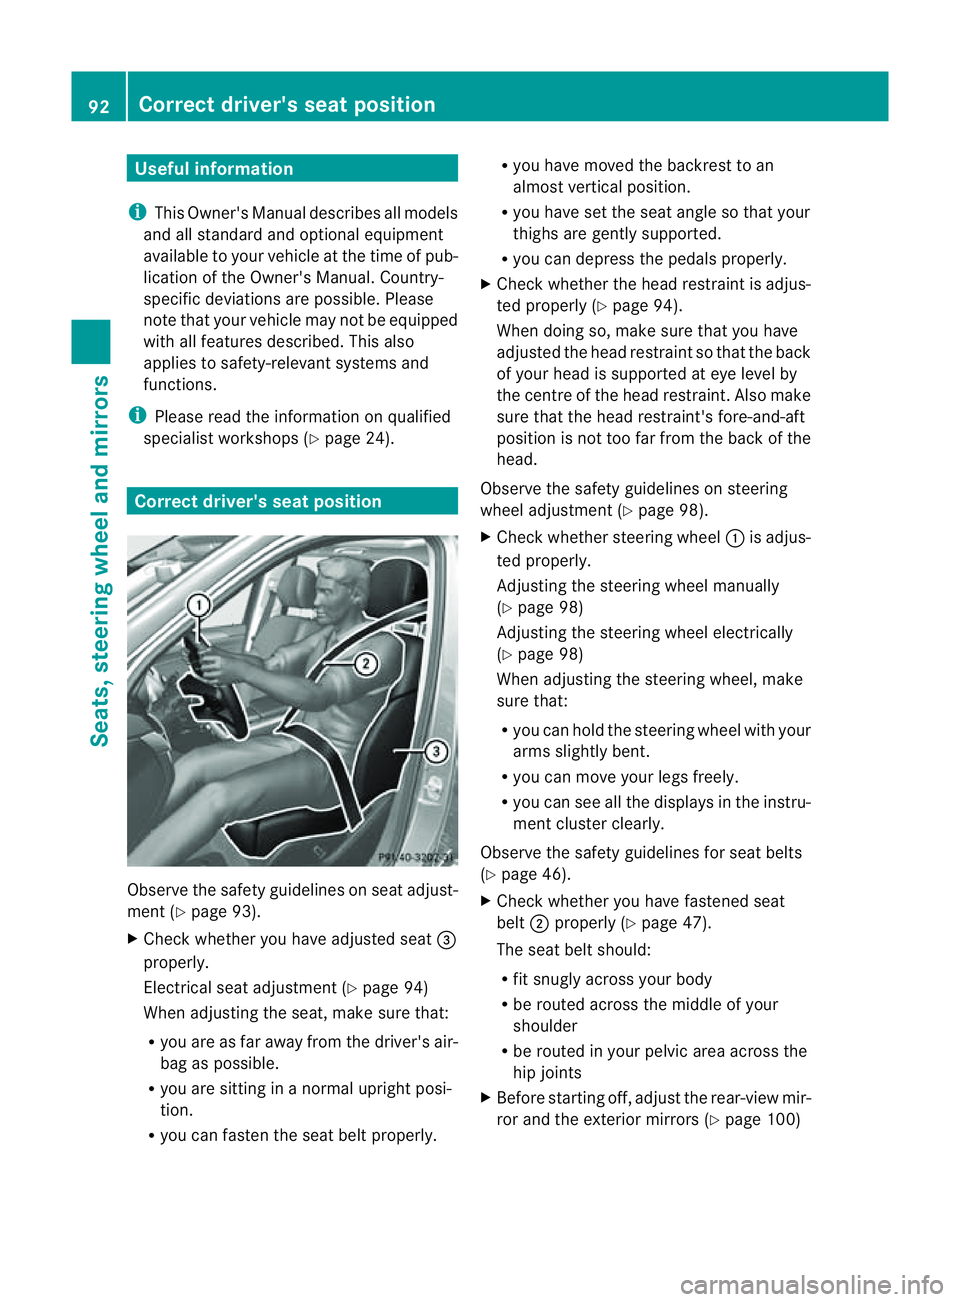
sseatp osition Observ
ethe safety guideli neso nseat adjust-
men t(Ypage 93).
X Chec kwhether you hav eadjusted seat =
properly.
Electrical seat adjustment (Y page 94)
When adjusting the seat, mak esure that:
R you are as far away from the driver' sair-
bag as possible.
R you are sitting in anormal upright posi-
tion.
R you can fasten the seat belt properly. R
you have moved the backrest to an
almost vertical position.
R you have set the seat angle so that your
thighs ar egently supported.
R you can depress the pedals properly.
X Check whether the head restraint is adjus-
ted properly (Y page 94).
When doing so, mak esure that you have
adjusted the head restraint so that the back
of your head is supported at eye level by
the centre of the head restraint .Also make
sure that the head restraint's fore-and-aft
position is not too far from the bac kofthe
head.
Observ ethe safety guidelines on steering
wheel adjustment (Y page 98).
X Chec kwhether steering wheel :is adjus-
ted properly.
Adjusti ngthe steering whee lmanually
(Y page 98)
Adjustin gthe steering wheel electrically
(Y page 98)
When adjustin gthe steering wheel, make
sur ethat:
R you can hold the steering wheel with your
arms slightl ybent.
R you can mov eyour legs freely.
R you can see all the displays in the instru-
men tcluster clearly.
Observe the safety guidelines for seat belts
(Y page 46).
X Check whether you have fastened seat
belt ;properly (Y page 47).
The seat belt should:
R fit snugly across your body
R be routed across the middle of your
shoulder
R be routed in your pelvic area across the
hip joints
X Befor estartin goff, adjus tthe rear-vie wmir-
ror and the exterior mirrors (Y page 100)92
Correct driver's seat positionSeats, steerin
gwhee land mirrors
Page 96 of 389
in such
away that you have agood view of
roa dand traffic conditions.
X Vehicles with amemory function: save
the seat, steerin gwheel and exterior mirror
settings (Y page 103). Sea
ts Important safety notes
G
WARNING
The seats can still be adjusted when ther eis
no key in the ignition lock. For this reaso n,
children shoul dnever be left unsupervised in
the vehicle. They could adjust the seat sand
become trapped. G
WARNING
Only adjus tthe driver' sseat when the vehicle
is stationary. You will otherwise be distrac ted
from the road and traffic conditions and you
could lose control of the vehicle as aresult of
the seat moving. This could cause an acci-
dent. G
WAR
NING
If you adjus tthe seat height car elessly, you or
others could be trapped and thereb yinjured.
Children in particular could unintentionally
pres sthe buttons to electrically adjust the
seat sand become trapped.
Take care that:
R whil emoving the seats, your hands do not
get under the lever assembly of the seat
adjustmen tsystem.
R children in the vehicl edonot slidetheir
hands unde rthe levers. G
WARNING
Make sur ethat nobody can becom etrapped
when adjusting the seats.
Observe the notes on airbags.
Secure children as recomm ended; see the
"Children in the vehicle" section. G
WAR
NING
Make sure that the back of your head is sup-
ported at eye level by the central area of the
head restraint .Ifyour head is not supported
correctly by the head restraint ,you coul dsuf-
fer asever eneck injury in the event of an
accident .Never driv eifthe head rest raints are
not engaged and set correctly. G
WARNING
As eat belt can only offer its intended degree
of protection when the back rest is almost ver-
tical and the occupan tiss itting upright. Avoid
seat positions that do not allow the seat belt
to be routed correctly. Adjust the backrest so
that it is as upright as possible .Never travel
with the back rest reclined too fa rbackwards.
You could otherwise be seriousl yoreven
fatally injured in th eevent of an accident or
sudden braking.
! To avoid damag etothe seats and the seat
heating, observe the followin ginformation:
R do not spill any liquids on the seats. If
liquid is spilled on the seats, dry them as
soon as possible.
R if the sea tcover sare damp or wet, do not
switc hont he seat heating. The seat
heating should also not to be used to dry
the seats.
R clea nthe seat cover sasrecommended;
see the "In terior care" section.
R do not transport heav yloads on the
seats. Do not plac eshar pobjects on the
seat cushions ,e.g. knives, nails or tools.
Th es eats should only be occupied by
passengers, if possible.
R when the seat heatin gisinoperation ,do
not cover the seats with insulating mate-
rials, e.g. blanke ts,c oats, bags, seat cov-
ers, child seats or booster seats.
! When you mov ethe seats, make sur ethat
ther eare no objects in th efootwell or
behind the seats. Otherwise, you could
damage the seats and the objects. Seats
93Seats,steering wheeland mirrors Z
Page 145 of 389
X
Take your foot off the brake pedal.
i Onc eyou have taken your foot off the
brake pedal, the vehicle is held for around
one second.
X Pull away.
Hill star tassist will not func tion if:
R you ar epulling away on alevel road or a
downhill gradient.
R the transmission is in position N.
R the electric parking brak eisapplied.
R ESP ®
is malfunc tioning. ECO sta
rt/stop function
General notes The ECO start/stop func
tion switches the
engin eoff automatically if th evehicle stops
moving.
The engine star tsautomatically when you pull
away again. The ECO start/stop function
thereby helps you to reduce the fuel con-
sumption and emissions of your vehicle.
The ECO start/stop function is activated each
time the engine is switched on. The system is
operational when ECO symbol ¤is shown
in the multifunc tion display.
If the ECO star t/stop func tion is deactivated
(Y page 143), ECO symbol ¤is not
shown. G
WARNING
If the ECO symbol appears in the multifunc-
tion displa ywhen the engin eisswitched off,
the engine was switched off automatically.
However, all vehicle systems remain active. If
you open the door, unfasten your seat belt or
remove your foot from the brake pedal, the
engine will automatically start .The vehicle
ma ybegin moving. There is arisk of accident.
To prevent the vehicle from accidentally pull-
ing away, do not release the brake pedal until
you want to drive on. Do not leave the vehicle until you have
switched off the ignition and secured the vehi-
cle to prevent it from rolling away.
! Always switch the ignition off and take the
key with you when leaving the vehicle.
Automa tice ngine switch-off The ECO start/stop function switches the
engin
eoff automatically in certain situations.
To do this ,the vehicle must brake to astand-
still and the brakes must remain depressed
with the transmission in position Dor N.
The engine is only switched off if:
R the vehicle is at astandstill.
R the outside temperature is withi nthe range
that is suitable for the system.
R the engin eisatnormal operatin gtemper-
ature.
R the set temperature for the vehicle interior
has been reached.
R the batter yissufficiently charged.
R the system detects that the windscreen is
not misted up when the air-conditioning
system is switched on.
R the bonnet is closed.
R the driver' sdoor is closed and the seat belt
is fastened.
i If you shift the transmission from Rto D,
the ECO start/stop func tion is available
again onc ethe ¤ ECO symbol reap-
pear sint he multifunction display.
i The engin ecan be switched off automat-
ically amaximum of three times in succes-
sion. The automatic engine switch-off is
then available again after the ¤ECO
symbol appears in the multifunction dis-
play.
i You can still activate the HOLD function
when the vehicle is stationary, even if the
engine has been switched off automati-
cally. It is then not necessary to continue
applying the brakes during the automatic
stop phase .When you depress the accel- 142
DrivingDriving and parking
Page 146 of 389
erator pedal, the engin
estart sautomati-
cally and the brakin geffect of th eHOLD
function is deactivated. Depress the accel-
erator pedal carefully ,asthe engin emust
be started first.
Automatic engin estart The engi
neis started automatically if:
R you depress the accelerator pedal.
R you release the brakes when in transmis-
sion position Dor N,w hen the HOL Dfunc-
tion is not active.
R the ECO start/stop function is deactivated
by pressing the ECO button.
R the vehicle start storoll.
R the driver's seat belt is removed or the driv-
er' sd oor is opened.
R you shift the transmission to position R.
R you switc htodrive program M.
R yo us witch to an off-road program.
R the brake system requires this.
R the system detect smoistur eont he wind-
screen when the air-conditionin gsystem is
switched on.
R the battery' scharge status is too low.
R the bonnet is opened.
R the temperature in the vehicle interior devi-
ates from the set range.
i Shif ting the transmissio ntoposition P
does not star tthe engine.
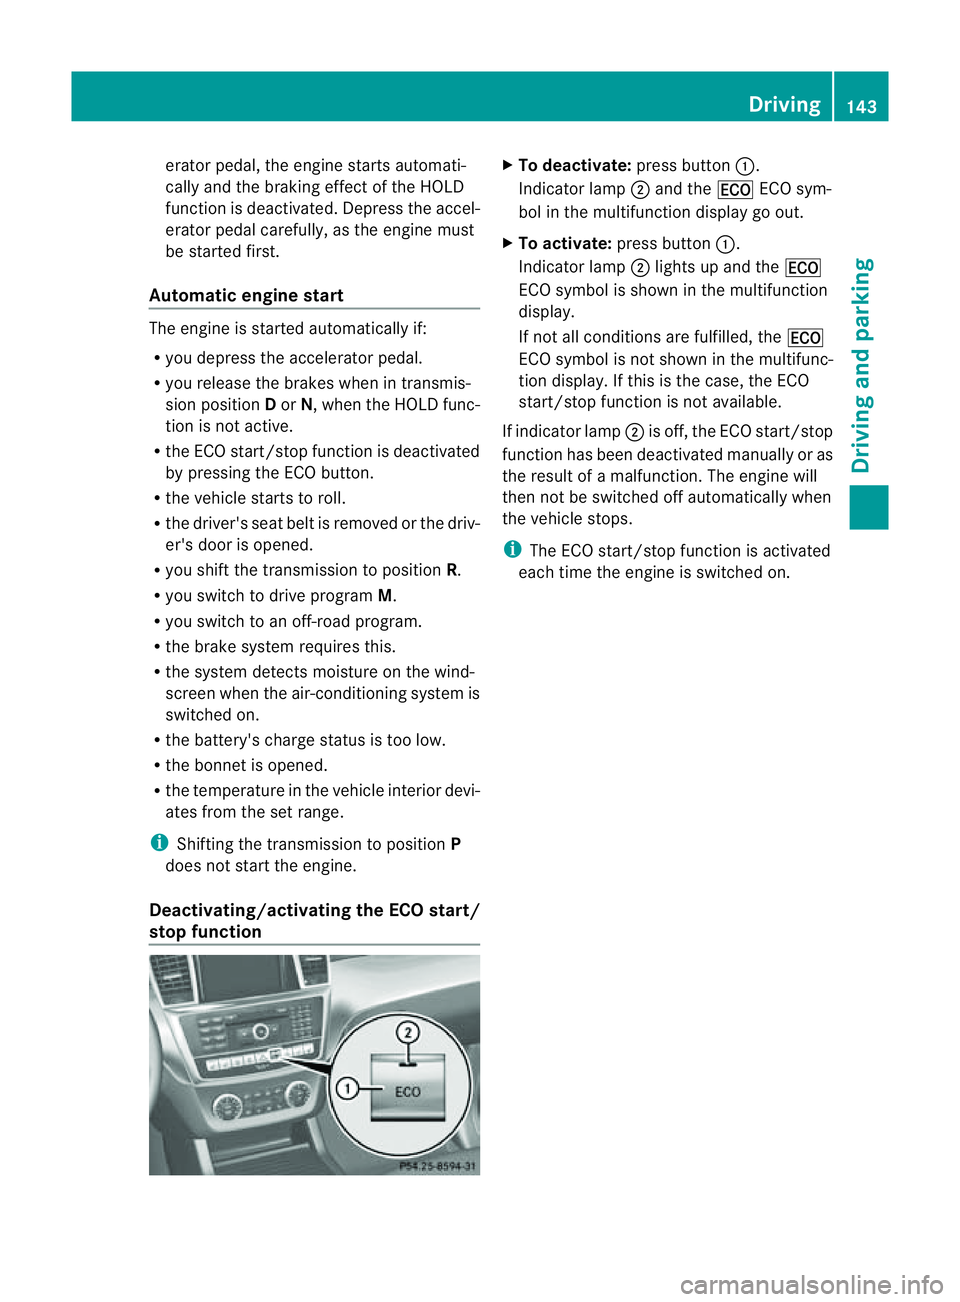
Deactiva ting/activa ting th eECO start/
stop function X
To deactivate: press button:.
Indicator lamp ;and the ¤ECO sym-
bol in the multifunction display go out.
X To activate: press button :.
Indicator lamp ;lights up and the ¤
ECO symbol is shown in the multifunction
display.
If not all conditions are fulfilled, the ¤
ECO symbol is not shown in the multifunc-
tion display. If this is the case, the ECO
start/stop function is not available.
If indicator lamp ;is off, the ECO start/stop
function has been deactivated manually or as
the result of amalfunction. The engine will
then not be switched off automatically when
the vehicle stops.
i The ECO start/stop function is activated
each time the engine is switched on. Driving
143Drivingand parking Z