2011 MERCEDES-BENZ M-CLASS SUV key battery
[x] Cancel search: key batteryPage 104 of 389

X
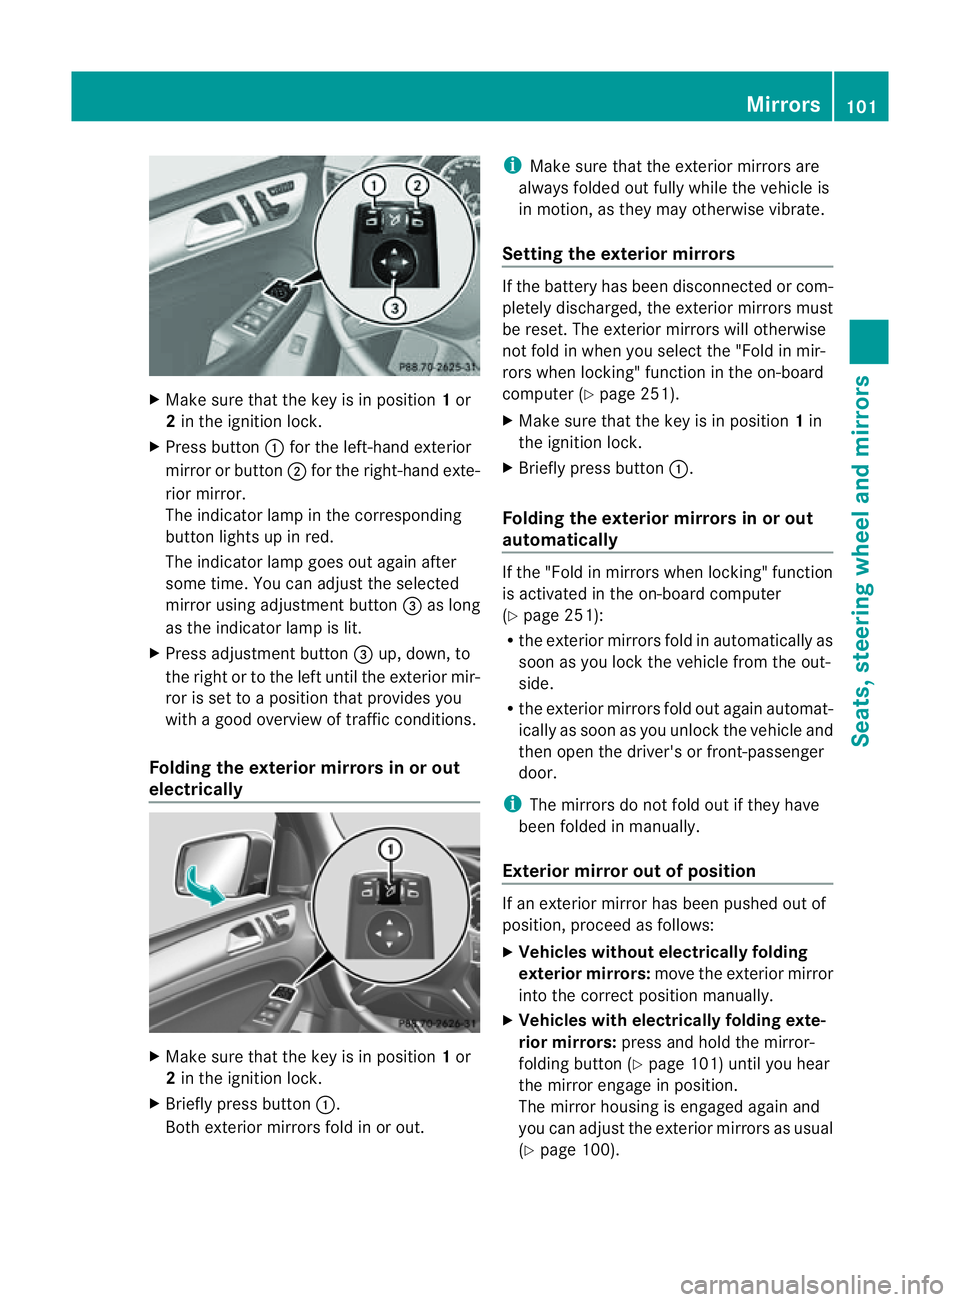
Make sur ethat the key is in position 1or
2 in the ignition lock.
X Press button :for the left-hand exterior
mirror or button ;for the right-hand exte-
rior mirror.
The indicator lam pint he corresponding
button lights up in red.
The indicator lam pgoes out again after
some time. You can adjust the selected
mirror using adjustment button =as long
as the indicator lam pislit.
X Press adjustment button =up, down, to
the right or to the left until the exterior mir-
ror is set to aposition that provides you
with agood overview of traffic conditions.
Folding th eexterior mir rors in or out
electrically X
Make sure that the key is in position 1or
2 in the ignitio nlock.
X Briefl ypres sbutton :.
Both exterior mirrors fold in or out. i
Make sure that the exterior mirrors are
always folded out fully while the vehicle is
in motion, as they may otherwis evibrate.
Setting the exterior mirrors If the battery has been disconnected or com-
pletely discharged, the exterior mirrors must
be reset. The exterior mirrors will otherwise
not fold in when you select the "Fold in mir-
rors when locking" func tion in the on-board
computer (Y page 251).
X Make sure that the key is in position 1in
the ignition lock.
X Briefl ypres sbutton :.
Folding the exterior mirrors in or out
automatically If the "Fold in mirrors when locking" function
is activated in the on-board computer
(Y page 251):
R the exterior mirrors fold in automatically as
soo nasyou lock the vehicle from the out-
side.
R the exterior mirror sfold out again automat-
ically as soon as you unloc kthe vehicle and
then open the driver's or front-passenger
door.
i The mirrors do not fol dout if they have
been folded in manually.
Exterior mirror out of position If an exterior mirror has been pushed out of
position, proceed as follows:
X Vehicles without electrically folding
exterior mirrors: move the exterior mirror
into the correct position manually.
X Vehicles with electrically folding exte-
rior mirrors: press and hold the mirror-
folding button (Y page 101)until you hear
the mirror engage in position.
The mirror housing is engaged agai nand
you can adjus tthe exterior mirrors as usual
(Y page 100). Mir
rors
101Seats ,steeri ngwheel and mirrors Z
Page 115 of 389

X
Drive with the headlamps switched on.
Th elevel of moisture diminishes, depend-
ing on the length of the journey and the
weather conditions (humidity and tem per-
ature).
If th elevel of moisture does not diminish:
X Have the headlamps checked at aquali fied
specialis tworkshop. Interior lighting
Overview of interior lighting
Overhead con
trol panel
: p To switch the left-hand front reading
lamp on/off
; c To switch the front interior lighting
on
= v To switch the rear interior lighting
on/off
? | To switch the front interior lighting/
automatic interior lighting control off
A p To switch the right-hand front read-
ing lamp on/off
B To switch the automatic interior lighting
control on Interio
rlighting control
Impor tant notes In order to prevent the vehicle'
sbattery from
discharging, the interior lighting functions are
automatically deactivated after some time except for when the key is in position
2in the
ignition lock.
The colour and brightness of the ambient
lighting may be set using the on-board com-
puter (Y page 248).
Automatic interior lighting control X
To switch on: set the rocker switch to
centre position B.
X To switch off: set the rocker switch to the
| position.
The interior lighting automatically switches
on if you:
R unlock the vehicle
R open adoor
R remove the key from the ignition lock
The interior light is activated for ashort while
when the key is removed from the ignition
lock .You can activate this delayed switch-off
using the on-boar dcomputer (Y page 249).
Manua linterior lighting control X
To switc hthe fron tinterior lighting on:
set the roc kers witch to the cposition.
X To switch the front interior lighting off:
set the rocker switch to the |position.
X To switch the rear interior lighting on/
off: press the ubutton.
X To switch the reading lamp son/off:
press the pbutton. Crash-responsive emergency lighting
The interior lightin gisactivate dautomatically
if the vehicle is involved in an accident.
X To switch off the crash-responsive
emergency lighting: press the hazard
warning lamp button.
or
X Lock and then unlock the vehicle using the
key. 112
Interior lightingLights and windscreen wipers
Page 131 of 389

X
Tur ncontrols :orB cloc kwise or anti-
clockwise (Y page 121), (Y page 121).
or
X Press the KorI button. Demisting the windows
Windows misted up on the inside X
Activate the ¿/Ácooling with air
dehumidification func tion.
X Activate automatic mode Ã.
X If the window scontinue to mist up, activa te
the demisting function (Y page 127).
i You should only select this setting until
the windscreen is clear again.
Windows misted up on the outside X
Activate the windscreen wipers.
X Press the _button repeatedly until the
P orO symbol appears in the dis-
play.
i You should only select this setting until
the windscreen is clear again. Rear window heating
Switchin gon/off G
WARNI
NG
Clear all windows of ice or snow before setting
off. Otherwise, impaired visibility could
endanger you and others.
The rear window heating has ahigh cur rent
draw. You should therefore switc hitoff as
soon as th ewindow is clear ,Ito therwise
switches off automatically after several
minutes.
If the battery voltage is too low, the rear win-
dow heati ngmay switch off. X
Turn th ekey to position 2in the ignition
lock.
X Press the ¤button.
The indicator lam pinthe¤ button lights
up or goes out.
Problems wit hthe rea rwindow hea ting The rea
rwindow heatin ghas switched off
prematurely or cannot be activated.
X Switch off any consumers that are not
required, e.g. readin glamps or interior
lighting.
When the battery is sufficiently charged,
the rear window heatin gisactivated again
automatically. Activating/deactivating air-recircula-
tion mode
You can deactivate the flow of fresh air if
unpleasant odours are entering the vehicle
from outside .The air already insid ethe vehi-
cle will then be recirculated.
The operation of air-recirculation mode is the
sam efor all contr ol panels. G
WARNING
Only swit chover to air-recirculation mode
briefly at low outside temperatures. Other-
wise, the window scould mist up, thus impair-
ing visibility and endan geringyoursel fand
othe rs.T his ma ypreve ntyou from observing
the traffic conditions, thereby causing an
accident.
X Turn the key to position 2in the ignition
lock.
X To activate: press thedbutton.
The indicator lam pint he d button lights
up.
i In the even tofhigh pollution levels 12
or at
high outside temperatures, air-recircula-
tion mode is automatically activated. When
air-recirculation mode is activated auto-
12 THERMOTRONIC automatic climate control only. 128
Operating the climate control systemClimate control
Page 133 of 389

X
To deactivate: press theÌ/Á but-
ton.
The indicator lamp in the Ì/Ábut-
ton goe sout.
i Residual hea tisdeactivated automati-
cally:
R after about 30 minutes
R when the ignition is switched on
R if the batter yvoltage drops
R if the coolant temperatur eistoo low Auxiliar
yheating
Important safety notes G
WARNING
Exhaust fumes are produced when the auxili-
ary heating is in operation. Inhalin gthese
exhaust fumes can be poisonous. You should
therefor eswitch off the auxiliary heating in
confined spaces without an extraction sys-
tem, e.g. agarage. G
WARNING
When operating the auxiliary heating, parts of
the vehicle may become very hot, and highly
inflammable material such as fuels could be
ignited. Operating the auxiliary heating is thus
prohibited at filling stations or when your vehi-
cle is being refuelled .You must therefore
switc hoff the auxiliary heating at filling sta-
tions.
! Operatin gthe auxiliary heating/ ventila-
tion draws on the vehicl ebattery. After you
have heated or ventilated the vehicle a
maximum of two times, drive for alonger
distance.
i Switch on the auxiliary heatin gregularly,
e.g. for about ten minutes ever ymonth.
The auxiliary heatin gheats the air in the vehi-
cle interior to the set temperature without
using the heat of the runnin gengine .The aux-
iliary heating is operated directly usin gthe
vehicle' sfuel. For this reason, the tank con- tent must be at least at reserve fuel level to
ensure that the auxiliary heating functions.
The auxiliary heating/ventilation automati-
cally adjusts to changes in temperature and
weather conditions. For this reason, the aux-
iliary heating could switch from ventilation
mode to heating mode or from heating mode
to ventilation mode.
The auxiliary heating switches off when the
engine is switched off. The auxiliary ventila-
tion switches off when you turn the key to key
position 2.
The auxiliary heating switches off automati-
cally after 30 minutes. This time limit can be
altered. To do this, visit aqualified specialist
workshop, e.g. aMercedes-Benz Service
Centre.
You can notu se the auxiliary ven tilation to
cool the vehicle interior to atemperature
lower than the outside temperature.
Before switching on X
Turn the key to position 2in the ignition
lock.
X Set the temperature.
The auxiliary heating/ventilation can be acti-
vated even when the climate control is being
controlled manually. Optimum comfor tcan
be attained when the system is set to auto-
matic mode. Set the temperature to 22 †.
The auxiliary heating/ventilation can be acti-
vated or deactivated using the remote control
or the button on the centre console.
The on-board computer can be used to spec-
ify up to three departure times, one of which
may be preselected (Y page 250).130
Operating the climate control systemClimate control
Page 147 of 389

Problems wit
hthe engine Problem Possible causes/consequences and
M Solutions
Th
ee ngine doe snot
start. The starter motor
can be heard. R
There is amalfunction in the engine electronics.
R There is amalfunction in the fuel supply.
X Before attempting to start the engine again, turn the key in the
ignition back to position 0or press the Start/Stop button
repeatedly until all indicator lamps in the instrumen tcluster go
out.
X Try to start the engin eagain (Y page 14 0).A void excessively
long and frequen tattempt stostartthe engine, as this will drain
the battery.
If the engine doe snot star tafter several attempts:
X Consult aqualified specialist workshop, e.g. aMercedes-Benz
Servic eCentre. The engine does not
start .The starter motor
can be heard. The
reserve fuel warning
lam pisl it and the fuel
gauge displa yshows 0. The fuel tan
kise mpty.
X Refue lthe vehicle. The engin
edoes not
start. You cannot hear
the starter motor. The on-boar
dvoltage is too low because the battery is too weak
or discharged.
X Jump-start the vehicle (Y page 348).
If the engin edoes not star tdespite attempt stojump-start it:
X Consult aqualified specialist workshop, e.g. aMercedes-Benz
Servic eCentre. The starter motor was exposed to
athermal load that was too high.
X Allo wthe starter motor to cool down for approximatel ytwo
minutes.
X Try to start the engine again.
If the engine still does not start:
X Consult aqualified specialist workshop, e.g. aMercedes-Benz
Servic eCentre. 144
DrivingDriving and parking
Page 159 of 389

Problems wit
hthe fuel and fuel tank Problem Possible causes/consequences and
M Solutions
Fue
lisl eakin gfrom the
vehicle. G
Ris
kofe xplosion or fire
The fuel line or the fuel tan kisf aulty.
X Turn the key to position 0(Ypage 139 )inthe ignition lock
immediately and remove it.
X Do not restar tthe engin eunder any circumstances.
X Consult aqualified specialist workshop. The engine does not
start. The fuel tank of
avehicle with adiesel engine has been run com-
pletely dry.
X Refuel the vehicle with at least fiv elitres of diesel.
X Turn the ignition on for at least 10 seconds (Y page 139).
X Star tthe engin econtinuously for up to 10 second suntil it runs
smoothly.
If the engine doe snot start:
X Tur nthe ignition on again for approximatel y10seconds
(Y page 139).
X Start the engine again continuously for up to 10 seconds until
it run ssmoothly.
If th eengine doe snot star tafter three attempts:
X Consult aqualified specialist workshop. The fuel filler flap can-
not be opened. The fuel filler flap is not unlocked.
or
The key battery is discharged.
X Unlock the vehicle (Y page 72).
or
X Unlock the vehicle using the emergency key element
(Y page 74). The fuel filler flap is unlocked, but the opening mechanism is jam-
med.
X Consult aqualified specialist workshop. 156
RefuellingDrivin
gand parking
Page 191 of 389

R
the electrica lsystem in thee ngine com-
partment, the battery or the fuses are tam-
pered with.
R the battery is disconnected.
If you leave the vehicl eorpark it, deactivate
the HOLD function and secure the vehicle
against rolling away.
The electric parking brake secures the vehicle
automatically if the HOLD function is activa-
ted and:
R the driver' sdoor is open and the driver's
seat belt is unfastened.
R the engin eisswitched off, unless it is auto-
matically switched off by the ECO start/
stop func tion.
R as ystem fault occurs.
R the powe rsupply is not sufficient.
On steep uphill or downhill inclines or if there
is am alfunction, the transmission may also
automatically be shifted into position P.AIRMATIC package
General notes AIRMATIC enables
asuspension tuning set-
ting to be selected and regulates the damping
behaviou rand level of your vehicle. The sys-
tem comprises aminimum of two compo-
nents. These are ADS (Adaptive Damping Sys-
tem) (Y page 188 )and level control
(Y page 189) .Your vehicle ma yalso be equip-
ped with the Active Curv eSystem
(Y page 188).
Observe the notes on driving with atrailer
(Y page 226).
ADS (Adaptive Damping System) General notes
ADS adapts th
edamping characteristic sto
the curren toperatin gand driving situation. Thi
sd epends on:
R your drivin gstyle
R the road surface conditions
R the AD Ssetting
R the vehicle level setting
Your selection remains stored even if you
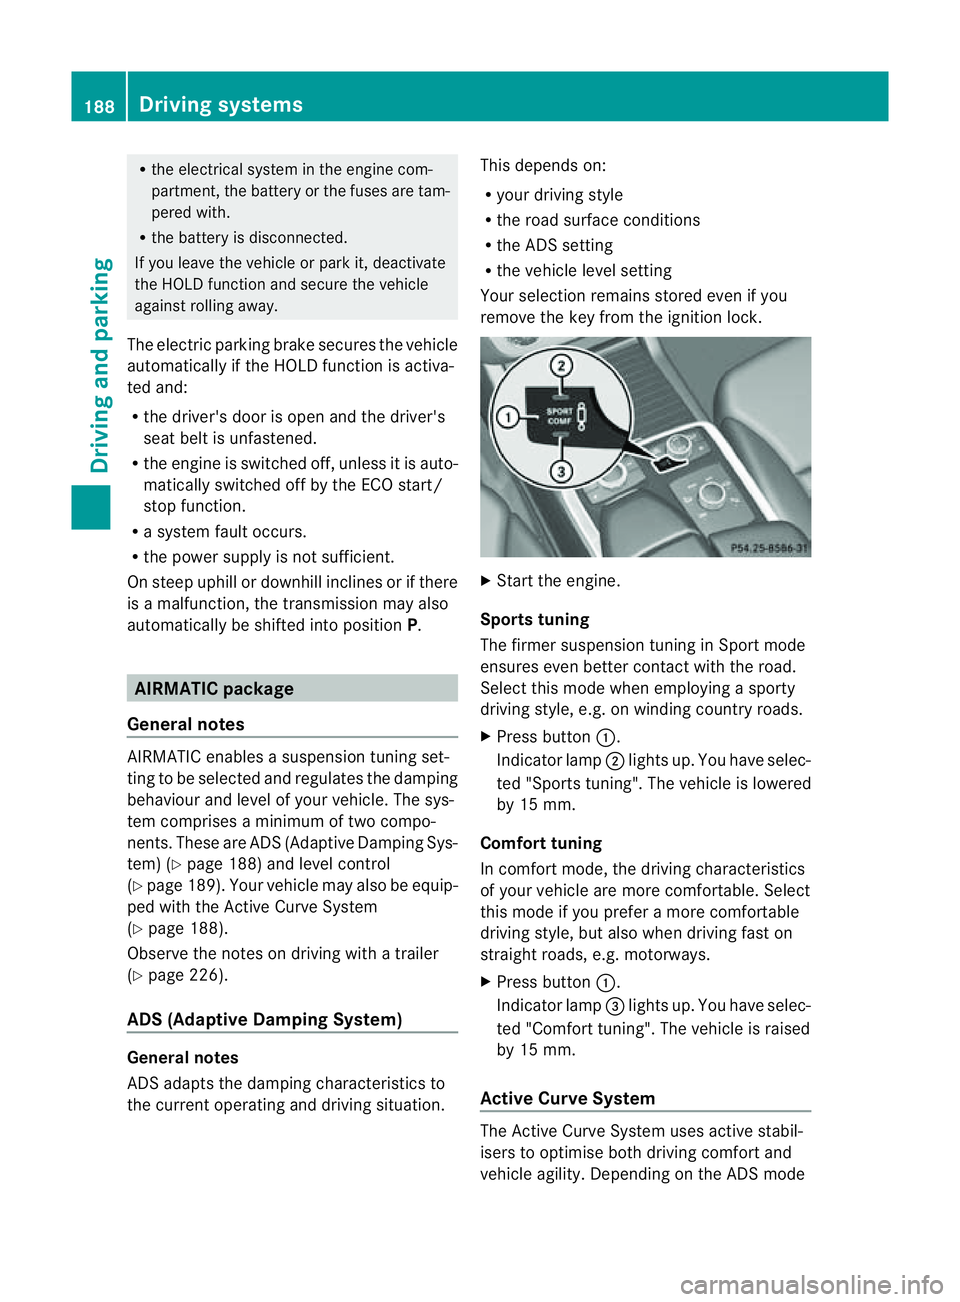
remov ethe key from the igni tion lock. X
Star tthe engine.
Sports tuning
The firmer suspension tunin ginSport mode
ensures even better contact with the road.
Select this mode when employing asporty
drivin gstyle, e.g. on winding country roads.
X Press button :.
Indicator lamp ;lights up. You have selec-
ted "Sports tuning". The vehicle is lowered
by 15 mm.
Comfort tuning
In comfort mode, the driving characteristics
of your vehicle are more comfortable. Select
this mode if you prefer amore com fortable
driving style ,but also when drivin gfast on
straight roads, e.g. motorways.
X Press button :.
Indicator lamp =lights up. You have selec-
ted "Comfort tuning". The vehicle is raised
by 15 mm.
Active Curve System The Active Curve System uses activ
estabil-
isers to optimis eboth drivin gcomfort and
vehicle agility. Depending on the AD Smode 188
Driving systemsDriving and parking
Page 313 of 389

If yo
uuse the sockets for long periods when
the engine is switched off ,the battery may
discharge.
X Tur nthe key to positi on1in the ignition
lock.
i An emergenc ycut-off ensures that the on-
board voltage does not drop too low. If the
on-board voltage is too low, the powe rto
the sockets is automaticall ycut. This
ensure sthat there is sufficien tpower to
star tthe engine.
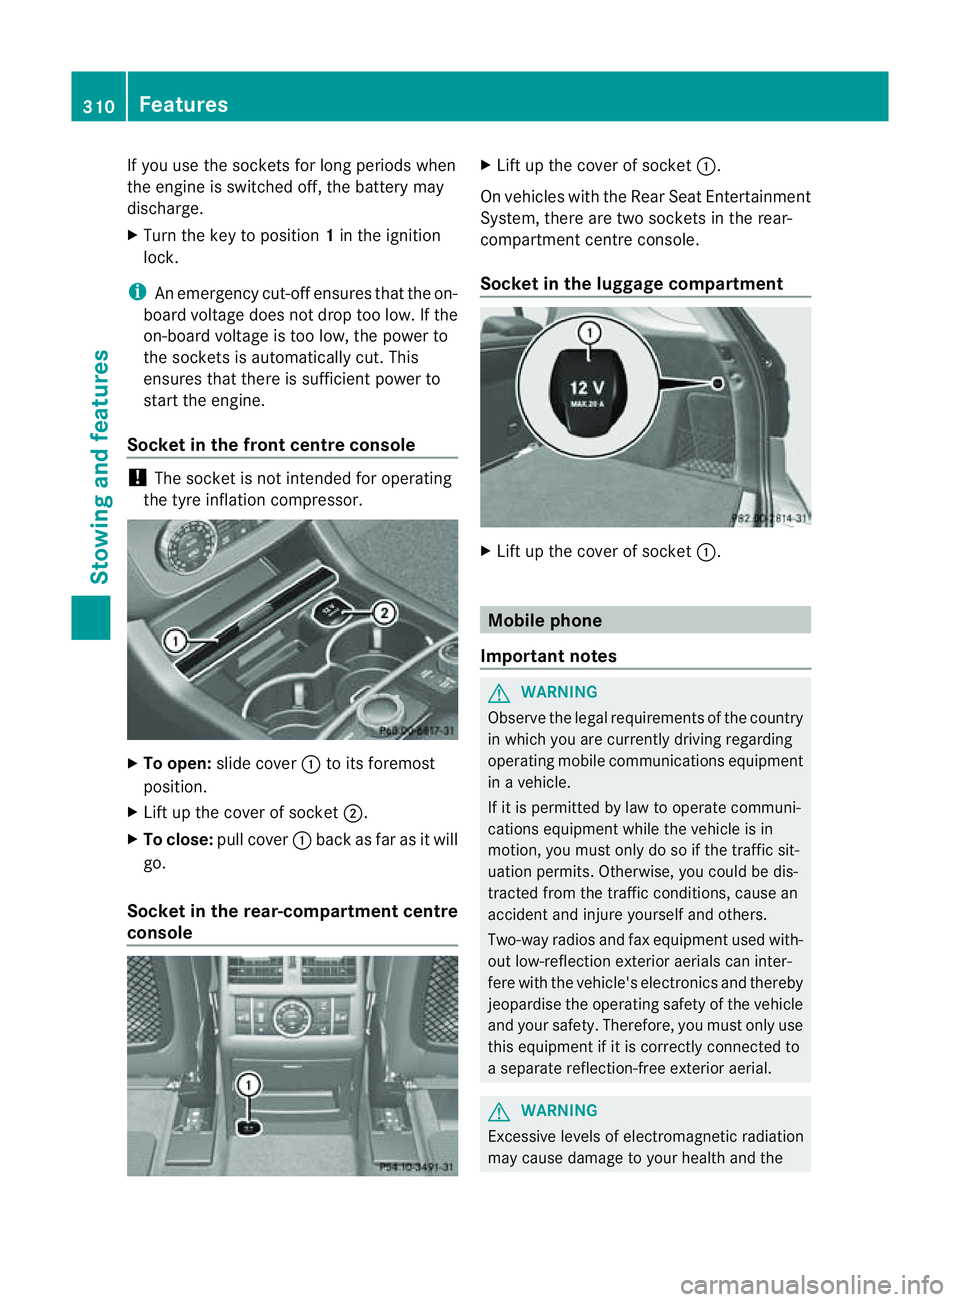
Socket in th efront centre console !
The socke tisn ot intended for operating
the tyr einflation compresso r.X
To open: slide cover :to its foremost
position.
X Lift up the cover of socket ;.
X To clos e:pull cover :back as far as it will
go.
Socket in the rear-compartment centre
console X
Lift up the cover of socket :.
On vehicles with the Rear Seat Entertainment
System, there are two sockets in the rear-
compartment centre console.
Socket in the luggage compartment X
Lift up the cover of socket :. Mobile phone
Important notes G
WARNING
Observe the legal requirements of the country
in which you are currently driving regarding
operating mobile communications equipment
in av ehicle.
If it is permitted by law to operat ecommuni-
cations equipment while the vehicle is in
motion ,you must only do so if the traffic sit-
uation permits. Otherwise, you coul dbedis-
trac tedf rom th etraffic conditions ,cause an
accident and injure yourself and others.
Two-way radios and fax equipment used with-
out low-reflection exterior aerials can inter-
fere with the vehicle's electronics and thereby
jeopardise the operating safety of the vehicle
and your safety. Therefore, you must only use
this equipment if it is correctly connected to
as eparate reflection-f reee xterior aerial. G
WARNING
Excessive level sofelectromagnetic radiation
may cause damage to your health and the 310
FeaturesStowing and features