2011 MERCEDES-BENZ M-CLASS SUV wheel size
[x] Cancel search: wheel sizePage 24 of 389

SRS
................................................ 290
Tyr ep ressure monito r................... 293
Warning triangle ................................ 332
Washer fluid Display message ............................ 282
se eW indscreen washer system
Whee lboltt ightening torque ...........341
Whee lchock ...................................... 338
Wheels Changing/replacing ....................... 363
Ch anging awheel .......................... 337
Ch ecking ........................................ 356
Cleaning ......................................... 325
Fitting awheel ............................... 340
Important safety notes ..................356
Removing awheel .......................... 340
Storin g........................................... 364
Ti gh tening torqu e........................... 341
Whee lsize/tyre size ...................... 364
Windowbag
Display message ............................ 262
Operatio n......................................... 45
Windows
Cleaning ......................................... 326
seeS ide windows
Windscreen
Demisting ...................................... 127
Infrared refl ective .......................... 316
Windscre enwasher system .............321
Windscre enwipers
Problem (malfunction) ...................118
Rea rwindow wiper ........................ 117
Replacing the wipe rblades ............ 117
Switch ingo n/off ........................... 116
Winte roperation
Important safety note s.................. 357
Radi ator cover ............................... 320
Sli pp ery road surf aces ................... 165
Sno wchains .................................. 358
Sno wdrive program ....................... 219
Winte rtyres
Limiting th espee d(on-board com-
puter) ............................................ .249
M+S tyre s...................................... 358
Wipe rblades
Cleaning ...... ................................... 327
Important safety note s.................. 117Replacing (o
nthe rea rwindo w)..... 118
Replacing (windscreen) ..................117
Wooden trim (cleanin ginstruc-
tions) .................................................. 329 Index
21
Page 103 of 389

Position of th
esteerin gwheel for driv-
ing Th
es teering whee lismoved to the previously
set position if:
R the driver's door is closed.
R you inser tthe key int othe ignition lock.
or
R you press the Star t/Stop butto nonce on
vehicles with KEYLESS-GO.
If you clos ethe driver's door with the key
inserted int othe ignition lock ,the steering
wheel is automatically moved to the previ-
ously set position.
The last position of the steering wheel is
stored when you switc hoff th eignition or
when you stor ethe setti ngwith the memory
function (Y page 103).
Crash-responsive EASY-EXIT fea tureIf th
ecrash-resp onsive EASY-EXIT feature is
trig gere dinana ccident,the steeri ngcolu mn
will mov eupwards when the driv er'sdoor is
opened. This occurs irrespective of the posi-
tion of the key in the ignition lock .This makes
it easier to exit the vehicle and rescue the
occupants.
The crash-responsive EASY-EXIT featur eis
only operational if the EASY-EXIT/ENTRY fea-
tur eisa ctivate dinthe on-boar dcomputer. Mirrors
Rear-view mirror
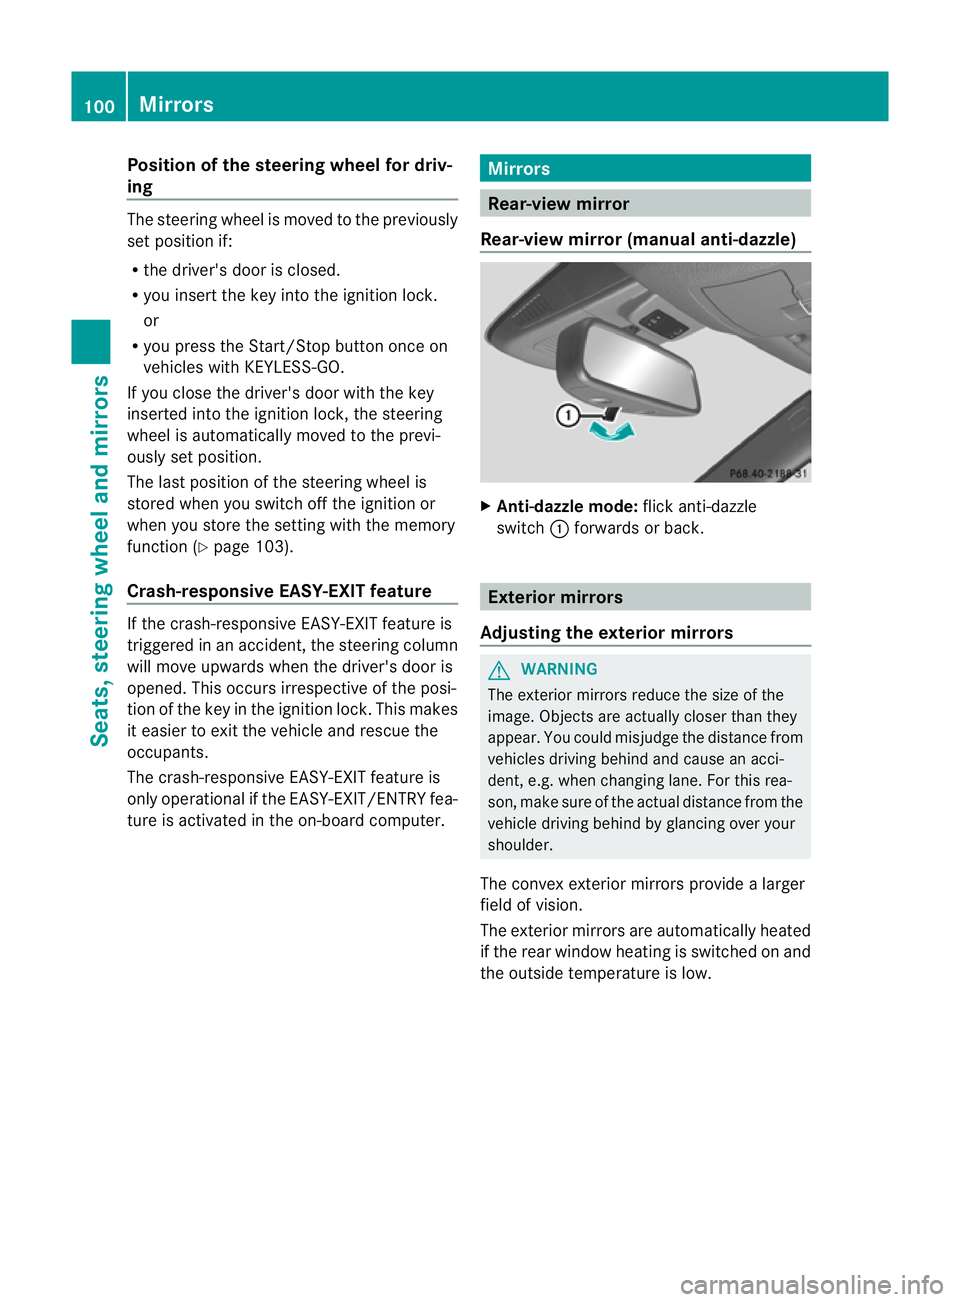
Rear-view mirror (manua lanti- daz zle) X
Anti-dazzle mode: flick anti-dazzle
switch :forward sorback. Exterior mirrors
Adjusting the exterior mirrors G
WARNING
The exterior mirrors reduce the size of the
image. Objects are actually closer than they
appear. You could misjudge the distance from
vehicles driving behind and cause an acci-
dent, e.g. when changing lane. For this rea-
son, make sure of the actual distance from the
vehicle driving behind by glancing over your
shoulder.
The convex exterior mirrors provide alarger
field of vision.
The exterior mirrors are automatically heated
if the rear window heating is switched on and
the outside temperature is low. 100
MirrorsSeats
,steering wheel and mirrors
Page 243 of 389

:
Digita lspeedom eter
Resetting values Yo
uc an reset the values of the following func-
tions:
R trip meter
R trip compute r"From start"
R trip co mputer"From reset"
X Press the =or; buttononthe steer-
ing whee ltoselect theTrip menu.
X Press the 9or: button to select the
functio nthat you wish to reset.
X Press a. Resettin
gthe trip computer "From start" (example)
X Press :to select Yes and press
a
to confirm. Naviga
tion menu
Displaying navigation instructions In the
Navi menu, the multifunction display
shows navigation instruc tions. For more
information ,see the separate operating
instructions.
X Switch on the audio system with Becker ®
MAP PILOT or COMAN DOnline (se ethe
separate operating instructions).
X Press the =or; button on the steer-
ing wheel to selec tthe Navi menu.Route guidance not active
:
Direction of travel
; Curren tstreet
Activated route guidance No change of direction announced
:
Distance to the destination
; Distance to the next change of direction
= Current street
? Symbol for "follo wthe road' scourse"
Change of direction announced without a
lane recommenda tion :
Road to which the change of direction
leads
; Distanc etochange of direction and visual
distanc edisplay
= Change-of-direction icon
When achange of direction has been
announced, you will see visual distanc edis-
play ;next to the symbol for change of
direction =.This decreases in size as you
approach the announced change of direction. 240
Menu
sand submenusOn-board computer and displays
Page 340 of 389

tems mus
tbec arrie dout at aquali fieds pe-
cialist workshop.
Ty re pressure of 180 kPa (1.8 bar/
26 psi) is reached X
Switch off the tyre inflation compressor.
X Unscrew the fille rhose from the valve of
the faulty tyre.
! Afteru se, excess TIREFIT ma yrun out of
the filler hose. This may cause stains.
Therefore, place the filler hos einthe plastic
bag whic hcontained the TIREFIT kit.
X Stow the tyr esealan tbottle, the tyr einfla-
tion compresso rand the warning triangle.
X Pull away immediately. G
WARNING
Do not exceed the maximum speed of
80 km/h.
The "max. 80 km/h" labe lmust be affixed in
the driver's field of vision.
The vehicle's handling characteristic smay be
affected.
X Stop after driving for approximately ten
minutes and check the tyre pressure with
the tyre inflation compressor. G
WARNING
If the tyre pressure is less than 130 kPa
(1.3 bar/2 0psi), the tyr eistoo severely dam-
aged. Do not driv eany further. Consult a
qualified specialis tworkshop which has the
necessary specialist knowledge and tools to
carry out the work required .Mercedes-Benz
recommends that you use aMercedes-Benz
Ser vice Centre for thi spurpose. In particular,
work relevant to safety or on safety-related
systems must be carried out at aqualified
specialist workshop.
X Correct the tyre pressure if it is still at least
130 kPa (1.3 bar/20 psi) (for the values,
see the fuel filler flap). X
To increase the tyr epressure: switchon
the tyre inflation compressor. E
Pressure releas ebutton
F Pressure gauge
X To reduce the tyr epressur e:press pres-
sure release button Eon the filler hose.
X Stow the tyr esealan tbottle, the tyr einfla-
tion compresso rand the warning triangle.
X Drive to the neares tworkshop and have the
tyr ec hange dthere.
X Hav ethe tyr esealan tbottle replaced as
soon as possible at aqualified specialist
workshop, e.g. at aMercedes-Benz Ser vice
Centre. H
Environmental note
Have the use dtyre sealant bottle dispose dof
professionally, e.g. at aMercedes-Benz
Ser vice Centre.
X Have the tyre sealant bottle replaced every
four years at aqualified specialist work-
shop, e.g. aMercedes-Benz Ser vice
Centre. Changing
awhee land fitting th espare
wheel
Preparing the vehicle G
WARNING
The wheel and tyre size of the emergency
spare wheel/s pare wh eelm ay differ to tha tof
the damaged wheel. Whe nusing an emer- Flat ty
re
337Breakd ownassistance
Z
Page 341 of 389

genc
yspare wheel/spar ewheel the handling
characteristic softhe vehicle ma ychange.
Adap tyour style of driving accordingly.
Never operate the vehicle with mor ethan one
emergenc yspare wheel/spar ewheel that dif-
fer sins ize.
Only use an emergenc yspare wheel/spare
wheel of adiffering size briefly and do not
switch off ESP ®
.
When using an emergenc yspare wheel you
must not exceed the maximum speed of
80 km/h. G
WARNING
Hav ethe emergenc yspare wheel/spare
wheel replaced with anew wheel as soon as
possible at aqualified specialist workshop
which has the necessary specialist knowledge
and tools to carry out the work required.
Mercedes-Benz recommends that you use a
Mercedes-Benz Service Centre for this pur-
pose .Inp articular, work relevant to safety or
on safety-related systems must be carried out
at aq ualified specialist workshop.
i Vehicles withou tanemergency spare
wheel/spare whee lare not equippe dwith
wheel-changing tools at the factory. For
more information on which tools are
required to perfor mawheel change on your
vehicle, e.g. wheel chock ,wheel wrenc hor
centring pin, consult aMercedes-Benz
Servic eCentre.
X Prepar ethe vehicle as described
(Y page 334).
X Ifat railer is coupled to th evehicle, uncou-
ple it.
X Remov ethe followin gitems (depending on
the vehicle's equipment) from the stowage
well under the luggage compartment floor:
R the emergency spare wheel 23
R the whee lwrench
R thef olding wheel chock
R the jack R
the ratchet rin gspanner
R the centrin gpin
X Secur ethe vehicle to preven titfrom rolling
awa y.
Se curing the vehicle to prevent it from
rolling away If your vehicle is equippe
dwithaw heel choc k,
it can be found in the vehicle tool kit
(Y page 333).
The folding wheel chock is an additional
securing measure to prevent the vehicle from
rolling away, for example when changing a
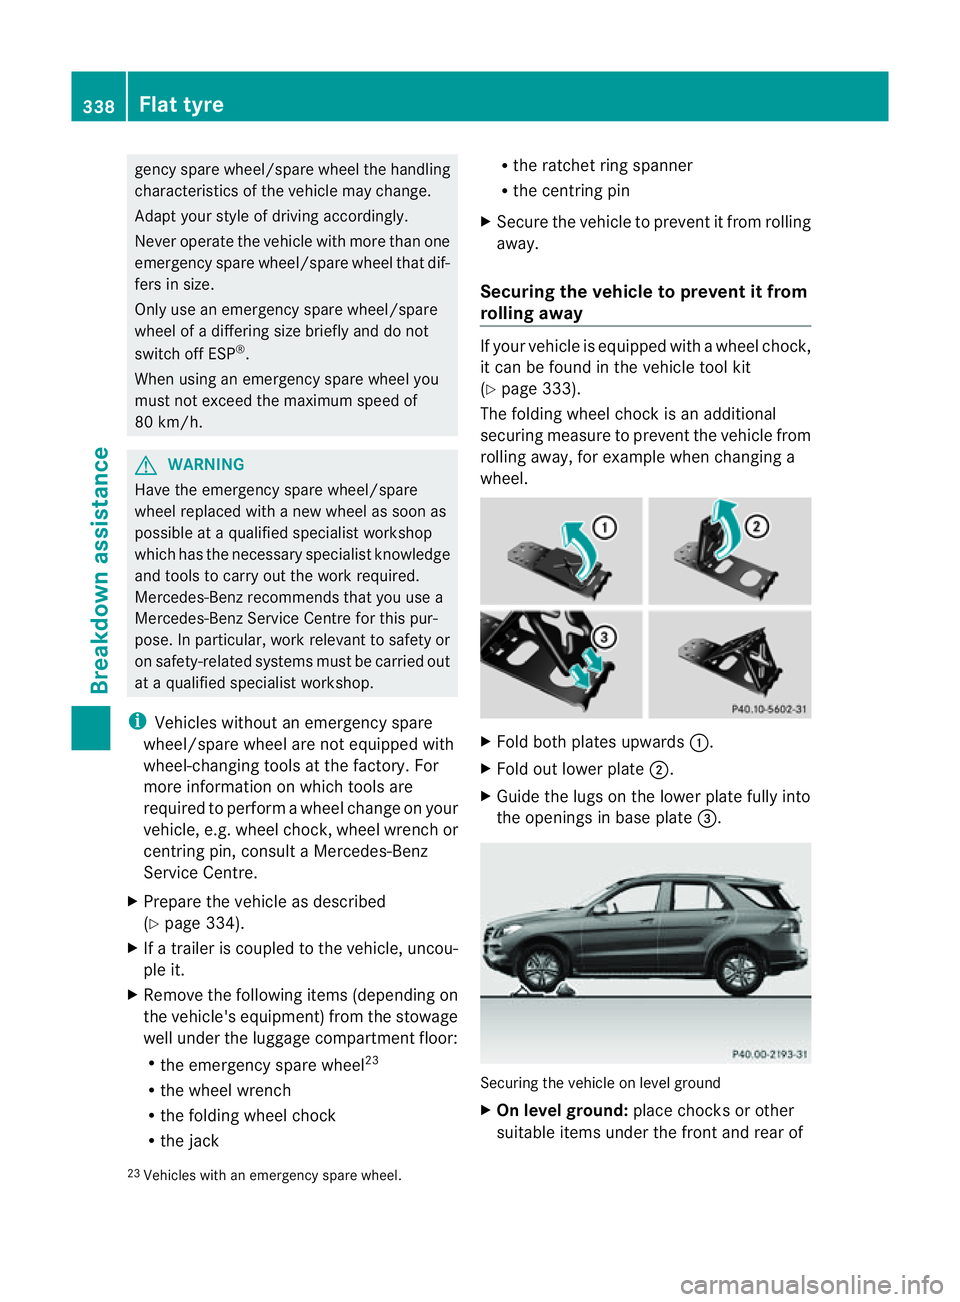
wheel. X
Fold both plates upwards :.
X Fold out lower plate ;.
X Guide the lugs on the lower plate fully into
the openings in base plate =. Securing the vehicle on level ground
X
On level ground: place chocksorother
suitable items under the front and rear of
23 Vehicles with an emergenc yspare wheel. 338
Flat tyreBreakdown assistance
Page 345 of 389

and transpor
tthe wheel in the luggage
compartment.
or
X Depending on the size of the wheel, you
ma yalso be able to secure the faulty wheel
in the emergenc yspare wheel well. In this
case, you must remove the stowage tray
from the emergency spare wheel well and
store it securely in the luggage compart-
ment.
i When you are driving with the collapsible
emergency spare wheel fitted, the tyre
pressur eloss warnin gsystem or the tyre
pressure monitor cannot function reliably.
Only restart the tyre pressure los swarning
system/tyre pressure monitor when the
defective wheel has been replaced with a
new wheel.
Vehicles with tyre pressure monitor: all fit-
ted wheels must be equipped with func-
tioning sensors. The defective wheel
should no longer be in the vehicle. MOExtended tyres (tyres with run-flat
characteristics)
MOExtended tyres (tyres with run-flat char-
acteristics) allow you to continue driving the
vehicle even when one or more tyres lose all
air pressure.
MOExtended tyres may only be used in con-
junction with the activated tyre pressure loss
warning system or with the tyre pressure
monitor.
The maximum permissible distance which
can be driven in run-flat mode depends on the
load in the vehicle. It is 80 km if the vehicle
is partially laden and 30 km if fully laden.
The maximum permissible distance which
can be driven in run-flat mode is counted from
the moment the tyre pressure loss warning
appears in the multifunction displ ay.
Yo um ust not exceed amaximum spee dof
80 km/h. G
WARNING
Th eh andling characteristics of your vehicle
deteriorate in run-flat mode, for example:
R when cornering
R when braking
R when accelerating rapidly
Adapt your driving style accordingly and avoid
sudden changes in direction and sudden
acceleration, as well as driving over obstacles
(i.e. kerbs, potholes), and driving off-road.
This is particularly the case when the vehicle
is heavily laden.
The maximum permissible distance that can
be driven in run-flat mode depends to alarge
exten tonthe loads placed on the vehicle. It
can be shorter due to high speeds, aheavy
load, sudden changes in direction, the road
surface condition, outside temperature, etc.,
or further if you driv ecarefully and conserva-
tively.
Do not continue to drive in run-flat mode if:
R you hear banging noises.
R the vehicle starts to shake.
R you see smoke and smell rubber.
R ESP ®
is intervening constantly.
R there are tears in the sidewalls of the tyre.
After driving in run-flat mode, you must have
the wheel(s) checked for damage at aquali-
fied specialist workshop which has the nec-
essary specialist knowledg eand tool stocarry
out the work required. The faulty tyre must be
replaced in every case.
Mercedes-Benz recommends that you use a
Mercedes-Benz Service Centr efor this pur-
pose. In particular ,work relevant to safet yor
on safety-related system smust be carried out
at aq ualified specialist workshop.
i Whe nreplacing one or all tyres, make
sure that you only use tyres marked
MOExtended and of the specified size for
the vehicle.
i Vehicles with MOExtended tyres are not
equipped with aTIREFIT kit at th efactory. 342
Flat tyreBreakdown assistance
Page 360 of 389

Tyre tread
G
WARNING
Bea rinm ind that:
R tyre gri pdecrease srapidly on wetroads
when the tread depth is less than 3mm.
Thus ,you should repl acet yres that have
insufficient tread.
R winter tyres sho uld bereplaced when the
trea ddepth is 4mmorl ess as they no lon-
ger provide adequat egrip.
R thet rea donat yre may not wear evenly.
Thus ,you should regularly chec kthe tread
depth and the condition of the tread across
the entire widt hofall tyres. If necessary,
turn the fron twheels to full lock in order to
inspec tthe tyr etrea dm ore easily.
Otherwise, you coul dlose control of the vehi-
cle and cause an accident due to the reduced
grip of the tyres on the road. Note
sons electing, fitting and replac-
ing tyres
R Only fit tyres and wheels of the same type
and make.
R Only fit tyres of the correct size onto the
wheels.
R After fittin gnew tyres, run them in at mod-
erat espeeds for the first 10 0km, as they
onl yreach their ful lperformanc eafter this
distance.
R Do not drive wit htyres which have too little
tread depth ,asthis significantly reduces
the traction on wet roads (aquaplaning).
R Replace the tyres after six year satthe lat-
est, regardless of wear .This also applies to
the emergency spar ewheel/spar ewheel. MOExtended ty
res( tyres with run-flat
characteristics)
MOExtended tyres (tyres with run-flat char-
acteristics) allo wyou to continue drivin gthe vehicle even when one or mor
etyres los eall
air pressure.
MOExtended tyres may only be used in con-
junction with the tyre pressure loss warning
system or with the tyre pressure monitor and
on wheels specifically tested by Mercedes-
Benz.
i Vehicles with MOExtended tyres are not
equipped with aTIREFIT kit at th efactory.
It is therefore recommended that you addi-
tionally equip your vehicle with the TIREFIT
kit if you fit tyres that do not feature run-
flat properties, e.g. winter tyres. ATIREFIT
kit can be obtaine dfrom aMercedes-Benz
Ser vice Centre.
Notes on driving with MOExtended tyres in
the event of aflat tyre can be found in the
"Breakdown assistance" section
(Y page 342). Winter operation
Points to remember
At the onset of winter ,have your vehicle win-
terproofed at aqualified specialist workshop,
e.g. at aMercedes-Ben zService Cent re.
Observe the notes in the "Changin gawheel"
section (Y page 363). Drivin
gwith summer ty res
At temperatures below +7 †, summer tyres
los ee lasticit yand therefore traction and
braking power; chang ethe tyres on your vehi-
cle to M+S tyres .Using summer tyres at very
cold temperatures could cause tears to form,
thereby damagin gthe tyres permanently.
Mercedes-Ben zcannot accept responsibility
for this type of damage. Winter operation
357Wheels andtyres Z
Page 362 of 389

On vehicle
swith the AIRMATIC package, you
must drive at raised vehicle level if snow
chains have been fitted (Y page 188).
Do not exceed the maximum permissible
speed of 50 km/h.
i You may wish to deactivate
ESP ®
(Y page 63) when pulling away with
snow chains fitted. This way you can allow
the wheels to spin in acontrolled manner,
achievin ganincrease ddriving force (cut-
tin ga ction). Tyre pressure
Tyre pressure specifications
You wil lfind atable of tyre pressures for var-
ious operating conditions on the inside of
your vehicle's fuel filler flap.
Operation with emergency spare wheel:
the applicable value for the emergency spare
wheel is stated on the spare wheel and in the
technical data section.
Operation with atrailer: the applicable
value for the rear tyres is the maximum tyre
pressure value stated on the table insid ethe
fuel filler flap.
The tabl einsid ethe fuel filler fla pmay state
tyre pressures for different load conditions.
Thes eare define dinthe tabl easdifferent
number sofpassengers and amounts of lug-
gage. The actual number of seats may vary –
for more information, please refer to the vehi-
cle's registration documents.
If no other data is stated, the tyre pressures
specified on the fuel filler flap appl yfor all
tyres approved for this vehicle. If
at yre size precede satyre pressure, the tyre
pressure information following is only valid
for that tyre size. G
WARNING
Tyre pressure that is eithe rtoo high or too low
has anegativ eeffect on the vehicle's driving
safety ,which coul dlead you to cause an acci-
dent. Therefore, you should regularly check
the pressur eofall the tyres, particularly prior
to long trips, and correct the pressure as nec-
essary.
To test tyre pressure, use asuitabl epressure
gaug e. Th eouter appearance of atyre does
not permit any reliabl econclusion about the
tyr ep ressure. On vehicles fitted wit hthe elec-
tronic tyr epressure monitor, th etyre pres-
sure can be checked using the on-board com-
puter. G
WARNING
Do not fit anything else to the tyre valve other
than the standard valve cap. In particular, ret-
rofitted tyre pressure monitors which are
screwed on to the valve may overload it and
cause it to fail. Due to their design, the valve
is kept open continuousl y, whichmay lead to
air loss. Tyr
epressure
359Wheels and tyres Z