2011 MERCEDES-BENZ M-Class adding oil
[x] Cancel search: adding oilPage 10 of 372

PARKTRONIC ................................. 184
Rear view camera .......................... 187
Driving tip
Braking .......................................... 163
Driving tips ........................................ 147
DISTRONIC .................................... 179
Downhill gradients .........................161
Driving on flooded roads ................164
Driving on sand .............................. 168
Driving over obstacles ...................169
Off-road driving .............................. 167
Off-road fording ............................. 164
Tire ruts ......................................... 169
Towing a trailer .............................. 198
Wet road surface ........................... 162
Winter ............................................ 166
DSR (Downhill Speed
Regulation) ......................................... 192
Display message ............................ 239
Setting (on-board computer) .......... 219
DVD audio (on-board computer) ...... 212
E
EASY-ENTRY feature ......................... 100
Activating/deactivating (on-
board computer) ............................ 218
EASY-EXIT feature ............................. 100
Crash-responsive ........................... 101
EASY-PACK cargo compartment
management system ........................ 263
EASY-PACK load-securing kit ........... 263
EBD (Electronic Brake force
Distribution) Display message ............................ 229
Function/notes ................................ 68
Electrical fuses
see Fuses
Electronic Brake-force
Distribution) see EBD
Electronic Stability Program
see ESP ®
Electronic Traction System
see ETS/4ETS
Emergency call
see mbrace
Emergency release
Fuel filler flap ................................. 153
Vehicle ............................................. 80
Emergency running mode
Automatic transmission .................151
Emergency spare wheel
Storage location ............................ 299
Stowing .......................................... 299
Emergency tensioning device
Function ........................................... 57
Safety guidelines ............................. 37
Emergency unlocking
Tailgate ............................................ 84
Emissions purification
Service and warranty information ....19
Engine
Irregular running ............................ 143
Starting problems ..........................143
Starting the engine with the key ....141
Starting with KEYLESS GO .............141
Switching off .................................. 158
Warning lamp (engine
diagnostics) ................................... 252
Engine electronics
Malfunction .................................... 143
Engine emergency stop .................... 322
Engine number .................................. 356
Engine oil Adding ........................................... 284
Checking the oil level ..................... 283
Display message ............................ 235
Lubricant additives ........................361
Notes about oil grades ................... 361
Temperature (on-board computer) . 209
Viscosity ........................................ 361
ESP ®
(Electronic Stability
Program) Activating/deactivating ...................67
Display message ............................ 223
ETS/4ETS ........................................ 67
Important safety information ...........66
Trailer stabilization ........................... 68
Warning lamp ................................. 250
ETS/4ETS (Electronic Traction
System) ................................................ 67
Exhaust check ................................... 1618IndexBA 164.1 USA, CA Edition B 2011; 1; 2, en-USd2mskotVersion: 3.0.3.52010-04-21T17:25:06+02:00 - Seite 8
Page 286 of 372

When checking the oil level:
Rpark the vehicle on a level surface.
Rthe engine should be switched off for at
least five minutes if the engine is at normal
operating temperature.
Rthe engine should be switched off for at
least 30 minutes if it is not at normal
operating temperature (i.e. if you only start
the engine briefly).
Checking the oil level using the oil
dipstick
Example: vehicles with a gasoline engine
Example: vehicles with a diesel engine
XPull oil dipstick : out of the dipstick guide
tube.
XWipe off oil dipstick :.XSlowly insert oil dipstick : into the
dipstick guide tube to the stop, and take it
out again.
The oil level is correct if the level is between
MIN mark = and MAX mark ;.
XAdd oil if necessary.Adding engine oilHEnvironmental note
When adding oil, take care not to spill any. If
oil enters the soil or waterways, it is harmful
to the environment.
! Only use engine oils and oil filters which
have been approved for vehicles with a
service system. A list of the engine oils and
oil filters that have been tested and
approved according to the Mercedes-Benz
specifications for service products can be
found on the Internet at http://
www.mbusa.com (USA only). Further
information on tested and approved engine
oils and oil filters can be obtained from any
authorized Mercedes-Benz Center.
The following causes engine failure or
damage to the exhaust system:
Rusing engine oils and oil filters that are
not specifically approved for the service
system
Rreplacing the engine oil and oil filter later
than the specified replacement interval
required by the service system
Rusing engine oil additives
Example: engine oil cap
284Engine compartmentMaintenance and care
BA 164.1 USA, CA Edition B 2011; 1; 2, en-USd2mskotVersion: 3.0.3.52010-04-21T17:25:06+02:00 - Seite 284
Page 287 of 372

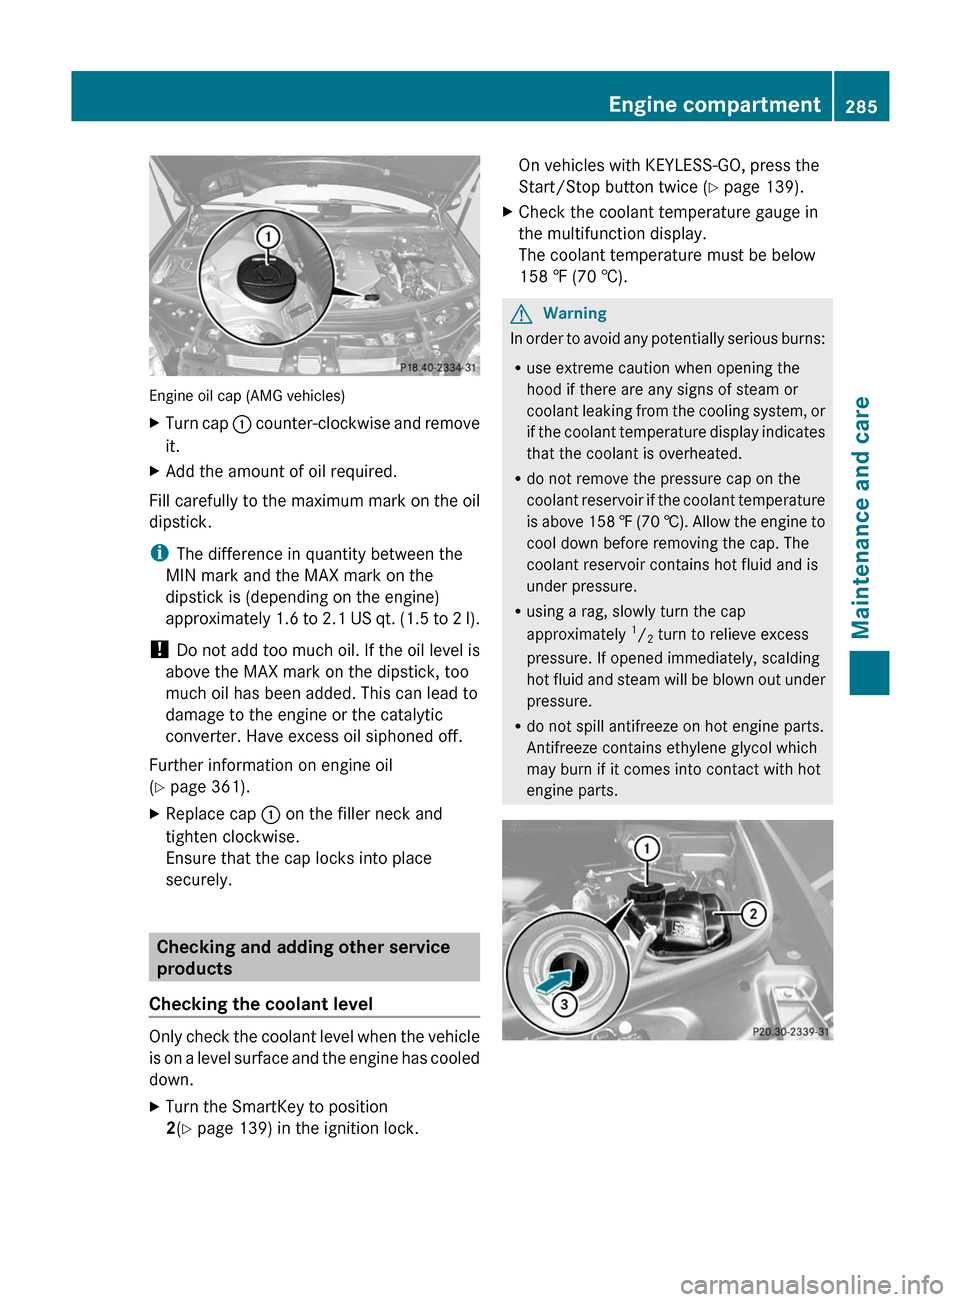
Engine oil cap (AMG vehicles)
XTurn cap : counter-clockwise and remove
it.XAdd the amount of oil required.
Fill carefully to the maximum mark on the oil
dipstick.
i The difference in quantity between the
MIN mark and the MAX mark on the
dipstick is (depending on the engine)
approximately 1.6 to 2.1 US qt. (1.5 to 2 l).
! Do not add too much oil. If the oil level is
above the MAX mark on the dipstick, too
much oil has been added. This can lead to
damage to the engine or the catalytic
converter. Have excess oil siphoned off.
Further information on engine oil
( Y page 361).
XReplace cap : on the filler neck and
tighten clockwise.
Ensure that the cap locks into place
securely.
Checking and adding other service
products
Checking the coolant level
Only check the coolant level when the vehicle
is on a level surface and the engine has cooled
down.
XTurn the SmartKey to position
2 (Y page 139) in the ignition lock.On vehicles with KEYLESS-GO, press the
Start/Stop button twice ( Y page 139).XCheck the coolant temperature gauge in
the multifunction display.
The coolant temperature must be below
158 ‡ (70 †).GWarning
In order to avoid any potentially serious burns:
R use extreme caution when opening the
hood if there are any signs of steam or
coolant leaking from the cooling system, or
if the coolant temperature display indicates
that the coolant is overheated.
R do not remove the pressure cap on the
coolant reservoir if the coolant temperature
is above 158 ‡ (70 †). Allow the engine to
cool down before removing the cap. The
coolant reservoir contains hot fluid and is
under pressure.
R using a rag, slowly turn the cap
approximately 1
/ 2 turn to relieve excess
pressure. If opened immediately, scalding
hot fluid and steam will be blown out under
pressure.
R do not spill antifreeze on hot engine parts.
Antifreeze contains ethylene glycol which
may burn if it comes into contact with hot
engine parts.
Engine compartment285Maintenance and careBA 164.1 USA, CA Edition B 2011; 1; 2, en-USd2mskotVersion: 3.0.3.52010-04-21T17:25:06+02:00 - Seite 285Z