2011 MERCEDES-BENZ GLK-Class weight
[x] Cancel search: weightPage 216 of 304
! Mercedes-Benz recommends that you
only use roof carriers that have been tested
and approved for Mercedes-Benz vehicles.
This helps to prevent damage to the
vehicle.
Position the cargo on the roof rack in such
a way that the vehicle will not sustain
damage even when it is in motion.
Ensure that, depending on the vehicle's
equipment, you can raise the panorama
roof with power tilt/sliding panel fully and
open the tailgate fully when the roof carrier
is installed.
Fastening the roof carrierXSecure the roof carrier to the roof rails.XObserve the manufacturer's installation
instructions.
Features
Cup holder
Points to observe before use
GWarning
In order to help prevent spilling liquids on
vehicle occupants and/or vehicle equipment,
only use containers that fit into the cup
holder. Use lids on open containers and do
not fill containers to a height where the
contents, especially hot liquids, could spill
during braking, vehicle maneuvers, or in an
accident. Liquids spilled on vehicle occupants
may cause serious personal injury. Liquids
spilled on vehicle equipment may cause
damage not covered by the Mercedes-Benz
Limited Warranty.
When not in use, keep the cup holder closed.
An open cup holder may cause injury to you
or others when contacted during braking,
vehicle maneuvers, or in an accident.
Keep in mind that objects placed in the cup
holder may come loose during braking,
vehicle maneuvers, or in an accident and be
thrown around in the vehicle interior. Objects
thrown around in the vehicle interior may
cause an accident and/or serious personal
injury.
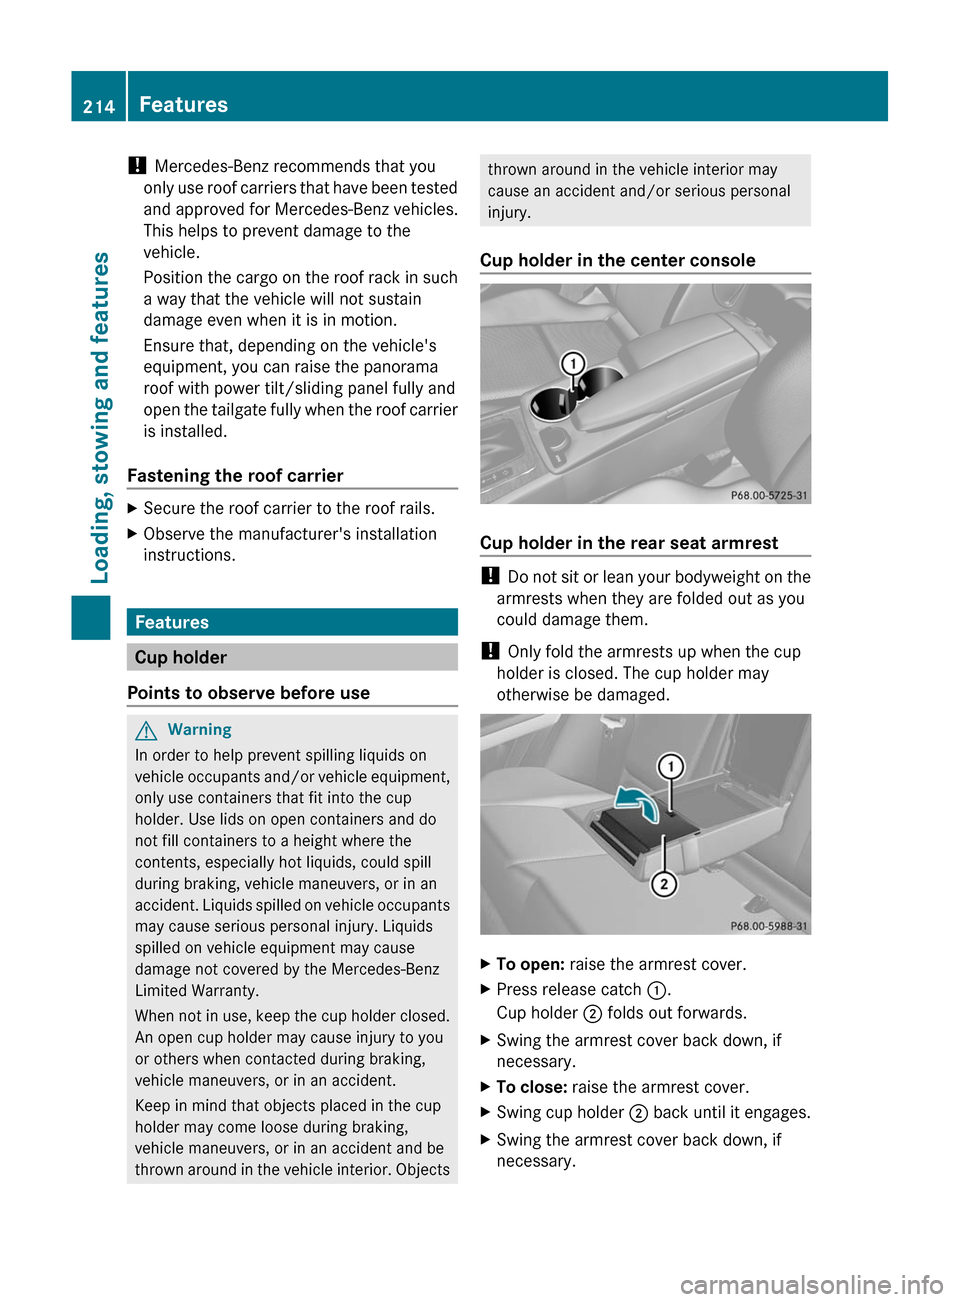
Cup holder in the center console
Cup holder in the rear seat armrest
! Do not sit or lean your bodyweight on the
armrests when they are folded out as you
could damage them.
! Only fold the armrests up when the cup
holder is closed. The cup holder may
otherwise be damaged.
XTo open: raise the armrest cover.XPress release catch :.
Cup holder ; folds out forwards.XSwing the armrest cover back down, if
necessary.XTo close: raise the armrest cover.XSwing cup holder ; back until it engages.XSwing the armrest cover back down, if
necessary.214FeaturesLoading, stowing and features
BA 204.9 USA, CA Edition A 2011; 1; 6, en-USd2mwentsVersion: 3.0.3.62010-06-15T08:58:39+02:00 - Seite 214
Page 260 of 304

Towing and tow-starting
Important safety notes
GWarning
If you tow the vehicle, you must use a rigid
towing bar if:
R the engine will not run.
R there is a malfunction in the brake system.
R there is a malfunction in the power supply
or the vehicle's electrical system.
With the engine not running, there is no power
assistance for the brake and steering
systems. You will then need considerably
more force to steer and to brake and the
brake pedal travel will be longer. If necessary,
depress the brake pedal with maximum force.
Before towing away, make sure that the
steering can be moved and is not locked.
If you tow or tow-start another vehicle, its
weight must not exceed the maximum
permissible gross vehicle weight of your
vehicle.
It is better to have the vehicle transported
than to have it towed.
! You may only tow the vehicle a maximum
distance of 30 miles (50 km). A towing
speed of 30 mph (50 km/h) must not be
exceeded.
For towing distances over 30 miles
(50 km), the vehicle must loaded onto a
transporter.
! Only secure the tow rope or tow bar at the
towing eyes. Otherwise, the vehicle could
be damaged.
! Do not use the towing eye for recovery,
as this could damage the vehicle. If in
doubt, recover the vehicle with a crane.
! Drive slowly and smoothly when towing.
Excessive tractive power could otherwise
damage the vehicles.
! Do not tow with sling-type equipment.
This could damage the vehicle.
! On vehicles with KEYLESS-GO, use the
SmartKey instead of the Start/Stop
button. Turn the SmartKey to position 2 in
the ignition lock and shift the automatic
transmission to N. Then, turn the SmartKey
back to 0 and leave it in the ignition lock.
! Vehicles with automatic transmission
must not be started by tow-starting. This
could otherwise damage the transmission.
! Vehicles with 4MATIC must not be towed
with the front or rear axle raised. This could
otherwise damage the transmission.
The automatic transmission must be in
position N while the vehicle is being towed.
The battery must be connected and charged.
Otherwise:
R you will not be able to turn the SmartKey to
position 2 in the ignition lock.
R you will not be able to shift the automatic
transmission to position N.
Vehicles with automatic transmission:
manually release the selector lever lock in
position P(Y page 139).
i Switch the automatic lock ( Y page 173)
off before towing. Otherwise, you could
lock yourself out of the vehicle when
pushing or towing the vehicle.
Installing/removing the towing eye
Installing the towing eye
Vehicles with a trailer tow hitch: if possible,
fasten the towing mechanism to the trailer
tow hitch ( Y page 156).
XRemove the towing eye from the vehicle
tool kit ( Y page 245).GWarning
The exhaust tail pipe may be hot. You could
burn yourself if you touch the tail pipe. Be
particularly careful when removing the rear
cover.
258Towing and tow-startingRoadside Assistance
BA 204.9 USA, CA Edition A 2011; 1; 6, en-USd2mwentsVersion: 3.0.3.62010-06-15T08:58:39+02:00 - Seite 258
Page 276 of 304

pressures are then accepted as reference
values and monitored.
If you wish to cancel the restart:
XPress the % button.
The tire pressure values stored at the last
restart will continue to be monitored.
Maximum tire pressures
GWarning
Never exceed the maximum tire inflation
pressure. Follow recommended tire inflation
pressures.
Do not underinflate tires. Underinflated tires
wear excessively and/or unevenly, adversely
affect handling and fuel economy, and are
more likely to fail from being overheated.
Do not overinflate tires. Overinflated tires can
adversely affect handling and ride comfort,
wear unevenly, increase stopping distance,
and result in sudden deflation (blowout)
because they are more likely to become
punctured or damaged by road debris,
potholes etc.
:Maximum permitted tire pressure
(example)
i The actual values for tires are specific to
each vehicle and may deviate from the
values in the illustration.
When adjusting the tire pressures always
observe the recommended tire pressure for
your vehicle ( Y page 266).
Loading the vehicle
Instruction labels for tires and loads
GWarning
Do not overload the tires by exceeding the
specified load limit as indicated on the Tire
and Loading Information placard on the
driver's door B-pillar. Overloading the tires
can overheat them, possibly causing a
blowout. Overloading the tires can also result
in handling or steering problems, or brake
failure.
Two instruction labels on your vehicle show
the maximum possible load.
(1)The Tire and Loading Information placard
is on the B-pillar on the driver's side. The
Tire and Loading Information placard
shows the permissible number of
occupants and the maximum permissible
vehicle load. It also contains details of the
tire sizes and corresponding pressures
for tires mounted at the factory.(2)The vehicle identification plate is on the
B-pillar on the driver's side. The vehicle
identification plate informs you of the
gross vehicle weight rating. It is made up
of the vehicle weight, all vehicle
occupants, the fuel and the cargo. You
can also find information about the
maximum gross axle weight rating on the
front and rear axle.
The maximum gross axle weight rating is
the maximum weight that can be carried
by one axle (front or rear axle). Never
exceed the maximum load or the
maximum gross axle weight rating for the
front or rear axle.274Loading the vehicleTires and wheels
BA 204.9 USA, CA Edition A 2011; 1; 6, en-USd2mwentsVersion: 3.0.3.62010-06-15T08:58:39+02:00 - Seite 274
Page 277 of 304
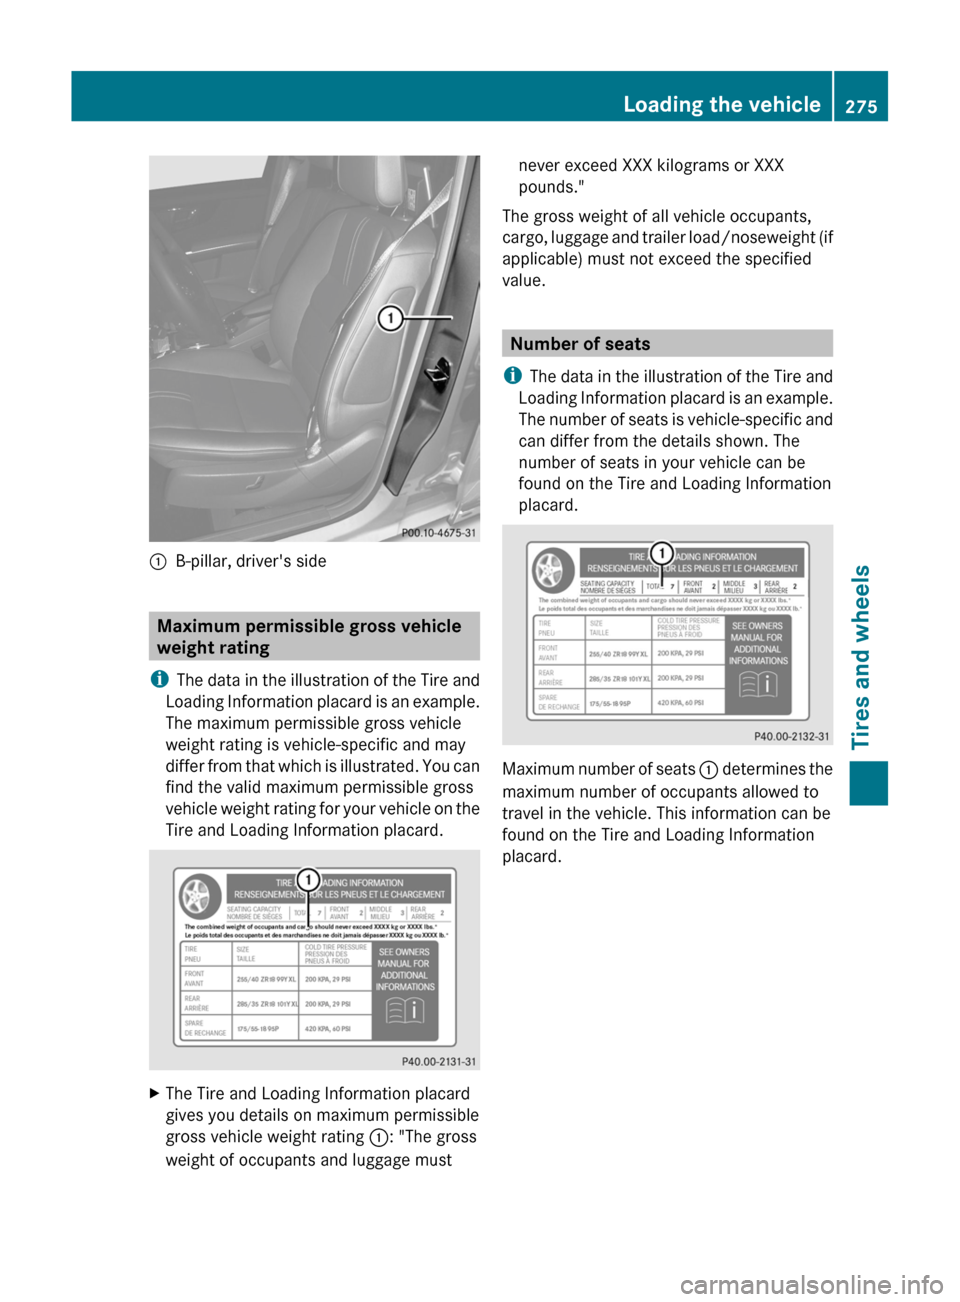
:B-pillar, driver's side
Maximum permissible gross vehicle
weight rating
i The data in the illustration of the Tire and
Loading Information placard is an example.
The maximum permissible gross vehicle
weight rating is vehicle-specific and may
differ from that which is illustrated. You can
find the valid maximum permissible gross
vehicle weight rating for your vehicle on the
Tire and Loading Information placard.
XThe Tire and Loading Information placard
gives you details on maximum permissible
gross vehicle weight rating :: "The gross
weight of occupants and luggage mustnever exceed XXX kilograms or XXX
pounds."
The gross weight of all vehicle occupants,
cargo, luggage and trailer load/noseweight (if
applicable) must not exceed the specified
value.
Number of seats
i The data in the illustration of the Tire and
Loading Information placard is an example.
The number of seats is vehicle-specific and
can differ from the details shown. The
number of seats in your vehicle can be
found on the Tire and Loading Information
placard.
Maximum number of seats : determines the
maximum number of occupants allowed to
travel in the vehicle. This information can be
found on the Tire and Loading Information
placard.
Loading the vehicle275Tires and wheelsBA 204.9 USA, CA Edition A 2011; 1; 6, en-USd2mwentsVersion: 3.0.3.62010-06-15T08:58:39+02:00 - Seite 275Z
Page 278 of 304
Determining the maximum load
The following steps have been developed as required of all manufacturers under Title 49, Code
of U.S. Federal Regulations, Part 575 pursuant to the "National Traffic and Motor Vehicle
Safety Act of 1966".XStep 1: Locate the statement "The combined weight of occupants and cargo should never
exceed XXX kg or XXX lbs." on your vehicle's Tire and Loading Information placard.XStep 2: Determine the combined weight of the driver and passengers that will be traveling
in your vehicle.XStep 3: Subtract the combined weight of the driver and passengers from XXX kilograms or
XXX lbs.XStep 4: The resulting figure equals the available amount of cargo and luggage load capacity.
For example, if the "XXX" amount equals 1400 lbs and there will be five 150 lbs passengers
in your vehicle, the amount of available cargo and luggage load capacity is 650 lbs (1400 -
750 (5 x 150) = 650 lbs).X Step 5: Determine the combined weight of luggage and cargo being loaded on the vehicle.
For reasons of safety, that weight must not exceed the available cargo and luggage cargo
capacity calculated in step 4.XStep 6 (if applicable): If you intend to tow a trailer behind your vehicle, the load on the
trailer is transferred to your vehicle. Consult this Operator's Manual to determine how this
reduces the available cargo and luggage load capacity of your vehicle ( Y page 278).
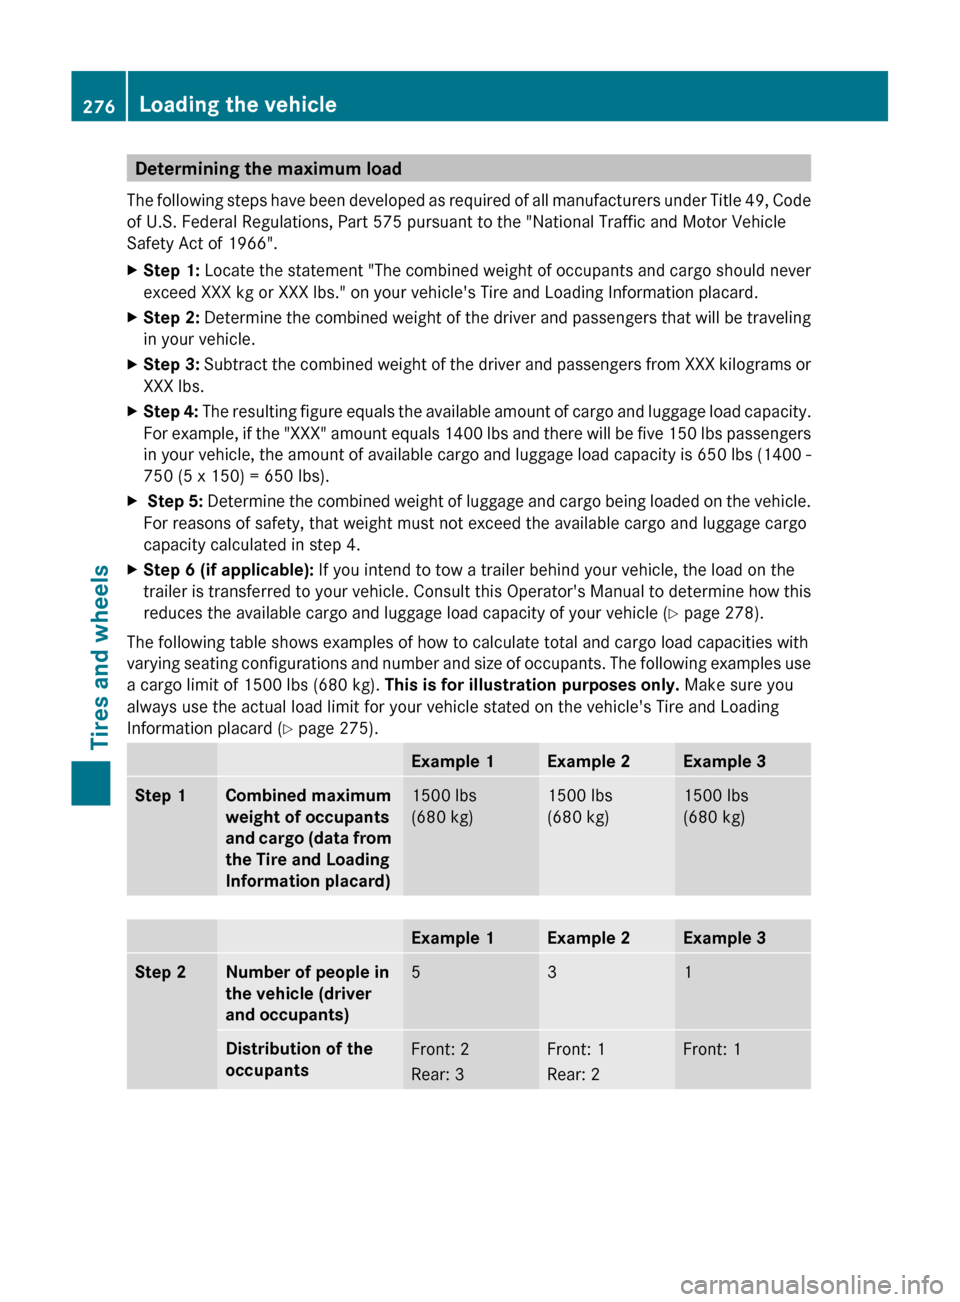
The following table shows examples of how to calculate total and cargo load capacities with
varying seating configurations and number and size of occupants. The following examples use
a cargo limit of 1500 lbs (680 kg). This is for illustration purposes only. Make sure you
always use the actual load limit for your vehicle stated on the vehicle's Tire and Loading
Information placard ( Y page 275).
Example 1Example 2Example 3Step 1Combined maximum
weight of occupants
and cargo (data from
the Tire and Loading
Information placard)1500 lbs
(680 kg)1500 lbs
(680 kg)1500 lbs
(680 kg)Example 1Example 2Example 3Step 2Number of people in
the vehicle (driver
and occupants)531Distribution of the
occupantsFront: 2
Rear: 3Front: 1
Rear: 2Front: 1276Loading the vehicleTires and wheels
BA 204.9 USA, CA Edition A 2011; 1; 6, en-USd2mwentsVersion: 3.0.3.62010-06-15T08:58:39+02:00 - Seite 276
Page 279 of 304
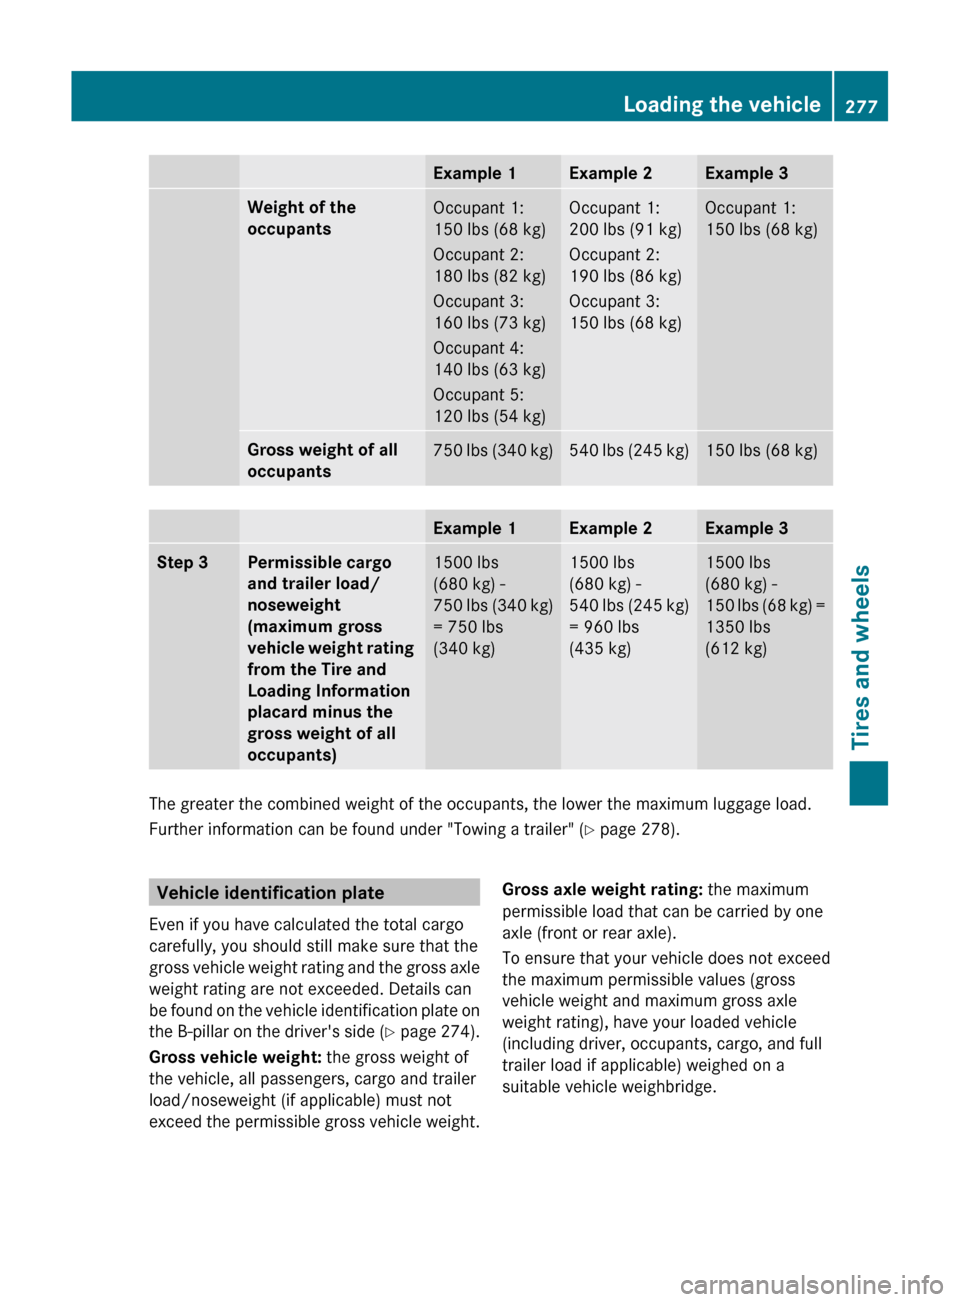
Example 1Example 2Example 3Weight of the
occupantsOccupant 1:
150 lbs (68 kg)
Occupant 2:
180 lbs (82 kg)
Occupant 3:
160 lbs (73 kg)
Occupant 4:
140 lbs (63 kg)
Occupant 5:
120 lbs (54 kg)Occupant 1:
200 lbs (91 kg)
Occupant 2:
190 lbs (86 kg)
Occupant 3:
150 lbs (68 kg)Occupant 1:
150 lbs (68 kg)Gross weight of all
occupants750 lbs (340 kg)540 lbs (245 kg)150 lbs (68 kg)Example 1Example 2Example 3Step 3Permissible cargo
and trailer load/
noseweight
(maximum gross
vehicle weight rating
from the Tire and
Loading Information
placard minus the
gross weight of all
occupants)1500 lbs
(680 kg) -
750 lbs (340 kg)
= 750 lbs
(340 kg)1500 lbs
(680 kg) -
540 lbs (245 kg)
= 960 lbs
(435 kg)1500 lbs
(680 kg) -
150 lbs (68 kg) =
1350 lbs
(612 kg)
The greater the combined weight of the occupants, the lower the maximum luggage load.
Further information can be found under "Towing a trailer" ( Y page 278).
Vehicle identification plate
Even if you have calculated the total cargo
carefully, you should still make sure that the
gross vehicle weight rating and the gross axle
weight rating are not exceeded. Details can
be found on the vehicle identification plate on
the B-pillar on the driver's side (Y page 274).
Gross vehicle weight: the gross weight of
the vehicle, all passengers, cargo and trailer
load/noseweight (if applicable) must not
exceed the permissible gross vehicle weight.Gross axle weight rating: the maximum
permissible load that can be carried by one
axle (front or rear axle).
To ensure that your vehicle does not exceed
the maximum permissible values (gross
vehicle weight and maximum gross axle
weight rating), have your loaded vehicle
(including driver, occupants, cargo, and full
trailer load if applicable) weighed on a
suitable vehicle weighbridge.Loading the vehicle277Tires and wheelsBA 204.9 USA, CA Edition A 2011; 1; 6, en-USd2mwentsVersion: 3.0.3.62010-06-15T08:58:39+02:00 - Seite 277Z
Page 280 of 304
Trailer load/noseweight
The trailer load/noseweight affects the gross
weight of the vehicle. If a trailer is attached,
the trailer load/noseweight is included in the
load along with occupants and luggage. The
trailer load/noseweight is usually
approximately 8% of the gross weight of the
trailer and its cargo.
Maximum tire load
GWarning
Do not overload the tires by exceeding the
specified load limit as indicated on the Tire
and Loading Information placard on the
driver's door B-pillar. Overloading the tires
can overheat them, possibly causing a
blowout. Overloading the tires can also result
in handling or steering problems, or brake
failure.
i The actual values for tires are specific to
each vehicle and may deviate from the
values in the illustration.
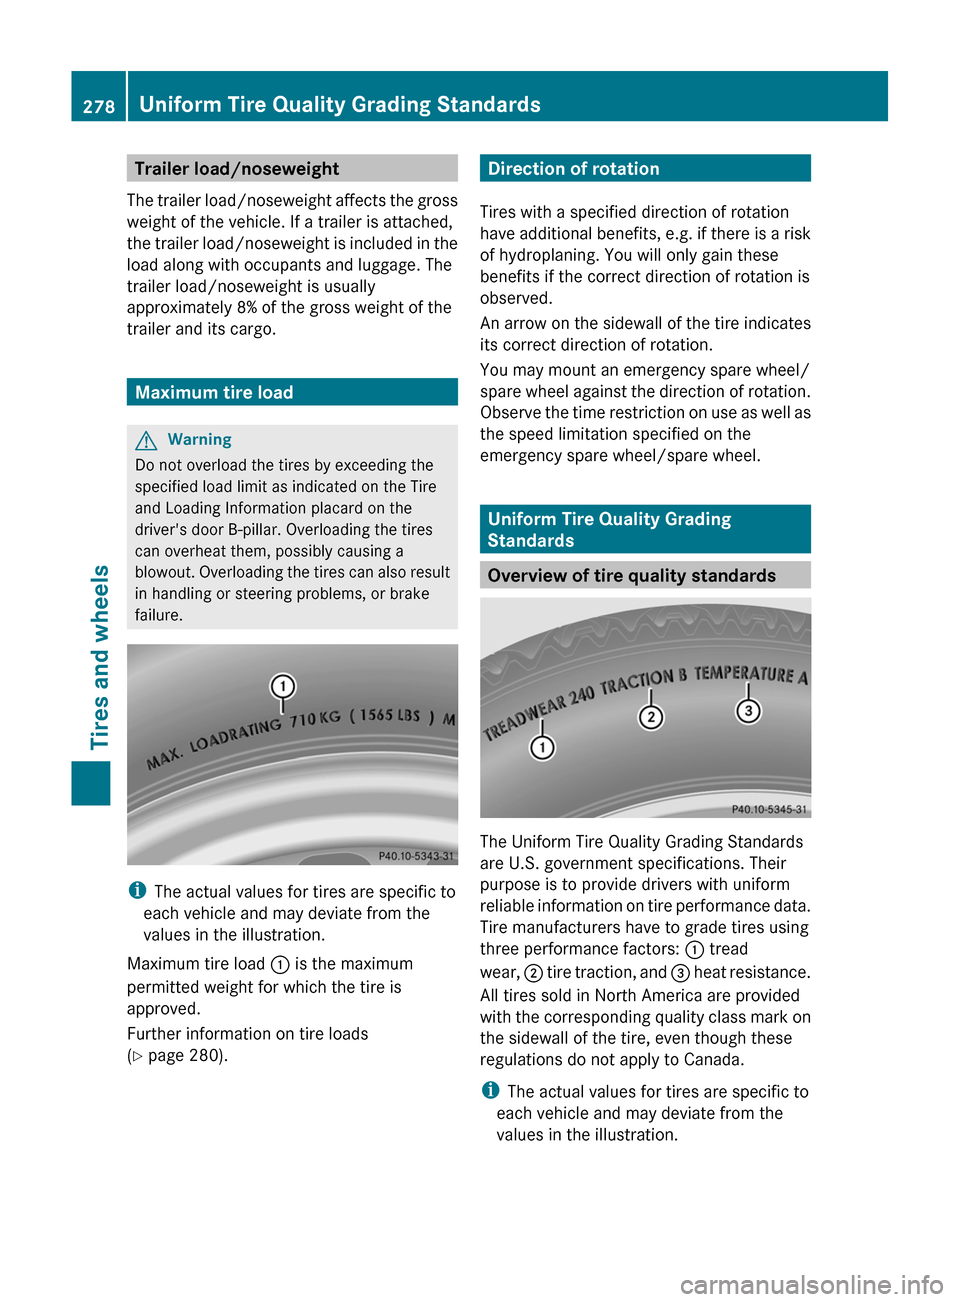
Maximum tire load : is the maximum
permitted weight for which the tire is
approved.
Further information on tire loads
( Y page 280).
Direction of rotation
Tires with a specified direction of rotation
have additional benefits, e.g. if there is a risk
of hydroplaning. You will only gain these
benefits if the correct direction of rotation is
observed.
An arrow on the sidewall of the tire indicates
its correct direction of rotation.
You may mount an emergency spare wheel/
spare wheel against the direction of rotation.
Observe the time restriction on use as well as
the speed limitation specified on the
emergency spare wheel/spare wheel.
Uniform Tire Quality Grading
Standards
Overview of tire quality standards
The Uniform Tire Quality Grading Standards
are U.S. government specifications. Their
purpose is to provide drivers with uniform
reliable information on tire performance data.
Tire manufacturers have to grade tires using
three performance factors: : tread
wear, ; tire traction, and = heat resistance.
All tires sold in North America are provided
with the corresponding quality class mark on
the sidewall of the tire, even though these
regulations do not apply to Canada.
i The actual values for tires are specific to
each vehicle and may deviate from the
values in the illustration.
278Uniform Tire Quality Grading StandardsTires and wheels
BA 204.9 USA, CA Edition A 2011; 1; 6, en-USd2mwentsVersion: 3.0.3.62010-06-15T08:58:39+02:00 - Seite 278
Page 286 of 304
Tire type code: tire type code ? can be
used by the manufacturer as a code to
describe specific characteristics of the tire.
Date of manufacture: date of manufacture
A provides information about the age of a
tire. The first and second positions represent
the week of manufacture, starting with "01"
for the first calendar week. Positions three
and four represent the year of manufacture.
For example, a tire that is marked with
"3208", was manufactured in week 32 in
2008.
Characteristics of the tire
i Tire data is vehicle-specific and may
deviate from the data in the example.
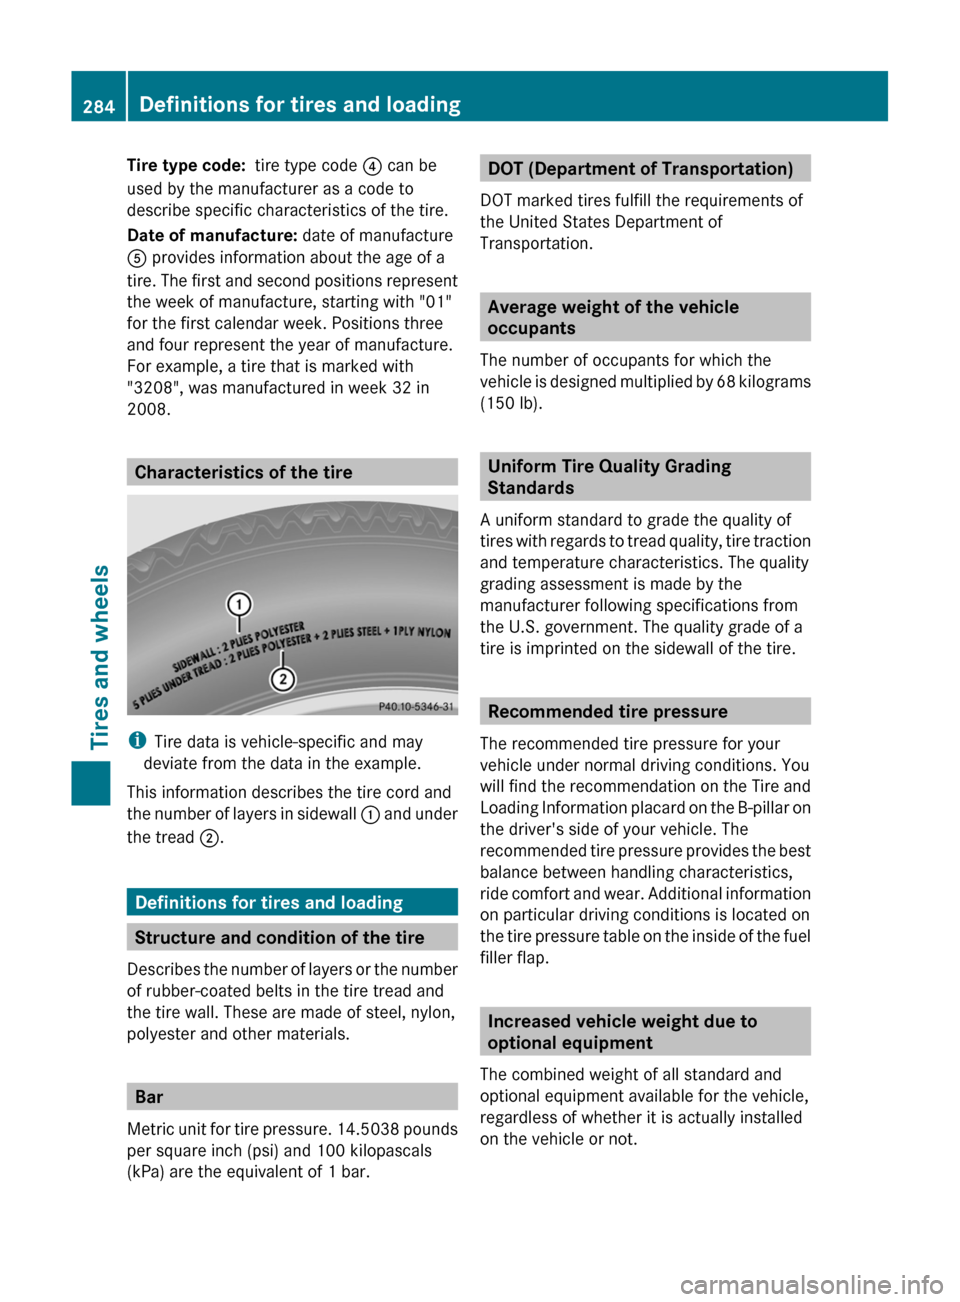
This information describes the tire cord and
the number of layers in sidewall : and under
the tread ;.
Definitions for tires and loading
Structure and condition of the tire
Describes the number of layers or the number
of rubber-coated belts in the tire tread and
the tire wall. These are made of steel, nylon,
polyester and other materials.
Bar
Metric unit for tire pressure. 14.5038 pounds
per square inch (psi) and 100 kilopascals
(kPa) are the equivalent of 1 bar.
DOT (Department of Transportation)
DOT marked tires fulfill the requirements of
the United States Department of
Transportation.
Average weight of the vehicle
occupants
The number of occupants for which the
vehicle is designed multiplied by 68 kilograms
(150 lb).
Uniform Tire Quality Grading
Standards
A uniform standard to grade the quality of
tires with regards to tread quality, tire traction
and temperature characteristics. The quality
grading assessment is made by the
manufacturer following specifications from
the U.S. government. The quality grade of a
tire is imprinted on the sidewall of the tire.
Recommended tire pressure
The recommended tire pressure for your
vehicle under normal driving conditions. You
will find the recommendation on the Tire and
Loading Information placard on the B-pillar on
the driver's side of your vehicle. The
recommended tire pressure provides the best
balance between handling characteristics,
ride comfort and wear. Additional information
on particular driving conditions is located on
the tire pressure table on the inside of the fuel
filler flap.
Increased vehicle weight due to
optional equipment
The combined weight of all standard and
optional equipment available for the vehicle,
regardless of whether it is actually installed
on the vehicle or not.
284Definitions for tires and loadingTires and wheels
BA 204.9 USA, CA Edition A 2011; 1; 6, en-USd2mwentsVersion: 3.0.3.62010-06-15T08:58:39+02:00 - Seite 284