2011 MERCEDES-BENZ GLK-Class towing
[x] Cancel search: towingPage 207 of 304
Vehicle equipment ............................206
Loading guidelines ............................206
Stowage compartments ...................206
Stowage areas .................................. 208
Features ............................................. 214205Loading, stowing and featuresBA 204.9 USA, CA Edition A 2011; 1; 6, en-USd2mwentsVersion: 3.0.3.62010-06-15T08:58:39+02:00 - Seite 205
Page 208 of 304
Vehicle equipment
i This manual describes all the standard
and optional equipment of your vehicle
which was available at the time of
purchase. Country-specific differences are
possible. Bear in mind that your vehicle
may not feature all functions described
here. This also refers to safety-related
systems and functions.
Loading guidelines
GWarning!
Always fasten items being carried as securely
as possible using cargo tie-down rings and
fastening materials appropriate for the weight
and size of the load.
In an accident, during hard braking or sudden
maneuvers, loose items will be thrown around
inside the vehicle. This can cause injury to
vehicle occupants unless the items are
securely fastened in the vehicle.
To help avoid personal injury during a collision
or sudden maneuver, exercise care when
transporting cargo. Do not pile luggage or
cargo higher than the seat backrests.
Never drive a vehicle with the tailgate open.
Deadly carbon monoxide (CO) gases may
enter vehicle interior resulting in
unconsciousness and death.
The gross vehicle weight (GVW) is the weight
of the vehicle including fuel, the vehicle tool
kit, spare tire, any installed accessories,
vehicle occupants and luggage/cargo.
The load limit and the gross vehicle weight
rating (GVWR) of your vehicle must never be
exceeded. The load limit and the GVWR are
stated on the vehicle identification plate on
the B-pillar on the driver's side
( Y page 274).
Additionally, the cargo must be distributed so
that the weight on each axle never exceeds
the maximum gross axle weight rating
(GAWR) for the front and rear axles. The data
on GVWR and GAWR is stated on the vehicle
identification plate on the B-pillar on the
driver's side ( Y page 274).
Further information can be found in the
"Loading the vehicle" section ( Y page 274).
The handling characteristics of a laden
vehicle are dependent on the distribution of
the load within the vehicle. For this reason,
you should observe the following notes when
transporting a load:
R Position heavy loads as far forwards as
possible and as low down in the cargo
compartment as possible.
R The load must not protrude above the
upper edge of the seat backrests.
R always place the load against the rear or
front seat backrests. Make sure that the
seat backrests are securely locked into
place.
R Hook in the cargo net when loading.
R Always place the load behind unoccupied
seats if possible.
R Secure the load with sufficiently strong and
wear-resistant tie down. Pad sharp edges
for protection.
Stowage compartments
Important safety notes
GWarning!
To help avoid personal injury during a collision
or sudden maneuver, exercise care when
storing objects in the vehicle. Put luggage or
cargo in the cargo compartment if possible.
Do not pile luggage or cargo higher than the
seat backrests.
Keep compartment lids closed. This will help
to prevent stored objects from being thrown
about and injuring vehicle occupants during
R braking
R vehicle maneuvers
R an accident
206Stowage compartmentsLoading, stowing and features
BA 204.9 USA, CA Edition A 2011; 1; 6, en-USd2mwentsVersion: 3.0.3.62010-06-15T08:58:39+02:00 - Seite 206
Page 209 of 304

Stowage compartments in the front
Glove box
iDepending on the vehicle equipment,
there is an AUX-IN connection or a Media
Interface installed in the glove box. Media
Interface is a universal interface for mobile
audio equipment, e.g. for an iPod® or USB
devices; see separate COMAND operating
instructions.
iThe glove box can be ventilated
(Y page 125).
XTo open: pull handle : and open glove box
flap ;.
XTo close: fold glove box flap ; upwards
until it engages.
The glove box can only be locked and
unlocked using the mechanical key.
XTo lock: insert the mechanical key into the
lock and turn it 90° clockwise to position
2.
XTo unlock: insert the mechanical key into
the lock and turn it 90° counter-clockwise
to position 1.
Stowage compartment under the
armrest
iA small and a large stowage compartment
are located under the armrest. The small
stowage compartment can be removed for
emptying.
XTo open: press left-hand button ; or right-
hand button :.
The stowage compartment opens.
Stowage compartments in the rear
Stowage pockets
GWarning!
Storage bags are intended for storing light-
weight items only.
Heavy objects, objects with sharp edges or
fragile objects may not be transported in the
storage bag. In an accident, during hard
braking, or sudden maneuvers, they could be
thrown around inside the vehicle and cause
injury to vehicle occupants.
Storage bags cannot protect transported
goods in the event of an accident.
Stowage compartments207Loading, stowing and featuresBA 204.9 USA, CA Edition A 2011; 1; 6, en-USd2mwentsVersion: 3.0.3.62010-06-15T08:58:39+02:00 - Seite 207Z
Page 210 of 304
Storage bags are located in the rear
compartment on the driver's and front-
passenger seat backrests.
Stowage areas
Parcel nets
GWarning
Parcel nets are intended for storing light-
weight items only, such as road maps, mail,
etc.
Heavy objects, objects with sharp edges, or
fragile objects may not be transported in the
parcel nets. In an accident, during hard
braking, or sudden maneuvers, they could be
thrown around inside the vehicle and cause
injury to vehicle occupants.
Parcel nets cannot protect transported goods
in the event of an accident.
Parcel nets are located in the front-passenger
footwell and on the left-hand side of the cargo
compartment.
Enlarging the luggage compartment
Important safety notes
GWarning!
Always lock the seat backrest in its upright
position when the rear seat bench is
occupied, or the extended cargo volume is not
in use.
Check for secure locking by pushing and
pulling on the seat backrest.
In an accident, during hard braking or sudden
maneuvers, loose items will be thrown around
inside the vehicle. This can cause injury to
vehicle occupants unless the items are
securely fastened in the vehicle.
To help avoid personal injury during a collision
or sudden maneuver, exercise care when
transporting cargo.
GWarning!
Never drive a vehicle with the tailgate open.
Deadly carbon monoxide (CO) gases may
enter vehicle interior resulting in
unconsciousness and death.
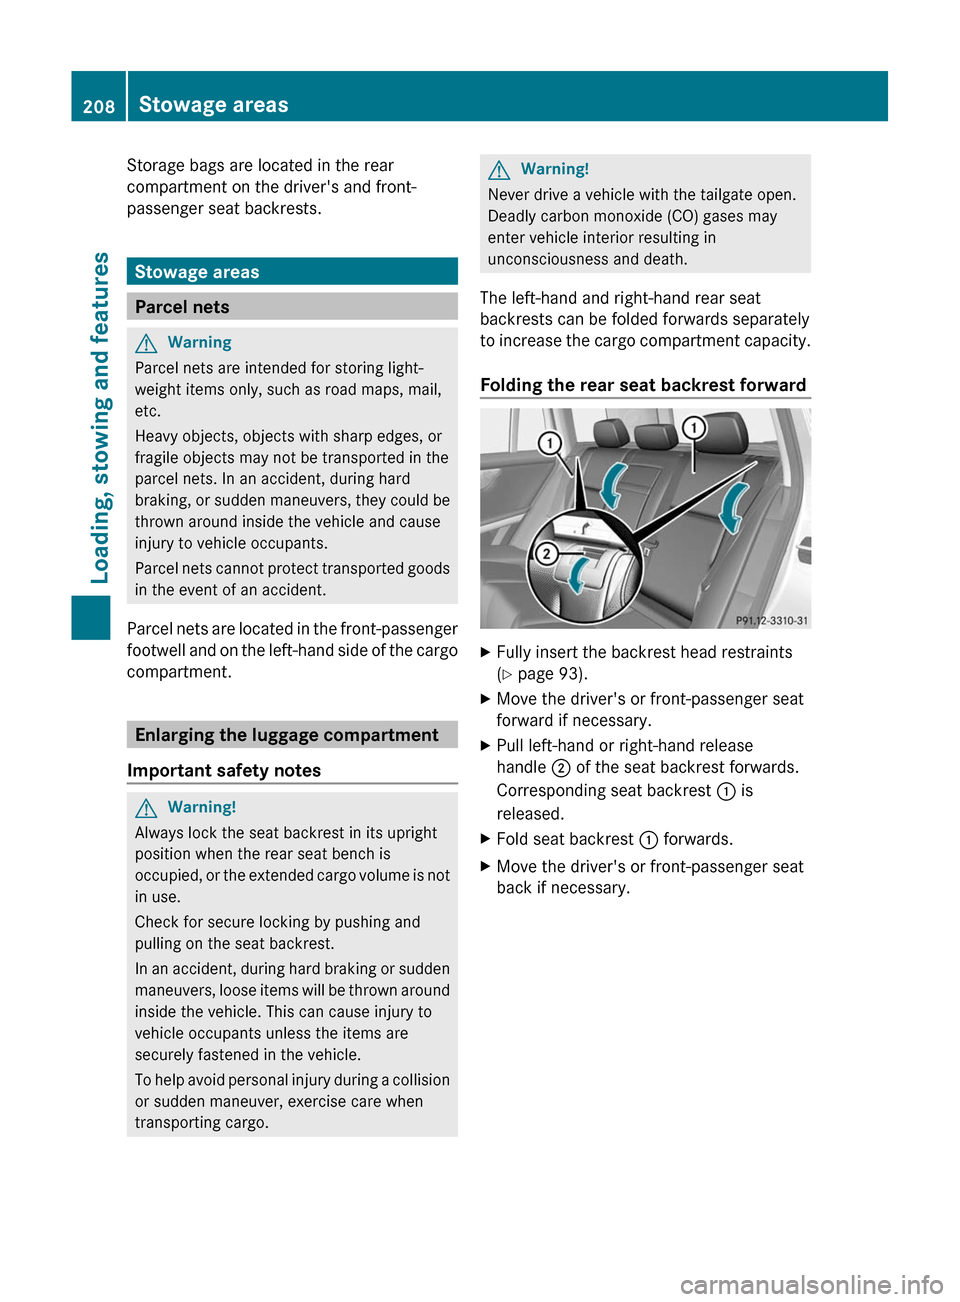
The left-hand and right-hand rear seat
backrests can be folded forwards separately
to increase the cargo compartment capacity.
Folding the rear seat backrest forward
XFully insert the backrest head restraints
(Y page 93).
XMove the driver's or front-passenger seat
forward if necessary.
XPull left-hand or right-hand release
handle ; of the seat backrest forwards.
Corresponding seat backrest : is
released.
XFold seat backrest : forwards.XMove the driver's or front-passenger seat
back if necessary.
208Stowage areasLoading, stowing and features
BA 204.9 USA, CA Edition A 2011; 1; 6, en-USd2mwentsVersion: 3.0.3.62010-06-15T08:58:39+02:00 - Seite 208
Page 211 of 304
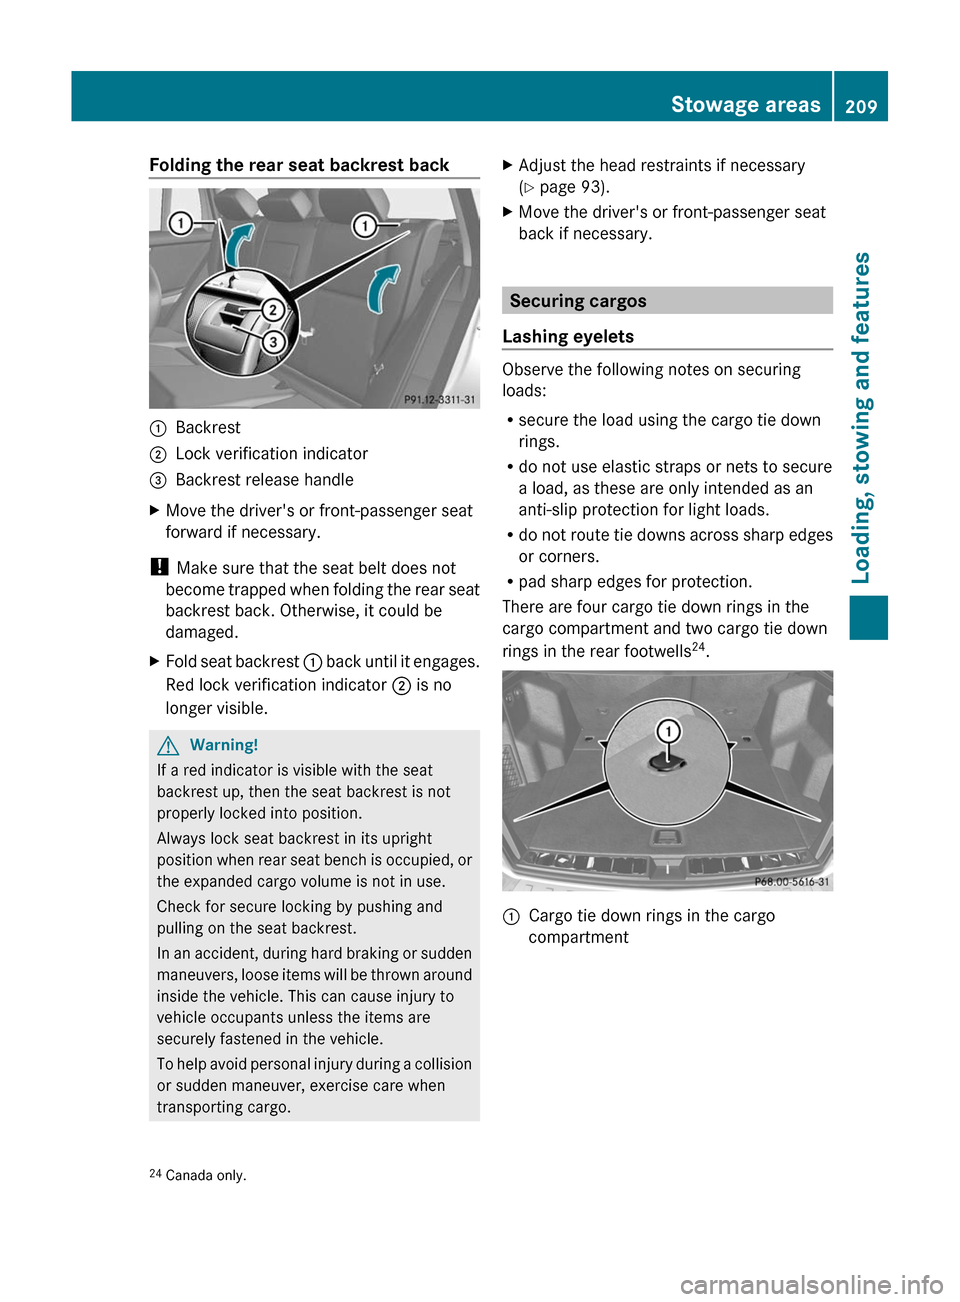
Folding the rear seat backrest back:Backrest;Lock verification indicator=Backrest release handleXMove the driver's or front-passenger seat
forward if necessary.
! Make sure that the seat belt does not
become trapped when folding the rear seat
backrest back. Otherwise, it could be
damaged.
XFold seat backrest : back until it engages.
Red lock verification indicator ; is no
longer visible.
GWarning!
If a red indicator is visible with the seat
backrest up, then the seat backrest is not
properly locked into position.
Always lock seat backrest in its upright
position when rear seat bench is occupied, or
the expanded cargo volume is not in use.
Check for secure locking by pushing and
pulling on the seat backrest.
In an accident, during hard braking or sudden
maneuvers, loose items will be thrown around
inside the vehicle. This can cause injury to
vehicle occupants unless the items are
securely fastened in the vehicle.
To help avoid personal injury during a collision
or sudden maneuver, exercise care when
transporting cargo.
XAdjust the head restraints if necessary
(Y page 93).
XMove the driver's or front-passenger seat
back if necessary.
Securing cargos
Lashing eyelets
Observe the following notes on securing
loads:
Rsecure the load using the cargo tie down
rings.
Rdo not use elastic straps or nets to secure
a load, as these are only intended as an
anti-slip protection for light loads.
Rdo not route tie downs across sharp edges
or corners.
Rpad sharp edges for protection.
There are four cargo tie down rings in the
cargo compartment and two cargo tie down
rings in the rear footwells24.
:Cargo tie down rings in the cargo
compartment24Canada only.Stowage areas209Loading, stowing and featuresBA 204.9 USA, CA Edition A 2011; 1; 6, en-USd2mwentsVersion: 3.0.3.62010-06-15T08:58:39+02:00 - Seite 209Z
Page 212 of 304
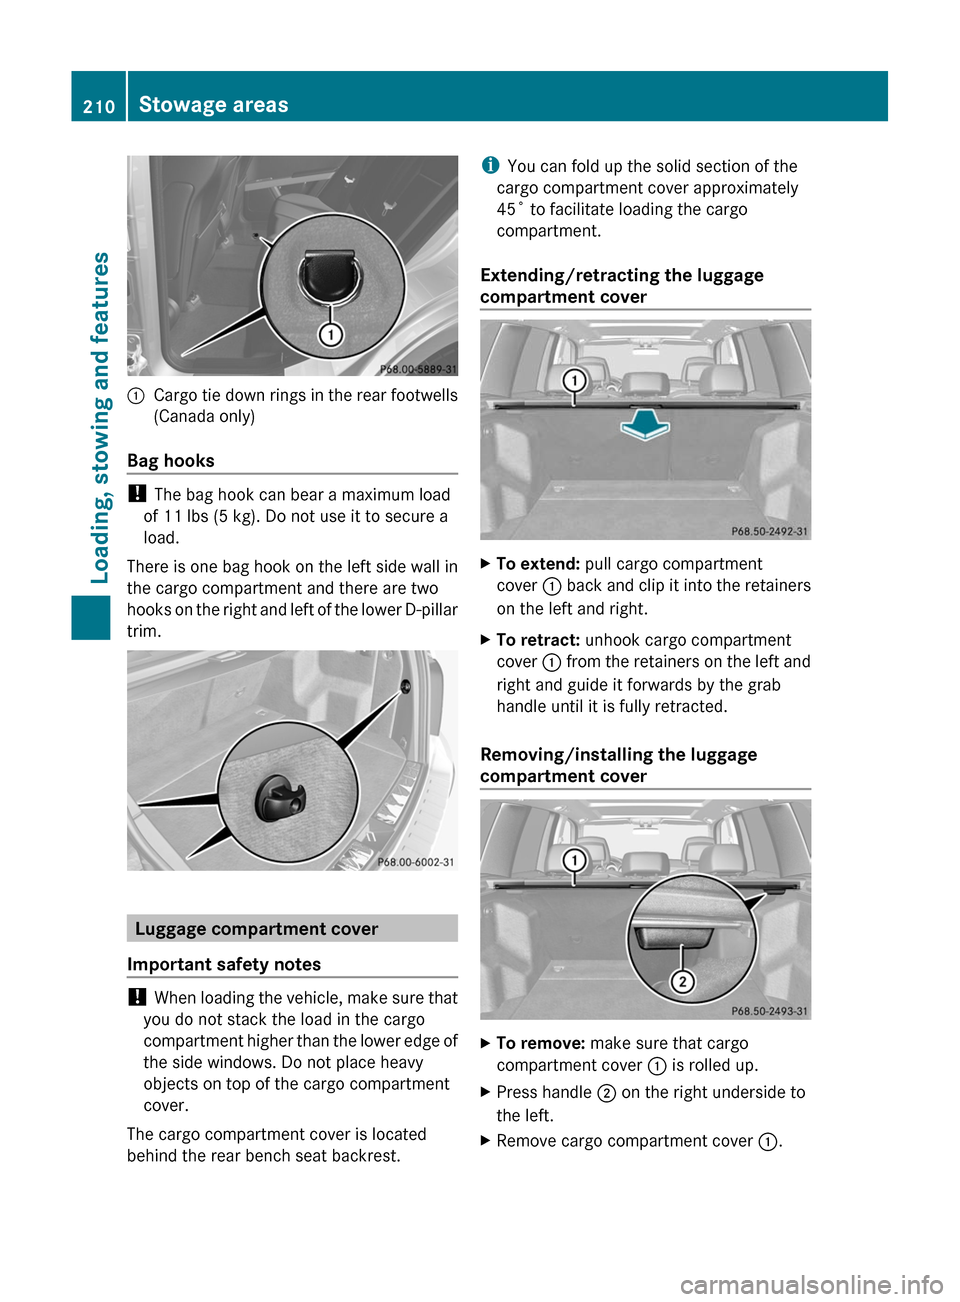
:Cargo tie down rings in the rear footwells
(Canada only)
Bag hooks
! The bag hook can bear a maximum load
of 11 lbs (5 kg). Do not use it to secure a
load.
There is one bag hook on the left side wall in
the cargo compartment and there are two
hooks on the right and left of the lower D-pillar
trim.
Luggage compartment cover
Important safety notes
! When loading the vehicle, make sure that
you do not stack the load in the cargo
compartment higher than the lower edge of
the side windows. Do not place heavy
objects on top of the cargo compartment
cover.
The cargo compartment cover is located
behind the rear bench seat backrest.
iYou can fold up the solid section of the
cargo compartment cover approximately
45˚ to facilitate loading the cargo
compartment.
Extending/retracting the luggage
compartment cover
XTo extend: pull cargo compartment
cover : back and clip it into the retainers
on the left and right.
XTo retract: unhook cargo compartment
cover : from the retainers on the left and
right and guide it forwards by the grab
handle until it is fully retracted.
Removing/installing the luggage
compartment cover
XTo remove: make sure that cargo
compartment cover : is rolled up.
XPress handle ; on the right underside to
the left.
XRemove cargo compartment cover :.210Stowage areasLoading, stowing and features
BA 204.9 USA, CA Edition A 2011; 1; 6, en-USd2mwentsVersion: 3.0.3.62010-06-15T08:58:39+02:00 - Seite 210
Page 213 of 304

XTo install: attach cargo compartment
cover : to the opening on the left-hand
side.
XPress handle ; to the right.XAllow cargo compartment cover : to
engage in the appropriate recess.
Cargo net
Important safety notes
GWarning!
Make sure the cargo net is properly engaged
at top and bottom position and the tightening
belts are securely fastened.
Never use a damaged cargo net.
Always use cargo net when transporting
cargo. This helps to avoid personal injury from
smaller objects being thrown around in the
occupant compartment during a collision or
sudden maneuver.
The cargo net cannot prevent the movement
of large, heavier objects into the passenger
compartment in an accident. Such items must
be properly secured using the cargo tie-down
rings in the cargo compartment floor.
Passenger use of seats behind installed cargo
net is restricted because of the footwell being
taken up by the net.
When the vehicle is loaded with objects that
extend beyond the seat backrests, using a
cargo net is particularly important. For
reasons of safety, a cargo net should always
be used when transporting cargo.
Preparing the cargo net
The cargo net can be used in two different
positions (behind the B-pillar or the C-pillar).
RThe brackets behind B-pillar : are
required for the cargo compartment
enlargement (Y page 208).
The corresponding cargo tie down rings to
tighten the net are located in the footwell
of the rear bench seat (Y page 209).
RThe brackets behind C-pillar ; are
required for the cargo compartment behind
the rear bench seat.
The corresponding cargo tie down rings to
tension the net are located in the cargo
compartment (Y page 209).
The cargo net is located in the loading tray in
the stowage well under the trunk floor
(Y page 212).
XOpen both Velcro fasteners and remove the
cargo net.
XUnroll and unfold the cargo net.
The upper and lower guide rods must
engage audibly.
Attaching the cargo net
Cargo net attached behind the C-pillar
Stowage areas211Loading, stowing and featuresBA 204.9 USA, CA Edition A 2011; 1; 6, en-USd2mwentsVersion: 3.0.3.62010-06-15T08:58:39+02:00 - Seite 211Z
Page 214 of 304

XInsert guide rod ; into retainer : in the
direction of the arrow.
XSlide guide rod ; forwards into
retainer : in the direction of the arrow.
Tightening the cargo net
Seat belt reel holder behind the front seats
XInsert belt hook : into cargo tie-down
ring ; in the direction of the arrow.
XPull tensioning strap = by the loose end in
the direction of the arrow until the cargo
net is tight.
XAfter driving a short distance, check the
tension of the cargo net and retighten it if
necessary.
Releasing the cargo net
Seat belt reel holder behind the front seats
XPull belt adjuster : upwards in the
direction of the arrow to reduce the tension
on the tensioning strap.
XUnhook belt hook ; from cargo tie-down
ring =.
Detaching and storing the cargo net
XDetach guide rod ; from bracket :
(Y page 211).
XPress the red button on the upper and lower
guide rods.
XFold the cargo net and roll it up.XClose the two Velcro fasteners on the cargo
net holder.
Coat hooks on the tailgate
GWarning!
The tailgate may close if too great a load is
placed on the coat hooks.
You and/or others could be trapped and
injured.
Only use the coat hooks for light clothing.
:Coat hooks
Stowage well under the cargo
compartment floor
GWarning!
If items are stored in the compartment, make
sure compartment is securely closed.
212Stowage areasLoading, stowing and features
BA 204.9 USA, CA Edition A 2011; 1; 6, en-USd2mwentsVersion: 3.0.3.62010-06-15T08:58:39+02:00 - Seite 212