2011 MERCEDES-BENZ GLK-Class display
[x] Cancel search: displayPage 229 of 304
from the transmitter button that you are
programming. Try different angles from a
distance of 2 to 12 inches (5 to 30 cm) or
the same angle from differing distances.
R If there is another garage door remote
control for the same device, perform the
programming steps again using the remote
control. Before performing these steps,
make sure that new batteries have been
installed in the garage door remote control.
R Align the antenna cable of the garage door
opener unit. This can improve signal
reception/transmission.
Opening or closing the garage door
Once programmed, the integrated remote
control will assume the function of the garage
door system's remote control. Please also
read the operating instructions for the garage
door system.
XTurn the SmartKey to position 2 in the
ignition lock.XPress transmitter button ;, = or ? in the
overhead control panel that you have
programmed to operate the garage door.
Garage door system with fixed code:
indicator lamp : lights up continuously.
Garage door system with rolling code:
indicator lamp : flashes briefly and then
lights up for approximately two seconds.
This is repeated for up to 20 seconds.
i The transmitter will transmit a signal for
as long as the transmitter button is being
pressed. The transmission will be halted
after a maximum of 20 seconds and
indicator lamp : will flash. Press the
transmitter button again, if necessary.
Clearing the remote control memoryXTurn the SmartKey to position 2 in the
ignition lock.XPress and hold transmitter buttons ;
and ? for approximately 20 seconds until
indicator lamp : flashes rapidly.
The memory is cleared.
i You should clear the remote control
memory before selling the vehicle.
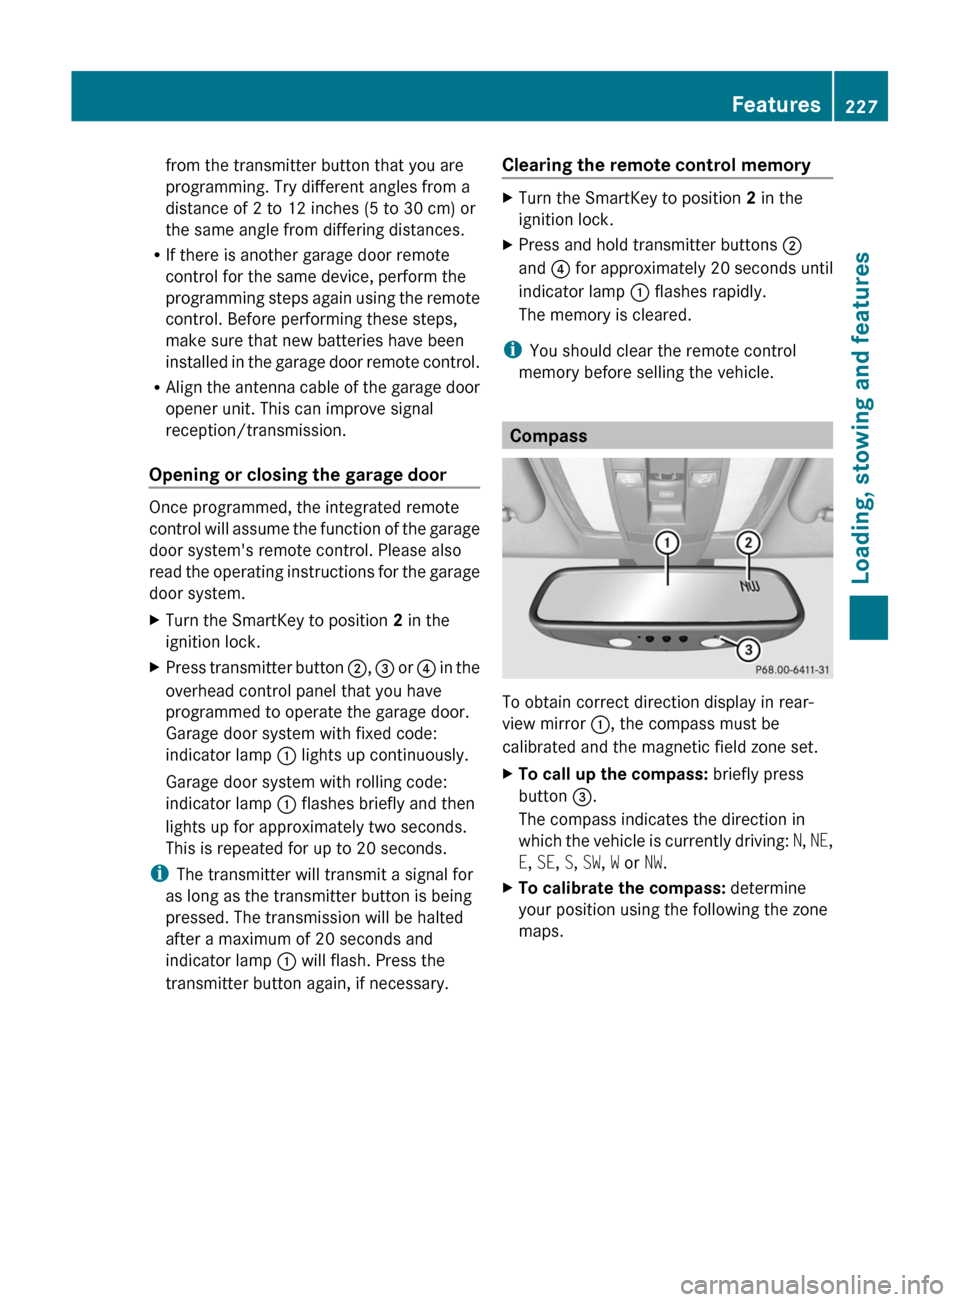
Compass
To obtain correct direction display in rear-
view mirror :, the compass must be
calibrated and the magnetic field zone set.
XTo call up the compass: briefly press
button =.
The compass indicates the direction in
which the vehicle is currently driving: N, NE ,
E , SE , S , SW , W or NW.XTo calibrate the compass: determine
your position using the following the zone
maps.Features227Loading, stowing and featuresBA 204.9 USA, CA Edition A 2011; 1; 6, en-USd2mwentsVersion: 3.0.3.62010-06-15T08:58:39+02:00 - Seite 227Z
Page 230 of 304
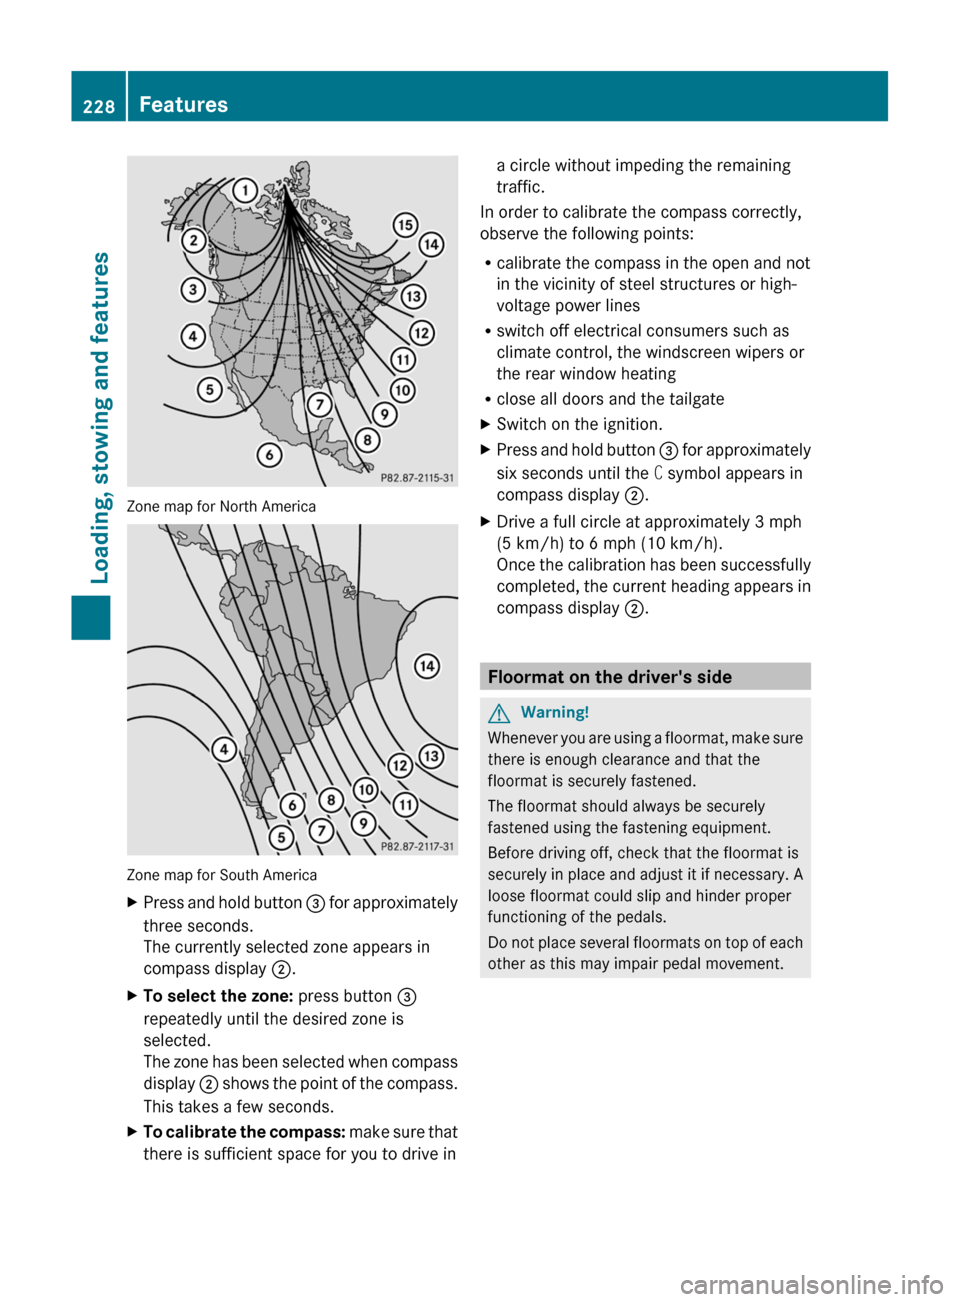
Zone map for North America
Zone map for South America
XPress and hold button = for approximately
three seconds.
The currently selected zone appears in
compass display ;.XTo select the zone: press button =
repeatedly until the desired zone is
selected.
The zone has been selected when compass
display ; shows the point of the compass.
This takes a few seconds.XTo calibrate the compass: make sure that
there is sufficient space for you to drive ina circle without impeding the remaining
traffic.
In order to calibrate the compass correctly,
observe the following points:
R calibrate the compass in the open and not
in the vicinity of steel structures or high-
voltage power lines
R switch off electrical consumers such as
climate control, the windscreen wipers or
the rear window heating
R close all doors and the tailgate
XSwitch on the ignition.XPress and hold button = for approximately
six seconds until the C symbol appears in
compass display ;.XDrive a full circle at approximately 3 mph
(5 km/h) to 6 mph (10 km/h).
Once the calibration has been successfully
completed, the current heading appears in
compass display ;.
Floormat on the driver's side
GWarning!
Whenever you are using a floormat, make sure
there is enough clearance and that the
floormat is securely fastened.
The floormat should always be securely
fastened using the fastening equipment.
Before driving off, check that the floormat is
securely in place and adjust it if necessary. A
loose floormat could slip and hinder proper
functioning of the pedals.
Do not place several floormats on top of each
other as this may impair pedal movement.
228FeaturesLoading, stowing and features
BA 204.9 USA, CA Edition A 2011; 1; 6, en-USd2mwentsVersion: 3.0.3.62010-06-15T08:58:39+02:00 - Seite 228
Page 236 of 304

Adding engine oilHEnvironmental note
When adding oil, take care not to spill any. If
oil enters the soil or waterways, it is harmful
to the environment.
! Only use engine oils and oil filters which
have been approved for vehicles with a
service system. A list of the engine oils and
oil filters that have been tested and
approved according to the Mercedes-Benz
specifications for service products can be
found on the Internet at http://
www.mbusa.com (USA only). Further
information on tested and approved engine
oils and oil filters can be obtained from any
authorized Mercedes-Benz Center.
The following causes engine failure or
damage to the exhaust system:
Rusing engine oils and oil filters that are
not specifically approved for the service
system
Rreplacing the engine oil and oil filter later
than the specified replacement interval
required by the service system
Rusing engine oil additives
Example: engine oil cap
XTurn cap : counter-clockwise and remove
it.
XAdd the amount of oil required.
Fill carefully to the maximum mark on the oil
dipstick.
iThe difference in quantity between the
MIN mark and the MAX mark on the
dipstick is (depending on the engine)
approximately 1.6 to 2.1 US qt. (1.5 to 2 l).
! Do not add too much oil. If the oil level is
above the MAX mark on the dipstick, too
much oil has been added. This can lead to
damage to the engine or the catalytic
converter. Have excess oil siphoned off.
Further information on engine oil
(Y page 297).
XReplace cap : on the filler neck and
tighten clockwise.
Ensure that the cap locks into place
securely.
Checking and adding other service
products
Checking the coolant level
Only check the coolant level when the vehicle
is on a level surface and the engine has cooled
down.
XTurn the SmartKey to position
2(Y page 129) in the ignition lock.
On vehicles with KEYLESS-GO, press the
Start/Stop button twice (Y page 129).
XCheck the coolant temperature display in
the instrument cluster.
The coolant temperature must be below
158 ‡ (70 †).
GWarning
In order to avoid any potentially serious burns:
Ruse extreme caution when opening the
hood if there are any signs of steam or
coolant leaking from the cooling system, or
if the coolant temperature display indicates
that the coolant is overheated.
Rdo not remove the pressure cap on the
coolant reservoir if the coolant temperature
is above 158 ‡ (70 †). Allow the engine to
cool down before removing the cap. The
234Engine compartmentMaintenance and care
BA 204.9 USA, CA Edition A 2011; 1; 6, en-USd2mwentsVersion: 3.0.3.62010-06-15T08:58:39+02:00 - Seite 234
Page 238 of 304
XMix the windshield washer fluid in a
container beforehand.XAt temperatures above freezing: fill the
washer fluid reservoir with a mix of water
and windshield washer concentrate (e.g.
MB SummerFit).XAt temperatures below freezing: fill the
washer fluid reservoir with a mix of water
and MB SummerFit windshield washer
concentrate. For information on the mixing
ratio, see (Y page 299) or use the premixed
windshield washer solution with antifreeze
available in specialist stores.XTo open: pull cap : upwards by the tab.XAdd the premixed washer fluid.XTo close: press cap : onto the filler neck
until it engages.
Brake fluid level
! If you discover that the brake fluid level in
the brake fluid reservoir has fallen to the
MIN mark or below, check the brake
system for leaks immediately. Also check
the brake lining thickness. Contact a
qualified specialist workshop, e.g. an
authorized Mercedes-Benz Center
immediately.
Do not top up the brake fluid. This will not
rectify the malfunction.
Only check the brake fluid level when the
vehicle is stationary and on a level surface.
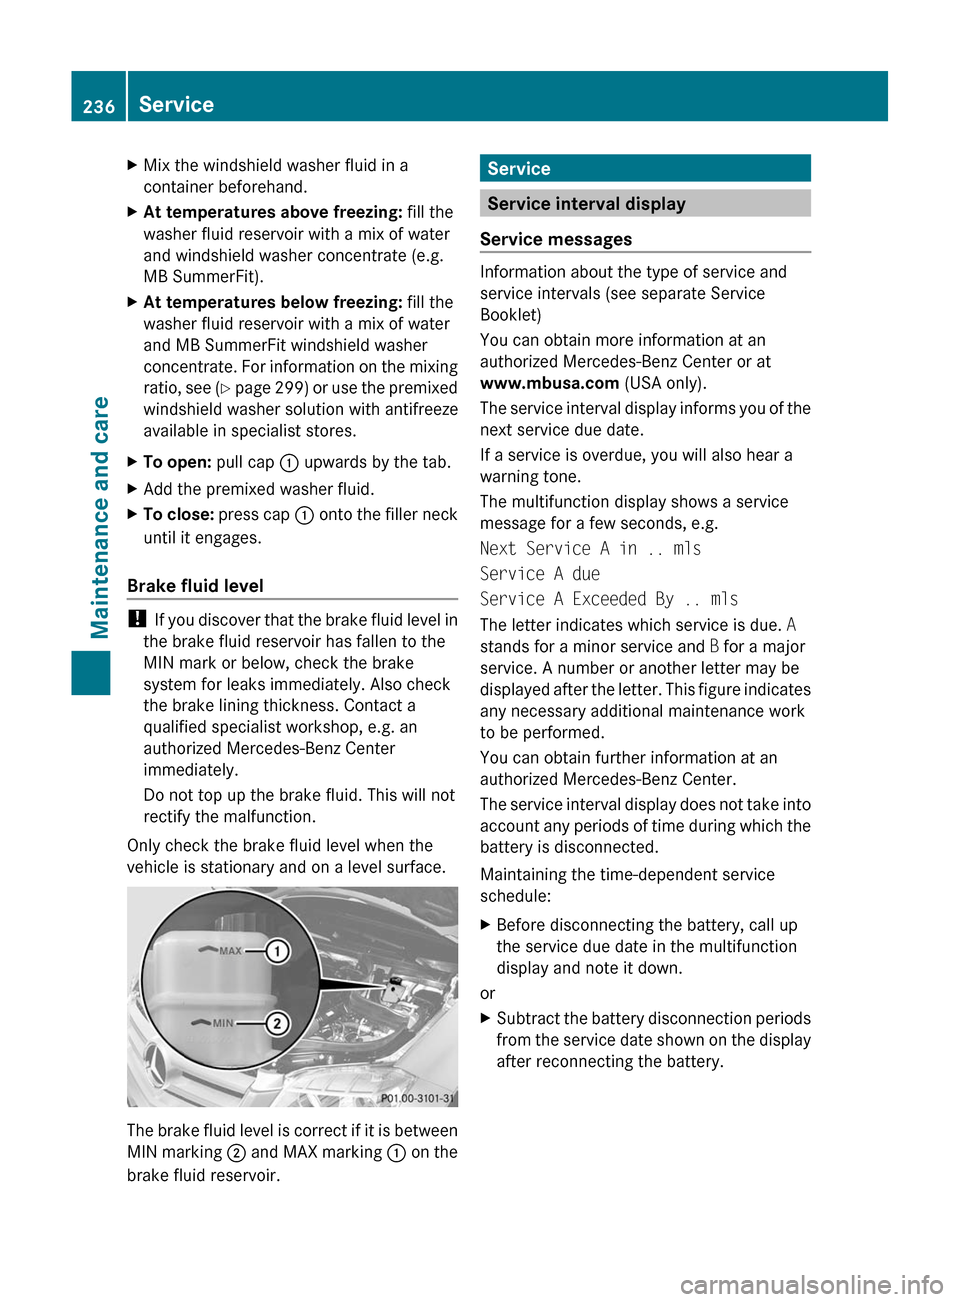
The brake fluid level is correct if it is between
MIN marking ; and MAX marking : on the
brake fluid reservoir.
Service
Service interval display
Service messages
Information about the type of service and
service intervals (see separate Service
Booklet)
You can obtain more information at an
authorized Mercedes-Benz Center or at
www.mbusa.com (USA only).
The service interval display informs you of the
next service due date.
If a service is overdue, you will also hear a
warning tone.
The multifunction display shows a service
message for a few seconds, e.g.
Next Service A in .. mls
Service A due
Service A Exceeded By .. mls
The letter indicates which service is due. A
stands for a minor service and B for a major
service. A number or another letter may be
displayed after the letter. This figure indicates
any necessary additional maintenance work
to be performed.
You can obtain further information at an
authorized Mercedes-Benz Center.
The service interval display does not take into
account any periods of time during which the
battery is disconnected.
Maintaining the time-dependent service
schedule:
XBefore disconnecting the battery, call up
the service due date in the multifunction
display and note it down.
or
XSubtract the battery disconnection periods
from the service date shown on the display
after reconnecting the battery.236ServiceMaintenance and care
BA 204.9 USA, CA Edition A 2011; 1; 6, en-USd2mwentsVersion: 3.0.3.62010-06-15T08:58:39+02:00 - Seite 236
Page 239 of 304

Hiding the service messageXPress % or a on the steering wheel.
Displaying the service message
XSwitch on the ignition.XPress = or ; to select the Service
menu on the steering wheel.XPress 9 or : to select the ASSYST
PLUS submenu and press a to confirm.
The service due date appears in the
multifunction display.
Points to remember
A qualified specialist workshop, e.g. an
authorized Mercedes-Benz Center, will reset
the service interval display after the
necessary service work has been carried out.
You can obtain more information, e.g. on
maintenance work, at an authorized
Mercedes-Benz Center or directly at
Mercedes-Benz.
! If the service interval indicator has been
inadvertently reset, this setting can be
corrected at an authorized Mercedes-Benz
Center.
Have the service work carried out as
described in the Service Booklet. There
may otherwise be increased wear, resulting
in damage to the vehicle or to the major
assemblies.
Care
Notes on care
Regular care of your vehicle is a condition for
retaining the quality in the long term.
Use care products and cleaning agents
recommended and approved by Mercedes-
Benz.
GWarning
Many cleaning products can be hazardous.
Some are poisonous, others are flammable.
Always follow the instructions on the
particular container. Always open your
vehicle's doors or windows when cleaning the
inside.
Never use fluids or solvents that are not
designed for cleaning your vehicle.
Always lock away cleaning products and keep
them out of reach of children.
! For cleaning your vehicle, do not use any
of the following:
R dry, rough or hard cloths
R abrasive cleaning agents
R solvents
R cleaning agents containing solvents
Do not scrub.
Do not touch the surfaces or protective
films with hard objects, e.g. a ring or ice
scraper. You could otherwise scratch or
damage the surfaces and protective film.HEnvironmental note
Dispose of empty packaging and cleaning
cloths in an environmentally responsible
manner.
! Do not park the vehicle for an extended
period right after cleaning it, particularly
after having cleaned the wheels with wheel
cleaner. Wheel cleaners could cause
increased corrosion of the brake discs and
brake pads/linings. For this reason, you
should drive for a few minutes after
cleaning. Braking heats the brake discs and
brake pads, thus drying them. The vehicle
can then be parked up.
Exterior care
Automatic car wash
GWarning!
Braking efficiency is reduced after washing
the vehicle. This could cause an accident. For
this reason, you must drive particularly
Care237Maintenance and careBA 204.9 USA, CA Edition A 2011; 1; 6, en-USd2mwentsVersion: 3.0.3.62010-06-15T08:58:39+02:00 - Seite 237Z
Page 243 of 304
Cleaning the exhaust tail pipes
Impurities combined with the effects of road
grit and corrosive environmental factors may
cause flash rust to form on the surface. You
can restore the original shine of the exhaust
tail pipe by cleaning it regularly, especially in
winter and after washing.
! Do not clean the exhaust tail pipes with
alkaline-based cleaning agents, such as
wheel cleaner.
XClean the exhaust tail pipes with a chrome
care product tested and approved by
Mercedes-Benz.
Interior care
Cleaning the display
XBefore cleaning the display, make sure that
it is switched off and has cooled down.XClean the display surface using a
commercially-available microfiber cloth
and TFT/LCD display cleaner.XDry the display surface using a dry
microfiber cloth.
! For cleaning, do not use any of the
following:
R alcohol-based thinner or gasoline
R abrasive cleaning agents
R commercially-available household
cleaning agents
These may damage the display surface. Do
not put pressure on the display surface
when cleaning. This could lead to
irreparable damage to the display.
Cleaning the plastic trim
GWarning!
When cleaning the steering wheel boss and
dashboard, do not use cockpit sprays or
cleaning agents containing solvents. Cleaning
agents containing solvents cause the surface
to become porous, and as a result, plastic
parts may break away and be thrown around
the interior when an air bag is deployed, which
may result in severe injuries.
! Do not affix the following to plastic
surfaces:
R stickers
R films
R scented oil bottles or similar items
You can otherwise damage the plastic.
! Do not allow cosmetics, insect repellent
or sunscreen to come into contact with the
plastic trim. This maintains the high-quality
look of the surfaces.XWipe the plastic trim with a damp, lint-free
cloth, e.g. a microfiber cloth.XHeavy soiling: use car care and cleaning
products recommended and approved by
Mercedes-Benz.
The surface may change color temporarily.
Wait until the surface is dry again.
Cleaning the steering wheel and gear or
selector lever
XWash thoroughly with a damp cloth or use
a leather care agent that has been
recommended and approved by Mercedes-
Benz.
Cleaning real wood and trim strips
XWipe the wooden trim and trim strips with
a damp, lint-free cloth, e.g. a microfiber
cloth.XHeavy soiling: use car care and cleaning
products recommended and approved by
Mercedes-Benz.
! Do not use solvent-based cleaning agents
such as tar remover, wheel cleaners,
polishes or waxes. There is otherwise a risk
of damaging the surface.
! Do not use chrome polish for trim strips.
The trim strips have a chrome look but are
mostly made of anodized aluminum and
Care241Maintenance and careBA 204.9 USA, CA Edition A 2011; 1; 6, en-USd2mwentsVersion: 3.0.3.62010-06-15T08:58:39+02:00 - Seite 241Z
Page 272 of 304
message will appear in the multifunction
display.GWarning
If the Check Tire Pressure Soon message
appears in the multifunction display, one or
more tires are significantly underinflated.
Stop the vehicle as soon as possible and
inflate the tires to the pressure specified on
the vehicle's Tire and Loading Information
placard or (where available) in the tire
pressure table.
Driving on a significantly underinflated tire
causes the tire to overheat and can lead to
tire failure. Underinflation also reduces fuel
efficiency and tire tread life, and may affect
the vehicle's handling and stopping ability.
Check all tires when cold, including the spare
tire, at least once a month. The tires should
be inflated to the recommended pressure.
This information can be found:
R on the Tire and Loading Information placard
on the B-pillar on the driver's side
or
R in the table for the tire pressure on the
inside of the fuel filler flap
GWarning!
The tire pressure loss warning system does
not provide a warning for wrongly selected tire
inflation pressures. Always adjust tire
inflation pressure according to the Tire and
Loading Information placard on the driver's
door B-pillar or on the tire inflation pressure
label located on the inside of the fuel filler flap.
The tire pressure loss warning system does
not replace regular checks of the tire inflation
pressures since a gradual pressure loss in
more than one tire cannot be detected by the
tire pressure loss warning system.
The tire pressure loss warning system is not
able to issue a warning due to a sudden
dramatic loss of tire inflation pressure (e.g.
tire blowout caused by a foreign object). In
this case bring the vehicle to a halt by carefully
applying the brakes and avoiding abrupt
steering maneuvers.
The function of the tire pressure loss warning
system is limited or delayed if:
R snow chains are mounted on your vehicle.
R road conditions are wintry.
R you are driving on sand or gravel.
R you adopt a very sporty driving style
(cornering at high speeds or driving with
high rates of acceleration).
R you are towing a very heavy or large trailer.
R you are driving with a heavy cargo (in the
vehicle or on the roof).
Restarting the tire pressure loss
warning system
Restart the tire pressure loss warning system
if you have:
R changed the tire pressure
R changed the wheels or tires
R mounted new wheels or tires
XBefore restarting, refer to the Tire and
Loading Information placard on the
B-pillar on the driver's side or the tire
pressure table on the inside of the fuel filler
flap to ensure the tire pressure in all four
tires is set correctly for the current
operating conditions.XObserve the notes in the section on tire
pressures ( Y page 266).GWarning
The tire pressure loss warning system can
only give reliable warnings if you have set the
correct tire pressure.
If an incorrect tire pressure is set, these
incorrect values will be monitored.
A tire with insufficient pressure results in
vehicle instability when driving, thus
increasing the risk of an accident.
270Tire pressuresTires and wheels
BA 204.9 USA, CA Edition A 2011; 1; 6, en-USd2mwentsVersion: 3.0.3.62010-06-15T08:58:39+02:00 - Seite 270
Page 273 of 304

XMake sure that the SmartKey is in
position 2 ( Y page 129) in the ignition lock.XPress the = or ; button to select the
Service menu.XPress the 9 or : button to select
Tire Pressure .XPress the a button.
The Run Flat Indicator Active
Press 'OK' to Restart message
appears in the multifunction display.
If you wish to confirm the restart:
XPress the a button.
The Tire Pressure Now OK? message
appears in the multifunction display.XPress 9 or : to select Yes.XPress the a button.
The Run Flat Indicator Restarted
message appears in the multifunction
display.
After a teach-in period, the tire pressure
loss warning system will monitor the set
tire pressures of all four tires.
If you wish to cancel the restart:
XPress the % button.
or
XIf the message: Tire Pressure now OK?
appears, use 9 or : to select
Cancel .XPress the a button.
The tire pressure values stored at the last
restart will continue to be monitored.
Tire pressure monitoring system
(USA only)
Important safety notes
If a tire pressure monitor is installed, the
vehicle's wheels have sensors installed that
monitor the tire pressures in all four tires. The
tire pressure monitor warns you when the
pressure drops in one or more of the tires. The
tire pressure monitor only functions if the
correct wheel electronics units are installed
in all wheels.
The tire pressure monitor has a yellow
warning lamp in the instrument cluster for
indicating a pressure loss or malfunction.
Depending on how the warning lamp flashes
or lights up, a tire pressure that is too low or
a malfunction in the tire pressure monitor is
displayed:
R if the warning lamp is lit continuously, the
tire pressure on one or more tires is
significantly too low. The tire pressure
monitor is not malfunctioning.
R if the warning lamp flashes for 60 seconds
and then remains lit constantly, the tire
pressure monitor is malfunctioning.GWarning!
Each tire, including the spare (if provided),
should be checked at least once a month
when cold and inflated to the inflation
pressure recommended by the vehicle
manufacturer on the tire and loading
information table on the driver's door B-pillar
or the tire inflation pressure table on the
inside of the fuel filler flap. If your vehicle has
tires of a different size than the size indicated
on the tire and loading information table or
the tire inflation pressure table, you should
determine the proper tire inflation pressure
for those tires.
As an added safety feature, your vehicle has
been equipped with a tire pressure monitor
(TPMS). An indicator lamp lights up if one or
more of your tires are significantly
underinflated. Accordingly, when the low tire
pressure indicator lamp lights up, you should
stop and check your tires as soon as possible,
and inflate them to the proper pressure.
Driving on a significantly underinflated tire
causes the tire to overheat and can lead to
tire failure.
Underinflation also reduces fuel efficiency
and tire tread life and may affect the vehicle's
handling and stopping ability. Please note that
the TPMS is not a substitute for proper tire
maintenance and it is the driver's
Tire pressures271Tires and wheelsBA 204.9 USA, CA Edition A 2011; 1; 6, en-USd2mwentsVersion: 3.0.3.62010-06-15T08:58:39+02:00 - Seite 271Z