2011 MERCEDES-BENZ GLK-Class warning light
[x] Cancel search: warning lightPage 209 of 304

Stowage compartments in the front
Glove box
iDepending on the vehicle equipment,
there is an AUX-IN connection or a Media
Interface installed in the glove box. Media
Interface is a universal interface for mobile
audio equipment, e.g. for an iPod® or USB
devices; see separate COMAND operating
instructions.
iThe glove box can be ventilated
(Y page 125).
XTo open: pull handle : and open glove box
flap ;.
XTo close: fold glove box flap ; upwards
until it engages.
The glove box can only be locked and
unlocked using the mechanical key.
XTo lock: insert the mechanical key into the
lock and turn it 90° clockwise to position
2.
XTo unlock: insert the mechanical key into
the lock and turn it 90° counter-clockwise
to position 1.
Stowage compartment under the
armrest
iA small and a large stowage compartment
are located under the armrest. The small
stowage compartment can be removed for
emptying.
XTo open: press left-hand button ; or right-
hand button :.
The stowage compartment opens.
Stowage compartments in the rear
Stowage pockets
GWarning!
Storage bags are intended for storing light-
weight items only.
Heavy objects, objects with sharp edges or
fragile objects may not be transported in the
storage bag. In an accident, during hard
braking, or sudden maneuvers, they could be
thrown around inside the vehicle and cause
injury to vehicle occupants.
Storage bags cannot protect transported
goods in the event of an accident.
Stowage compartments207Loading, stowing and featuresBA 204.9 USA, CA Edition A 2011; 1; 6, en-USd2mwentsVersion: 3.0.3.62010-06-15T08:58:39+02:00 - Seite 207Z
Page 210 of 304
Storage bags are located in the rear
compartment on the driver's and front-
passenger seat backrests.
Stowage areas
Parcel nets
GWarning
Parcel nets are intended for storing light-
weight items only, such as road maps, mail,
etc.
Heavy objects, objects with sharp edges, or
fragile objects may not be transported in the
parcel nets. In an accident, during hard
braking, or sudden maneuvers, they could be
thrown around inside the vehicle and cause
injury to vehicle occupants.
Parcel nets cannot protect transported goods
in the event of an accident.
Parcel nets are located in the front-passenger
footwell and on the left-hand side of the cargo
compartment.
Enlarging the luggage compartment
Important safety notes
GWarning!
Always lock the seat backrest in its upright
position when the rear seat bench is
occupied, or the extended cargo volume is not
in use.
Check for secure locking by pushing and
pulling on the seat backrest.
In an accident, during hard braking or sudden
maneuvers, loose items will be thrown around
inside the vehicle. This can cause injury to
vehicle occupants unless the items are
securely fastened in the vehicle.
To help avoid personal injury during a collision
or sudden maneuver, exercise care when
transporting cargo.
GWarning!
Never drive a vehicle with the tailgate open.
Deadly carbon monoxide (CO) gases may
enter vehicle interior resulting in
unconsciousness and death.
The left-hand and right-hand rear seat
backrests can be folded forwards separately
to increase the cargo compartment capacity.
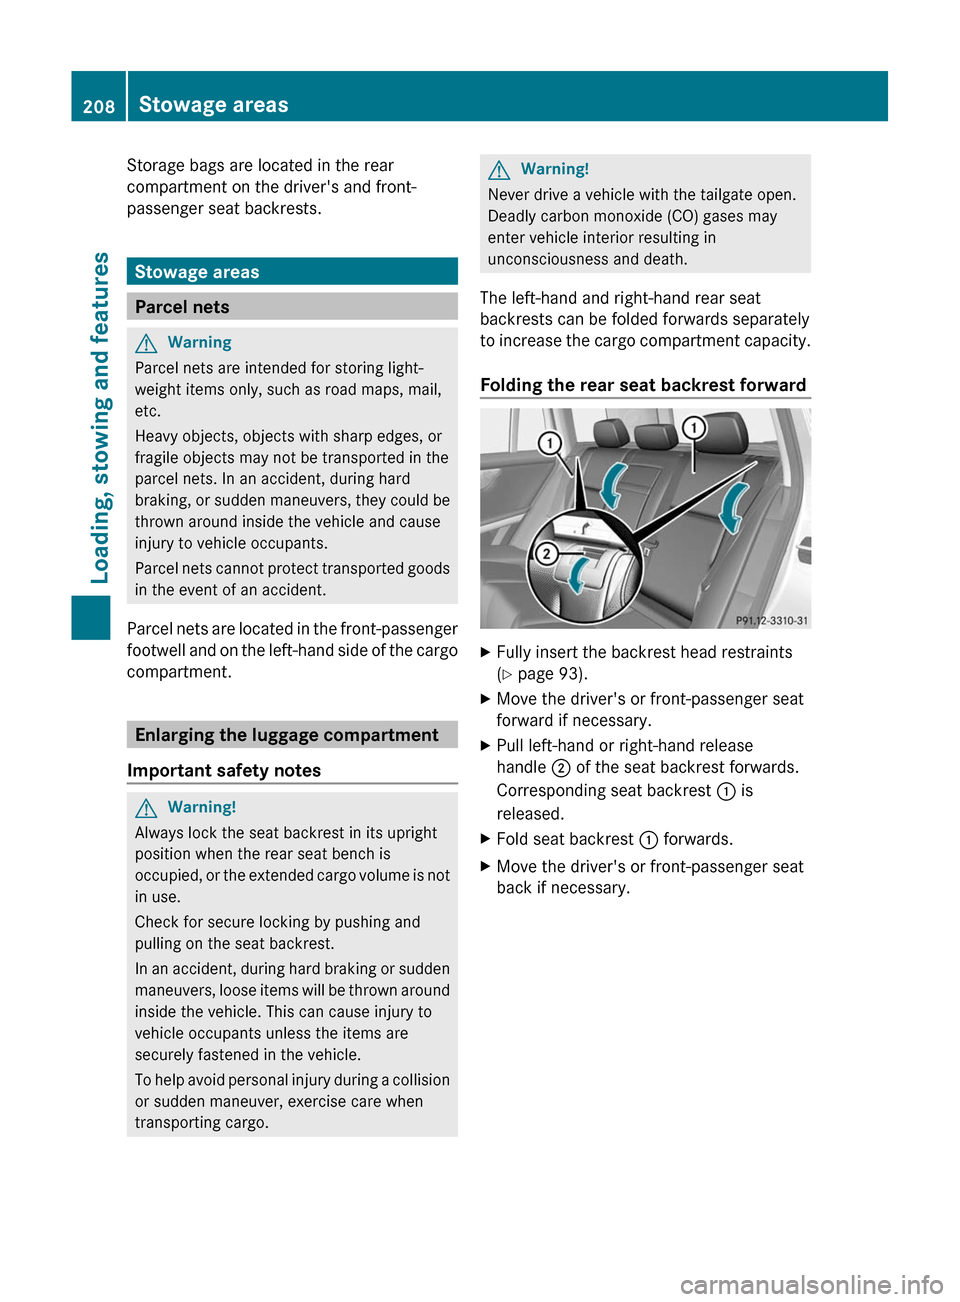
Folding the rear seat backrest forward
XFully insert the backrest head restraints
(Y page 93).
XMove the driver's or front-passenger seat
forward if necessary.
XPull left-hand or right-hand release
handle ; of the seat backrest forwards.
Corresponding seat backrest : is
released.
XFold seat backrest : forwards.XMove the driver's or front-passenger seat
back if necessary.
208Stowage areasLoading, stowing and features
BA 204.9 USA, CA Edition A 2011; 1; 6, en-USd2mwentsVersion: 3.0.3.62010-06-15T08:58:39+02:00 - Seite 208
Page 211 of 304
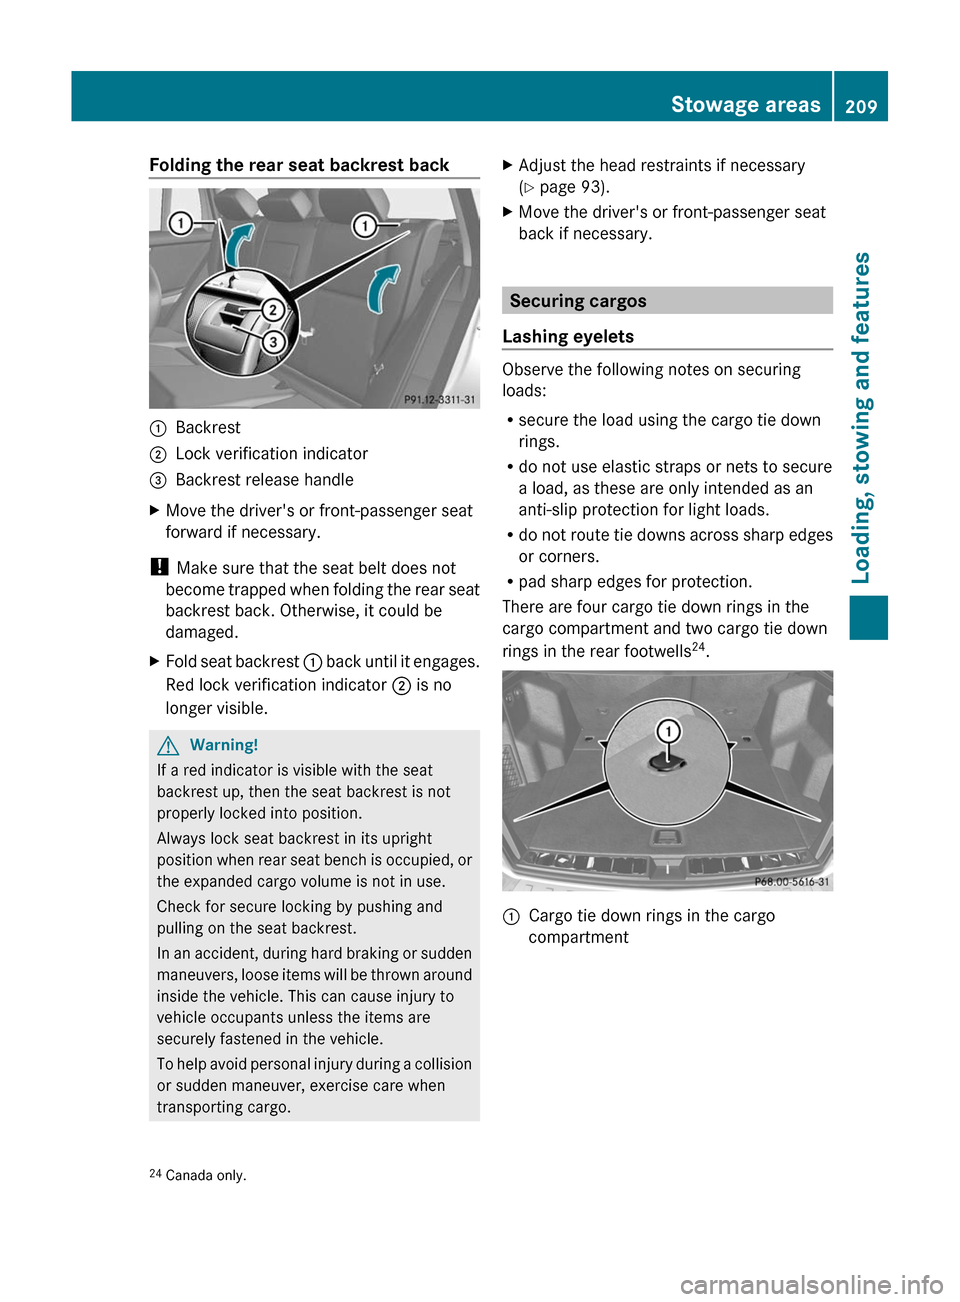
Folding the rear seat backrest back:Backrest;Lock verification indicator=Backrest release handleXMove the driver's or front-passenger seat
forward if necessary.
! Make sure that the seat belt does not
become trapped when folding the rear seat
backrest back. Otherwise, it could be
damaged.
XFold seat backrest : back until it engages.
Red lock verification indicator ; is no
longer visible.
GWarning!
If a red indicator is visible with the seat
backrest up, then the seat backrest is not
properly locked into position.
Always lock seat backrest in its upright
position when rear seat bench is occupied, or
the expanded cargo volume is not in use.
Check for secure locking by pushing and
pulling on the seat backrest.
In an accident, during hard braking or sudden
maneuvers, loose items will be thrown around
inside the vehicle. This can cause injury to
vehicle occupants unless the items are
securely fastened in the vehicle.
To help avoid personal injury during a collision
or sudden maneuver, exercise care when
transporting cargo.
XAdjust the head restraints if necessary
(Y page 93).
XMove the driver's or front-passenger seat
back if necessary.
Securing cargos
Lashing eyelets
Observe the following notes on securing
loads:
Rsecure the load using the cargo tie down
rings.
Rdo not use elastic straps or nets to secure
a load, as these are only intended as an
anti-slip protection for light loads.
Rdo not route tie downs across sharp edges
or corners.
Rpad sharp edges for protection.
There are four cargo tie down rings in the
cargo compartment and two cargo tie down
rings in the rear footwells24.
:Cargo tie down rings in the cargo
compartment24Canada only.Stowage areas209Loading, stowing and featuresBA 204.9 USA, CA Edition A 2011; 1; 6, en-USd2mwentsVersion: 3.0.3.62010-06-15T08:58:39+02:00 - Seite 209Z
Page 214 of 304

XInsert guide rod ; into retainer : in the
direction of the arrow.
XSlide guide rod ; forwards into
retainer : in the direction of the arrow.
Tightening the cargo net
Seat belt reel holder behind the front seats
XInsert belt hook : into cargo tie-down
ring ; in the direction of the arrow.
XPull tensioning strap = by the loose end in
the direction of the arrow until the cargo
net is tight.
XAfter driving a short distance, check the
tension of the cargo net and retighten it if
necessary.
Releasing the cargo net
Seat belt reel holder behind the front seats
XPull belt adjuster : upwards in the
direction of the arrow to reduce the tension
on the tensioning strap.
XUnhook belt hook ; from cargo tie-down
ring =.
Detaching and storing the cargo net
XDetach guide rod ; from bracket :
(Y page 211).
XPress the red button on the upper and lower
guide rods.
XFold the cargo net and roll it up.XClose the two Velcro fasteners on the cargo
net holder.
Coat hooks on the tailgate
GWarning!
The tailgate may close if too great a load is
placed on the coat hooks.
You and/or others could be trapped and
injured.
Only use the coat hooks for light clothing.
:Coat hooks
Stowage well under the cargo
compartment floor
GWarning!
If items are stored in the compartment, make
sure compartment is securely closed.
212Stowage areasLoading, stowing and features
BA 204.9 USA, CA Edition A 2011; 1; 6, en-USd2mwentsVersion: 3.0.3.62010-06-15T08:58:39+02:00 - Seite 212
Page 215 of 304

In an accident, during hard braking or sudden
maneuvers, they could be thrown around
inside the vehicle, and cause injury to vehicle
occupants.
XTo open: open the tailgate.XHolding the ribbing, press handle :
downwards ;.
Handle : folds upwards.
XSwing the trunk floor upwards using
handle : until it rests against the cargo
compartment cover.
XRelease hook = from the bracket on the
underside of the trunk floor.
XEngage hook = into rain trough ?.
iStowage compartments A and B can be
used to stow small, light and flat objects.
! Before you close the tailgate, unhook the
hook from the rain trough and fold the trunk
floor down.
XTo close: unhook hook = from rain
trough ?.
XFasten the hook to the bracket on the
underside of the trunk floor
XFold the trunk floor down.XPress the trunk floor down ; until it
engages.
Roof carrier
Important safety notes
GWarning!
Only use roof racks approved by Mercedes-
Benz for your vehicle model to avoid damage
to the vehicle.
Follow the manufacturer’s installation
instructions. Otherwise, an improperly
attached roof rack system or its load could
become detached from the vehicle.
Do not exceed the maximum roof load of
165 lb (75 kg).
Take into consideration that when the roof
rack is loaded, the handling characteristics
are different from those when operating the
vehicle without the roof rack loaded.
Stowage areas213Loading, stowing and featuresBA 204.9 USA, CA Edition A 2011; 1; 6, en-USd2mwentsVersion: 3.0.3.62010-06-15T08:58:39+02:00 - Seite 213Z
Page 217 of 304
Sun visors
Overview of the sun visor
GWarning
Do not use the vanity mirror while driving.
Keep the vanity mirrors in the sun visors
closed while the vehicle is in motion.
Reflected glare can endanger you and others.
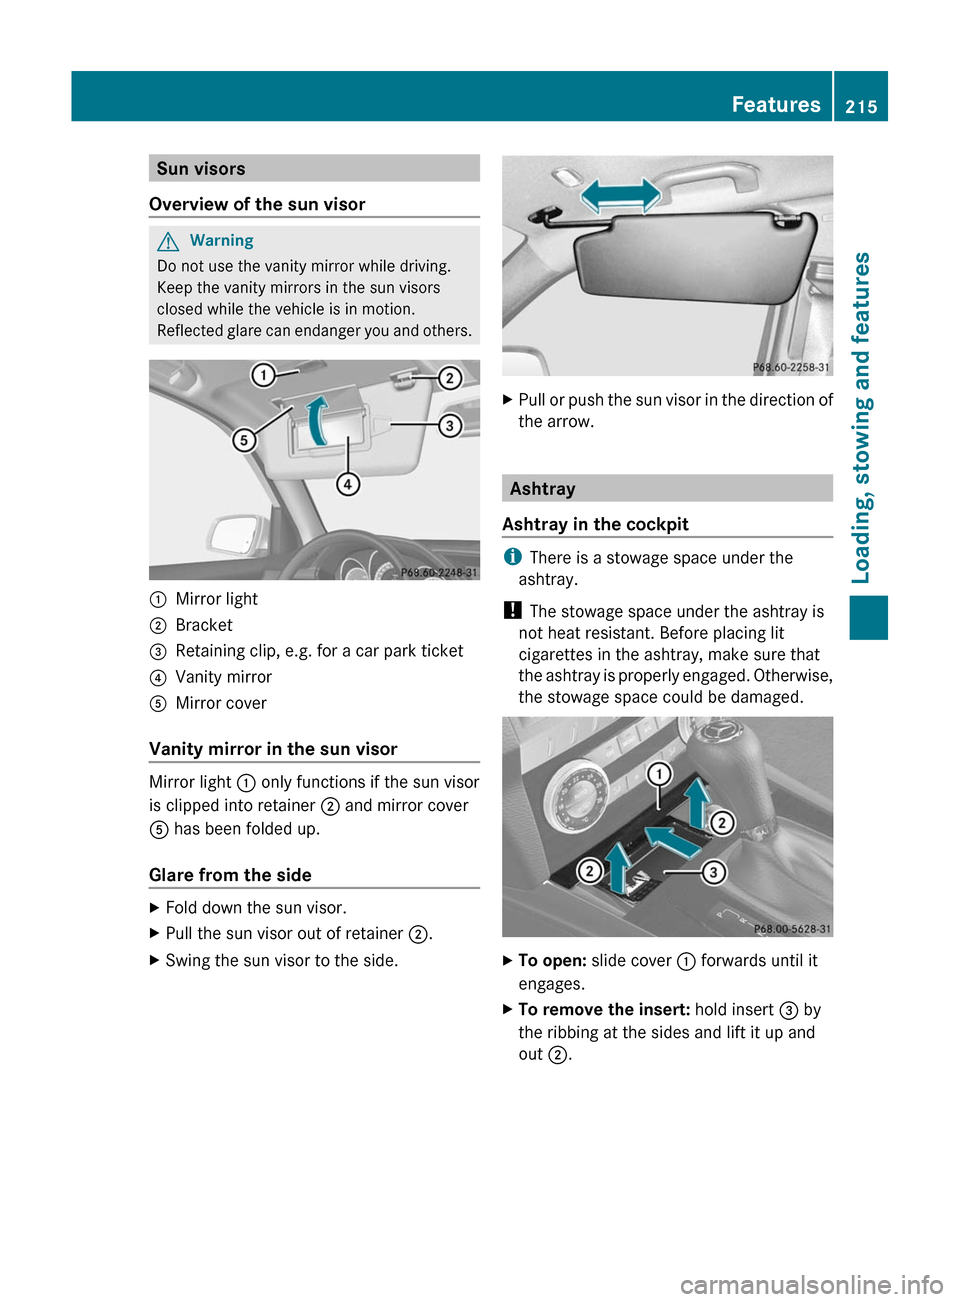
:Mirror light;Bracket=Retaining clip, e.g. for a car park ticket?Vanity mirrorAMirror cover
Vanity mirror in the sun visor
Mirror light : only functions if the sun visor
is clipped into retainer ; and mirror cover
A has been folded up.
Glare from the side
XFold down the sun visor.XPull the sun visor out of retainer ;.XSwing the sun visor to the side.XPull or push the sun visor in the direction of
the arrow.
Ashtray
Ashtray in the cockpit
iThere is a stowage space under the
ashtray.
! The stowage space under the ashtray is
not heat resistant. Before placing lit
cigarettes in the ashtray, make sure that
the ashtray is properly engaged. Otherwise,
the stowage space could be damaged.
XTo open: slide cover : forwards until it
engages.
XTo remove the insert: hold insert = by
the ribbing at the sides and lift it up and
out ;.
Features215Loading, stowing and featuresBA 204.9 USA, CA Edition A 2011; 1; 6, en-USd2mwentsVersion: 3.0.3.62010-06-15T08:58:39+02:00 - Seite 215Z
Page 218 of 304
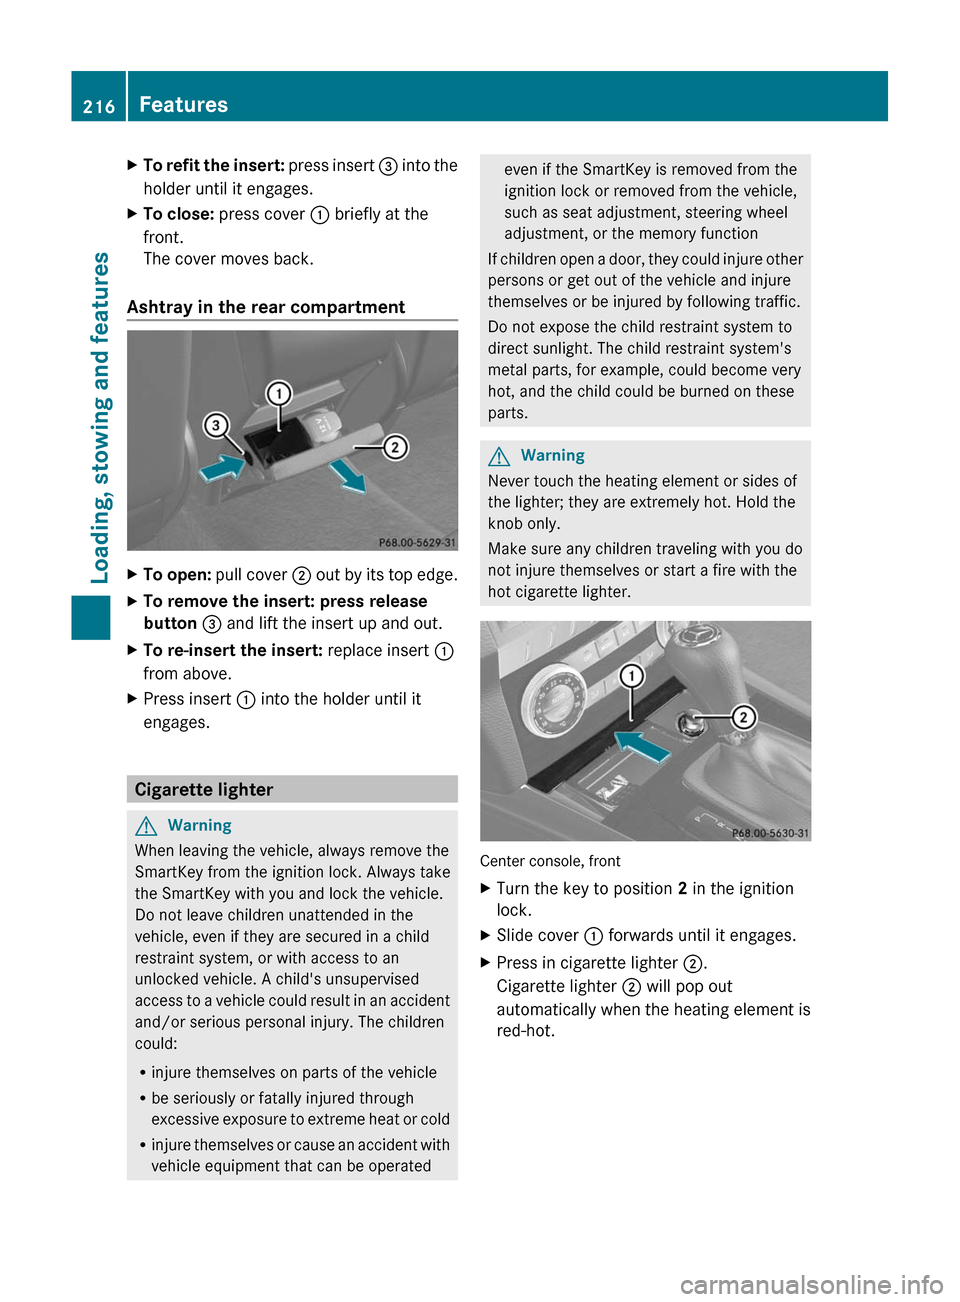
XTo refit the insert: press insert = into the
holder until it engages.
XTo close: press cover : briefly at the
front.
The cover moves back.
Ashtray in the rear compartment
XTo open: pull cover ; out by its top edge.XTo remove the insert: press release
button = and lift the insert up and out.
XTo re-insert the insert: replace insert :
from above.
XPress insert : into the holder until it
engages.
Cigarette lighter
GWarning
When leaving the vehicle, always remove the
SmartKey from the ignition lock. Always take
the SmartKey with you and lock the vehicle.
Do not leave children unattended in the
vehicle, even if they are secured in a child
restraint system, or with access to an
unlocked vehicle. A child's unsupervised
access to a vehicle could result in an accident
and/or serious personal injury. The children
could:
Rinjure themselves on parts of the vehicle
Rbe seriously or fatally injured through
excessive exposure to extreme heat or cold
Rinjure themselves or cause an accident with
vehicle equipment that can be operated
even if the SmartKey is removed from the
ignition lock or removed from the vehicle,
such as seat adjustment, steering wheel
adjustment, or the memory function
If children open a door, they could injure other
persons or get out of the vehicle and injure
themselves or be injured by following traffic.
Do not expose the child restraint system to
direct sunlight. The child restraint system's
metal parts, for example, could become very
hot, and the child could be burned on these
parts.
GWarning
Never touch the heating element or sides of
the lighter; they are extremely hot. Hold the
knob only.
Make sure any children traveling with you do
not injure themselves or start a fire with the
hot cigarette lighter.
Center console, front
XTurn the key to position 2 in the ignition
lock.
XSlide cover : forwards until it engages.XPress in cigarette lighter ;.
Cigarette lighter ; will pop out
automatically when the heating element is
red-hot.
216FeaturesLoading, stowing and features
BA 204.9 USA, CA Edition A 2011; 1; 6, en-USd2mwentsVersion: 3.0.3.62010-06-15T08:58:39+02:00 - Seite 216
Page 220 of 304
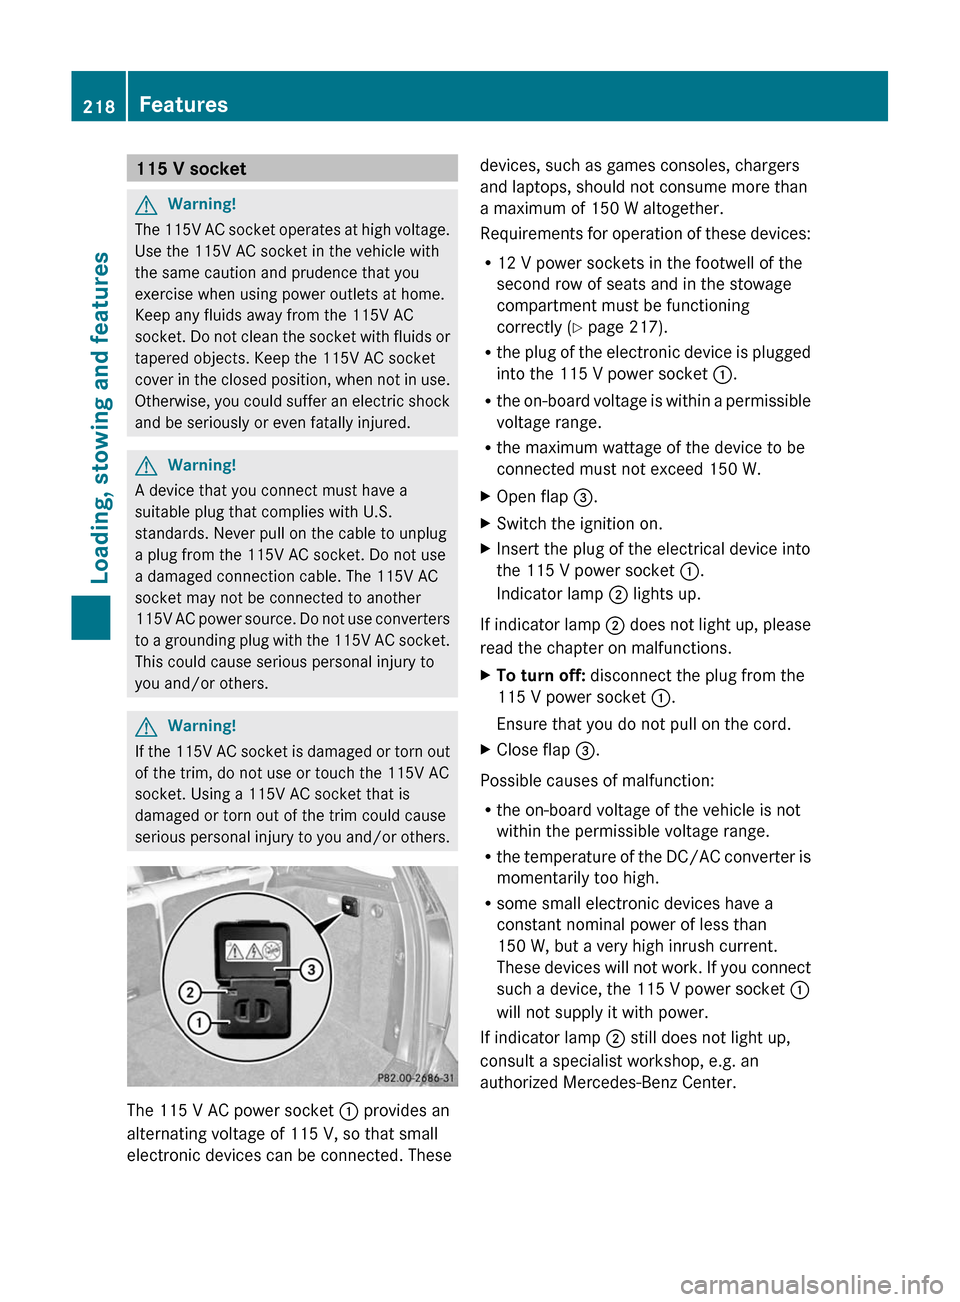
115 V socketGWarning!
The 115V AC socket operates at high voltage.
Use the 115V AC socket in the vehicle with
the same caution and prudence that you
exercise when using power outlets at home.
Keep any fluids away from the 115V AC
socket. Do not clean the socket with fluids or
tapered objects. Keep the 115V AC socket
cover in the closed position, when not in use.
Otherwise, you could suffer an electric shock
and be seriously or even fatally injured.
GWarning!
A device that you connect must have a
suitable plug that complies with U.S.
standards. Never pull on the cable to unplug
a plug from the 115V AC socket. Do not use
a damaged connection cable. The 115V AC
socket may not be connected to another
115V AC power source. Do not use converters
to a grounding plug with the 115V AC socket.
This could cause serious personal injury to
you and/or others.
GWarning!
If the 115V AC socket is damaged or torn out
of the trim, do not use or touch the 115V AC
socket. Using a 115V AC socket that is
damaged or torn out of the trim could cause
serious personal injury to you and/or others.
The 115 V AC power socket : provides an
alternating voltage of 115 V, so that small
electronic devices can be connected. These
devices, such as games consoles, chargers
and laptops, should not consume more than
a maximum of 150 W altogether.
Requirements for operation of these devices:
R12 V power sockets in the footwell of the
second row of seats and in the stowage
compartment must be functioning
correctly (Y page 217).
Rthe plug of the electronic device is plugged
into the 115 V power socket :.
Rthe on-board voltage is within a permissible
voltage range.
Rthe maximum wattage of the device to be
connected must not exceed 150 W.
XOpen flap =.XSwitch the ignition on.XInsert the plug of the electrical device into
the 115 V power socket :.
Indicator lamp ; lights up.
If indicator lamp ; does not light up, please
read the chapter on malfunctions.
XTo turn off: disconnect the plug from the
115 V power socket :.
Ensure that you do not pull on the cord.
XClose flap =.
Possible causes of malfunction:
Rthe on-board voltage of the vehicle is not
within the permissible voltage range.
Rthe temperature of the DC/AC converter is
momentarily too high.
Rsome small electronic devices have a
constant nominal power of less than
150 W, but a very high inrush current.
These devices will not work. If you connect
such a device, the 115 V power socket :
will not supply it with power.
If indicator lamp ; still does not light up,
consult a specialist workshop, e.g. an
authorized Mercedes-Benz Center.
218FeaturesLoading, stowing and features
BA 204.9 USA, CA Edition A 2011; 1; 6, en-USd2mwentsVersion: 3.0.3.62010-06-15T08:58:39+02:00 - Seite 218