2011 MERCEDES-BENZ GL350 BlueTEC door lock
[x] Cancel search: door lockPage 168 of 376
Using KEYLESS-GOXPress the Start/Stop button (Y page 147).
When the driver's door is closed, the Start/
Stop button is in position 1. When the
driver's door is opened, the Start/Stop
button moves to position 0. This
corresponds to removing the SmartKey.XApply the parking brake firmly.
i If you turn off the engine with the Start/
Stop button and open a front door, the
automatic transmission switches to P
automatically.
i The engine can be turned off while the
vehicle is in motion by pressing and holding
the Start/Stop button for three seconds.
If you have started the engine with the Start/
Stop button and it cannot be switched off as
described:
Xremove the Start/Stop button from the
ignition lock.Xinsert the SmartKey into the ignition lock.
The engine stops. The ignition lock is in
position 0.
Parking brake
GWarning
Engaging the parking brake while the vehicle
is in motion can cause the rear wheels to lock
up. You could lose control of the vehicle and
cause an accident. In addition, the vehicle's
brake lights do not light up when the parking
brake is engaged.
GWarning!
When leaving the vehicle, always remove the
SmartKey from the starter switch, take it with
you, and lock the vehicle. Do not leave
children unattended in the vehicle, or with
access to an unlocked vehicle. Children could
release the parking brake and/or shift the
automatic transmission out of park position
P , either of which could result in an accident
and/or serious personal injury.
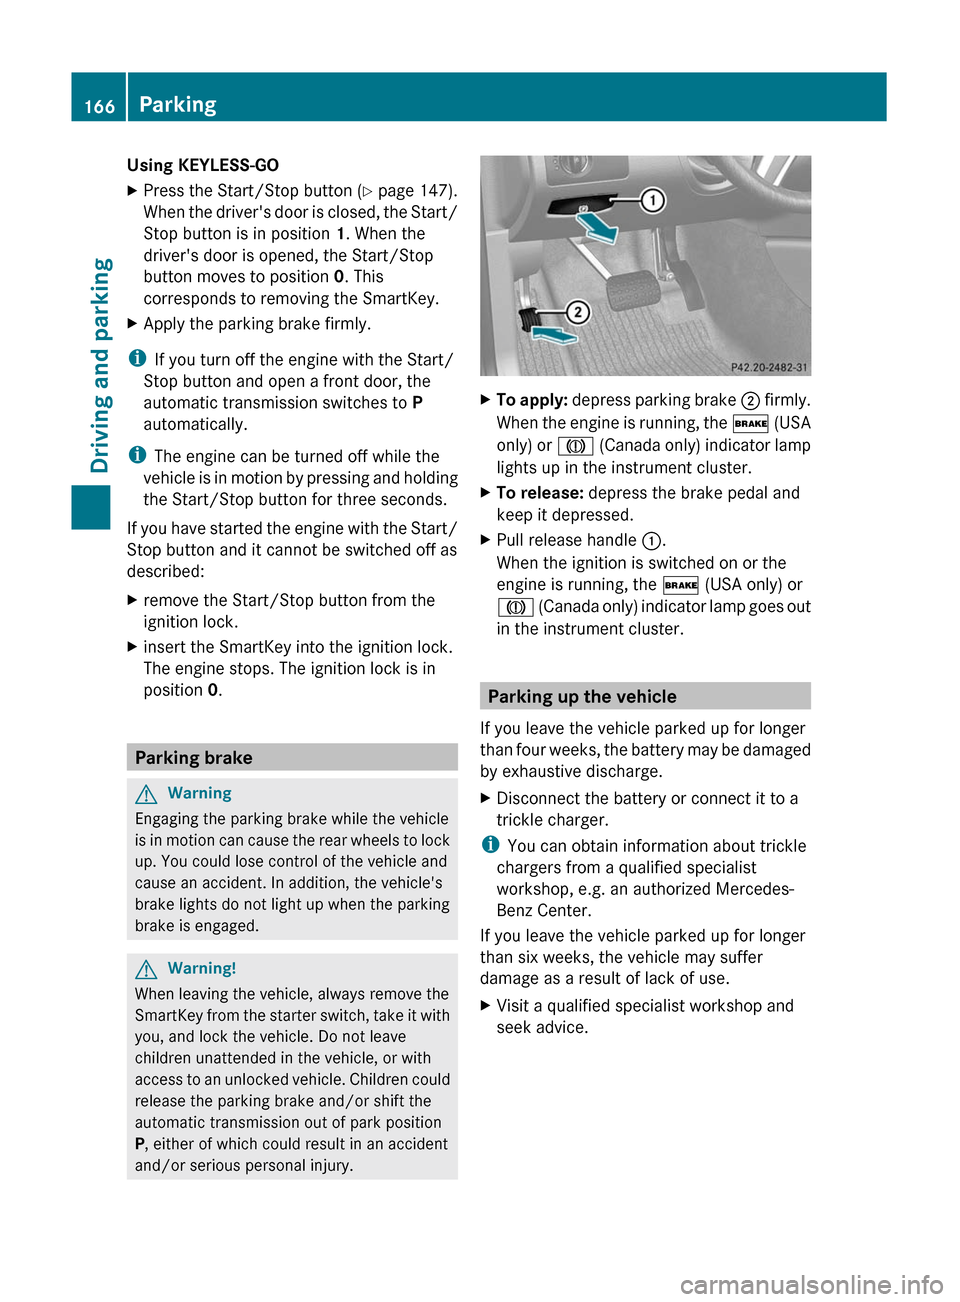
XTo apply: depress parking brake ; firmly.
When the engine is running, the $ (USA
only) or J (Canada only) indicator lamp
lights up in the instrument cluster.XTo release: depress the brake pedal and
keep it depressed.XPull release handle :.
When the ignition is switched on or the
engine is running, the $ (USA only) or
J (Canada only) indicator lamp goes out
in the instrument cluster.
Parking up the vehicle
If you leave the vehicle parked up for longer
than four weeks, the battery may be damaged
by exhaustive discharge.
XDisconnect the battery or connect it to a
trickle charger.
i You can obtain information about trickle
chargers from a qualified specialist
workshop, e.g. an authorized Mercedes-
Benz Center.
If you leave the vehicle parked up for longer
than six weeks, the vehicle may suffer
damage as a result of lack of use.
XVisit a qualified specialist workshop and
seek advice.166ParkingDriving and parking
BA 164.8 USA, CA Edition B 2011; 1; 2, en-USd2sboikeVersion: 3.0.3.52010-04-21T15:08:44+02:00 - Seite 166
Page 176 of 376
GWarning!
Please be aware that by raising the vehicle
level, the center of gravity also rises.
Therefore, always ensure that the vehicle
level is as low as possible. With higher ride
height the ESP ®
may activate earlier in certain
situations.
GWarning!
Do not reduce the tire inflation pressure
before driving through sand. However, if you
do so, remember to correct the tire inflation
pressure before continuing your trip. Driving
with reduced tire inflation pressure increases
the risk of losing control of the vehicle and
rolling over.
General information
Read this section before driving your vehicle
off-road. Practice by traveling over more
gentle off-road terrain first.
Familiarize yourself with the characteristics
of your vehicle and the gear change process
before driving through difficult terrain.
The following driving systems are specially
adapted to off-road driving:
R off-road drive program (vehicles without
the Off-Road Pro engineering package)
( Y page 204)
R LOW RANGE off-road gear ( Y page 157)
R off-road ABS ( Y page 66)
R off-road 4ETS ( Y page 67)
R off-road ESP ®
(Y page 68)
R hill start assist
R differential locks ( Y page 207)
R DSR (Downhill Speed Regulation)
( Y page 203)
Observe the following notes:
R stop your vehicle and, if necessary, select
the off-road drive program (Y page 204) or
the LOW RANGE off-road gear
( Y page 157) before driving off-road.
R select a vehicle level that is suitable for the
terrain. Make sure there is always sufficient
ground clearance to prevent damage to the
vehicle.
R activate the differential lock if necessary.
R make sure that items of luggage and cargo
are stowed safely and are well secured
( Y page 268).
R always keep the engine running and in gear
when driving on a downhill gradient.
Activate DSR ( Y page 203).
R always keep the doors, tailgate, windows
and the tilt/sliding sunroof closed while the
vehicle is in motion.
R adapt the speed to suit the terrain
conditions. The more uneven, worn or
steeper the terrain is, the slower you should
drive.
R drive slowly and at an even speed through
the water. Ensure that a bow wave does not
form as you drive.
R drive with extreme care on unfamiliar off-
road routes where visibility is poor. For
safety reasons, get out of the vehicle first
and survey the off-road route.
R look out for obstacles, such as rocks, holes,
tree stumps and furrows.
R check the depth of water before fording
rivers and streams.
R do not stop in water and do not switch the
engine off.
R drive quickly on sand to overcome the
rolling resistance. Otherwise, the vehicle
could dig itself into the sand.
R do not jump with the vehicle. This
interrupts the vehicle's traction.
R always keep the engine running and in gear
when driving on slopes.
R do not shift the automatic transmission to
transmission position N.174Driving tipsDriving and parking
BA 164.8 USA, CA Edition B 2011; 1; 2, en-USd2sboikeVersion: 3.0.3.52010-04-21T15:08:44+02:00 - Seite 174
Page 191 of 376
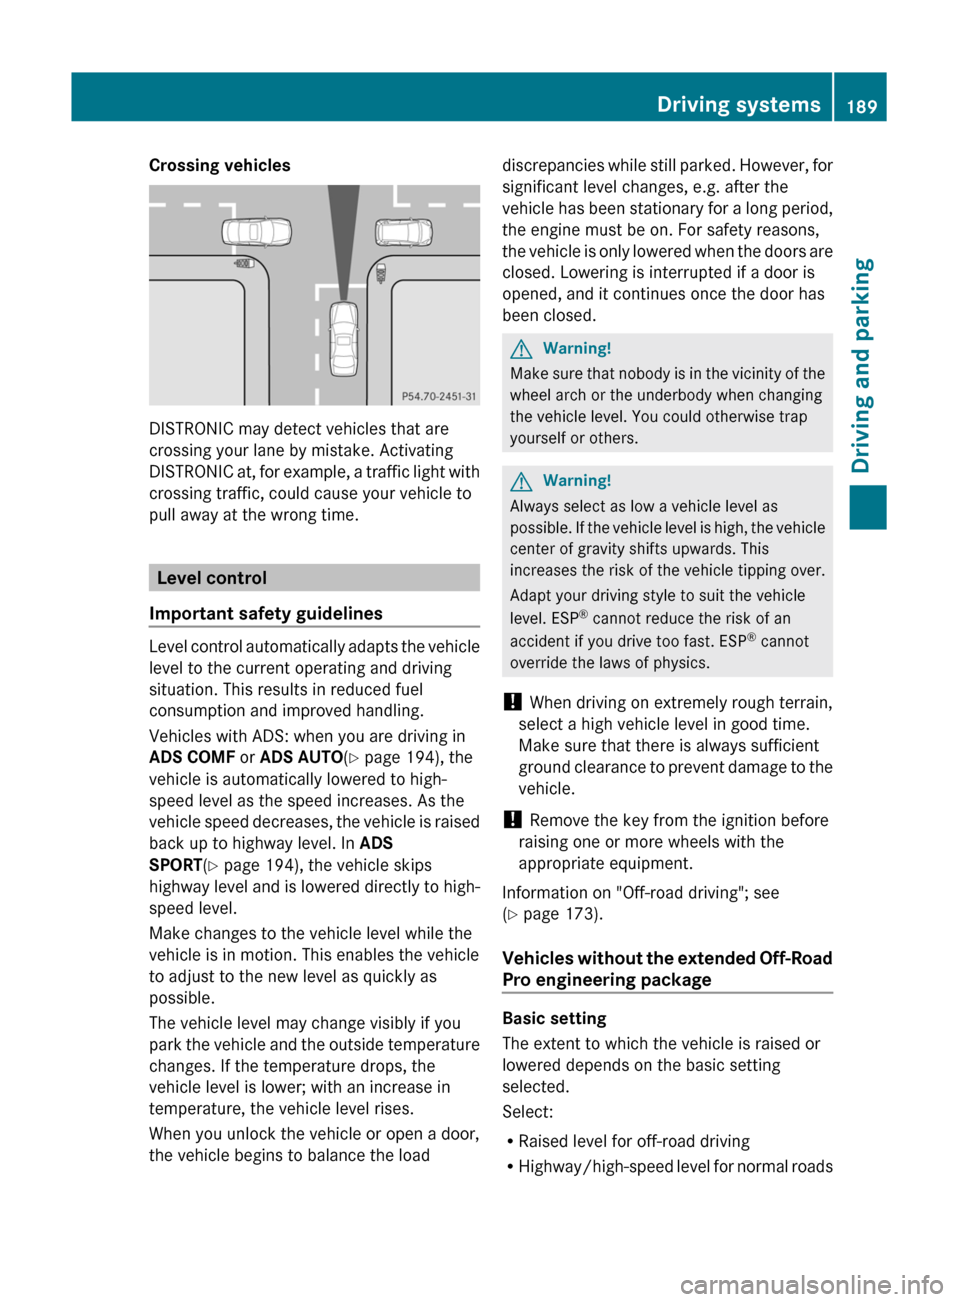
Crossing vehicles
DISTRONIC may detect vehicles that are
crossing your lane by mistake. Activating
DISTRONIC at, for example, a traffic light with
crossing traffic, could cause your vehicle to
pull away at the wrong time.
Level control
Important safety guidelines
Level control automatically adapts the vehicle
level to the current operating and driving
situation. This results in reduced fuel
consumption and improved handling.
Vehicles with ADS: when you are driving in
ADS COMF or ADS AUTO(Y page 194), the
vehicle is automatically lowered to high-
speed level as the speed increases. As the
vehicle speed decreases, the vehicle is raised
back up to highway level. In ADS
SPORT(Y page 194), the vehicle skips
highway level and is lowered directly to high-
speed level.
Make changes to the vehicle level while the
vehicle is in motion. This enables the vehicle
to adjust to the new level as quickly as
possible.
The vehicle level may change visibly if you
park the vehicle and the outside temperature
changes. If the temperature drops, the
vehicle level is lower; with an increase in
temperature, the vehicle level rises.
When you unlock the vehicle or open a door,
the vehicle begins to balance the load
discrepancies while still parked. However, for
significant level changes, e.g. after the
vehicle has been stationary for a long period,
the engine must be on. For safety reasons,
the vehicle is only lowered when the doors are
closed. Lowering is interrupted if a door is
opened, and it continues once the door has
been closed.
GWarning!
Make sure that nobody is in the vicinity of the
wheel arch or the underbody when changing
the vehicle level. You could otherwise trap
yourself or others.
GWarning!
Always select as low a vehicle level as
possible. If the vehicle level is high, the vehicle
center of gravity shifts upwards. This
increases the risk of the vehicle tipping over.
Adapt your driving style to suit the vehicle
level. ESP® cannot reduce the risk of an
accident if you drive too fast. ESP® cannot
override the laws of physics.
! When driving on extremely rough terrain,
select a high vehicle level in good time.
Make sure that there is always sufficient
ground clearance to prevent damage to the
vehicle.
! Remove the key from the ignition before
raising one or more wheels with the
appropriate equipment.
Information on "Off-road driving"; see
(Y page 173).
Vehicles without the extended Off-Road
Pro engineering package
Basic setting
The extent to which the vehicle is raised or
lowered depends on the basic setting
selected.
Select:
RRaised level for off-road driving
RHighway/high-speed level for normal roads
Driving systems189Driving and parkingBA 164.8 USA, CA Edition B 2011; 1; 2, en-USd2sboikeVersion: 3.0.3.52010-04-21T15:08:44+02:00 - Seite 189Z
Page 211 of 376
Message in the multifunction display
Diff. Lock System Overheated -
Wait briefly.
The differential lock system has overheated
and briefly disengaged.XContinue driving.
The differential locks cool off and are soon
available once again.
Towing a trailer
Notes on towing a trailer
Important safety instructions
GWarning!
Failure to use proper equipment and driving
technique can result in a loss of vehicle
control when towing a trailer.
Improper towing or failure to follow the
instructions in this manual can result in
vehicle damage and/or serious personal
injury. Follow the guidelines below carefully
to assure safe trailer operation.
Contact an authorized Mercedes-Benz Center
should you require an explanation of
information contained in this manual.
General information
R Only install an approved trailer coupling on
your vehicle.
Further information on availability and on
installation is available from any authorized
Mercedes-Benz Center.
R The bumpers of your vehicle are not
suitable for installing detachable trailer
couplings.
R Do not install hired trailer couplings or
other detachable trailer couplings on the
bumpers of your vehicle.
R To reduce the risk of damage to the ball
coupling, remove it from the ball coupling
recess when not in use.
Coupling up a trailerGWarning!
While you are coupling or decoupling a trailer,
make sure nobody locks or unlocks the
vehicle and/or opens or closes doors or the
tailgate.
The vehicle’s level could change and you
could endanger yourself and/or others as a
result.
Make sure that you do not operate the ADS
button or the vehicle level control system
when coupling/decoupling the trailer.
Observe the maximum permissible trailer
dimensions (width and length).
Most federal states and all Canadian
provinces require by law:
R safety chains between the towing vehicle
and the trailer. The chains should be cross-
wound under the trailer drawbar. They must
be fastened to the vehicle's trailer
coupling, not to the bumper or the axle.
Allow for enough play in the chains to
facilitate turning tight corners.
R a separate brake system for certain types
of trailer.
R a safety switch for braked trailers. Check
the specific legal requirements applicable
to your federal state.
If the trailer detaches from the towing
vehicle, the safety switch applies the
trailer's brakes.
! Do not connect the trailer's brake system
(if featured) to the hydraulic brake system
of the towing vehicle, as the latter is
equipped with an anti-lock brake system.
Doing so will result in a loss of function of
the brake systems of both the vehicle and
the trailer.
i The vehicle's wiring harness features a
line to the brake indicator lamp.
Towing a trailer209Driving and parkingBA 164.8 USA, CA Edition B 2011; 1; 2, en-USd2sboikeVersion: 3.0.3.52010-04-21T15:08:44+02:00 - Seite 209Z
Page 213 of 376
ROn long and steep gradients that are
difficult to drive down in shift range 1,
switch to the off-road drive program or
engage the LOW GEAR off-road gear.
R When driving downhill, shift to a lower gear
to utilize the engine's braking effect.
Avoid continuous brake application as this
may overheat the vehicle brakes and, if
installed, the trailer brakes.
R If the coolant temperature increases
dramatically while the air-conditioning
system is switched on, switch off the air-
conditioning system.
Coolant heat can additionally be dissipated
by opening the windows and by setting the
blower fan and the interior temperature to
maximum.
R When overtaking, pay particular attention
to the extended length of your vehicle/
trailer combination.
Due to the length of your vehicle/trailer
combination, you will have to travel an
additional distance beyond the vehicle you
are overtaking before returning to the
previous lane.
Decoupling a trailer
GWarning!
While you are coupling or decoupling a trailer,
make sure nobody locks or unlocks the
vehicle and/or opens or closes doors or the
tailgate.
The vehicle’s level could change and you
could endanger yourself and/or others as a
result.
Make sure that you do not operate the ADS
button or the vehicle level control system
when coupling/decoupling the trailer.
XMake sure that the automatic transmission
is set to position P.XApply the vehicle's parking brake.XStart the engine.XClose all doors and the tailgate.XApply the trailer's parking brake.GWarning!
As soon as you disconnect the electrical
connection between the trailer and the
vehicle, the vehicle will lower. To help avoid
personal injury, make sure no one is near the
wheel housing or underneath the vehicle
before the electrical connection is
disconnected.
When you decouple the trailer, the vehicle is
temporarily raised because the springs are
relieved of load. Be especially careful during
this process, as you could otherwise injure
yourself and/or others. Make sure that any
persons remaining in the vehicle do not press
the switches for vehicle level control or the
ADS.
XDetach the trailer cable and decouple the
trailer.XDetach the trailer cable and decouple the
trailer.XSwitch off the engine.
Permissible trailer load and drawbar
noseweight
Weight specifications
The Gross Trailer Weight (GTW) is the
combined weight of the trailer together with
the cargo and equipment loaded on the
trailer. Permissible gross weight: 7500 lb
(3402 kg).
The permissible Trailer drawbar Weight
Rating (TWR) is the maximum weight
permitted on the trailer drawbar: 600 lb
(272 kg) limit for Mercedes-Benz-approved
trailer couplings.
Loading a trailer
R When loading a trailer, please note that
neither the permissible gross trailer weight
nor the permissible Gross Vehicle Weight
Towing a trailer211Driving and parkingBA 164.8 USA, CA Edition B 2011; 1; 2, en-USd2sboikeVersion: 3.0.3.52010-04-21T15:08:44+02:00 - Seite 211Z
Page 217 of 376
Speedometer with segments
The segments in the speedometer indicate
which speed range is available.
DISTRONIC mode:
One or two segments around the stored
speed light up.
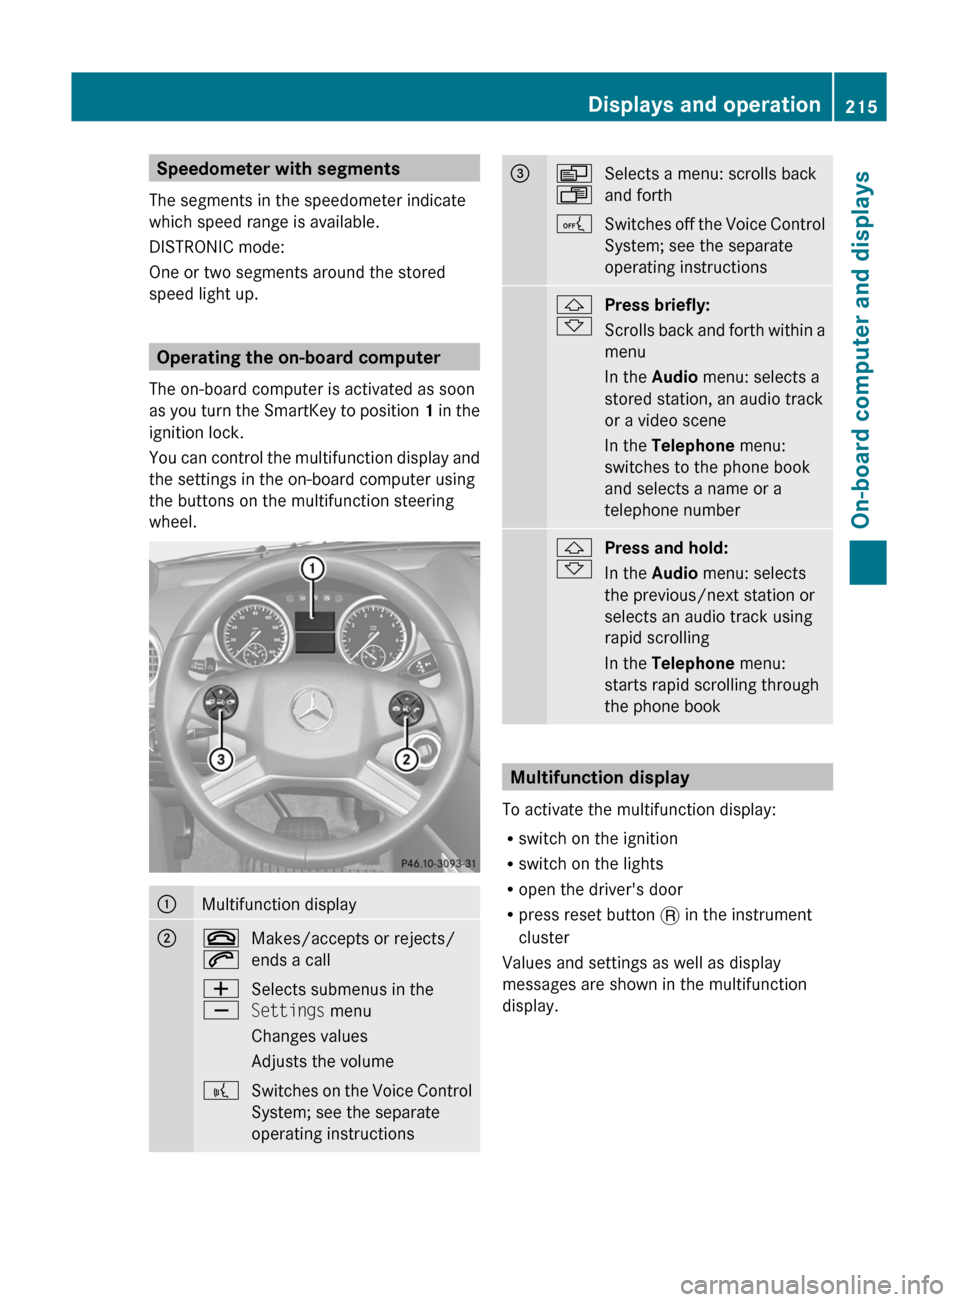
Operating the on-board computer
The on-board computer is activated as soon
as you turn the SmartKey to position 1 in the
ignition lock.
You can control the multifunction display and
the settings in the on-board computer using
the buttons on the multifunction steering
wheel.
:Multifunction display;~
6Makes/accepts or rejects/
ends a callW
XSelects submenus in the
Settings menu
Changes values
Adjusts the volume?Switches on the Voice Control
System; see the separate
operating instructions=V
USelects a menu: scrolls back
and forthASwitches off the Voice Control
System; see the separate
operating instructions&
*Press briefly:
Scrolls back and forth within a
menu
In the Audio menu: selects a
stored station, an audio track
or a video scene
In the Telephone menu:
switches to the phone book
and selects a name or a
telephone number&
*Press and hold:
In the Audio menu: selects
the previous/next station or
selects an audio track using
rapid scrolling
In the Telephone menu:
starts rapid scrolling through
the phone book
Multifunction display
To activate the multifunction display:
R switch on the ignition
R switch on the lights
R open the driver's door
R press reset button . in the instrument
cluster
Values and settings as well as display
messages are shown in the multifunction
display.
Displays and operation215On-board computer and displaysBA 164.8 USA, CA Edition B 2011; 1; 2, en-USd2sboikeVersion: 3.0.3.52010-04-21T15:08:44+02:00 - Seite 215Z
Page 225 of 376
lamps are switched on automatically when
the engine is running.
In the dark, the following also light up:
R the low-beam headlamps
R the parking lamps
R the tail lamps
R the license plate lamp
R the side marker lampsXPress V or U on the steering wheel
to select the Settings menu.XPress & to call up the selection of
submenus.XPress the W or X button to select the
Lighting submenu.XPress & to select Daytime Running
Lamps .XPress W or X to set daytime running
lamps to On or Off .XPress the &, V or U button to
select a different display.
Switching the surround lighting on/off
If you activate the surround lighting function
and the light switch is set to Ã, the
following will light up if it is dark and you
unlock the vehicle using the SmartKey:
R the parking lamps
R the license plate lamp
R the tail lamps
R the fog lamps 31
R the low-beam headlamps 32
R the side marker lamps
The surround lighting switches off
automatically after 40 seconds or when the
driver's door is opened.
XPress V or U on the steering wheel
to select the Settings menu.XPress & to call up the selection of
submenus.XPress the W or X button to select the
Lighting submenu.XPress & to select Surround Lighting
Function .XPress the W or X button to activate
or deactivate the Surround Lighting
function.XWhen leaving the vehicle, turn the light
switch to position Ã.
The surround lighting is activated.XPress the &, V or U button to
select a different display.
Setting the ambient lighting
XPress V or U on the steering wheel
to select the Settings menu.XPress & to call up the selection of
submenus.XPress the W or X button to select the
Lighting submenu.XPress the & button to select Ambient
Light .XPress W or X to adjust the
brightness to any level from Level 0 (off)
to Level 5 (bright).XPress the &, V or U button to
select a different display.
Activating/deactivating the exterior
lighting delayed switch-off
When you activate the Headlamp Delayed
Shut-off function and the light switch is set
to à , the exterior lighting remains on for
another 15 seconds after closing the doors
when it is dark.
If the engine is switched off and then none of
the doors are opened, or if an open door is
not closed, the exterior lighting goes out after
60 seconds.
If you have activated the delayed switch-off
function, the light switch is set to à and
31
Only for vehicles with front fog lamps.
32 Only for vehicles without front fog lamps.Menus and submenus223On-board computer and displaysBA 164.8 USA, CA Edition B 2011; 1; 2, en-USd2sboikeVersion: 3.0.3.52010-04-21T15:08:44+02:00 - Seite 223Z
Page 226 of 376
you switch off the engine, the following
remain lit:
R the parking lamps
R the license plate lamp
R the tail lamps
R the fog lamps 33
R the low-beam headlamps 34
R the side marker lampsXPress V or U on the steering wheel
to select the Settings menu.XPress & to call up the selection of
submenus.XPress the W or X button to select the
Lighting submenu.XPress the & button to select Headlamp
Delayed Shut-off .XPress the W or X button to activate
or deactivate the Headlamp Delayed
Shut-off function.XBefore switching off the engine, turn the
light switch to position Ã.
The exterior lighting delayed shut-off is
activated.XPress the &, V or U button to
select a different display.
To deactivate the delayed shut-off
temporarily:
XBefore leaving the vehicle, turn the
SmartKey to position 0 in the ignition lock.XTurn the SmartKey to position 2 in the
ignition lock and back to position 0.
The delayed shut-off is deactivated.
The delayed shut-off is reactivated the next
time you start the engine.
Activating/deactivating the interior
lighting delayed switch-off
When you activate the Interior Lighting
Delayed Shut-off function and remove the
SmartKey from the ignition lock, the interior
lighting remains on for 10 seconds.
XPress V or U on the steering wheel
to select the Settings menu.XPress & to call up the selection of
submenus.XPress the W or X button to select the
Lighting submenu.XPress the & button to select Interior
Lighting Delayed Shut-off .XPress the W or X button to activate
or deactivate the Interior Lighting
Delayed Shut-off function.XPress the &, V or U button to
select a different display.
Vehicle
Activating/deactivating the automatic
locking feature
When you activate the Automatic Door
Locking function, your vehicle will be
centrally locked above a speed of
approximately 9 mph (15 km/h).
i Further information on the automatic
locking feature ( Y page 79).
XPress V or U on the steering wheel
to select the Settings menu.XPress & to call up the selection of
submenus.XPress the W or X button to select the
Vehicle submenu.XPress & to select Automatic Door
Locking .XPress W or X to switch Automatic
Door Locking on or off.XPress the &, V or U button to
select a different display.
Activating/deactivating the radar sensor
system
If the radar sensor system is switched off,
Blind Spot Assist (Y page 200) is deactivated.
33
Only for vehicles with front fog lamps.
34 Only for vehicles without front fog lamps.224Menus and submenusOn-board computer and displays
BA 164.8 USA, CA Edition B 2011; 1; 2, en-USd2sboikeVersion: 3.0.3.52010-04-21T15:08:44+02:00 - Seite 224