2011 MERCEDES-BENZ GL350 BlueTEC roof
[x] Cancel search: roofPage 281 of 376
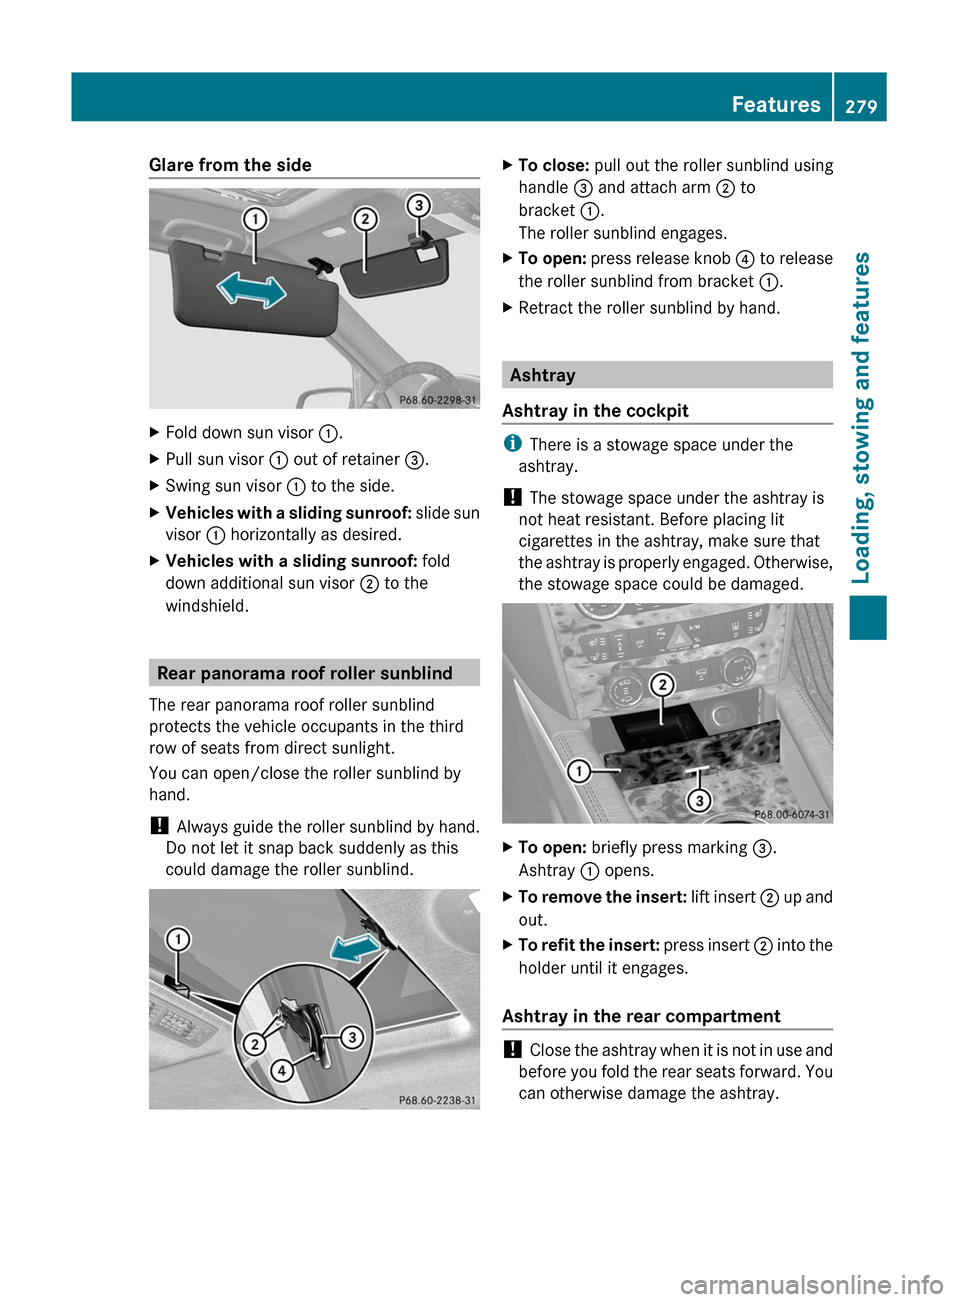
Glare from the sideXFold down sun visor :.XPull sun visor : out of retainer =.XSwing sun visor : to the side.XVehicles with a sliding sunroof: slide sun
visor : horizontally as desired.XVehicles with a sliding sunroof: fold
down additional sun visor ; to the
windshield.
Rear panorama roof roller sunblind
The rear panorama roof roller sunblind
protects the vehicle occupants in the third
row of seats from direct sunlight.
You can open/close the roller sunblind by
hand.
! Always guide the roller sunblind by hand.
Do not let it snap back suddenly as this
could damage the roller sunblind.
XTo close: pull out the roller sunblind using
handle = and attach arm ; to
bracket :.
The roller sunblind engages.XTo open: press release knob ? to release
the roller sunblind from bracket :.XRetract the roller sunblind by hand.
Ashtray
Ashtray in the cockpit
i There is a stowage space under the
ashtray.
! The stowage space under the ashtray is
not heat resistant. Before placing lit
cigarettes in the ashtray, make sure that
the ashtray is properly engaged. Otherwise,
the stowage space could be damaged.
XTo open: briefly press marking =.
Ashtray : opens.XTo remove the insert: lift insert ; up and
out.XTo refit the insert: press insert ; into the
holder until it engages.
Ashtray in the rear compartment
! Close the ashtray when it is not in use and
before you fold the rear seats forward. You
can otherwise damage the ashtray.
Features279Loading, stowing and featuresBA 164.8 USA, CA Edition B 2011; 1; 2, en-USd2sboikeVersion: 3.0.3.52010-04-21T15:08:44+02:00 - Seite 279Z
Page 307 of 376
Cleaning results depend on the type of
dirt and how long it has been there.
R clean Alcantara ®
covers with a damp
cloth. Make sure you wipe entire seat
sections to avoid leaving visible lines.
i Note that regular care is essential to
ensure that the appearance and comfort of
the covers is retained over time.
Cleaning the seat beltsXUse clean, luke-warm water and soap
solution.
! Do not clean the seat belts using chemical
cleaning agents. Do not dry the seat belts
by warming them above 176 ‡ (80 †) or
placing them in direct sunlight.
GWarning
Do not bleach or dye seat belts as this may
severely weaken them. In a crash, they may
not be able to provide adequate protection.
Cleaning the headliner and carpets
XRoof lining: use soft brushes or dry
shampoo if it is particularly dirty.XCarpets: use carpet and textile cleaners
that have been approved and
recommended by Mercedes-Benz.Care305Maintenance and careBA 164.8 USA, CA Edition B 2011; 1; 2, en-USd2sboikeVersion: 3.0.3.52010-04-21T15:08:44+02:00 - Seite 305Z
Page 325 of 376
GWarning
Do not place any metal objects on the battery
as this could result in a short circuit.
Use leak-proof batteries only to avoid the risk
of acid burns in the event of an accident.
Take care that you do not become statically
charged, e.g. by wearing synthetic clothing or
rubbing against textiles. For this reason, you
also should not pull or push the battery over
carpets or other synthetic materials.
Never touch the battery first. First, touch the
outside body of the vehicle in order to release
any possible electrostatic charges.
Do not rub the battery with rags or cloths. The
battery could explode if touched due to
electrostatic charge or due to spark
formation.
! Switch off the engine and remove the
SmartKey before disconnecting the
terminal clamps from the battery. On
vehicles with KEYLESS-GO, make sure that
the ignition is switched off. Check that all
the indicator lamps in the instrument
cluster are off. You may otherwise destroy
electronic components, such as the
alternator.
! Like other batteries, the vehicle battery
may discharge over time if you do not use
the vehicle. In this case, have the battery
disconnected at a qualified specialist
workshop, e.g. an authorized Mercedes-
Benz Center. You can also charge the
battery with a charger recommended by
Mercedes-Benz. Contact an authorized
Mercedes-Benz Center for further
information.
The battery, breather hose and cover of the
positive terminal clamp must be installed
securely during operation.
i Remove the SmartKey if you park the
vehicle and do not require any electrical
consumers. The vehicle will then use very
little energy, thus conserving battery
power.
Mercedes-Benz recommends that you do not
carry out work on batteries yourself, e.g.
removing, charging or replacing. Always have
this work performed at a qualified specialist
workshop, e.g. an authorized Mercedes-Benz
Center.
i If the power supply has been interrupted,
e.g. if the battery has been reconnected,
you must carry out the following tasks:
R set the clock ( Y page 222)
On vehicles with COMAND and a
navigation system, the clock is set
automatically.
R reset the sliding sunroof ( Y page 90)
R reset the function for folding the exterior
mirrors in/out automatically by folding
the mirrors out once ( Y page 108)
R reset the side windows ( Y page 87)
Charging the battery
GWarning
Never charge a battery while still installed in
the vehicle unless the accessory battery
charge unit approved by Mercedes-Benz is
being used. Gases may escape during
charging and cause explosions that may
result in paint damage, corrosion or personal
injury.
An accessory battery charge unit specially
adapted for Mercedes-Benz vehicles and
tested and approved by Mercedes-Benz is
available. It permits the charging of the
battery in its installed position. Contact an
authorized Mercedes-Benz Center for
information and availability.
Charge the battery in accordance with the
separate instructions for the accessory
battery charger.
GWarning!
There is a risk of acid burns during the
charging process due to the gases which
escape from the battery. Do not lean over the
battery during the charging process.
Battery323Roadside assistanceBA 164.8 USA, CA Edition B 2011; 1; 2, en-USd2sboikeVersion: 3.0.3.52010-04-21T15:08:44+02:00 - Seite 323Z
Page 342 of 376
message will appear in the multifunction
display.GWarning!
When the multifunction display shows the
message Tire Pressure Check Tires , one
or more of your tires are significantly
underinflated. You should stop and check
your tires as soon as possible, and inflate
them to the proper tire inflation pressure as
indicated on the vehicle’s Tire and Loading
Information placard or on the tire inflation
pressure label.
Driving on a significantly underinflated tire
causes the tire to overheat and can lead to
tire failure. Underinflation also reduces fuel
efficiency and tire tread life, and may affect
the vehicle’s handling and stopping ability.
Each tire, including the spare, should be
checked at least once a month when cold.
Inflate the tires to the recommended tire
inflation pressure as specified on
R the Tire and Loading Information placard on
the driver’s door B-pillar
or
R the tire inflation pressure label located on
the inside of the fuel filler flap
GWarning!
The tire pressure loss warning system does
not provide a warning for wrongly selected tire
inflation pressures. Always adjust tire
inflation pressure according to the Tire and
Loading Information placard on the driver's
door B-pillar or on the tire inflation pressure
label located on the inside of the fuel filler flap.
The tire pressure loss warning system does
not replace regular checks of the tire inflation
pressures since a gradual pressure loss in
more than one tire cannot be detected by the
tire pressure loss warning system.
The tire pressure loss warning system is not
able to issue a warning due to a sudden
dramatic loss of tire inflation pressure (e.g.
tire blowout caused by a foreign object). In
this case bring the vehicle to a halt by carefully
applying the brakes and avoiding abrupt
steering maneuvers.
The function of the tire pressure loss warning
system is limited or delayed if:
R snow chains are mounted on your vehicle's
tires.
R road conditions are wintry.
R you are driving on sand or gravel.
R you adopt a very sporty driving style
(cornering at high speeds or driving with
high rates of acceleration).
R you are towing a very heavy or large trailer.
R you are driving with a heavy load or a load
on the roof.
Restarting the tire pressure loss
warning system
Restart the tire pressure loss warning system
if you have:
R changed the tire pressure
R changed the wheels or tires
R mounted new wheels or tires
XBefore restarting, make sure that the tire
pressures are set properly on all four tires
for the respective operating conditions,
using the Tire and Loading Information
placard on the B-pillar on the driver's side
or the tire pressure table on the fuel filler
flap.XObserve the notes in the section on tire
pressures ( Y page 336).GWarning!
The tire pressure loss warning system can
only give reliable warnings if you have set the
correct tire pressure.
If an incorrect tire pressure is set, these
incorrect values will be monitored.
A tire with insufficient pressure results in
vehicle instability when driving, thus
increasing the risk of an accident.
340Tire pressuresTires and wheels
BA 164.8 USA, CA Edition B 2011; 1; 2, en-USd2sboikeVersion: 3.0.3.52010-04-21T15:08:44+02:00 - Seite 340
Page 358 of 376
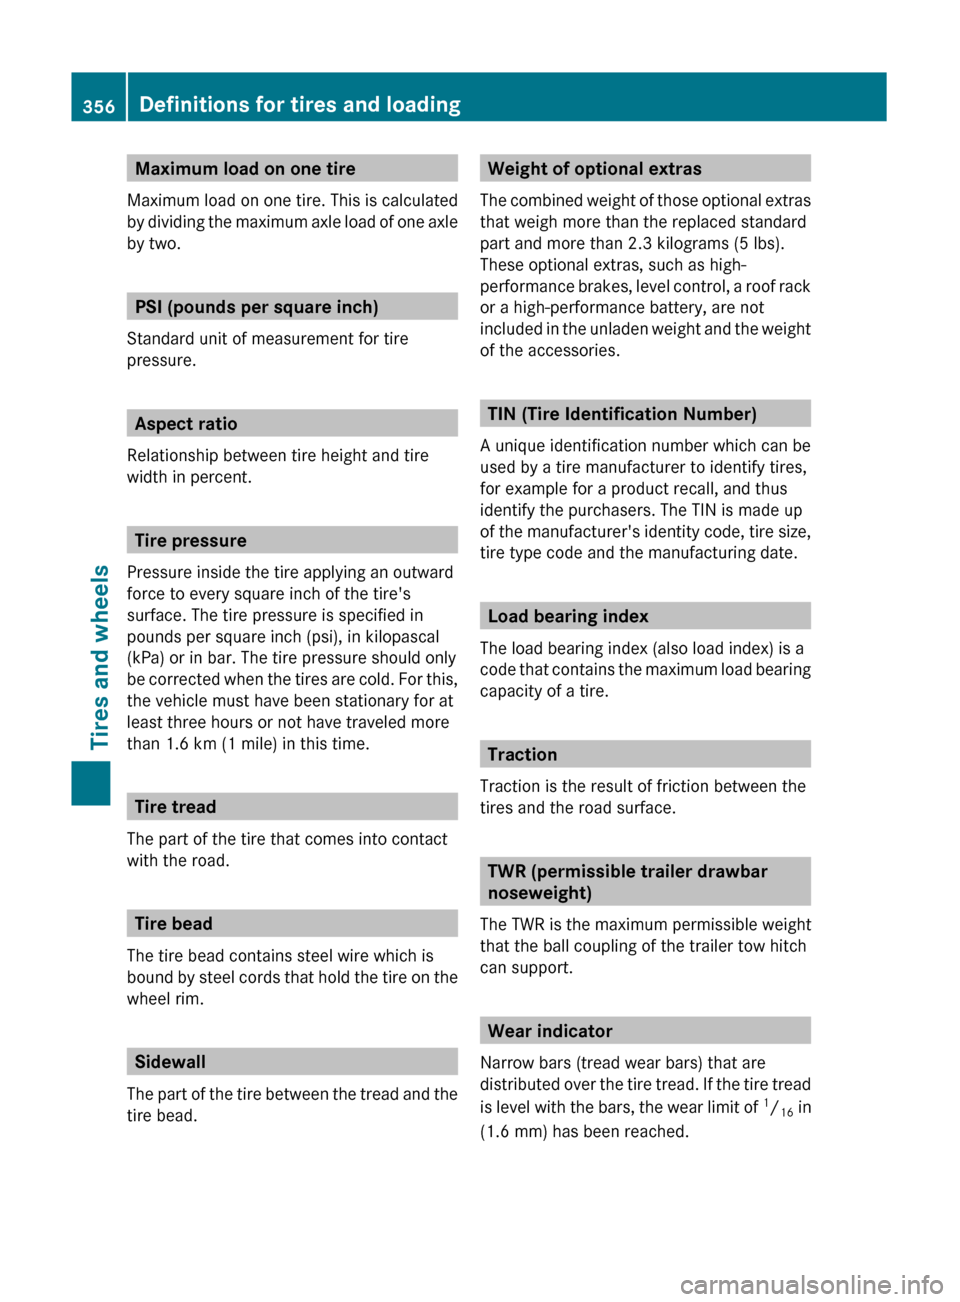
Maximum load on one tire
Maximum load on one tire. This is calculated
by dividing the maximum axle load of one axle
by two.
PSI (pounds per square inch)
Standard unit of measurement for tire
pressure.
Aspect ratio
Relationship between tire height and tire
width in percent.
Tire pressure
Pressure inside the tire applying an outward
force to every square inch of the tire's
surface. The tire pressure is specified in
pounds per square inch (psi), in kilopascal
(kPa) or in bar. The tire pressure should only
be corrected when the tires are cold. For this,
the vehicle must have been stationary for at
least three hours or not have traveled more
than 1.6 km (1 mile) in this time.
Tire tread
The part of the tire that comes into contact
with the road.
Tire bead
The tire bead contains steel wire which is
bound by steel cords that hold the tire on the
wheel rim.
Sidewall
The part of the tire between the tread and the
tire bead.
Weight of optional extras
The combined weight of those optional extras
that weigh more than the replaced standard
part and more than 2.3 kilograms (5 lbs).
These optional extras, such as high-
performance brakes, level control, a roof rack
or a high-performance battery, are not
included in the unladen weight and the weight
of the accessories.
TIN (Tire Identification Number)
A unique identification number which can be
used by a tire manufacturer to identify tires,
for example for a product recall, and thus
identify the purchasers. The TIN is made up
of the manufacturer's identity code, tire size,
tire type code and the manufacturing date.
Load bearing index
The load bearing index (also load index) is a
code that contains the maximum load bearing
capacity of a tire.
Traction
Traction is the result of friction between the
tires and the road surface.
TWR (permissible trailer drawbar
noseweight)
The TWR is the maximum permissible weight
that the ball coupling of the trailer tow hitch
can support.
Wear indicator
Narrow bars (tread wear bars) that are
distributed over the tire tread. If the tire tread
is level with the bars, the wear limit of 1
/ 16 in
(1.6 mm) has been reached.
356Definitions for tires and loadingTires and wheels
BA 164.8 USA, CA Edition B 2011; 1; 2, en-USd2sboikeVersion: 3.0.3.52010-04-21T15:08:44+02:00 - Seite 356
Page 373 of 376
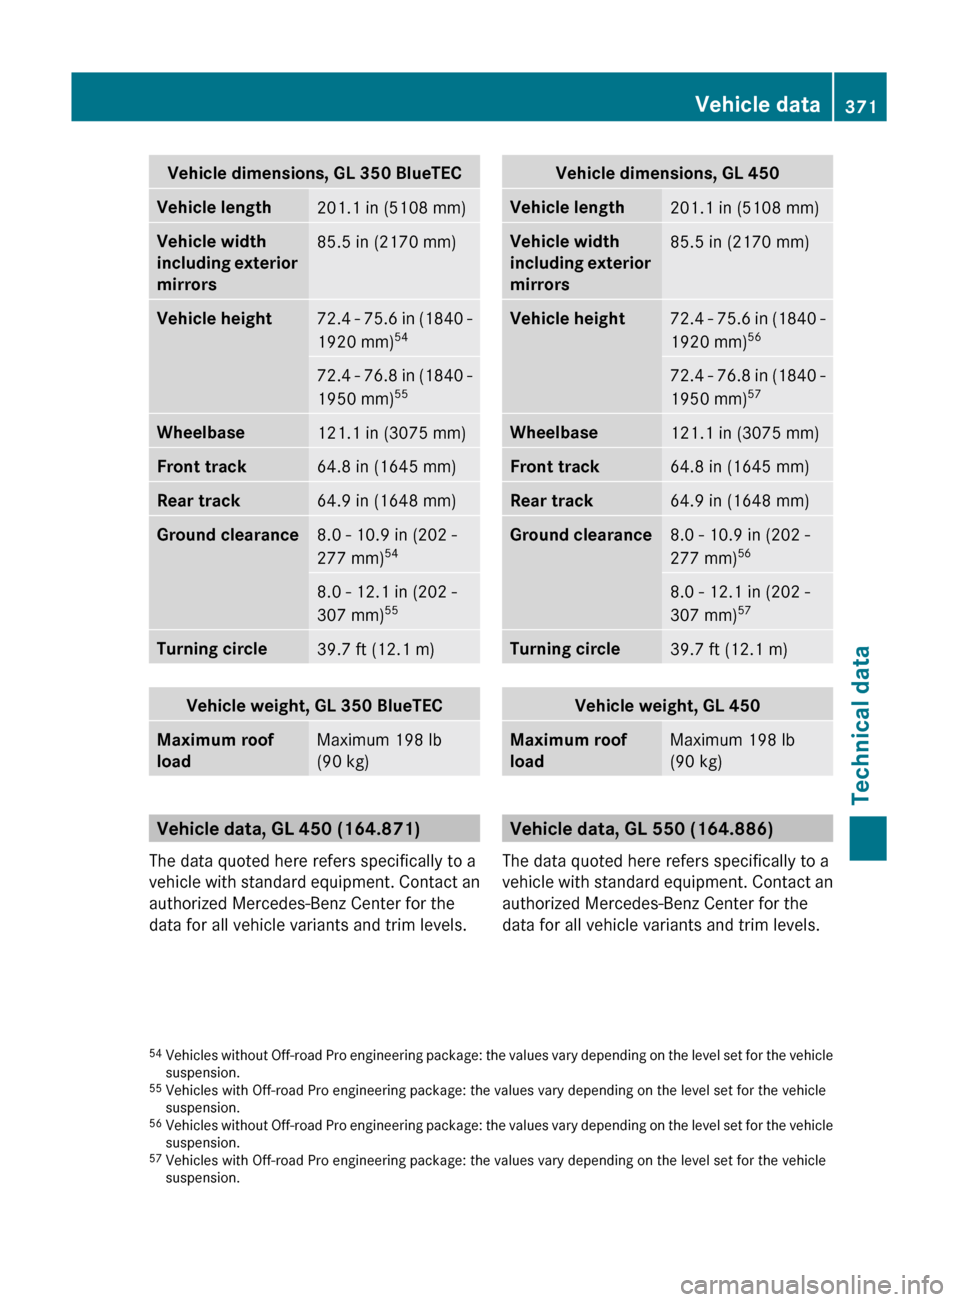
Vehicle dimensions, GL 350 BlueTECVehicle length201.1 in (5108 mm)Vehicle width
including exterior
mirrors85.5 in (2170 mm)Vehicle height72.4 - 75.6 in (1840 -
1920 mm) 5472.4 - 76.8 in (1840 -
1950 mm) 55Wheelbase121.1 in (3075 mm)Front track64.8 in (1645 mm)Rear track64.9 in (1648 mm)Ground clearance8.0 - 10.9 in (202 -
277 mm) 548.0 - 12.1 in (202 -
307 mm) 55Turning circle39.7 ft (12.1 m)Vehicle weight, GL 350 BlueTECMaximum roof
loadMaximum 198 lb
(90 kg)
Vehicle data, GL 450 (164.871)
The data quoted here refers specifically to a
vehicle with standard equipment. Contact an
authorized Mercedes-Benz Center for the
data for all vehicle variants and trim levels.
Vehicle dimensions, GL 450Vehicle length201.1 in (5108 mm)Vehicle width
including exterior
mirrors85.5 in (2170 mm)Vehicle height72.4 - 75.6 in (1840 -
1920 mm) 5672.4 - 76.8 in (1840 -
1950 mm) 57Wheelbase121.1 in (3075 mm)Front track64.8 in (1645 mm)Rear track64.9 in (1648 mm)Ground clearance8.0 - 10.9 in (202 -
277 mm) 568.0 - 12.1 in (202 -
307 mm) 57Turning circle39.7 ft (12.1 m)Vehicle weight, GL 450Maximum roof
loadMaximum 198 lb
(90 kg)
Vehicle data, GL 550 (164.886)
The data quoted here refers specifically to a
vehicle with standard equipment. Contact an
authorized Mercedes-Benz Center for the
data for all vehicle variants and trim levels.
54 Vehicles without Off-road Pro engineering package: the values vary depending on the level set for the vehicle
suspension.
55 Vehicles with Off-road Pro engineering package: the values vary depending on the level set for the vehicle
suspension.
56 Vehicles without Off-road Pro engineering package: the values vary depending on the level set for the vehicle
suspension.
57 Vehicles with Off-road Pro engineering package: the values vary depending on the level set for the vehicle
suspension.Vehicle data371Technical dataBA 164.8 USA, CA Edition B 2011; 1; 2, en-USd2sboikeVersion: 3.0.3.52010-04-21T15:08:44+02:00 - Seite 371Z
Page 374 of 376
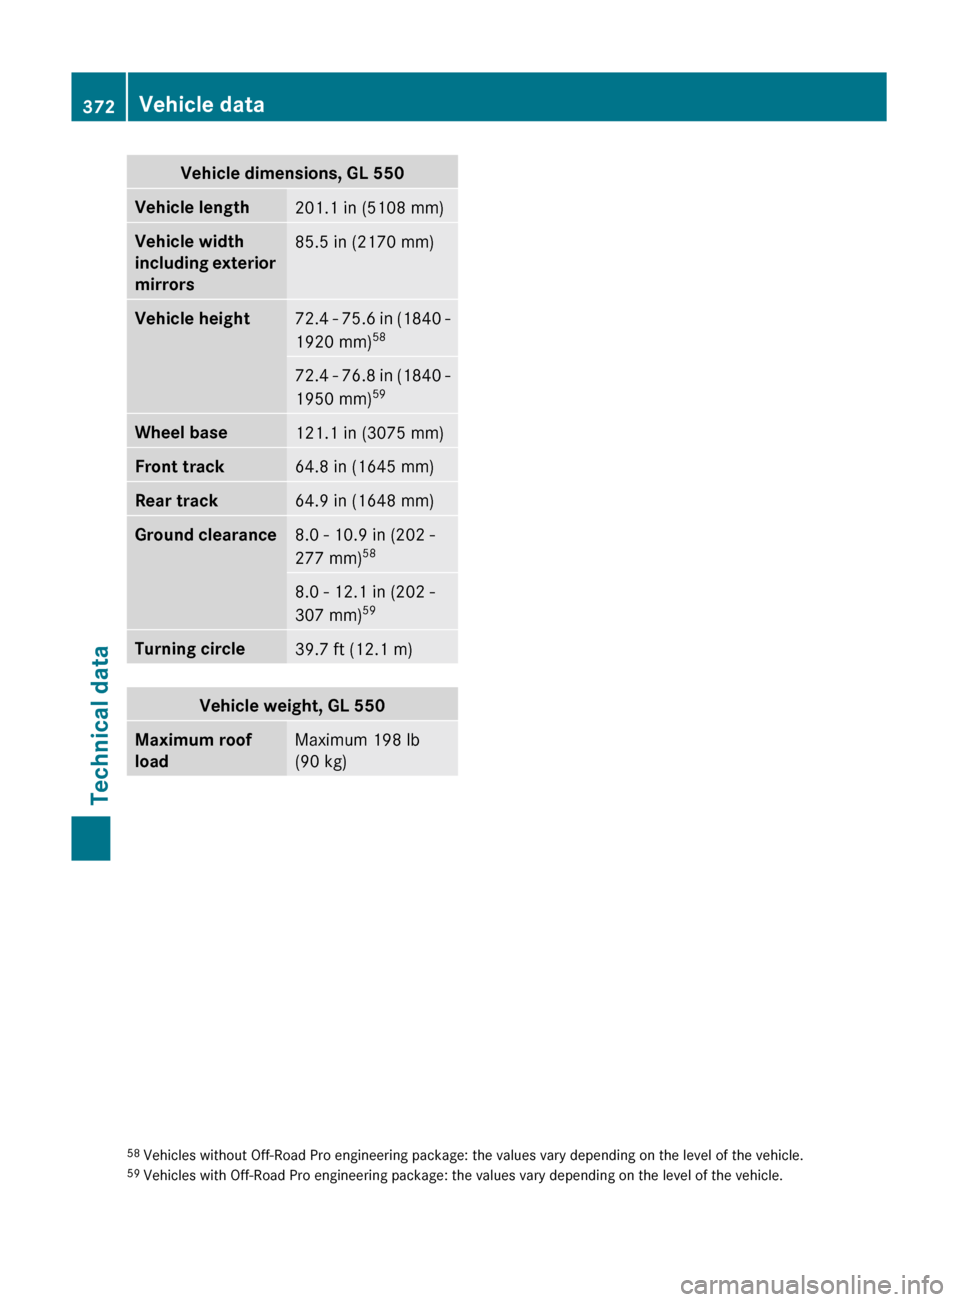
Vehicle dimensions, GL 550Vehicle length201.1 in (5108 mm)Vehicle width
including exterior
mirrors85.5 in (2170 mm)Vehicle height72.4 - 75.6 in (1840 -
1920 mm) 5872.4 - 76.8 in (1840 -
1950 mm) 59Wheel base121.1 in (3075 mm)Front track64.8 in (1645 mm)Rear track64.9 in (1648 mm)Ground clearance8.0 - 10.9 in (202 -
277 mm) 588.0 - 12.1 in (202 -
307 mm) 59Turning circle39.7 ft (12.1 m)Vehicle weight, GL 550Maximum roof
loadMaximum 198 lb
(90 kg)58 Vehicles without Off-Road Pro engineering package: the values vary depending on the level of the vehicle.
59 Vehicles with Off-Road Pro engineering package: the values vary depending on the level of the vehicle.372Vehicle dataTechnical data
BA 164.8 USA, CA Edition B 2011; 1; 2, en-USd2sboikeVersion: 3.0.3.52010-04-21T15:08:44+02:00 - Seite 372