2011 MERCEDES-BENZ GL350 BlueTEC stop start
[x] Cancel search: stop startPage 168 of 376
Using KEYLESS-GOXPress the Start/Stop button (Y page 147).
When the driver's door is closed, the Start/
Stop button is in position 1. When the
driver's door is opened, the Start/Stop
button moves to position 0. This
corresponds to removing the SmartKey.XApply the parking brake firmly.
i If you turn off the engine with the Start/
Stop button and open a front door, the
automatic transmission switches to P
automatically.
i The engine can be turned off while the
vehicle is in motion by pressing and holding
the Start/Stop button for three seconds.
If you have started the engine with the Start/
Stop button and it cannot be switched off as
described:
Xremove the Start/Stop button from the
ignition lock.Xinsert the SmartKey into the ignition lock.
The engine stops. The ignition lock is in
position 0.
Parking brake
GWarning
Engaging the parking brake while the vehicle
is in motion can cause the rear wheels to lock
up. You could lose control of the vehicle and
cause an accident. In addition, the vehicle's
brake lights do not light up when the parking
brake is engaged.
GWarning!
When leaving the vehicle, always remove the
SmartKey from the starter switch, take it with
you, and lock the vehicle. Do not leave
children unattended in the vehicle, or with
access to an unlocked vehicle. Children could
release the parking brake and/or shift the
automatic transmission out of park position
P , either of which could result in an accident
and/or serious personal injury.
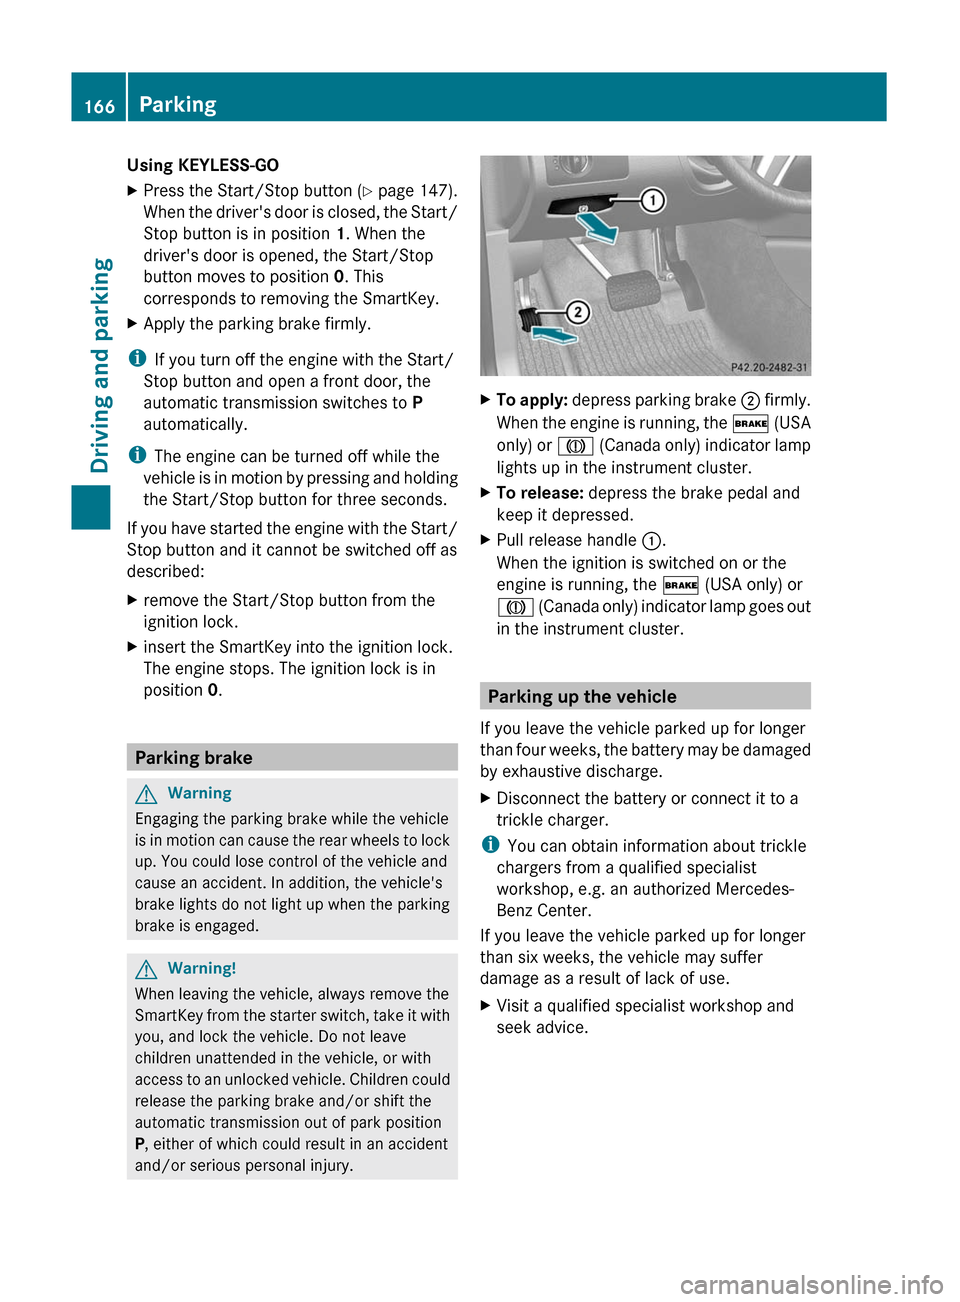
XTo apply: depress parking brake ; firmly.
When the engine is running, the $ (USA
only) or J (Canada only) indicator lamp
lights up in the instrument cluster.XTo release: depress the brake pedal and
keep it depressed.XPull release handle :.
When the ignition is switched on or the
engine is running, the $ (USA only) or
J (Canada only) indicator lamp goes out
in the instrument cluster.
Parking up the vehicle
If you leave the vehicle parked up for longer
than four weeks, the battery may be damaged
by exhaustive discharge.
XDisconnect the battery or connect it to a
trickle charger.
i You can obtain information about trickle
chargers from a qualified specialist
workshop, e.g. an authorized Mercedes-
Benz Center.
If you leave the vehicle parked up for longer
than six weeks, the vehicle may suffer
damage as a result of lack of use.
XVisit a qualified specialist workshop and
seek advice.166ParkingDriving and parking
BA 164.8 USA, CA Edition B 2011; 1; 2, en-USd2sboikeVersion: 3.0.3.52010-04-21T15:08:44+02:00 - Seite 166
Page 171 of 376
Heavy and light loadsGWarning
Depressing the brake pedal constantly results
in excessive and premature wear to the brake
pads.
It may also cause the brakes to overheat,
seriously impairing their effectiveness. It may
then not be possible to stop the vehicle in
sufficient time to avoid an accident.
If the brakes have been subjected to a heavy
cargo, do not stop the vehicle immediately,
but drive on for a short while. This allows the
airflow to cool the brakes more quickly.
Wet roads
GWarning
After driving in heavy rain for some time
without applying the brakes or through water
deep enough to wet brake components, the
first braking action may be somewhat
reduced. You have to depress the brake pedal
more firmly. Maintain a safe distance from
vehicles in front.
After driving on a wet road or having the
vehicle washed, brake firmly while paying
attention to the traffic conditions. This will
warm up the brake discs, thereby drying them
more quickly and protecting them against
corrosion.
Limited braking performance on salt
treated roads
GWarning
The layer of salt on the brake discs and the
brake pads/linings may cause a delay in the
braking effect, resulting in a significantly
longer braking distance, which could lead to
an accident.
To avoid this danger, you should:
R occasionally brake carefully, without
putting other road users at risk, when you
are driving on salted roads. This helps to
remove any salt that may have started to
build up on the brake discs and the brake
pads/linings.
R maintain a greater distance to the vehicle
ahead and drive with particular care.
R carefully apply the brakes at the end of a
trip and immediately after commencing a
new trip, so that salt residues are removed
from the brake discs.
Maintenance of the brakes
! If the brake warning lamp lights up in the
instrument cluster and you hear a warning
tone, even though the parking brake has
been released, the brake fluid level may be
too low. Observe additional warning
messages in the multifunction display.
The brake fluid level may be too low due to
brake pad wear or leaking brake lines.
Have the brake system checked
immediately. This work should be carried
out at an authorized Mercedes-Benz
Center.
All checks and maintenance work on the
brake system must be carried out at a
qualified specialist workshop. Contact an
authorized Mercedes-Benz Center.
Only install brake pads and use brake fluid
recommended by Mercedes-Benz.
GWarning
If other than recommended brake pads are
installed, or other than recommended brake
fluid is used, the braking properties of the
vehicle can be degraded to an extent that safe
braking is substantially impaired. This could
result in an accident.
! A function or performance test may only
be carried out on a two-axle dynamometer.
If you are planning to have the vehicle
tested on such a dynamometer, contact an
authorized Mercedes-Benz Center to
obtain further information first. Otherwise,
the drive train or the brake system may
suffer damage.
Driving tips169Driving and parkingBA 164.8 USA, CA Edition B 2011; 1; 2, en-USd2sboikeVersion: 3.0.3.52010-04-21T15:08:44+02:00 - Seite 169Z
Page 172 of 376
! As the ESP ®
system operates
automatically, the engine and the ignition
must be switched off (SmartKey in position
0 or 1 in the ignition lock or Start/Stop
button in position 0 or 1) while the parking
brake is being tested on a brake
dynamometer (maximum 10 seconds).
Braking maneuvers triggered automatically
by ESP ®
may seriously damage the brake
system.
If your brake system is only subjected to
moderate loads, you should regularly test
your brake system's function by forcefully
depressing the brake pedal when driving at
high speed. This also improves the brake
pads' friction.GWarning
Make sure that you do not endanger other
road users when you apply the brakes.
You can find a description of Brake Assist
(BAS) on ( Y page 66).
Parking brake
If you drive on wet roads or dirt-covered
surfaces, road salt and/or dirt could get into
the parking brake.
In order to prevent corrosion and a reduction
in the braking power of the parking brake,
observe the following:
R gently depress the parking brake from time
to time before beginning the journey.
R drive approximately 110 yd (100 m)
without exceeding a speed of 12 mph
(20 km/h).
GWarning!
While performing this procedure please
assure that the vehicle is stopped before
applying the parking brake. Otherwise the
rear wheels could lock up. You could lose
control of the vehicle and cause an accident.
In addition, the vehicle’s brake lights do not
light up when the parking brake is engaged.
Make sure not to endanger any other road
users when you engage the parking brake.
Driving on wet roads
Hydroplaning
If water has accumulated to a certain depth
on the road surface, there is a danger of
hydroplaning occurring, even if:
R you drive at low speeds
R the tires have adequate tread depth
For this reason, in the event of heavy rain or
in conditions in which hydroplaning can occur
you must drive in the following manner:
R Lower your speed
R Avoid ruts
R Brake carefully
Driving on flooded roads
! Do not drive through flooded areas.
Check the depth of any water before driving
through it. Drive slowly through standing
water. Otherwise, water may enter the
vehicle interior or the engine compartment.
This can damage the electronic
components in the engine or the automatic
transmission. Water can also be drawn in
by the engine's air suction nozzles and this
can cause engine damage.
i Set the raised vehicle level before driving
through standing water.
170Driving tipsDriving and parking
BA 164.8 USA, CA Edition B 2011; 1; 2, en-USd2sboikeVersion: 3.0.3.52010-04-21T15:08:44+02:00 - Seite 170
Page 176 of 376
GWarning!
Please be aware that by raising the vehicle
level, the center of gravity also rises.
Therefore, always ensure that the vehicle
level is as low as possible. With higher ride
height the ESP ®
may activate earlier in certain
situations.
GWarning!
Do not reduce the tire inflation pressure
before driving through sand. However, if you
do so, remember to correct the tire inflation
pressure before continuing your trip. Driving
with reduced tire inflation pressure increases
the risk of losing control of the vehicle and
rolling over.
General information
Read this section before driving your vehicle
off-road. Practice by traveling over more
gentle off-road terrain first.
Familiarize yourself with the characteristics
of your vehicle and the gear change process
before driving through difficult terrain.
The following driving systems are specially
adapted to off-road driving:
R off-road drive program (vehicles without
the Off-Road Pro engineering package)
( Y page 204)
R LOW RANGE off-road gear ( Y page 157)
R off-road ABS ( Y page 66)
R off-road 4ETS ( Y page 67)
R off-road ESP ®
(Y page 68)
R hill start assist
R differential locks ( Y page 207)
R DSR (Downhill Speed Regulation)
( Y page 203)
Observe the following notes:
R stop your vehicle and, if necessary, select
the off-road drive program (Y page 204) or
the LOW RANGE off-road gear
( Y page 157) before driving off-road.
R select a vehicle level that is suitable for the
terrain. Make sure there is always sufficient
ground clearance to prevent damage to the
vehicle.
R activate the differential lock if necessary.
R make sure that items of luggage and cargo
are stowed safely and are well secured
( Y page 268).
R always keep the engine running and in gear
when driving on a downhill gradient.
Activate DSR ( Y page 203).
R always keep the doors, tailgate, windows
and the tilt/sliding sunroof closed while the
vehicle is in motion.
R adapt the speed to suit the terrain
conditions. The more uneven, worn or
steeper the terrain is, the slower you should
drive.
R drive slowly and at an even speed through
the water. Ensure that a bow wave does not
form as you drive.
R drive with extreme care on unfamiliar off-
road routes where visibility is poor. For
safety reasons, get out of the vehicle first
and survey the off-road route.
R look out for obstacles, such as rocks, holes,
tree stumps and furrows.
R check the depth of water before fording
rivers and streams.
R do not stop in water and do not switch the
engine off.
R drive quickly on sand to overcome the
rolling resistance. Otherwise, the vehicle
could dig itself into the sand.
R do not jump with the vehicle. This
interrupts the vehicle's traction.
R always keep the engine running and in gear
when driving on slopes.
R do not shift the automatic transmission to
transmission position N.174Driving tipsDriving and parking
BA 164.8 USA, CA Edition B 2011; 1; 2, en-USd2sboikeVersion: 3.0.3.52010-04-21T15:08:44+02:00 - Seite 174
Page 194 of 376
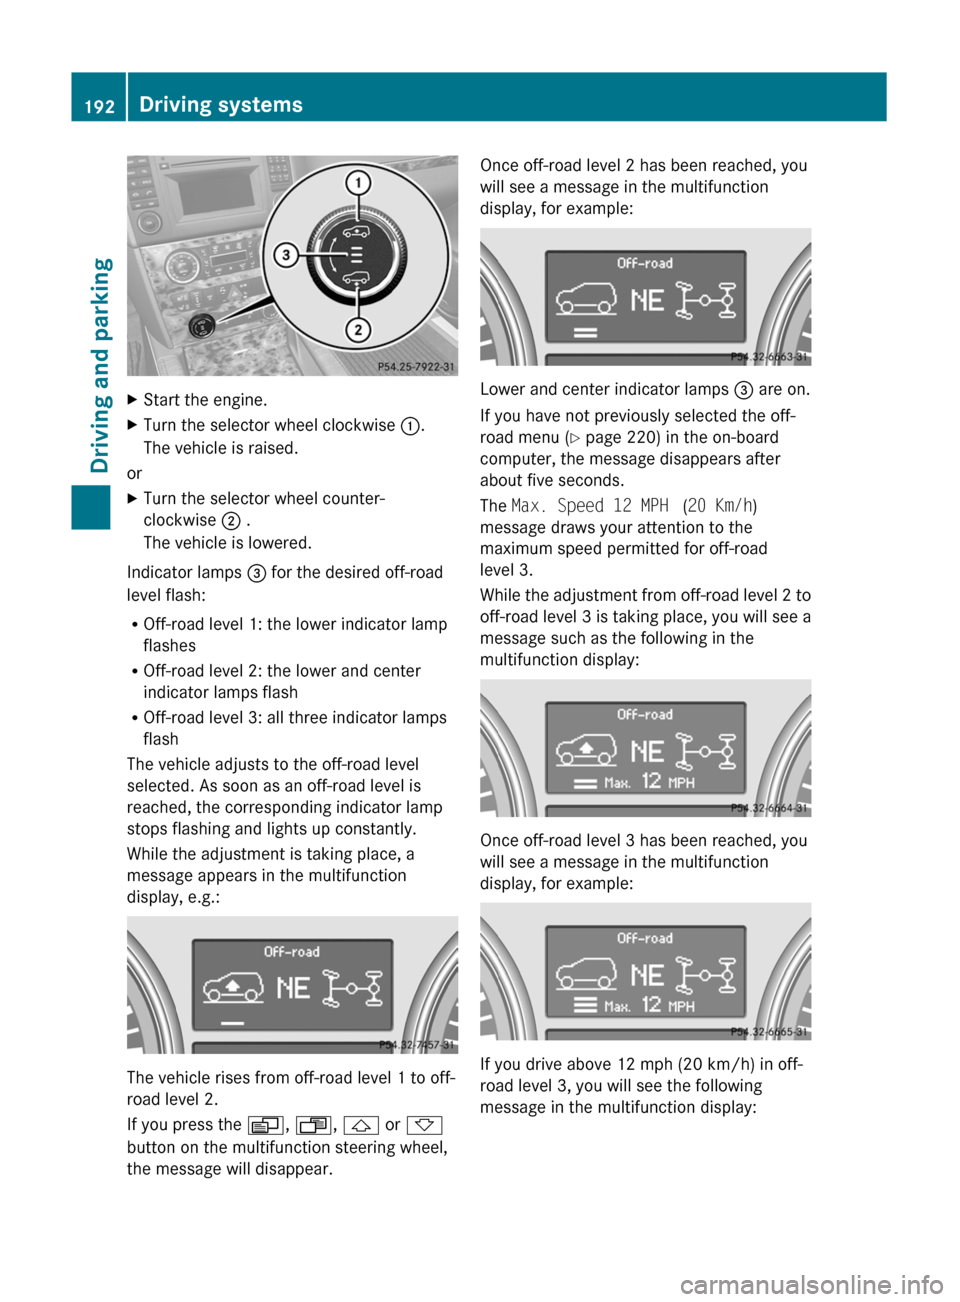
XStart the engine.XTurn the selector wheel clockwise :.
The vehicle is raised.
or
XTurn the selector wheel counter-
clockwise ; .
The vehicle is lowered.
Indicator lamps = for the desired off-road
level flash:
R Off-road level 1: the lower indicator lamp
flashes
R Off-road level 2: the lower and center
indicator lamps flash
R Off-road level 3: all three indicator lamps
flash
The vehicle adjusts to the off-road level
selected. As soon as an off-road level is
reached, the corresponding indicator lamp
stops flashing and lights up constantly.
While the adjustment is taking place, a
message appears in the multifunction
display, e.g.:
The vehicle rises from off-road level 1 to off-
road level 2.
If you press the V, U , & or *
button on the multifunction steering wheel,
the message will disappear.
Once off-road level 2 has been reached, you
will see a message in the multifunction
display, for example:
Lower and center indicator lamps = are on.
If you have not previously selected the off-
road menu ( Y page 220) in the on-board
computer, the message disappears after
about five seconds.
The Max. Speed 12 MPH (20 Km/h )
message draws your attention to the
maximum speed permitted for off-road
level 3.
While the adjustment from off-road level 2 to
off-road level 3 is taking place, you will see a
message such as the following in the
multifunction display:
Once off-road level 3 has been reached, you
will see a message in the multifunction
display, for example:
If you drive above 12 mph (20 km/h) in off-
road level 3, you will see the following
message in the multifunction display:
192Driving systemsDriving and parking
BA 164.8 USA, CA Edition B 2011; 1; 2, en-USd2sboikeVersion: 3.0.3.52010-04-21T15:08:44+02:00 - Seite 192
Page 196 of 376

:To raise the level;To lower the level=Indicator lampsXStart the engine.
If one or more indicator lamps = are on:
XTurn the selector wheel
counterclockwise ; until all indicator
lamps = that are lit start to flash.
The vehicle is lowered to highway level. As
soon as the next lowest level is reached,
the indicator lamp stops flashing and goes
out.
While the adjustment is taking place, a
message appears in the multifunction
display, e.g.:
If you press the V, U , & or *
button on the multifunction steering wheel,
the message will disappear.
Once highway level has been reached, all
indicator lamps = go out. You will see a
message in the multifunction display, for
example:
If you have not previously selected the off-
road menu ( Y page 220) in the on-board
computer, the message disappears after
about five seconds.
The vehicle automatically selects highway
level if you are driving faster than 60 mph
(115 km/h). Depending on the ADS setting
( Y page 194), the vehicle is lowered to high-
speed level at higher speeds.
i If you are towing a trailer, the vehicle is
not lowered to high-speed level.
ADS (Adaptive Damping System)
General notes
ADS is continuously electronically controlled.
It adapts the damping characteristics to the
current operating and driving situation.
Damping is controlled separately for each
wheel. This increases driving safety and tire
comfort.
This depends on:
R your driving style
R the road surface conditions
R the ADS setting
R the vehicle level setting
Your selection remains stored even if you
remove the key from the ignition lock.
194Driving systemsDriving and parking
BA 164.8 USA, CA Edition B 2011; 1; 2, en-USd2sboikeVersion: 3.0.3.52010-04-21T15:08:44+02:00 - Seite 194
Page 210 of 376
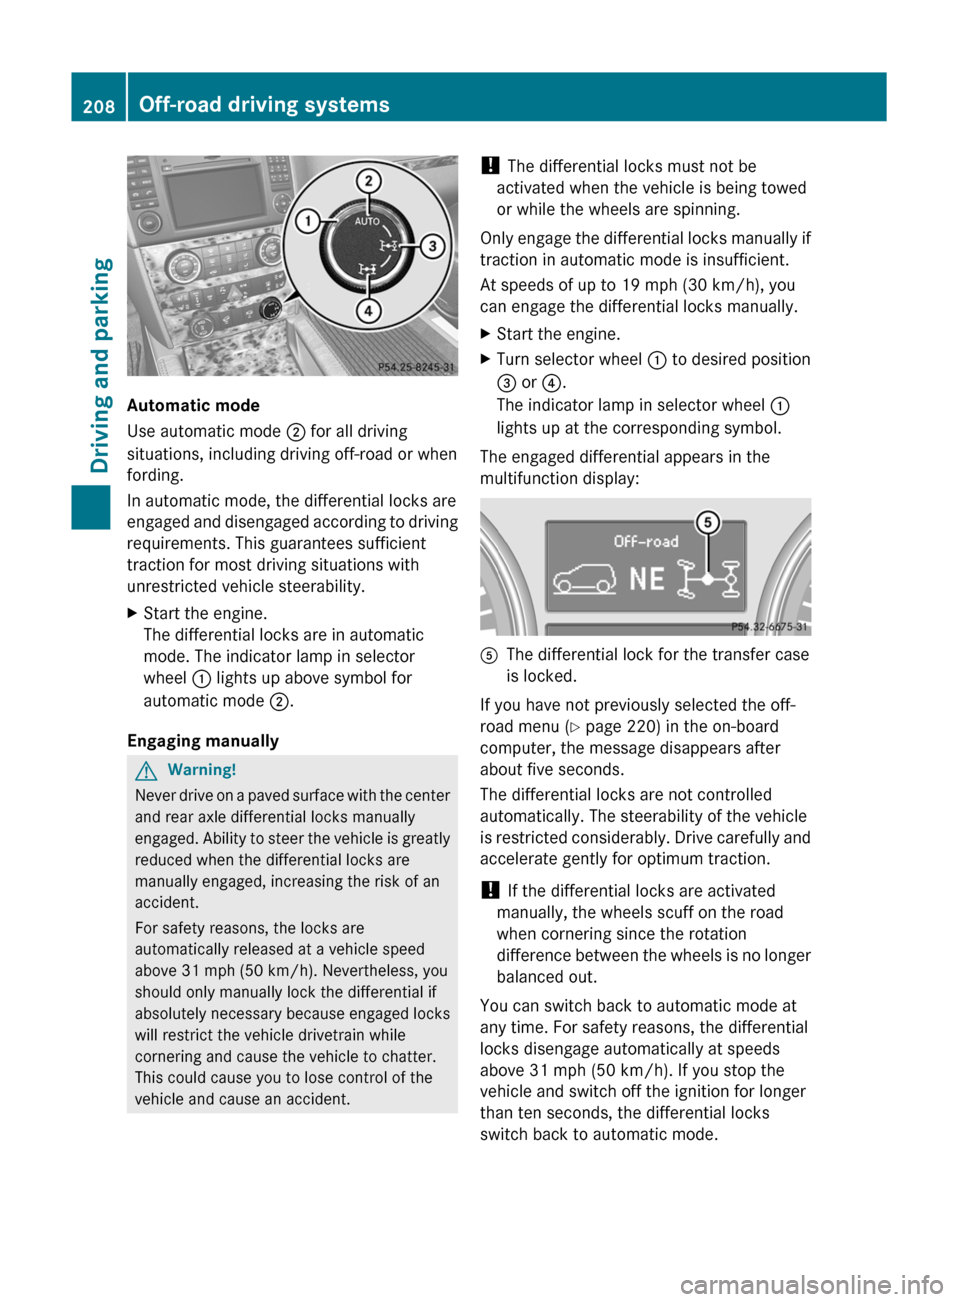
Automatic mode
Use automatic mode ; for all driving
situations, including driving off-road or when
fording.
In automatic mode, the differential locks are
engaged and disengaged according to driving
requirements. This guarantees sufficient
traction for most driving situations with
unrestricted vehicle steerability.
XStart the engine.
The differential locks are in automatic
mode. The indicator lamp in selector
wheel : lights up above symbol for
automatic mode ;.
Engaging manually
GWarning!
Never drive on a paved surface with the center
and rear axle differential locks manually
engaged. Ability to steer the vehicle is greatly
reduced when the differential locks are
manually engaged, increasing the risk of an
accident.
For safety reasons, the locks are
automatically released at a vehicle speed
above 31 mph (50 km/h). Nevertheless, you
should only manually lock the differential if
absolutely necessary because engaged locks
will restrict the vehicle drivetrain while
cornering and cause the vehicle to chatter.
This could cause you to lose control of the
vehicle and cause an accident.
! The differential locks must not be
activated when the vehicle is being towed
or while the wheels are spinning.
Only engage the differential locks manually if
traction in automatic mode is insufficient.
At speeds of up to 19 mph (30 km/h), you
can engage the differential locks manually.XStart the engine.XTurn selector wheel : to desired position
= or ?.
The indicator lamp in selector wheel :
lights up at the corresponding symbol.
The engaged differential appears in the
multifunction display:
AThe differential lock for the transfer case
is locked.
If you have not previously selected the off-
road menu ( Y page 220) in the on-board
computer, the message disappears after
about five seconds.
The differential locks are not controlled
automatically. The steerability of the vehicle
is restricted considerably. Drive carefully and
accelerate gently for optimum traction.
! If the differential locks are activated
manually, the wheels scuff on the road
when cornering since the rotation
difference between the wheels is no longer
balanced out.
You can switch back to automatic mode at
any time. For safety reasons, the differential
locks disengage automatically at speeds
above 31 mph (50 km/h). If you stop the
vehicle and switch off the ignition for longer
than ten seconds, the differential locks
switch back to automatic mode.
208Off-road driving systemsDriving and parking
BA 164.8 USA, CA Edition B 2011; 1; 2, en-USd2sboikeVersion: 3.0.3.52010-04-21T15:08:44+02:00 - Seite 208
Page 212 of 376
XMake sure that the automatic transmission
is set to position P.XApply the vehicle's parking brake.XStart the engine.XSelect highway level.XVehicles with the adaptive damping
system: set ADS to AUTO or COMF .XSwitch off the engine.XClose all doors and the tailgate.XCouple up the trailer.XEstablish all electrical connections.
i
Vehicles with the AIRMATIC package:
with a trailer attached, the vehicle will
always remain at highway level. When
coupling up a trailer, please observe the
following:
R if highway level has not been set
manually, the vehicle will automatically
sink to highway level as soon as it
reaches a speed of 5 mph (8 km/h).
R high-speed level is not available.
These restrictions apply to all accessories
powered through a connection to the trailer
power socket of your vehicle, e.g. a bicycle
carrier.
Towing a trailer
There are numerous legal requirements
concerning the towing of a trailer, e.g. speed
restrictions. Make sure that your vehicle/
trailer combination complies with the local
requirements not only in your area of
residence but also at any location to which
you are traveling. The police and local
authorities can provide reliable information.
Please observe the following when towing a
trailer:
R To acquaint yourself with driving with a
trailer and with the resulting changes to
handling, you should practice cornering,
stopping and reversing in a traffic-free
location.
R Before driving, check:
- the trailer coupling
- the safety switch for braked trailers
- the safety chains
- the electrical connections
- the lights
- the wheels
R Adjust the exterior mirrors to provide an
unobstructed view of the rear section of the
trailer.
R If the trailer features electronically
controlled brakes, pull away the vehicle/
trailer combination carefully, manually
brake using the brake controller, and check
the brakes for correct function.
R Secure any objects on the trailer to prevent
the cargo from slipping when the vehicle is
in motion.
R If you couple up a trailer, regularly check
the cargo for secure fastening and make
sure that the trailer lamps and (if
applicable) the trailer brakes are
functioning correctly.
R Bear in mind that the handling will be less
stable when towing a trailer than when
driving without one. Avoid sudden steering
movements.
R The vehicle/trailer combination is heavier,
accelerates more slowly, has a decreased
gradient climbing capability and a longer
braking distance.
It is more susceptible to side winds and
requires more careful steering.
R If possible, avoid abrupt braking. Depress
the brake pedal moderately at first, so that
the trailer can activate its own brakes. Then
increase the pressure on the brake pedal.
R If the automatic transmission continues to
shift back and forth between two gears
when driving up or downhill, restrict the
shift range. Select shift range 4, 3, 2, or 1.
A lower gear and lower speed reduce the
risk of engine failure.210Towing a trailerDriving and parking
BA 164.8 USA, CA Edition B 2011; 1; 2, en-USd2sboikeVersion: 3.0.3.52010-04-21T15:08:44+02:00 - Seite 210