2011 MERCEDES-BENZ GL350 BlueTEC stop start
[x] Cancel search: stop startPage 76 of 376

Important information about using
KEYLESS-GO
R You can use the KEYLESS-GO key as a
conventional SmartKey.
R You can combine KEYLESS-GO functions
with those of a conventional SmartKey, e.g.
you can open the vehicle with KEYLESS-GO
and close it with the & button.
R Always carry your KEYLESS-GO key on your
person.
R Never store the KEYLESS-GO key together
with:
- electronic devices, such as a mobile
phone or other SmartKey
- metal objects, such as coins or metal foil
Doing so may impair the function of
KEYLESS-GO.
R To open or close the vehicle, the KEYLESS-
GO key should not be more than 3 ft (1 m)
from the door or tailgate.
R If the vehicle is parked for more than
72 hours, the KEYLESS-GO function is
deactivated. Pull an outer door handle and
switch on the ignition to reactivate the
KEYLESS-GO function.
R If the KEYLESS-GO key is removed from the
vehicle, the system may not be able to
recognize the SmartKey anymore. The
vehicle can then no longer be locked or
started with KEYLESS-GO.
R If the KEYLESS-GO key has been removed
from the vehicle, e.g. when another vehicle
occupant with a KEYLESS-GO key leaves
the vehicle:
- when the Start/Stop button is pressed,
or when trying to lock the vehicle using
the locking button on the outside door
handle, the Key Not Detected message
appears in the multifunction display.
- when the engine is running, the red Key
Not Detected message appears in the
multifunction display as you pull away.
Look for the KEYLESS-GO key and place
it somewhere else in the vehicle. Place
the KEYLESS-GO key on the front-
passenger seat, for example, or in your
shirt pocket.
R If you have switched on the engine with the
Start/Stop button, you can switch it off
again by:
- pressing the Start/Stop button
- inserting the KEYLESS-GO key into the
ignition lock while the vehicle is at a
standstill and the automatic
transmission is in park position P.
R You may inadvertently unlock the vehicle if
the KEYLESS-GO key is less than 3 ft (1 m)
from the vehicle and:
- an exterior door handle is hit by a jet of
water, or
- you clean an exterior door handle
R Please note that any vehicle occupant can
start the engine when there is a KEYLESS-
GO key in the vehicle.
Scenario 1: There is a KEYLESS-GO key in
the vehicle and a second one outside the
vehicle. If you leave the KEYLESS-GO key
in the vehicle when you leave and lock the
vehicle, no message appears in the
multifunction display.
Scenario 2: There is a KEYLESS-GO key in
the vehicle, but none outside the vehicle. If
you get out of the vehicle and attempt to
lock it, the Key Detected In Vehicle
message appears in the multifunction
display. The vehicle is not then locked.
When starting the engine and whilst driving,
KEYLESS-GO also checks whether a valid
SmartKey is in the vehicle by periodically
establishing radio contact.74SmartKeyOpening and closing
BA 164.8 USA, CA Edition B 2011; 1; 2, en-USd2sboikeVersion: 3.0.3.52010-04-21T15:08:44+02:00 - Seite 74
Page 77 of 376

X To unlock the vehicle: touch the inner
surface of the door handle.XTo lock the vehicle: press locking
button :.
If you pull on the handle of the tailgate, only
the cargo compartment of the vehicle is
unlocked.
Changing the settings of the locking
system
You can change the setting of the locking
system in such a way that only the driver's
door and the fuel filler flap are unlocked. This
is useful if you frequently travel on your own.
XTo change the setting: press and hold
down the % and & buttons
simultaneously for approximately six
seconds until the battery check lamp
( Y page 76) flashes twice.
The SmartKey now functions as follows:
XTo unlock the driver's door: press the
% button once.XTo unlock centrally: press the %
button twice.XTo lock centrally: press the & button.
The KEYLESS-GO function is changed as
follows:
XTo unlock the driver's door: touch the
inner surface of the door handle on the
driver's door.XTo unlock centrally: touch the inner
surface of the door handle on the front-
passenger door or the rear door.XTo lock centrally: press locking
button : on one of the door handles.
Restoring the factory settings
XPress the % and & buttons
simultaneously for approximately six
seconds until the battery check lamp
flashes twice.Mechanical key
General notes
If the vehicle can no longer be unlocked with
the SmartKey, use the mechanical key.
If you use the mechanical key to unlock and
open the driver's door, the anti-theft alarm
system will be triggered ( Y page 69).
There are several ways to turn off the alarm:
XPress the % or & button on the
SmartKey.
or
XInsert the SmartKey into the ignition lock.
or
XPress the Start/Stop button in the ignition
lock. The SmartKey must be in the vehicle.
or
XLock or unlock the vehicle using KEYLESS-
GO. The SmartKey must be outside the
vehicle.
Removing the mechanical key
XPush release catch : in the direction of
the arrow and at the same time, remove
mechanical key ; from the SmartKey.
SmartKey battery
Important safety notes
It is advisable to have batteries replaced at a
qualified specialist workshop, e.g. at an
authorized Mercedes-Benz Center.
SmartKey75Opening and closingBA 164.8 USA, CA Edition B 2011; 1; 2, en-USd2sboikeVersion: 3.0.3.52010-04-21T15:08:44+02:00 - Seite 75Z
Page 84 of 376
Automatic opening and closing from
the outside
Important safety guidelinesGWarning!
Make sure the tailgate is closed when the
engine is running and while driving. Among
other dangers, deadly carbon monoxide (CO)
gases may enter vehicle interior resulting in
unconsciousness and death.
! The tailgate swings upwards and to the
rear when opened. Therefore, make sure
that there is sufficient clearance above and
behind the tailgate.
For the tailgate to be opened fully, there must
be a minimum clearance from floor to ceiling
of 7.40 ft (2.25 m).
Opening
You can open the tailgate automatically with
the SmartKey or the handle in the tailgate.
XPress and hold the F button on the
SmartKey until the tailgate opens.
or
XWhen the tailgate is unlocked, pull the
handle and let it go again immediately.
Closing
GWarning!
Monitor the closing procedure carefully to
make sure no one is in danger of being
injured. To prevent possible personal injury,
always keep hands and fingers away from the
cargo compartment opening when closing the
tailgate. Be especially careful when small
children are around. To stop the closing
procedure, do one of the following:
R Press or pull the remote tailgate opening/
closing switch on the driver’s door.
R Press the tailgate closing switch.
RPress the KEYLESS-GO locking/closing
switch.
R Pull outside handle on the tailgate.
R When no SmartKey is inserted in the starter
switch (vehicles with KEYLESS-GO: Make
sure the vehicle’s on-board electronics
have status 0): Press button F on the
SmartKey.
You can close the tailgate automatically using
the SmartKey, the closing button 5
or the
locking button 6
.
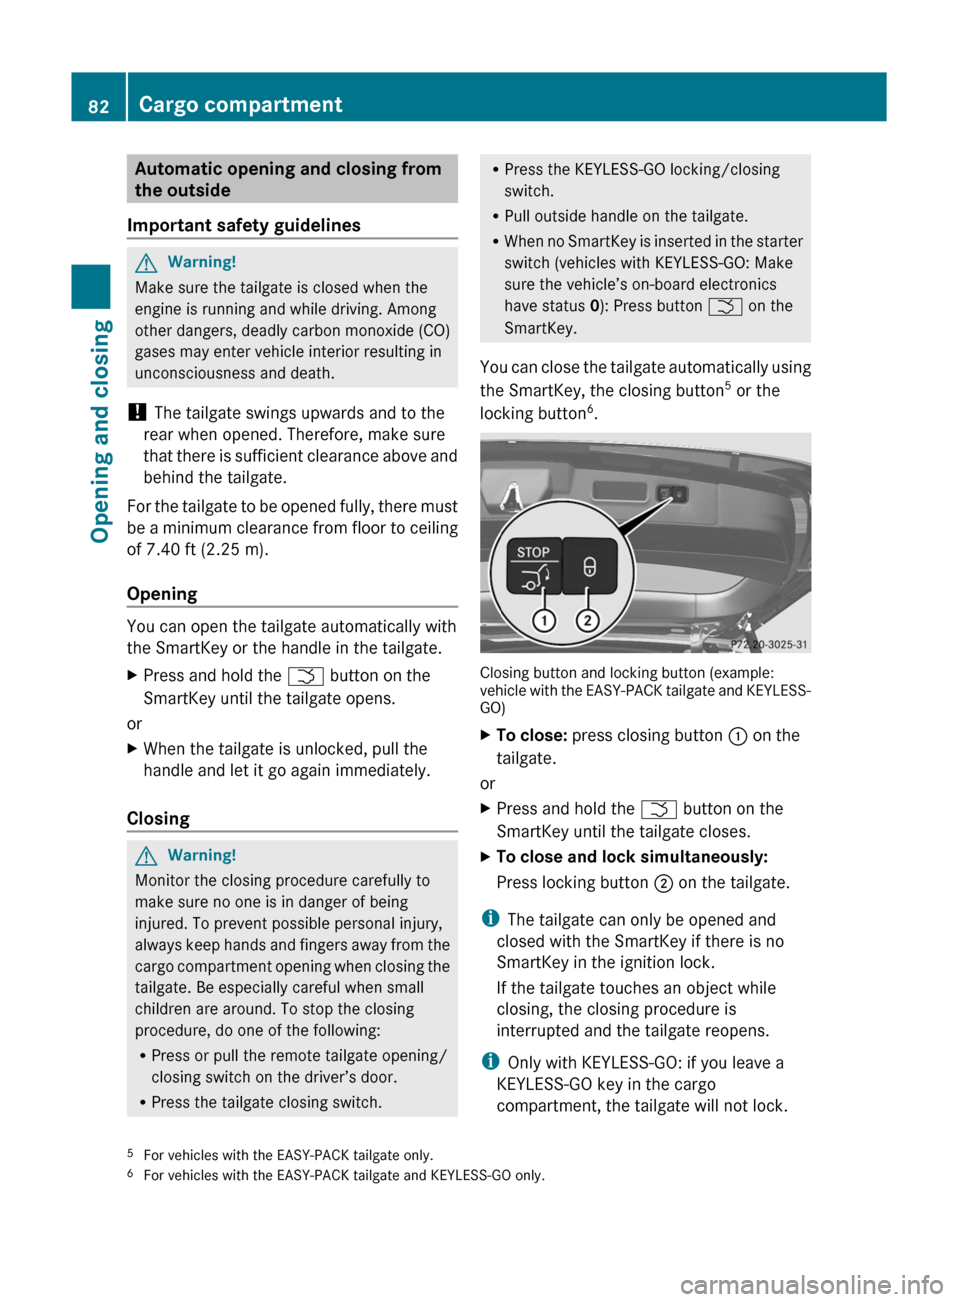
Closing button and locking button (example:
vehicle with the EASY-PACK tailgate and KEYLESS-
GO)
XTo close: press closing button : on the
tailgate.
or
XPress and hold the F button on the
SmartKey until the tailgate closes.XTo close and lock simultaneously:
Press locking button ; on the tailgate.
i
The tailgate can only be opened and
closed with the SmartKey if there is no
SmartKey in the ignition lock.
If the tailgate touches an object while
closing, the closing procedure is
interrupted and the tailgate reopens.
i Only with KEYLESS-GO: if you leave a
KEYLESS-GO key in the cargo
compartment, the tailgate will not lock.
5 For vehicles with the EASY-PACK tailgate only.
6 For vehicles with the EASY-PACK tailgate and KEYLESS-GO only.82Cargo compartmentOpening and closing
BA 164.8 USA, CA Edition B 2011; 1; 2, en-USd2sboikeVersion: 3.0.3.52010-04-21T15:08:44+02:00 - Seite 82
Page 88 of 376
iIf you press the switch beyond the point
of resistance, an automatic opening/
closing process is started in the
corresponding direction. You can stop
automatic operation by pressing again.
i You can continue to operate the side
windows after you switch off the engine.
This function remains active for five
minutes or until one of the front doors is
opened.
Opening and closing the hinged side
windows
You can operate the hinged side windows
electrically.
The hinged side windows can only be
operated from the driver's seat.
GWarning!
Make sure that nobody can become trapped
as you close the hinged side windows. If there
is a risk of somebody becoming trapped,
release the switch or push the switch again to
reopen the side window.
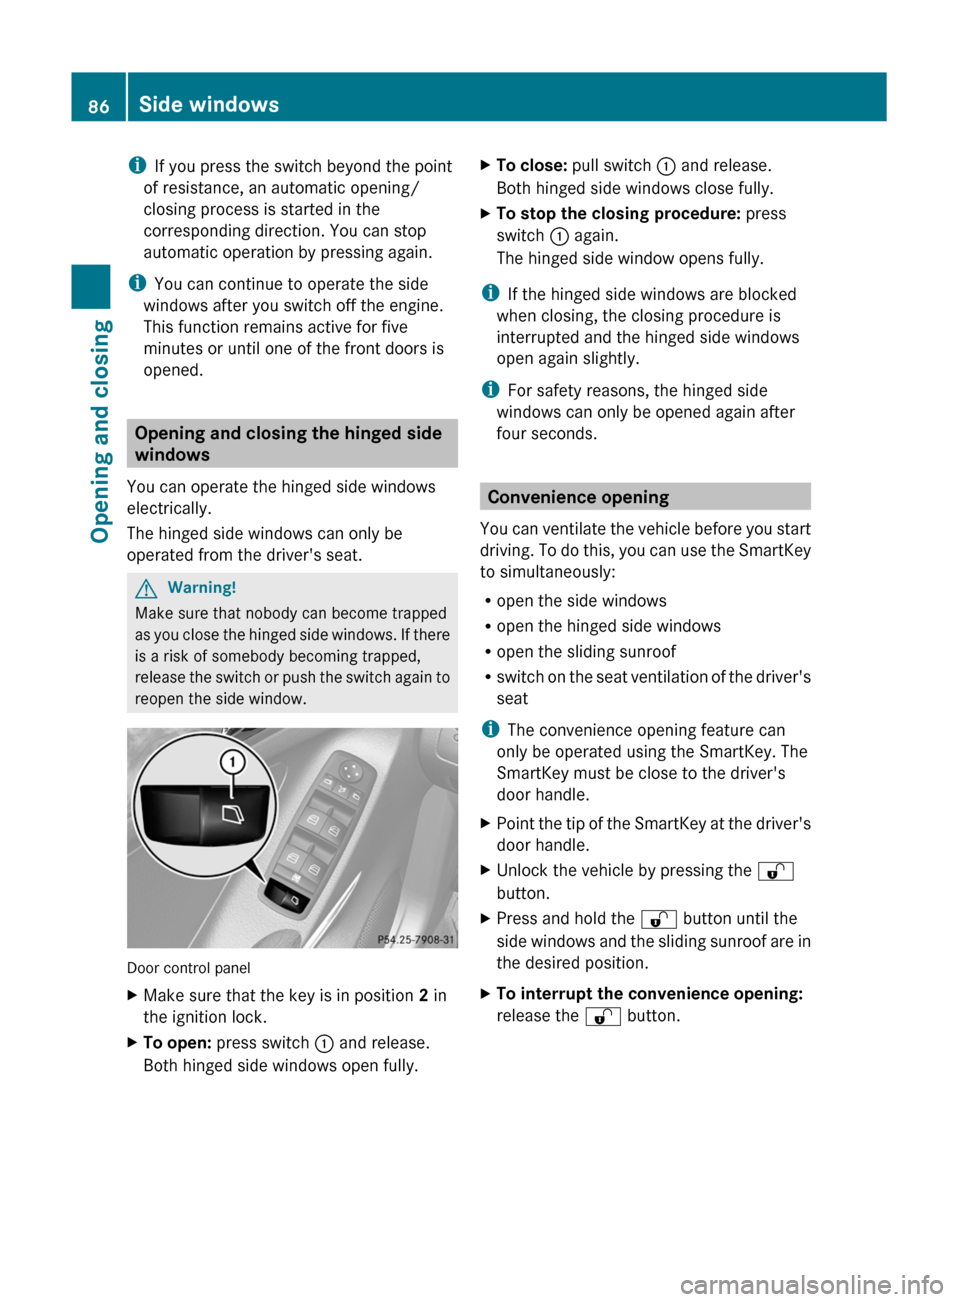
Door control panel
XMake sure that the key is in position 2 in
the ignition lock.XTo open: press switch : and release.
Both hinged side windows open fully.XTo close: pull switch : and release.
Both hinged side windows close fully.XTo stop the closing procedure: press
switch : again.
The hinged side window opens fully.
i If the hinged side windows are blocked
when closing, the closing procedure is
interrupted and the hinged side windows
open again slightly.
i For safety reasons, the hinged side
windows can only be opened again after
four seconds.
Convenience opening
You can ventilate the vehicle before you start
driving. To do this, you can use the SmartKey
to simultaneously:
R open the side windows
R open the hinged side windows
R open the sliding sunroof
R switch on the seat ventilation of the driver's
seat
i The convenience opening feature can
only be operated using the SmartKey. The
SmartKey must be close to the driver's
door handle.
XPoint the tip of the SmartKey at the driver's
door handle.XUnlock the vehicle by pressing the %
button.XPress and hold the % button until the
side windows and the sliding sunroof are in
the desired position.XTo interrupt the convenience opening:
release the % button.86Side windowsOpening and closing
BA 164.8 USA, CA Edition B 2011; 1; 2, en-USd2sboikeVersion: 3.0.3.52010-04-21T15:08:44+02:00 - Seite 86
Page 92 of 376

Overhead control panel
:To raise;To open=To closeXSwitch on the ignition.XPush or pull the 2 switch in the
corresponding direction.
i If you press the 2 switch beyond the
point of resistance, an automatic opening/
closing process is started in the
corresponding direction. You can stop
automatic operation by pressing again.
Automatic opening/raising is only available
if the tilt/sliding sunroof is in the closed
position.
You can open/close the cover for the
sunblind manually when the tilt/sliding
sunroof is raised/closed.
Resetting
Reset the tilt/sliding sunroof if it does not
open smoothly, or if the battery has been
disconnected or has become discharged.
! Contact a qualified specialist workshop if
the tilt/sliding sunroof cannot be closed
fully or reset.
XRemove the SmartKey from the ignition
lock or turn to position 0 (KEYLESS-GO).XRemove the fuse for the tilt/sliding sunroof
from the main fuse box. To find out where
the fuse is located, refer to the fuse
allocation chart in the vehicle tool kit
( Y page 310).XReinsert the fuse.XSwitch on the ignition.XRaise the tilt/sliding sunroof fully at the
rear ( Y page 89).XKeep the 2 switch pressed for another
second.XMake sure that the tilt/sliding sunroof can
be opened or closed fully again using the
opening/closing process ( Y page 89).XIf the tilt/sliding sunroof can be raised fully
at the rear it is set correctly. If this is not
the case, you must repeat the previously
described steps.
Problems with the sliding sunroof
Problem: the sunroof cannot be closed
and you cannot see the cause.
GWarning!
You could be severely or even fatally injured
when closing the sliding sunroof with
increased closing force or if the anti-
entrapment feature is deactivated. Make sure
that nobody can become trapped when
closing the sliding sunroof.
If the sliding sunroof is obstructed during
closing:
XImmediately after the sliding sunroof
blocks, pull the 2 switch in the
overhead control panel down to the point
of resistance and hold it until the sliding
sunroof is closed.
The sliding sunroof is closed with increased
force.
If the sliding sunroof is obstructed during
closing again:
XImmediately after the sliding sunroof
blocks, pull the 2 switch in the
overhead control panel down to the point
of resistance and hold it until the sliding
sunroof is closed.
The sliding sunroof is closed without the
anti-entrapment feature.90Sliding sunroofOpening and closing
BA 164.8 USA, CA Edition B 2011; 1; 2, en-USd2sboikeVersion: 3.0.3.52010-04-21T15:08:44+02:00 - Seite 90
Page 109 of 376
Problems with the steering wheel
heating
If the steering wheel heating indicator lamp
on the lower left lever of the steering column
is flashing, the steering wheel heating has
switched off automatically. The vehicle's
electrical system voltage is too low because
too many electrical consumers are switched
on.
XSwitch off electrical consumers which you
do not need, such as the rear window
defroster or interior lighting.
Once the battery is sufficiently charged, the
steering wheel heating will switch back on
automatically.
EASY-ENTRY/EXIT
GWarning
You must make sure no one can become
trapped or injured by the moving steering
wheel when the easy-entry/exit feature is
activated.
To stop steering wheel movement do one of
the following:
R Move steering wheel adjustment stalk.
R Press one of the memory position buttons.
R Press memory button M.
Do not leave children unattended in the
vehicle, or with access to an unlocked vehicle.
Children could open the driver's door and
unintentionally activate the easy-entry/exit
feature, which could result in an accident
and/or serious personal injury.
The EASY-ENTRY/EXIT feature makes getting
in and out of your vehicle easier.
The steering wheel swings upwards when
you:
R remove the key from the ignition lock.
R open the driver's door and KEYLESS-GO is
in position 1
R open the driver's door and the key is in
position 0 or 1 in the ignition lock.
i
The steering wheel only moves upwards if
it has not already reached the upper end
stop.
The steering wheel is moved to the last
selected position when:
R the driver's door is closed, and
R you insert the key into the ignition lock.
or
R in vehicles with KEYLESS-GO, you press the
Start/Stop button once.
When you close the driver's door with the
ignition switched on, the steering wheel is
also automatically moved to the previously
set position.
The last position of the steering wheel is
stored when you switch off the ignition or
when you store the setting with the memory
function ( Y page 110).
You can activate and deactivate the EASY-
ENTRY/EXIT feature in the on-board
computer ( Y page 225).GWarning
Let the system complete the adjustment
procedure before setting the vehicle in
motion. All steering wheel adjustment must
be completed before setting the vehicle in
motion. Driving off with the steering wheel
still adjusting could cause the driver to lose
control of the vehicle.
i If the crash-responsive EASY-EXIT feature
is triggered in an accident, the steering
column will move upwards when the
driver's door is opened. This occurs
irrespective of the position of the key in the
ignition lock. This makes it easier to exit the
vehicle and rescue the occupants.
The crash-responsive EASY-EXIT feature is
only operational after an accident if the
EASY-EXIT/ENTRY feature is activated in
the on-board computer.
Steering wheel107Seats, steering wheel and mirrorsBA 164.8 USA, CA Edition B 2011; 1; 2, en-USd2sboikeVersion: 3.0.3.52010-04-21T15:08:44+02:00 - Seite 107Z
Page 117 of 376
XTurn the light switch to $ or à .
or
XIf the rear fog lamp is switched on: press
the light switch in to the stop.
Low-beam headlamps
XTo switch on the low-beam headlamps:
turn the key in the ignition lock to position
2 or start the engine.XTurn the light switch to L.
The L indicator lamp in the instrument
cluster lights up.XTo switch off the low-beam
headlamps: turn the light switch to $.
Daytime running lamps
Daytime running lamps in Canada
In Canada, the "daytime running lamps"
function is required by law. It can therefore
not be deactivated.
XTurn the light switch to $ or à .
With the engine running: depending on the
ambient light, either the daytime running
lamps or the low-beam headlamps are
switched on.
If the low-beam headlamps are switched
on, the T indicator lamp on the light
switch and the L indicator lamp in the
instrument cluster light up.
With the engine running while the vehicle is
stationary or if the parking brake is applied:
the daytime running lamps/low-beam
headlamps switch off after 3 minutes if you
shift the selector lever to P from a driving
position.
With the engine running, the vehicle
stationary and bright ambient light: if you set
the light switch to T, the daytime running
lamps and the parking lamps switch on.
Daytime running lamps in the USA
The daytime running lamps are deactivated
ex works on vehicles for the USA.
XTo switch on the daytime running
lamps: switch on the "daytime running
lamps" function via the on-board computer
( Y page 223).XTurn the light switch to $ or à .
With the engine running: depending on the
ambient light, either the daytime running
lamps or the low-beam headlamps are
switched on.
If the low-beam headlamps are switched
on, the T indicator lamp on the light
switch and the L indicator lamp in the
instrument cluster light up.
If you set the light switch to T or
L
while the engine is running, the manual
setting overrides the daytime running lamps.
Automatic headlamps
GWarning!
If the light switch is set to Ã, the low-beam
headlamps will not come on automatically if
it is foggy. This could endanger you and
others. Therefore, turn the light switch to
L in fog.
The automatic headlamp feature is only an
aid. The driver is responsible for the vehicle's
lighting at all times.
GWarning
In low ambient lighting or foggy conditions,
only switch from position à to L with
the vehicle at a standstill in a safe location.
Switching from à to L will briefly
switch off the headlamps. Doing so while
driving in low ambient lighting conditions may
result in an accident.
XTo switch on automatic headlamp
mode: turn the light switch to Ã.
SmartKey in position 1 in the ignition lock:
the parking lamps are switched on or off
automatically depending on the brightness
of the ambient light.Exterior lighting115Lights and windshield wipersBA 164.8 USA, CA Edition B 2011; 1; 2, en-USd2sboikeVersion: 3.0.3.52010-04-21T15:08:44+02:00 - Seite 115Z
Page 118 of 376
With the engine running: depending on the
brightness of the ambient light, the daytime
running lamps 11
or the low-beam
headlamps are switched on or off
automatically.
When the low-beam headlamps are
switched on, the L indicator lamp in the
instrument cluster lights up.
Fog lamps and rear fog lamps
Front fog lamps
Only vehicles with front fog lamps have the
"fog lamps" function.
GWarning!
If you suspect that driving conditions will be
foggy, turn the light switch to L before you
start your journey. Otherwise, your vehicle
may not be visible and you could endanger
yourself and others.
GWarning
In low ambient lighting or foggy conditions,
only switch from position à to L with
the vehicle at a standstill in a safe location.
Switching from à to L will briefly
switch off the headlamps. Doing so while
driving in low ambient lighting conditions may
result in an accident.
XTo switch on the front fog lamps: turn
the key in the ignition lock to position 2 or
start the engine.XTurn the light switch to L or T . If the
light switch is set to Ã, you cannot
switch on the fog lamps.XPull the light switch out to the first detent.
The green N indicator lamp on the light
switch lights up.XTo switch off the front fog lamps: press
the light switch in as far as it will go.
The green N indicator lamp on the light
switch goes out.Rear fog lampXTo switch on (vehicles with front fog
lamps): turn the key in the ignition lock to
position 2 or start the engine.XTurn the light switch to L or T . When
the light switch is set to Ã, you cannot
switch on the rear fog lamp.XPull the light switch out to the second stop.
The yellow R indicator lamp on the light
switch lights up.XTo switch off the rear fog lamp: press the
light switch in as far as it will go.
The yellow R indicator lamp on the light
switch goes out.XTo switch on (vehicles without front fog
lamps): turn the key in the ignition lock to
position 2 or start the engine.XTurn the light switch to L. When the
light switch is set to Ã, you cannot
switch on the rear fog lamp.XPull the light switch out to the stop.
The yellow R indicator lamp on the light
switch lights up.XTo switch off the rear fog lamp: press the
light switch in as far as it will go.
The yellow R indicator lamp on the light
switch goes out.11 Only if daytime running lamps have been activated via the on-board computer.116Exterior lightingLights and windshield wipers
BA 164.8 USA, CA Edition B 2011; 1; 2, en-USd2sboikeVersion: 3.0.3.52010-04-21T15:08:44+02:00 - Seite 116