Page 272 of 376
cover ; into the recess of the side trim on
the left-hand side.XGuide cargo compartment cover ; in front
of the recess on the right.XPress button : and insert the right-hand
side section into the recess of the side trim.
Cargo net
Important safety notes
GWarning!
Make sure the cargo net is properly engaged
at top and bottom position and the tightening
belts are securely fastened.
Never use a damaged cargo net.
Always use cargo net when transporting
cargo. This helps to avoid personal injury from
smaller objects being thrown around in the
occupant compartment during a collision or
sudden maneuver.
The cargo net cannot prevent the movement
of large, heavier objects into the passenger
compartment in an accident. Such items must
be properly secured using the cargo tie-down
rings in the cargo compartment floor.
Passenger use of seats behind installed cargo
net is restricted because of the footwell being
taken up by the net.
When the vehicle is loaded with objects that
extend beyond the seat backrests, using a
cargo net is particularly important. For
reasons of safety, a cargo net should always
be used when transporting cargo.
Preparing the cargo net
The cargo net can be used in two different
positions (behind the B-pillar or the C-pillar).
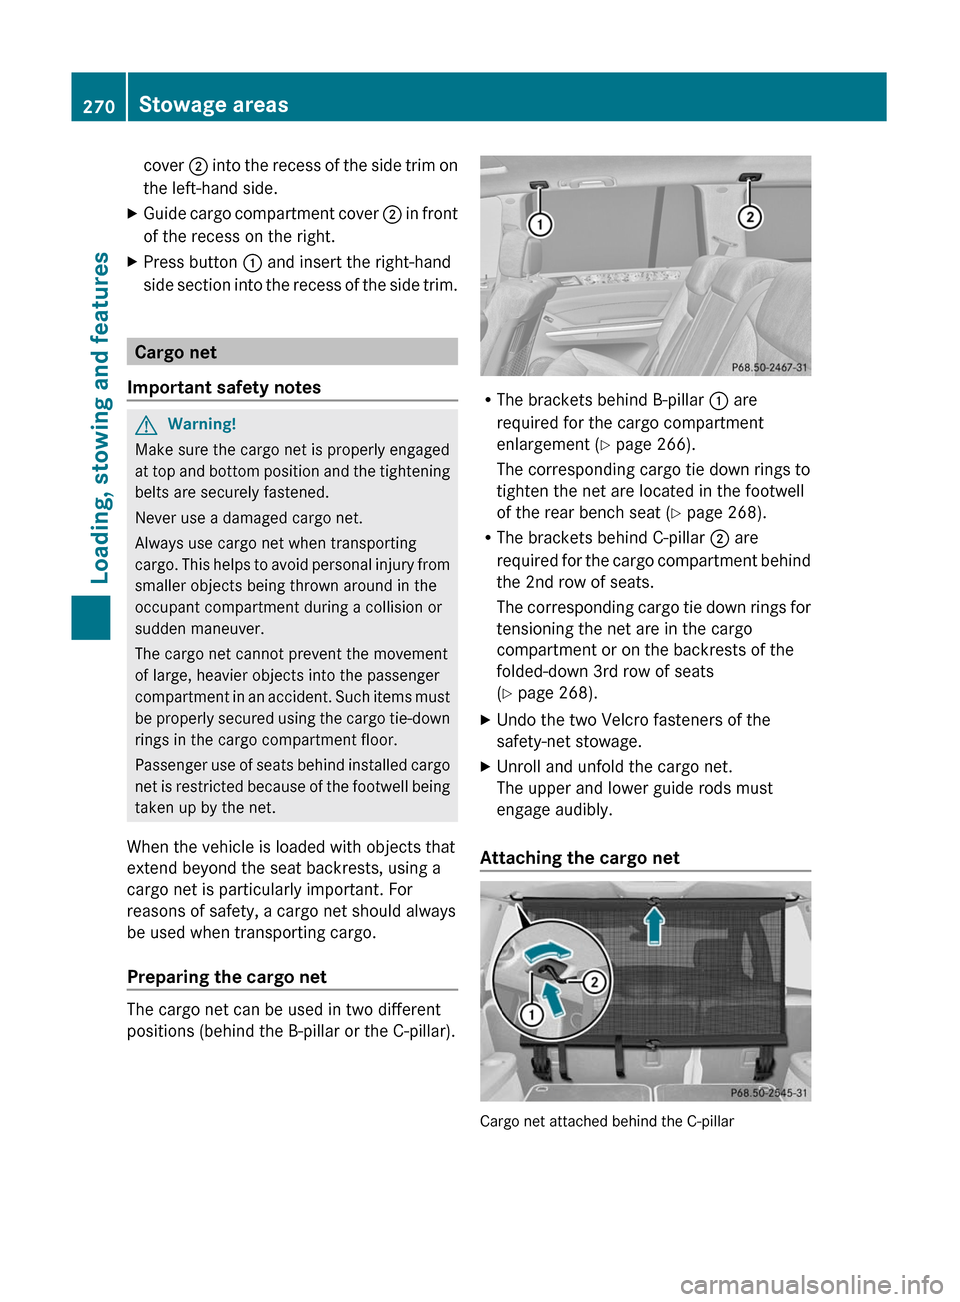
R The brackets behind B-pillar : are
required for the cargo compartment
enlargement ( Y page 266).
The corresponding cargo tie down rings to
tighten the net are located in the footwell
of the rear bench seat ( Y page 268).
R The brackets behind C-pillar ; are
required for the cargo compartment behind
the 2nd row of seats.
The corresponding cargo tie down rings for
tensioning the net are in the cargo
compartment or on the backrests of the
folded-down 3rd row of seats
( Y page 268).
XUndo the two Velcro fasteners of the
safety-net stowage.XUnroll and unfold the cargo net.
The upper and lower guide rods must
engage audibly.
Attaching the cargo net
Cargo net attached behind the C-pillar
270Stowage areasLoading, stowing and features
BA 164.8 USA, CA Edition B 2011; 1; 2, en-USd2sboikeVersion: 3.0.3.52010-04-21T15:08:44+02:00 - Seite 270
Page 273 of 376
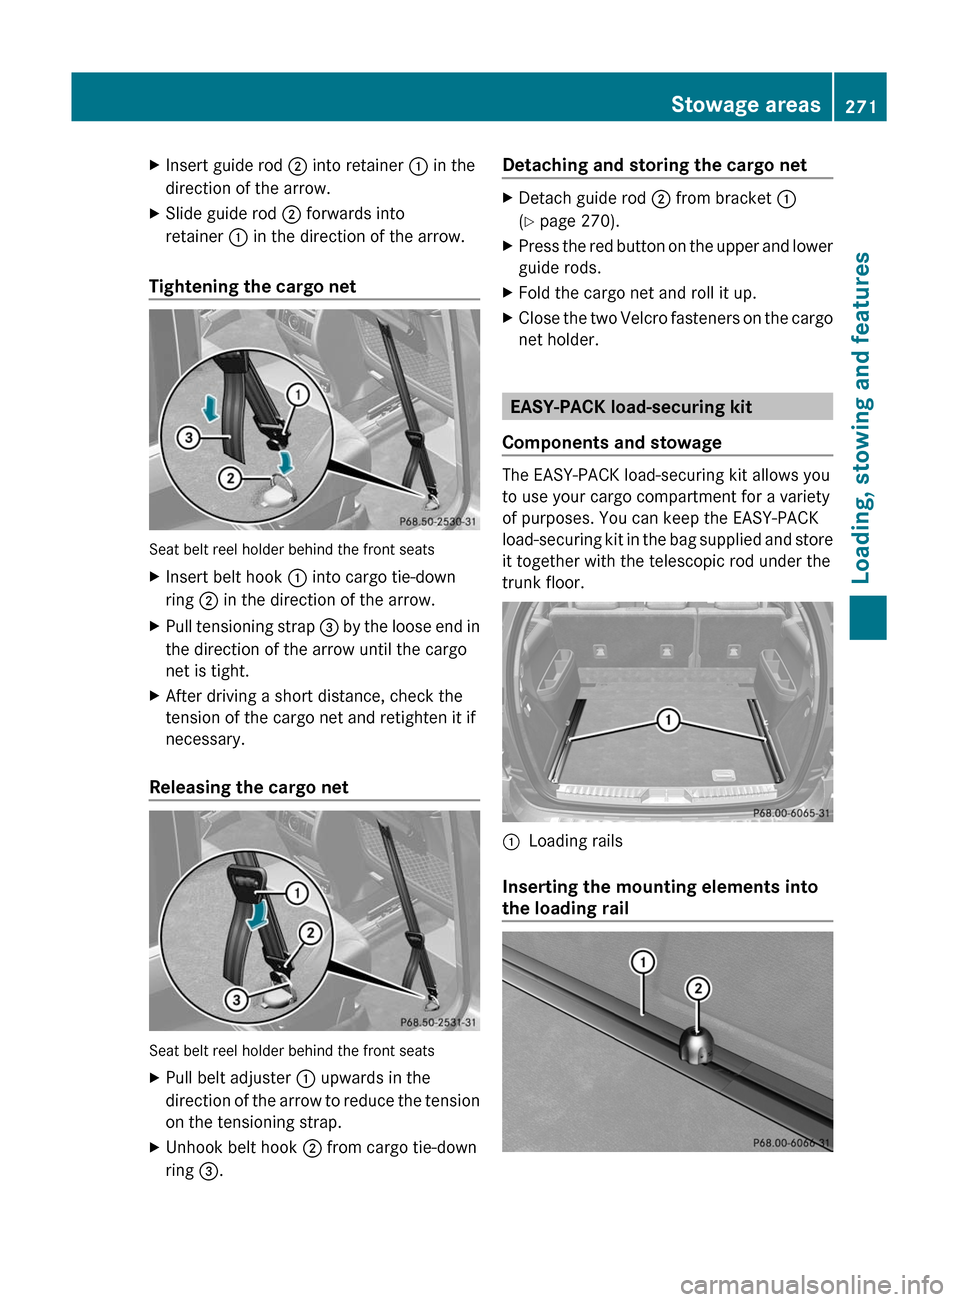
XInsert guide rod ; into retainer : in the
direction of the arrow.XSlide guide rod ; forwards into
retainer : in the direction of the arrow.
Tightening the cargo net
Seat belt reel holder behind the front seats
XInsert belt hook : into cargo tie-down
ring ; in the direction of the arrow.XPull tensioning strap = by the loose end in
the direction of the arrow until the cargo
net is tight.XAfter driving a short distance, check the
tension of the cargo net and retighten it if
necessary.
Releasing the cargo net
Seat belt reel holder behind the front seats
XPull belt adjuster : upwards in the
direction of the arrow to reduce the tension
on the tensioning strap.XUnhook belt hook ; from cargo tie-down
ring =.Detaching and storing the cargo netXDetach guide rod ; from bracket :
( Y page 270).XPress the red button on the upper and lower
guide rods.XFold the cargo net and roll it up.XClose the two Velcro fasteners on the cargo
net holder.
EASY-PACK load-securing kit
Components and stowage
The EASY-PACK load-securing kit allows you
to use your cargo compartment for a variety
of purposes. You can keep the EASY-PACK
load-securing kit in the bag supplied and store
it together with the telescopic rod under the
trunk floor.
:Loading rails
Inserting the mounting elements into
the loading rail
Stowage areas271Loading, stowing and featuresBA 164.8 USA, CA Edition B 2011; 1; 2, en-USd2sboikeVersion: 3.0.3.52010-04-21T15:08:44+02:00 - Seite 271Z
Page 280 of 376
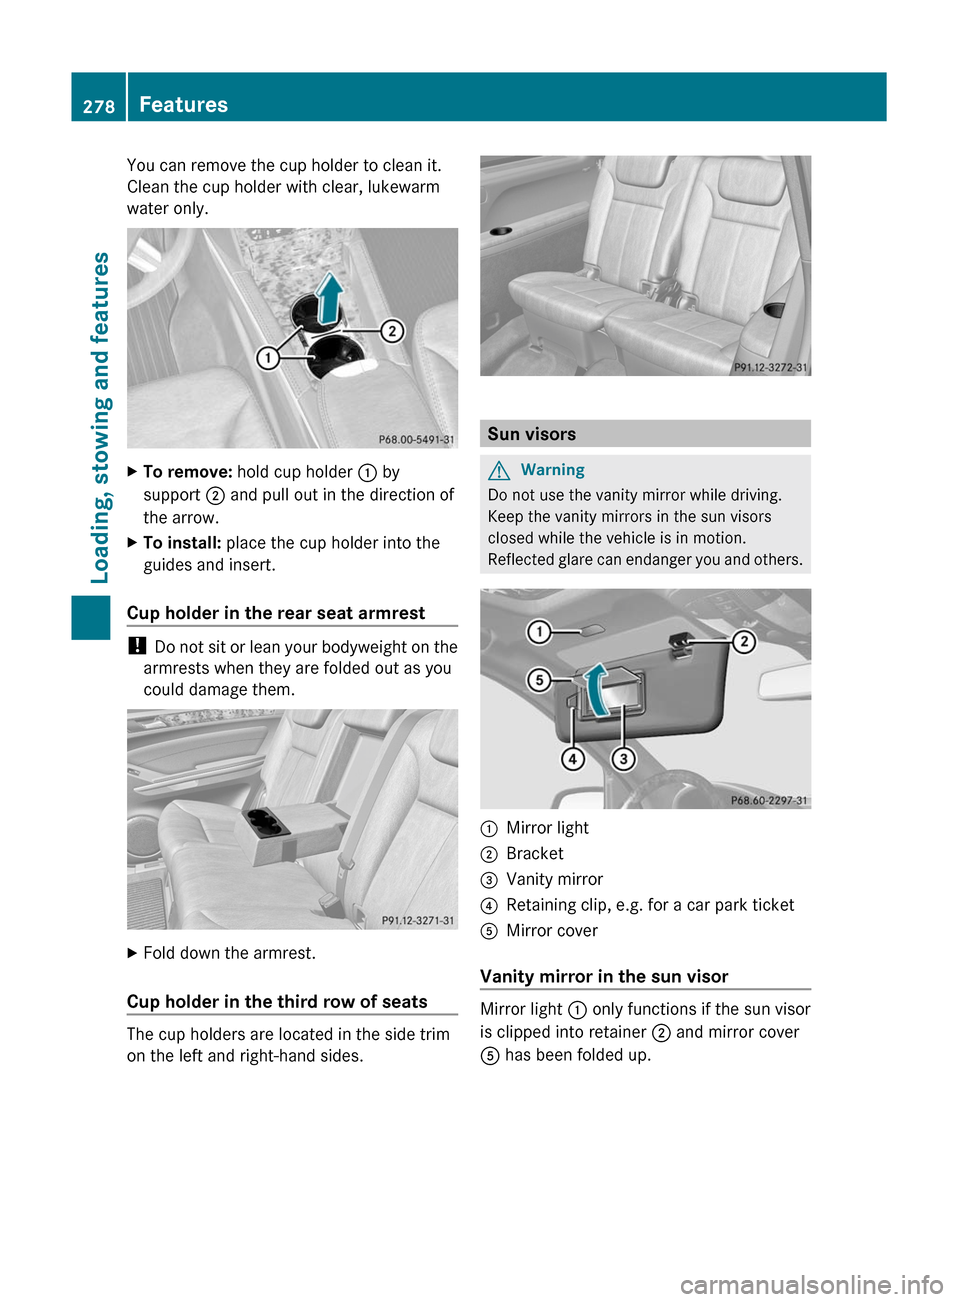
You can remove the cup holder to clean it.
Clean the cup holder with clear, lukewarm
water only.XTo remove: hold cup holder : by
support ; and pull out in the direction of
the arrow.XTo install: place the cup holder into the
guides and insert.
Cup holder in the rear seat armrest
! Do not sit or lean your bodyweight on the
armrests when they are folded out as you
could damage them.
XFold down the armrest.
Cup holder in the third row of seats
The cup holders are located in the side trim
on the left and right-hand sides.
Sun visors
GWarning
Do not use the vanity mirror while driving.
Keep the vanity mirrors in the sun visors
closed while the vehicle is in motion.
Reflected glare can endanger you and others.
:Mirror light;Bracket=Vanity mirror?Retaining clip, e.g. for a car park ticketAMirror cover
Vanity mirror in the sun visor
Mirror light : only functions if the sun visor
is clipped into retainer ; and mirror cover
A has been folded up.
278FeaturesLoading, stowing and features
BA 164.8 USA, CA Edition B 2011; 1; 2, en-USd2sboikeVersion: 3.0.3.52010-04-21T15:08:44+02:00 - Seite 278
Page 281 of 376
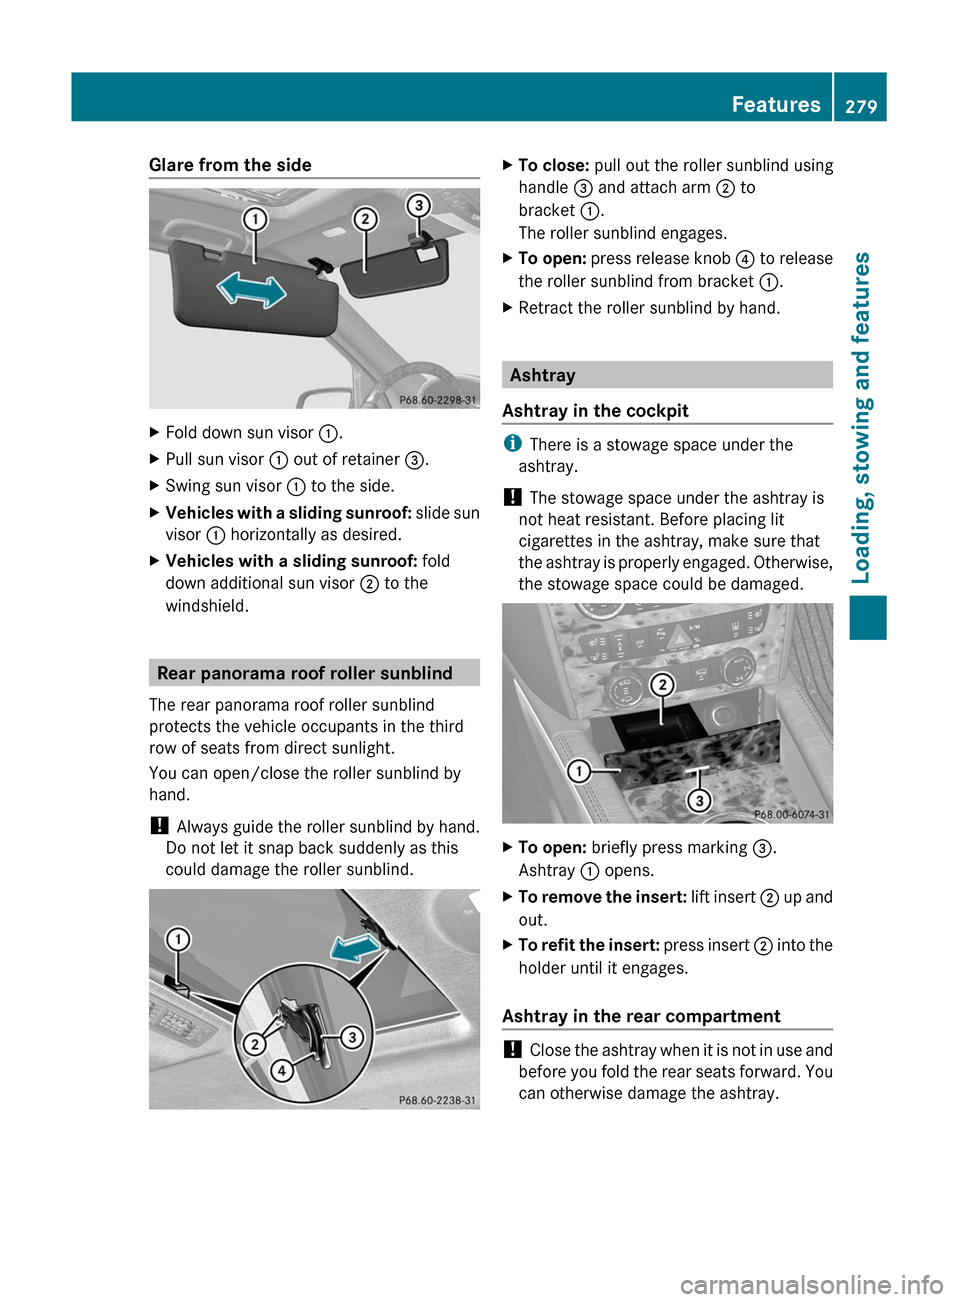
Glare from the sideXFold down sun visor :.XPull sun visor : out of retainer =.XSwing sun visor : to the side.XVehicles with a sliding sunroof: slide sun
visor : horizontally as desired.XVehicles with a sliding sunroof: fold
down additional sun visor ; to the
windshield.
Rear panorama roof roller sunblind
The rear panorama roof roller sunblind
protects the vehicle occupants in the third
row of seats from direct sunlight.
You can open/close the roller sunblind by
hand.
! Always guide the roller sunblind by hand.
Do not let it snap back suddenly as this
could damage the roller sunblind.
XTo close: pull out the roller sunblind using
handle = and attach arm ; to
bracket :.
The roller sunblind engages.XTo open: press release knob ? to release
the roller sunblind from bracket :.XRetract the roller sunblind by hand.
Ashtray
Ashtray in the cockpit
i There is a stowage space under the
ashtray.
! The stowage space under the ashtray is
not heat resistant. Before placing lit
cigarettes in the ashtray, make sure that
the ashtray is properly engaged. Otherwise,
the stowage space could be damaged.
XTo open: briefly press marking =.
Ashtray : opens.XTo remove the insert: lift insert ; up and
out.XTo refit the insert: press insert ; into the
holder until it engages.
Ashtray in the rear compartment
! Close the ashtray when it is not in use and
before you fold the rear seats forward. You
can otherwise damage the ashtray.
Features279Loading, stowing and featuresBA 164.8 USA, CA Edition B 2011; 1; 2, en-USd2sboikeVersion: 3.0.3.52010-04-21T15:08:44+02:00 - Seite 279Z
Page 365 of 376
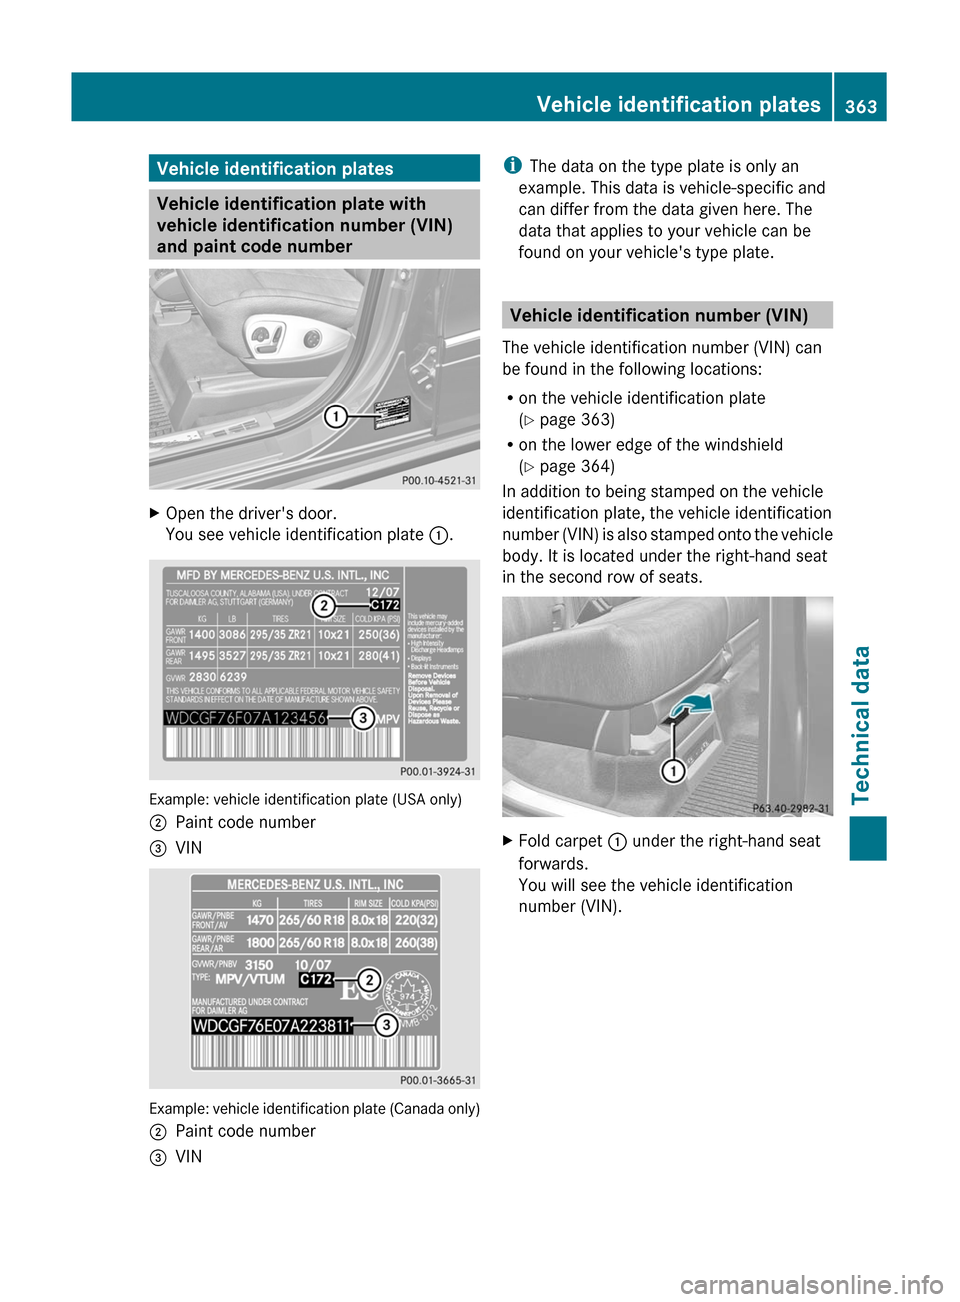
Vehicle identification plates
Vehicle identification plate with
vehicle identification number (VIN)
and paint code number
XOpen the driver's door.
You see vehicle identification plate :.
Example: vehicle identification plate (USA only)
;Paint code number=VIN
Example: vehicle identification plate (Canada only)
;Paint code number=VINi
The data on the type plate is only an
example. This data is vehicle-specific and
can differ from the data given here. The
data that applies to your vehicle can be
found on your vehicle's type plate.
Vehicle identification number (VIN)
The vehicle identification number (VIN) can
be found in the following locations:
R on the vehicle identification plate
( Y page 363)
R on the lower edge of the windshield
( Y page 364)
In addition to being stamped on the vehicle
identification plate, the vehicle identification
number (VIN) is also stamped onto the vehicle
body. It is located under the right-hand seat
in the second row of seats.
XFold carpet : under the right-hand seat
forwards.
You will see the vehicle identification
number (VIN).Vehicle identification plates363Technical dataBA 164.8 USA, CA Edition B 2011; 1; 2, en-USd2sboikeVersion: 3.0.3.52010-04-21T15:08:44+02:00 - Seite 363Z
Page:
< prev 1-8 9-16 17-24