2011 MERCEDES-BENZ GL350 BlueTEC fold seats
[x] Cancel search: fold seatsPage 104 of 376
hand side not locked appears in the
multifunction display.
When you fold the seat and backrest back
until they engage, the display message
disappears.
For further information on enlarging the cargo
compartment (folding the second row of
seats forwards), see ( Y page 267), and for
information on folding the seats in the third
row up and down, see ( Y page 100).
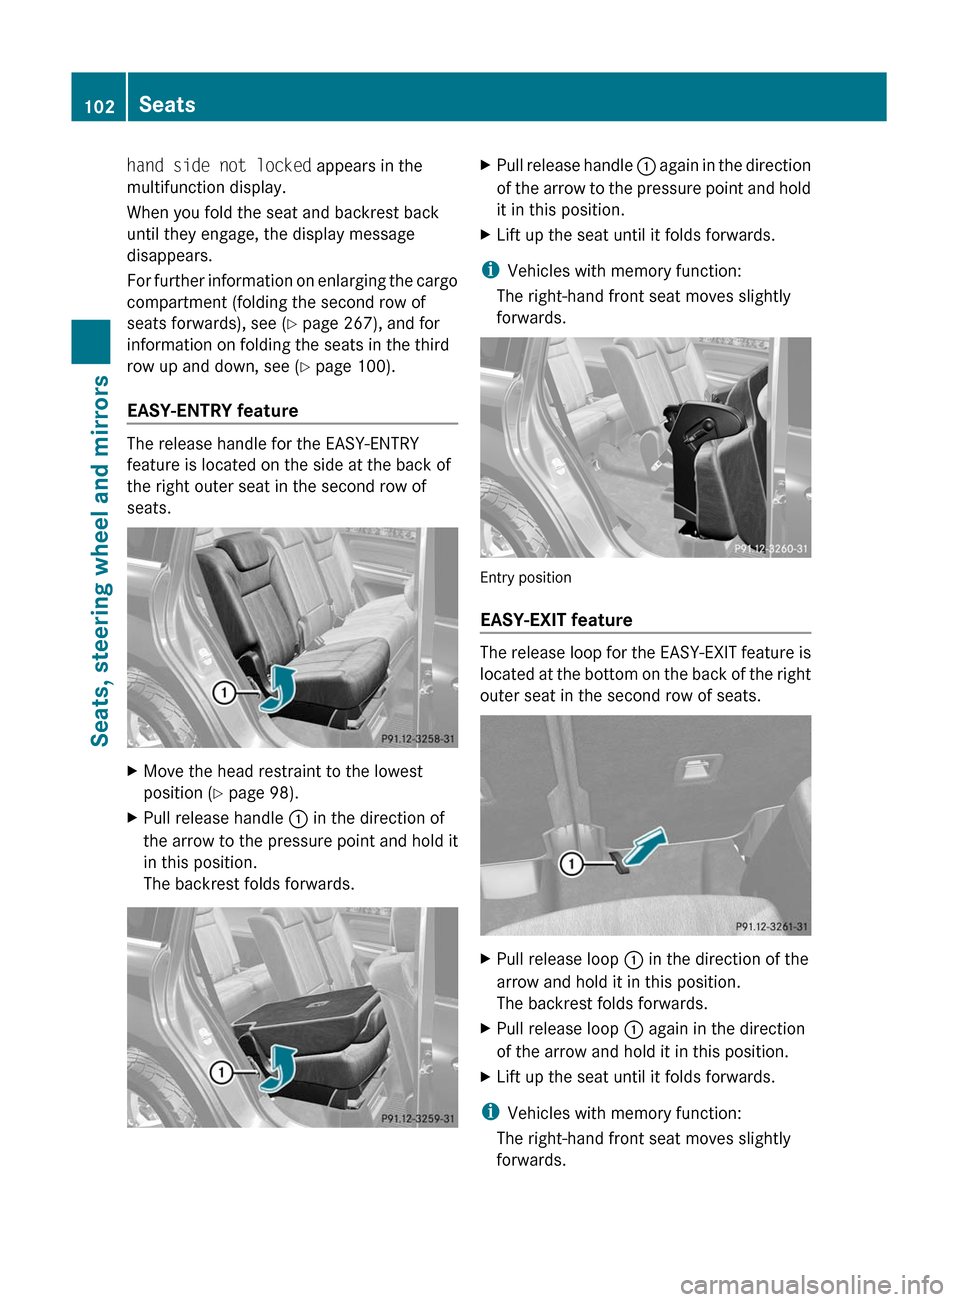
EASY-ENTRY feature
The release handle for the EASY-ENTRY
feature is located on the side at the back of
the right outer seat in the second row of
seats.
XMove the head restraint to the lowest
position ( Y page 98).XPull release handle : in the direction of
the arrow to the pressure point and hold it
in this position.
The backrest folds forwards.XPull release handle : again in the direction
of the arrow to the pressure point and hold
it in this position.XLift up the seat until it folds forwards.
i Vehicles with memory function:
The right-hand front seat moves slightly
forwards.
Entry position
EASY-EXIT feature
The release loop for the EASY-EXIT feature is
located at the bottom on the back of the right
outer seat in the second row of seats.
XPull release loop : in the direction of the
arrow and hold it in this position.
The backrest folds forwards.XPull release loop : again in the direction
of the arrow and hold it in this position.XLift up the seat until it folds forwards.
i Vehicles with memory function:
The right-hand front seat moves slightly
forwards.
102SeatsSeats, steering wheel and mirrors
BA 164.8 USA, CA Edition B 2011; 1; 2, en-USd2sboikeVersion: 3.0.3.52010-04-21T15:08:44+02:00 - Seite 102
Page 105 of 376
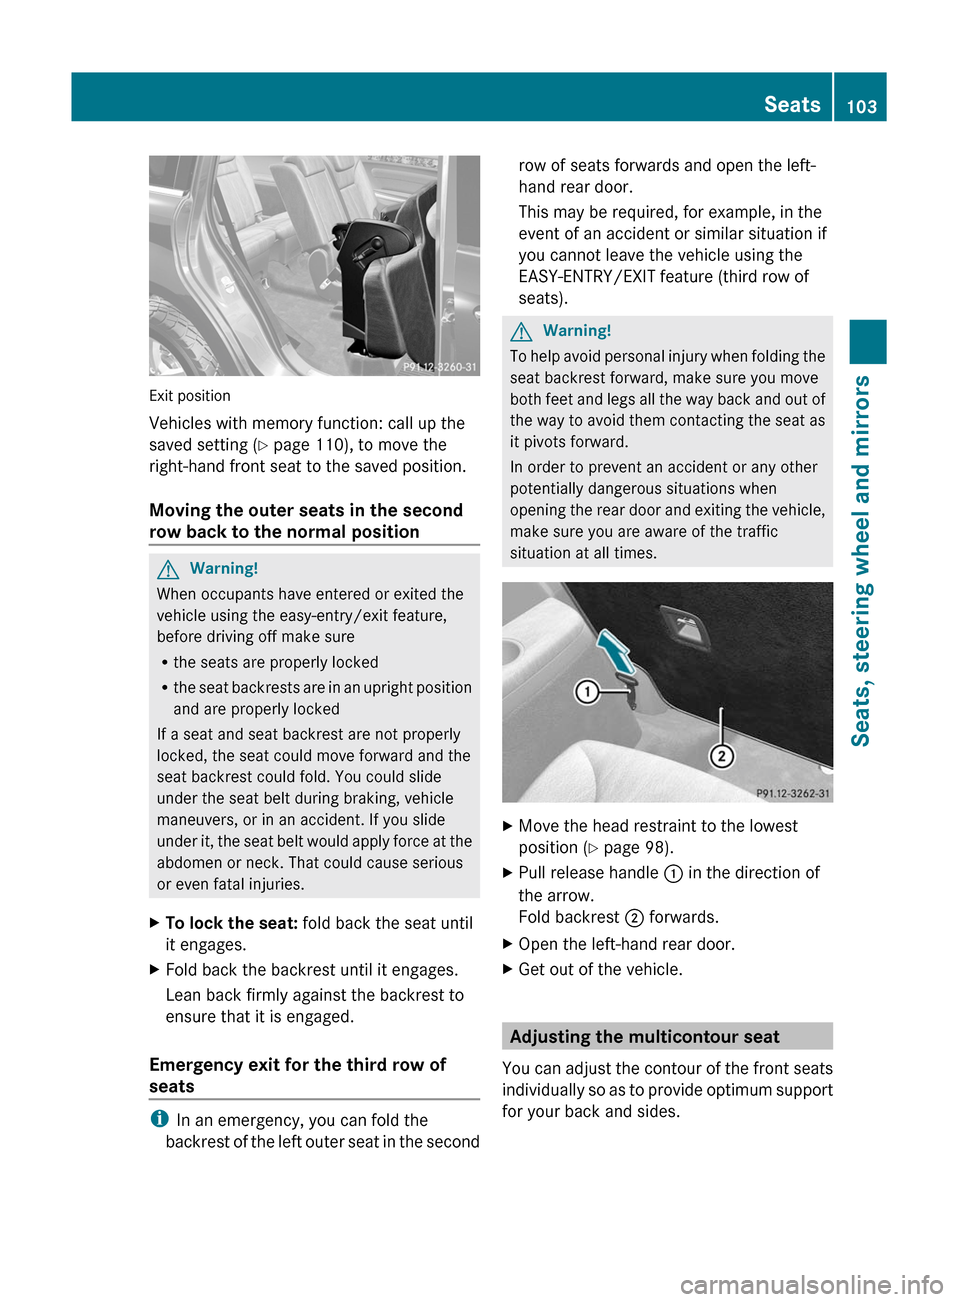
Exit position
Vehicles with memory function: call up the
saved setting ( Y page 110), to move the
right-hand front seat to the saved position.
Moving the outer seats in the second
row back to the normal position
GWarning!
When occupants have entered or exited the
vehicle using the easy-entry/exit feature,
before driving off make sure
R the seats are properly locked
R the seat backrests are in an upright position
and are properly locked
If a seat and seat backrest are not properly
locked, the seat could move forward and the
seat backrest could fold. You could slide
under the seat belt during braking, vehicle
maneuvers, or in an accident. If you slide
under it, the seat belt would apply force at the
abdomen or neck. That could cause serious
or even fatal injuries.
XTo lock the seat: fold back the seat until
it engages.XFold back the backrest until it engages.
Lean back firmly against the backrest to
ensure that it is engaged.
Emergency exit for the third row of
seats
i In an emergency, you can fold the
backrest of the left outer seat in the second
row of seats forwards and open the left-
hand rear door.
This may be required, for example, in the
event of an accident or similar situation if
you cannot leave the vehicle using the
EASY-ENTRY/EXIT feature (third row of
seats).GWarning!
To help avoid personal injury when folding the
seat backrest forward, make sure you move
both feet and legs all the way back and out of
the way to avoid them contacting the seat as
it pivots forward.
In order to prevent an accident or any other
potentially dangerous situations when
opening the rear door and exiting the vehicle,
make sure you are aware of the traffic
situation at all times.
XMove the head restraint to the lowest
position ( Y page 98).XPull release handle : in the direction of
the arrow.
Fold backrest ; forwards.XOpen the left-hand rear door.XGet out of the vehicle.
Adjusting the multicontour seat
You can adjust the contour of the front seats
individually so as to provide optimum support
for your back and sides.
Seats103Seats, steering wheel and mirrorsBA 164.8 USA, CA Edition B 2011; 1; 2, en-USd2sboikeVersion: 3.0.3.52010-04-21T15:08:44+02:00 - Seite 103Z
Page 110 of 376
Mirrors
Rear-view mirror
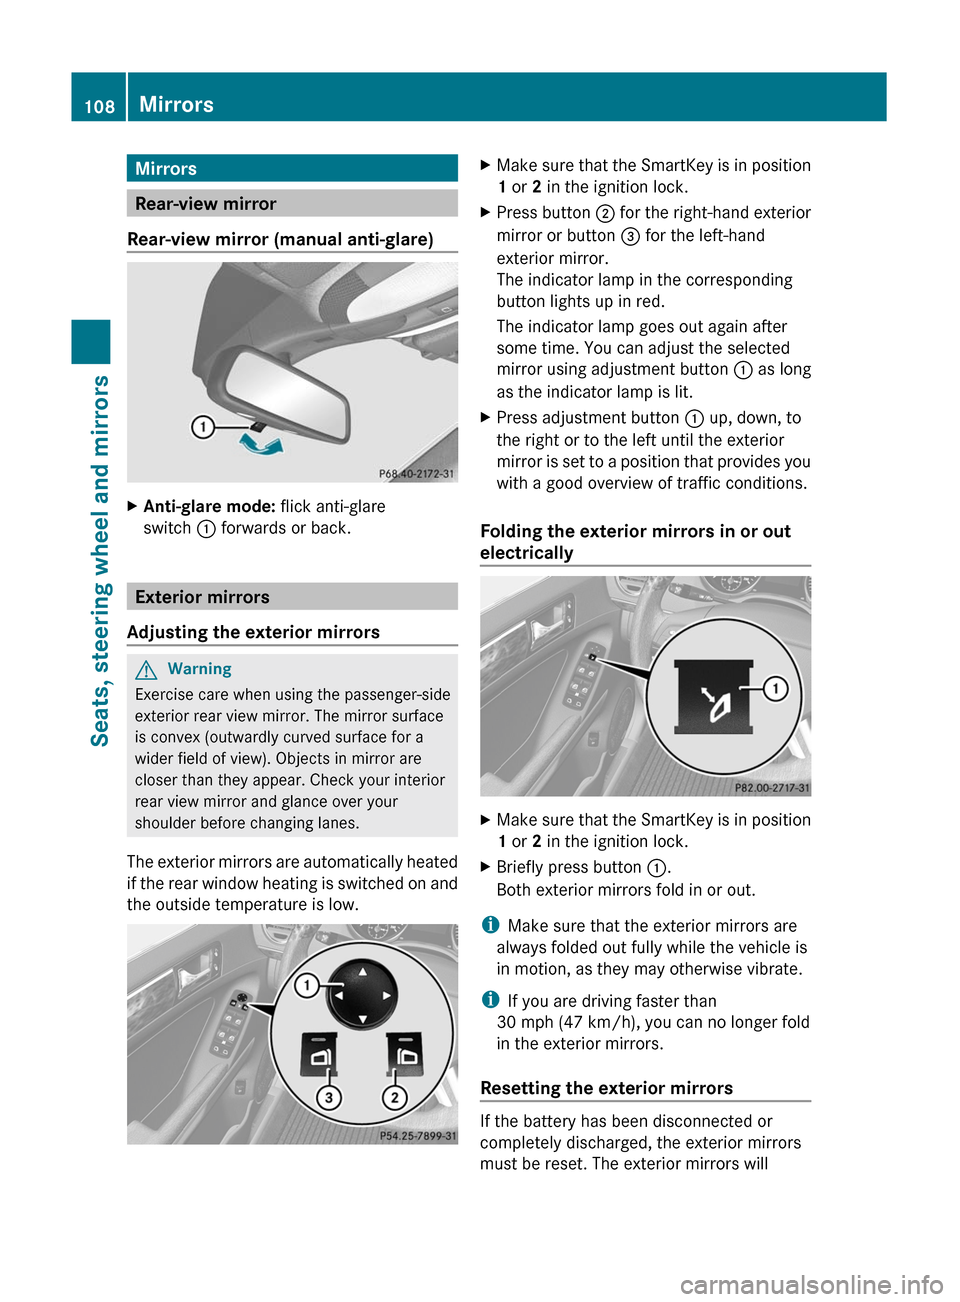
Rear-view mirror (manual anti-glare)
XAnti-glare mode: flick anti-glare
switch : forwards or back.
Exterior mirrors
Adjusting the exterior mirrors
GWarning
Exercise care when using the passenger-side
exterior rear view mirror. The mirror surface
is convex (outwardly curved surface for a
wider field of view). Objects in mirror are
closer than they appear. Check your interior
rear view mirror and glance over your
shoulder before changing lanes.
The exterior mirrors are automatically heated
if the rear window heating is switched on and
the outside temperature is low.
XMake sure that the SmartKey is in position
1 or 2 in the ignition lock.XPress button ; for the right-hand exterior
mirror or button = for the left-hand
exterior mirror.
The indicator lamp in the corresponding
button lights up in red.
The indicator lamp goes out again after
some time. You can adjust the selected
mirror using adjustment button : as long
as the indicator lamp is lit.XPress adjustment button : up, down, to
the right or to the left until the exterior
mirror is set to a position that provides you
with a good overview of traffic conditions.
Folding the exterior mirrors in or out
electrically
XMake sure that the SmartKey is in position
1 or 2 in the ignition lock.XBriefly press button :.
Both exterior mirrors fold in or out.
i Make sure that the exterior mirrors are
always folded out fully while the vehicle is
in motion, as they may otherwise vibrate.
i If you are driving faster than
30 mph (47 km/h), you can no longer fold
in the exterior mirrors.
Resetting the exterior mirrors
If the battery has been disconnected or
completely discharged, the exterior mirrors
must be reset. The exterior mirrors will
108MirrorsSeats, steering wheel and mirrors
BA 164.8 USA, CA Edition B 2011; 1; 2, en-USd2sboikeVersion: 3.0.3.52010-04-21T15:08:44+02:00 - Seite 108
Page 111 of 376
otherwise not fold in when you select the
"Fold in mirrors when locking" function in the
on-board computer ( Y page 226).XMake sure that the SmartKey is in
position 1 in the ignition lock.XBriefly press button :.
Folding the exterior mirrors in or out
automatically
If the "Fold in mirrors when locking" function
is activated in the on-board computer
( Y page 226):
R the exterior mirrors fold in automatically as
soon as you lock the vehicle from the
outside.
R the exterior mirrors fold out again
automatically as soon as you unlock the
vehicle and then open the driver's or front-
passenger door.
i The mirrors do not fold out if they have
been folded in manually.
Exterior mirror out of position
If an exterior mirror has been pushed out of
position, proceed as follows:
X Vehicles without electrically folding
exterior mirrors: move the exterior mirror
into the correct position manually.XVehicles with electrically folding
exterior mirrors: press the mirror-folding
button ( Y page 108) repeatedly until you
hear the mirror engage in position.
The mirror housing is engaged again and
you can adjust the exterior mirrors as usual
( Y page 108).
Automatic anti-glare mirrors
GWarning!
The auto-dimming function does not react if
incoming light is not aimed directly at sensors
in the interior rear view mirror.
The interior rear view mirror and the exterior
rear view mirror on the driver’s side do not
react, for example, when transporting cargo
which covers the rear window.
Light hitting the mirror(s) at certain angles
(incident light) could blind you. As a result,
you may not be able to observe traffic
conditions and could cause an accident.
The rear-view mirror and the exterior mirror
on the driver's side automatically go into anti-
glare mode if the ignition is switched on and
incident light from headlamps strikes the
sensor in the rear-view mirror.
The mirrors do not go into anti-glare mode if
reverse gear is engaged or the interior lighting
is switched on.
Parking position for the exterior
mirror on the front-passenger side
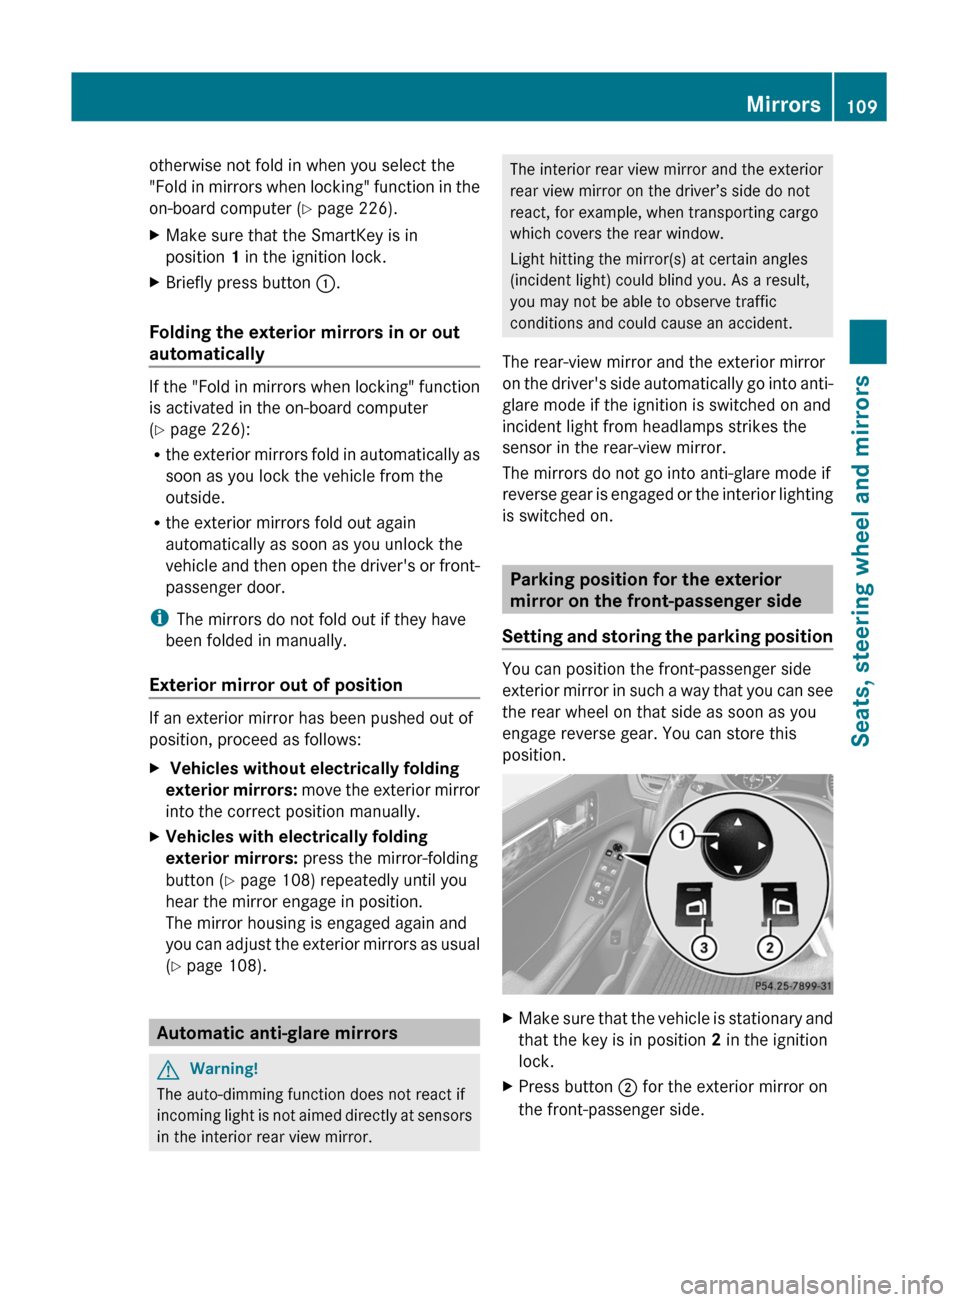
Setting and storing the parking position
You can position the front-passenger side
exterior mirror in such a way that you can see
the rear wheel on that side as soon as you
engage reverse gear. You can store this
position.
XMake sure that the vehicle is stationary and
that the key is in position 2 in the ignition
lock.XPress button ; for the exterior mirror on
the front-passenger side.Mirrors109Seats, steering wheel and mirrorsBA 164.8 USA, CA Edition B 2011; 1; 2, en-USd2sboikeVersion: 3.0.3.52010-04-21T15:08:44+02:00 - Seite 109Z
Page 268 of 376
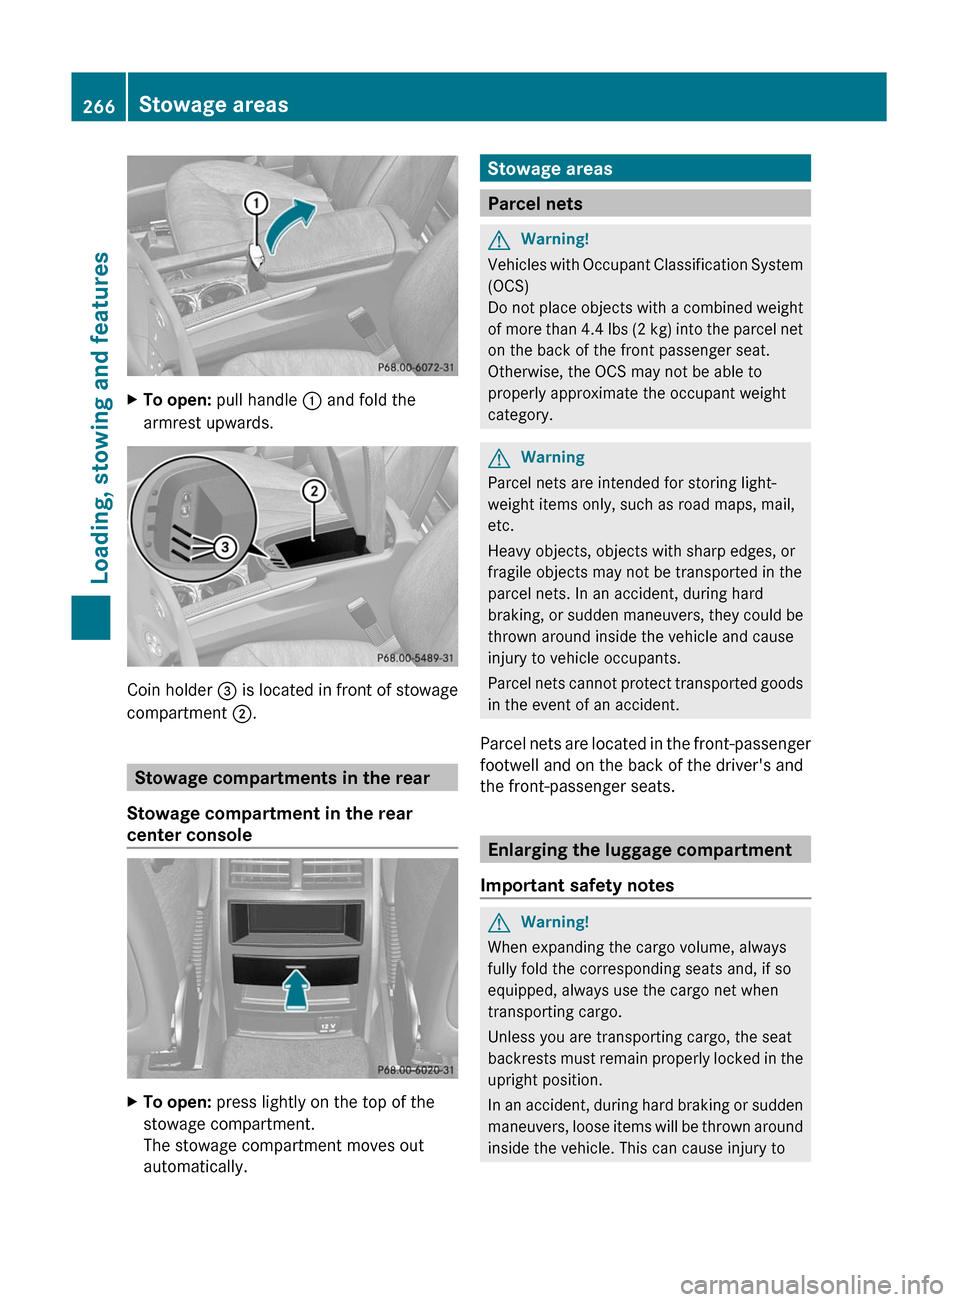
XTo open: pull handle : and fold the
armrest upwards.
Coin holder = is located in front of stowage
compartment ;.
Stowage compartments in the rear
Stowage compartment in the rear
center console
XTo open: press lightly on the top of the
stowage compartment.
The stowage compartment moves out
automatically.Stowage areas
Parcel nets
GWarning!
Vehicles with Occupant Classification System
(OCS)
Do not place objects with a combined weight
of more than 4.4 lbs (2 kg) into the parcel net
on the back of the front passenger seat.
Otherwise, the OCS may not be able to
properly approximate the occupant weight
category.
GWarning
Parcel nets are intended for storing light-
weight items only, such as road maps, mail,
etc.
Heavy objects, objects with sharp edges, or
fragile objects may not be transported in the
parcel nets. In an accident, during hard
braking, or sudden maneuvers, they could be
thrown around inside the vehicle and cause
injury to vehicle occupants.
Parcel nets cannot protect transported goods
in the event of an accident.
Parcel nets are located in the front-passenger
footwell and on the back of the driver's and
the front-passenger seats.
Enlarging the luggage compartment
Important safety notes
GWarning!
When expanding the cargo volume, always
fully fold the corresponding seats and, if so
equipped, always use the cargo net when
transporting cargo.
Unless you are transporting cargo, the seat
backrests must remain properly locked in the
upright position.
In an accident, during hard braking or sudden
maneuvers, loose items will be thrown around
inside the vehicle. This can cause injury to
266Stowage areasLoading, stowing and features
BA 164.8 USA, CA Edition B 2011; 1; 2, en-USd2sboikeVersion: 3.0.3.52010-04-21T15:08:44+02:00 - Seite 266
Page 269 of 376
vehicle occupants unless the items are
securely fastened in the vehicle.
Always use the cargo tie-down rings.GWarning!
Never drive a vehicle with the tailgate open.
Deadly carbon monoxide (CO) gases may
enter vehicle interior resulting in
unconsciousness and death.
! Release and fold the seat cushion
upwards before folding the rear bench seat
forward. Otherwise, the backrests may be
damaged.
When the backrest is folded forwards, the
front seats cannot be moved to their
rearmost position. Otherwise, the front
seats and the rear bench seat could be
damaged.
The left-hand and right-hand backrests in the
2nd row of seats can be folded forwards
separately to increase the cargo
compartment capacity. On vehicles with a 3rd
row of seats, you must fold down the 3rd row
of seats beforehand ( Y page 100) to obtain
maximum cargo compartment enlargement.
Folding the rear bench seat forward
i If the driver's or front-passenger seat is
set for a larger person, it may not be
possible to fold the rear bench seat
forwards. In this case, move the front seats
as far forward as possible.
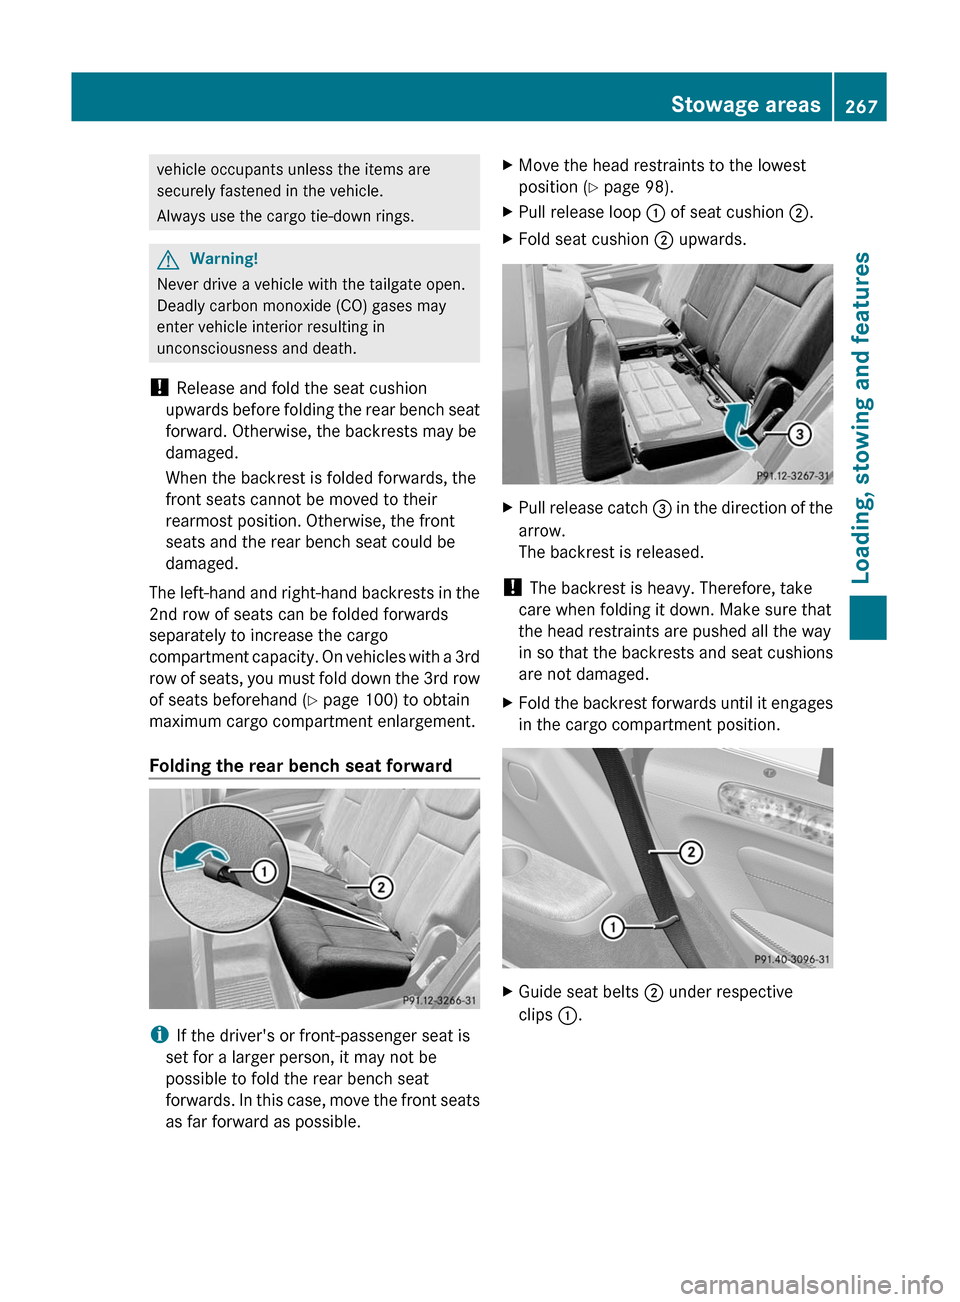
XMove the head restraints to the lowest
position ( Y page 98).XPull release loop : of seat cushion ;.XFold seat cushion ; upwards.XPull release catch = in the direction of the
arrow.
The backrest is released.
! The backrest is heavy. Therefore, take
care when folding it down. Make sure that
the head restraints are pushed all the way
in so that the backrests and seat cushions
are not damaged.
XFold the backrest forwards until it engages
in the cargo compartment position.XGuide seat belts ; under respective
clips :.Stowage areas267Loading, stowing and featuresBA 164.8 USA, CA Edition B 2011; 1; 2, en-USd2sboikeVersion: 3.0.3.52010-04-21T15:08:44+02:00 - Seite 267Z
Page 270 of 376
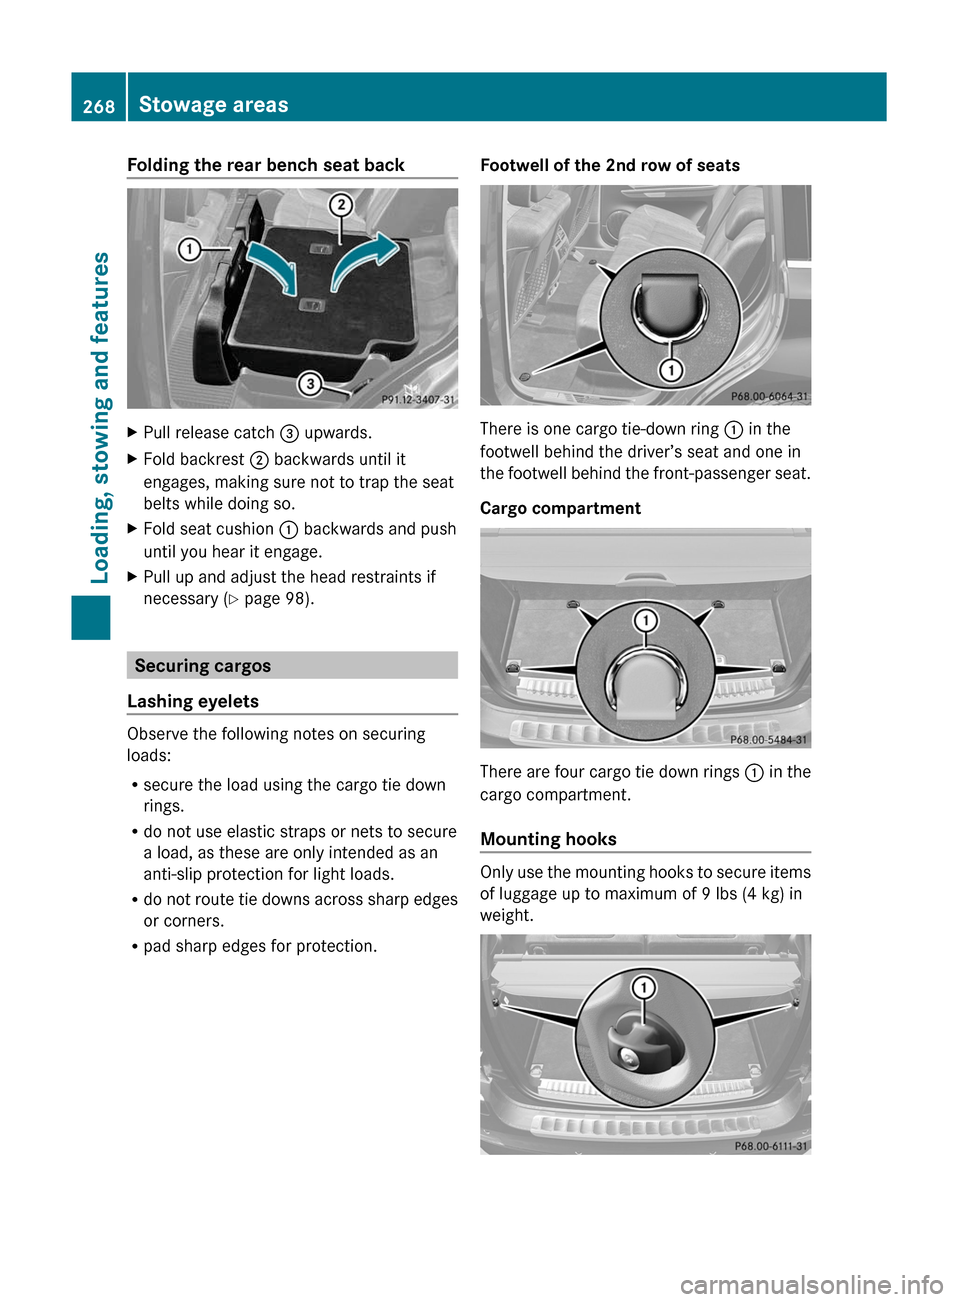
Folding the rear bench seat backXPull release catch = upwards.XFold backrest ; backwards until it
engages, making sure not to trap the seat
belts while doing so.XFold seat cushion : backwards and push
until you hear it engage.XPull up and adjust the head restraints if
necessary ( Y page 98).
Securing cargos
Lashing eyelets
Observe the following notes on securing
loads:
R secure the load using the cargo tie down
rings.
R do not use elastic straps or nets to secure
a load, as these are only intended as an
anti-slip protection for light loads.
R do not route tie downs across sharp edges
or corners.
R pad sharp edges for protection.
Footwell of the 2nd row of seats
There is one cargo tie-down ring : in the
footwell behind the driver’s seat and one in
the footwell behind the front-passenger seat.
Cargo compartment
There are four cargo tie down rings : in the
cargo compartment.
Mounting hooks
Only use the mounting hooks to secure items
of luggage up to maximum of 9 lbs (4 kg) in
weight.
268Stowage areasLoading, stowing and features
BA 164.8 USA, CA Edition B 2011; 1; 2, en-USd2sboikeVersion: 3.0.3.52010-04-21T15:08:44+02:00 - Seite 268
Page 271 of 376
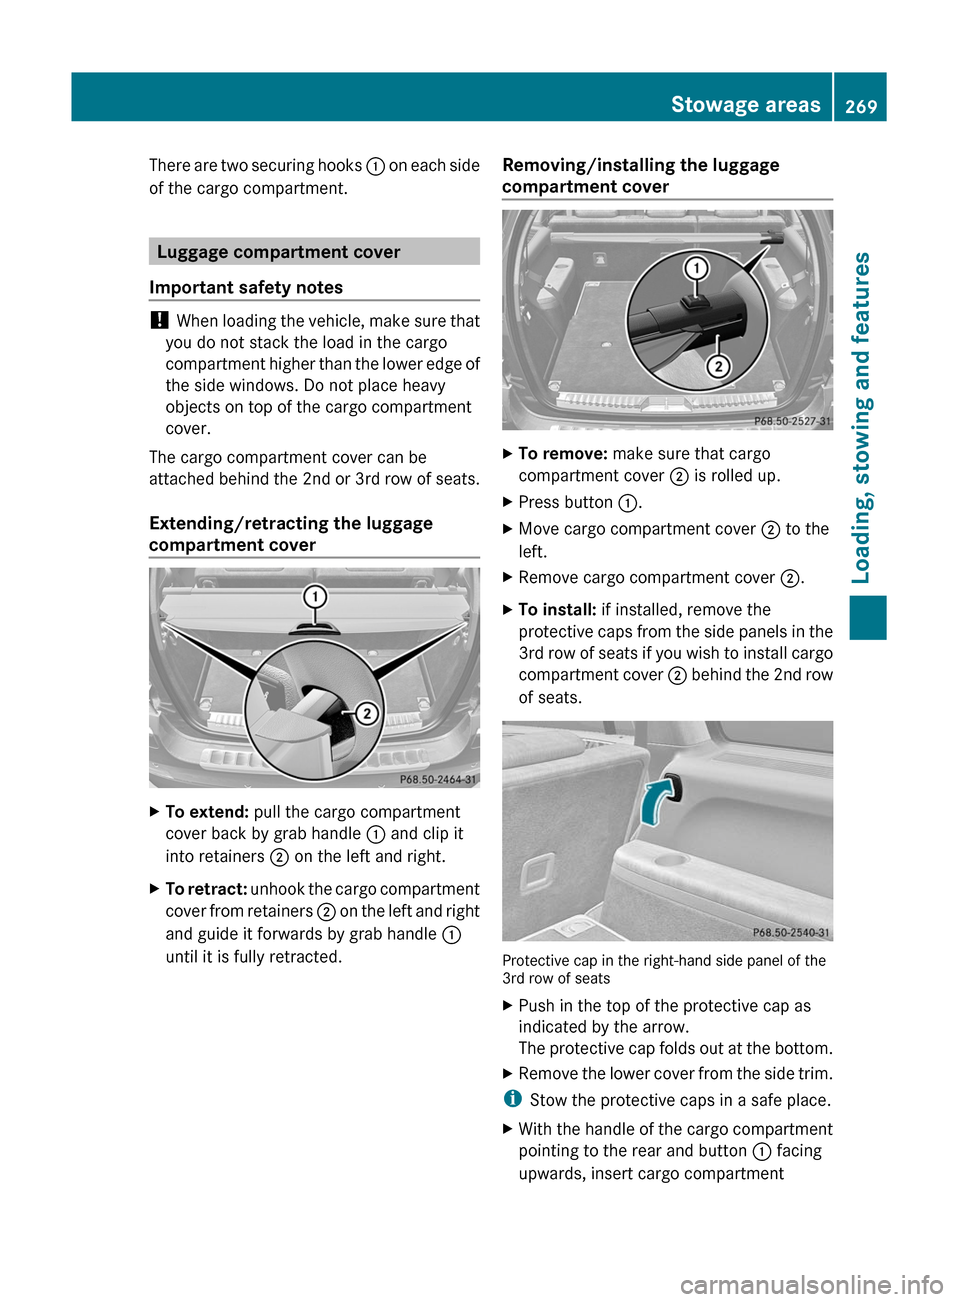
There are two securing hooks : on each side
of the cargo compartment.
Luggage compartment cover
Important safety notes
! When loading the vehicle, make sure that
you do not stack the load in the cargo
compartment higher than the lower edge of
the side windows. Do not place heavy
objects on top of the cargo compartment
cover.
The cargo compartment cover can be
attached behind the 2nd or 3rd row of seats.
Extending/retracting the luggage
compartment cover
XTo extend: pull the cargo compartment
cover back by grab handle : and clip it
into retainers ; on the left and right.XTo retract: unhook the cargo compartment
cover from retainers ; on the left and right
and guide it forwards by grab handle :
until it is fully retracted.Removing/installing the luggage
compartment coverXTo remove: make sure that cargo
compartment cover ; is rolled up.XPress button :.XMove cargo compartment cover ; to the
left.XRemove cargo compartment cover ;.XTo install: if installed, remove the
protective caps from the side panels in the
3rd row of seats if you wish to install cargo
compartment cover ; behind the 2nd row
of seats.
Protective cap in the right-hand side panel of the
3rd row of seats
XPush in the top of the protective cap as
indicated by the arrow.
The protective cap folds out at the bottom.XRemove the lower cover from the side trim.
i Stow the protective caps in a safe place.
XWith the handle of the cargo compartment
pointing to the rear and button : facing
upwards, insert cargo compartmentStowage areas269Loading, stowing and featuresBA 164.8 USA, CA Edition B 2011; 1; 2, en-USd2sboikeVersion: 3.0.3.52010-04-21T15:08:44+02:00 - Seite 269Z