2011 MERCEDES-BENZ GL350 BlueTEC Console
[x] Cancel search: ConsolePage 47 of 376

Rwhen securing a child in a child restraint
system on the front-passenger seat, you
must:
- move the front-passenger seat as far
back as possible
- use a child restraint system that is
suitable for the age, size and weight of
the child
- observe the manufacturer's installation
instructions in order to install and secure
the child restraint system correctly.
R for children larger than the typical 12-
month-old child, the passenger front air bag
is activated.
Deployment of the driver front air bag does
not mean that the front-passenger front air
bag also should have deployed. The OCS may
have determined:
R that the seat was empty or occupied by a
person with a weight up to or less than that
of a typical 12 month-old child seated in a
standard child restraint
R that the seat was occupied by a small
person (e.g. a young teenager or a small
adult) or a child that weighs more than a
typical 12 month old child in a child
restraint system
These are examples of when OCS disables the
front-passenger front air bag. This occurs
even though the impact fulfills the criteria for
deployment of the driver's front air bag.
If the key has been removed from the ignition
lock or is in position 0, indicator lamp
42 : does not light up.
GWarning
If the red + SRS warning lamp in the
instrument cluster and the 42
indicator lamp light up simultaneously, OCS is
malfunctioning. The front-passenger front air
bag is disabled in this case. Have the system
checked as soon as possible by qualified
technicians. Contact an authorized
Mercedes-Benz Center.
Only have the seat repaired or replaced at an
authorized Mercedes-Benz Center.
In order to ensure proper operation of the air
bag system and OCS:
R do not place any objects with a total weight
of more than 4.4 lb(2 kg) in the parcel net
on the back of the front-passenger seat.
OCS may otherwise be unable to correctly
assess the occupant's weight category.
R do not place any objects under or near the
front-passenger seat.
R do not hang or fasten any objects on the
seats.
R do not store any objects, such as books,
between the front-passenger seat and the
center console or the front-passenger door.
R do not slide the front-passenger seat
backwards against any hard objects.
R sit with the seat belt fastened correctly and
in a position that is as upright as possible
with your back against the backrest.
R while seated, an occupant should not
position him/herself in such a way as to
cause the occupant's weight to be lifted
from the seat bottom as this may result in
the OCS being unable to correctly
approximate the occupant's weight
category.
R read and observe all warnings in this
chapter.
Occupant safety45SafetyBA 164.8 USA, CA Edition B 2011; 1; 2, en-USd2sboikeVersion: 3.0.3.52010-04-21T15:08:44+02:00 - Seite 45Z
Page 209 of 376
Differential lock
General notes
i Differential locks are available only in
vehicles with the Off-Road Pro engineering
package.
Your vehicle is equipped with the following:
R A differential lock for the transfer box: this
controls the balance between the front and
rear axles.
R A differential lock for the rear axle: this
controls the balance between the wheels
and the rear axle.
Differential locks improve the vehicle's
traction. 4ETS ( Y page 67)controls the
balance between the wheels on the front axle.
Information on "Off-road driving"; see
( Y page 173).
Information about the differential and
differential locks
When the vehicle is driving around a curve,
the wheels on the outside of the curve have
to cover a greater distance and therefore
have to turn faster than the wheels on the
inside. The differential, a transmission in the
drive train, balances these different rotational
speeds out, making cornering possible.
The disadvantage of a differential: the wheels
with the least grip are driven the hardest.
Example: one wheel on a driven axle is on a
snow-covered surface and therefore has no
traction. This wheel has the most driving
force, since the differential distributes most
of the force to the wheel with the least
resistance. The wheel on the opposite side of
this axle, which is on a solid surface and could
therefore enable traction, does not have any
driving force. 4ETS eliminates this
disadvantage and ensures good steerability
by braking the spinning wheel automatically
and thereby directing more force to the wheel
that is on a solid surface and can provide
traction.
ESP ®
and 4ETS are traction systems that are
ideally suited to road driving and driving on
easily negotiable off-road terrain. The LOW
RANGE off-road gear also improves off-road
capability.
Difficult off-road conditions require additional
measures, such as locking one or more
differentials. Your vehicle has two differential
locks: one (central) differential lock for the
transfer case and one differential lock for the
rear axle. Both differential locks can be
activated using the selector wheel on the
center console. When the (central)
differential for the transfer case is locked, the
speed of the front wheels is the same as the
speed of the rear wheels. When the
differential for the rear axle is locked, both of
the rear wheels turn at the same speed,
independent of their individual torques. Note
that activating the differential locks
significantly reduces the steerability of the
vehicle.
For your safety, the safety of others and to
prevent damage to the vehicle, the
differential locks must not be activated on
paved roads. Note that the differential
function is necessary when driving on paved
roads and that the differentials must never be
locked on paved roads. Otherwise, the
vehicle can no longer be steered. The
differential locks must therefore only be
activated when driving off-road, and then only
if activating the other driving systems (4ETS,
ESP ®
and LOW RANGE off-road gear) is no
longer sufficient.
Engaging the differential locks
! Drive off slowly when the differential
locks are engaged.
Function or performance tests may only be
performed on a 2-axle dynamometer. If you
wish to operate the vehicle on such a
dynamometer, please consult an
authorized Mercedes-Benz Center
beforehand. You could otherwise damage
the drive train or the brake system.
Off-road driving systems207Driving and parkingBA 164.8 USA, CA Edition B 2011; 1; 2, en-USd2sboikeVersion: 3.0.3.52010-04-21T15:08:44+02:00 - Seite 207Z
Page 267 of 376
If so equipped, always use the cargo net when
transporting cargo. The cargo net cannot
secure hard or heavy objects.
Parcel nets cannot secure hard or heavy
objects.
Keep compartment lids closed. This will help
to prevent stored objects from being thrown
about and injuring vehicle occupants during
R braking
R vehicle maneuvers
R an accident
Stowage compartments in the front
Glove box
i Depending on the vehicle equipment,
there is an AUX-IN connection or a Media
Interface installed in the glove box. Media
Interface is a universal interface for mobile
audio equipment, e.g. for an iPod ®
or USB
devices; see separate COMAND APS
operating instructions.
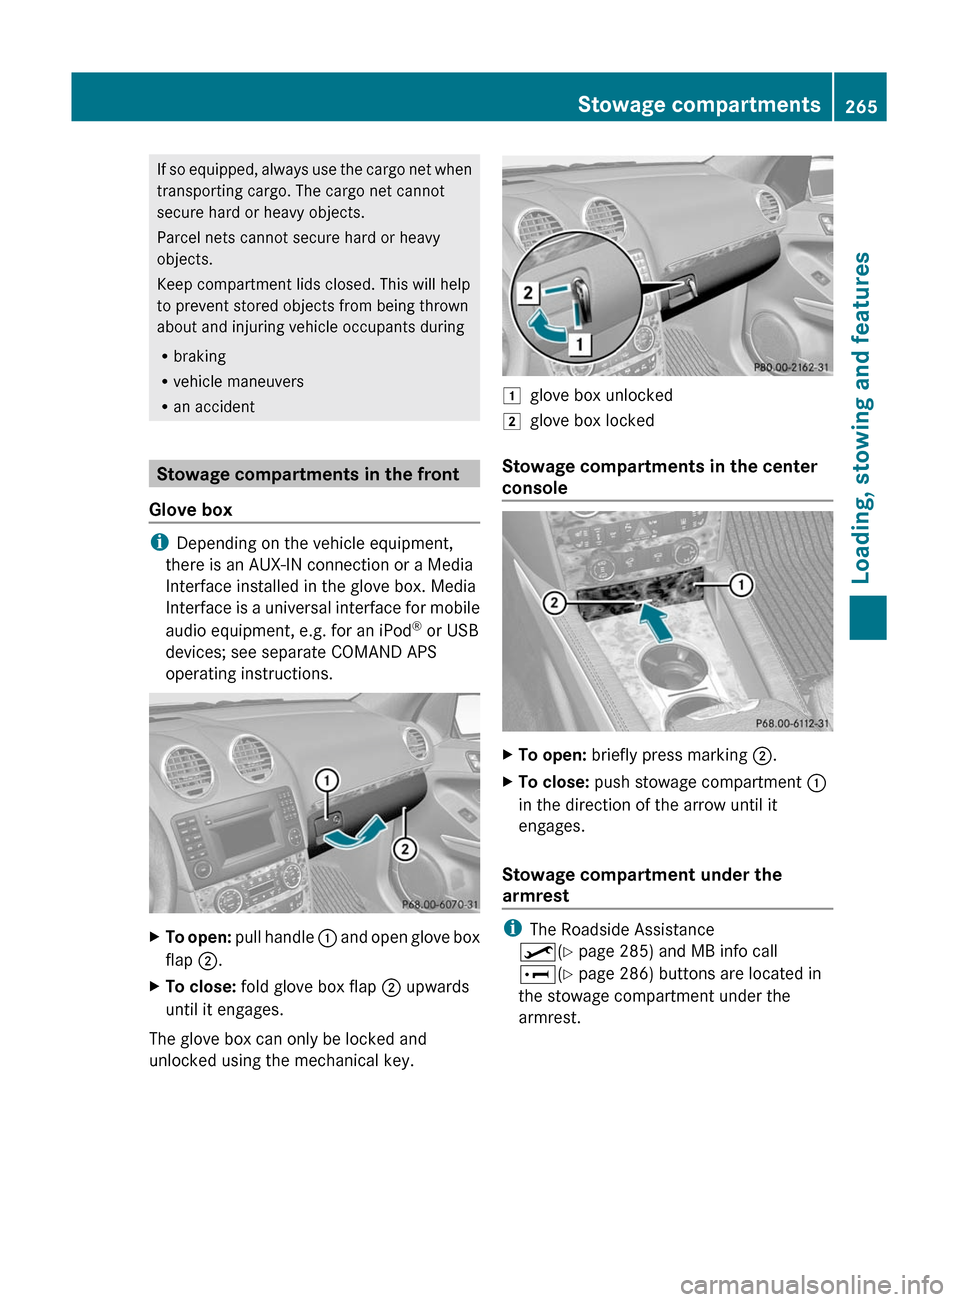
XTo open: pull handle : and open glove box
flap ;.XTo close: fold glove box flap ; upwards
until it engages.
The glove box can only be locked and
unlocked using the mechanical key.
1glove box unlocked2glove box locked
Stowage compartments in the center
console
XTo open: briefly press marking ;.XTo close: push stowage compartment :
in the direction of the arrow until it
engages.
Stowage compartment under the
armrest
i The Roadside Assistance
º (Y page 285) and MB info call
E (Y page 286) buttons are located in
the stowage compartment under the
armrest.
Stowage compartments265Loading, stowing and featuresBA 164.8 USA, CA Edition B 2011; 1; 2, en-USd2sboikeVersion: 3.0.3.52010-04-21T15:08:44+02:00 - Seite 265Z
Page 268 of 376
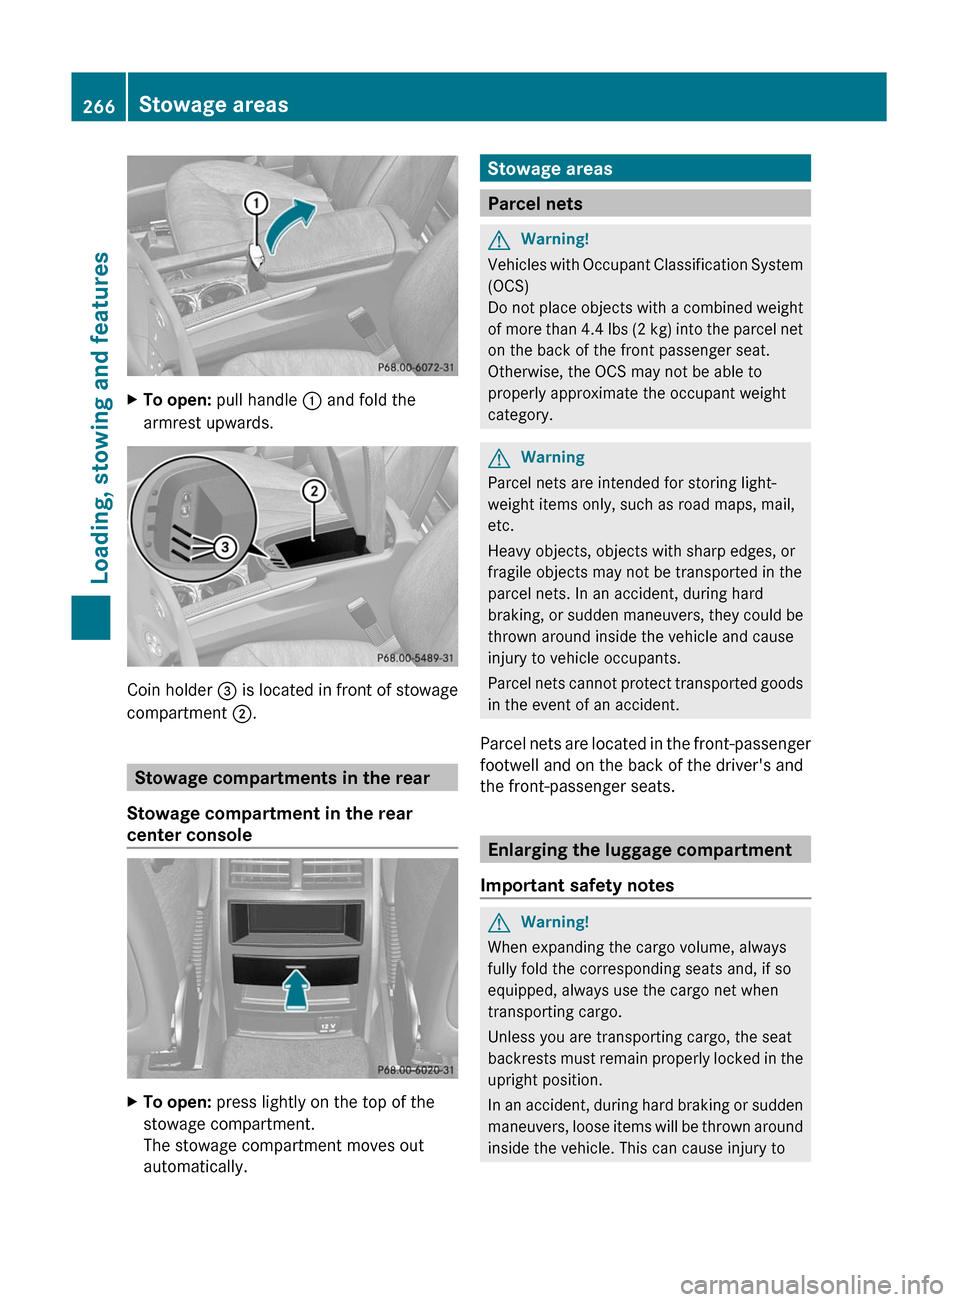
XTo open: pull handle : and fold the
armrest upwards.
Coin holder = is located in front of stowage
compartment ;.
Stowage compartments in the rear
Stowage compartment in the rear
center console
XTo open: press lightly on the top of the
stowage compartment.
The stowage compartment moves out
automatically.Stowage areas
Parcel nets
GWarning!
Vehicles with Occupant Classification System
(OCS)
Do not place objects with a combined weight
of more than 4.4 lbs (2 kg) into the parcel net
on the back of the front passenger seat.
Otherwise, the OCS may not be able to
properly approximate the occupant weight
category.
GWarning
Parcel nets are intended for storing light-
weight items only, such as road maps, mail,
etc.
Heavy objects, objects with sharp edges, or
fragile objects may not be transported in the
parcel nets. In an accident, during hard
braking, or sudden maneuvers, they could be
thrown around inside the vehicle and cause
injury to vehicle occupants.
Parcel nets cannot protect transported goods
in the event of an accident.
Parcel nets are located in the front-passenger
footwell and on the back of the driver's and
the front-passenger seats.
Enlarging the luggage compartment
Important safety notes
GWarning!
When expanding the cargo volume, always
fully fold the corresponding seats and, if so
equipped, always use the cargo net when
transporting cargo.
Unless you are transporting cargo, the seat
backrests must remain properly locked in the
upright position.
In an accident, during hard braking or sudden
maneuvers, loose items will be thrown around
inside the vehicle. This can cause injury to
266Stowage areasLoading, stowing and features
BA 164.8 USA, CA Edition B 2011; 1; 2, en-USd2sboikeVersion: 3.0.3.52010-04-21T15:08:44+02:00 - Seite 266
Page 279 of 376
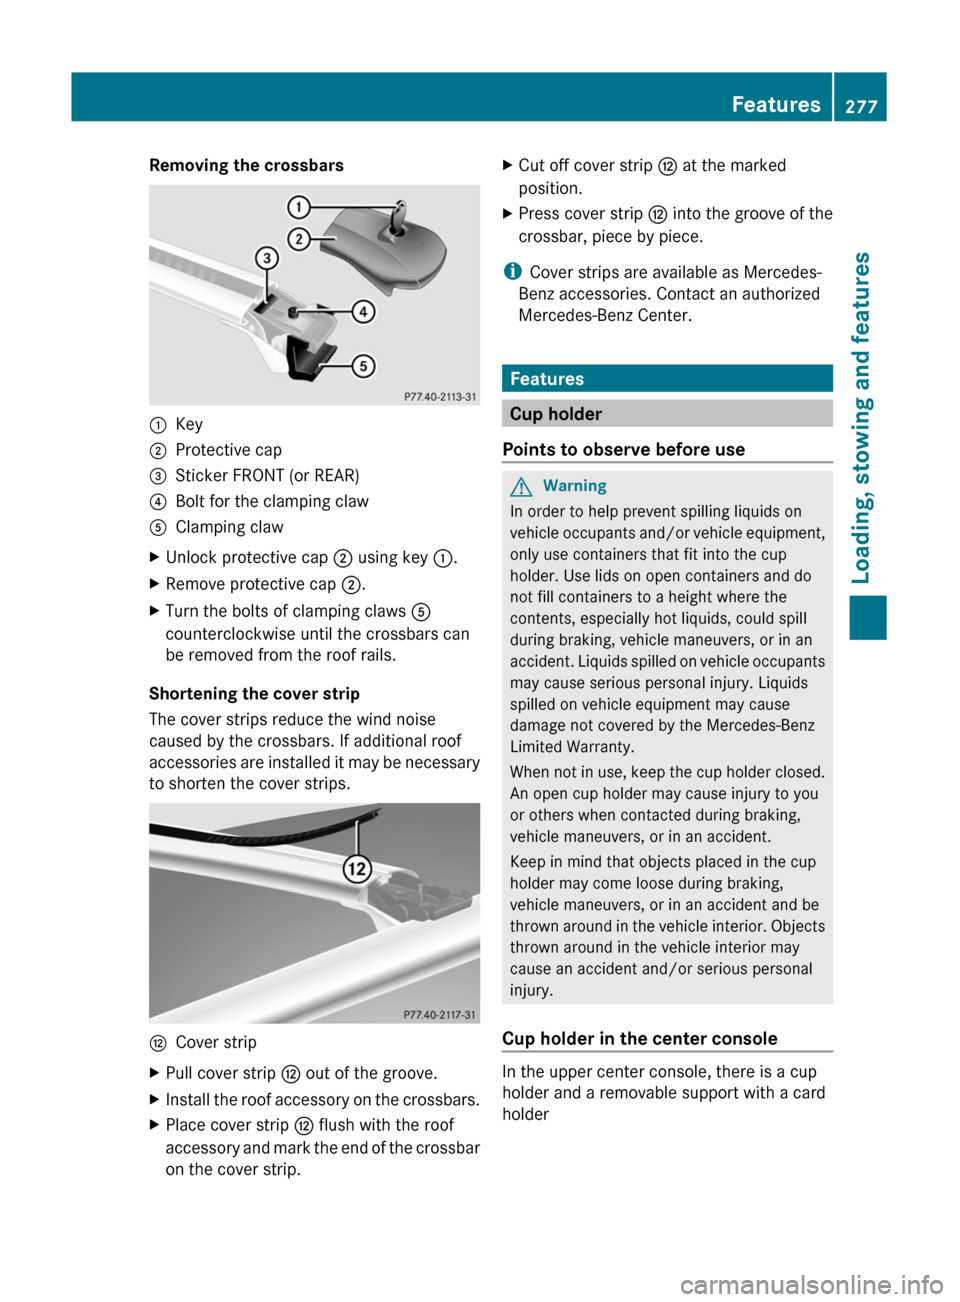
Removing the crossbars:Key;Protective cap=Sticker FRONT (or REAR)?Bolt for the clamping clawAClamping clawXUnlock protective cap ; using key :.XRemove protective cap ;.XTurn the bolts of clamping claws A
counterclockwise until the crossbars can
be removed from the roof rails.
Shortening the cover strip
The cover strips reduce the wind noise
caused by the crossbars. If additional roof
accessories are installed it may be necessary
to shorten the cover strips.
HCover stripXPull cover strip H out of the groove.XInstall the roof accessory on the crossbars.XPlace cover strip H flush with the roof
accessory and mark the end of the crossbar
on the cover strip.XCut off cover strip H at the marked
position.XPress cover strip H into the groove of the
crossbar, piece by piece.
i Cover strips are available as Mercedes-
Benz accessories. Contact an authorized
Mercedes-Benz Center.
Features
Cup holder
Points to observe before use
GWarning
In order to help prevent spilling liquids on
vehicle occupants and/or vehicle equipment,
only use containers that fit into the cup
holder. Use lids on open containers and do
not fill containers to a height where the
contents, especially hot liquids, could spill
during braking, vehicle maneuvers, or in an
accident. Liquids spilled on vehicle occupants
may cause serious personal injury. Liquids
spilled on vehicle equipment may cause
damage not covered by the Mercedes-Benz
Limited Warranty.
When not in use, keep the cup holder closed.
An open cup holder may cause injury to you
or others when contacted during braking,
vehicle maneuvers, or in an accident.
Keep in mind that objects placed in the cup
holder may come loose during braking,
vehicle maneuvers, or in an accident and be
thrown around in the vehicle interior. Objects
thrown around in the vehicle interior may
cause an accident and/or serious personal
injury.
Cup holder in the center console
In the upper center console, there is a cup
holder and a removable support with a card
holder
Features277Loading, stowing and featuresBA 164.8 USA, CA Edition B 2011; 1; 2, en-USd2sboikeVersion: 3.0.3.52010-04-21T15:08:44+02:00 - Seite 277Z
Page 282 of 376
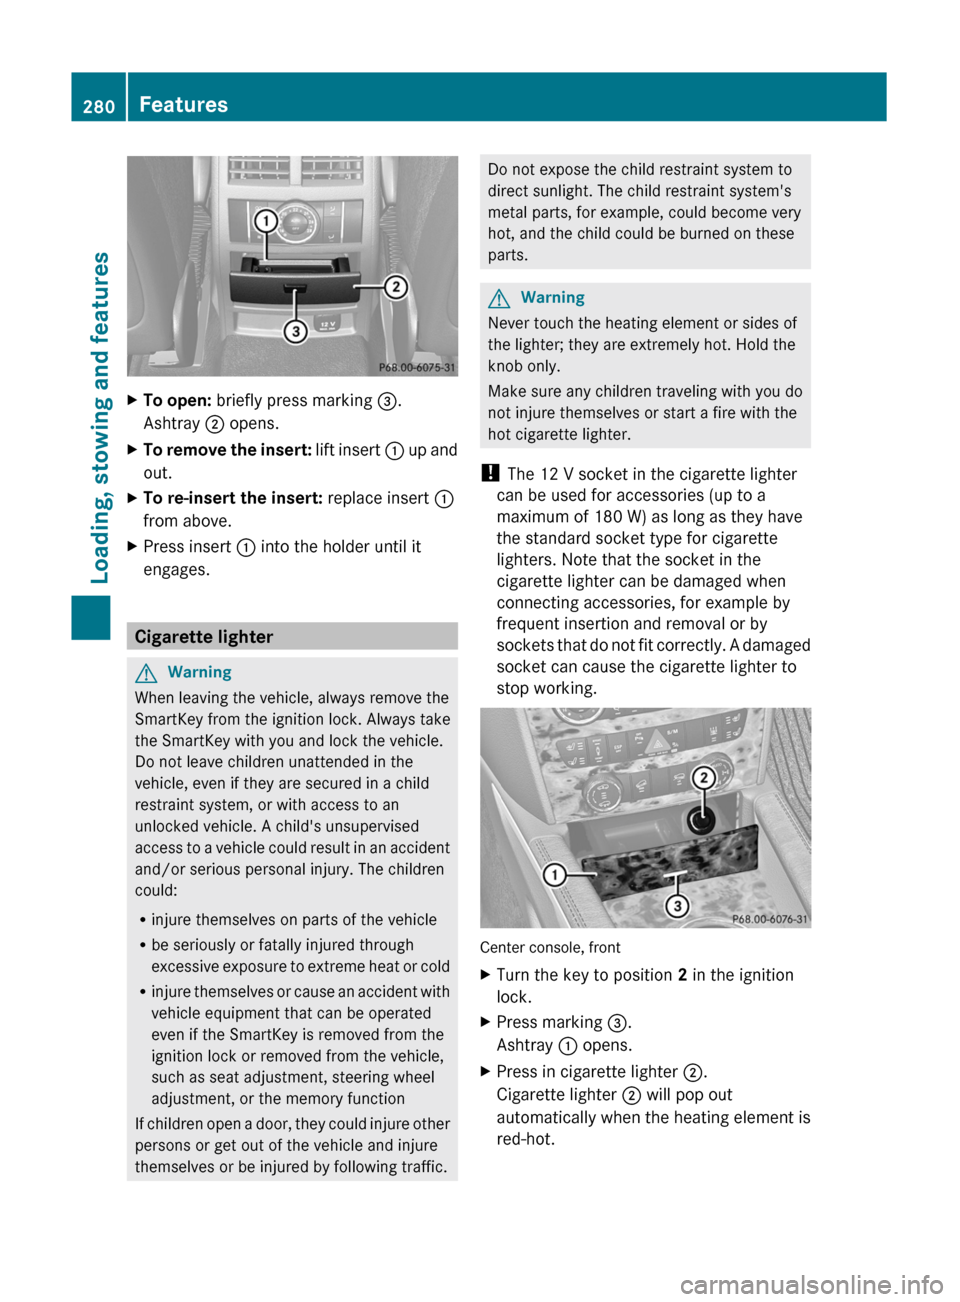
XTo open: briefly press marking =.
Ashtray ; opens.XTo remove the insert: lift insert : up and
out.XTo re-insert the insert: replace insert :
from above.XPress insert : into the holder until it
engages.
Cigarette lighter
GWarning
When leaving the vehicle, always remove the
SmartKey from the ignition lock. Always take
the SmartKey with you and lock the vehicle.
Do not leave children unattended in the
vehicle, even if they are secured in a child
restraint system, or with access to an
unlocked vehicle. A child's unsupervised
access to a vehicle could result in an accident
and/or serious personal injury. The children
could:
R injure themselves on parts of the vehicle
R be seriously or fatally injured through
excessive exposure to extreme heat or cold
R injure themselves or cause an accident with
vehicle equipment that can be operated
even if the SmartKey is removed from the
ignition lock or removed from the vehicle,
such as seat adjustment, steering wheel
adjustment, or the memory function
If children open a door, they could injure other
persons or get out of the vehicle and injure
themselves or be injured by following traffic.
Do not expose the child restraint system to
direct sunlight. The child restraint system's
metal parts, for example, could become very
hot, and the child could be burned on these
parts.GWarning
Never touch the heating element or sides of
the lighter; they are extremely hot. Hold the
knob only.
Make sure any children traveling with you do
not injure themselves or start a fire with the
hot cigarette lighter.
! The 12 V socket in the cigarette lighter
can be used for accessories (up to a
maximum of 180 W) as long as they have
the standard socket type for cigarette
lighters. Note that the socket in the
cigarette lighter can be damaged when
connecting accessories, for example by
frequent insertion and removal or by
sockets that do not fit correctly. A damaged
socket can cause the cigarette lighter to
stop working.
Center console, front
XTurn the key to position 2 in the ignition
lock.XPress marking =.
Ashtray : opens.XPress in cigarette lighter ;.
Cigarette lighter ; will pop out
automatically when the heating element is
red-hot.280FeaturesLoading, stowing and features
BA 164.8 USA, CA Edition B 2011; 1; 2, en-USd2sboikeVersion: 3.0.3.52010-04-21T15:08:44+02:00 - Seite 280
Page 284 of 376
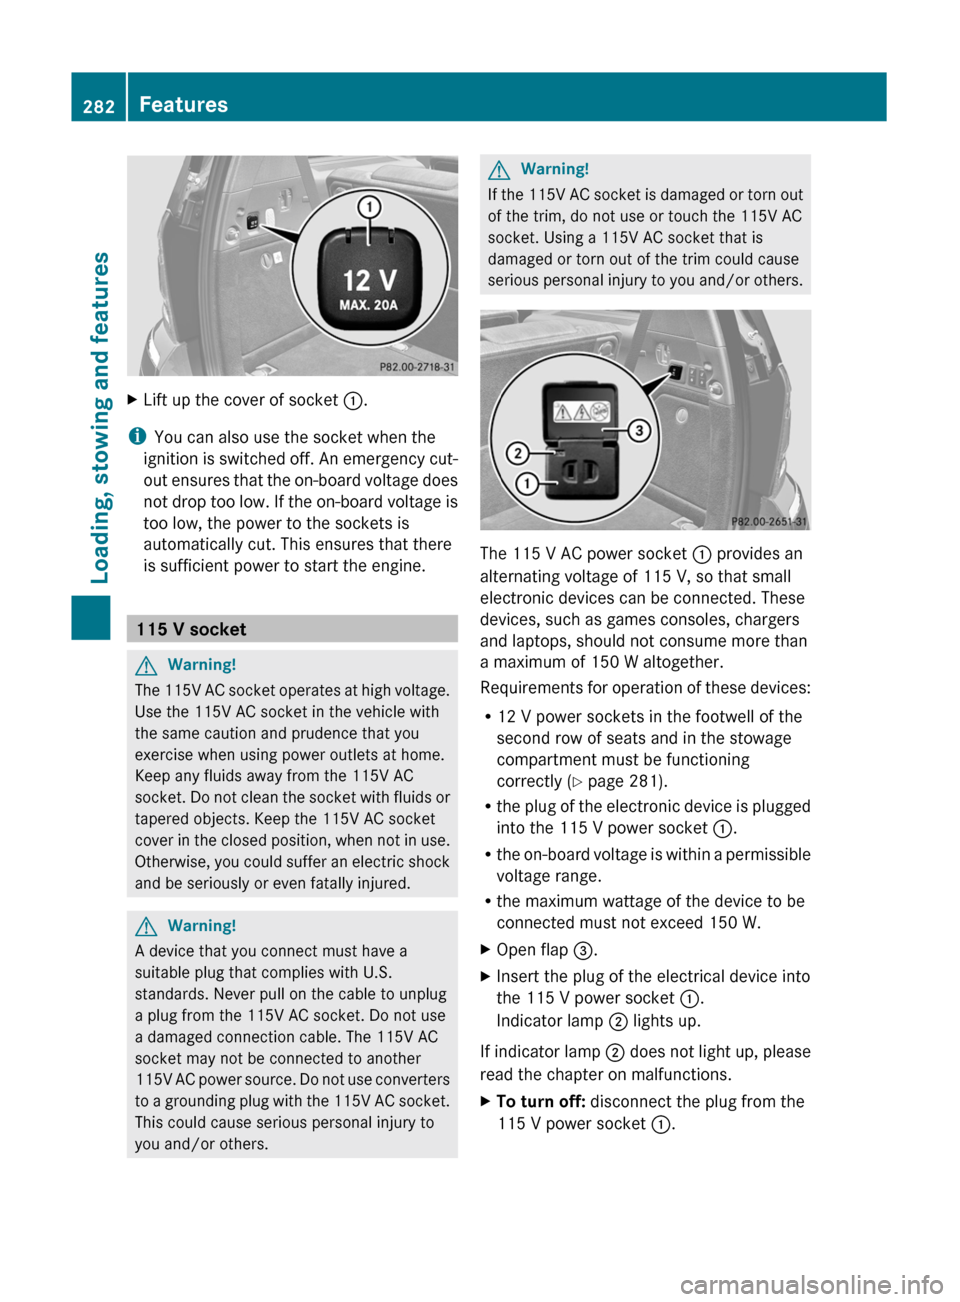
XLift up the cover of socket :.
i
You can also use the socket when the
ignition is switched off. An emergency cut-
out ensures that the on-board voltage does
not drop too low. If the on-board voltage is
too low, the power to the sockets is
automatically cut. This ensures that there
is sufficient power to start the engine.
115 V socket
GWarning!
The 115V AC socket operates at high voltage.
Use the 115V AC socket in the vehicle with
the same caution and prudence that you
exercise when using power outlets at home.
Keep any fluids away from the 115V AC
socket. Do not clean the socket with fluids or
tapered objects. Keep the 115V AC socket
cover in the closed position, when not in use.
Otherwise, you could suffer an electric shock
and be seriously or even fatally injured.
GWarning!
A device that you connect must have a
suitable plug that complies with U.S.
standards. Never pull on the cable to unplug
a plug from the 115V AC socket. Do not use
a damaged connection cable. The 115V AC
socket may not be connected to another
115V AC power source. Do not use converters
to a grounding plug with the 115V AC socket.
This could cause serious personal injury to
you and/or others.
GWarning!
If the 115V AC socket is damaged or torn out
of the trim, do not use or touch the 115V AC
socket. Using a 115V AC socket that is
damaged or torn out of the trim could cause
serious personal injury to you and/or others.
The 115 V AC power socket : provides an
alternating voltage of 115 V, so that small
electronic devices can be connected. These
devices, such as games consoles, chargers
and laptops, should not consume more than
a maximum of 150 W altogether.
Requirements for operation of these devices:
R 12 V power sockets in the footwell of the
second row of seats and in the stowage
compartment must be functioning
correctly ( Y page 281).
R the plug of the electronic device is plugged
into the 115 V power socket :.
R the on-board voltage is within a permissible
voltage range.
R the maximum wattage of the device to be
connected must not exceed 150 W.
XOpen flap =.XInsert the plug of the electrical device into
the 115 V power socket :.
Indicator lamp ; lights up.
If indicator lamp ; does not light up, please
read the chapter on malfunctions.
XTo turn off: disconnect the plug from the
115 V power socket :.282FeaturesLoading, stowing and features
BA 164.8 USA, CA Edition B 2011; 1; 2, en-USd2sboikeVersion: 3.0.3.52010-04-21T15:08:44+02:00 - Seite 282