2011 MERCEDES-BENZ GL350 BlueTEC driver seat adjustment
[x] Cancel search: driver seat adjustmentPage 16 of 376

Emergency Tensioning Devices ........ 57
Fastening ......................................... 55
Important safety guidelines .............53
Releasing ......................................... 57
Safety guidelines ............................. 37
Switching belt adjustment on/off
(on-board computer) ......................225
Warning lamp ................................. 255
Warning lamp (function) ................... 57
Seat heating
Indicator lamp (Malfunction) ..........105
Seats
Adjusting (electrically) .....................96
Adjusting (second and third rows) . 100
Adjusting the 4-way lumbar
support .......................................... 104
Adjusting the head restraint ............97
Cleaning the cover .........................304
Correct driver's seat position ........... 94
Important safety instructions ...........95
Multicontour seat .......................... 103
Storing settings (memory
function) ........................................ 110
Switching seat heating on/off .......104
Switching the seat ventilation on/
off .................................................. 105
Seat ventilation
Indicator lamp (Malfunction) ..........105
Securing hooks .................................. 268
Sensors (cleaning instructions) ....... 303
Service indicator see Service interval display
Service interval display .................... 298
Displaying a service message (on-
board computer) ............................ 299
Service products
AdBlue ®
special additives ..............367
Brake fluid ..................................... 369
Coolant (engine) ............................ 369
Engine oil ....................................... 368
Filling capacity ............................... 365
Fuel ................................................ 366
Important safety notes ..................364
Notes ............................................. 364
Refrigerant (air-conditioning
system) .......................................... 369
Washer fluid ................................... 370Settings
Factory (on-board computer) .........221
On-board computer .......................221
Shift ranges ....................................... 155
Side impact air bag ............................. 41
Side marker lamp (display
message) ............................................ 239
Side windows Convenience closing feature ............87
Convenience opening feature ..........86
Hinged side windows .......................86
Important safety information ...........84
Opening/closing .............................. 85
Resetting ......................................... 87
Troubleshooting ............................... 88
Sliding sunroof
Important safety information ...........88
Troubleshooting ............................... 90
see Tilt/sliding sunroof
SmartKey
Changing the battery .......................76
Changing the programming .............75
Checking the battery .......................76
Important safety notes ....................72
Malfunction ...................................... 77
Snow chains ...................................... 172
Socket ................................................ 281
Dashboard ..................................... 281
Front-passenger footwell ...............281
Luggage compartment ...................281
Rear compartment .........................281
SOS
see mbrace
Spare wheel
Notes/data .................................... 359
Storage location ............................ 311
see Emergency spare wheel
Speedometer
Additional speedometer (on-
board computer) ............................ 218
Segments ...................................... 215
Setting the unit (on-board
computer) ...................................... 221
SRS (Supplemental Restraint
System) Display message ............................ 231
Introduction ..................................... 3614IndexBA 164.8 USA, CA Edition B 2011; 1; 2, en-USd2sboikeVersion: 3.0.3.52010-04-21T15:08:44+02:00 - Seite 14
Page 54 of 376
of having to swerve to avoid an obstacle at
a speed above 85 mph (140 km/h).
PRE-SAFE ®
takes the following measures
depending on the hazardous situation
detected:
R the front seat belts are pre-tensioned.
R on vehicles with memory functions: the
front-passenger seat is adjusted if it is in an
unfavorable position under accident
conditions.
R if the vehicle skids, the side windows are
closed so that only a small gap remains.
R on vehicles with sliding sunroof: if the
vehicle skids, the sliding sunroof closes so
that only a small gap remains.
If the hazardous situation passes without
resulting in an accident, PRE-SAFE ®
slackens
the belt pretensioning. All settings made by
PRE-SAFE ®
can then be reversed.
If the seat belts are not released:XMove the backrest or the seat back slightly
until the belt pretensioning is reduced.
The locking mechanism releases.GWarning
Make sure that nobody can become trapped
as you adjust the seat.
! Make sure that there are no objects in the
footwell or behind the seats when resetting
the seats. There is a risk that the seats
and/or the objects could be damaged.
More information about belt adjustment, a
convenience function integrated into PRE-
SAFE ®
, can be found in the "Belt adjustment"
section ( Y page 56).
NECK-PRO head restraints
The NECK-PRO head restraints increase
protection to the driver's and front-
passenger's head and neck. To this end, the
head restraints on the driver's and front-
passenger seats are moved forwards and
upwards in the event of a rear-end collision of
a certain severity. This provides better head
support.GWarning
Do not secure any objects (e.g. coat hangers)
on the NECK-PRO head restraints. Otherwise,
the NECK-PRO head restraints may not
function properly, or in the event of a rear-end
collision may not be able offer the level of
protection they are designed to provide.
If the NECK-PRO head restraints have been
triggered in an accident, you must reset the
NECK-PRO head restraints on the driver’s and
front-passenger seat ( Y page 52).
Otherwise, the additional protection will not
be available in the event of another rear-end
collision. You can recognize when NECK-PRO
head restraints have been triggered by the
fact that they have moved forwards and can
no longer be adjusted.
Resetting triggered NECK-PRO head
restraints
Important safety information
GWarning
For reasons of safety, have the NECK-PRO
head restraints/NECK-PRO luxury head
restraints checked at a Mercedes-Benz
Service Center after a rear-end collision.
GWarning
If you press the NECK-PRO head restraint
cushion backwards, make sure that your
fingers are not trapped between the cushion
and the cover. Failure to observe could result
in injuries.
NECK-PRO head restraints
i Resetting the NECK-PRO head restraints
requires a certain amount of strength. If
you have difficulty resetting the NECK-PRO
head restraints, have this work carried out
at a qualified specialist workshop, e.g. an
authorized Mercedes-Benz Center.
52Occupant safetySafety
BA 164.8 USA, CA Edition B 2011; 1; 2, en-USd2sboikeVersion: 3.0.3.52010-04-21T15:08:44+02:00 - Seite 52
Page 58 of 376

XAdjust the seat and move the backrest to
an almost vertical position ( Y page 94).XPull the seat belt smoothly through belt
sash guide :.XWithout twisting it, place the shoulder
section of the seat belt over the center of
the shoulder and the lap section across the
hips.XEngage belt tongue ; in buckle =.
Seat belt adjustment: if necessary, the
driver's and front-passenger seat belts
automatically adjust to the upper body
( Y page 56).XIf necessary, adjust the seat belt to the
appropriate height ( Y page 56).XIf necessary, pull upwards on the shoulder
section of the seat belt to tighten the belt
across your body.
All seat belts in the vehicle, except the
driver's seat belt, are equipped with a special
seat belt retractor to secure child restraint
systems properly. For further information on
"Special seat belt retractors", see
( Y page 61).
For more information about releasing the seat
belt with release button ?, see "Releasing
seat belts" ( Y page 57).
Seat belt adjustment
The belt adjustment function adjusts the
driver's and front-passenger seat belt to the
upper body of the occupants. The belt strap
is tightened slightly when:
R you engage the belt tongue in the belt
buckle and you then turn the SmartKey to
position 2 in the ignition lock.
R the SmartKey is in position 2 in the ignition
lock and you then engage the belt tongue
in the buckle.
The seat-belt adjustment will apply a certain
tightening force if any slack is detected
between the occupant and the seat belt. Do
not hold on to the seat belt tightly while it is
adjusting. You can switch the belt adjustment
on and off in the on-board computer
( Y page 225).
Seat belt outlet height adjustment
You can adjust the seat belt height on the
driver's seat and the front-passenger seat.
Adjust the belt to a height that allows the
upper part of the seat belt to be routed across
the center of your shoulder.
XTo raise: slide the belt sash guide upwards.
The belt sash guide engages in various
positions.XTo lower: press and hold belt sash guide
release :.56Occupant safetySafety
BA 164.8 USA, CA Edition B 2011; 1; 2, en-USd2sboikeVersion: 3.0.3.52010-04-21T15:08:44+02:00 - Seite 56
Page 74 of 376

Vehicle equipment
i This manual describes all the standard
and optional equipment of your vehicle
which was available at the time of
purchase. Country-specific differences are
possible. Bear in mind that your vehicle
may not feature all functions described
here. This also refers to safety-related
systems and functions.
SmartKey
Important safety notes
GWarning!
When leaving the vehicle, always remove the
SmartKey from the starter switch. Always
take the SmartKey with you and lock the
vehicle. Do not leave children unattended in
the vehicle, even if they are secured in a child
restraint system, or with access to an
unlocked vehicle. A child's unsupervised
access to a vehicle could result in an accident
and/or serious personal injury. The children
could
R injure themselves on parts of the vehicle
R be seriously or fatally injured through
excessive exposure to extreme heat or cold
R injure themselves or cause an accident with
vehicle equipment that can be operated
even if the SmartKey is removed from the
starter switch or removed from the vehicle,
such as seat adjustment, steering wheel
adjustment, or the memory function
If children open a door, they could injure other
persons or get out of the vehicle and injure
themselves or be injured by following traffic.
Do not expose the child restraint system to
direct sunlight. The child restraint system's
metal parts, for example, could become very
hot, and the child could be burned by these
parts.
GWarning!
Do not carry heavy or hard objects in the
passenger compartment or cargo
compartment unless they are firmly secured
in place.
Unsecured or improperly positioned cargo
increases a child’s risk of injury in the event
of
R strong braking maneuvers
R sudden changes of direction
R an accident
General information
If you cannot open or lock the vehicle with the
SmartKey, either the battery in the SmartKey
is empty, the SmartKey is faulty, or the vehicle
battery is discharged.
XCheck the battery in the SmartKey and
replace it if necessary ( Y page 76).XUnlock the driver's door using the
mechanical key ( Y page 75).XLock the vehicle using the mechanical key
( Y page 75).XHave the vehicle battery and battery
contacts checked by an authorized
Mercedes-Benz Center.
If the SmartKey is faulty, contact Roadside
Assistance or an authorized Mercedes-Benz
Center.
SmartKey functions
General notes
i USA only:
This device complies with Part 15 of the
FCC regulations. Operation is subject to
the following conditions:
1. This device must not cause any harmful
interference, and
2. This device must be able to
accommodate interference that is
72SmartKeyOpening and closing
BA 164.8 USA, CA Edition B 2011; 1; 2, en-USd2sboikeVersion: 3.0.3.52010-04-21T15:08:44+02:00 - Seite 72
Page 82 of 376
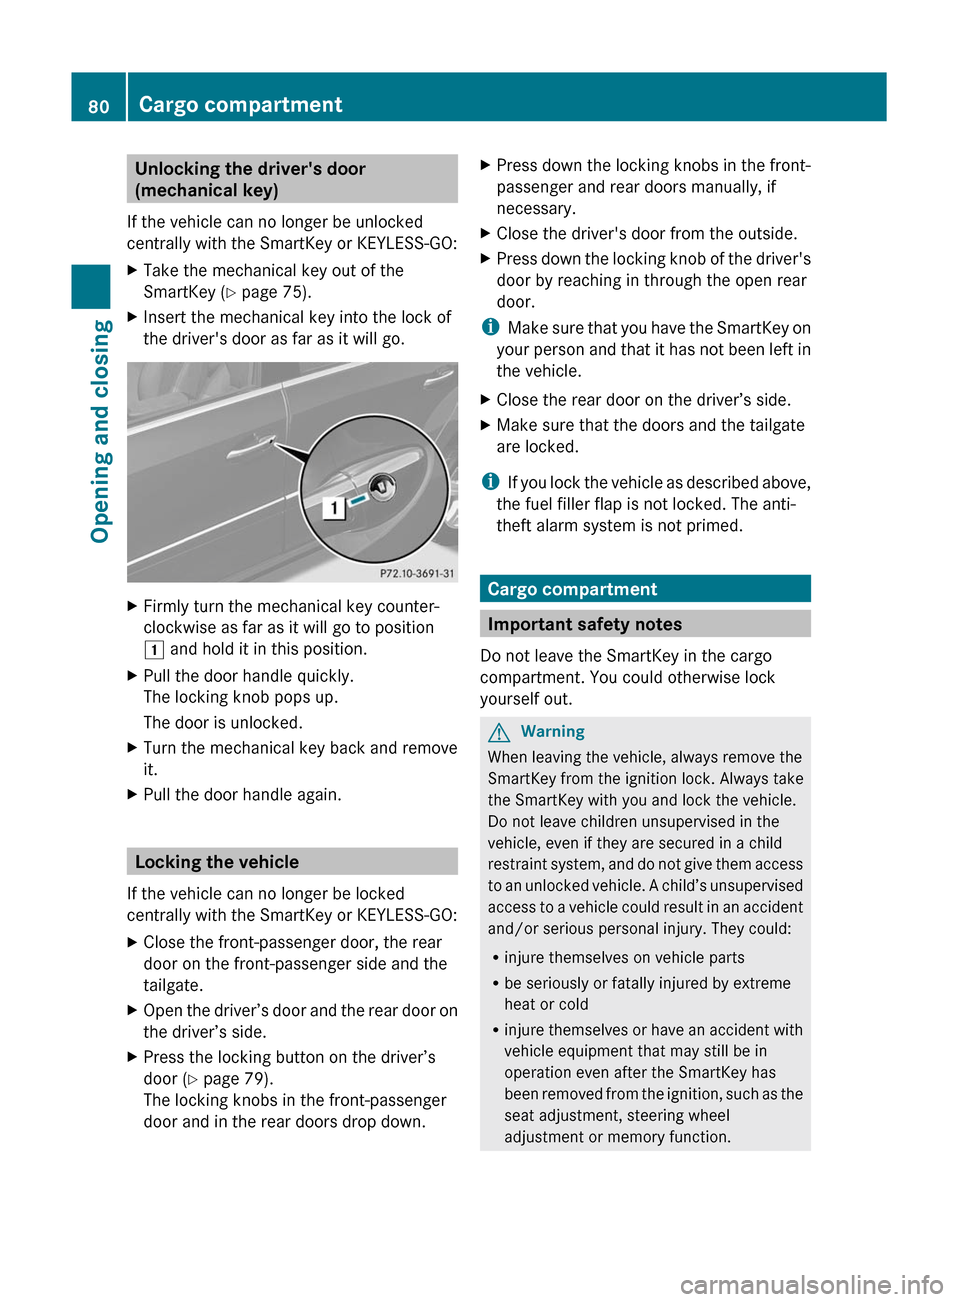
Unlocking the driver's door
(mechanical key)
If the vehicle can no longer be unlocked
centrally with the SmartKey or KEYLESS-GO:XTake the mechanical key out of the
SmartKey ( Y page 75).XInsert the mechanical key into the lock of
the driver's door as far as it will go.XFirmly turn the mechanical key counter-
clockwise as far as it will go to position
1 and hold it in this position.XPull the door handle quickly.
The locking knob pops up.
The door is unlocked.XTurn the mechanical key back and remove
it.XPull the door handle again.
Locking the vehicle
If the vehicle can no longer be locked
centrally with the SmartKey or KEYLESS-GO:
XClose the front-passenger door, the rear
door on the front-passenger side and the
tailgate.XOpen the driver’s door and the rear door on
the driver’s side.XPress the locking button on the driver’s
door ( Y page 79).
The locking knobs in the front-passenger
door and in the rear doors drop down.XPress down the locking knobs in the front-
passenger and rear doors manually, if
necessary.XClose the driver's door from the outside.XPress down the locking knob of the driver's
door by reaching in through the open rear
door.
i Make sure that you have the SmartKey on
your person and that it has not been left in
the vehicle.
XClose the rear door on the driver’s side.XMake sure that the doors and the tailgate
are locked.
i If you lock the vehicle as described above,
the fuel filler flap is not locked. The anti-
theft alarm system is not primed.
Cargo compartment
Important safety notes
Do not leave the SmartKey in the cargo
compartment. You could otherwise lock
yourself out.
GWarning
When leaving the vehicle, always remove the
SmartKey from the ignition lock. Always take
the SmartKey with you and lock the vehicle.
Do not leave children unsupervised in the
vehicle, even if they are secured in a child
restraint system, and do not give them access
to an unlocked vehicle. A child’s unsupervised
access to a vehicle could result in an accident
and/or serious personal injury. They could:
R injure themselves on vehicle parts
R be seriously or fatally injured by extreme
heat or cold
R injure themselves or have an accident with
vehicle equipment that may still be in
operation even after the SmartKey has
been removed from the ignition, such as the
seat adjustment, steering wheel
adjustment or memory function.
80Cargo compartmentOpening and closing
BA 164.8 USA, CA Edition B 2011; 1; 2, en-USd2sboikeVersion: 3.0.3.52010-04-21T15:08:44+02:00 - Seite 80
Page 96 of 376
Vehicle equipment
i This manual describes all the standard
and optional equipment of your vehicle
which was available at the time of
purchase. Country-specific differences are
possible. Bear in mind that your vehicle
may not feature all functions described
here. This also refers to safety-related
systems and functions.
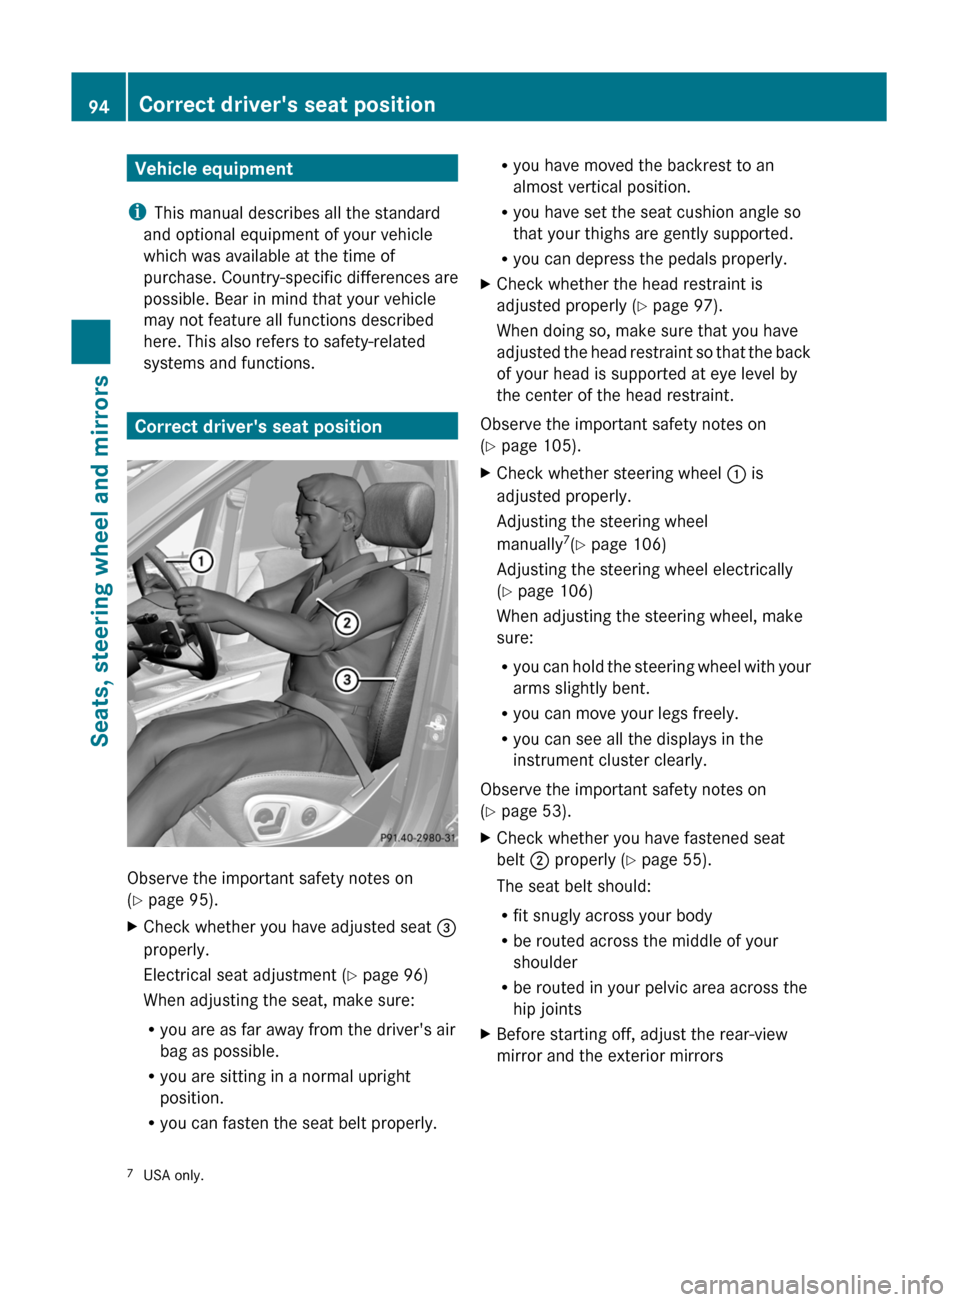
Correct driver's seat position
Observe the important safety notes on
( Y page 95).
XCheck whether you have adjusted seat =
properly.
Electrical seat adjustment ( Y page 96)
When adjusting the seat, make sure:
R you are as far away from the driver's air
bag as possible.
R you are sitting in a normal upright
position.
R you can fasten the seat belt properly.Ryou have moved the backrest to an
almost vertical position.
R you have set the seat cushion angle so
that your thighs are gently supported.
R you can depress the pedals properly.XCheck whether the head restraint is
adjusted properly ( Y page 97).
When doing so, make sure that you have
adjusted the head restraint so that the back
of your head is supported at eye level by
the center of the head restraint.
Observe the important safety notes on
( Y page 105).
XCheck whether steering wheel : is
adjusted properly.
Adjusting the steering wheel
manually 7
(Y page 106)
Adjusting the steering wheel electrically
( Y page 106)
When adjusting the steering wheel, make
sure:
R you can hold the steering wheel with your
arms slightly bent.
R you can move your legs freely.
R you can see all the displays in the
instrument cluster clearly.
Observe the important safety notes on
( Y page 53).
XCheck whether you have fastened seat
belt ; properly ( Y page 55).
The seat belt should:
R fit snugly across your body
R be routed across the middle of your
shoulder
R be routed in your pelvic area across the
hip jointsXBefore starting off, adjust the rear-view
mirror and the exterior mirrors7 USA only.94Correct driver's seat positionSeats, steering wheel and mirrors
BA 164.8 USA, CA Edition B 2011; 1; 2, en-USd2sboikeVersion: 3.0.3.52010-04-21T15:08:44+02:00 - Seite 94
Page 97 of 376
(Y page 108) in such a way that you have
a good view of road and traffic conditions.XVehicles with memory function: save the
seat, steering wheel and exterior mirror
settings ( Y page 110).
Seats
Important safety notes
GWarning
In order to avoid possible loss of vehicle
control, all seat, head restraint, steering
wheel and rear view mirror adjustments, as
well as fastening of seat belts, must be done
before setting the vehicle in motion.
GWarning
Do not adjust the driver's seat while driving.
Adjusting the seat while driving could cause
the driver to lose control of the vehicle.
Never travel in a moving vehicle with the seat
backrest in an excessively reclined position as
this can be dangerous. You could slide under
the seat belt in a collision. If you slide under
it, the seat belt would apply force at the
abdomen or neck. This could cause serious or
fatal injuries. The seat backrest and seat belts
provide the best restraint when the wearer is
in a position that is as upright as possible and
seat belts are properly positioned on the
body.
GWarning
Your seat belt must be adjusted so that you
can correctly fasten your seat belt.
Observe the following points:
R adjust the seat backrest until your arms are
slightly angled when holding the steering
wheel.
R adjust the seat to a comfortable seating
position that still allows you to reach the
accelerator/brake pedal safely. The
position should be as far back as possible
with the driver still able to operate the
controls properly.
R adjust the head restraint so that it is as
close to the head as possible and the center
of the head restraint supports the back of
the head at eye level.
R never place hands under the seat or near
any moving parts while a seat is being
adjusted.
Failure to do so could result in an accident
and/or serious personal injury.GWarning
The electrically adjustable seats can be
operated at any time. Therefore, do not leave
children unattended in the vehicle, or with
access to an unlocked vehicle. A child's
unsupervised access to a vehicle could result
in an accident and/or serious personal injury.
GWarning!
According to accident statistics, children are
safer when properly restrained in the rear
seating positions than in the front seating
position. Thus, we strongly recommend that
children be placed in the rear seats whenever
possible. Regardless of seating position,
children 12 years old and under must be
seated and properly secured in an
appropriately sized infant restraint, toddler
restraint, or booster seat recommended for
the size and weight of the child. For additional
information, see "Children in the vehicle".
A child's risk of serious or fatal injuries is
significantly increased if the child restraints
are not properly secured in the vehicle and/
or the child is not properly secured in the child
restraint.
GWarning
For your protection, drive only with properly
positioned head restraints.
Adjust the head restraint so that it is as close
to the head as possible and the center of the
head restraint supports the back of the head
at eye level. This will reduce the potential for
Seats95Seats, steering wheel and mirrorsBA 164.8 USA, CA Edition B 2011; 1; 2, en-USd2sboikeVersion: 3.0.3.52010-04-21T15:08:44+02:00 - Seite 95Z
Page 108 of 376
driving without the steering wheel adjustment
feature locked could cause the driver to lose
control of the vehicle.
The electrical steering wheel adjustment
feature can be operated at any time.
Therefore, do not leave children unattended
in the vehicle, or with access to an unlocked
vehicle. A child's unsupervised access to a
vehicle could result in an accident and/or
serious personal injury.
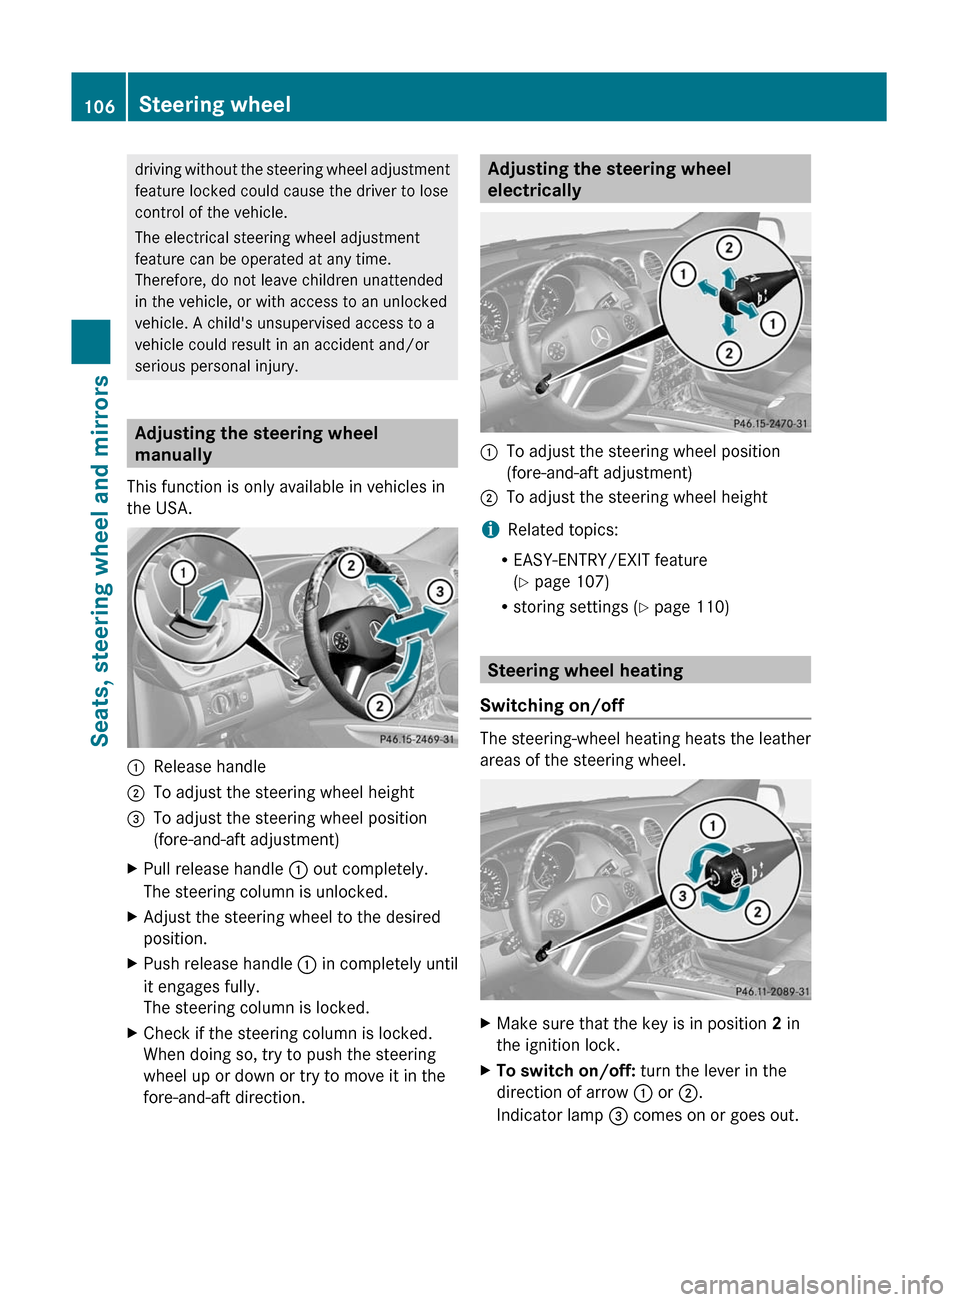
Adjusting the steering wheel
manually
This function is only available in vehicles in
the USA.
:Release handle;To adjust the steering wheel height=To adjust the steering wheel position
(fore-and-aft adjustment)XPull release handle : out completely.
The steering column is unlocked.XAdjust the steering wheel to the desired
position.XPush release handle : in completely until
it engages fully.
The steering column is locked.XCheck if the steering column is locked.
When doing so, try to push the steering
wheel up or down or try to move it in the
fore-and-aft direction.Adjusting the steering wheel
electrically:To adjust the steering wheel position
(fore-and-aft adjustment);To adjust the steering wheel height
i Related topics:
R EASY-ENTRY/EXIT feature
( Y page 107)
R storing settings ( Y page 110)
Steering wheel heating
Switching on/off
The steering-wheel heating heats the leather
areas of the steering wheel.
XMake sure that the key is in position 2 in
the ignition lock.XTo switch on/off: turn the lever in the
direction of arrow : or ;.
Indicator lamp = comes on or goes out.106Steering wheelSeats, steering wheel and mirrors
BA 164.8 USA, CA Edition B 2011; 1; 2, en-USd2sboikeVersion: 3.0.3.52010-04-21T15:08:44+02:00 - Seite 106