2011 MERCEDES-BENZ GL start stop button
[x] Cancel search: start stop buttonPage 255 of 376
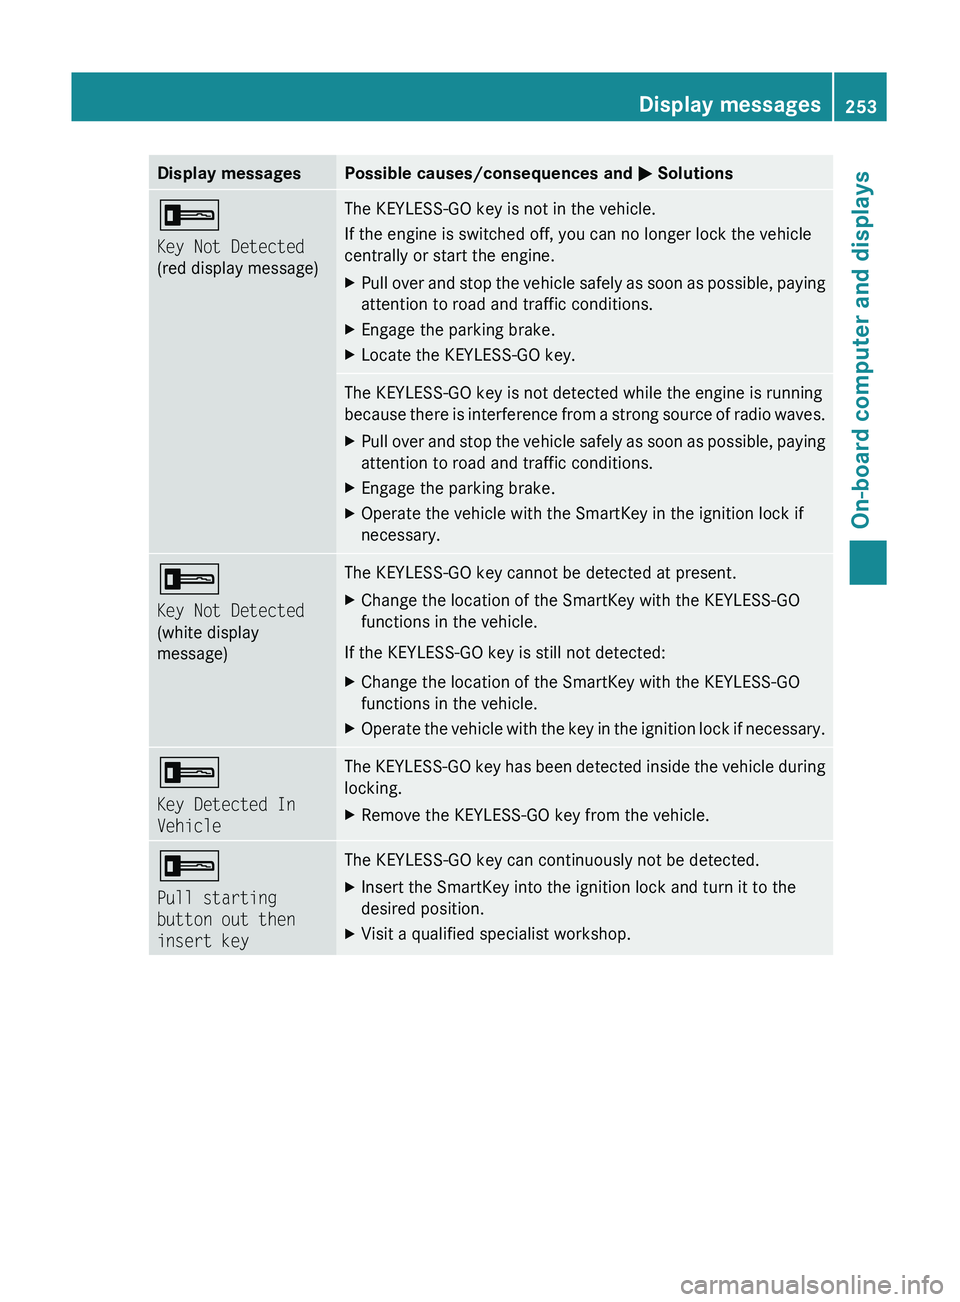
Display messagesPossible causes/consequences and M Solutions+
Key Not Detected
(red display message)The KEYLESS-GO key is not in the vehicle.
If the engine is switched off, you can no longer lock the vehicle
centrally or start the engine.XPull over and stop the vehicle safely as soon as possible, paying
attention to road and traffic conditions.XEngage the parking brake.XLocate the KEYLESS-GO key.The KEYLESS-GO key is not detected while the engine is running
because there is interference from a strong source of radio waves.XPull over and stop the vehicle safely as soon as possible, paying
attention to road and traffic conditions.XEngage the parking brake.XOperate the vehicle with the SmartKey in the ignition lock if
necessary.+
Key Not Detected
(white display
message)The KEYLESS-GO key cannot be detected at present.XChange the location of the SmartKey with the KEYLESS-GO
functions in the vehicle.
If the KEYLESS-GO key is still not detected:
XChange the location of the SmartKey with the KEYLESS-GO
functions in the vehicle.XOperate the vehicle with the key in the ignition lock if necessary.+
Key Detected In
VehicleThe KEYLESS-GO key has been detected inside the vehicle during
locking.XRemove the KEYLESS-GO key from the vehicle.+
Pull starting
button out then
insert keyThe KEYLESS-GO key can continuously not be detected.XInsert the SmartKey into the ignition lock and turn it to the
desired position.XVisit a qualified specialist workshop.Display messages253On-board computer and displaysBA 164.8 USA, CA Edition B 2011; 1; 2, en-USd2sboikeVersion: 3.0.3.52010-04-21T15:08:44+02:00 - Seite 253Z
Page 299 of 376
Further information on engine oil
( Y page 368).XReplace cap : on the filler neck and
tighten clockwise.
Ensure that the cap locks into place
securely.
Checking and adding other service
products
Checking the coolant level
Only check the coolant level when the vehicle
is on a level surface and the engine has cooled
down.
XTurn the SmartKey to position
2 (Y page 147) in the ignition lock.
On vehicles with KEYLESS-GO, press the
Start/Stop button twice ( Y page 147).XCheck the coolant temperature gauge in
the multifunction display.
The coolant temperature must be below
158 ‡ (70 †).GWarning
In order to avoid any potentially serious burns:
R use extreme caution when opening the
hood if there are any signs of steam or
coolant leaking from the cooling system, or
if the coolant temperature display indicates
that the coolant is overheated.
R do not remove the pressure cap on the
coolant reservoir if the coolant temperature
is above 158 ‡ (70 †). Allow the engine to
cool down before removing the cap. The
coolant reservoir contains hot fluid and is
under pressure.
R using a rag, slowly turn the cap
approximately 1
/ 2 turn to relieve excess
pressure. If opened immediately, scalding
hot fluid and steam will be blown out under
pressure.
R do not spill antifreeze on hot engine parts.
Antifreeze contains ethylene glycol which
may burn if it comes into contact with hot
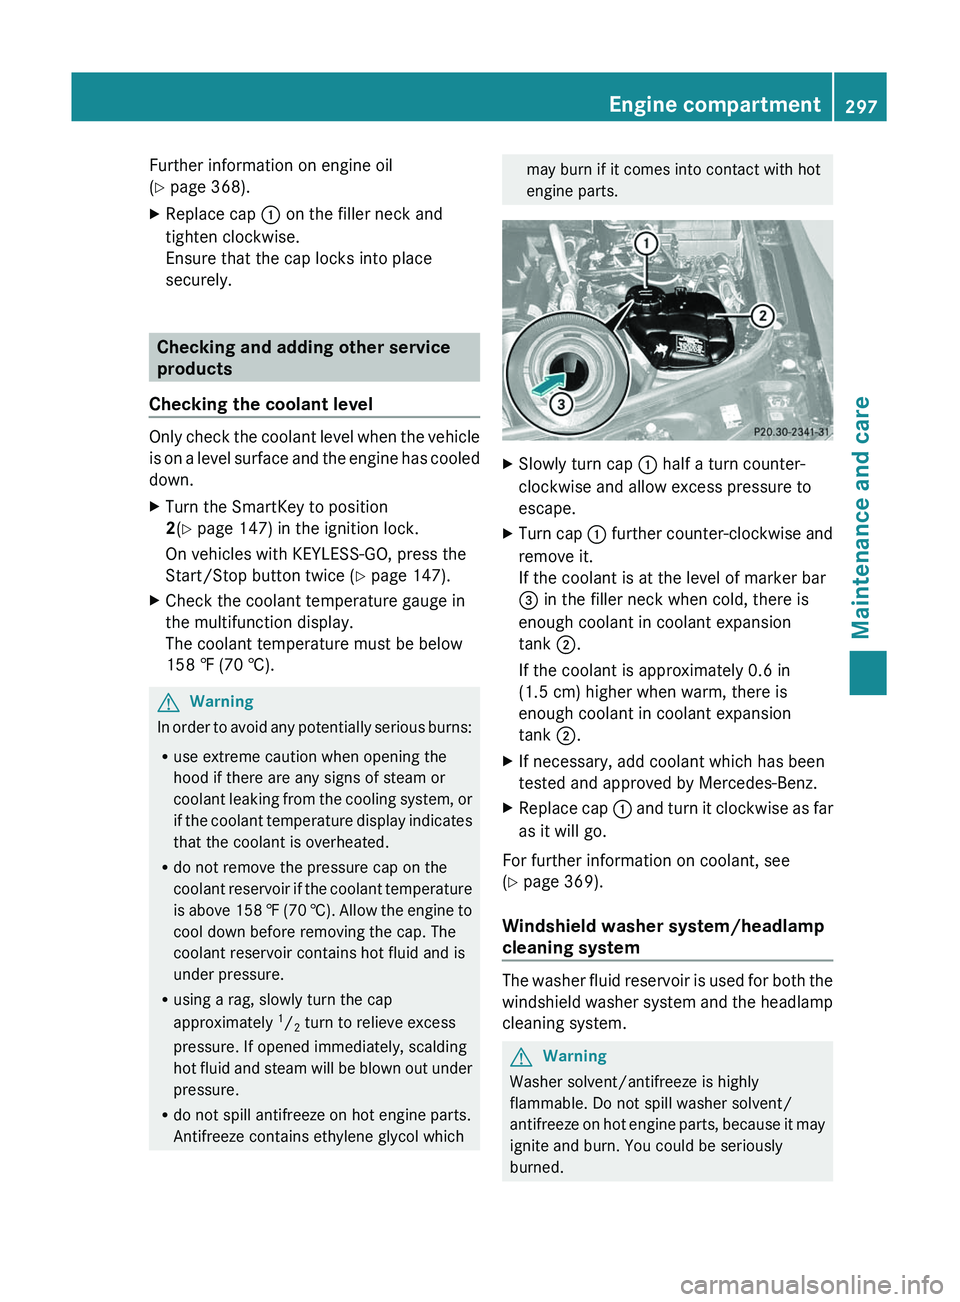
engine parts.XSlowly turn cap : half a turn counter-
clockwise and allow excess pressure to
escape.XTurn cap : further counter-clockwise and
remove it.
If the coolant is at the level of marker bar
= in the filler neck when cold, there is
enough coolant in coolant expansion
tank ;.
If the coolant is approximately 0.6 in
(1.5 cm) higher when warm, there is
enough coolant in coolant expansion
tank ;.XIf necessary, add coolant which has been
tested and approved by Mercedes-Benz.XReplace cap : and turn it clockwise as far
as it will go.
For further information on coolant, see
( Y page 369).
Windshield washer system/headlamp
cleaning system
The washer fluid reservoir is used for both the
windshield washer system and the headlamp
cleaning system.
GWarning
Washer solvent/antifreeze is highly
flammable. Do not spill washer solvent/
antifreeze on hot engine parts, because it may
ignite and burn. You could be seriously
burned.
Engine compartment297Maintenance and careBA 164.8 USA, CA Edition B 2011; 1; 2, en-USd2sboikeVersion: 3.0.3.52010-04-21T15:08:44+02:00 - Seite 297Z
Page 302 of 376
Rsolvents
R cleaning agents containing solvents
Do not scrub.
Do not touch the surfaces or protective
films with hard objects, e.g. a ring or ice
scraper. You could otherwise scratch or
damage the surfaces and protective film.HEnvironmental note
Dispose of empty packaging and cleaning
cloths in an environmentally responsible
manner.
! Do not park the vehicle for an extended
period right after cleaning it, particularly
after having cleaned the wheels with wheel
cleaner. Wheel cleaners could cause
increased corrosion of the brake discs and
brake pads/linings. Generally, park the
vehicle at operating temperature after
cleaning.
Exterior care
Automatic car wash
GWarning!
Braking efficiency is reduced after washing
the vehicle. This could cause an accident. For
this reason, you must drive particularly
carefully after washing the vehicle until the
brakes have dried.
You can wash the vehicle in an automatic car
wash from the very start.
! Never clean your vehicle in a Touchless
Automatic Car Wash as these use special
cleaning agents. These cleaning agents can
damage the paintwork or plastic parts.
If the vehicle is very dirty, pre-wash it before
cleaning it in an automatic car wash.
! In car washes with a towing mechanism,
make sure that the automatic transmission
is in transmission position N, otherwise the
vehicle could be damaged.
R Vehicles with a SmartKey:
Do not remove the SmartKey from the
ignition lock. Do not open the driver's
door or front-passenger door when the
engine is switched off. Otherwise, the
automatic transmission selects park
position P automatically and locks the
wheels. You can prevent this by shifting
the automatic transmission to N
beforehand.
R Vehicles with KEYLESS-GO:
Do not open the driver's door or front-
passenger door when the engine is
switched off. Otherwise, the automatic
transmission selects park position P
automatically and locks the wheels.
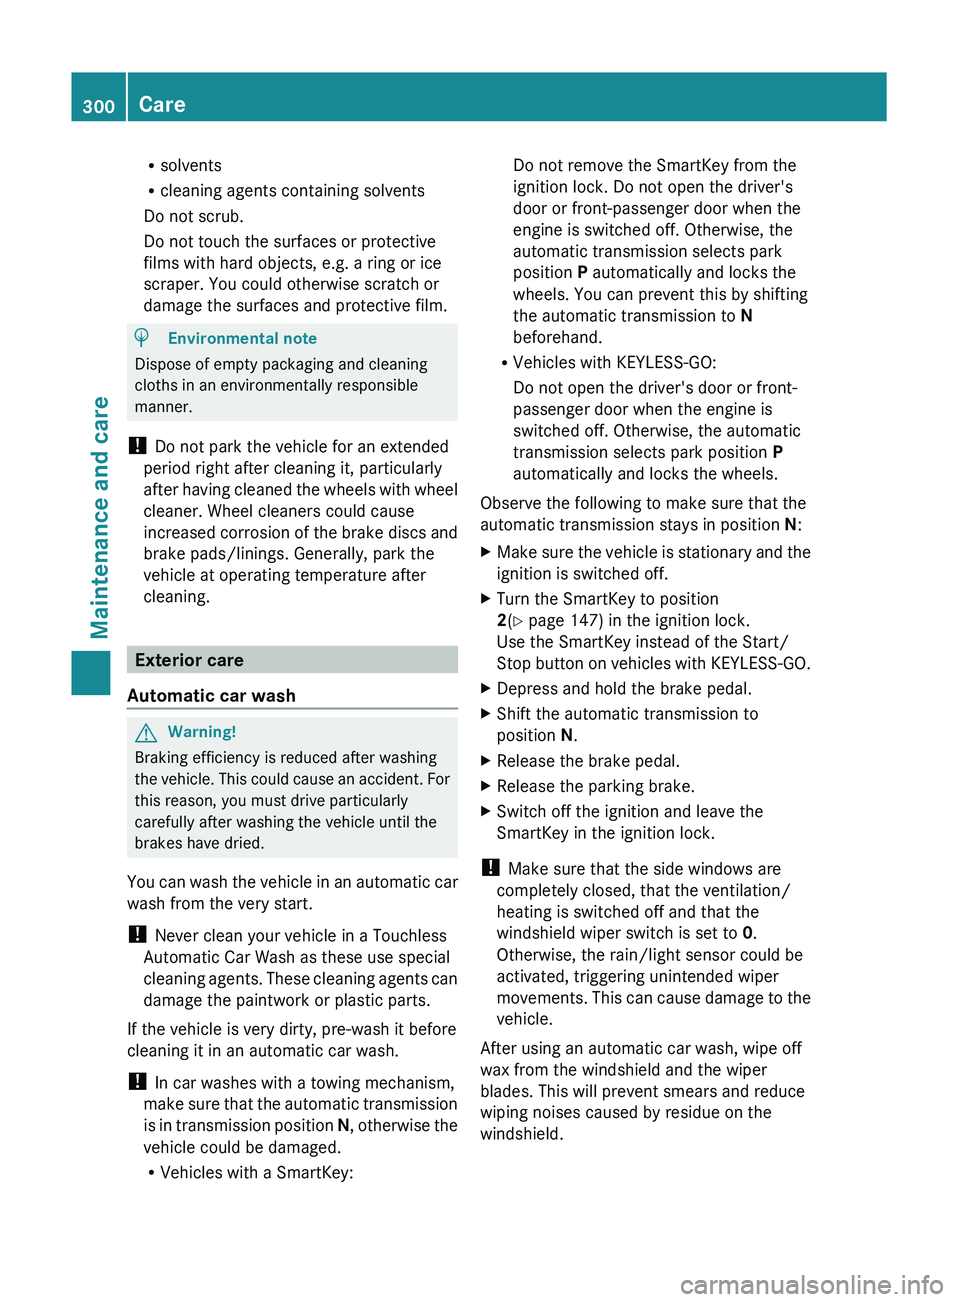
Observe the following to make sure that the
automatic transmission stays in position N:XMake sure the vehicle is stationary and the
ignition is switched off.XTurn the SmartKey to position
2 (Y page 147) in the ignition lock.
Use the SmartKey instead of the Start/
Stop button on vehicles with KEYLESS-GO.XDepress and hold the brake pedal.XShift the automatic transmission to
position N.XRelease the brake pedal.XRelease the parking brake.XSwitch off the ignition and leave the
SmartKey in the ignition lock.
! Make sure that the side windows are
completely closed, that the ventilation/
heating is switched off and that the
windshield wiper switch is set to 0.
Otherwise, the rain/light sensor could be
activated, triggering unintended wiper
movements. This can cause damage to the
vehicle.
After using an automatic car wash, wipe off
wax from the windshield and the wiper
blades. This will prevent smears and reduce
wiping noises caused by residue on the
windshield.
300CareMaintenance and care
BA 164.8 USA, CA Edition B 2011; 1; 2, en-USd2sboikeVersion: 3.0.3.52010-04-21T15:08:44+02:00 - Seite 300
Page 304 of 376
to painted surfaces. You could otherwise
damage the paintwork.
If water no longer forms "beads" on the
painted surface, paint care products should
be used that have been approved and
recommended by Mercedes-Benz. This is the
case approximately every three to five
months, depending on climatic conditions
and the care product used.
If dirt has entered the paint surface or the
paintwork has become dull, a paint cleaner
should be used that has been approved and
recommended by Mercedes-Benz.
Never use such care products in direct
sunlight or on a hot hood.XUse a suitable touch-up stick, e.g. MB
Touch Up stick, for quick, temporary repair
of damaged paintwork.
Cleaning the windows
GWarning!
Switch off the windshield wipers and remove
the SmartKey from the ignition lock before
cleaning the windshield or the wiper blades.
On vehicles with KEYLESS-GO, press the
Start/Stop button repeatedly until all
indicator lamps in the instrument cluster have
gone out. The windshield wipers could
otherwise move and injure you.
XClean the inside and outside of the
windows with a damp cloth and a cleaning
agent that is recommended and approved
by Mercedes-Benz.
! Do not use dry cloths, abrasive products,
solvents or cleaning agents containing
solvents to clean the inside of the windows.
Do not use hard objects to clean the insides
of the windows, e.g. an ice scraper or ring.
There is otherwise a risk of damaging the
windows.
! Clean the water drainage channels of the
windshield and the rear window at regular
intervals. Under certain circumstances,
deposits such as leaves, petals and pollen
may prevent water from draining away,
leading to corrosion damage.
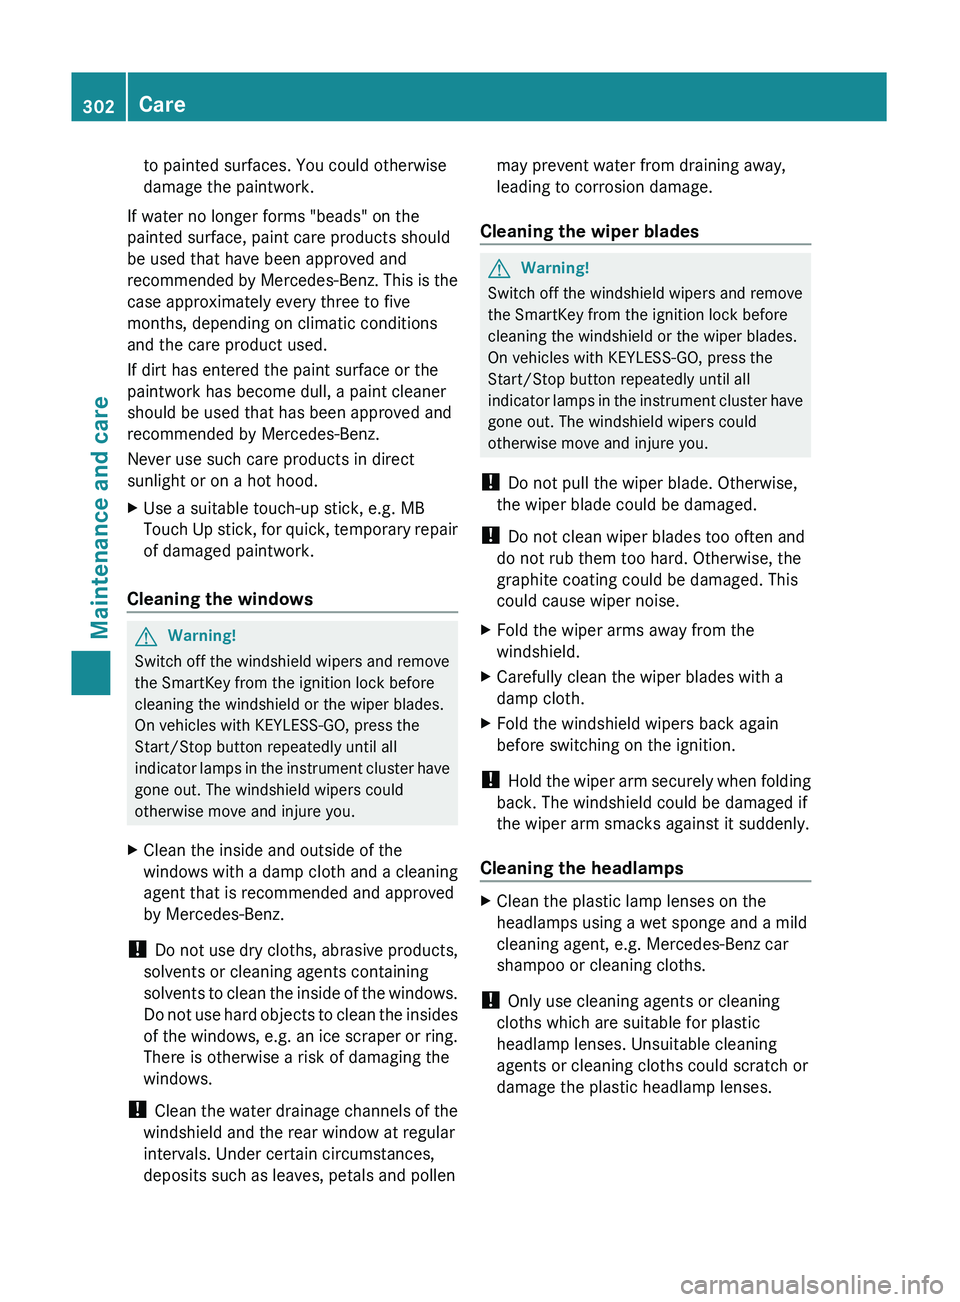
Cleaning the wiper bladesGWarning!
Switch off the windshield wipers and remove
the SmartKey from the ignition lock before
cleaning the windshield or the wiper blades.
On vehicles with KEYLESS-GO, press the
Start/Stop button repeatedly until all
indicator lamps in the instrument cluster have
gone out. The windshield wipers could
otherwise move and injure you.
! Do not pull the wiper blade. Otherwise,
the wiper blade could be damaged.
! Do not clean wiper blades too often and
do not rub them too hard. Otherwise, the
graphite coating could be damaged. This
could cause wiper noise.
XFold the wiper arms away from the
windshield.XCarefully clean the wiper blades with a
damp cloth.XFold the windshield wipers back again
before switching on the ignition.
! Hold the wiper arm securely when folding
back. The windshield could be damaged if
the wiper arm smacks against it suddenly.
Cleaning the headlamps
XClean the plastic lamp lenses on the
headlamps using a wet sponge and a mild
cleaning agent, e.g. Mercedes-Benz car
shampoo or cleaning cloths.
! Only use cleaning agents or cleaning
cloths which are suitable for plastic
headlamp lenses. Unsuitable cleaning
agents or cleaning cloths could scratch or
damage the plastic headlamp lenses.
302CareMaintenance and care
BA 164.8 USA, CA Edition B 2011; 1; 2, en-USd2sboikeVersion: 3.0.3.52010-04-21T15:08:44+02:00 - Seite 302
Page 314 of 376
XVehicles without KEYLESS-GO: remove
the key from the ignition lock.
XVehicles with KEYLESS-GO: open the
driver's door.
The on-board electronics have status 0,
which is the same as the key having been
removed.
XVehicles with KEYLESS-GO: remove the
Start/Stop button from the ignition lock
(Y page 147).
XAll occupants must get out of the vehicle.
Make sure that they are not endangered as
they get out of the vehicle.
XMake sure that no one is near the danger
area whilst a wheel is being changed.
Anyone who is not directly assisting in the
wheel change should, for example, stand
behind the barrier.
XGet out of the vehicle. Pay attention to
traffic conditions when doing so.
XClose the driver's door.
iOnly operate the electric air pump using
the socket in the footwell of the 2nd row of
seats (Y page 281), even if the ignition is
turned off.
An emergency cut-off ensures that the on-
board voltage does not drop too low. If the
on-board voltage is too low, power to the
sockets is automatically cut-off. This
ensures that there is sufficient power to
start the engine.
TIREFIT kit
Using the TIREFIT kit
You can use the TIREFIT kit to seal small
punctures, particularly those in the tire tread.
You can use TIREFIT at outside temperatures
down to -4 ‡ (-20 †).
GWarning
TIREFIT is a limited repair device. TIREFIT
cannot be used for cuts or punctures larger
than approximately 0.16 in (4 mm) and tire
damage caused by driving with extremely low
tire inflation pressure, or on a flat tire, or a
damaged wheel.
Do not drive the vehicle under such
circumstances.
Contact the nearest authorized Mercedes-
Benz Center for assistance or call roadside
assistance.
XDo not remove any foreign objects which
have penetrated the tire, e.g. screws or
nails.
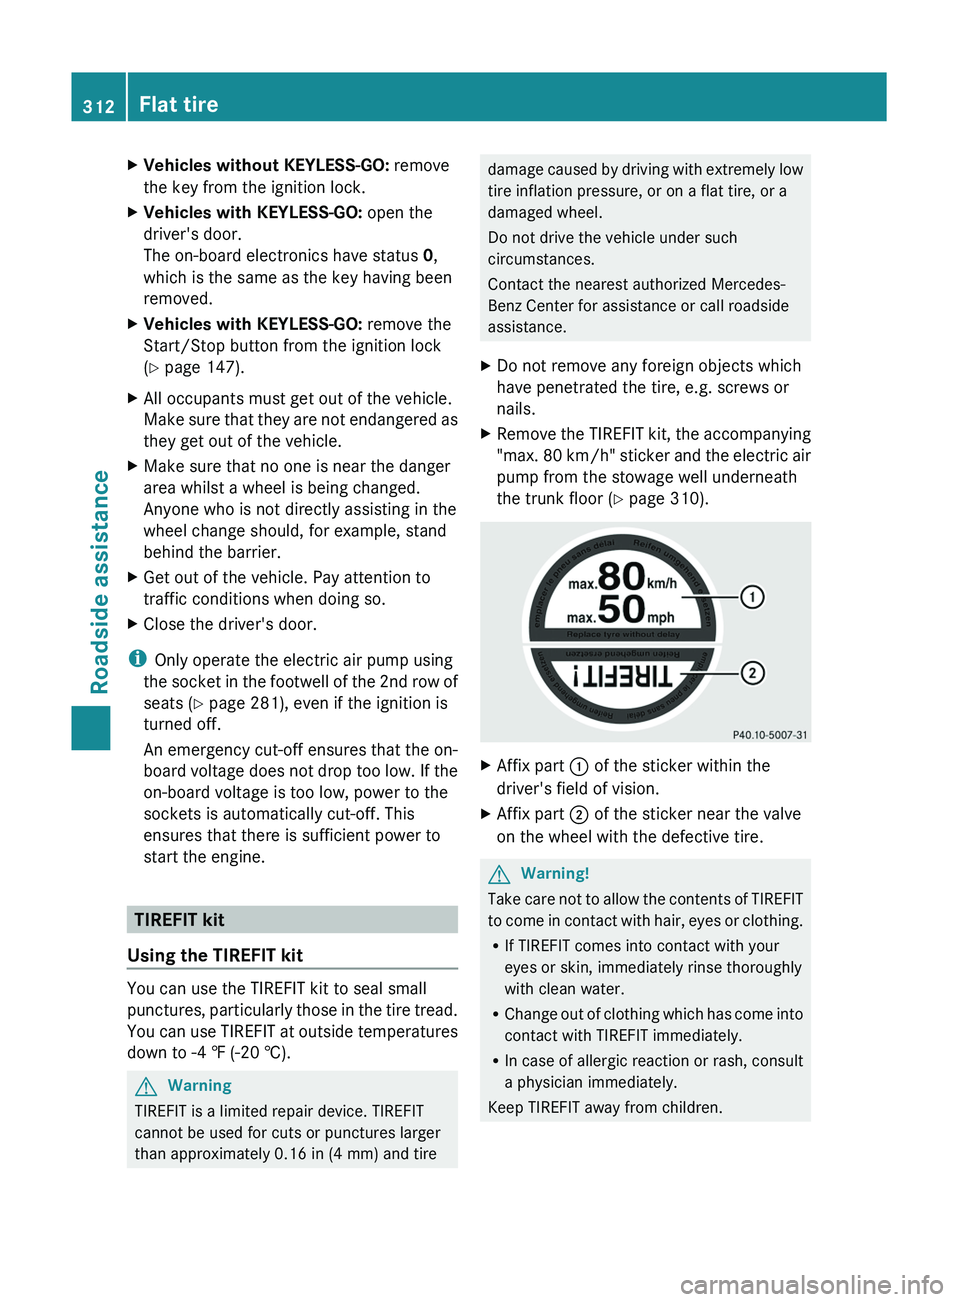
XRemove the TIREFIT kit, the accompanying
"max. 80 km/h" sticker and the electric air
pump from the stowage well underneath
the trunk floor (Y page 310).
XAffix part : of the sticker within the
driver's field of vision.
XAffix part ; of the sticker near the valve
on the wheel with the defective tire.
GWarning!
Take care not to allow the contents of TIREFIT
to come in contact with hair, eyes or clothing.
RIf TIREFIT comes into contact with your
eyes or skin, immediately rinse thoroughly
with clean water.
RChange out of clothing which has come into
contact with TIREFIT immediately.
RIn case of allergic reaction or rash, consult
a physician immediately.
Keep TIREFIT away from children.
312Flat tireRoadside assistance
BA 164.8 USA, CA Edition B 2011; 1; 2, en-USd2sboikeVersion: 3.0.3.52010-04-21T15:08:44+02:00 - Seite 312
Page 329 of 376
Towing and tow-starting
Important safety notes
GWarning
If you tow the vehicle, you must use a rigid
towing bar if:
R the engine will not run.
R there is a malfunction in the brake system.
R there is a malfunction in the power supply
or the vehicle's electrical system.
With the engine not running, there is no power
assistance for the brake and steering
systems. You will then need considerably
more force to steer and to brake and the
brake pedal travel will be longer. If necessary,
depress the brake pedal with maximum force.
Before towing away, make sure that the
steering can be moved and is not locked.
If you tow or tow-start another vehicle, its
weight must not exceed the maximum
permissible gross vehicle weight of your
vehicle.
It is better to have the vehicle transported
than to have it towed.
! You may only tow the vehicle a maximum
distance of 30 miles (50 km). A towing
speed of 30 mph (50 km/h) must not be
exceeded.
For towing distances over 30 miles
(50 km), the vehicle must loaded onto a
transporter.
! Only secure the tow rope or tow bar at the
towing eyes. Otherwise, the vehicle could
be damaged.
! Do not use the towing eye for recovery,
as this could damage the vehicle. If in
doubt, recover the vehicle with a crane.
! Drive slowly and smoothly when towing.
Excessive tractive power could otherwise
damage the vehicles.
! Do not tow with sling-type equipment.
This could damage the vehicle.
! When towing vehicles with KEYLESS-GO,
use the key instead of the Start/Stop
button. Otherwise, the automatic
transmission may shift to position P when
the driver's or front-passenger door are
opened, which could lead to damage to the
transmission.
! Vehicles with differential locks: make
sure that the differential locks are in
automatic mode. When towing, the
differential locks must not be switched on
by hand. This could otherwise damage the
transmission.
! Vehicles with automatic transmission
must not be started by tow-starting. This
could otherwise damage the transmission.
! Vehicles with 4MATIC must not be towed
with the front or rear axle raised. This could
otherwise damage the transmission.
If the vehicle has suffered transmission
damage, have it carried away on a transporter
or trailer.
The automatic transmission must be in
position N when the vehicle is being towed.
Make sure that the battery is connected and
charged. You will otherwise not be able to:
R turn the SmartKey to position 2 in the
ignition lock.
R shift the automatic transmission to
position N.
i Switch off the automatic locking feature
before the vehicle is towed ( Y page 79).
Otherwise, you could lock yourself out of
the vehicle when pushing or towing the
vehicle.
Installing/removing the towing eye
Installing the towing eye
Vehicles with a trailer tow hitch: if possible
secure the towing device on the trailer tow
hitch ( Y page 209).
Towing and tow-starting327Roadside assistanceBA 164.8 USA, CA Edition B 2011; 1; 2, en-USd2sboikeVersion: 3.0.3.52010-04-21T15:08:44+02:00 - Seite 327Z
Page 330 of 376
XRemove the towing eye from the vehicle
tool kit ( Y page 310).GWarning
The exhaust tail pipe may be hot. You could
burn yourself if you touch the tail pipe. Be
particularly careful when removing the rear
cover.
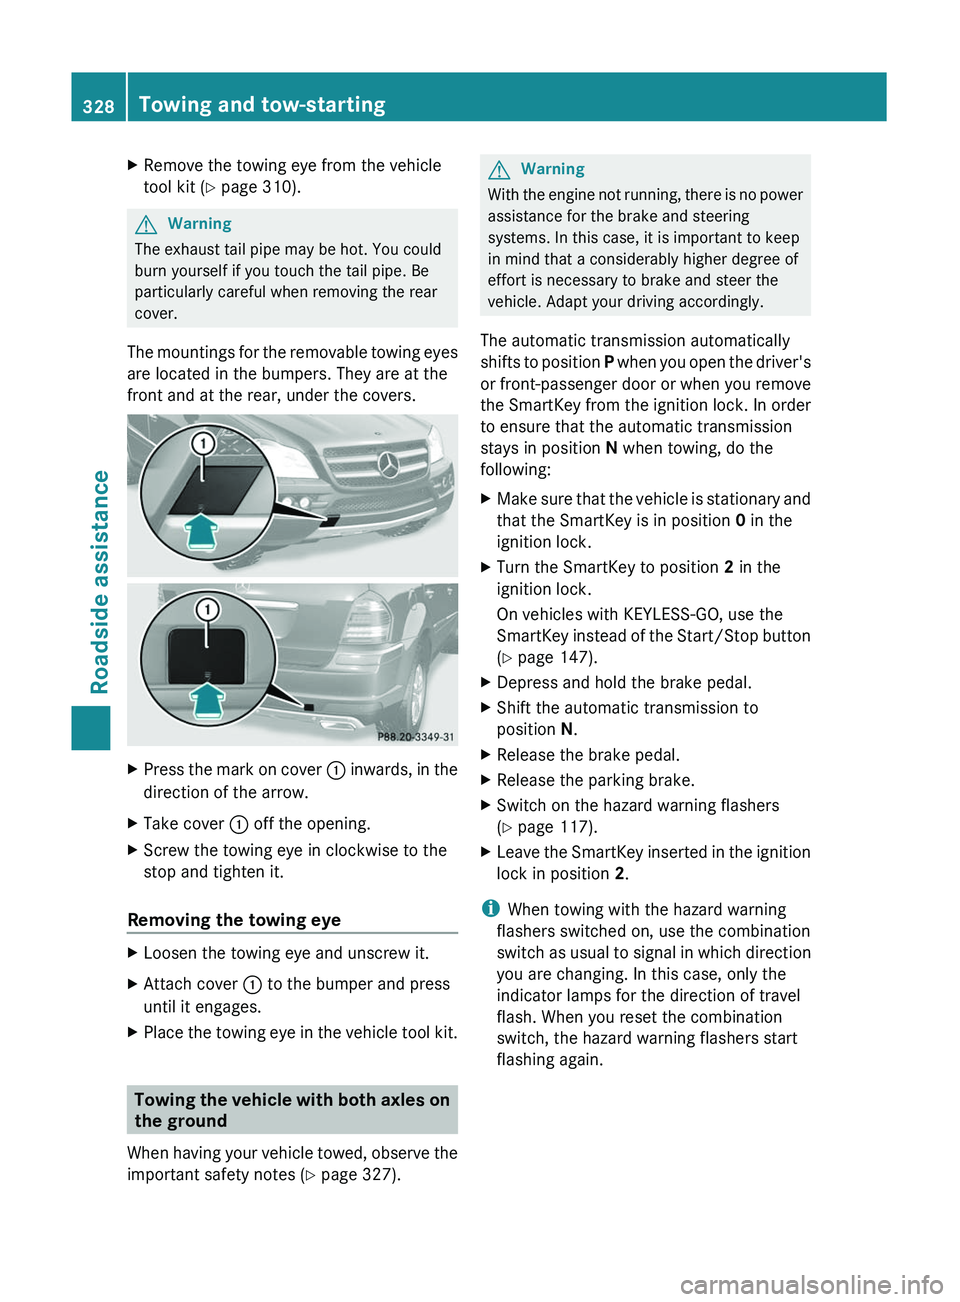
The mountings for the removable towing eyes
are located in the bumpers. They are at the
front and at the rear, under the covers.
XPress the mark on cover : inwards, in the
direction of the arrow.XTake cover : off the opening.XScrew the towing eye in clockwise to the
stop and tighten it.
Removing the towing eye
XLoosen the towing eye and unscrew it.XAttach cover : to the bumper and press
until it engages.XPlace the towing eye in the vehicle tool kit.
Towing the vehicle with both axles on
the ground
When having your vehicle towed, observe the
important safety notes ( Y page 327).
GWarning
With the engine not running, there is no power
assistance for the brake and steering
systems. In this case, it is important to keep
in mind that a considerably higher degree of
effort is necessary to brake and steer the
vehicle. Adapt your driving accordingly.
The automatic transmission automatically
shifts to position P when you open the driver's
or front-passenger door or when you remove
the SmartKey from the ignition lock. In order
to ensure that the automatic transmission
stays in position N when towing, do the
following:
XMake sure that the vehicle is stationary and
that the SmartKey is in position 0 in the
ignition lock.XTurn the SmartKey to position 2 in the
ignition lock.
On vehicles with KEYLESS-GO, use the
SmartKey instead of the Start/Stop button
( Y page 147).XDepress and hold the brake pedal.XShift the automatic transmission to
position N.XRelease the brake pedal.XRelease the parking brake.XSwitch on the hazard warning flashers
( Y page 117).XLeave the SmartKey inserted in the ignition
lock in position 2.
i
When towing with the hazard warning
flashers switched on, use the combination
switch as usual to signal in which direction
you are changing. In this case, only the
indicator lamps for the direction of travel
flash. When you reset the combination
switch, the hazard warning flashers start
flashing again.
328Towing and tow-startingRoadside assistance
BA 164.8 USA, CA Edition B 2011; 1; 2, en-USd2sboikeVersion: 3.0.3.52010-04-21T15:08:44+02:00 - Seite 328
Page 343 of 376
XMake sure that the key is in position 2
( Y page 147) in the ignition lock.XPress and hold the V or U button on
the multifunction steering wheel until the
standard display appears in the
multifunction display ( Y page 218).XPress the * or & button until the
Run Flat Indicator Active Menu: R-
Button message appears in the
multifunction display.XPress the reset button ( Y page 28) on the
instrument cluster.
The Restart Run Flat Indicator?
Yes Cancel message appears in the
multifunction display.
If you wish to confirm the restart:
XPress the W button.
The Run Flat Indicator Restarted
message appears in the multifunction
display.
After a teach-in period, the tire pressure
loss warning system will monitor the set
tire pressures of all four tires.
If you wish to cancel the restart:
XPress the X button.
or
XWait until the Restart Run Flat
Indicator? Yes Cancel message
disappears.
The tire pressure values stored at the last
restart will continue to be monitored.
Tire pressure monitoring system
(USA only)
Important safety information
The tire pressure monitoring system consists
of sensors installed in the vehicle wheels that
monitor the air pressure in all four tires. The
tire pressure monitoring system warns you
when the pressure in one or more tires
decreases. It only works when the
corresponding sensors are installed on all the
wheels.
The tire pressure monitor informs you via a
yellow warning lamp in the instrument cluster
about pressure loss or if the system is
malfunctioning. Whether the warning lamp
flashes or lights up indicates whether a tire
pressure is too low or the tire pressure
monitor is malfunctioning:
R If the warning lamp is lit up constantly, one
or more of your tires are significantly
underinflated. The tire pressure monitor is
not malfunctioning.
R If the warning lamp flashes for 60 seconds
and is then lit constantly, the tire pressure
monitor is malfunctioning.GWarning!
Each tire, including the spare (if provided),
should be checked at least once a month
when cold and inflated to the inflation
pressure recommended by the vehicle
manufacturer on the tire and loading
information table on the driver's door B-pillar
or the tire inflation pressure table on the
inside of the fuel filler flap. If your vehicle has
tires of a different size than the size indicated
on the tire and loading information table or
the tire inflation pressure table, you should
determine the proper tire inflation pressure
for those tires.
As an added safety feature, your vehicle has
been equipped with a tire pressure monitor
(TPMS). An indicator lamp lights up if one or
more of your tires are significantly
underinflated. Accordingly, when the low tire
pressure indicator lamp lights up, you should
stop and check your tires as soon as possible,
and inflate them to the proper pressure.
Driving on a significantly underinflated tire
causes the tire to overheat and can lead to
tire failure.
Underinflation also reduces fuel efficiency
and tire tread life and may affect the vehicle's
handling and stopping ability. Please note that
the TPMS is not a substitute for proper tire
maintenance and it is the driver's
Tire pressures341Tires and wheelsBA 164.8 USA, CA Edition B 2011; 1; 2, en-USd2sboikeVersion: 3.0.3.52010-04-21T15:08:44+02:00 - Seite 341Z