2011 MERCEDES-BENZ GL lock
[x] Cancel search: lockPage 51 of 376
carry a child on the front-passenger seat
once the system has been repaired.
A child in a rear-facing child restraint on the
passenger seat will be seriously injured or
even killed if the passenger front air bag
inflates.
R when securing a child in a front-facing child
restraint system on the front-passenger
seat, you must:
- move the front-passenger seat as far
back as possible
- use a child restraint system that is
suitable for the age, size and weight of
the child
- observe the manufacturer's installation
instructions in order to install and secure
the child restraint system correctly.GWarning
When using a BabySmart™-compatible child
restraint system on the front-passenger seat,
the front-passenger front air bag is only
disabled if the 42 indicator lamp
is illuminated.
Always check the 42 indicator
lamp if you are using a BabySmart™-
compatible child restraint system on the
front-passenger seat. If the 42
indicator lamp does not light up or goes out
when the child restraint system is installed,
check the anchorages of the restraint system.
If the 42 indicator lamp remains
out, do not use the BabySmart™ child
restraint system to carry a child on the front-
passenger seat until the system has been
repaired.
GWarning
The BabySmart™ air bag disabling system
ONLY works with specially adapted child
restraint systems. It does not work with child
restraint systems that are not compatible with
BabySmart™.
Never place anything between the seat
cushion and the child restraint system (e.g. a
cushion), as this reduces the effectiveness of
the BabySmart™ air bag deactivation system.
The underside of the child restraint system
must lie against the seat cushion of the front-
passenger seat. In the event of an accident,
an incorrectly installed child restraint system
could injure the child instead of offering
protection.
Observe the manufacturer's instructions
when installing special child restraint
systems.
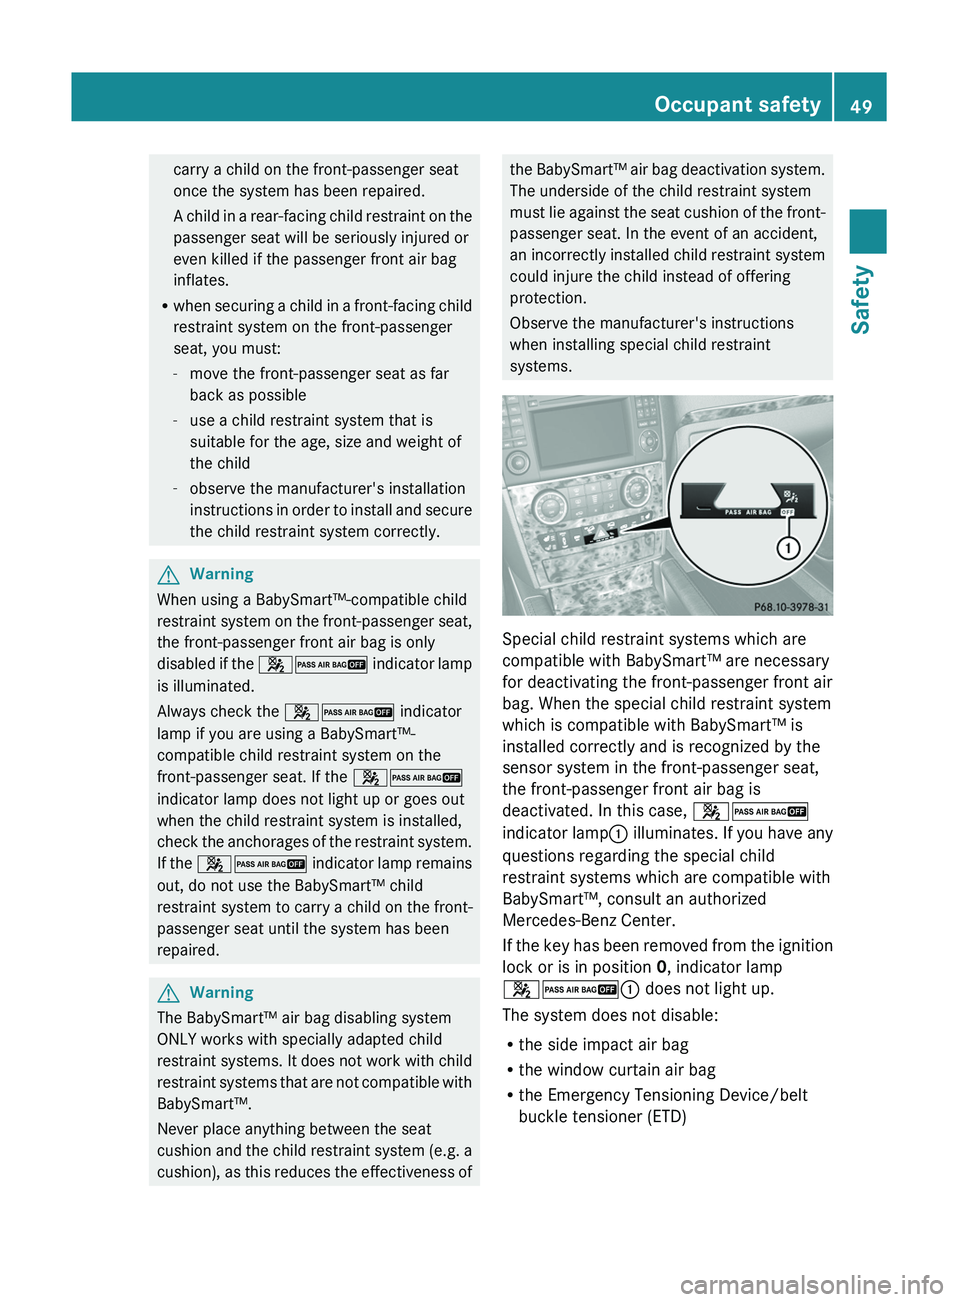
Special child restraint systems which are
compatible with BabySmart™ are necessary
for deactivating the front-passenger front air
bag. When the special child restraint system
which is compatible with BabySmart™ is
installed correctly and is recognized by the
sensor system in the front-passenger seat,
the front-passenger front air bag is
deactivated. In this case, 42
indicator lamp : illuminates. If you have any
questions regarding the special child
restraint systems which are compatible with
BabySmart™, consult an authorized
Mercedes-Benz Center.
If the key has been removed from the ignition
lock or is in position 0, indicator lamp
42 : does not light up.
The system does not disable:
R the side impact air bag
R the window curtain air bag
R the Emergency Tensioning Device/belt
buckle tensioner (ETD)
Occupant safety49SafetyBA 164.8 USA, CA Edition B 2011; 1; 2, en-USd2sboikeVersion: 3.0.3.52010-04-21T15:08:44+02:00 - Seite 49Z
Page 52 of 376

System self-test
The 42 indicator lamp
illuminates when you:
R turn the SmartKey to position 1 or 2 in the
ignition lock
R on vehicles with KEYLESS-GO, press the
Start-Stop button once or twice.
The 42 indicator lamp goes out
again after approximately six seconds.
If the 42 indicator lamp does not
illuminate or is lit continuously, the system is
malfunctioning. Before transporting a child
on the front-passenger seat, have the
BabySmart™ system checked at an
authorized Mercedes-Benz Center.
For more information, see "Problems with the
air bag deactivation system" section
( Y page 51)
GWarning!
Do not place powered-on laptops, mobile
phones, electronic tags such as those used in
ski passes and like electronic devices on the
front passenger seat. Signals from such
devices may interfere with the BabySmart™
air bag deactivation system. Such signal
interference may cause the 4 2
indicator lamp not to come on during self-test.
The SRS indicator lamp + and/or the
4 2 indicator lamp could be
continuously lit, indicating that the system is
not functioning. The front passenger front air
bag could deploy inadvertently or fail to
deploy in an accident.
50Occupant safetySafety
BA 164.8 USA, CA Edition B 2011; 1; 2, en-USd2sboikeVersion: 3.0.3.52010-04-21T15:08:44+02:00 - Seite 50
Page 54 of 376
of having to swerve to avoid an obstacle at
a speed above 85 mph (140 km/h).
PRE-SAFE ®
takes the following measures
depending on the hazardous situation
detected:
R the front seat belts are pre-tensioned.
R on vehicles with memory functions: the
front-passenger seat is adjusted if it is in an
unfavorable position under accident
conditions.
R if the vehicle skids, the side windows are
closed so that only a small gap remains.
R on vehicles with sliding sunroof: if the
vehicle skids, the sliding sunroof closes so
that only a small gap remains.
If the hazardous situation passes without
resulting in an accident, PRE-SAFE ®
slackens
the belt pretensioning. All settings made by
PRE-SAFE ®
can then be reversed.
If the seat belts are not released:XMove the backrest or the seat back slightly
until the belt pretensioning is reduced.
The locking mechanism releases.GWarning
Make sure that nobody can become trapped
as you adjust the seat.
! Make sure that there are no objects in the
footwell or behind the seats when resetting
the seats. There is a risk that the seats
and/or the objects could be damaged.
More information about belt adjustment, a
convenience function integrated into PRE-
SAFE ®
, can be found in the "Belt adjustment"
section ( Y page 56).
NECK-PRO head restraints
The NECK-PRO head restraints increase
protection to the driver's and front-
passenger's head and neck. To this end, the
head restraints on the driver's and front-
passenger seats are moved forwards and
upwards in the event of a rear-end collision of
a certain severity. This provides better head
support.GWarning
Do not secure any objects (e.g. coat hangers)
on the NECK-PRO head restraints. Otherwise,
the NECK-PRO head restraints may not
function properly, or in the event of a rear-end
collision may not be able offer the level of
protection they are designed to provide.
If the NECK-PRO head restraints have been
triggered in an accident, you must reset the
NECK-PRO head restraints on the driver’s and
front-passenger seat ( Y page 52).
Otherwise, the additional protection will not
be available in the event of another rear-end
collision. You can recognize when NECK-PRO
head restraints have been triggered by the
fact that they have moved forwards and can
no longer be adjusted.
Resetting triggered NECK-PRO head
restraints
Important safety information
GWarning
For reasons of safety, have the NECK-PRO
head restraints/NECK-PRO luxury head
restraints checked at a Mercedes-Benz
Service Center after a rear-end collision.
GWarning
If you press the NECK-PRO head restraint
cushion backwards, make sure that your
fingers are not trapped between the cushion
and the cover. Failure to observe could result
in injuries.
NECK-PRO head restraints
i Resetting the NECK-PRO head restraints
requires a certain amount of strength. If
you have difficulty resetting the NECK-PRO
head restraints, have this work carried out
at a qualified specialist workshop, e.g. an
authorized Mercedes-Benz Center.
52Occupant safetySafety
BA 164.8 USA, CA Edition B 2011; 1; 2, en-USd2sboikeVersion: 3.0.3.52010-04-21T15:08:44+02:00 - Seite 52
Page 58 of 376
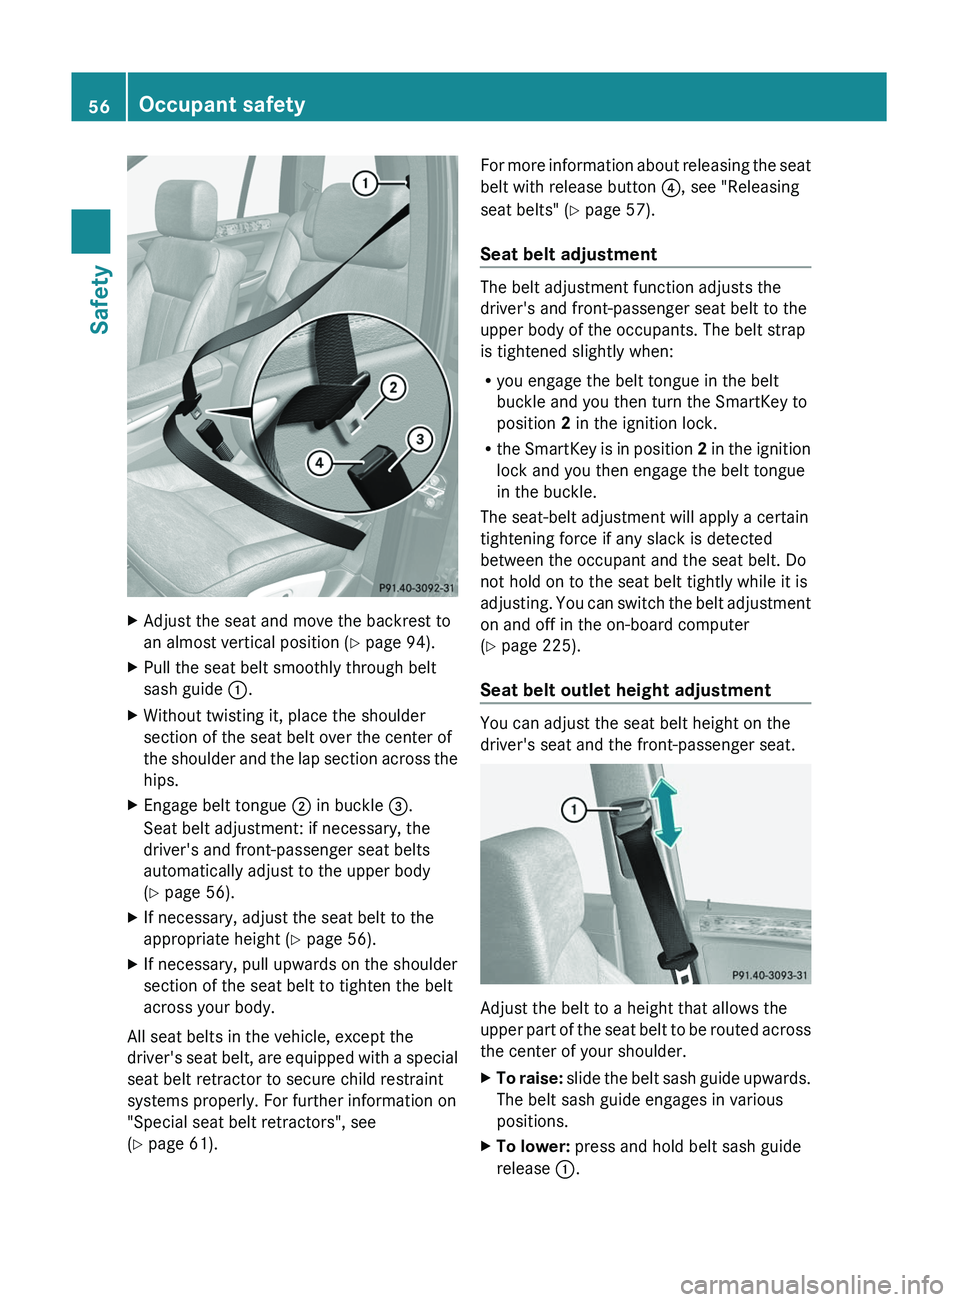
XAdjust the seat and move the backrest to
an almost vertical position ( Y page 94).XPull the seat belt smoothly through belt
sash guide :.XWithout twisting it, place the shoulder
section of the seat belt over the center of
the shoulder and the lap section across the
hips.XEngage belt tongue ; in buckle =.
Seat belt adjustment: if necessary, the
driver's and front-passenger seat belts
automatically adjust to the upper body
( Y page 56).XIf necessary, adjust the seat belt to the
appropriate height ( Y page 56).XIf necessary, pull upwards on the shoulder
section of the seat belt to tighten the belt
across your body.
All seat belts in the vehicle, except the
driver's seat belt, are equipped with a special
seat belt retractor to secure child restraint
systems properly. For further information on
"Special seat belt retractors", see
( Y page 61).
For more information about releasing the seat
belt with release button ?, see "Releasing
seat belts" ( Y page 57).
Seat belt adjustment
The belt adjustment function adjusts the
driver's and front-passenger seat belt to the
upper body of the occupants. The belt strap
is tightened slightly when:
R you engage the belt tongue in the belt
buckle and you then turn the SmartKey to
position 2 in the ignition lock.
R the SmartKey is in position 2 in the ignition
lock and you then engage the belt tongue
in the buckle.
The seat-belt adjustment will apply a certain
tightening force if any slack is detected
between the occupant and the seat belt. Do
not hold on to the seat belt tightly while it is
adjusting. You can switch the belt adjustment
on and off in the on-board computer
( Y page 225).
Seat belt outlet height adjustment
You can adjust the seat belt height on the
driver's seat and the front-passenger seat.
Adjust the belt to a height that allows the
upper part of the seat belt to be routed across
the center of your shoulder.
XTo raise: slide the belt sash guide upwards.
The belt sash guide engages in various
positions.XTo lower: press and hold belt sash guide
release :.56Occupant safetySafety
BA 164.8 USA, CA Edition B 2011; 1; 2, en-USd2sboikeVersion: 3.0.3.52010-04-21T15:08:44+02:00 - Seite 56
Page 60 of 376
ETDs/belt buckle tensioners do not correct
incorrect seat positions or incorrectly
fastened seat belts.
ETDs do not pull vehicle occupants back
towards the backrest.
Seat belt force limiters, when activated, are
employed to help reduce the force exerted by
the seat belts on occupants during a crash.
The front belt force limiters are synchronized
with the front air bags, which take on a part
of the deceleration force. Thus, the force
exerted on the occupant is distributed over a
greater area.
The ETDs/belt buckle tensioners can only be
activated when:
R the ignition is switched on
R the restraint systems are operational; see
"SRS warning lamp" ( Y page 36)
R the belt tongue is engaged in the buckle on
each of the three-point seat belts in the
front
R the front-passenger seat is occupied and
the belt tongue is engaged in the buckle on
the front-passenger side.
The ETDs on the outside seats in the second
row and on the seats in the third row are
triggered independently of the lock status of
the seat belts.
The ETDs are triggered depending on the type
and severity of an accident:
R in the event of a head-on or rear-end
collision if the vehicle decelerates or
accelerates rapidly in a longitudinal
direction during the initial stages of the
impact
R in the event of a side impact, on the side
opposite the impact if the vehicle
decelerates or accelerates rapidly in a
lateral direction
R in certain situations if the vehicle overturns
and the system determines that it can
provide additional protection.
If the ETDs/belt buckle tensioners are
triggered, you will hear a bang and a small
amount of powder may also be released. Onlyin rare cases will the bang affect your hearing.
The powder that is released generally does
not constitute a health hazard. The + SRS
warning lamp lights up.
i If the belt buckle tensioners have been
triggered on the front seats, the buckle will
be pulled down and will be almost flush with
the upper edge of the seat. The + SRS
warning lamp is lit.GWarning
The belt buckle tensioners on the front seats
only function if the belt buckles can be pulled
down unobstructed. They must not be
restricted in any way. Therefore, do not grab
the belt buckles and do not place any objects
under the belt buckles. Otherwise, the
tensioning of the belt by the buckle is
restricted or will not function, and will not
provide any additional protection.
GWarning
Pyrotechnical ETDs/belt buckle tensioners
that were activated must be replaced.
For your safety, when disposing of the
pyrotechnic ETDs/belt buckle tensioners
always follow our safety instructions. These
instructions are available from any authorized
Mercedes-Benz Center.
The PRE-SAFE ®
system is equipped with
electrically reversible pre-tensioners that do
not need replacing after deployment.
58Occupant safetySafety
BA 164.8 USA, CA Edition B 2011; 1; 2, en-USd2sboikeVersion: 3.0.3.52010-04-21T15:08:44+02:00 - Seite 58
Page 61 of 376
Children in the vehicle
Important safety notes
GWarning
When leaving the vehicle, always remove the
SmartKey from the ignition lock. Always take
the SmartKey with you and lock the vehicle.
Do not leave children unattended in the
vehicle, even if they are secured in a child
restraint system, or with access to an
unlocked vehicle. A child's unsupervised
access to a vehicle could result in an accident
and/or serious personal injury. The children
could:
R injure themselves on parts of the vehicle
R be seriously or fatally injured through
excessive exposure to extreme heat or cold
R injure themselves or cause an accident with
vehicle equipment that can be operated
even if the SmartKey is removed from the
ignition lock or removed from the vehicle,
such as seat adjustment, steering wheel
adjustment, or the memory function
If children open a door, they could injure other
persons or get out of the vehicle and injure
themselves or be injured by following traffic.
Do not expose the child restraint system to
direct sunlight. The child restraint system's
metal parts, for example, could become very
hot, and the child could be burned on these
parts.
GWarning!
Do not carry heavy or hard objects in the
passenger compartment or trunk unless they
are firmly secured in place.
Unsecured or improperly positioned cargo
increases a child's risk of injury in the event
of
R strong braking maneuvers
R sudden changes of direction
R an accident
If an infant or child is traveling in the vehicle:XSecure the child using an infant or child
restraint system appropriate to the age and
weight of the child.XMake sure that the infant or child is
properly secured at all times while the
vehicle is in motion.
Child restraint systems
Important safety notes
GWarning
Observe "Important safety instructions"
( Y page 59).
We recommend all infants and children be
properly restrained using the child restraint
systems at all times while the vehicle is in
motion.
The use of infant or child restraints is required
by law in all 50 states, the District of
Columbia, the U.S. territories and all
Canadian provinces.
Infants and small children should always be
seated in an infant or child seat restraint
system appropriate for the size and weight of
the child. They must be properly secured in
accordance with the manufacturer's
installation instructions for the infant or child
seat restraint system. All infant and child seat
restraint systems must comply with the US
Federal Motor Vehicle Safety Standards 213
and 225 and Canadian Motor Vehicle Safety
Standards 213 and 210.2.
A statement by the child restraint
manufacturer of compliance with these
standards can be found on the instruction
label on the child restraint system. You will
also find the statement in the instruction
manual provided with the child restraint
system.
When using an infant restraint system, child
restraint system or booster seat, make sure
to carefully read and follow all manufacturer's
instructions for installation and use.
Children in the vehicle59SafetyBA 164.8 USA, CA Edition B 2011; 1; 2, en-USd2sboikeVersion: 3.0.3.52010-04-21T15:08:44+02:00 - Seite 59Z
Page 64 of 376
LATCH-type child restraint (ISOFIX) in
the rearGWarning
Observe "Important safety instructions"
( Y page 59).
GWarning
Children too big for a toddler restraint must
ride in seats using regular seat belts. Position
the shoulder belt across the chest and
shoulder, not face or neck.
In order to attain the correct seating position
for children weighing over 41 lb (18 kg), it may
be necessary to use a booster seat until they
reach a height where a normal lap/shoulder
seat belt lies properly across their bodies
without the need for a booster seat.
Install the child restraint system according to
the manufacturer's instructions.
The child restraint system must be installed
firmly on both brackets.
An incorrectly installed child restraint system
can come loose in the event of an accident,
causing the child to be severely or fatally
injured.
Child restraint systems/child restraint
retaining brackets that are damaged or have
suffered damage due to an impact must be
replaced.
ISOFIX is a standardized securing system for
specially-designed child restraint systems on
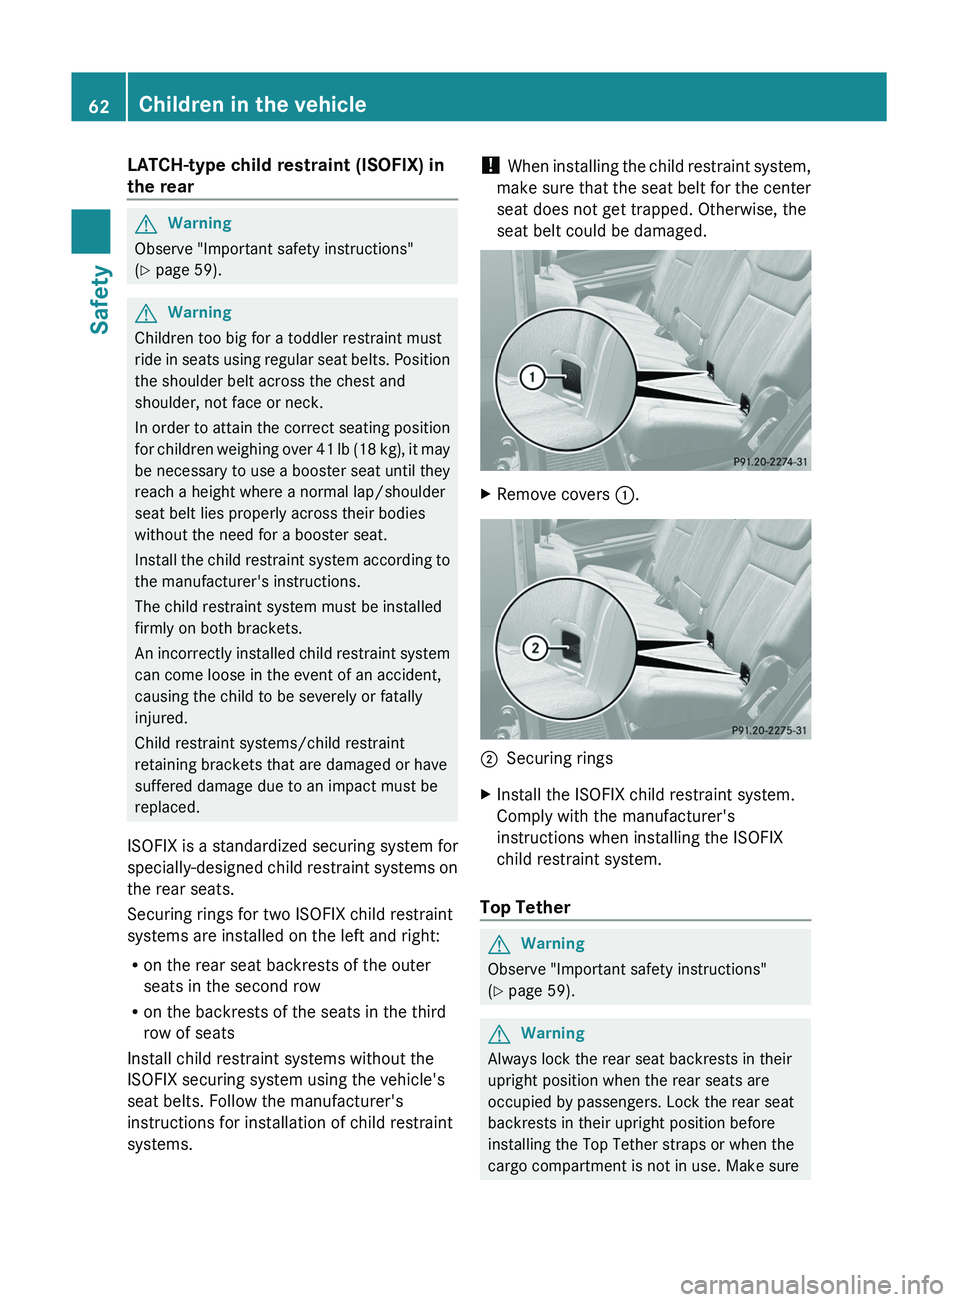
the rear seats.
Securing rings for two ISOFIX child restraint
systems are installed on the left and right:
R on the rear seat backrests of the outer
seats in the second row
R on the backrests of the seats in the third
row of seats
Install child restraint systems without the
ISOFIX securing system using the vehicle's
seat belts. Follow the manufacturer's
instructions for installation of child restraint
systems.
! When installing the child restraint system,
make sure that the seat belt for the center
seat does not get trapped. Otherwise, the
seat belt could be damaged.XRemove covers :.;Securing ringsXInstall the ISOFIX child restraint system.
Comply with the manufacturer's
instructions when installing the ISOFIX
child restraint system.
Top Tether
GWarning
Observe "Important safety instructions"
( Y page 59).
GWarning
Always lock the rear seat backrests in their
upright position when the rear seats are
occupied by passengers. Lock the rear seat
backrests in their upright position before
installing the Top Tether straps or when the
cargo compartment is not in use. Make sure
62Children in the vehicleSafety
BA 164.8 USA, CA Edition B 2011; 1; 2, en-USd2sboikeVersion: 3.0.3.52010-04-21T15:08:44+02:00 - Seite 62
Page 65 of 376
that rear seat backrests are secured properly
by pushing and pulling on the seat backrests.
If the seat backrest is not locked properly, the
seat backrest could fold forward. The child
restraint system is no longer supported
properly or held in position and can no longer
fulfill its function. That could cause serious or
even fatal injuries.
Top Tether provides an additional connection
between the child restraint system secured
with ISOFIX and the rear seat. It helps reduce
the risk of injury even further.
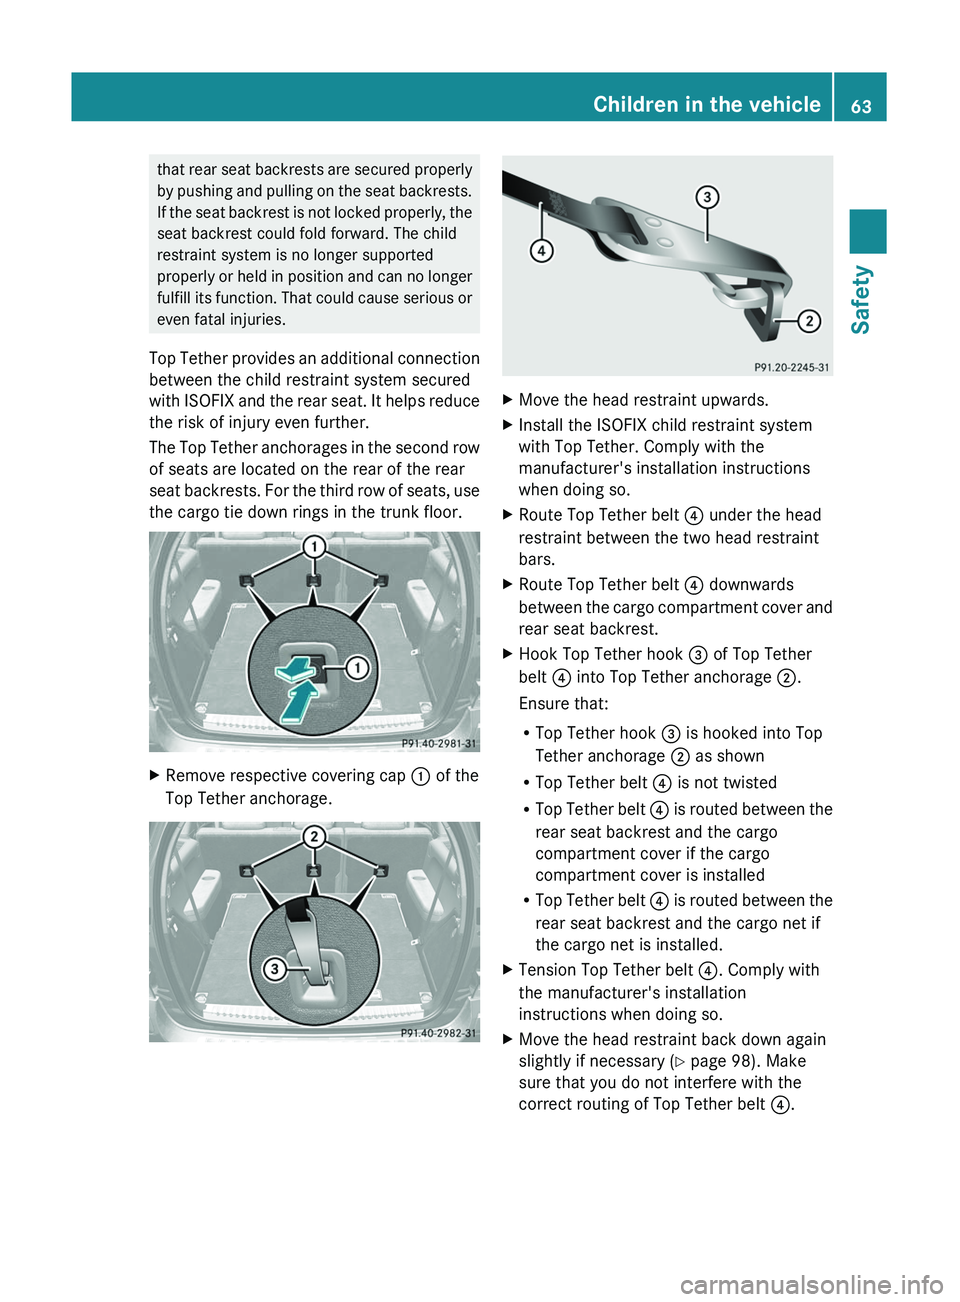
The Top Tether anchorages in the second row
of seats are located on the rear of the rear
seat backrests. For the third row of seats, use
the cargo tie down rings in the trunk floor.XRemove respective covering cap : of the
Top Tether anchorage.XMove the head restraint upwards.XInstall the ISOFIX child restraint system
with Top Tether. Comply with the
manufacturer's installation instructions
when doing so.XRoute Top Tether belt ? under the head
restraint between the two head restraint
bars.XRoute Top Tether belt ? downwards
between the cargo compartment cover and
rear seat backrest.XHook Top Tether hook = of Top Tether
belt ? into Top Tether anchorage ;.
Ensure that:
R Top Tether hook = is hooked into Top
Tether anchorage ; as shown
R Top Tether belt ? is not twisted
R Top Tether belt ? is routed between the
rear seat backrest and the cargo
compartment cover if the cargo
compartment cover is installed
R Top Tether belt ? is routed between the
rear seat backrest and the cargo net if
the cargo net is installed.XTension Top Tether belt ?. Comply with
the manufacturer's installation
instructions when doing so.XMove the head restraint back down again
slightly if necessary ( Y page 98). Make
sure that you do not interfere with the
correct routing of Top Tether belt ?.Children in the vehicle63SafetyBA 164.8 USA, CA Edition B 2011; 1; 2, en-USd2sboikeVersion: 3.0.3.52010-04-21T15:08:44+02:00 - Seite 63Z