2011 MERCEDES-BENZ GL turn signal
[x] Cancel search: turn signalPage 123 of 376
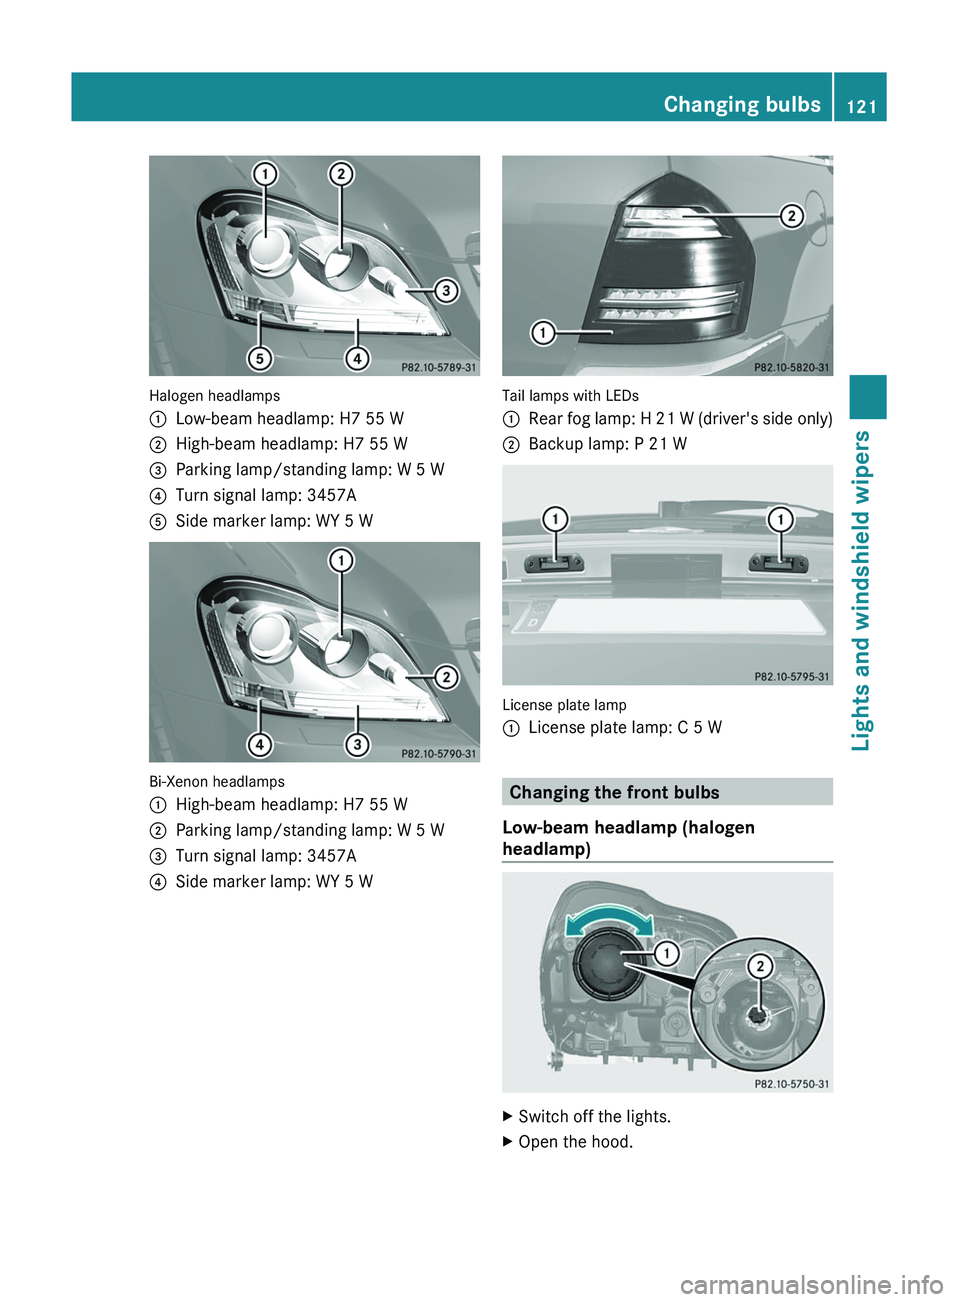
Halogen headlamps
:Low-beam headlamp: H7 55 W;High-beam headlamp: H7 55 W=Parking lamp/standing lamp: W 5 W?Turn signal lamp: 3457AASide marker lamp: WY 5 W
Bi-Xenon headlamps
:High-beam headlamp: H7 55 W;Parking lamp/standing lamp: W 5 W=Turn signal lamp: 3457A?Side marker lamp: WY 5 W
Tail lamps with LEDs
:Rear fog lamp: H 21 W (driver's side only);Backup lamp: P 21 W
License plate lamp
:License plate lamp: C 5 W
Changing the front bulbs
Low-beam headlamp (halogen
headlamp)
XSwitch off the lights.XOpen the hood.Changing bulbs121Lights and windshield wipersBA 164.8 USA, CA Edition B 2011; 1; 2, en-USd2sboikeVersion: 3.0.3.52010-04-21T15:08:44+02:00 - Seite 121Z
Page 124 of 376
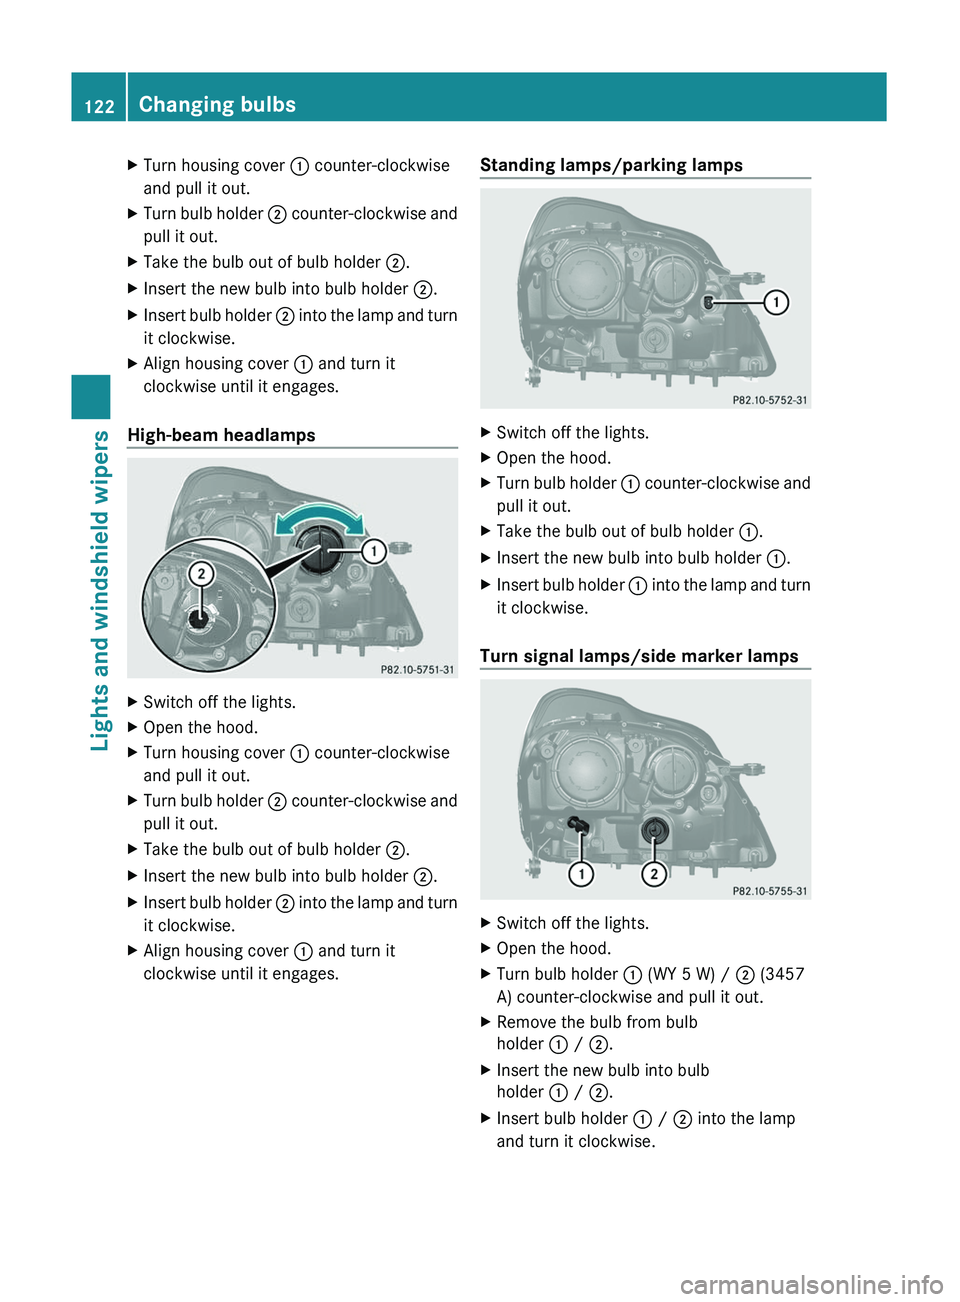
XTurn housing cover : counter-clockwise
and pull it out.XTurn bulb holder ; counter-clockwise and
pull it out.XTake the bulb out of bulb holder ;.XInsert the new bulb into bulb holder ;.XInsert bulb holder ; into the lamp and turn
it clockwise.XAlign housing cover : and turn it
clockwise until it engages.
High-beam headlamps
XSwitch off the lights.XOpen the hood.XTurn housing cover : counter-clockwise
and pull it out.XTurn bulb holder ; counter-clockwise and
pull it out.XTake the bulb out of bulb holder ;.XInsert the new bulb into bulb holder ;.XInsert bulb holder ; into the lamp and turn
it clockwise.XAlign housing cover : and turn it
clockwise until it engages.Standing lamps/parking lampsXSwitch off the lights.XOpen the hood.XTurn bulb holder : counter-clockwise and
pull it out.XTake the bulb out of bulb holder :.XInsert the new bulb into bulb holder :.XInsert bulb holder : into the lamp and turn
it clockwise.
Turn signal lamps/side marker lamps
XSwitch off the lights.XOpen the hood.XTurn bulb holder : (WY 5 W) / ; (3457
A) counter-clockwise and pull it out.XRemove the bulb from bulb
holder : / ; .XInsert the new bulb into bulb
holder : / ; .XInsert bulb holder : / ; into the lamp
and turn it clockwise.122Changing bulbsLights and windshield wipers
BA 164.8 USA, CA Edition B 2011; 1; 2, en-USd2sboikeVersion: 3.0.3.52010-04-21T15:08:44+02:00 - Seite 122
Page 149 of 376

SmartKey positions
SmartKeygTo remove the SmartKey1Power supply for some consumers, such
as the windshield wipers2Ignition (power supply for all consumers)
and drive position3To start the engine
As soon as the ignition is switched on, all the
indicator lamps in the instrument cluster light
up. The indicator lamps of the low-beam
headlamps, high-beam headlamps or the turn
signal lamps only light up if the low-beam
headlamps, high-beam headlamps or turn
signal lamps are switched on. If an indicator
lamp does not light up when the ignition is
switched on, check it and replace it if
necessary. If an indicator lamp does not go
out after the engine is started or if it lights up
while the vehicle is in motion, see
( Y page 254).
XRemove the SmartKey when the engine is
switched off.
The battery may otherwise discharge.
If you cannot turn the SmartKey in the ignition
lock, the vehicle battery may not be charged
sufficiently.
XCheck the vehicle battery and charge if
necessary ( Y page 323).
or
XJump-start the vehicle ( Y page 325).
i
The SmartKey can be turned in the
ignition lock even if it is not the correct
SmartKey for the vehicle. The ignition is not
switched on. The engine cannot be started.
KEYLESS-GO
Vehicles with KEYLESS-GO are equipped with
a SmartKey with an integrated KEYLESS-GO
function and a detachable Start/Stop button.
The Start/Stop button must be inserted in the
ignition lock and the SmartKey must be in the
vehicle.
Pressing the Start/Stop button several times
in succession corresponds to the different
key positions in the ignition lock. This is only
the case if you are not depressing the brake
pedal.
If you depress the brake pedal and press the
Start/Stop button, the engine starts
immediately.
The Start/Stop button can be removed from
the ignition lock. Then you can insert the
SmartKey in the ignition lock.
i You do not have to remove the Start/Stop
button from the ignition lock when you
leave the vehicle. However, you should
always take the SmartKey with you when
leaving the vehicle. The vehicle can be
started with the Start/Stop button and the
electrical equipment can be operated while
the SmartKey is in the vehicle.
:Start/Stop button;Ignition lockXInsert Start/Stop button : into ignition
lock ;.Driving147Driving and parkingBA 164.8 USA, CA Edition B 2011; 1; 2, en-USd2sboikeVersion: 3.0.3.52010-04-21T15:08:44+02:00 - Seite 147Z
Page 150 of 376
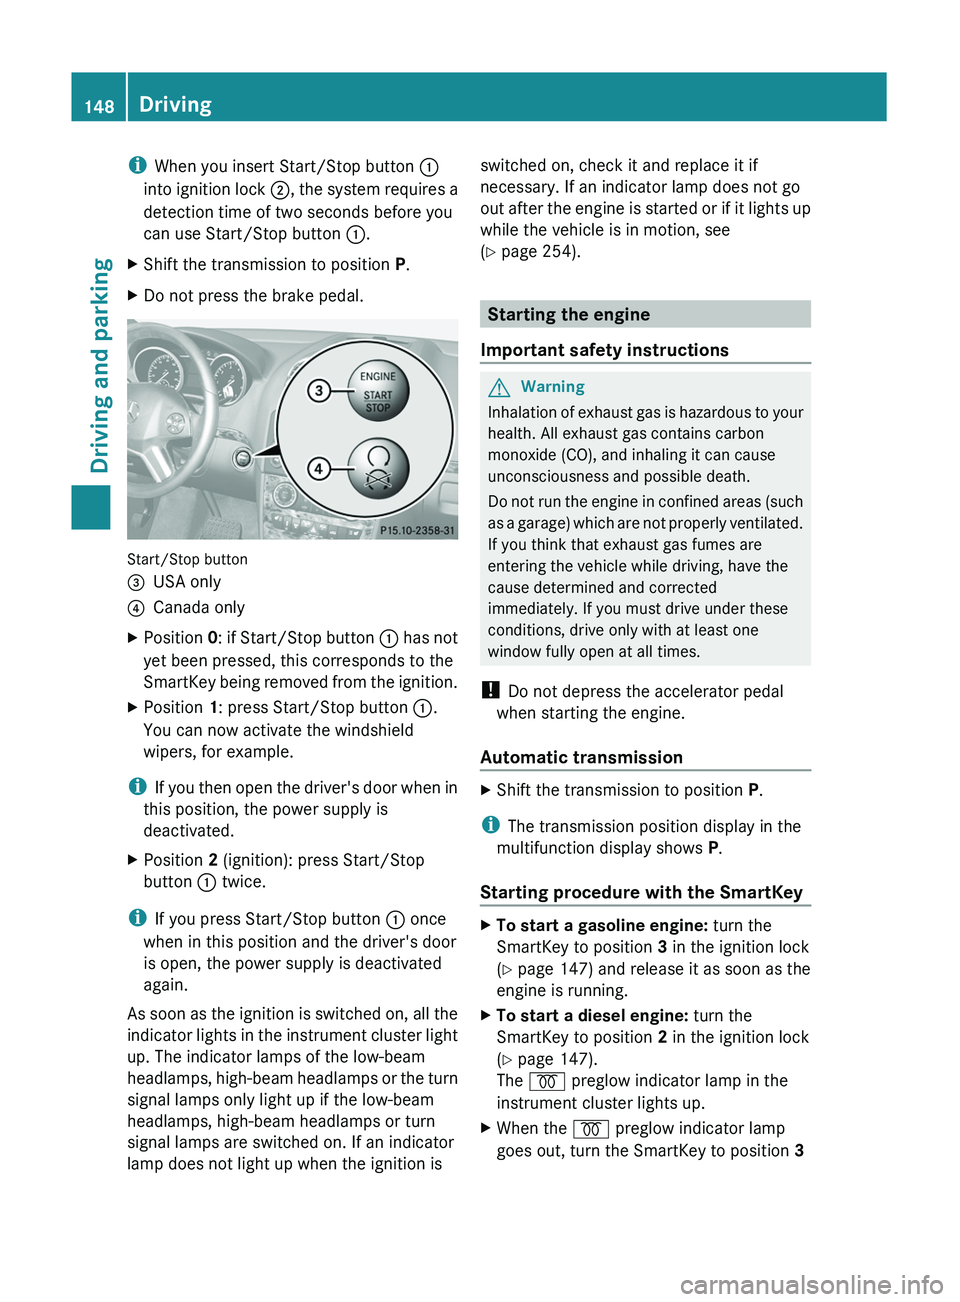
iWhen you insert Start/Stop button :
into ignition lock ;, the system requires a
detection time of two seconds before you
can use Start/Stop button :.XShift the transmission to position P.XDo not press the brake pedal.
Start/Stop button
=USA only?Canada onlyXPosition 0: if Start/Stop button : has not
yet been pressed, this corresponds to the
SmartKey being removed from the ignition.XPosition 1: press Start/Stop button :.
You can now activate the windshield
wipers, for example.
i If you then open the driver's door when in
this position, the power supply is
deactivated.
XPosition 2 (ignition): press Start/Stop
button : twice.
i
If you press Start/Stop button : once
when in this position and the driver's door
is open, the power supply is deactivated
again.
As soon as the ignition is switched on, all the
indicator lights in the instrument cluster light
up. The indicator lamps of the low-beam
headlamps, high-beam headlamps or the turn
signal lamps only light up if the low-beam
headlamps, high-beam headlamps or turn
signal lamps are switched on. If an indicator
lamp does not light up when the ignition is
switched on, check it and replace it if
necessary. If an indicator lamp does not go
out after the engine is started or if it lights up
while the vehicle is in motion, see
( Y page 254).
Starting the engine
Important safety instructions
GWarning
Inhalation of exhaust gas is hazardous to your
health. All exhaust gas contains carbon
monoxide (CO), and inhaling it can cause
unconsciousness and possible death.
Do not run the engine in confined areas (such
as a garage) which are not properly ventilated.
If you think that exhaust gas fumes are
entering the vehicle while driving, have the
cause determined and corrected
immediately. If you must drive under these
conditions, drive only with at least one
window fully open at all times.
! Do not depress the accelerator pedal
when starting the engine.
Automatic transmission
XShift the transmission to position P.
i
The transmission position display in the
multifunction display shows P.
Starting procedure with the SmartKey
XTo start a gasoline engine: turn the
SmartKey to position 3 in the ignition lock
( Y page 147) and release it as soon as the
engine is running.XTo start a diesel engine: turn the
SmartKey to position 2 in the ignition lock
( Y page 147).
The % preglow indicator lamp in the
instrument cluster lights up.XWhen the % preglow indicator lamp
goes out, turn the SmartKey to position 3 148DrivingDriving and parking
BA 164.8 USA, CA Edition B 2011; 1; 2, en-USd2sboikeVersion: 3.0.3.52010-04-21T15:08:44+02:00 - Seite 148
Page 153 of 376

Problems with the engineProblemPossible causes/consequences and M SolutionsThe engine does not
start. The starter motor
can be heard.R There is a malfunction in the engine electronics.
R There is a malfunction in the fuel supply.XTurn the SmartKey back to position 0 in the ignition lock before
the next attempt to start with the SmartKey.XBefore the next starting attempt with KEYLESS-GO: shut all open
vehicle doors so that the signals from the SmartKey may be
better received.
or
XPull the Start/Stop button out of the ignition.XUse the SmartKey to start the engine, (Y page 148) as external
radio signals cause KEYLESS-GO to malfunction. Avoid
excessively long and frequent attempts to start the engine as
these will drain the battery.
If the engine does not start after several attempts:
XConsult a qualified specialist workshop.The engine does not
start. You cannot hear
the starter motor.The on-board voltage is too low because the starter battery is too
weak or discharged.XJump-start the vehicle ( Y page 325).
If the engine does not start despite attempts to jump-start it:
XConsult a qualified specialist workshop.The starter motor was exposed to a thermal load that was too high.XAllow the starter motor to cool down for approximately two
minutes.XTry to start the engine again.
If the engine still does not start:
XConsult a qualified specialist workshop.Driving151Driving and parkingBA 164.8 USA, CA Edition B 2011; 1; 2, en-USd2sboikeVersion: 3.0.3.52010-04-21T15:08:44+02:00 - Seite 151Z
Page 204 of 376
recognize dangers in time, cause an accident
and injure yourself and others.
Collision warning
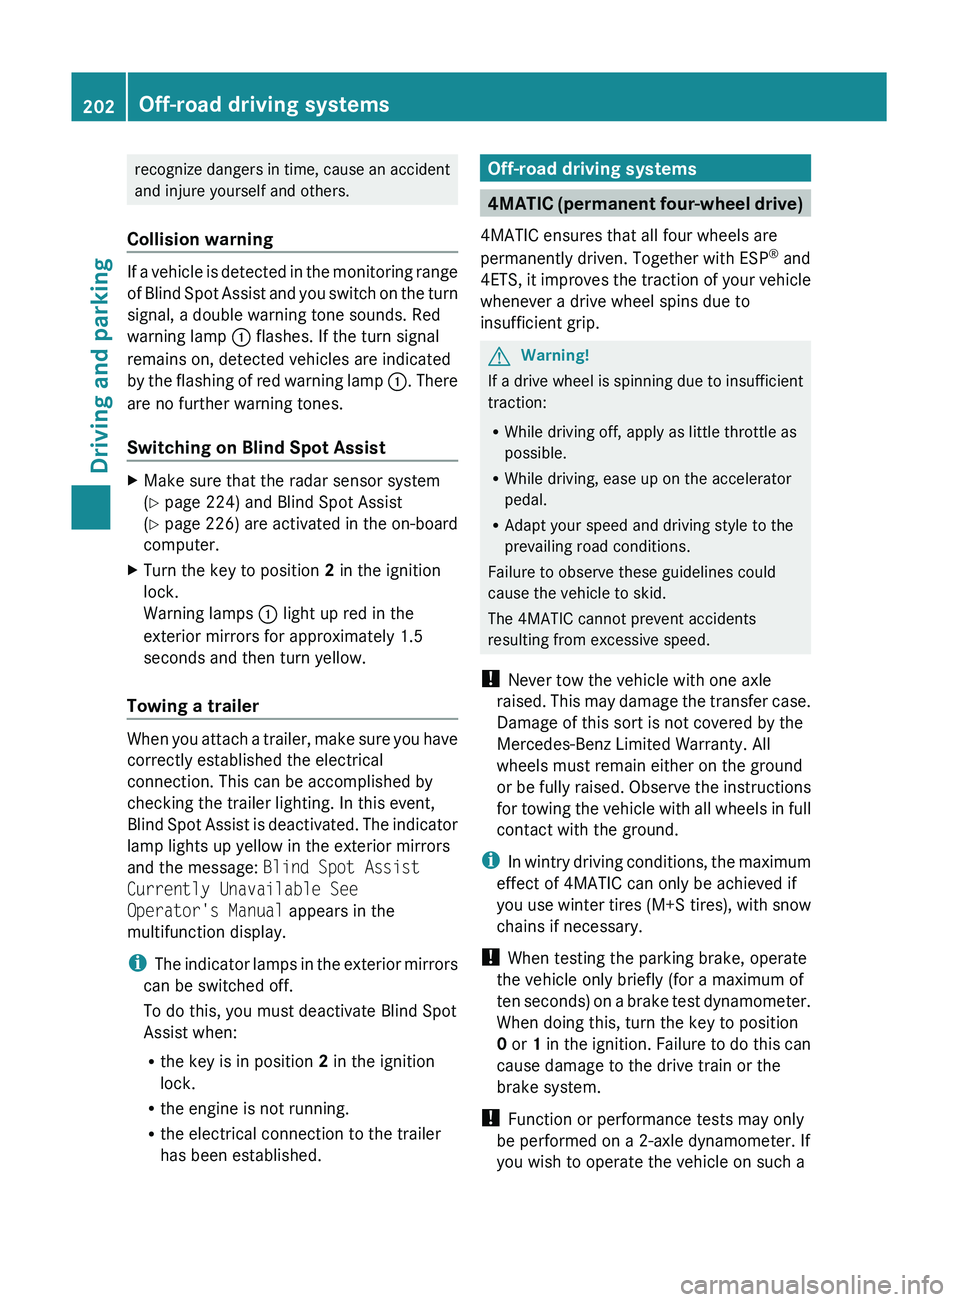
If a vehicle is detected in the monitoring range
of Blind Spot Assist and you switch on the turn
signal, a double warning tone sounds. Red
warning lamp : flashes. If the turn signal
remains on, detected vehicles are indicated
by the flashing of red warning lamp :. There
are no further warning tones.
Switching on Blind Spot Assist
XMake sure that the radar sensor system
( Y page 224) and Blind Spot Assist
( Y page 226) are activated in the on-board
computer.XTurn the key to position 2 in the ignition
lock.
Warning lamps : light up red in the
exterior mirrors for approximately 1.5
seconds and then turn yellow.
Towing a trailer
When you attach a trailer, make sure you have
correctly established the electrical
connection. This can be accomplished by
checking the trailer lighting. In this event,
Blind Spot Assist is deactivated. The indicator
lamp lights up yellow in the exterior mirrors
and the message: Blind Spot Assist
Currently Unavailable See
Operator's Manual appears in the
multifunction display.
i The indicator lamps in the exterior mirrors
can be switched off.
To do this, you must deactivate Blind Spot
Assist when:
R the key is in position 2 in the ignition
lock.
R the engine is not running.
R the electrical connection to the trailer
has been established.
Off-road driving systems
4MATIC (permanent four-wheel drive)
4MATIC ensures that all four wheels are
permanently driven. Together with ESP ®
and
4ETS , it improves the traction of your vehicle
whenever a drive wheel spins due to
insufficient grip.
GWarning!
If a drive wheel is spinning due to insufficient
traction:
R While driving off, apply as little throttle as
possible.
R While driving, ease up on the accelerator
pedal.
R Adapt your speed and driving style to the
prevailing road conditions.
Failure to observe these guidelines could
cause the vehicle to skid.
The 4MATIC cannot prevent accidents
resulting from excessive speed.
! Never tow the vehicle with one axle
raised. This may damage the transfer case.
Damage of this sort is not covered by the
Mercedes-Benz Limited Warranty. All
wheels must remain either on the ground
or be fully raised. Observe the instructions
for towing the vehicle with all wheels in full
contact with the ground.
i In wintry driving conditions, the maximum
effect of 4MATIC can only be achieved if
you use winter tires ( M+S tires), with snow
chains if necessary.
! When testing the parking brake, operate
the vehicle only briefly (for a maximum of
ten seconds) on a brake test dynamometer.
When doing this, turn the key to position
0 or 1 in the ignition. Failure to do this can
cause damage to the drive train or the
brake system.
! Function or performance tests may only
be performed on a 2-axle dynamometer. If
you wish to operate the vehicle on such a
202Off-road driving systemsDriving and parking
BA 164.8 USA, CA Edition B 2011; 1; 2, en-USd2sboikeVersion: 3.0.3.52010-04-21T15:08:44+02:00 - Seite 202
Page 239 of 376
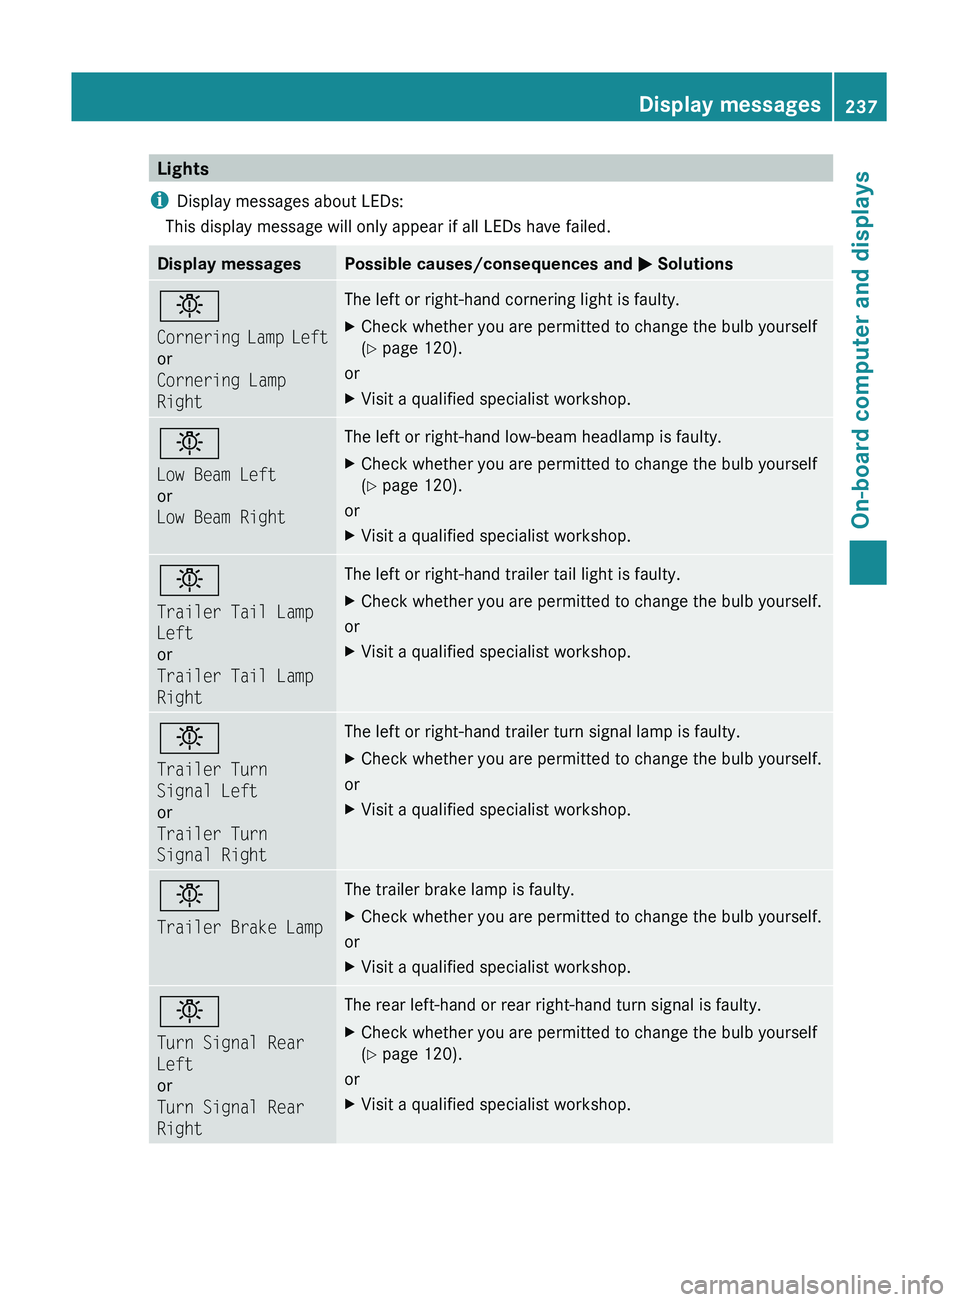
Lights
i Display messages about LEDs:
This display message will only appear if all LEDs have failed.Display messagesPossible causes/consequences and M Solutionsb
Cornering Lamp Left
or
Cornering Lamp
RightThe left or right-hand cornering light is faulty. XCheck whether you are permitted to change the bulb yourself
( Y page 120).
or
XVisit a qualified specialist workshop.b
Low Beam Left
or
Low Beam RightThe left or right-hand low-beam headlamp is faulty. XCheck whether you are permitted to change the bulb yourself
( Y page 120).
or
XVisit a qualified specialist workshop.b
Trailer Tail Lamp
Left
or
Trailer Tail Lamp
RightThe left or right-hand trailer tail light is faulty.XCheck whether you are permitted to change the bulb yourself.
or
XVisit a qualified specialist workshop.b
Trailer Turn
Signal Left
or
Trailer Turn
Signal RightThe left or right-hand trailer turn signal lamp is faulty.XCheck whether you are permitted to change the bulb yourself.
or
XVisit a qualified specialist workshop.b
Trailer Brake LampThe trailer brake lamp is faulty.XCheck whether you are permitted to change the bulb yourself.
or
XVisit a qualified specialist workshop.b
Turn Signal Rear
Left
or
Turn Signal Rear
RightThe rear left-hand or rear right-hand turn signal is faulty.XCheck whether you are permitted to change the bulb yourself
( Y page 120).
or
XVisit a qualified specialist workshop.Display messages237On-board computer and displaysBA 164.8 USA, CA Edition B 2011; 1; 2, en-USd2sboikeVersion: 3.0.3.52010-04-21T15:08:44+02:00 - Seite 237Z
Page 240 of 376
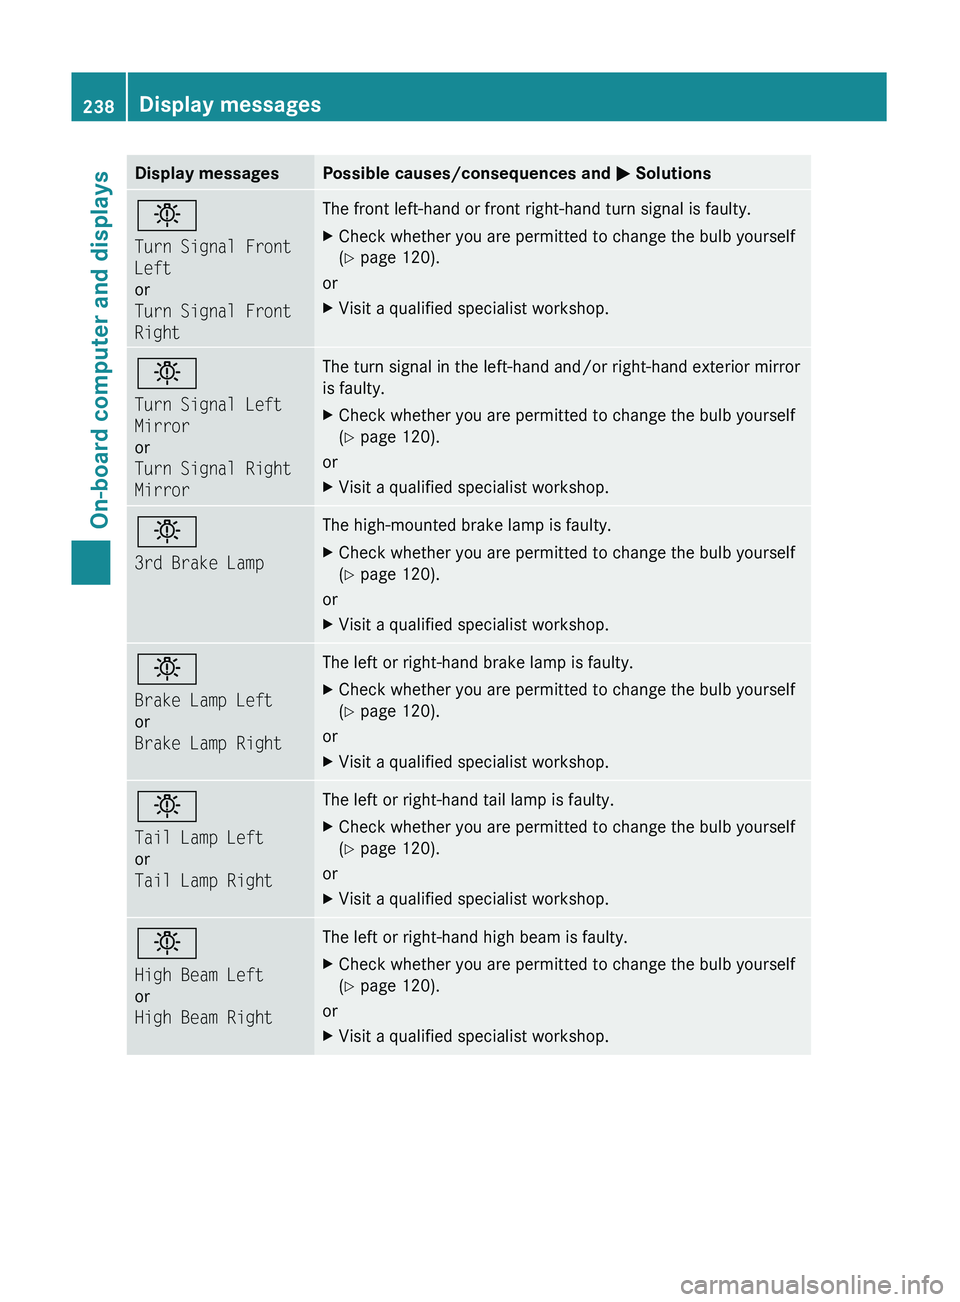
Display messagesPossible causes/consequences and M Solutionsb
Turn Signal Front
Left
or
Turn Signal Front
RightThe front left-hand or front right-hand turn signal is faulty.XCheck whether you are permitted to change the bulb yourself
( Y page 120).
or
XVisit a qualified specialist workshop.b
Turn Signal Left
Mirror
or
Turn Signal Right
MirrorThe turn signal in the left-hand and/or right-hand exterior mirror
is faulty.XCheck whether you are permitted to change the bulb yourself
( Y page 120).
or
XVisit a qualified specialist workshop.b
3rd Brake LampThe high-mounted brake lamp is faulty.XCheck whether you are permitted to change the bulb yourself
( Y page 120).
or
XVisit a qualified specialist workshop.b
Brake Lamp Left
or
Brake Lamp RightThe left or right-hand brake lamp is faulty.XCheck whether you are permitted to change the bulb yourself
( Y page 120).
or
XVisit a qualified specialist workshop.b
Tail Lamp Left
or
Tail Lamp RightThe left or right-hand tail lamp is faulty.XCheck whether you are permitted to change the bulb yourself
( Y page 120).
or
XVisit a qualified specialist workshop.b
High Beam Left
or
High Beam RightThe left or right-hand high beam is faulty. XCheck whether you are permitted to change the bulb yourself
( Y page 120).
or
XVisit a qualified specialist workshop.238Display messagesOn-board computer and displays
BA 164.8 USA, CA Edition B 2011; 1; 2, en-USd2sboikeVersion: 3.0.3.52010-04-21T15:08:44+02:00 - Seite 238