2011 MERCEDES-BENZ GL rear view mirror
[x] Cancel search: rear view mirrorPage 103 of 376
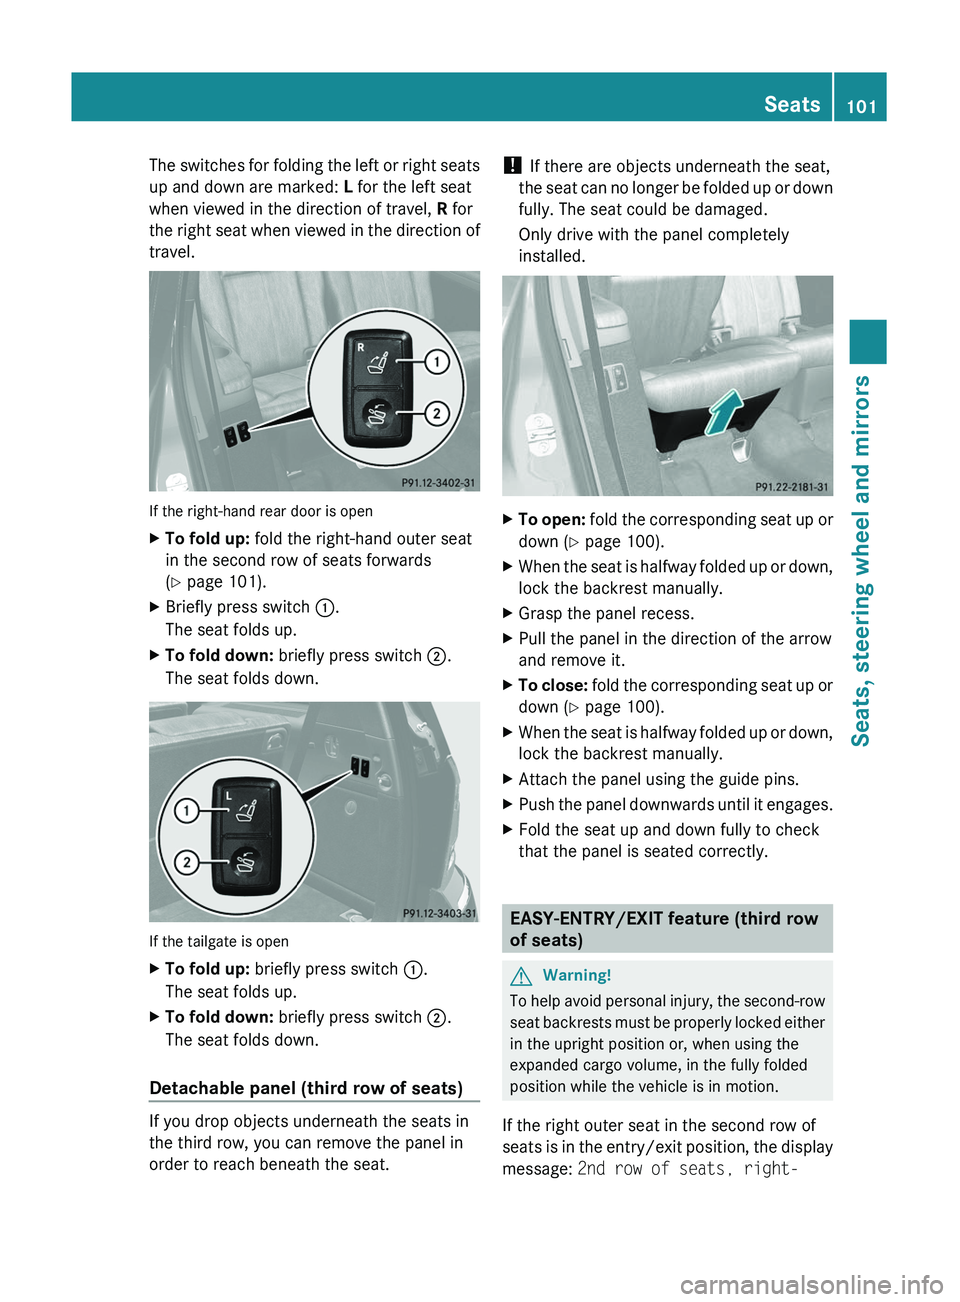
The switches for folding the left or right seats
up and down are marked: L for the left seat
when viewed in the direction of travel, R for
the right seat when viewed in the direction of
travel.
If the right-hand rear door is open
XTo fold up: fold the right-hand outer seat
in the second row of seats forwards
( Y page 101).XBriefly press switch :.
The seat folds up.XTo fold down: briefly press switch ;.
The seat folds down.
If the tailgate is open
XTo fold up: briefly press switch :.
The seat folds up.XTo fold down: briefly press switch ;.
The seat folds down.
Detachable panel (third row of seats)
If you drop objects underneath the seats in
the third row, you can remove the panel in
order to reach beneath the seat.
! If there are objects underneath the seat,
the seat can no longer be folded up or down
fully. The seat could be damaged.
Only drive with the panel completely
installed.XTo open: fold the corresponding seat up or
down ( Y page 100).XWhen the seat is halfway folded up or down,
lock the backrest manually.XGrasp the panel recess.XPull the panel in the direction of the arrow
and remove it.XTo close: fold the corresponding seat up or
down ( Y page 100).XWhen the seat is halfway folded up or down,
lock the backrest manually.XAttach the panel using the guide pins.XPush the panel downwards until it engages.XFold the seat up and down fully to check
that the panel is seated correctly.
EASY-ENTRY/EXIT feature (third row
of seats)
GWarning!
To help avoid personal injury, the second-row
seat backrests must be properly locked either
in the upright position or, when using the
expanded cargo volume, in the fully folded
position while the vehicle is in motion.
If the right outer seat in the second row of
seats is in the entry/exit position, the display
message: 2nd row of seats, right-
Seats101Seats, steering wheel and mirrorsBA 164.8 USA, CA Edition B 2011; 1; 2, en-USd2sboikeVersion: 3.0.3.52010-04-21T15:08:44+02:00 - Seite 101Z
Page 110 of 376
Mirrors
Rear-view mirror
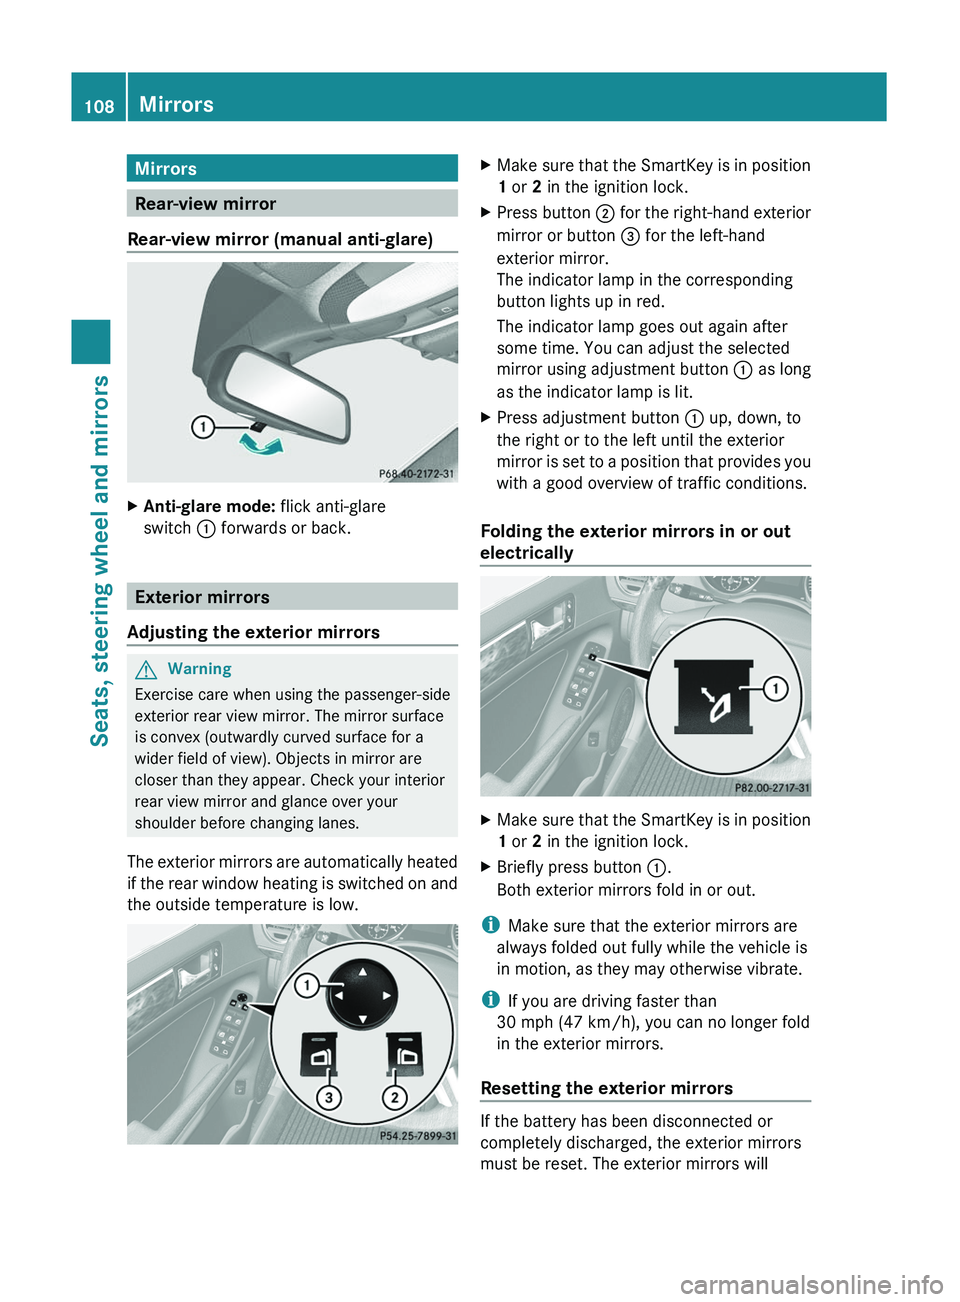
Rear-view mirror (manual anti-glare)
XAnti-glare mode: flick anti-glare
switch : forwards or back.
Exterior mirrors
Adjusting the exterior mirrors
GWarning
Exercise care when using the passenger-side
exterior rear view mirror. The mirror surface
is convex (outwardly curved surface for a
wider field of view). Objects in mirror are
closer than they appear. Check your interior
rear view mirror and glance over your
shoulder before changing lanes.
The exterior mirrors are automatically heated
if the rear window heating is switched on and
the outside temperature is low.
XMake sure that the SmartKey is in position
1 or 2 in the ignition lock.XPress button ; for the right-hand exterior
mirror or button = for the left-hand
exterior mirror.
The indicator lamp in the corresponding
button lights up in red.
The indicator lamp goes out again after
some time. You can adjust the selected
mirror using adjustment button : as long
as the indicator lamp is lit.XPress adjustment button : up, down, to
the right or to the left until the exterior
mirror is set to a position that provides you
with a good overview of traffic conditions.
Folding the exterior mirrors in or out
electrically
XMake sure that the SmartKey is in position
1 or 2 in the ignition lock.XBriefly press button :.
Both exterior mirrors fold in or out.
i Make sure that the exterior mirrors are
always folded out fully while the vehicle is
in motion, as they may otherwise vibrate.
i If you are driving faster than
30 mph (47 km/h), you can no longer fold
in the exterior mirrors.
Resetting the exterior mirrors
If the battery has been disconnected or
completely discharged, the exterior mirrors
must be reset. The exterior mirrors will
108MirrorsSeats, steering wheel and mirrors
BA 164.8 USA, CA Edition B 2011; 1; 2, en-USd2sboikeVersion: 3.0.3.52010-04-21T15:08:44+02:00 - Seite 108
Page 111 of 376
otherwise not fold in when you select the
"Fold in mirrors when locking" function in the
on-board computer ( Y page 226).XMake sure that the SmartKey is in
position 1 in the ignition lock.XBriefly press button :.
Folding the exterior mirrors in or out
automatically
If the "Fold in mirrors when locking" function
is activated in the on-board computer
( Y page 226):
R the exterior mirrors fold in automatically as
soon as you lock the vehicle from the
outside.
R the exterior mirrors fold out again
automatically as soon as you unlock the
vehicle and then open the driver's or front-
passenger door.
i The mirrors do not fold out if they have
been folded in manually.
Exterior mirror out of position
If an exterior mirror has been pushed out of
position, proceed as follows:
X Vehicles without electrically folding
exterior mirrors: move the exterior mirror
into the correct position manually.XVehicles with electrically folding
exterior mirrors: press the mirror-folding
button ( Y page 108) repeatedly until you
hear the mirror engage in position.
The mirror housing is engaged again and
you can adjust the exterior mirrors as usual
( Y page 108).
Automatic anti-glare mirrors
GWarning!
The auto-dimming function does not react if
incoming light is not aimed directly at sensors
in the interior rear view mirror.
The interior rear view mirror and the exterior
rear view mirror on the driver’s side do not
react, for example, when transporting cargo
which covers the rear window.
Light hitting the mirror(s) at certain angles
(incident light) could blind you. As a result,
you may not be able to observe traffic
conditions and could cause an accident.
The rear-view mirror and the exterior mirror
on the driver's side automatically go into anti-
glare mode if the ignition is switched on and
incident light from headlamps strikes the
sensor in the rear-view mirror.
The mirrors do not go into anti-glare mode if
reverse gear is engaged or the interior lighting
is switched on.
Parking position for the exterior
mirror on the front-passenger side
Setting and storing the parking position
You can position the front-passenger side
exterior mirror in such a way that you can see
the rear wheel on that side as soon as you
engage reverse gear. You can store this
position.
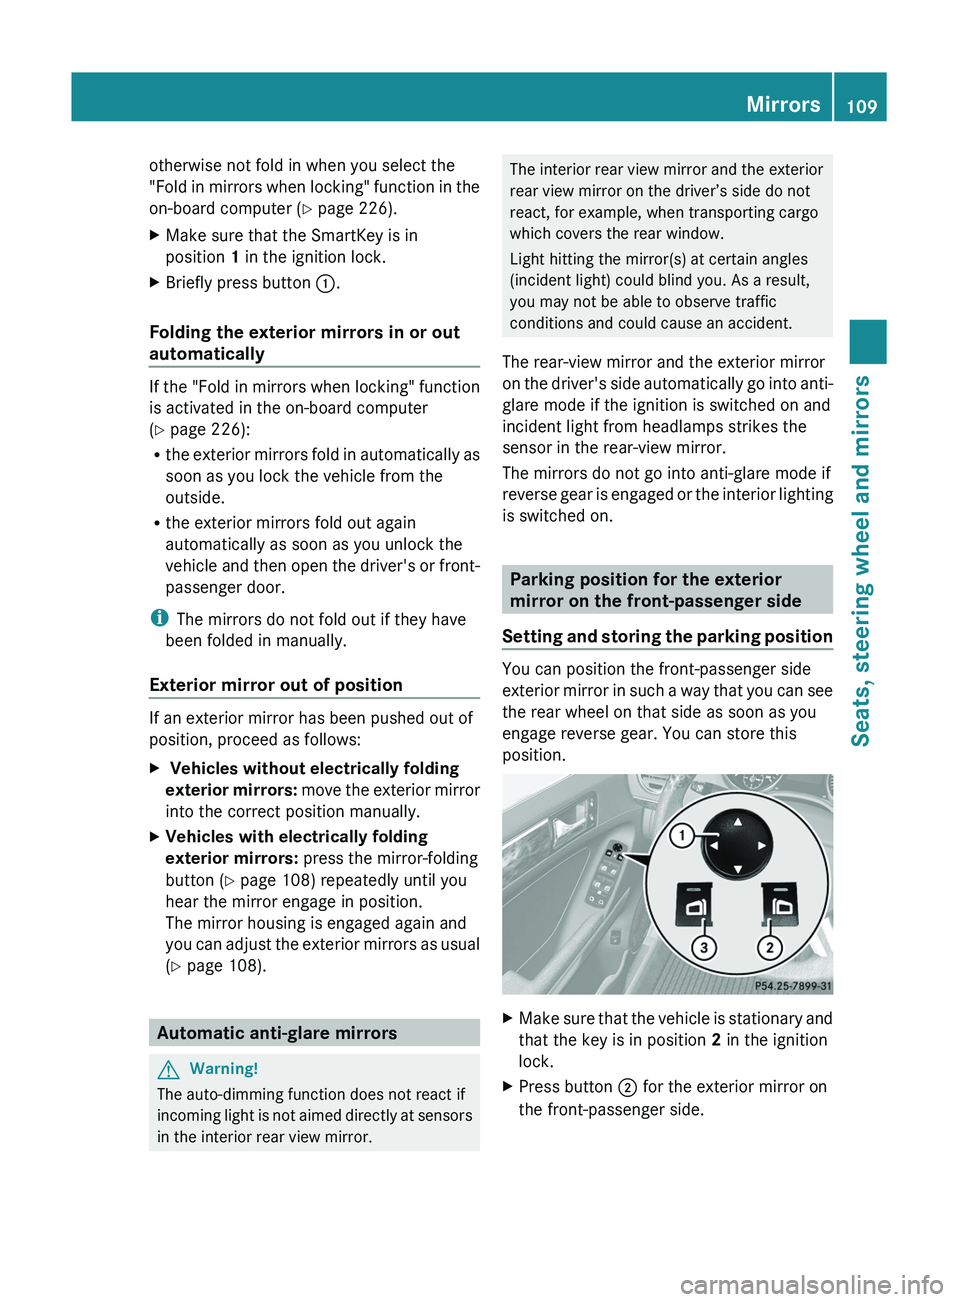
XMake sure that the vehicle is stationary and
that the key is in position 2 in the ignition
lock.XPress button ; for the exterior mirror on
the front-passenger side.Mirrors109Seats, steering wheel and mirrorsBA 164.8 USA, CA Edition B 2011; 1; 2, en-USd2sboikeVersion: 3.0.3.52010-04-21T15:08:44+02:00 - Seite 109Z
Page 200 of 376
Problems with PARKTRONICProblemPossible causes/consequences and M SolutionsOnly the red segments
in the PARKTRONIC
warning displays are lit.
You also hear a warning
tone for approximately
two seconds.
PARKTRONIC is
deactivated after
approximately
20 seconds and the
indicator lamp in the
PARKTRONIC button
lights up.PARKTRONIC has malfunctioned and has switched off.XIf problems persist, have PARKTRONIC checked at a qualified
specialist workshop.Only the red segments
in the PARKTRONIC
warning displays are lit.
PARKTRONIC is
deactivated after
approximately 20
seconds.The PARKTRONIC sensors are dirty or there is interference.XClean the PARKTRONIC sensors ( Y page 303).XSwitch the ignition back on.The problem may be caused by an external source of radio or
ultrasound waves.XSee if PARKTRONIC functions in a different location.Rear view camera
Important safety guidelines
The rear view camera is an optical parking aid.
It shows the area behind your vehicle in the
COMAND APS display.
GWarning!
Make sure no persons or animals are in or
near the area in which you are parking/
maneuvering. Otherwise, they could be
injured.
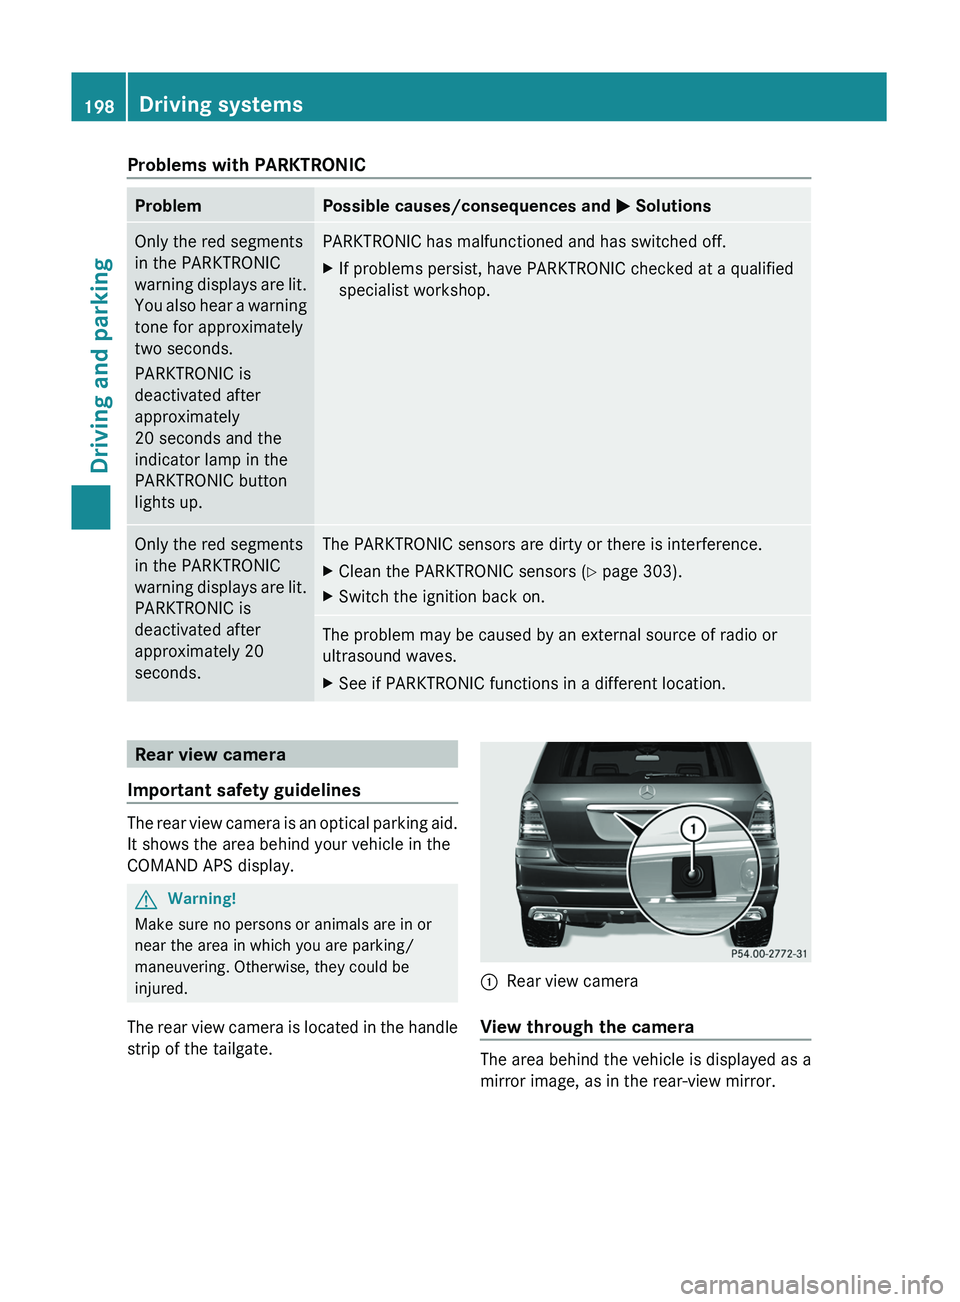
The rear view camera is located in the handle
strip of the tailgate.
:Rear view camera
View through the camera
The area behind the vehicle is displayed as a
mirror image, as in the rear-view mirror.
198Driving systemsDriving and parking
BA 164.8 USA, CA Edition B 2011; 1; 2, en-USd2sboikeVersion: 3.0.3.52010-04-21T15:08:44+02:00 - Seite 198
Page 212 of 376
XMake sure that the automatic transmission
is set to position P.XApply the vehicle's parking brake.XStart the engine.XSelect highway level.XVehicles with the adaptive damping
system: set ADS to AUTO or COMF .XSwitch off the engine.XClose all doors and the tailgate.XCouple up the trailer.XEstablish all electrical connections.
i
Vehicles with the AIRMATIC package:
with a trailer attached, the vehicle will
always remain at highway level. When
coupling up a trailer, please observe the
following:
R if highway level has not been set
manually, the vehicle will automatically
sink to highway level as soon as it
reaches a speed of 5 mph (8 km/h).
R high-speed level is not available.
These restrictions apply to all accessories
powered through a connection to the trailer
power socket of your vehicle, e.g. a bicycle
carrier.
Towing a trailer
There are numerous legal requirements
concerning the towing of a trailer, e.g. speed
restrictions. Make sure that your vehicle/
trailer combination complies with the local
requirements not only in your area of
residence but also at any location to which
you are traveling. The police and local
authorities can provide reliable information.
Please observe the following when towing a
trailer:
R To acquaint yourself with driving with a
trailer and with the resulting changes to
handling, you should practice cornering,
stopping and reversing in a traffic-free
location.
R Before driving, check:
- the trailer coupling
- the safety switch for braked trailers
- the safety chains
- the electrical connections
- the lights
- the wheels
R Adjust the exterior mirrors to provide an
unobstructed view of the rear section of the
trailer.
R If the trailer features electronically
controlled brakes, pull away the vehicle/
trailer combination carefully, manually
brake using the brake controller, and check
the brakes for correct function.
R Secure any objects on the trailer to prevent
the cargo from slipping when the vehicle is
in motion.
R If you couple up a trailer, regularly check
the cargo for secure fastening and make
sure that the trailer lamps and (if
applicable) the trailer brakes are
functioning correctly.
R Bear in mind that the handling will be less
stable when towing a trailer than when
driving without one. Avoid sudden steering
movements.
R The vehicle/trailer combination is heavier,
accelerates more slowly, has a decreased
gradient climbing capability and a longer
braking distance.
It is more susceptible to side winds and
requires more careful steering.
R If possible, avoid abrupt braking. Depress
the brake pedal moderately at first, so that
the trailer can activate its own brakes. Then
increase the pressure on the brake pedal.
R If the automatic transmission continues to
shift back and forth between two gears
when driving up or downhill, restrict the
shift range. Select shift range 4, 3, 2, or 1.
A lower gear and lower speed reduce the
risk of engine failure.210Towing a trailerDriving and parking
BA 164.8 USA, CA Edition B 2011; 1; 2, en-USd2sboikeVersion: 3.0.3.52010-04-21T15:08:44+02:00 - Seite 210
Page 291 of 376
This device complies with part 15 of the
FCC rules. Operation is subject to the
following two conditions:
1. The device must not cause harmful
interference.
2. The device must withstand any
interference received, including
interference that may cause undesired
operation.
Unauthorized modification of this device
could void the device's operating permit.
i Canada only:
This device complies with the RSS-210
requirements of Industry Canada.
Operation is subject to the following two
conditions:
1. The device must not cause harmful
interference.
2. The device must accept any interference
received, including interference that may
cause undesired operation.
Unauthorized modification of this device
could void the user's authority to legally
operate the device.
Programming the remote control
Programming
GWarning!
Only press the transmitter button on the
integrated remote control if there are no
persons or objects present within the sweep
of the garage door. People could otherwise be
injured by the movement of the door.
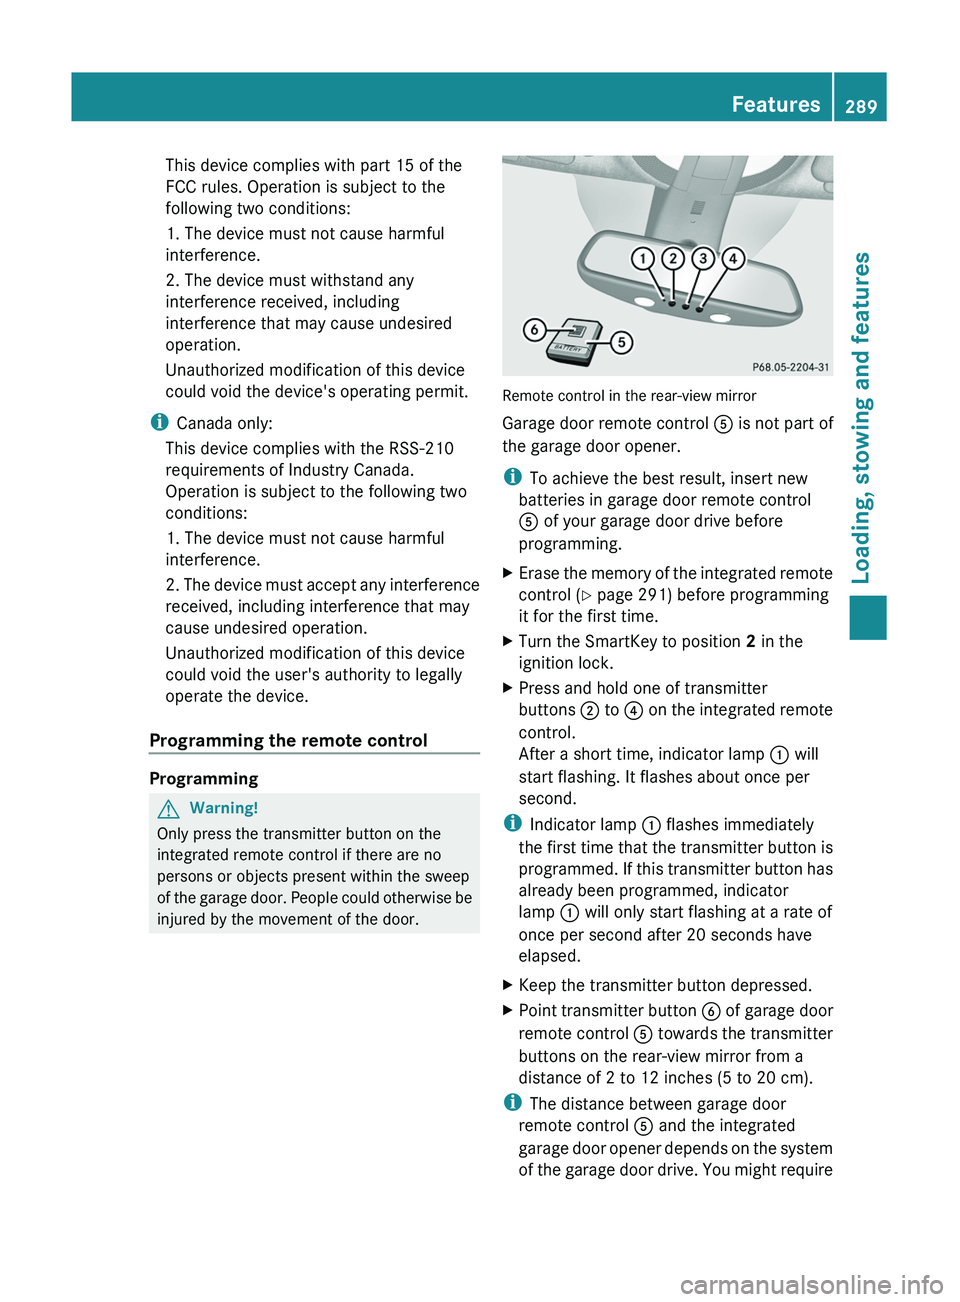
Remote control in the rear-view mirror
Garage door remote control A is not part of
the garage door opener.
i To achieve the best result, insert new
batteries in garage door remote control
A of your garage door drive before
programming.
XErase the memory of the integrated remote
control ( Y page 291) before programming
it for the first time.XTurn the SmartKey to position 2 in the
ignition lock.XPress and hold one of transmitter
buttons ; to ? on the integrated remote
control.
After a short time, indicator lamp : will
start flashing. It flashes about once per
second.
i Indicator lamp : flashes immediately
the first time that the transmitter button is
programmed. If this transmitter button has
already been programmed, indicator
lamp : will only start flashing at a rate of
once per second after 20 seconds have
elapsed.
XKeep the transmitter button depressed.XPoint transmitter button B of garage door
remote control A towards the transmitter
buttons on the rear-view mirror from a
distance of 2 to 12 inches (5 to 20 cm).
i The distance between garage door
remote control A and the integrated
garage door opener depends on the system
of the garage door drive. You might require
Features289Loading, stowing and featuresBA 164.8 USA, CA Edition B 2011; 1; 2, en-USd2sboikeVersion: 3.0.3.52010-04-21T15:08:44+02:00 - Seite 289Z
Page 292 of 376
several attempts. You should test every
position for at least 20 seconds before
trying another position.XKeep transmitter button B on garage door
remote control A pressed until indicator
lamp : starts to flash rapidly.
The programming has been successful if
indicator lamp : flashes rapidly.XRelease transmitter buttons ;, = or ?
on the integrated remote control or
transmitter button on the garage door
remote control B.
If indicator lamp : goes out after
approximately 20 seconds and has not
flashed rapidly:
XRelease transmitter buttons ;, = or ?
on the integrated remote control or
transmitter button on the garage door
remote control B.XRepeat the procedure for the other
transmitter buttons. When doing so, vary
the distance between the garage door's
remote control and the transmitter buttons
in the rear-view mirror.
i If the garage door system works with a
rolling code, you must synchronize the
remote control integrated into the rear-
view mirror with the garage door system
receiver after programming.
You will find further information in the
garage door opening system's operating
instructions, e.g. the sections on
"Synchronizing the transmitter" or
"Registering a new transmitter". You can
also call the hotline mentioned above.
Notes on programming the remote
control
Canadian radio frequency laws require
transmitter signals to "time-out" (or quit) after
several seconds of transmission. This may
not be long enough for the integrated signal
transmitter to pick up the signal during
programming. Similar to this Canadian law,
some U.S. gate operators are designed to
"time-out" in the same manner.
If you live in Canada or have difficulties
programming the garage door opener
(regardless of where you live) when using the
programming steps (see above), proceed as
follows:XPress transmitter button ( ;, = or ?) and
hold it down during the following steps until
the setup has been completed
successfully.XAt the same time, press transmitter button
B of the garage door remote control for
two seconds, then release it for two
seconds, then press it again for two
seconds.XRepeat this sequence on transmitter
button B of the garage door remote
control until the frequency signal has been
learned.XIf the setup procedure is successful,
indicator lamp : flashes once slowly and
goes out after a few seconds.XContinue with the other programming
steps (see above).
Problems when programming
If you have problems when programming the
integrated remote control, please note the
following:
R check the transmitter frequency of garage
door remote control A (which can usually
be found on the rear of the remote control).
The integrated remote control is
compatible with equipment that operates
in the frequency range 280 to 390 MHz.
R replace the batteries in garage door remote
control A. This increases the likelihood of
garage door remote control A sending a
strong and precise signal to the integrated
remote control on the rear-view mirror.
R When aiming the garage door remote
control at the transmitter buttons on the
rear-view mirror, hold garage door remote
control A at differing distances and angles
290FeaturesLoading, stowing and features
BA 164.8 USA, CA Edition B 2011; 1; 2, en-USd2sboikeVersion: 3.0.3.52010-04-21T15:08:44+02:00 - Seite 290