2011 MERCEDES-BENZ G55AMG fuel
[x] Cancel search: fuelPage 133 of 288
ABS not available Differential
Locked message.
The å!÷ warning lamps light up
in the instrument cluster.
The differential lock for the transfer case is
engaged.
4ETS, ESP ®
, BAS and ABS are deactivated.
The vehicle's ability to steer is severely
restricted. Drive carefully and accelerate
gently for optimum traction.
i You can now engage differential lock for
the rear axle ? and differential lock for the
front axle ; as desired.
Differential lock for the rear axle
XTo engage: press switch ?.
First, the yellow activation indicator lamp
lights up, followed by the red function
indicator lamp.
The differential lock for the rear axle is
engaged.
Differential lock for the front axle
XTo engage: press switch ;.
First, the yellow activation indicator lamp
lights up, followed by the red function
indicator lamp.
The differential lock for the front axle is
engaged.
Deactivating the differential lock
You can deactivate the differential locks in
the reverse order: ;, ? , = .
XTo simultaneously deactivate all
differential locks: press switch =.
Yellow activation indicator lamps A go
out. Red function indicator lamps : go out
once the differential locks have
disengaged.
After approximately three seconds of
normal driving, ABS, 4ETS, ESP ®
and BAS
are activated.
The ABS not available Differential
Locked message disappears from themultifunction display and the å, !
and ÷ warning lamps in the instrument
cluster go out.XSwitch the transfer case to road gear
HIGH (Y page 126).
i
If red function indicator lamps : do not
go out when you disengage the differential
locks, bring the vehicle to a stop in
accordance with the traffic conditions,
then begin driving again. The load change
can disengage the differential locks.
GWarning!
Always remember to disengage the
differential locks when returning to drive on
paved roads, see “A few words about
differentials and differential locks”.
Refueling
Important safety notes
GWarning
Gasoline is highly flammable and poisonous.
It burns violently and can cause serious
personal injury.
Never allow sparks, flames or smoking
materials near gasoline.
Turn off the engine before refueling.
Whenever you are around gasoline, avoid
inhaling fumes and any skin or clothing
contact.
Direct skin contact with fuels and the
inhalation of fuel vapors are damaging to your
health.
GWarning
Overfilling of the fuel tank may create
pressure in the system which could cause a
gas discharge. This could cause the gasoline
to spray back out when removing the fuel
pump nozzle, which could cause personal
injury.
Refueling131Driving and parkingZ
Page 134 of 288
! Do not use diesel to refuel vehicles with a
gasoline engine. Even small amounts of the
wrong fuel result in damage to the fuel
system and engine.
! Do not switch on the ignition if you
accidentally refuel with the wrong fuel.
Otherwise, the fuel will enter the fuel lines.
Notify a qualified specialist workshop and
have the fuel tank and fuel lines drained
completely.
Gasoline
Fuel grade
! You should only refuel with unleaded
premium-grade gasoline as this avoids
damaging the catalytic converter.
If engine running problems are apparent,
have the cause checked immediately and
repaired. Excess unburned fuel can
otherwise enter the catalytic converter,
leading to overheating and possibly
causing a fire.
i Only refuel with unleaded premium-grade
gasoline with a specified minimum octane
number of 91 (average value of 96 RON/
86 MON).
Usually, you will find information about the
fuel grade on the pump. If you cannot find
the label on the gasoline pump, ask the gas
station staff.
You can find further information under
"Fuel" ( Y page 277), by consulting an
authorized Mercedes-Benz Center or
visiting http://www.mbusa.com (USA
only).
! Use a filter when refueling from a fuel can.
Otherwise, the fuel lines and/or injection
system could be blocked by particles from
the fuel can.
Refueling
Fuel filler flap
When you open or close the vehicle with the
key, the fuel filler flap is automatically
unlocked or locked.
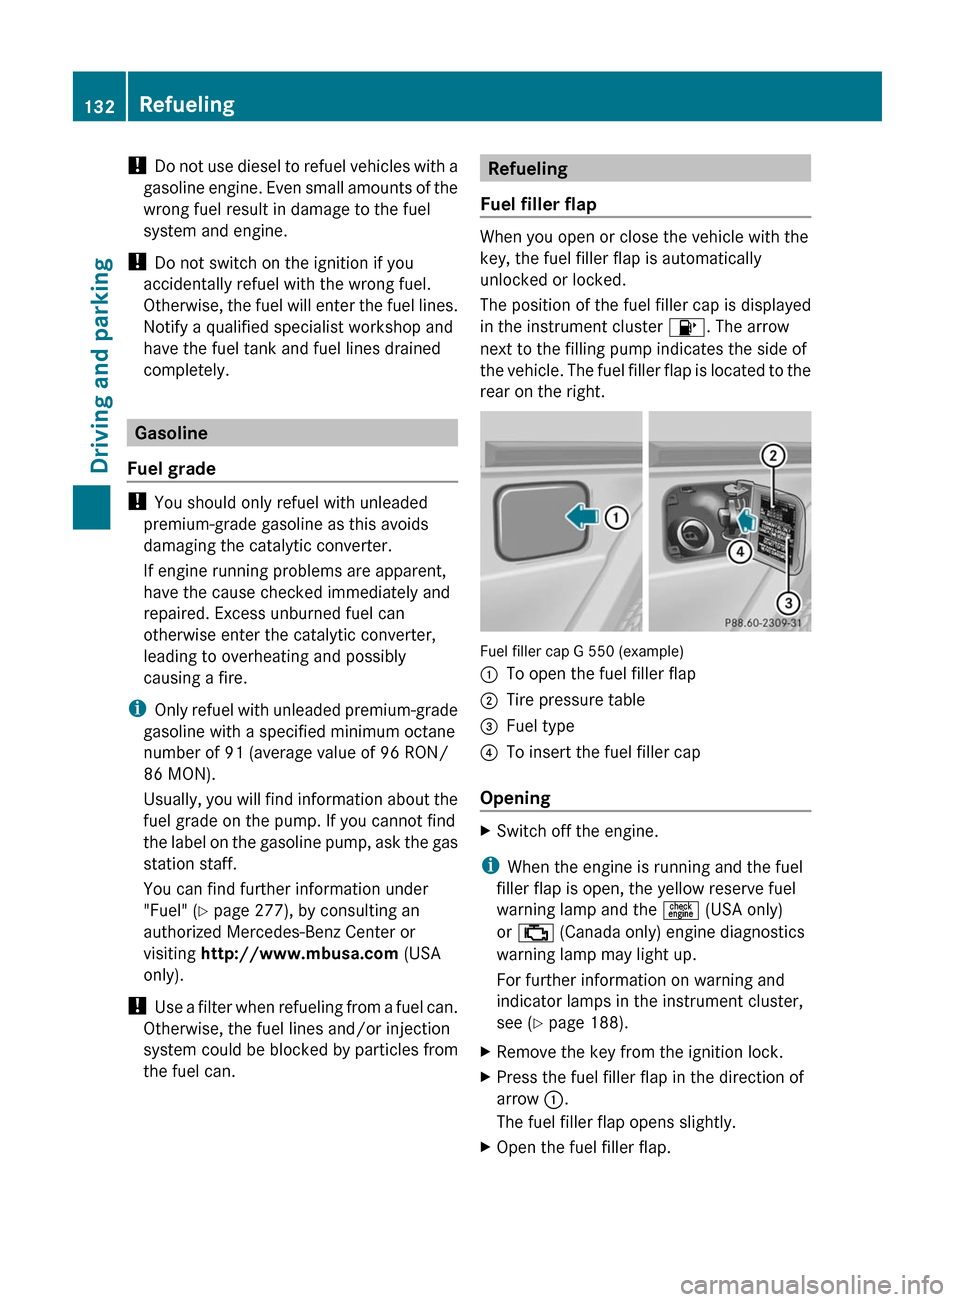
The position of the fuel filler cap is displayed
in the instrument cluster 8. The arrow
next to the filling pump indicates the side of
the vehicle. The fuel filler flap is located to the
rear on the right.
Fuel filler cap G 550 (example)
:To open the fuel filler flap;Tire pressure table=Fuel type?To insert the fuel filler cap
Opening
XSwitch off the engine.
i When the engine is running and the fuel
filler flap is open, the yellow reserve fuel
warning lamp and the = (USA only)
or ; (Canada only) engine diagnostics
warning lamp may light up.
For further information on warning and
indicator lamps in the instrument cluster,
see ( Y page 188).
XRemove the key from the ignition lock.XPress the fuel filler flap in the direction of
arrow :.
The fuel filler flap opens slightly.XOpen the fuel filler flap.132RefuelingDriving and parking
Page 135 of 288
XTurn the fuel filler cap counter-clockwise
and remove it.XInsert the fuel filler cap into the holder
bracket on the inside of filler flap ?.XCompletely insert the fuel pump nozzle into
the filler neck and refuel.XOnly fill the tank until the pump nozzle
switches off.
! Overfilling the fuel tank could damage the
fuel system.
Closing
XReplace the fuel filler cap and turn it
clockwise. The fuel filler cap audibly
engages.XClose the fuel filler flap.
i Close the fuel filler flap before locking the
vehicle. A locking pin otherwise prevents
the fuel filler flap from closing after the
vehicle has been locked.
Fuel filler flap emergency release
GWarning!
Avoid contact with the vehicle walls as they
may contain sharp edges. Otherwise, you
could injure yourself while releasing the fuel
filler flap.
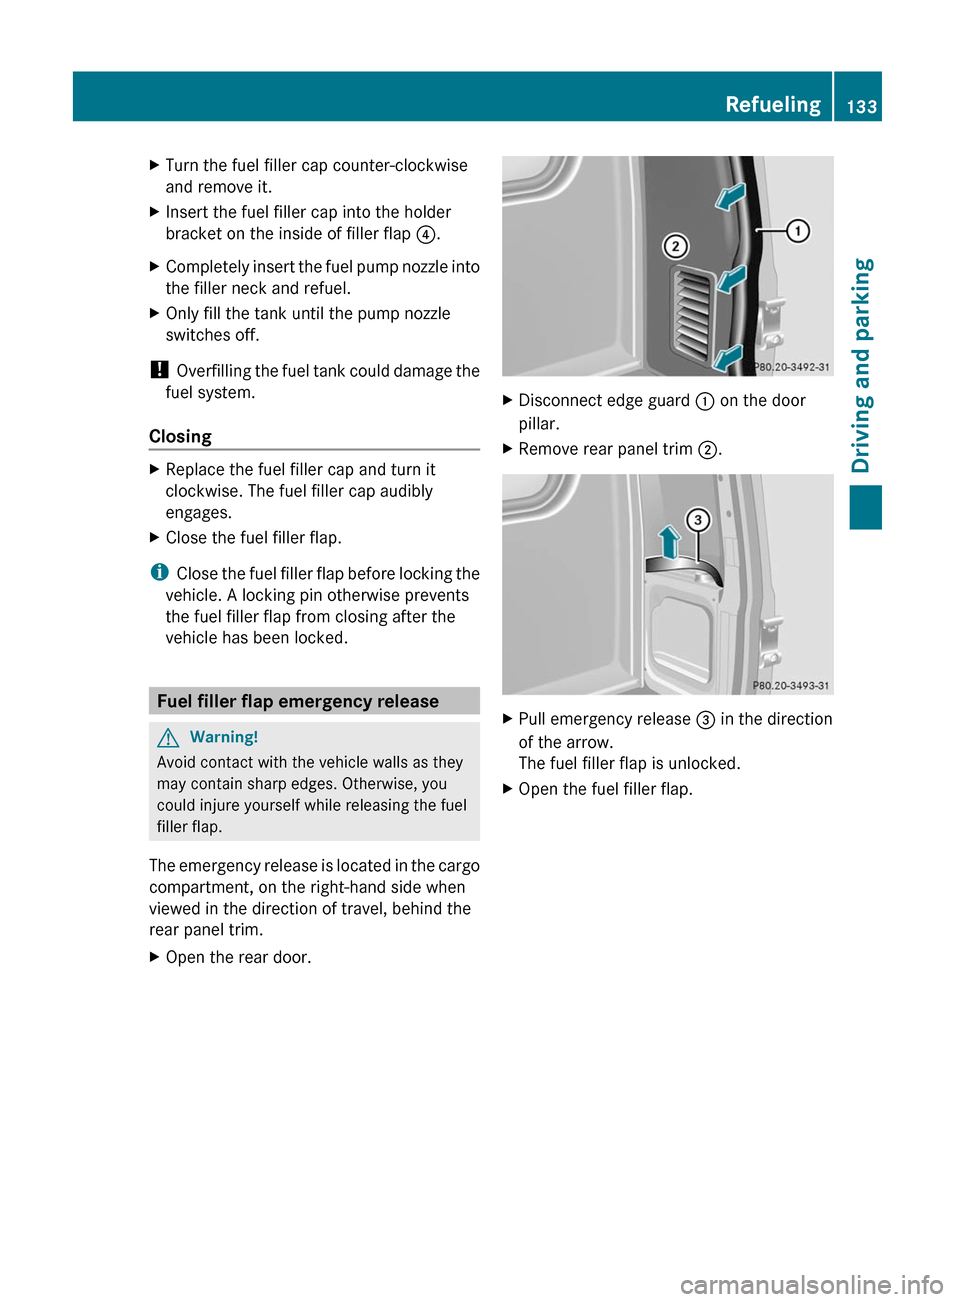
The emergency release is located in the cargo
compartment, on the right-hand side when
viewed in the direction of travel, behind the
rear panel trim.
XOpen the rear door.XDisconnect edge guard : on the door
pillar.XRemove rear panel trim ;.XPull emergency release = in the direction
of the arrow.
The fuel filler flap is unlocked.XOpen the fuel filler flap.Refueling133Driving and parkingZ
Page 136 of 288
Problems with the fuel and fuel tankProblemPossible causes/consequences and M SolutionsFuel is leaking from the
vehicle.GRisk of explosion or fire
The fuel line or the fuel tank is defective.
XTurn the key to position 0 (Y page 117) in the ignition lock
immediately and remove it.XDo not restart the engine under any circumstances.XConsult a qualified specialist workshop.The fuel filler flap
cannot be opened.The fuel filler flap is not unlocked.
or
The key batteries are discharged.XUnlock the vehicle ( Y page 62).
or
XUnlock the vehicle using the mechanical key ( Y page 63).XOpen the rear door.XManually unlock the fuel filler flap using the emergency release
( Y page 133).The fuel filler flap is unlocked, but the opening mechanism is
jammed.XManually unlock the fuel filler flap using the emergency release
( Y page 133).XConsult a qualified specialist workshop.Parking
Important safety notes
GWarning
Do not park this vehicle in areas where
combustible materials can come into contact
with the hot exhaust system. Do not park the
vehicle on dry grassland or harvested grain
fields. Combustible materials, such as grass,
hay or leaves could be ignited by the hot
exhaust system and cause a vehicle fire.
Unintended vehicle movement can cause
serious personal injury or damage to the
vehicle or the vehicle drivetrain. To reduce
such risks, always do the following before
turning off the engine and leaving the vehicle:
R keep your right foot on the brake pedal.
R engage the parking brake.
R shift the automatic transmission into park
position P.
R slowly release the brake pedal.
R when parked on an incline, always turn the
front wheels towards the road curb.134ParkingDriving and parking
Page 138 of 288
XConnect a trickle charger.
iYou can obtain information about trickle
chargers from a qualified specialist
workshop, e.g. an authorized Mercedes-
Benz Center.
If you leave the vehicle parked up for longer
than six weeks, the vehicle may suffer
damage as a result of lack of use.
XVisit a qualified specialist workshop and
seek advice.
Driving tips
General driving tips
Important safety notes
GWarning!
Please do not forget that your primary
responsibility is to drive the vehicle. A driver’s
attention to the road must always be his/her
primary focus when driving. For your safety
and the safety of others, we recommend that
you pull over to a safe location and stop
before placing or taking a telephone call.
If you choose to use the telephone 11
while
driving, please use the hands-free device and
only use the telephone when road, weather
and traffic conditions permit. Some
jurisdictions prohibit the driver from using a
mobile telephone while driving a vehicle.
Only operate the COMAND 11
(Cockpit
Management and Data System) if road,
weather and traffic conditions permit.
Otherwise, you may not be able to observe
traffic conditions and could endanger yourself
and others.
Bear in mind that at a speed of just 30 mph
(approximately 50 km/h), your vehicle is
covering a distance of 44 feet (approximately
14 m) every second.
Drive sensibly – save fuel
Observe the following tips to save fuel:
XThe tires should always be inflated to the
recommended tire pressure.XRemove unnecessary loads.XRemove roof carriers when they are not
needed.XWarm up the engine at low engine speeds.XAvoid frequent acceleration or braking.XHave all maintenance work performed at
the service intervals specified in the
Service Booklet or indicated by the service
interval indicator.
Fuel consumption also increases when
driving in cold weather, in stop-and-go traffic
and in mountainous terrain.
Drinking and driving
GWarning
Drinking and driving and/or taking drugs and
driving are very dangerous combinations.
Even a small amount of alcohol or drugs can
affect your reflexes, perceptions and
judgment.
The possibility of a serious or even fatal
accident are greatly increased when you drink
or take drugs and drive.
Do not drink or take drugs and drive or allow
anyone to drive who has been drinking or
taking drugs.
Pedals
GWarning
Make sure absolutely no objects are
obstructing the pedals' range of movement.
Keep the driver's footwell clear of all
obstacles. If there are any floormats or
carpets in the footwell, make sure that the
pedals still have sufficient clearance.
During sudden driving or braking maneuvers,
the objects could get caught between the
11 Observe all legal requirements.136Driving tipsDriving and parking
Page 146 of 288
XClean the headlamps and rear lights and
check for damage.XClean the front and rear license plates.XClean the wheels and tires with a water jet
and remove any foreign objects.XClean the wheels, tires, wheel arches and
the vehicle underside with a water jet;
check for any foreign objects and damage.XCheck whether twigs or other parts of
plants have become trapped. These
increase the risk of fire and can damage
fuel pipes, brake hoses or the rubber
bellows of the axle joints and propeller
shafts.XAfter the trip, examine without fail the
entire undercarriage, wheels, tires, brakes,
bodywork structure, steering, chassis and
exhaust system for damage.XAfter driving for extended periods across
sand, mud, gravel, water or in similarly dirty
conditions, have the brake discs, wheels,
brake pads/linings and axle joints checked
and cleaned.XIf you detect strong vibrations after off-road
driving, check for foreign objects in the
wheels and drivetrain and remove any that
you find. Foreign objects can disturb the
balance and cause vibrations.XTest the brakes.
Driving on sand
GWarning!
Do not reduce the tire inflation pressure
before driving through sand. However, if you
do so, remember to correct the tire inflation
pressure before continuing your trip. Driving
with reduced tire inflation pressure increases
the risk of losing control of the vehicle and
rolling over.
Observe the following rules when driving on
sand:
R shift the transfer case to
LOW (Y page 126).
R avoid high engine speeds.
R limit the shift range of the automatic
transmission according to the off-road
conditions.
R drive quickly to overcome the rolling
resistance. Otherwise, the vehicle could dig
itself into the sand.
R drive in the tracks of other vehicles if
possible. Make sure that the ruts are not
too deep, that the sand is firm enough and
that your vehicle has sufficient ground
clearance.
Tire ruts and gravel roads
Observe the following rules when driving
along ruts in off-road terrain or on roads with
loose gravel:
! Check that the ruts are not too deep and
that your vehicle has sufficient clearance.
Otherwise, your vehicle could be damaged
or bottom out and get stuck.
R shift the transfer case to
LOW (Y page 126).
R avoid high engine speeds.
R observe the safety notes (Y page 142) and
the general notes (Y page 142) on off-road
driving.
R restrict the shift range of the automatic
transmission to 1 (Y page 123).
R drive slowly.
R where ruts are too deep, drive with the
wheels of one side on the center grassy
area, if possible.
144Driving tipsDriving and parking
Page 158 of 288

Vehicle equipment
i This manual describes all the standard
and optional equipment of your vehicle
which was available at the time of
purchase. Country-specific differences are
possible. Please note that your vehicle may
not be equipped with all features
described. This also applies to safety-
relevant systems and functions.
Important safety notes
You will find an illustration of the instrument
cluster in the "At a glance" section
( Y page 26).
GWarning
A driver's attention to the road and traffic
conditions must always be his/her primary
focus when driving.
For your safety and the safety of others,
selecting features through the multifunction
steering wheel should only be done by the
driver when traffic and road conditions permit
it to be done safely.
Bear in mind that at a speed of just 30 mph
(approximately 50 km/h ), your vehicle is
covering a distance of 44 feet (approximately
14 m) every second.
GWarning!
No messages will be displayed if either the
instrument cluster or the multifunction
display is inoperative.
As a result, you will not be able to see
information about your driving conditions,
such as
R speed
R outside temperature
R warning/indicator lamps
R malfunction/warning messages
R failure of any systems
Driving characteristics may be impaired.
If you must continue to drive, do so with added
caution. Contact an authorized Mercedes-
Benz Center as soon as possible.GWarning
Malfunction and warning messages are only
indicated for certain systems and are
intentionally not very detailed. The
malfunction and warning messages are
simply a reminder with respect to the
operation of certain systems. They do not
replace the owner's and/or driver's
responsibility to maintain the vehicle's
operating safety. Have all required
maintenance and safety checks performed on
the vehicle. Bring the vehicle to an authorized
Mercedes-Benz Center to address the
malfunction and warning messages.
Displays and operation
Tachometer
The red band in the tachometer indicates the
engine's overrevving range.
! Do not drive in the overrevving range, as
this could damage the engine.
The fuel supply is interrupted to protect the
engine when the red band is reached.
Displaying the coolant temperature
GWarning
Driving when your engine is overheated can
cause some fluids which may have leaked into
the engine compartment to catch fire. You
could be seriously burned.
Steam from an overheated engine can cause
serious burns which can occur just by opening
the engine hood. Stay away from the engine
if you see or hear steam coming from it.
Stop the vehicle in a safe location away from
other traffic. Turn off the engine, get out of the
vehicle and do not stand near the vehicle until
the engine has cooled down.
156Displays and operationOn-board computer and displays
Page 168 of 288
unintentionally activate the easy-entry/exit
feature, which could result in an accident
and/or serious personal injury.XPress the V or U button on the
steering wheel to select the Settings
menu.XPress the & button to select submenus.XPress the W or X button to select the
Convenience submenu.XPress the & button to select the Easy-
entry Function .XPress the W or X button to activate
or deactivate the Easy-entry Function .XPress the &, V or U button to
select a different display.
Trip computer menu
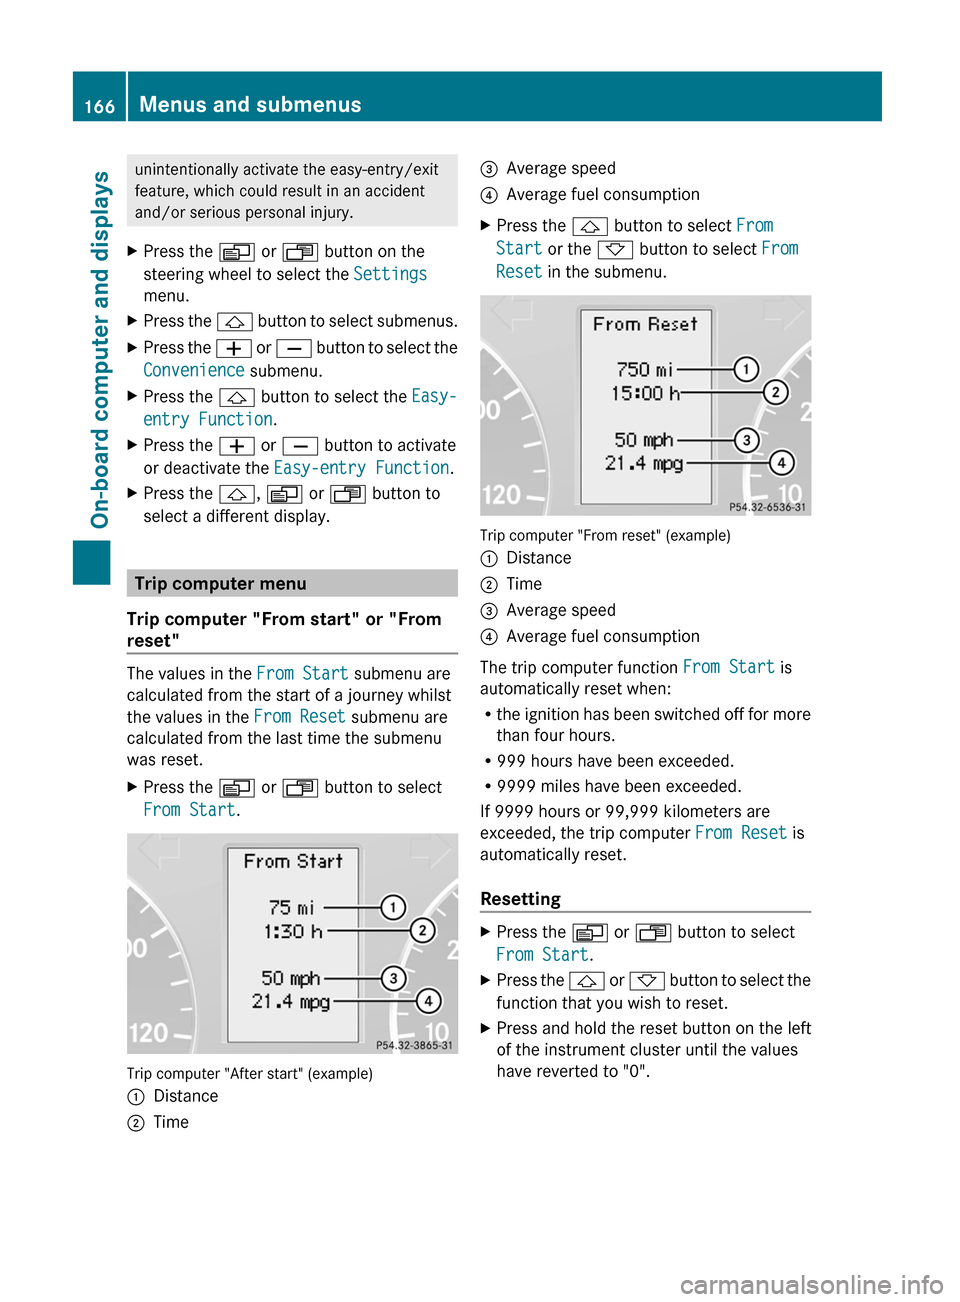
Trip computer "From start" or "From
reset"
The values in the From Start submenu are
calculated from the start of a journey whilst
the values in the From Reset submenu are
calculated from the last time the submenu
was reset.
XPress the V or U button to select
From Start .
Trip computer "After start" (example)
:Distance;Time=Average speed?Average fuel consumptionXPress the & button to select From
Start or the * button to select From
Reset in the submenu.
Trip computer "From reset" (example)
:Distance;Time=Average speed?Average fuel consumption
The trip computer function From Start is
automatically reset when:
R the ignition has been switched off for more
than four hours.
R 999 hours have been exceeded.
R 9999 miles have been exceeded.
If 9999 hours or 99,999 kilometers are
exceeded, the trip computer From Reset is
automatically reset.
Resetting
XPress the V or U button to select
From Start .XPress the & or * button to select the
function that you wish to reset.XPress and hold the reset button on the left
of the instrument cluster until the values
have reverted to "0".166Menus and submenusOn-board computer and displays