2011 MERCEDES-BENZ G55AMG Garage
[x] Cancel search: GaragePage 10 of 288

Exterior viewOverview .......................................... 24
F
First-aid kit ......................................... 229
Flat tire Changing a wheel/mounting the
spare wheel ................................... 232
Preparing the vehicle .....................232
Raising the vehicle .........................233
Floormat ............................................. 211
Front fog lamp (display message) ... 173
Fuel Additives ........................................ 278
Notes ............................................. 277
Premium-grade unleaded gasoline . 278
Refueling ........................................ 131
Specifications ................................ 278
Troubleshooting ............................. 134
Fuel/water separator ....................... 220
Fuel consumption Notes ............................................. 136
Fuel filler cap (display message) ..... 178
Fuel filler flap Emergency release ........................133
Opening/closing ............................ 132
Fuel filter
Display message ............................ 178
Fuel level
Calling up the range (on-board
computer) ...................................... 167
Fuse allocation chart ........................ 243
Fuse box Battery case ................................... 244
Dashboard ..................................... 243
Front-passenger footwell ...............243
Transmission tunnel ....................... 244
Fuse extractor ................................... 243
Fuses Dashboard fuse box .......................243
Fuse allocation chart .....................243
Fuse box in the front-passenger
footwell .......................................... 243
Fuse box in the transmission
tunnel ............................................ 244
In the battery case .........................244
Notes ............................................. 242
G
Garage door opener Clearing the memory .....................211
Notes ............................................. 208
Opening/closing the garage door ..210
Programming the remote control ...209
Gear or selector lever (cleaning
guidelines) ......................................... 225
Genuine Mercedes-Benz parts ......... 274
Genuine wood trim and trim strips
(cleaning instructions) ...................... 225
Glove box ........................................... 193
Gradient-climbing capability
(maximum) ......................................... 146
GTW (Gross Trailer Weight)
(definition) ......................................... 267
H
Hazard warning lamps ........................ 93
Headlamp cleaning system ................ 93
Adding washer fluid .......................218
Notes ............................................. 281
Headlamp delayed switch-off
see Exterior lighting delayed switch-off
Headlamp protection grille .............. 100
Headlamps Cleaning ......................................... 224
Misting up ........................................ 94
Headlamps (automatic) ...................... 91
Head restraints Adjusting (angle) .............................. 79
Adjusting (rear) ................................ 80
Installing/removing (rear) ................80
Luxury .............................................. 80
Resetting (front) ............................... 80
see NECK-PRO head restraints
Heating
see Climate control ........................ 106
High beam flasher ............................... 93
high-mounted brake lamp Display message ............................ 173
Hill start assist .................................. 118
Hood Closing ........................................... 215
Display message ............................ 181
Opening ......................................... 214
8Index
Page 13 of 288
Operating safetyImportant safety note ......................19
Operating system
see On-board computer
Outside temperature
Calling up (on-board computer) .....160
Display ........................................... 157
Overhead control panel
Overview .......................................... 30
Override feature
Rear side windows ...........................54
P
Paint code number ............................ 275
Paintwork (cleaning instructions) ... 222
Panic alarm .......................................... 54
Parking ............................................... 134
Parking aid Exterior mirror on the front-
passenger side ................................. 87
Rear view camera .......................... 152
Parking brake .................................... 135
Display message ............................ 171
see Parking brake ..........................139
Parking lamp (display message) ...... 174
Parking lock releasing manually .........................126
Parking position
Exterior mirror on the front-
passenger side ................................. 87
Pedals ................................................. 136
Permanent four-wheel drive see 4MATIC
Permissible gross vehicle weight
rating .................................................. 256
Plastic trim (cleaning instructions) . 225
Power washers .................................. 222
Product information ............................ 17
Programming SmartKeys ....................................... 63
Pulling away
Automatic transmission .................118
R
Radio Changing stations (on-board
computer) ...................................... 160
see separate operating instructions
Range (on-board computer) ............. 167
Rear bench seat Folding forward .............................. 195
Rear compartment
Setting the air vents ......................113
Rear door
Display message ............................ 181
Opening/closing .............................. 69
Rear fog lamp (display message) ..... 173
Rear seat bench Folding into an upright position .....195
Rear view camera
Function/notes ............................. 152
Rear view camera (cleaning
instructions) ...................................... 224
Rear-view mirror Adjusting ......................................... 85
Dipping (automatic) .........................87
Rear window heating ........................ 111
Malfunction .................................... 111
Rear window wiper ........................... 102
Refueling ............................................ 131
Remote control Programming (garage door
opener) .......................................... 209
Reporting
Malfunctions relevant to safety ........ 20
Reserve fuel
Display message ............................ 178
Warning lamp ................................. 188
Residual heat
Switching on/off ........................... 112
Restraint systems
see SRS
Roadside Assistance (breakdown) .... 18
Roof carrier ........................................ 197
Roof lining and carpets (cleaning
guidelines) ......................................... 226
Route see Route guidance (on-board
computer) Index11
Page 32 of 288
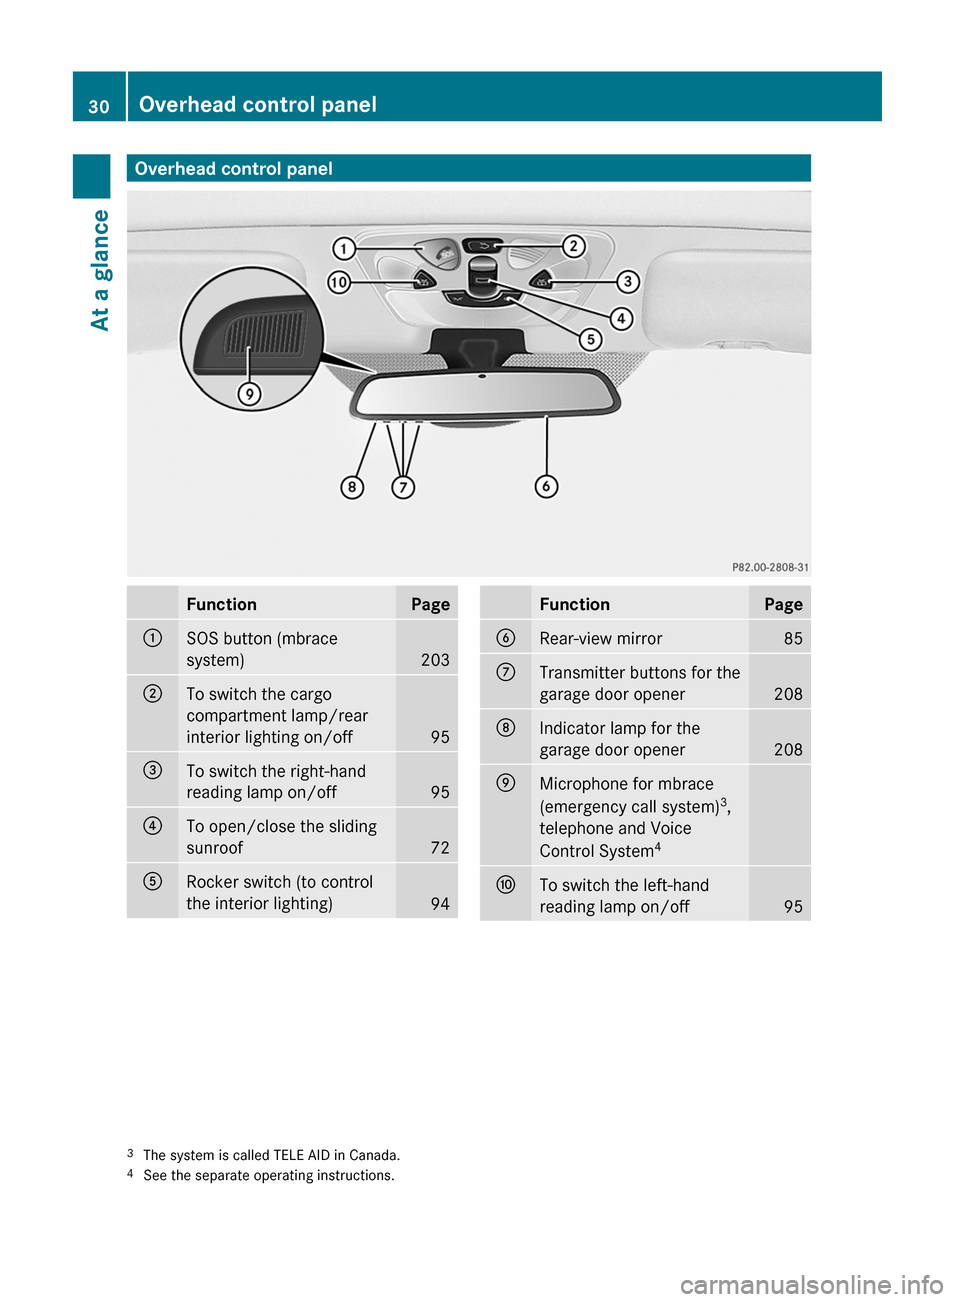
Overhead control panelFunctionPage:SOS button (mbrace
system)
203
;To switch the cargo
compartment lamp/rear
interior lighting on/off
95
=To switch the right-hand
reading lamp on/off
95
?To open/close the sliding
sunroof
72
ARocker switch (to control
the interior lighting)
94
FunctionPageBRear-view mirror85CTransmitter buttons for the
garage door opener
208
DIndicator lamp for the
garage door opener
208
EMicrophone for mbrace
(emergency call system) 3
,
telephone and Voice
Control System 4FTo switch the left-hand
reading lamp on/off
953 The system is called TELE AID in Canada.
4 See the separate operating instructions.30Overhead control panelAt a glance
Page 62 of 288
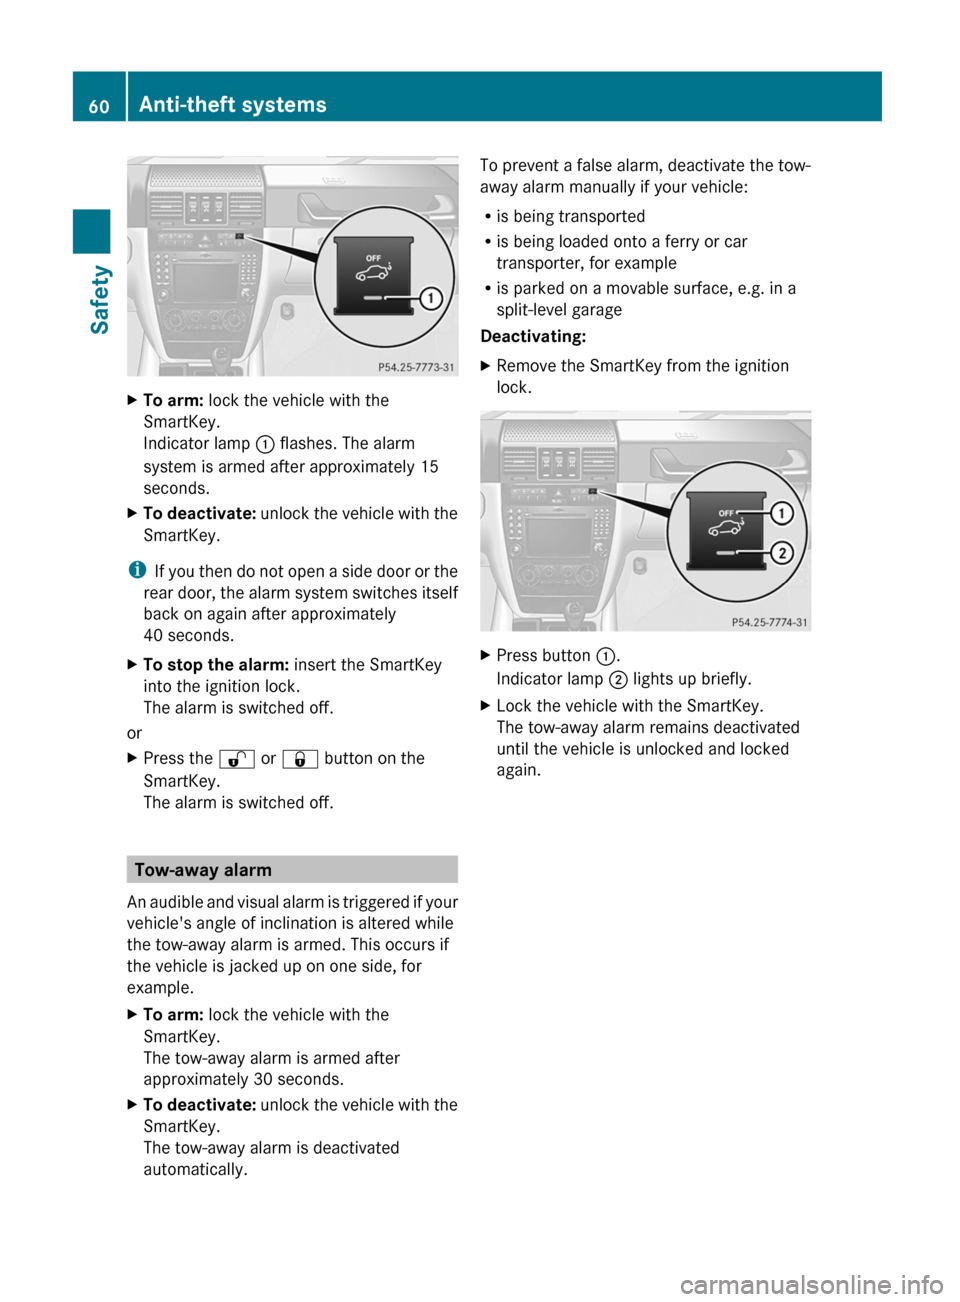
XTo arm: lock the vehicle with the
SmartKey.
Indicator lamp : flashes. The alarm
system is armed after approximately 15
seconds.XTo deactivate: unlock the vehicle with the
SmartKey.
i If you then do not open a side door or the
rear door, the alarm system switches itself
back on again after approximately
40 seconds.
XTo stop the alarm: insert the SmartKey
into the ignition lock.
The alarm is switched off.
or
XPress the % or & button on the
SmartKey.
The alarm is switched off.
Tow-away alarm
An audible and visual alarm is triggered if your
vehicle's angle of inclination is altered while
the tow-away alarm is armed. This occurs if
the vehicle is jacked up on one side, for
example.
XTo arm: lock the vehicle with the
SmartKey.
The tow-away alarm is armed after
approximately 30 seconds.XTo deactivate: unlock the vehicle with the
SmartKey.
The tow-away alarm is deactivated
automatically.To prevent a false alarm, deactivate the tow-
away alarm manually if your vehicle:
R is being transported
R is being loaded onto a ferry or car
transporter, for example
R is parked on a movable surface, e.g. in a
split-level garage
Deactivating:XRemove the SmartKey from the ignition
lock.XPress button :.
Indicator lamp ; lights up briefly.XLock the vehicle with the SmartKey.
The tow-away alarm remains deactivated
until the vehicle is unlocked and locked
again.60Anti-theft systemsSafety
Page 119 of 288
Only shift the automatic transmission to
the desired drive position when the vehicle
is stationary.
Where possible, avoid spinning the drive
wheels when pulling away on slippery
roads. You could otherwise damage the
drive train.
! Avoid high engine speeds when the
engine is cold. The engine's service life
could otherwise be significantly shortened.
Do not use the engine's full performance
until it has reached operating temperature.
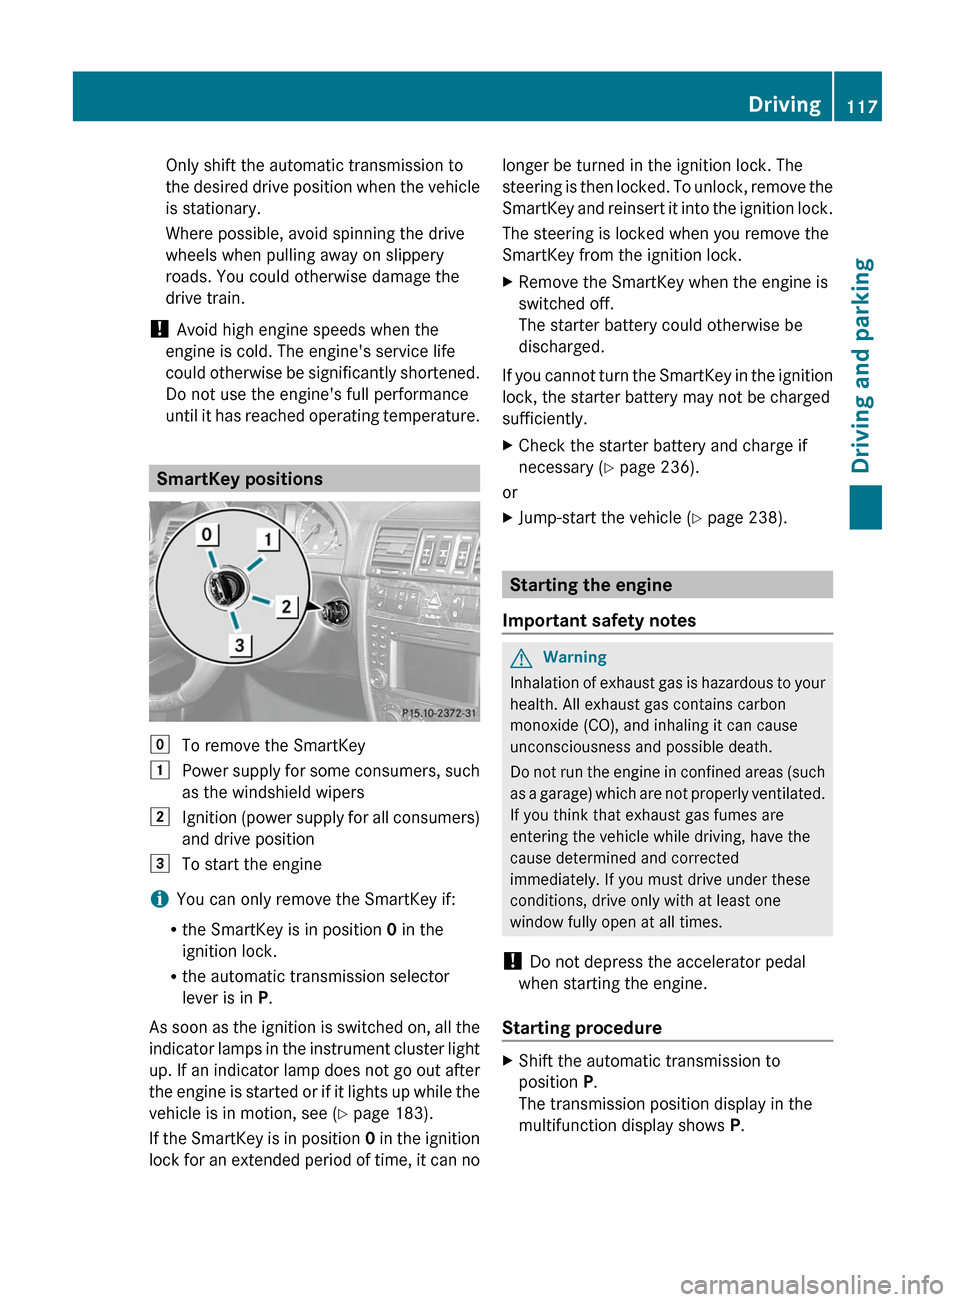
SmartKey positions
gTo remove the SmartKey1Power supply for some consumers, such
as the windshield wipers2Ignition (power supply for all consumers)
and drive position3To start the engine
i You can only remove the SmartKey if:
R the SmartKey is in position 0 in the
ignition lock.
R the automatic transmission selector
lever is in P.
As soon as the ignition is switched on, all the
indicator lamps in the instrument cluster light
up. If an indicator lamp does not go out after
the engine is started or if it lights up while the
vehicle is in motion, see ( Y page 183).
If the SmartKey is in position 0 in the ignition
lock for an extended period of time, it can no
longer be turned in the ignition lock. The
steering is then locked. To unlock, remove the
SmartKey and reinsert it into the ignition lock.
The steering is locked when you remove the
SmartKey from the ignition lock.XRemove the SmartKey when the engine is
switched off.
The starter battery could otherwise be
discharged.
If you cannot turn the SmartKey in the ignition
lock, the starter battery may not be charged
sufficiently.
XCheck the starter battery and charge if
necessary ( Y page 236).
or
XJump-start the vehicle ( Y page 238).
Starting the engine
Important safety notes
GWarning
Inhalation of exhaust gas is hazardous to your
health. All exhaust gas contains carbon
monoxide (CO), and inhaling it can cause
unconsciousness and possible death.
Do not run the engine in confined areas (such
as a garage) which are not properly ventilated.
If you think that exhaust gas fumes are
entering the vehicle while driving, have the
cause determined and corrected
immediately. If you must drive under these
conditions, drive only with at least one
window fully open at all times.
! Do not depress the accelerator pedal
when starting the engine.
Starting procedure
XShift the automatic transmission to
position P.
The transmission position display in the
multifunction display shows P.Driving117Driving and parkingZ
Page 139 of 288
pedals. You could then no longer brake or
accelerate. This could lead to accidents and
injury.
Rolling with the engine switched offGWarning!
There is no power assistance for the steering
and the brake when the engine is not running.
Steering and braking requires significantly
more effort and you could lose control of the
vehicle and cause an accident as a result.
Do not turn off the engine while the vehicle is
in motion.
Exhaust check
GWarning
Inhalation of exhaust gas is hazardous to your
health. All exhaust gas contains carbon
monoxide (CO), and inhaling it can cause
unconsciousness and possible death.
Do not run the engine in confined areas (such
as a garage) which are not properly ventilated.
If you think that exhaust gas fumes are
entering the vehicle while driving, have the
cause determined and corrected
immediately. If you must drive under these
conditions, drive only with at least one
window fully open at all times.
Certain engine systems are designed to keep
the level of poisonous components in exhaust
fumes within legal limits.
These systems only work at peak efficiency
when they are maintained exactly in
accordance with the manufacturer's
specifications. For this reason, all work on the
engine must be carried out only by qualified
and authorized Mercedes-Benz technicians.
The engine settings must not be changed in
any circumstances. Furthermore, all specific
service work must be carried out at regular
intervals and in accordance with the
Mercedes-Benz service requirements. Details
can be found in the Service Booklet.
Brakes
Important safety notesGWarning!
On slippery road surfaces, never downshift in
order to obtain braking action. This could
result in drive wheel slip and reduced vehicle
control. Your vehicle’s ABS will not prevent
this type of control loss.
Do not engage the transfer case in position
LOW when driving on ice or packed snow. At
speeds below 18 mph (30 km/h) vehicle
steering is adversely affected by the Off-road
ABS.
Downhill gradients
! On long and steep gradients, you must
reduce the load on the brakes by shifting
early to a lower gear. This allows you to take
advantage of the engine braking effect and
helps avoid overheating and excessive
wear of the brakes.
When you take advantage of the engine
braking effect, a drive wheel may not turn
for some time, e.g. on a slippery road
surface. This could cause damage to the
drive train. This type of damage is not
covered by the Mercedes-Benz warranty.
Heavy and light loads
GWarning
Depressing the brake pedal constantly results
in excessive and premature wear to the brake
pads.
It may also cause the brakes to overheat,
seriously impairing their effectiveness. It may
then not be possible to stop the vehicle in
sufficient time to avoid an accident.
If the brakes have been subjected to a heavy
load, do not stop the vehicle immediately, but
drive on for a short while. This allows the
airflow to cool the brakes more quickly.
Driving tips137Driving and parkingZ
Page 155 of 288
The rear view camera does not relieve you of
the responsibility to be cautious. Take care
and pay careful attention. The rear view
camera may not show objects which are
R very close to the rear bumper
R under the rear bumper
R under the spare wheel
R nearby behind the spare wheel
You are responsible for safety at all times and
must continue to pay attention to the
immediate surroundings when parking and
maneuvering. This includes the area behind,
in front of, and beside the vehicle. Otherwise
you could endanger yourself and/or others.GWarning!
The rear view camera either will not function
or will not function to its full capability if
R the tailgate is open
R it is raining very hard, snowing or foggy
R it is night or you are parking/maneuvering
your vehicle in an area where it is very dark
R the camera is exposed to a very bright white
light
R the immediate surroundings are
illuminated with fluorescent light (the
display may flicker)
R there is a sudden change in temperature,
e.g. if you drive into a heated garage from
the cold (lens condensation)
R the camera lens is dirty or covered
R the rear of your vehicle is damaged
In this case, have the position and setting
of the camera checked by a qualified
specialist workshop. Mercedes-Benz
recommends that you contact a Mercedes-
Benz Center for this purpose.
Do not use the rear view camera in these
situations. Otherwise you could injure
yourself or others and/or damage property
including your vehicle while parking/
maneuvering.
Activating the rear view cameraXMake sure that the SmartKey is in
position 2 in the ignition lock.XMake sure that the "rear view camera"
function is selected in COMAND (see the
separate operating instructions for
COMAND).XEngage reverse gear.
The area behind the vehicle is shown in the
COMAND display.Driving systems153Driving and parkingZ
Page 210 of 288
XTo swing up and secure: swing the brush
guard up to stop joint ? and hold it in
place.
The pins of quick-release fasteners ;
need to engage in the openings in lock =.XLock quick-release fasteners ; on both
sides using wrench :.
!
Make sure that the pins of the quick-
release fasteners are securely engaged in
the lock on both sides.
Garage door opener
Important safety notes
You can use the HomeLink ®
garage door
opener integrated into the rear-view mirror to
operate up to three different gate/garage
door opener systems.
i Certain garage door drives are
incompatible with the integrated garage
door opener. If you experience difficulties
programming the integrated garage door
opener, contact an authorized Mercedes-
Benz Center. You can also contact the
following service hotlines:
R USA: Mercedes-Benz Customer
Assistance Center under
1-800-FOR-MERCedes
R Canada: Customer Service under
1-800-387-0100
GWarning
Before programming the integrated remote
control to a garage door opener or gate
operator, make sure people and objects are
out of the way of the device to prevent
potential harm or damage. When
programming a garage door opener, the door
moves up or down. When programming a gate
operator, the gate opens or closes.
Do not use the integrated remote control with
any garage door opener that lacks safety stop
and reverse features as required by U.S.
federal safety standards (this includes any
garage door opener model manufactured
before April 1, 1982). A garage door that
cannot detect an object - signaling the door
to stop and reverse - does not meet current
U.S. federal safety standards.
When programming a garage door opener,
park vehicle outside the garage.
Do not run the engine while programming the
integrated remote control. Inhalation of
exhaust gas is hazardous to your health. All
exhaust gas contains carbon monoxide (CO),
and inhaling it can cause unconsciousness
and possible death. All exhaust gas contains
carbon monoxide (CO), and inhaling it can
cause unconsciousness and possible death.
i USA only:
This device complies with part 15 of the
FCC requirements. Operation is subject to
the following two conditions:
1. The device must not cause harmful
interference.
2. The device must withstand any
interference received, including
interference that may cause undesired
operation.
Unauthorized modification of this device
could void the device's operating permit.
i Canada only:
This device complies with the RSS-210
requirements of Industry Canada.
Operation is subject to the following two
conditions:
1. The device must not cause harmful
interference.
2. The device must withstand any
interference received, including
interference that may cause undesired
operation.
Unauthorized modification of this device
could void the user's authority to legally
operate the device.208FeaturesLoading, stowing and features