2011 MERCEDES-BENZ G550 window
[x] Cancel search: windowPage 86 of 288
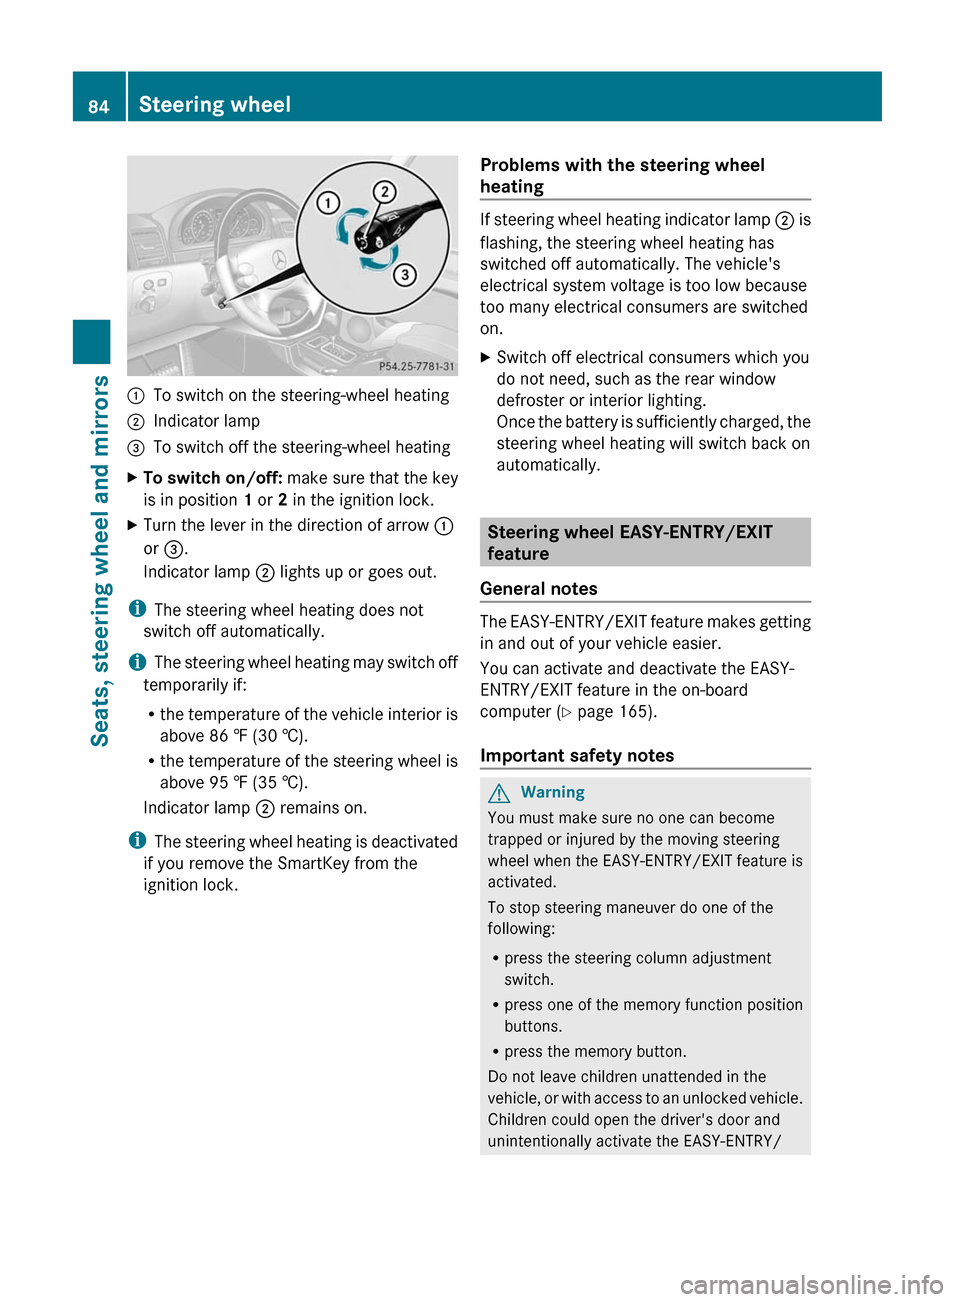
:To switch on the steering-wheel heating;Indicator lamp=To switch off the steering-wheel heatingXTo switch on/off: make sure that the key
is in position 1 or 2 in the ignition lock.XTurn the lever in the direction of arrow :
or = .
Indicator lamp ; lights up or goes out.
i
The steering wheel heating does not
switch off automatically.
i The steering wheel heating may switch off
temporarily if:
R the temperature of the vehicle interior is
above 86 ‡ (30 †).
R the temperature of the steering wheel is
above 95 ‡ (35 †).
Indicator lamp ; remains on.
i The steering wheel heating is deactivated
if you remove the SmartKey from the
ignition lock.
Problems with the steering wheel
heating
If steering wheel heating indicator lamp ; is
flashing, the steering wheel heating has
switched off automatically. The vehicle's
electrical system voltage is too low because
too many electrical consumers are switched
on.
XSwitch off electrical consumers which you
do not need, such as the rear window
defroster or interior lighting.
Once the battery is sufficiently charged, the
steering wheel heating will switch back on
automatically.
Steering wheel EASY-ENTRY/EXIT
feature
General notes
The EASY-ENTRY/EXIT feature makes getting
in and out of your vehicle easier.
You can activate and deactivate the EASY-
ENTRY/EXIT feature in the on-board
computer ( Y page 165).
Important safety notes
GWarning
You must make sure no one can become
trapped or injured by the moving steering
wheel when the EASY-ENTRY/EXIT feature is
activated.
To stop steering maneuver do one of the
following:
R press the steering column adjustment
switch.
R press one of the memory function position
buttons.
R press the memory button.
Do not leave children unattended in the
vehicle, or with access to an unlocked vehicle.
Children could open the driver's door and
unintentionally activate the EASY-ENTRY/
84Steering wheelSeats, steering wheel and mirrors
Page 89 of 288
Problems with the exterior mirrorsProblemPossible causes/consequences and M SolutionsAn exterior mirror has
been pushed out of
position.XMove the exterior mirror into the correct position manually.Automatic anti-glare mirrorsGWarning!
The auto-dimming function does not react if
incoming light is not aimed directly at sensors
in the interior rear view mirror.
The interior rear view mirror and the exterior
rear view mirror on the driver’s side do not
react, for example, when transporting cargo
which covers the rear window.
Light hitting the mirror(s) at certain angles
(incident light) could blind you. As a result,
you may not be able to observe traffic
conditions and could cause an accident.
The rear-view mirror and the exterior mirror
on the driver's side automatically go into anti-
glare mode if the ignition is switched on and
incident light from headlamps strikes the
sensor in the rear-view mirror.
The mirrors do not go into anti-glare mode if
reverse gear is engaged or the interior lighting
is switched on.
Parking position for the exterior
mirror on the front-passenger side
General notes
To make it easier to park, you can store the
front-passenger side exterior mirror position
in such a way that you can see the rear wheel
on that side as soon as you engage reverse
gear R.
Using the memory buttons on the driver's
side, you can store three parking positions
per key.
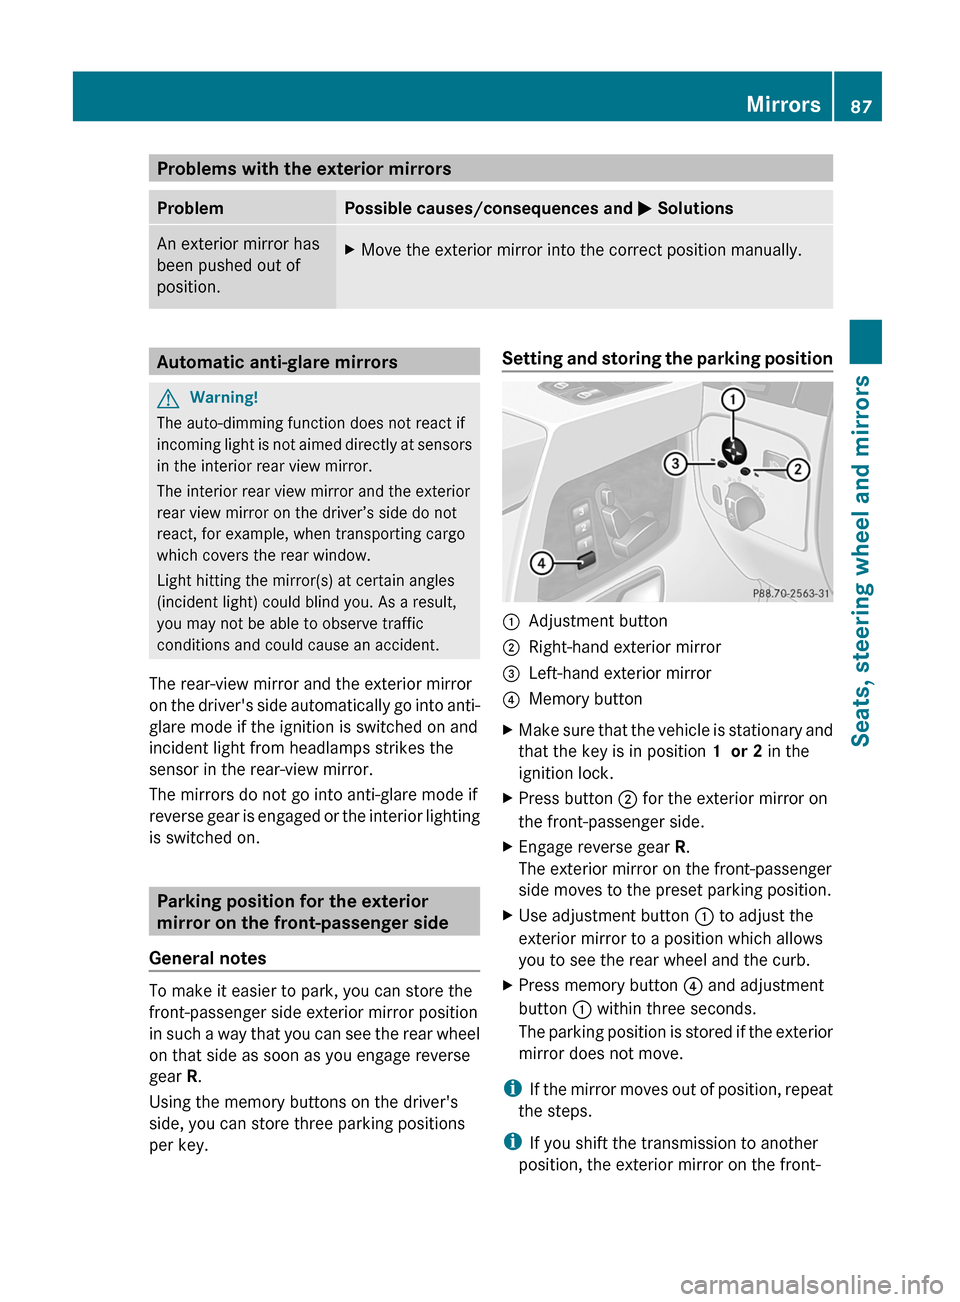
Setting and storing the parking position:Adjustment button;Right-hand exterior mirror=Left-hand exterior mirror?Memory buttonXMake sure that the vehicle is stationary and
that the key is in position 1 or 2 in the
ignition lock.XPress button ; for the exterior mirror on
the front-passenger side.XEngage reverse gear R.
The exterior mirror on the front-passenger
side moves to the preset parking position.XUse adjustment button : to adjust the
exterior mirror to a position which allows
you to see the rear wheel and the curb.XPress memory button ? and adjustment
button : within three seconds.
The parking position is stored if the exterior
mirror does not move.
i If the mirror moves out of position, repeat
the steps.
i If you shift the transmission to another
position, the exterior mirror on the front-
Mirrors87Seats, steering wheel and mirrorsZ
Page 103 of 288
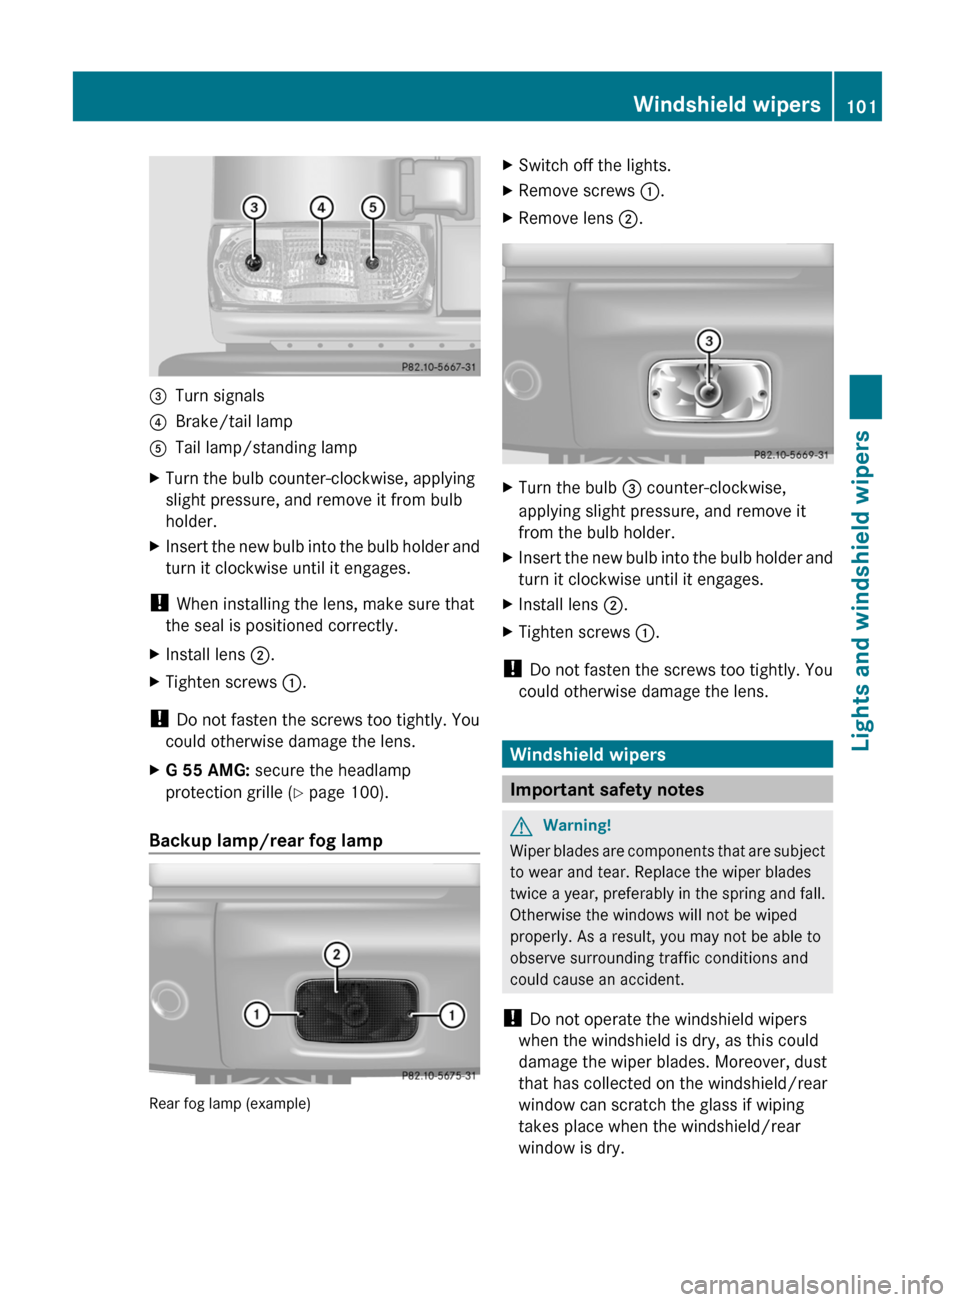
=Turn signals?Brake/tail lampATail lamp/standing lampXTurn the bulb counter-clockwise, applying
slight pressure, and remove it from bulb
holder.XInsert the new bulb into the bulb holder and
turn it clockwise until it engages.
! When installing the lens, make sure that
the seal is positioned correctly.
XInstall lens ;.XTighten screws :.
!
Do not fasten the screws too tightly. You
could otherwise damage the lens.
XG 55 AMG: secure the headlamp
protection grille ( Y page 100).
Backup lamp/rear fog lamp
Rear fog lamp (example)
XSwitch off the lights.XRemove screws :.XRemove lens ;.XTurn the bulb = counter-clockwise,
applying slight pressure, and remove it
from the bulb holder.XInsert the new bulb into the bulb holder and
turn it clockwise until it engages.XInstall lens ;.XTighten screws :.
!
Do not fasten the screws too tightly. You
could otherwise damage the lens.
Windshield wipers
Important safety notes
GWarning!
Wiper blades are components that are subject
to wear and tear. Replace the wiper blades
twice a year, preferably in the spring and fall.
Otherwise the windows will not be wiped
properly. As a result, you may not be able to
observe surrounding traffic conditions and
could cause an accident.
! Do not operate the windshield wipers
when the windshield is dry, as this could
damage the wiper blades. Moreover, dust
that has collected on the windshield/rear
window can scratch the glass if wiping
takes place when the windshield/rear
window is dry.
Windshield wipers101Lights and windshield wipersZ
Page 104 of 288

If it is necessary to switch on the windshield
wipers in dry weather conditions, always
use washer fluid when operating the
windshield wipers.
Switching the windshield wipers on/
off
Combination switch
1III Continuous wipe, fast2II Continuous wipe, slow3I Intermittent wipe/rain sensor40 windshield wipers offAí Single wipe/ î To wipe the
windshield using washer fluidXTurn the SmartKey to position 1 or 2 in the
ignition lock.XTurn the combination switch to the
corresponding position.
! Intermittent wiping with rain sensor: due
to optical influences and the windshield
becoming dirty in dry weather conditions,
the windshield wipers may be activated
inadvertently. This could then damage the
windshield wiper blades or scratch the
windshield.
For this reason, you should always switch
off the windshield wipers in dry weather.
In the I position, the appropriate wiping
frequency is set automatically according to
the intensity of the rain.
Intermittent wiping is interrupted if you stop
and open a front door. This protects people
getting into and out of the vehicle from being
sprayed with water.
Intermittent wiping continues when all doors
are closed and:
R you shift the automatic transmission to
drive position D or reverse gear R
or
R you change the wipe setting on the
combination switch.
Switching the rear window wiper on/
off
:è Intermittent wipe;Indicator lamp=ô To wipe with washer fluid
The rear window wiper comes on
automatically if you shift the selector lever to
R while the windshield wipers are on.
XTurn the SmartKey to position 1 or 2 in the
ignition lock.XTo switch on intermittent wiping: push
button :.
Indicator lamp ; lights up.XTo switch off intermittent wiping: push
button : again.
Indicator lamp ; goes out.XTo wipe with washer fluid: push button
= and hold it there until the rear window
is clean.
The rear window is wiped for a further five
seconds after the button is released.102Windshield wipersLights and windshield wipers
Page 105 of 288
Replacing the wiper blades
Important safety notesGWarning!
For safety reasons, switch off the wipers and
remove the SmartKey from the starter switch
before replacing a wiper blade. Otherwise, the
wiper motor could suddenly turn on and cause
injury.
! To avoid damaging the wiper blades,
make sure that you touch only the wiper
arm of the wiper.
! Never open the hood if a windshield wiper
arm has been folded away from the
windshield.
Never fold a windshield wiper arm without
a wiper blade back onto the windshield/
rear window.
Hold the windshield wiper arm firmly when
you change the wiper blade. If you release
the windshield wiper arm without a wiper
blade and it falls onto the windshield, the
windshield may be damaged by the force of
the impact.
Mercedes-Benz recommends that you have
the wiper blades replaced by a qualified
specialist workshop, e.g. at an authorized
Mercedes-Benz Center.
Removing the wiper blade
XRemove the SmartKey from the ignition
lock.XFold the wiper arm away from the
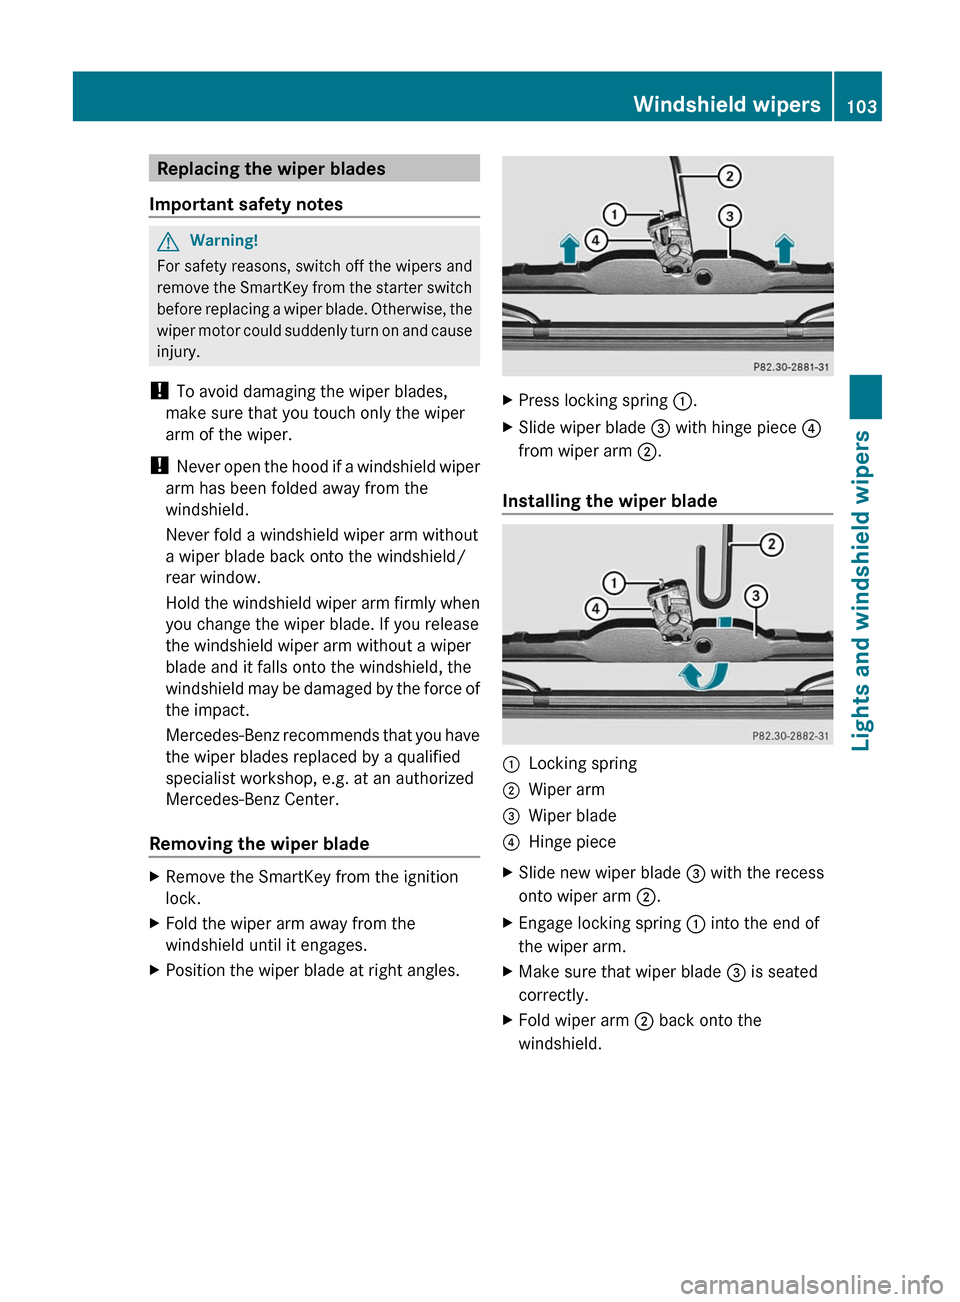
windshield until it engages.XPosition the wiper blade at right angles.XPress locking spring :.XSlide wiper blade = with hinge piece ?
from wiper arm ;.
Installing the wiper blade
:Locking spring;Wiper arm=Wiper blade?Hinge pieceXSlide new wiper blade = with the recess
onto wiper arm ;.XEngage locking spring : into the end of
the wiper arm.XMake sure that wiper blade = is seated
correctly.XFold wiper arm ; back onto the
windshield.Windshield wipers103Lights and windshield wipersZ
Page 108 of 288

Vehicle equipment
i This manual describes all the standard
and optional equipment of your vehicle
which was available at the time of
purchase. Country-specific differences are
possible. Please note that your vehicle may
not be equipped with all features
described. This also applies to safety-
relevant systems and functions.
Overview of climate control systems
Important safety notes
GWarning
Severe conditions (e.g. strong air pollution)
may require replacement of the filter before
its scheduled replacement interval. A clogged
filter will reduce the air volume to the interior
and the windows could fog up, impairing
visibility and endangering you and others.
Have a clogged filter replaced as soon as
possible at an authorized Mercedes-Benz
Center.
GWarning
Follow the recommended settings for heating
and cooling given on the following pages.
Otherwise, the windows could fog up,
impairing visibility and endangering you and
others.
Automatic climate control controls the
temperature and the humidity in the vehicle
interior and filters undesirable substances
from the air.
Automatic climate control is only operational
when the engine is running 6
. Optimum
operation is only achieved when you drive
with the side windows and the sliding sunroof
closed.
i Ventilate the vehicle for a brief period
during warm weather, e.g. using the
convenience opening feature ( Y page 71).
This will speed up the cooling process and
the desired vehicle interior temperature
will be reached more quickly.
i The integrated filter can filter out most
particles of dust and completely filters out
pollen. A clogged filter reduces the amount
of air supplied to the vehicle interior. For
this reason, you should always observe the
interval for replacing the filter, which is
specified in the Service Booklet. As it
depends on environmental conditions, e.g.
heavy air pollution, the interval may be
shorter than stated in the Service Booklet.6 The "residual heat" function can only be switched on/off if the ignition is switched off.106Overview of climate control systemsClimate control
Page 109 of 288
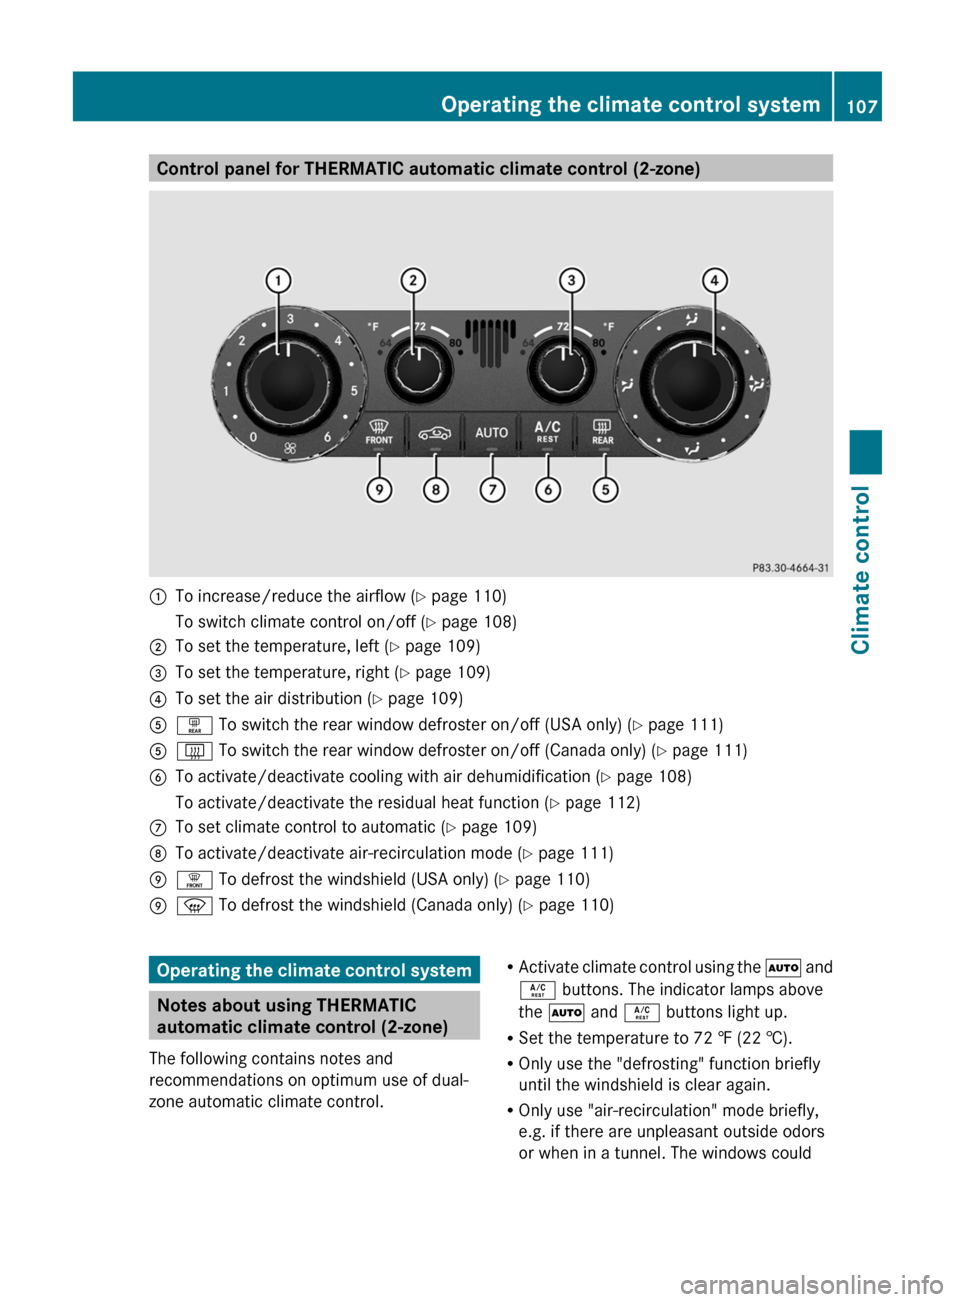
Control panel for THERMATIC automatic climate control (2-zone):To increase/reduce the airflow (Y page 110)To switch climate control on/off ( Y page 108);To set the temperature, left ( Y page 109)=To set the temperature, right ( Y page 109)?To set the air distribution ( Y page 109)Aª To switch the rear window defroster on/off (USA only) ( Y page 111)A£ To switch the rear window defroster on/off (Canada only) ( Y page 111)BTo activate/deactivate cooling with air dehumidification ( Y page 108)To activate/deactivate the residual heat function ( Y page 112)CTo set climate control to automatic ( Y page 109)DTo activate/deactivate air-recirculation mode ( Y page 111)E¥ To defrost the windshield (USA only) ( Y page 110)Ez To defrost the windshield (Canada only) ( Y page 110)Operating the climate control system
Notes about using THERMATIC
automatic climate control (2-zone)
The following contains notes and
recommendations on optimum use of dual-
zone automatic climate control.
R Activate climate control using the à and
Á buttons. The indicator lamps above
the à and Á buttons light up.
R Set the temperature to 72 ‡ (22 †).
R Only use the "defrosting" function briefly
until the windshield is clear again.
R Only use "air-recirculation" mode briefly,
e.g. if there are unpleasant outside odors
or when in a tunnel. The windows couldOperating the climate control system107Climate controlZ
Page 110 of 288
otherwise fog up as, in air-recirculation
mode, no fresh air is drawn into the vehicle.
R Use the residual heat function if you want
to heat or ventilate the vehicle interior
when the ignition is switched off. The
"residual heat" function can only be
activated or deactivated with the ignition
switched off.
R At very low temperatures, the rear window
defroster is only switched on once the
vehicle interior has warmed up.
Activating/deactivating climate
control
Important information
GWarning!
When the climate control system is
deactivated, the outside air supply and
circulation are also deactivated. Only choose
this setting for a short time. Otherwise the
windows could fog up, impairing visibility and
endangering you and others.
i Switch on climate control primarily using
the à button ( Y page 109).
Activating/deactivating
XTurn the key to position 2 in the ignition
lock.XTo switch on: turn control : clockwise to
the desired position (except position 0)
( Y page 107).XThe previously selected settings come into
effect again.XTo switch off: turn control : counter-
clockwise to position 0(Y page 107).Switching cooling with air
dehumidification on/off
Important information
The cooling with air dehumidification function
is only available when the engine is running.
The air inside the vehicle is cooled and
dehumidified according to the temperature
selected.
GWarning
If you switch off the cooling function, the
vehicle will not be cooled when weather
conditions are warm. The windows can fog up
more quickly. Window fogging may impair
visibility and endanger you and others.
Condensation may drip from the underside of
the vehicle when it is in cooling mode. This is
normal and not a sign that there is a
malfunction.
i The cooling with air dehumidification
function uses refrigerant R134a. This
coolant does not contain
chlorofluorocarbons, and therefore does
not damage the ozone layer.
Activating/deactivating
! If the cooling with air dehumidification
does not switch on, it is possible that the
climate control system has lost coolant.
Have the cooling with air dehumidification
checked at a qualified specialist workshop.
XTo activate: press the Á button.
The indicator lamp in the Á button lights
up.XTo switch off: press the Á button.
The indicator lamp in the Á button goes
out. The cooling with air dehumidification
function has a delayed switch-off feature.108Operating the climate control systemClimate control