2011 MERCEDES-BENZ G550 change wheel
[x] Cancel search: change wheelPage 234 of 288
Flat tire
Preparing the vehicle
XStop the vehicle as far away as possible
from traffic on solid, non-slippery and level
ground.XSwitch on the hazard warning lamps.XApply the parking brake.XBring the front wheels into the straight-
ahead position.XMove the selector lever to P.XSwitch off the engine.XRemove the SmartKey from the ignition
lock.XAll occupants must get out of the vehicle.
Make sure that they are not endangered as
they do so.XMake sure that no one is near the danger
area while a wheel is being changed.
Anyone who is not directly assisting in the
wheel change should, for example, stand
behind the barrier.XGet out of the vehicle. Pay attention to
traffic conditions when doing so.XClose the driver's door.
Changing a wheel and mounting the
spare wheel
Important safety notes
GWarning!
If the spare tire is more than 6 years old or is
not the same model as the regular tires, have
the spare tire replaced with a new tire at the
nearest Mercedes-Benz Center.
Never operate the vehicle with more than one
spare wheel mounted.
GWarning
G 55 AMG:
Rim and tire sizes are different for the spare
wheel and the normal wheel. With the spare
wheel mounted, handling is impaired.
Do not exceed a maximum speed of
50 mph(80 km/h).
Preparing the vehicleXPrepare the vehicle as described
( Y page 232).GWarning!
You must remove the spare wheel from the
spare wheel carrier before lifting the vehicle.
Otherwise the vehicle could fall off the jack
and injure you or others.
XRemove the vehicle tool kit and the jack
( Y page 229).XRemove the spare wheel from the spare
wheel bracket ( Y page 230).
i
Vehicles without an emergency spare
wheel/spare wheel are not equipped with
a wheel-changing tool kit at the factory. For
more information on which tools are
required to perform a wheel change on your
vehicle e.g. lug wrench or jack, consult an
authorized Mercedes-Benz Center.
Securing the vehicle to prevent it from
rolling away
XSecure the vehicle to prevent it from rolling
away.
On level ground: place chocks or similar
items under the front and rear of the wheel
that is diagonally opposite to the wheel you
wish to change.XOn downhill gradients: place chocks or
similar items behind both wheels of the
other axle.GWarning
Only jack up the vehicle on level ground or on
slight inclines/declines. The vehicle could
otherwise fall off the jack and injure you or
others.
232Flat tireRoadside Assistance
Page 235 of 288
Raising the vehicleGWarning!
When jacking up the vehicle, only use the jack
which has been specifically approved by
Mercedes-Benz for your vehicle.
The jack is designed exclusively for jacking up
the vehicle under the axle housing. Make sure
the jack is positioned correctly under the axle
housing. The jack must always be vertical
when in use, especially on inclines or
declines.
The jack is intended only for lifting the vehicle
briefly for wheel changes. It is not suited for
performing maintenance work under the
vehicle. To help avoid personal injury, use the
jack only to lift the vehicle during a wheel
change.
Never get beneath the vehicle while it is
supported by the jack. Keep hands and feet
away from the area under the lifted vehicle.
Always lower the vehicle onto sufficient
capacity jackstands before working under the
vehicle.
Always firmly engage the parking brake and
block the wheels with wheel chocks or other
sizeable objects before raising the vehicle
with the jack. Do not disengage the parking
brake while the vehicle is raised.
Make sure that the ground on which the
vehicle is standing and where you place the
jack is solid, level and not slippery. If
necessary, use a large underlay. On slippery
surfaces, such as tiled floors, you should use
a non-slip underlay, for example a rubber mat.
Do not use wooden blocks or similar objects
to support the jack. Otherwise the jack may
not be able to achieve its load-bearing
capacity if it is not at its full height.
Never start the engine when the vehicle is
raised.
Also observe the notes on the jack.
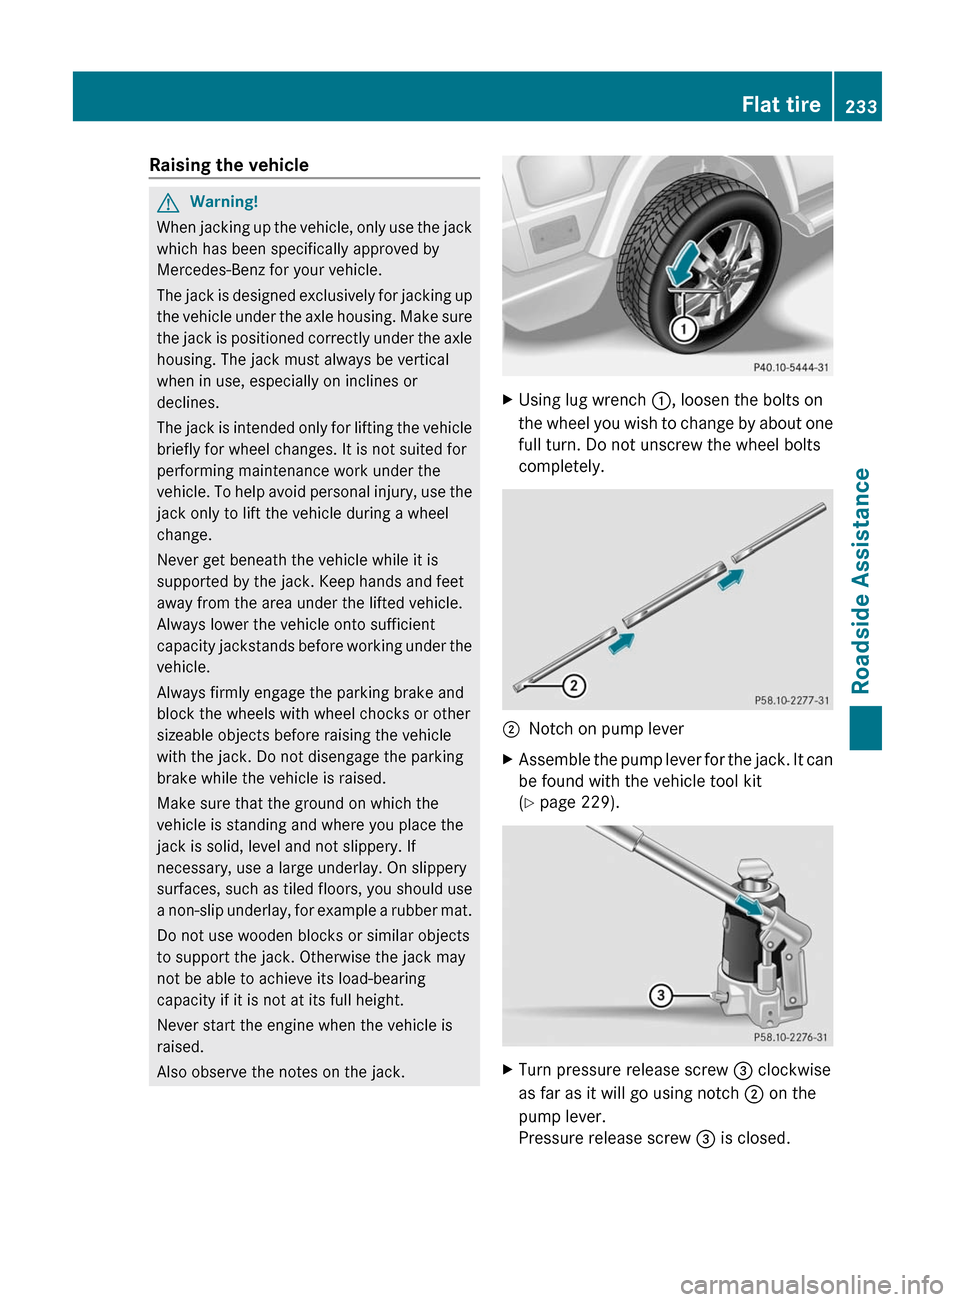
XUsing lug wrench :, loosen the bolts on
the wheel you wish to change by about one
full turn. Do not unscrew the wheel bolts
completely.;Notch on pump leverXAssemble the pump lever for the jack. It can
be found with the vehicle tool kit
( Y page 229).XTurn pressure release screw = clockwise
as far as it will go using notch ; on the
pump lever.
Pressure release screw = is closed.Flat tire233Roadside AssistanceZ
Page 243 of 288
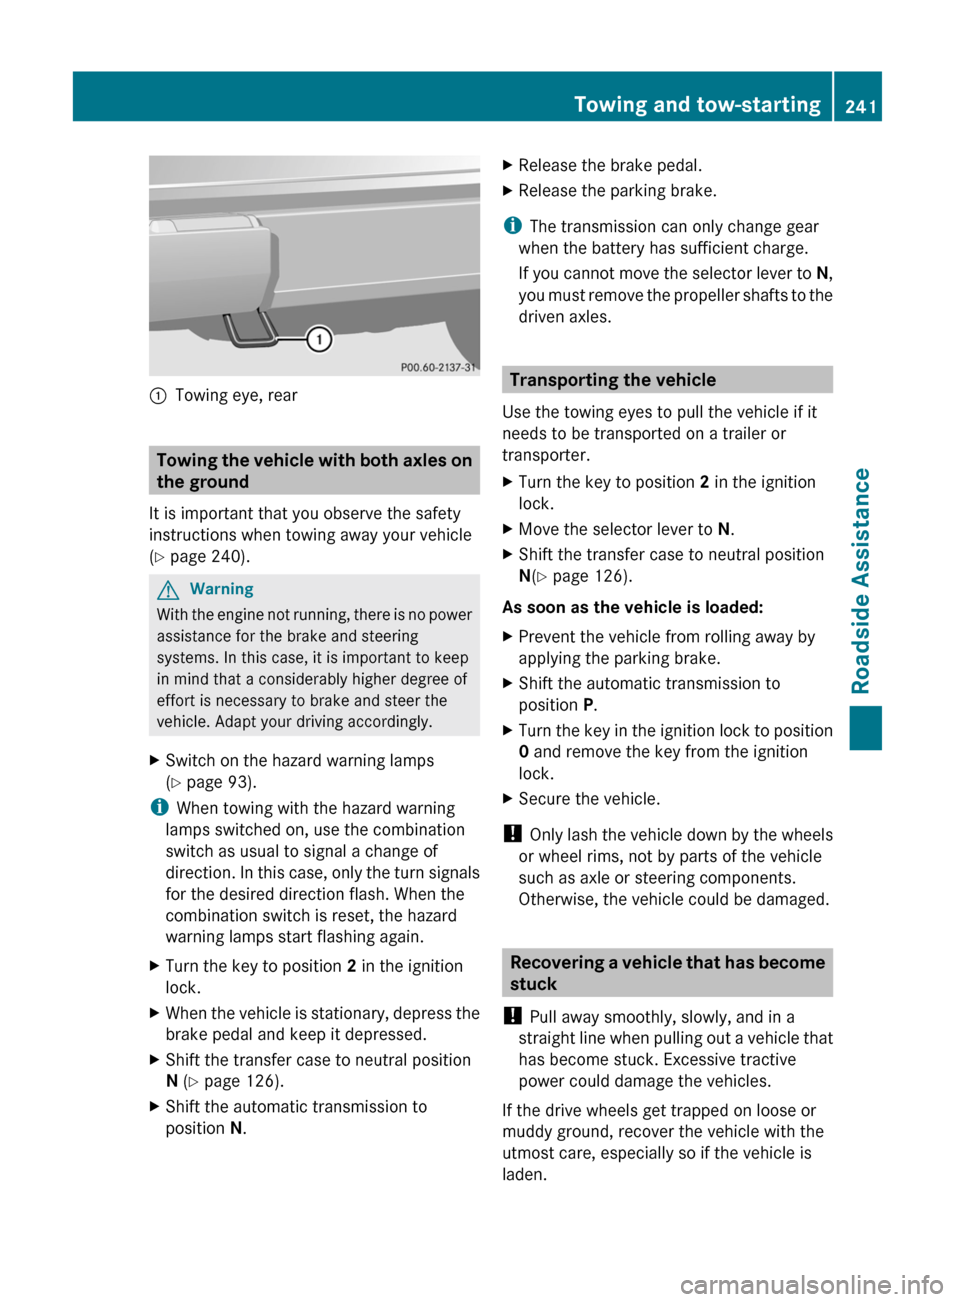
:Towing eye, rear
Towing the vehicle with both axles on
the ground
It is important that you observe the safety
instructions when towing away your vehicle
( Y page 240).
GWarning
With the engine not running, there is no power
assistance for the brake and steering
systems. In this case, it is important to keep
in mind that a considerably higher degree of
effort is necessary to brake and steer the
vehicle. Adapt your driving accordingly.
XSwitch on the hazard warning lamps
( Y page 93).
i
When towing with the hazard warning
lamps switched on, use the combination
switch as usual to signal a change of
direction. In this case, only the turn signals
for the desired direction flash. When the
combination switch is reset, the hazard
warning lamps start flashing again.
XTurn the key to position 2 in the ignition
lock.XWhen the vehicle is stationary, depress the
brake pedal and keep it depressed.XShift the transfer case to neutral position
N (Y page 126).XShift the automatic transmission to
position N.XRelease the brake pedal.XRelease the parking brake.
i
The transmission can only change gear
when the battery has sufficient charge.
If you cannot move the selector lever to N,
you must remove the propeller shafts to the
driven axles.
Transporting the vehicle
Use the towing eyes to pull the vehicle if it
needs to be transported on a trailer or
transporter.
XTurn the key to position 2 in the ignition
lock.XMove the selector lever to N.XShift the transfer case to neutral position
N (Y page 126).
As soon as the vehicle is loaded:
XPrevent the vehicle from rolling away by
applying the parking brake.XShift the automatic transmission to
position P.XTurn the key in the ignition lock to position
0 and remove the key from the ignition
lock.XSecure the vehicle.
! Only lash the vehicle down by the wheels
or wheel rims, not by parts of the vehicle
such as axle or steering components.
Otherwise, the vehicle could be damaged.
Recovering a vehicle that has become
stuck
! Pull away smoothly, slowly, and in a
straight line when pulling out a vehicle that
has become stuck. Excessive tractive
power could damage the vehicles.
If the drive wheels get trapped on loose or
muddy ground, recover the vehicle with the
utmost care, especially so if the vehicle is
laden.
Towing and tow-starting241Roadside AssistanceZ
Page 252 of 288
about the tire pressure. On vehicles equipped
with the electronic tire pressure monitoring
system, the tire pressure can be checked
using the on-board computer.GWarning
Should the tire pressure drop repeatedly:
R check the tire for foreign bodies.
R check whether the wheel is losing air or the
valve is leaking.
R make sure that only a valve cap approved
by Mercedes-Benz is installed on the tire
valve.
Tire pressures that are too low have a
negative effect on vehicle safety, which could
lead you to cause an accident.
Only correct tire pressures when the tires are
cold. The tires are cold when the vehicle has
been parked for at least three hours or driven
for less than 1 mile (1.6 km). The tire
temperature changes depending on the
outside temperature, the vehicle speed and
the tire load. If the tire temperature changes
by 18 ‡ (10 †), the tire pressure changes by
approximately 10 kPa (0.1 bar/1.5 psi). Take
this into account when checking the pressure
of warm tires and only correct the tire
pressure if it is too low for the current
operating conditions. If you check the tire
pressure when the tires are warm, the
resulting value will be higher than if the tires
were cold. This is normal. Do not reduce the
tire pressure to the value specified for cold
tires. The tire pressure would otherwise be
too low.
Observe the recommended tire pressure
specifications for cold tires on the Tire and
Loading Information placard on the B-pillar on
the driver's side.
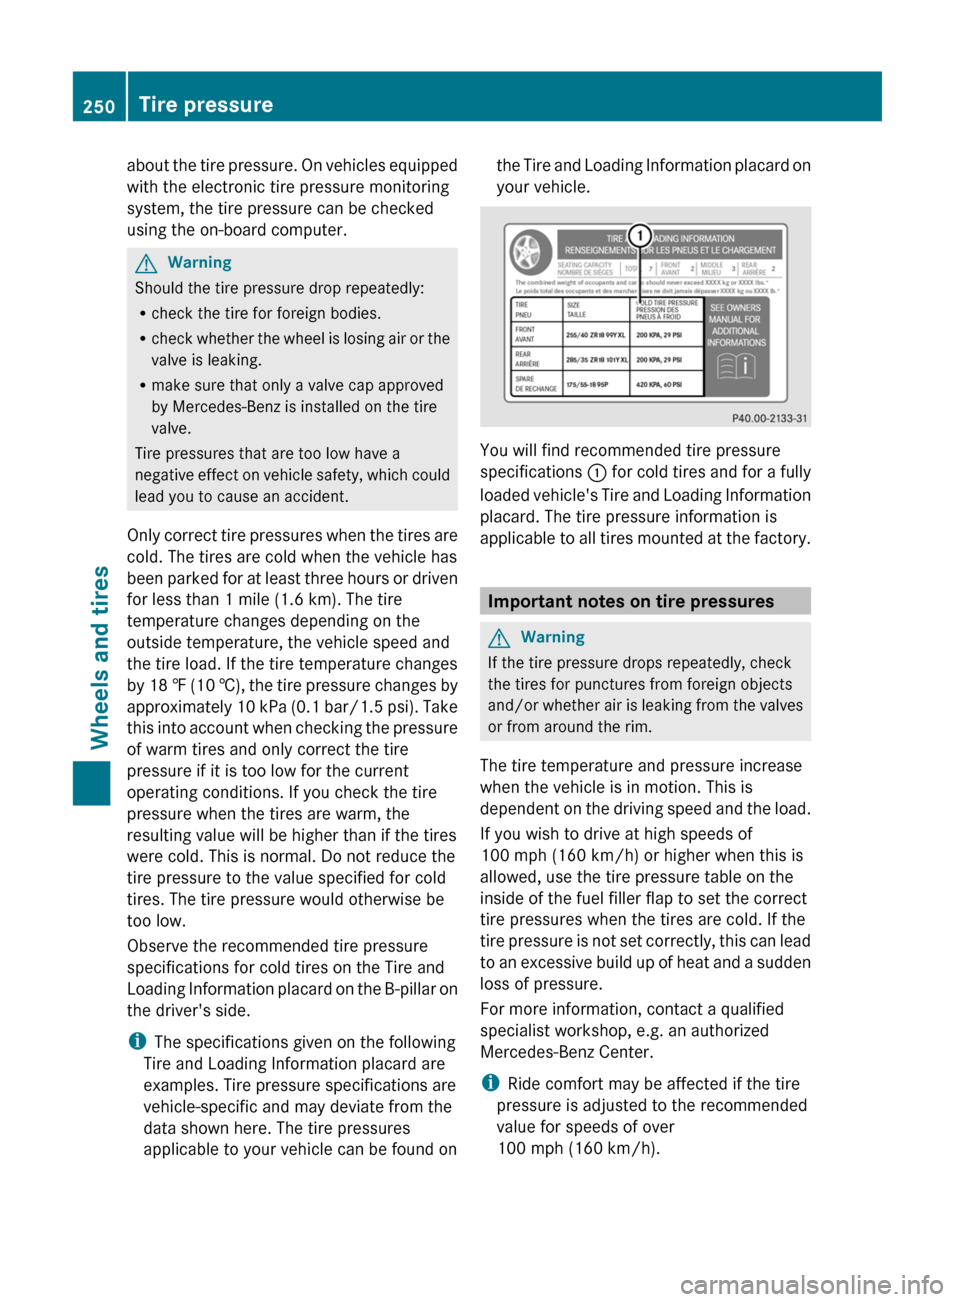
i The specifications given on the following
Tire and Loading Information placard are
examples. Tire pressure specifications are
vehicle-specific and may deviate from the
data shown here. The tire pressures
applicable to your vehicle can be found on
the Tire and Loading Information placard on
your vehicle.
You will find recommended tire pressure
specifications : for cold tires and for a fully
loaded vehicle's Tire and Loading Information
placard. The tire pressure information is
applicable to all tires mounted at the factory.
Important notes on tire pressures
GWarning
If the tire pressure drops repeatedly, check
the tires for punctures from foreign objects
and/or whether air is leaking from the valves
or from around the rim.
The tire temperature and pressure increase
when the vehicle is in motion. This is
dependent on the driving speed and the load.
If you wish to drive at high speeds of
100 mph (160 km/h) or higher when this is
allowed, use the tire pressure table on the
inside of the fuel filler flap to set the correct
tire pressures when the tires are cold. If the
tire pressure is not set correctly, this can lead
to an excessive build up of heat and a sudden
loss of pressure.
For more information, contact a qualified
specialist workshop, e.g. an authorized
Mercedes-Benz Center.
i Ride comfort may be affected if the tire
pressure is adjusted to the recommended
value for speeds of over
100 mph (160 km/h).
250Tire pressureWheels and tires
Page 257 of 288
2. This device must accept any interference
received, including interference that may
cause undesired operation.
Unauthorized modifications to the device
can lead to the invalidation of the operating
agreement of the device.
Checking tire pressure electronicallyXMake sure that the SmartKey is in position
2 (Y page 117) in the ignition lock.XPress and hold the V or U button on
the multifunction steering wheel until the
standard display appears in the
multifunction display ( Y page 160).XPress and hold the & or * button
until the current tire pressure of each tire
is shown in the multifunction display.
If the vehicle has been parked for over 20
minutes, the Tire pressure displayed
only after driving for a few
minutes message appears.
i If a spare wheel is installed, the system
may continue to show the tire pressure of
the wheel that has been removed for a few
minutes. If this occurs, note that the value
displayed for the position where the spare
tire is installed is not the same as the spare
tire's current tire pressure.
Tire pressure monitor warning
messages
If the tire pressure monitor detects a
significant pressure loss on one or more tires,
a warning message is shown in the
multifunction display. A warning tone also
sounds and the tire pressure warning lamp
lights up in the instrument cluster.
Each tire that is affected by a significant loss
of pressure is highlighted by a red rectangle.
i If the wheel positions on the vehicle are
interchanged, the tire pressures may be
displayed for the wrong positions for a
short time. This is rectified after a few
minutes of driving, and the tire pressures
are displayed for the correct positions.
Restarting the tire pressure monitorGWarning
It is the driver's responsibility to set the tire
inflation pressure to the recommended cold
tire inflation pressure. Underinflated tires
affect the ability to steer or brake the vehicle.
You might lose control over the vehicle.
When you restart the tire pressure monitor,
all existing warning messages are deleted and
the warning lamps go out. The monitor uses
the currently set tire pressures as the
reference values for monitoring.
The tire pressure monitor must be restarted
when you set the tire pressure to a new value
(as a result of changed drive or load
characteristics, for example). The tire
pressure monitor then monitors the new tire
pressure values.
i Canada only: in most cases, the tire
pressure monitor recognizes the new
reference values automatically. However,
you can also define reference values
manually as described here.
Restart the tire pressure monitor after you
have set the tire pressure to the value
recommended for the desired driving
situation ( Y page 249). Only correct tire
pressures on cold tires. Comply with the
recommended tire pressures on the tire and
loading information table on the B-pillar on
the driver's side. Additional tire pressure
values for driving at high speeds or with heavy
loads can be found in the tire pressure table
on the inside of the fuel filler flap.
XMake sure that the tire pressure is correct
on all four wheels.XMake sure that the SmartKey is in position
2 in the ignition lock.XPress and hold the V or U button on
the multifunction steering wheel until theTire pressure255Wheels and tiresZ
Page 272 of 288
requires. Do not change the direction of
wheel rotation.
Clean the contact surfaces of the wheel and
the brake disc thoroughly every time a wheel
is interchanged. Check the tire pressure and
reactivate the tire pressure monitor
( Y page 253) if necessary.
Information on changing a wheel and
mounting the spare wheel ( Y page 232).
! On vehicles installed with a tire pressure
monitor, electronic components are
located in the wheel.
Tire-mounting tools should not be applied
in the area of the valve, as this could
damage the electronic components.
Always have the tires changed at a qualified
specialist workshop, e.g. an authorized
Mercedes-Benz Center.
Direction of rotation
Tires with a specified direction of rotation
have additional benefits, e.g. if there is a risk
of hydroplaning. You will only gain these
benefits if the correct direction of rotation is
maintained.
An arrow on the sidewall of the tire indicates
its correct direction of rotation.
You may install the spare wheel against the
direction of rotation. Adhere to the time
restriction on use as well as the speed
limitation specified on the spare wheel.
Storing wheels
Store tires that are not being used in a cool,
dry and preferably dark place. Protect the
tires from oil, grease, gasoline and diesel.
Cleaning the wheels
GWarning
Do not use power washers with circular jet
nozzles (concentrated-power jets) to clean
your vehicle, especially for cleaning tires. You
could otherwise damage the tires and cause
an accident.
Wheel and tire combinations
Please bear the following in mind
GWarning
Replace rims or tires with the same
designation, manufacturer and type as shown
on the original part. For further information
contact an authorized Mercedes-Benz Center.
If incorrectly sized rims and tires are
mounted, the wheel brakes or suspension
components can be damaged. Also, the
operating clearance of the wheels and the
tires may no longer be correct.
GWarning
Worn, old tires can cause accidents. If the tire
tread is worn to minimum tread depth, or if
the tires have sustained damage, replace
them.
When replacing rims, only use genuine
Mercedes-Benz wheel bolts specified for the
particular rim type. Failure to do so can result
in the bolts loosening and possibly an
accident.
Retreaded tires are not tested or
recommended by Mercedes-Benz, since
previous damage cannot always be
recognized on retreads. The operating safety
of the vehicle cannot be assured when such
tires are used.
GWarning
If you feel a sudden significant vibration or
ride disturbance, or you suspect that possible
damage to your vehicle has occurred, you
should turn on the hazard warning flashers,
carefully slow down, and drive with caution to
an area which is a safe distance from the road.
Inspect the tires and the vehicle underbody
for possible damage. If the vehicle appears
unsafe, have the vehicle towed to the nearest
270Wheel and tire combinationsWheels and tires