2011 MERCEDES-BENZ G550 change wheel
[x] Cancel search: change wheelPage 159 of 288
The coolant temperature gauge is in the
instrument cluster on the left-hand side.
Under normal driving conditions, with the
correct anti-corrosion and antifreeze additive
concentration, the reading may rise to
248 ‡(120 †).
! If the coolant temperature exceeds
248 ‡(120 †) do not continue driving. The
engine will otherwise be damaged.
Outside temperature display
The outside temperature display is in the
multifunction display ( Y page 158).
GWarning!
The outside temperature indicator is not
designed to serve as an ice-warning device
and is therefore unsuitable for that purpose.
Indicated temperatures just above the
freezing point do not guarantee that the road
surface is free of ice. The road may still be icy,
especially in wooded areas or on bridges.
Changes in the outside temperature are
displayed after a short delay.
Operating the on-board computer
The on-board computer is activated as soon
as you turn the SmartKey to position 1 in the
ignition lock.
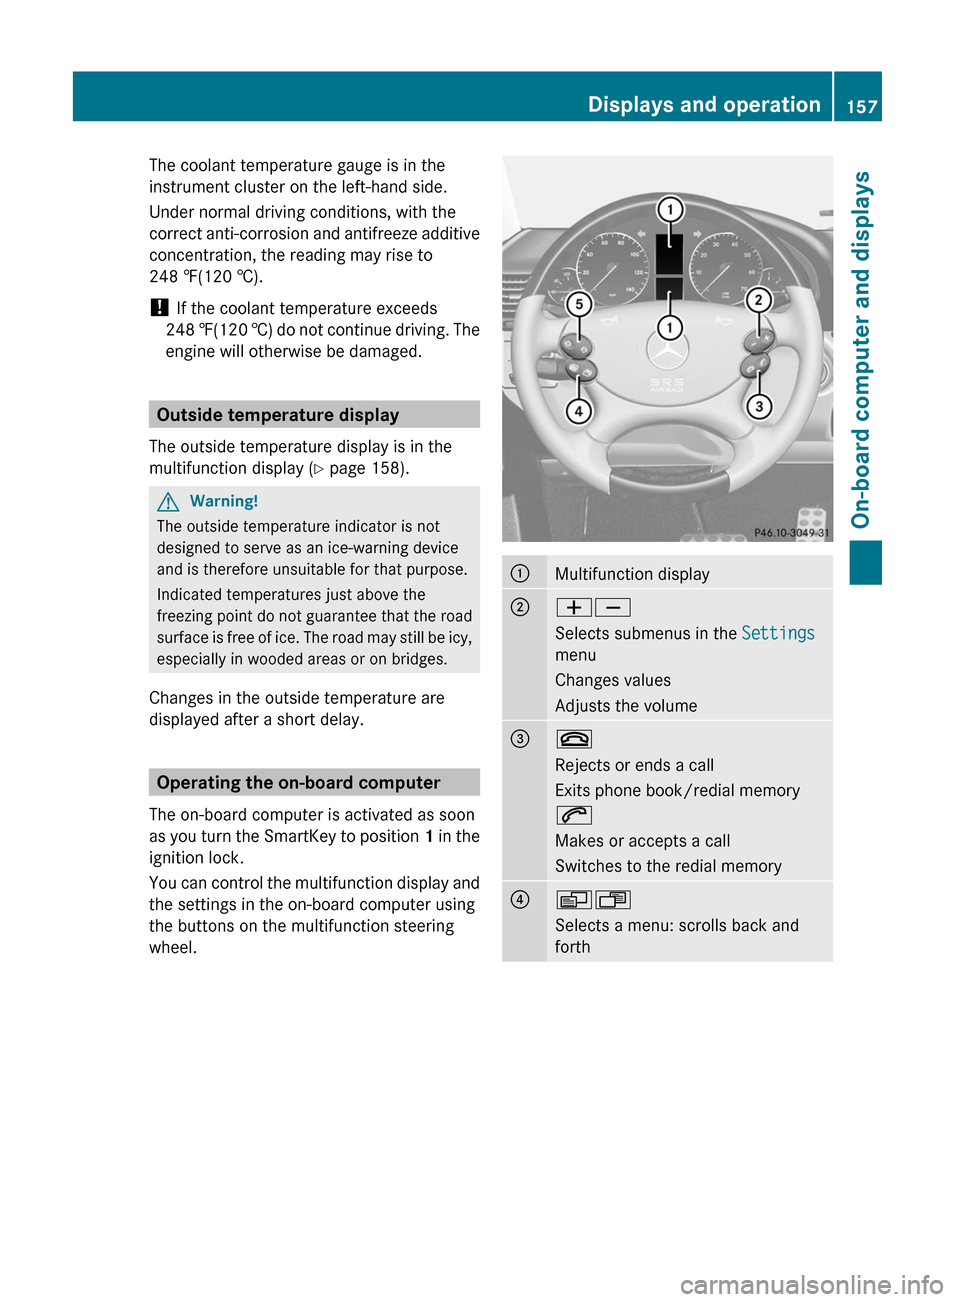
You can control the multifunction display and
the settings in the on-board computer using
the buttons on the multifunction steering
wheel.
:Multifunction display;WX
Selects submenus in the Settings
menu
Changes values
Adjusts the volume=~
Rejects or ends a call
Exits phone book/redial memory
6
Makes or accepts a call
Switches to the redial memory?VU
Selects a menu: scrolls back and
forthDisplays and operation157On-board computer and displaysZ
Page 163 of 288
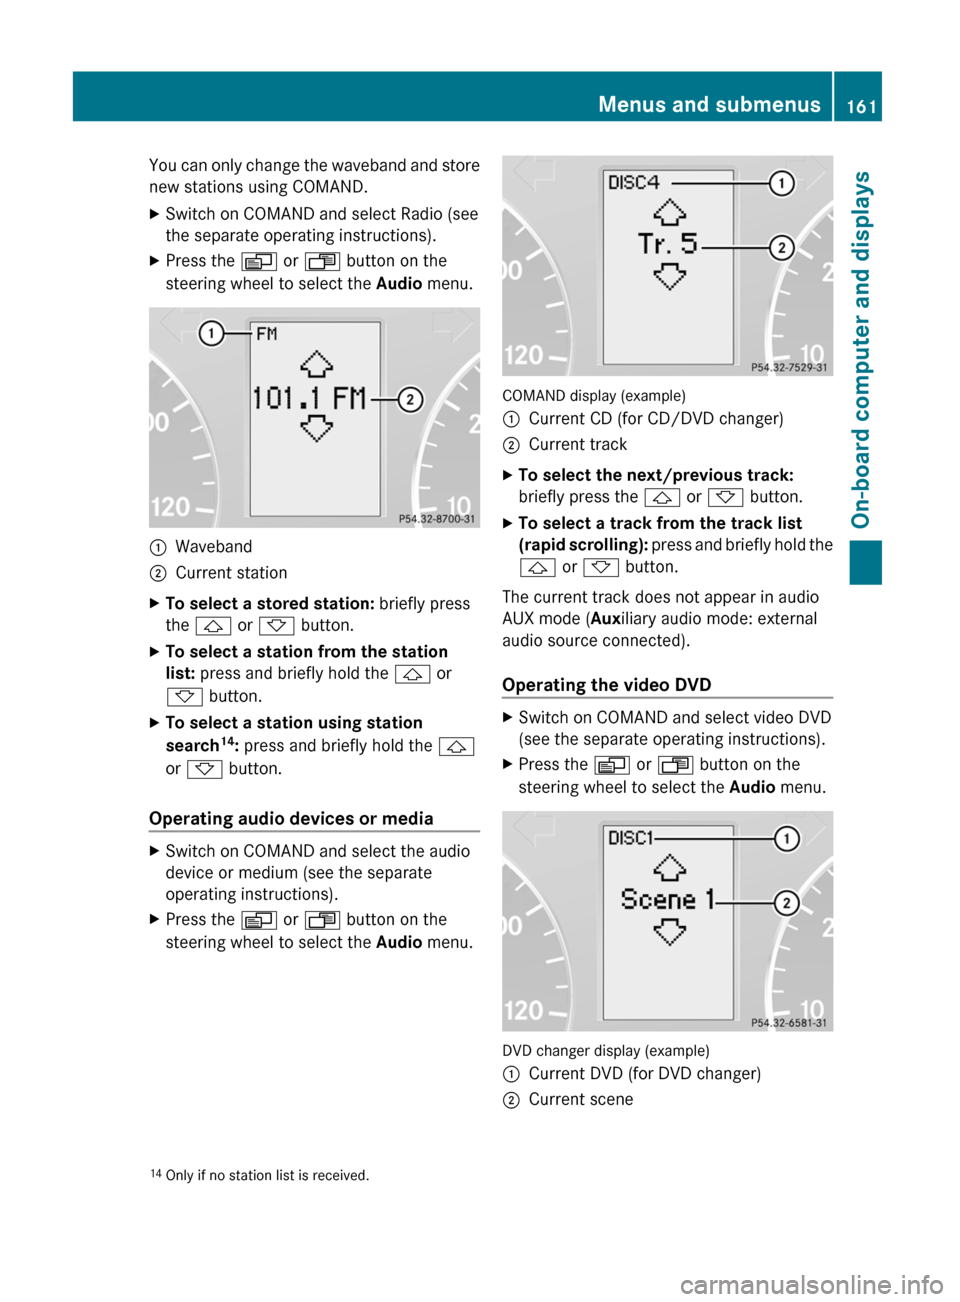
You can only change the waveband and store
new stations using COMAND.XSwitch on COMAND and select Radio (see
the separate operating instructions).XPress the V or U button on the
steering wheel to select the Audio menu.:Waveband;Current stationXTo select a stored station: briefly press
the & or * button.XTo select a station from the station
list: press and briefly hold the & or
* button.XTo select a station using station
search 14
: press and briefly hold the &
or * button.
Operating audio devices or media
XSwitch on COMAND and select the audio
device or medium (see the separate
operating instructions).XPress the V or U button on the
steering wheel to select the Audio menu.
COMAND display (example)
:Current CD (for CD/DVD changer);Current trackXTo select the next/previous track:
briefly press the & or * button.XTo select a track from the track list
(rapid scrolling): press and briefly hold the
& or * button.
The current track does not appear in audio
AUX mode ( Auxiliary audio mode: external
audio source connected).
Operating the video DVD
XSwitch on COMAND and select video DVD
(see the separate operating instructions).XPress the V or U button on the
steering wheel to select the Audio menu.
DVD changer display (example)
:Current DVD (for DVD changer);Current scene14
Only if no station list is received.Menus and submenus161On-board computer and displaysZ
Page 181 of 288

TiresGWarning
Do not drive with a flat tire. A flat tire affects the ability to steer or brake the vehicle. You may
lose control of the vehicle. Continued driving with a flat tire will cause excessive heat build-up
and possibly a fire.
GWarning
Follow recommended tire inflation pressures.
Do not underinflate tires. Underinflated tires wear excessively and/or unevenly, adversely affect
handling and fuel economy, and are more likely to fail from being overheated.
Do not overinflate tires. Overinflated tires can adversely affect handling and ride comfort, wear
unevenly, increase stopping distance, and result in sudden deflation (blowout) because they are
more likely to become punctured or damaged by road debris, potholes etc.
Display messagesPossible causes/consequences and M SolutionsTire pressure
displayed only
after driving for
a few minutesThe tire pressure monitor is measuring the tire pressure.XDrive on.
The tire pressures appear in the multifunction display after you
have been driving for a few minutes.Tire Pres.
Check TiresGRisk of accident
The tire pressure monitor has detected a significant pressure loss.
XStop the vehicle without making any sudden steering or braking
maneuvers. Pay attention to the traffic conditions as you do so.XCheck the tires.XCheck the tire pressure and correct it if necessary
( Y page 246).XRepair or change the faulty wheel as necessary ( Y page 232).XThen, restart the tire pressure monitor when the tire pressure
is correct ( Y page 253).Tire Pres. Monitor
InoperativeThe tire pressure monitor is deactivated due to a malfunction.XVisit a qualified specialist workshop.Tire Pres. Monitor
Inoperative No
Wheel SensorsThe wheels mounted do not have a suitable tire pressure sensor.
The tire pressure monitor is deactivated.XMount wheels with suitable tire pressure sensors.
The tire pressure monitor is activated automatically after driving
for a few minutes.Display messages179On-board computer and displaysZ
Page 182 of 288
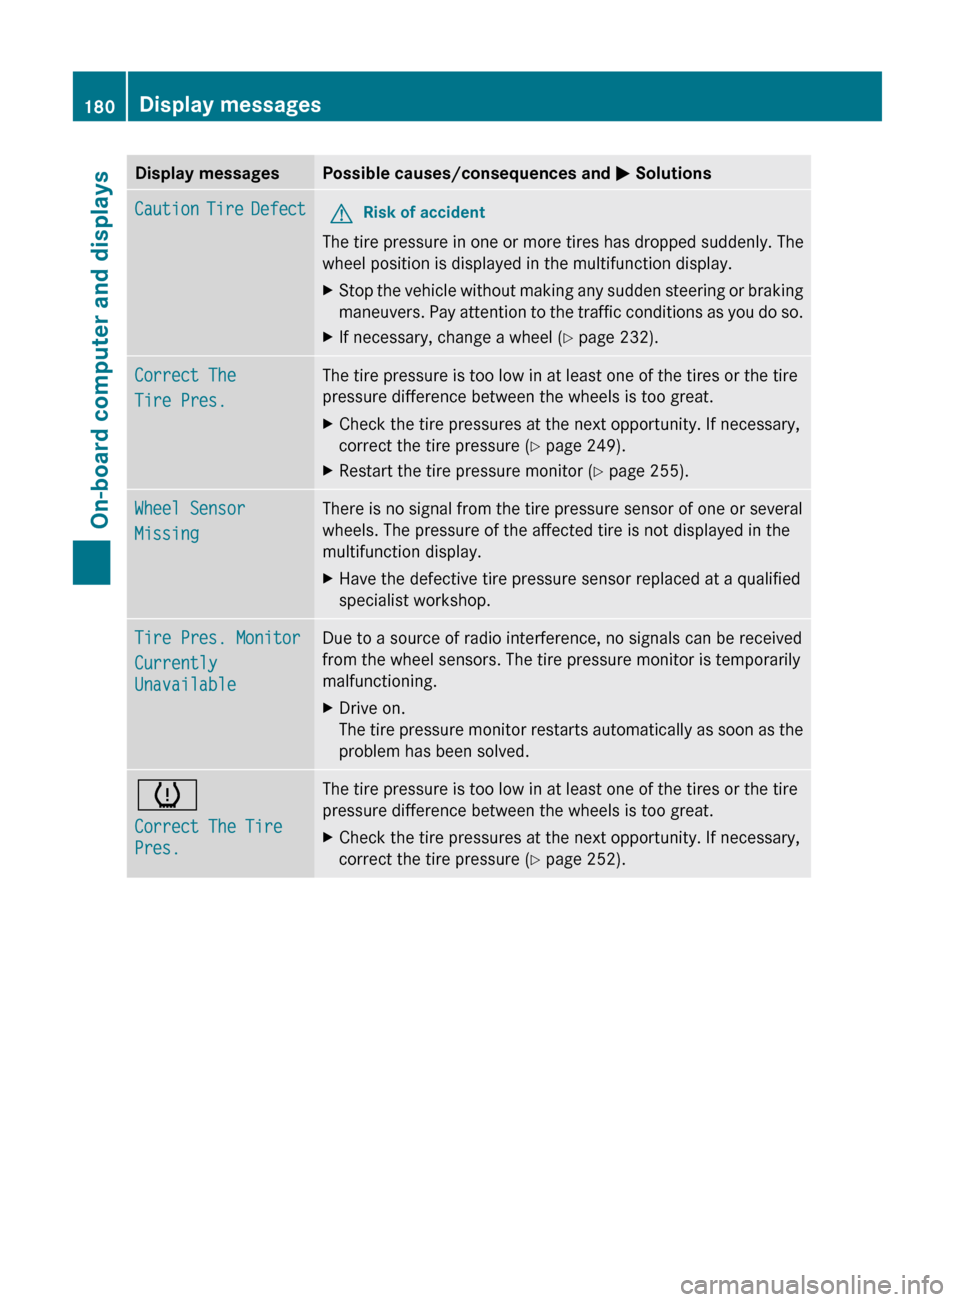
Display messagesPossible causes/consequences and M SolutionsCaution Tire DefectGRisk of accident
The tire pressure in one or more tires has dropped suddenly. The
wheel position is displayed in the multifunction display.
XStop the vehicle without making any sudden steering or braking
maneuvers. Pay attention to the traffic conditions as you do so.XIf necessary, change a wheel ( Y page 232).Correct The
Tire Pres.The tire pressure is too low in at least one of the tires or the tire
pressure difference between the wheels is too great.XCheck the tire pressures at the next opportunity. If necessary,
correct the tire pressure ( Y page 249).XRestart the tire pressure monitor ( Y page 255).Wheel Sensor
MissingThere is no signal from the tire pressure sensor of one or several
wheels. The pressure of the affected tire is not displayed in the
multifunction display.XHave the defective tire pressure sensor replaced at a qualified
specialist workshop.Tire Pres. Monitor
Currently
UnavailableDue to a source of radio interference, no signals can be received
from the wheel sensors. The tire pressure monitor is temporarily
malfunctioning.XDrive on.
The tire pressure monitor restarts automatically as soon as the
problem has been solved.h
Correct The Tire
Pres.The tire pressure is too low in at least one of the tires or the tire
pressure difference between the wheels is too great.XCheck the tire pressures at the next opportunity. If necessary,
correct the tire pressure ( Y page 252).180Display messagesOn-board computer and displays
Page 183 of 288

Display messagesPossible causes/consequences and M Solutionsh
Tire Pres. Caution
Tire DefectGRisk of accident
The tire pressure in one or more tires has dropped suddenly.
XStop the vehicle without making any sudden steering or braking
maneuvers. Pay attention to the traffic conditions as you do so.XIf necessary, change a wheel ( Y page 232).h
Tire Pres. Check
TiresGRisk of accident
The tire pressure in one or more tires has dropped significantly.
XStop the vehicle without making any sudden steering or braking
maneuvers. Pay attention to the traffic conditions as you do so.XIf necessary, change a wheel ( Y page 232).XCheck the tire pressure. If necessary, correct the tire pressure
( Y page 252).
Vehicle
Display messagesPossible causes/consequences and M Solutions:The rear door is open.XClose the rear door.MGRisk of accident
Vehicles with anti-theft alarm system:
The hood is open. A warning tone also sounds.
XPull over and stop the vehicle safely as soon as possible, paying
attention to road and traffic conditions.XApply the parking brake.XClose the hood.¡At least one door is open.XClose all the doors.~
Bluetooth ReadyThe Bluetooth ®
connection between your mobile phone and
COMAND is not activated.XIf desired, activate the Bluetooth ®
connection between your
mobile phone and COMAND (see the separate Operator's
Manual).¥
Top Up Washer FluidThe washer fluid level in the washer fluid reservoir has dropped
below the minimum.XAdd washer fluid ( Y page 218).Display messages181On-board computer and displaysZ
Page 191 of 288
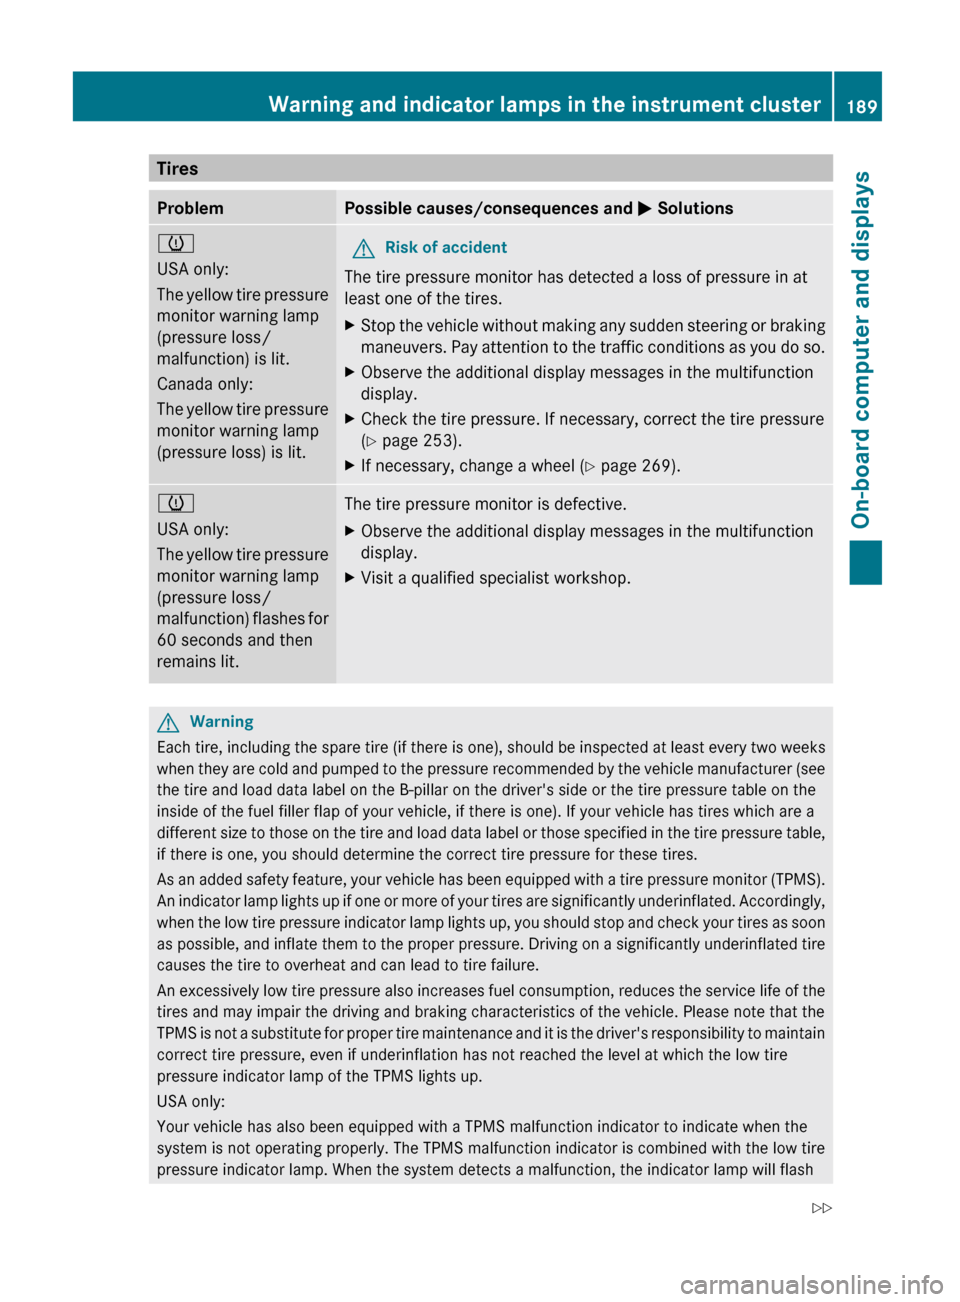
TiresProblemPossible causes/consequences and M Solutionsh
USA only:
The yellow tire pressure
monitor warning lamp
(pressure loss/
malfunction) is lit.
Canada only:
The yellow tire pressure
monitor warning lamp
(pressure loss) is lit.GRisk of accident
The tire pressure monitor has detected a loss of pressure in at
least one of the tires.
XStop the vehicle without making any sudden steering or braking
maneuvers. Pay attention to the traffic conditions as you do so.XObserve the additional display messages in the multifunction
display.XCheck the tire pressure. If necessary, correct the tire pressure
( Y page 253).XIf necessary, change a wheel ( Y page 269).h
USA only:
The yellow tire pressure
monitor warning lamp
(pressure loss/
malfunction) flashes for
60 seconds and then
remains lit.The tire pressure monitor is defective.XObserve the additional display messages in the multifunction
display.XVisit a qualified specialist workshop.GWarning
Each tire, including the spare tire (if there is one), should be inspected at least every two weeks
when they are cold and pumped to the pressure recommended by the vehicle manufacturer (see
the tire and load data label on the B-pillar on the driver's side or the tire pressure table on the
inside of the fuel filler flap of your vehicle, if there is one). If your vehicle has tires which are a
different size to those on the tire and load data label or those specified in the tire pressure table,
if there is one, you should determine the correct tire pressure for these tires.
As an added safety feature, your vehicle has been equipped with a tire pressure monitor (TPMS).
An indicator lamp lights up if one or more of your tires are significantly underinflated. Accordingly,
when the low tire pressure indicator lamp lights up, you should stop and check your tires as soon
as possible, and inflate them to the proper pressure. Driving on a significantly underinflated tire
causes the tire to overheat and can lead to tire failure.
An excessively low tire pressure also increases fuel consumption, reduces the service life of the
tires and may impair the driving and braking characteristics of the vehicle. Please note that the
TPMS is not a substitute for proper tire maintenance and it is the driver's responsibility to maintain
correct tire pressure, even if underinflation has not reached the level at which the low tire
pressure indicator lamp of the TPMS lights up.
USA only:
Your vehicle has also been equipped with a TPMS malfunction indicator to indicate when the
system is not operating properly. The TPMS malfunction indicator is combined with the low tire
pressure indicator lamp. When the system detects a malfunction, the indicator lamp will flash
Warning and indicator lamps in the instrument cluster189On-board computer and displaysZ
Page 227 of 288
Cleaning the plastic trimGWarning
When cleaning the steering wheel boss and
dashboard, do not use cockpit sprays or
cleaning agents containing solvents. Cleaning
agents containing solvents cause the surface
to become porous, and as a result, plastic
parts may break away and be thrown around
the interior when an air bag is deployed, which
may result in severe injuries.
! Do not affix the following to plastic
surfaces:
R stickers
R films
R scented oil bottles or similar items
You can otherwise damage the plastic.
! Do not allow cosmetics, insect repellent
or sunscreen to come into contact with the
plastic trim. This maintains the high-quality
look of the surfaces.
XWipe the plastic trim with a damp, lint-free
cloth, e.g. a microfiber cloth.XHeavy soiling: use car care and cleaning
products recommended and approved by
Mercedes-Benz.
The surface may change color temporarily.
Wait until the surface is dry again.
Cleaning the steering wheel and gear or
selector lever
XThoroughly wipe with a damp cloth or use
leather care agents that have been
recommended and approved by Mercedes-
Benz.
Cleaning real wood and trim strips
XWipe the wooden trim and trim strips with
a damp, lint-free cloth, e.g. a microfiber
cloth.XHeavy soiling: use car care and cleaning
products recommended and approved by
Mercedes-Benz.! Do not use solvent-based cleaning agents
such as tar remover, wheel cleaners,
polishes or waxes. There is otherwise a risk
of damaging the surface.
! Do not use chrome polish for trim strips.
The trim strips have a chrome look but are
mostly made of anodized aluminum and
can lose their shine if chrome polish is
used. Use a damp, lint-free cloth instead
when cleaning the trim strips.
Chrome polish can be used to remove very
heavy soiling from trim strips which you are
sure are made of chrome. If you are unsure
as to whether a trim strip is chrome-plated
or not, consult an authorized Mercedes-
Benz Center.
Cleaning the seat covers
! Do not use microfiber cloths to clean
genuine leather or artificial leather covers,
as these are too aggressive and, if used
often, may damage the cover.
! Observe the following when cleaning:
R clean genuine leather covers carefully
with a damp cloth and then wipe the
covers down with a dry cloth. Make sure
that the leather does not become
soaked. It may otherwise become rough
and cracked. Only use leather care
agents that have been tested and
approved by Mercedes-Benz. You can
obtain these from a qualified specialist
workshop, e.g. an authorized Mercedes-
Benz Center.
R clean artificial leather covers with a cloth
moistened with a solution containing 1%
detergent (e.g. dish washing liquid).
R clean cloth covers with a microfiber cloth
moistened with a solution containing 1%
detergent (e.g. dish washing liquid). Rub
carefully and always wipe entire seat
sections to avoid leaving visible lines.
Leave the seat to dry afterwards.
Cleaning results depend on the type of
dirt and how long it has been there.
Care225Maintenance and careZ
Page 231 of 288
After an accidentProblemPossible causes/consequences and M SolutionsFuel is leaking from the
vehicle.GRisk of explosion or fire
The fuel line or the fuel tank is faulty.
XImmediately turn the SmartKey to position 0 ( Y page 117) in the
ignition lock and remove it.XDo not restart the engine under any circumstances.XConsult a qualified specialist workshop.You are unable to
determine the extent of
the damage.XConsult a qualified specialist workshop.You cannot detect any
damage.XStart the engine as normal.The NECK-PRO head
restraints on the
driver's and front-
passenger seats have
been triggered.Your vehicle has been involved in a rear-end collision.XReset the NECK-PRO head restraints ( Y page 43).Where will I find...?
First-aid kit
i Check the expiration date on the first-aid
kit at least once a year. Replace the
contents if necessary, and replace missing
contents.
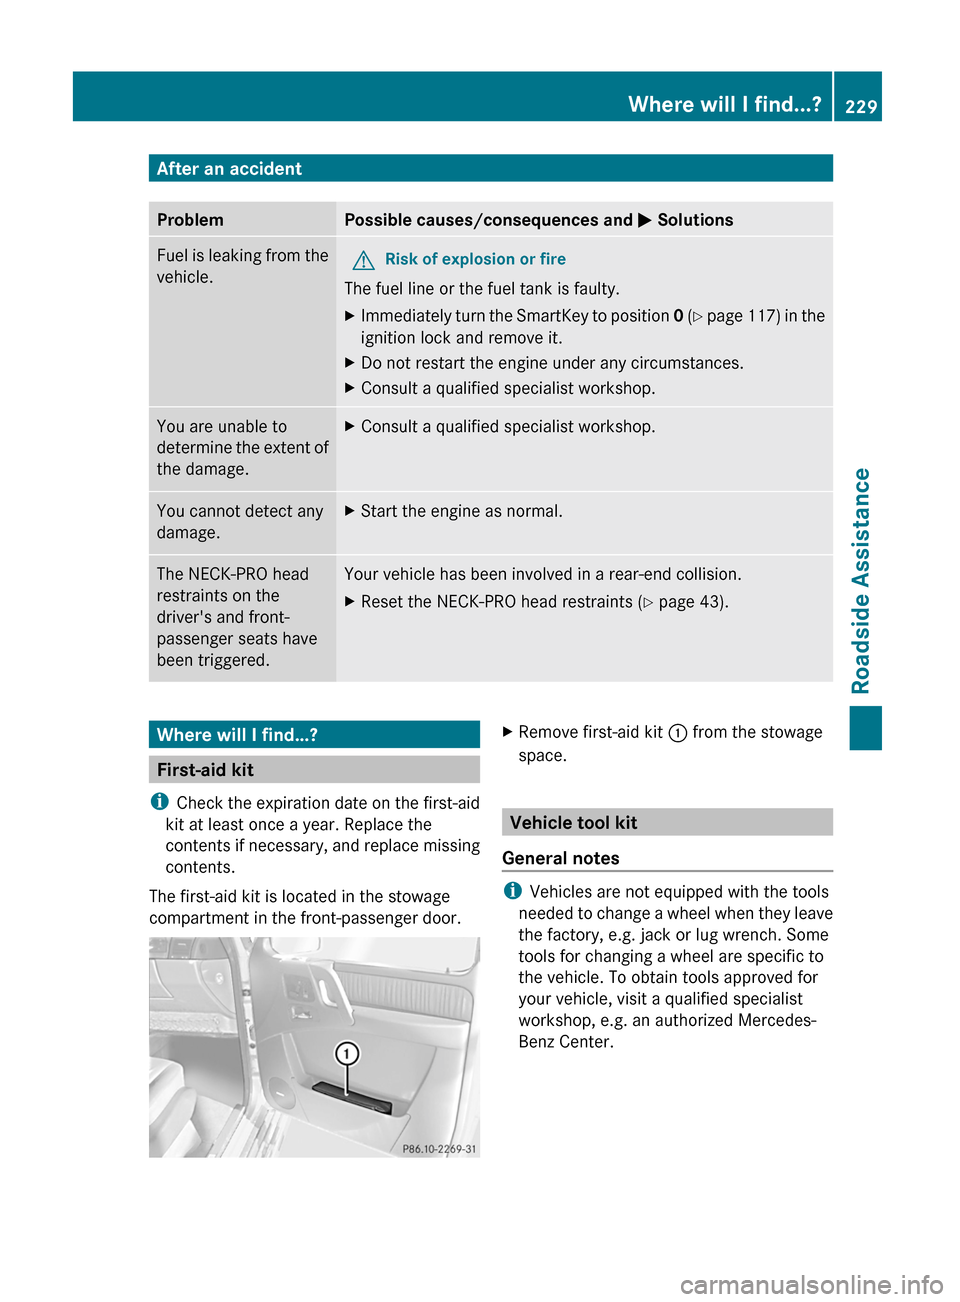
The first-aid kit is located in the stowage
compartment in the front-passenger door.
XRemove first-aid kit : from the stowage
space.
Vehicle tool kit
General notes
i Vehicles are not equipped with the tools
needed to change a wheel when they leave
the factory, e.g. jack or lug wrench. Some
tools for changing a wheel are specific to
the vehicle. To obtain tools approved for
your vehicle, visit a qualified specialist
workshop, e.g. an authorized Mercedes-
Benz Center.
Where will I find...?229Roadside AssistanceZ