2011 MERCEDES-BENZ G-CLASS steering
[x] Cancel search: steeringPage 201 of 288
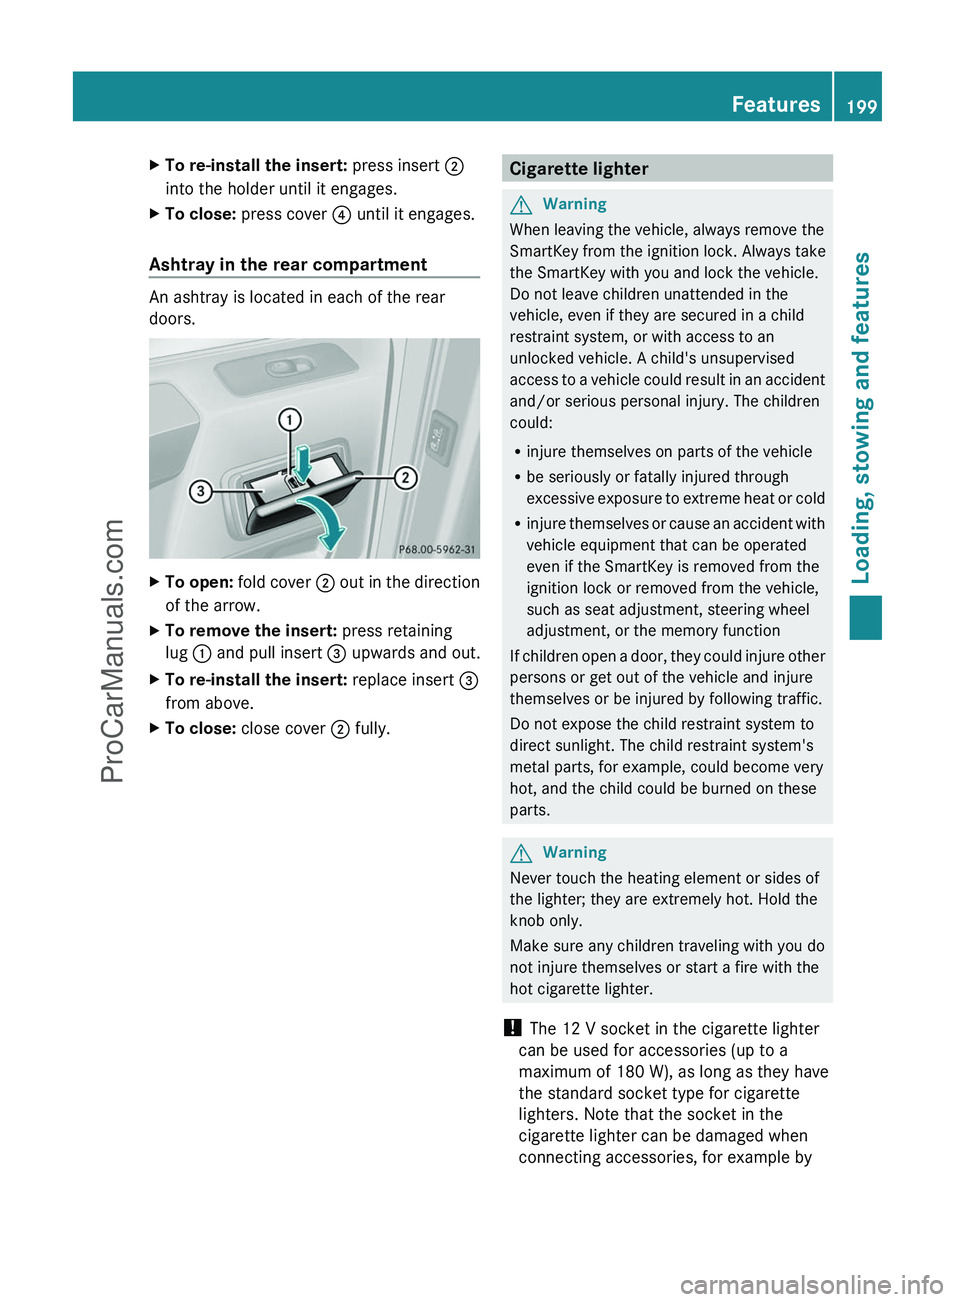
XTo re-install the insert: press insert ;
into the holder until it engages.XTo close: press cover ? until it engages.
Ashtray in the rear compartment
An ashtray is located in each of the rear
doors.
XTo open: fold cover ; out in the direction
of the arrow.XTo remove the insert: press retaining
lug : and pull insert = upwards and out.XTo re-install the insert: replace insert =
from above.XTo close: close cover ; fully.Cigarette lighterGWarning
When leaving the vehicle, always remove the
SmartKey from the ignition lock. Always take
the SmartKey with you and lock the vehicle.
Do not leave children unattended in the
vehicle, even if they are secured in a child
restraint system, or with access to an
unlocked vehicle. A child's unsupervised
access to a vehicle could result in an accident
and/or serious personal injury. The children
could:
R injure themselves on parts of the vehicle
R be seriously or fatally injured through
excessive exposure to extreme heat or cold
R injure themselves or cause an accident with
vehicle equipment that can be operated
even if the SmartKey is removed from the
ignition lock or removed from the vehicle,
such as seat adjustment, steering wheel
adjustment, or the memory function
If children open a door, they could injure other
persons or get out of the vehicle and injure
themselves or be injured by following traffic.
Do not expose the child restraint system to
direct sunlight. The child restraint system's
metal parts, for example, could become very
hot, and the child could be burned on these
parts.
GWarning
Never touch the heating element or sides of
the lighter; they are extremely hot. Hold the
knob only.
Make sure any children traveling with you do
not injure themselves or start a fire with the
hot cigarette lighter.
! The 12 V socket in the cigarette lighter
can be used for accessories (up to a
maximum of 180 W), as long as they have
the standard socket type for cigarette
lighters. Note that the socket in the
cigarette lighter can be damaged when
connecting accessories, for example by
Features199Loading, stowing and featuresZProCarManuals.com
Page 204 of 288
Possible causes of malfunction:
R the on-board voltage is not within a
permissible voltage range.
R the temperature of the DC/AC converter is
temporarily too high.
R some small electronic devices have a
constant nominal power of less than
150 W, but a very high switch-on current.
In that case, there is a possibility that these
devices will not function properly as 115 V
socket : is not able to provide a high
enough current.
If indicator lamp ; still does not light up,
consult a qualified specialist workshop, e.g.
an authorized Mercedes-Benz Center.
mbrace 15
Important safety notes
! A license agreement must exist in order
to activate the mbrace service. Make sure
that your system is activated and ready for
use, and press the E MB info call button
to register. If you cannot carry out any of
the steps mentioned, the system may not
be activated.
If you have any questions concerning
activation, please contact one of the
following service hotlines:
R USA: Response Center under
1-888-990-9007
R Canada: Customer Service under
1-888-923-8367
Shortly after successfully registering with the
mbrace service, a user ID and password will
be sent to you by post. You can use this
password to log in to the mbrace section
under "Owners Online" at http://
www.mbusa.com 16
.
The mbrace system is available if:
R it has been activated and is operational.
Activation requires an available mobile
phone network, a valid SIM card and a
service subscription to a surveillance
service provider.
R the battery is sufficiently charged.
R the corresponding mobile phone network
is available for transmitting data to the
Customer Center.
i Determining the location of the vehicle on
a map is only possible if there is sufficient
GPS reception and the vehicle position can
be forwarded to the Customer Center.
The mbrace system
The mbrace system provides three different
services:
R automatic and manual emergency call
R Roadside Assistance call
R MB Info call
To adjust the volume during an mbrace call,
proceed as follows:
XPress the W or X button on the
multifunction steering wheel.
or
XUse the COMAND volume controller.
You can find information and a description of
all available features under "Owners Online"
at http://www.mbusa.com 17
.
System self-test
After you have switched on the ignition, the
system carries out a self-diagnosis.
15 The system is called TELE AID in Canada.
16 USA only.
17 USA only.202FeaturesLoading, stowing and features
ProCarManuals.com
Page 207 of 288

The Mercedes-Benz Roadside Assistance
Representative either sends a qualified
Mercedes-Benz technician or organizes for
your vehicle to be transported to the nearest
authorized Mercedes-Benz Center. You may
be charged for services such as repair work
and/or towing. Further details are available
in your mbrace manual.
i If the indicator lamp in Roadside
Assistance button : flashes continuously
and no voice connection to the Response
Center has been established, then the
mbrace system has failed to initiate a
Roadside Assistance call (e.g. the
corresponding mobile phone network is not
available). The Call Failed message
appears in the multifunction display.XTo end a call: press the ~ button on the
multifunction steering wheel.
or
XPress the corresponding button for ending
a phone call on COMAND.
i Sign and Drive services 18
: you are not
charged for services such as jump-starting,
providing a few gallons of fuel for a fuel tank
that has been run dry or changing a flat tire
with the vehicle's own spare wheel.
MB Info call button
XOpen the stowage space under the armrest
( Y page 193).XPress and hold MB Info call button : for
more than two seconds.
A call to the Response Center is initiated.
MB Info call button : indicator lamp
flashes while the connection is being
established. The Connecting call
message appears in the multifunction
display and the COMAND system is muted.
If a connection can be established, the Call
Connected message appears in the
multifunction display.
If a mobile phone network is available and
there is sufficient GPS reception, the mbrace
system transmits data to the Response
Center, for example:
R current location of the vehicle
R vehicle identification number
R vehicle model
R vehicle color
i The COMAND display shows that an
mbrace call is active. You can switch to the
navigation menu by pressing the NAVI
button on COMAND during the call. The
voice output is not available.
A voice connection between the Response
Center and the vehicle occupants is
established. You can obtain information on
how to operate your vehicle's systems, on the
location of the nearest authorized Mercedes-
Benz Center, and on further products and
services offered by Mercedes-Benz USA.
Further details on the mbrace system can be
found at http://www.mbusa.com 19
. Log in
under "Owners Online".
i If the indicator lamp in MB Info call
button : flashes continuously and no
voice connection to the Response Center
has been established, then the mbrace
system has failed to initiate an MB Info call
(e.g. because the corresponding mobile
phone network is not available). The Call
18
USA only.
19 USA only.Features205Loading, stowing and featuresZProCarManuals.com
Page 208 of 288
Failed message appears in the
multifunction display.XTo end a call: press the ~ button on the
multifunction steering wheel.
or
XPress the corresponding button for ending
a phone call on COMAND.
Call priority
When service calls are active, e.g. Roadside
Assistance or MB Info calls, an emergency
call can still be initiated. In this case, an
emergency call has the highest priority and
takes precedence over all other active calls.
The indicator lamp of the respective button
flashes until the call is ended. An emergency
call can only be terminated by the Response
Center. All other calls can be ended by
pressing the ~ button on the
multifunction steering wheel or the
corresponding button for ending a telephone
call on COMAND.
i When an mbrace call has been initiated,
COMAND is muted. The mobile phone is no
longer connected to COMAND. However, if
you want to use your mobile phone, we
recommend that you do this only when the
vehicle is stationary and in a safe location.
Downloading destinations in COMAND
i Information on the components and
operating principles of the COMAND
system can be found in the separate
COMAND operating instructions.
Destination Download gives you access to a
database with over ten million points of
interest (POIs) which can be downloaded onto
the navigation system of your vehicle. If you
know the destination, you can download the
address or obtain the location of points of
interest (POIs) or important destinations in
the surrounding area.
You are prompted to confirm route guidance
to the address entered.XSelect Yes using the = or ; button
on COMAND.XPress 9 on COMAND to confirm.
The system calculates the route and
subsequently starts the route guidance with
the address entered.
i If you select No, the address can be stored
in the address book.
i The Destination Download function is
available if the corresponding mobile
phone network is available and data
transfer is possible.
Search & Send
"Search & Send" is a destination entry
service. You can find further information on
"Search & Send" in the separate COMAND
operating instructions.
Vehicle remote unlocking
If you have unintentionally locked your
vehicle (e.g. the SmartKey is inside the
vehicle) and a replacement key is not
available:
XContact the following service hotlines:
R USA: Response Center at
1-888-990-9007
R Canada: Customer Service at
1-888-923-8367
You will be asked for your password.XReturn to your vehicle at the time arranged
with the Response Center.XPress and hold the release button on the
rear door handle for at least 20 seconds
until the indicator lamp in the SOS button
( Y page 203) begins flashing.
The Connecting Call message appears
on the multifunction display.
Alternatively, the vehicle can also be opened
via the Internet in the "Owners Online"
206FeaturesLoading, stowing and features
ProCarManuals.com
Page 218 of 288
XSlowly insert oil dipstick : into the
dipstick guide tube to the stop, and take it
out again.
The oil level is correct if the level is between
MIN mark = and MAX mark ;.XAdd oil if necessary.
Checking the oil level using the on-
board computer
On the G 55 AMG, the oil level can be checked
using the on-board computer.
When checking the oil level:
R park the vehicle on a level surface.
R the engine should be switched off for
approximately five minutes if the engine is
at normal operating temperature.
Xmake sure that the SmartKey is in position
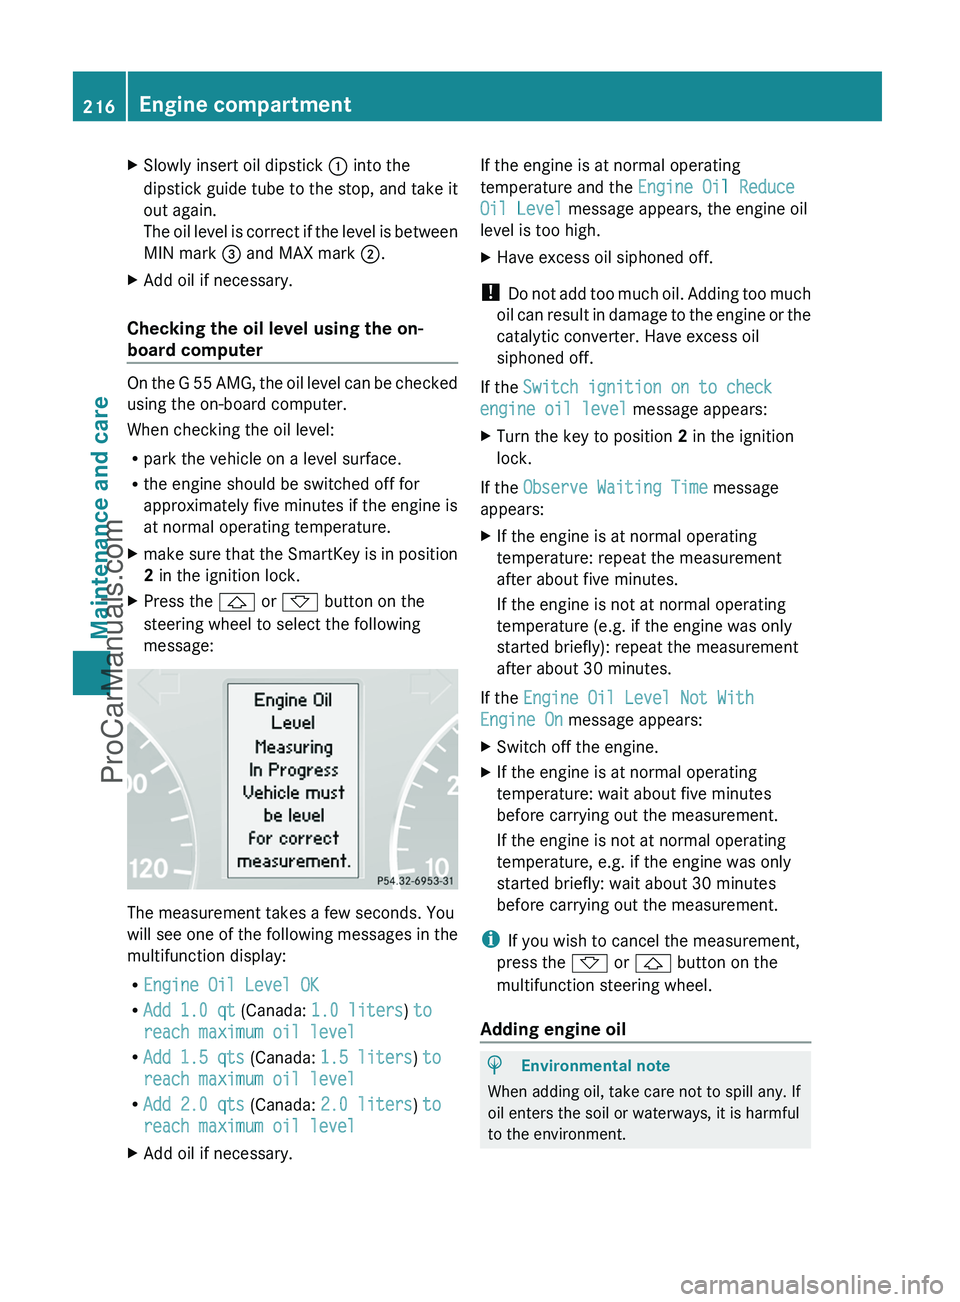
2 in the ignition lock.XPress the & or * button on the
steering wheel to select the following
message:
The measurement takes a few seconds. You
will see one of the following messages in the
multifunction display:
R Engine Oil Level OK
R Add 1.0 qt (Canada: 1.0 liters ) to
reach maximum oil level
R Add 1.5 qts (Canada: 1.5 liters ) to
reach maximum oil level
R Add 2.0 qts (Canada: 2.0 liters ) to
reach maximum oil level
XAdd oil if necessary.If the engine is at normal operating
temperature and the Engine Oil Reduce
Oil Level message appears, the engine oil
level is too high.XHave excess oil siphoned off.
! Do not add too much oil. Adding too much
oil can result in damage to the engine or the
catalytic converter. Have excess oil
siphoned off.
If the Switch ignition on to check
engine oil level message appears:
XTurn the key to position 2 in the ignition
lock.
If the Observe Waiting Time message
appears:
XIf the engine is at normal operating
temperature: repeat the measurement
after about five minutes.
If the engine is not at normal operating
temperature (e.g. if the engine was only
started briefly): repeat the measurement
after about 30 minutes.
If the Engine Oil Level Not With
Engine On message appears:
XSwitch off the engine.XIf the engine is at normal operating
temperature: wait about five minutes
before carrying out the measurement.
If the engine is not at normal operating
temperature, e.g. if the engine was only
started briefly: wait about 30 minutes
before carrying out the measurement.
i If you wish to cancel the measurement,
press the * or & button on the
multifunction steering wheel.
Adding engine oil
HEnvironmental note
When adding oil, take care not to spill any. If
oil enters the soil or waterways, it is harmful
to the environment.
216Engine compartmentMaintenance and care
ProCarManuals.com
Page 222 of 288
Maintaining the time-dependent service
schedule:XNote down the service due date displayed
before disconnecting the battery.
or:
XSubtract the battery disconnection periods
from the service date shown on the display
after reconnecting the battery.
i The service interval display should not be
confused with the 4 engine oil level
display.
Hiding a service message
XPress the reset button on the left of the
instrument cluster ( Y page 26).
Displaying service messages
Use the buttons on the multifunction steering
wheel.
XSwitch on the ignition.XPress V or U to select the standard
display menu on the steering wheel
( Y page 160).XSelect & or * to select the service
interval display.
The ¯ or ± service symbol and the
service due date are displayed.
Please bear the following in mind
A qualified specialist workshop, e.g. an
authorized Mercedes-Benz Center, will reset
the service interval display after the
necessary service work has been carried out.
You can obtain further information, e.g.
regarding service work, at an authorized
Mercedes-Benz Center or directly from
Mercedes-Benz.
! If the service interval indicator has been
inadvertently reset, this setting can be
corrected at an authorized Mercedes-Benz
Center.
Have the service work carried out as
described in the Service Booklet. There
may otherwise be increased wear, resulting
in damage to the vehicle or to the major
assemblies.
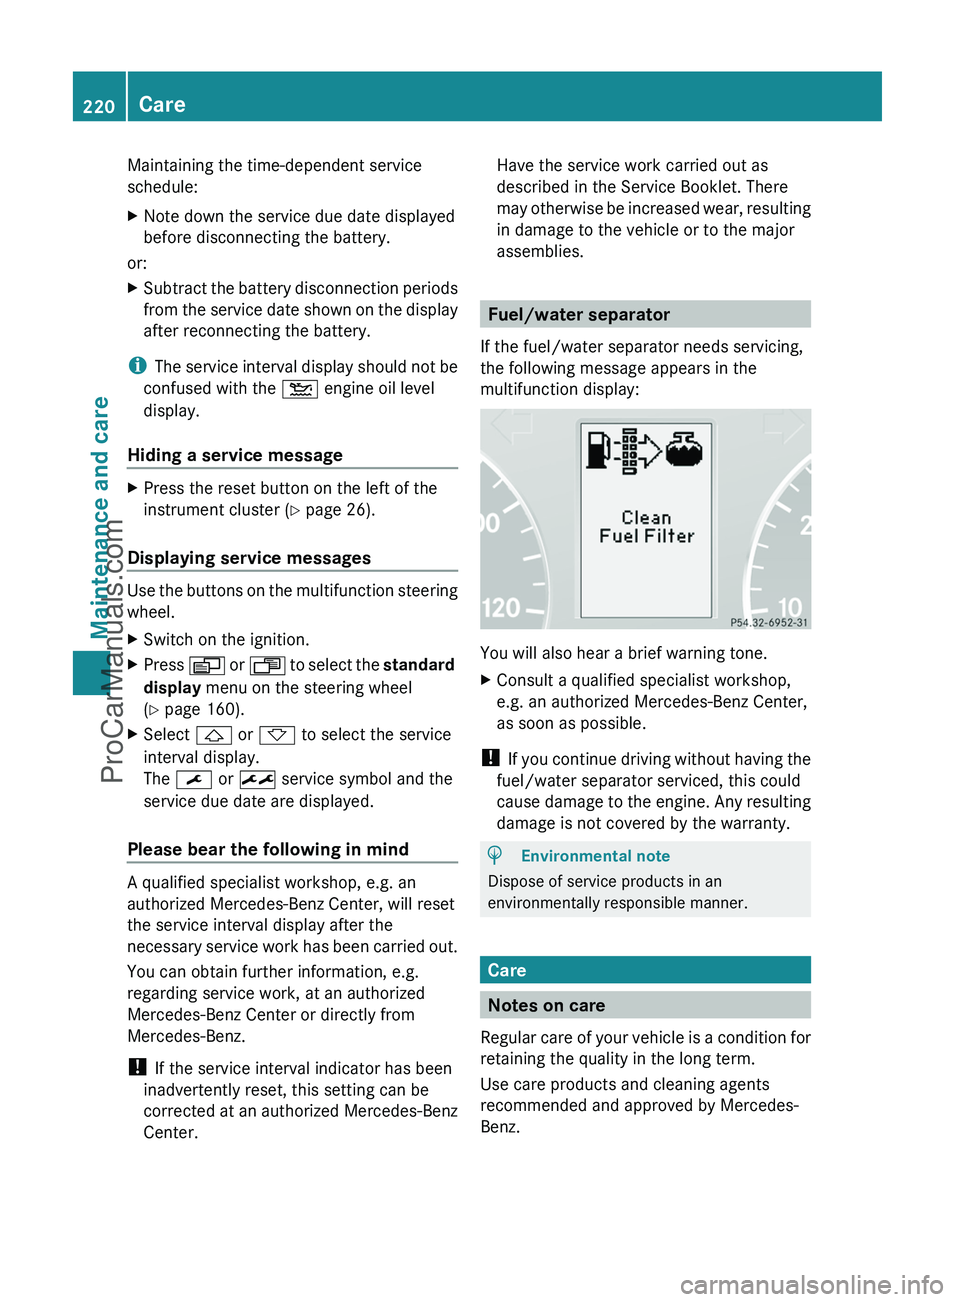
Fuel/water separator
If the fuel/water separator needs servicing,
the following message appears in the
multifunction display:
You will also hear a brief warning tone.
XConsult a qualified specialist workshop,
e.g. an authorized Mercedes-Benz Center,
as soon as possible.
! If you continue driving without having the
fuel/water separator serviced, this could
cause damage to the engine. Any resulting
damage is not covered by the warranty.
HEnvironmental note
Dispose of service products in an
environmentally responsible manner.
Care
Notes on care
Regular care of your vehicle is a condition for
retaining the quality in the long term.
Use care products and cleaning agents
recommended and approved by Mercedes-
Benz.
220CareMaintenance and care
ProCarManuals.com
Page 227 of 288
Cleaning the plastic trimGWarning
When cleaning the steering wheel boss and
dashboard, do not use cockpit sprays or
cleaning agents containing solvents. Cleaning
agents containing solvents cause the surface
to become porous, and as a result, plastic
parts may break away and be thrown around
the interior when an air bag is deployed, which
may result in severe injuries.
! Do not affix the following to plastic
surfaces:
R stickers
R films
R scented oil bottles or similar items
You can otherwise damage the plastic.
! Do not allow cosmetics, insect repellent
or sunscreen to come into contact with the
plastic trim. This maintains the high-quality
look of the surfaces.
XWipe the plastic trim with a damp, lint-free
cloth, e.g. a microfiber cloth.XHeavy soiling: use car care and cleaning
products recommended and approved by
Mercedes-Benz.
The surface may change color temporarily.
Wait until the surface is dry again.
Cleaning the steering wheel and gear or
selector lever
XThoroughly wipe with a damp cloth or use
leather care agents that have been
recommended and approved by Mercedes-
Benz.
Cleaning real wood and trim strips
XWipe the wooden trim and trim strips with
a damp, lint-free cloth, e.g. a microfiber
cloth.XHeavy soiling: use car care and cleaning
products recommended and approved by
Mercedes-Benz.! Do not use solvent-based cleaning agents
such as tar remover, wheel cleaners,
polishes or waxes. There is otherwise a risk
of damaging the surface.
! Do not use chrome polish for trim strips.
The trim strips have a chrome look but are
mostly made of anodized aluminum and
can lose their shine if chrome polish is
used. Use a damp, lint-free cloth instead
when cleaning the trim strips.
Chrome polish can be used to remove very
heavy soiling from trim strips which you are
sure are made of chrome. If you are unsure
as to whether a trim strip is chrome-plated
or not, consult an authorized Mercedes-
Benz Center.
Cleaning the seat covers
! Do not use microfiber cloths to clean
genuine leather or artificial leather covers,
as these are too aggressive and, if used
often, may damage the cover.
! Observe the following when cleaning:
R clean genuine leather covers carefully
with a damp cloth and then wipe the
covers down with a dry cloth. Make sure
that the leather does not become
soaked. It may otherwise become rough
and cracked. Only use leather care
agents that have been tested and
approved by Mercedes-Benz. You can
obtain these from a qualified specialist
workshop, e.g. an authorized Mercedes-
Benz Center.
R clean artificial leather covers with a cloth
moistened with a solution containing 1%
detergent (e.g. dish washing liquid).
R clean cloth covers with a microfiber cloth
moistened with a solution containing 1%
detergent (e.g. dish washing liquid). Rub
carefully and always wipe entire seat
sections to avoid leaving visible lines.
Leave the seat to dry afterwards.
Cleaning results depend on the type of
dirt and how long it has been there.
Care225Maintenance and careZProCarManuals.com
Page 242 of 288
Towing and tow-starting
Important safety notes
GWarning
If circumstances require towing the vehicle
with all wheels on the ground, always tow with
a tow bar if:
R the engine will not run
R there is a malfunction in the brake system
R there is a malfunction in the power supply
or the vehicle's electrical system
This is necessary to adequately control the
towed vehicle.
Prior to towing the vehicle with all wheels on
the ground, make sure the SmartKey is in
starter switch position 2.
If the SmartKey is left in starter switch
position 0 for an extended period of time, it
can no longer be turned in the switch. In this
case, the steering is locked. To unlock,
remove SmartKey from starter switch and
reinsert.
It is better to have the vehicle transported
than to have it towed.
! You may only tow the vehicle a maximum
distance of 30 miles (50 km). A towing
speed of 30 mph (50 km/h) must not be
exceeded.
For towing distances over 30 miles
(50 km), the vehicle must loaded onto a
transporter.
! Only secure the tow cable or tow bar to
the towing eyes. You could otherwise
damage the vehicle.
! Do not tow with sling-type equipment.
This could damage the vehicle.
! Do not use the towing eyes for recovery
purposes as this could damage the vehicle.
If in doubt, recover the vehicle with a crane.
! When towing, pull away slowly and
smoothly. If the tractive power is too high,
the vehicles could be damaged.
! Your vehicles is equipped with an
automatic transmission. Therefore, you
must not have the vehicle tow-started. The
transmission may otherwise be damaged.
If the transfer case can be shifted into neutral
N , you can tow the vehicle.
If the transfer case cannot be shifted into
neutral N, you can tow the vehicle with one
axle raised. Please bear the following in mind:
R remove the propeller shaft between the
transfer case and the rolling axle.
R turn the key to position 1 in the ignition
lock.
The battery must be connected and charged.
Otherwise, you:
R cannot turn the key in the ignition lock to
position 2
R cannot shift the automatic transmission to
position N
i Deactivate the automatic locking feature
( Y page 165) You could otherwise be
locked out when pushing or towing the
vehicle.
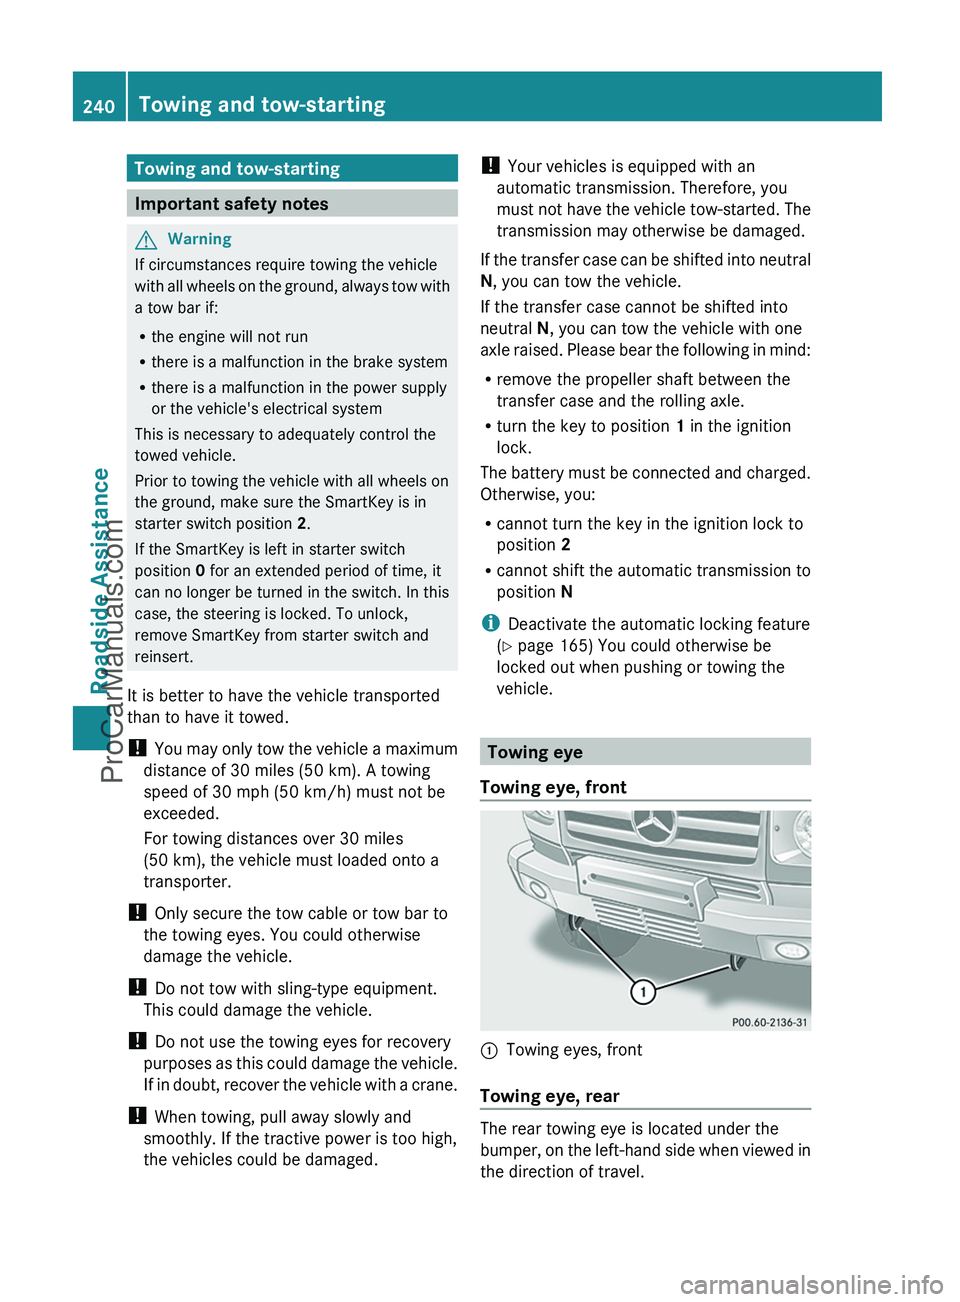
Towing eye
Towing eye, front
:Towing eyes, front
Towing eye, rear
The rear towing eye is located under the
bumper, on the left-hand side when viewed in
the direction of travel.
240Towing and tow-startingRoadside Assistance
ProCarManuals.com