2011 MERCEDES-BENZ G-CLASS mirror
[x] Cancel search: mirrorPage 84 of 288
iThe system automatically switches down
from level 3 to level 2 after approximately
five minutes.
The system automatically switches down
from level 2 to level 1 after approximately
ten minutes.
The system automatically switches off
approximately 20 minutes after it is set to
level 1.XTo switch on: press button : repeatedly
until the desired heating level is set.XTo switch off: press button : repeatedly
until all the indicator lamps go out.
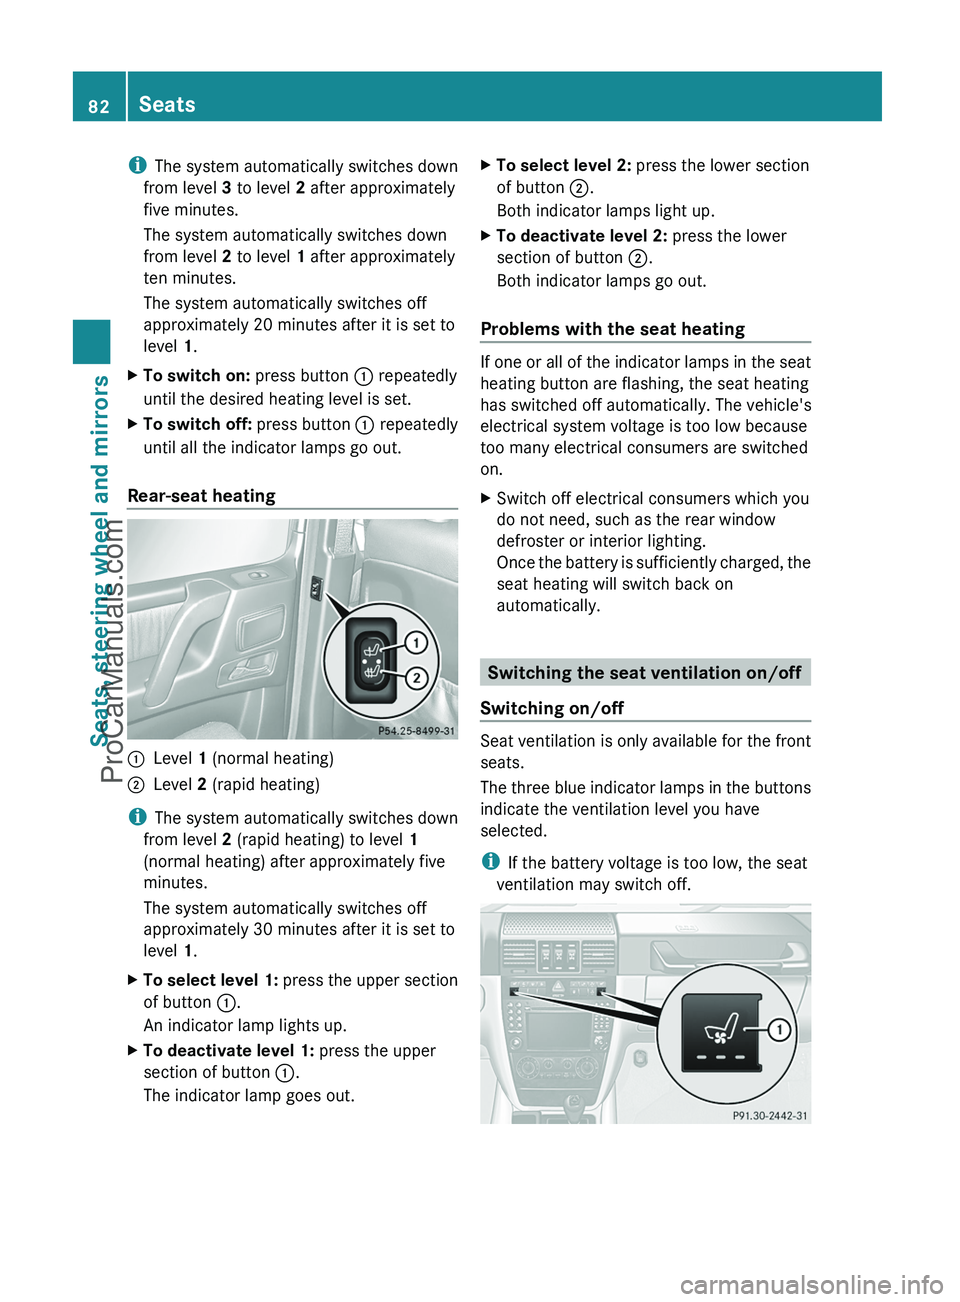
Rear-seat heating
:Level 1 (normal heating);Level 2 (rapid heating)
i
The system automatically switches down
from level 2 (rapid heating) to level 1
(normal heating) after approximately five
minutes.
The system automatically switches off
approximately 30 minutes after it is set to
level 1.
XTo select level 1: press the upper section
of button :.
An indicator lamp lights up.XTo deactivate level 1: press the upper
section of button :.
The indicator lamp goes out.XTo select level 2: press the lower section
of button ;.
Both indicator lamps light up.XTo deactivate level 2: press the lower
section of button ;.
Both indicator lamps go out.
Problems with the seat heating
If one or all of the indicator lamps in the seat
heating button are flashing, the seat heating
has switched off automatically. The vehicle's
electrical system voltage is too low because
too many electrical consumers are switched
on.
XSwitch off electrical consumers which you
do not need, such as the rear window
defroster or interior lighting.
Once the battery is sufficiently charged, the
seat heating will switch back on
automatically.
Switching the seat ventilation on/off
Switching on/off
Seat ventilation is only available for the front
seats.
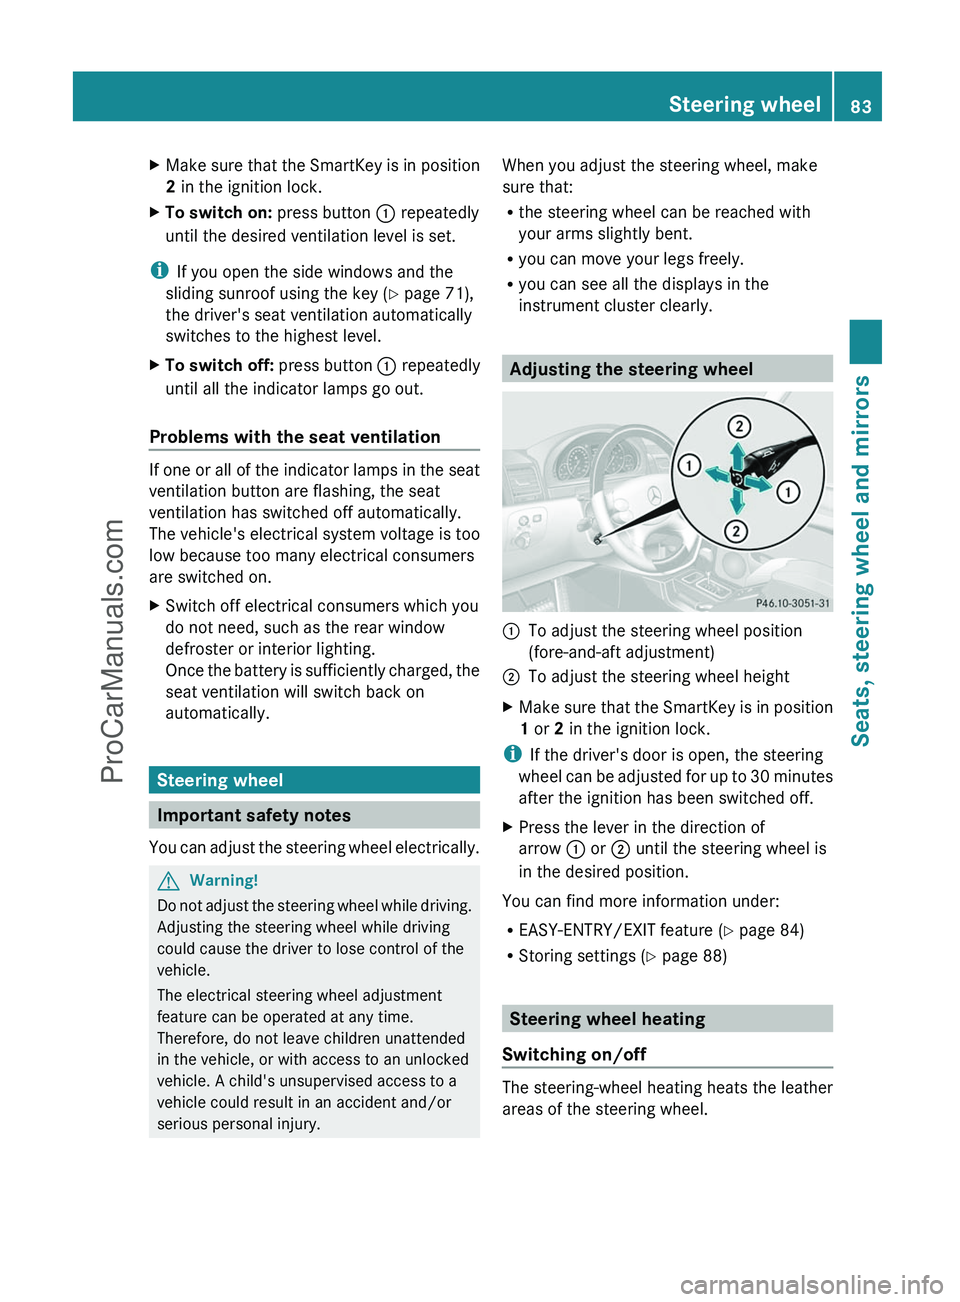
The three blue indicator lamps in the buttons
indicate the ventilation level you have
selected.
i If the battery voltage is too low, the seat
ventilation may switch off.
82SeatsSeats, steering wheel and mirrors
ProCarManuals.com
Page 85 of 288
XMake sure that the SmartKey is in position
2 in the ignition lock.XTo switch on: press button : repeatedly
until the desired ventilation level is set.
i If you open the side windows and the
sliding sunroof using the key ( Y page 71),
the driver's seat ventilation automatically
switches to the highest level.
XTo switch off: press button : repeatedly
until all the indicator lamps go out.
Problems with the seat ventilation
If one or all of the indicator lamps in the seat
ventilation button are flashing, the seat
ventilation has switched off automatically.
The vehicle's electrical system voltage is too
low because too many electrical consumers
are switched on.
XSwitch off electrical consumers which you
do not need, such as the rear window
defroster or interior lighting.
Once the battery is sufficiently charged, the
seat ventilation will switch back on
automatically.
Steering wheel
Important safety notes
You can adjust the steering wheel electrically.
GWarning!
Do not adjust the steering wheel while driving.
Adjusting the steering wheel while driving
could cause the driver to lose control of the
vehicle.
The electrical steering wheel adjustment
feature can be operated at any time.
Therefore, do not leave children unattended
in the vehicle, or with access to an unlocked
vehicle. A child's unsupervised access to a
vehicle could result in an accident and/or
serious personal injury.
When you adjust the steering wheel, make
sure that:
R the steering wheel can be reached with
your arms slightly bent.
R you can move your legs freely.
R you can see all the displays in the
instrument cluster clearly.
Adjusting the steering wheel
:To adjust the steering wheel position
(fore-and-aft adjustment);To adjust the steering wheel heightXMake sure that the SmartKey is in position
1 or 2 in the ignition lock.
i
If the driver's door is open, the steering
wheel can be adjusted for up to 30 minutes
after the ignition has been switched off.
XPress the lever in the direction of
arrow : or ; until the steering wheel is
in the desired position.
You can find more information under:
R EASY-ENTRY/EXIT feature ( Y page 84)
R Storing settings ( Y page 88)
Steering wheel heating
Switching on/off
The steering-wheel heating heats the leather
areas of the steering wheel.
Steering wheel83Seats, steering wheel and mirrorsZProCarManuals.com
Page 86 of 288
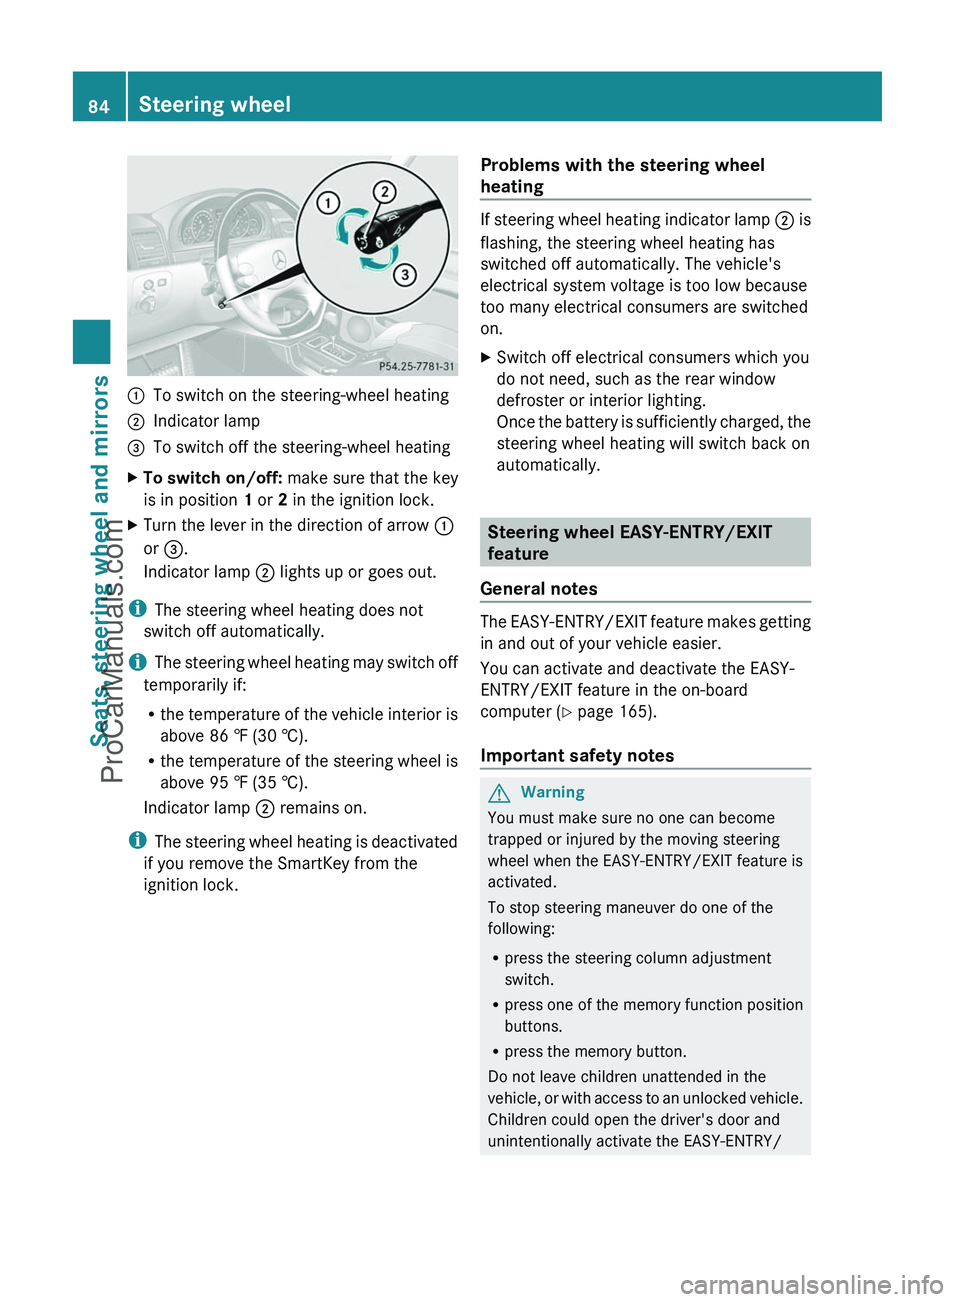
:To switch on the steering-wheel heating;Indicator lamp=To switch off the steering-wheel heatingXTo switch on/off: make sure that the key
is in position 1 or 2 in the ignition lock.XTurn the lever in the direction of arrow :
or = .
Indicator lamp ; lights up or goes out.
i
The steering wheel heating does not
switch off automatically.
i The steering wheel heating may switch off
temporarily if:
R the temperature of the vehicle interior is
above 86 ‡ (30 †).
R the temperature of the steering wheel is
above 95 ‡ (35 †).
Indicator lamp ; remains on.
i The steering wheel heating is deactivated
if you remove the SmartKey from the
ignition lock.
Problems with the steering wheel
heating
If steering wheel heating indicator lamp ; is
flashing, the steering wheel heating has
switched off automatically. The vehicle's
electrical system voltage is too low because
too many electrical consumers are switched
on.
XSwitch off electrical consumers which you
do not need, such as the rear window
defroster or interior lighting.
Once the battery is sufficiently charged, the
steering wheel heating will switch back on
automatically.
Steering wheel EASY-ENTRY/EXIT
feature
General notes
The EASY-ENTRY/EXIT feature makes getting
in and out of your vehicle easier.
You can activate and deactivate the EASY-
ENTRY/EXIT feature in the on-board
computer ( Y page 165).
Important safety notes
GWarning
You must make sure no one can become
trapped or injured by the moving steering
wheel when the EASY-ENTRY/EXIT feature is
activated.
To stop steering maneuver do one of the
following:
R press the steering column adjustment
switch.
R press one of the memory function position
buttons.
R press the memory button.
Do not leave children unattended in the
vehicle, or with access to an unlocked vehicle.
Children could open the driver's door and
unintentionally activate the EASY-ENTRY/
84Steering wheelSeats, steering wheel and mirrors
ProCarManuals.com
Page 87 of 288
EXIT feature. This could result in an accident
and/or serious personal injury.GWarning
Let the system complete the adjustment
procedure before setting the vehicle in
motion. All steering wheel adjustment must
be completed before setting the vehicle in
motion. Driving off with the steering wheel
still adjusting could cause the driver to lose
control of the vehicle.
! Do not activate the EASY-ENTRY/EXIT
feature, if the seat backrest is reclined too
far backwards. This can damage the front
or rear seats. You must first move the
backrest to a vertical position.
Position of the steering wheel when the
EASY-ENTRY/EXIT feature is active
The steering wheel moves upwards and
towards the dashboard if:
R an easy-entry/exit steering wheel position
has been stored for the key and
R you remove the key from the ignition lock
or
R you open the driver's door with the key in
position 0 or 1 in the ignition lock.
If you insert the key into the ignition lock with
the driver's door closed, the steering wheel is
automatically moved to the previously set
position.
The last position of the steering wheel is
stored when you switch off the ignition or
when you store the setting with the memory
function ( Y page 88).
i The steering wheel only moves upwards
and towards the dashboard if it has not
already reached the upper end stop.
Mirrors
Rear-view mirror
XAdjust the rear-view mirror by hand so you
have a good overview of the traffic
conditions.
Exterior mirrors
Important safety notes
GWarning
Exercise care when using the passenger-side
exterior rear view mirror. The mirror surface
is convex (outwardly curved surface for a
wider field of view). Objects in mirror are
closer than they appear. Check your interior
rear view mirror and glance over your
shoulder before changing lanes.
At low outside temperatures, the exterior
mirrors are heated automatically.
Adjusting the exterior mirrors
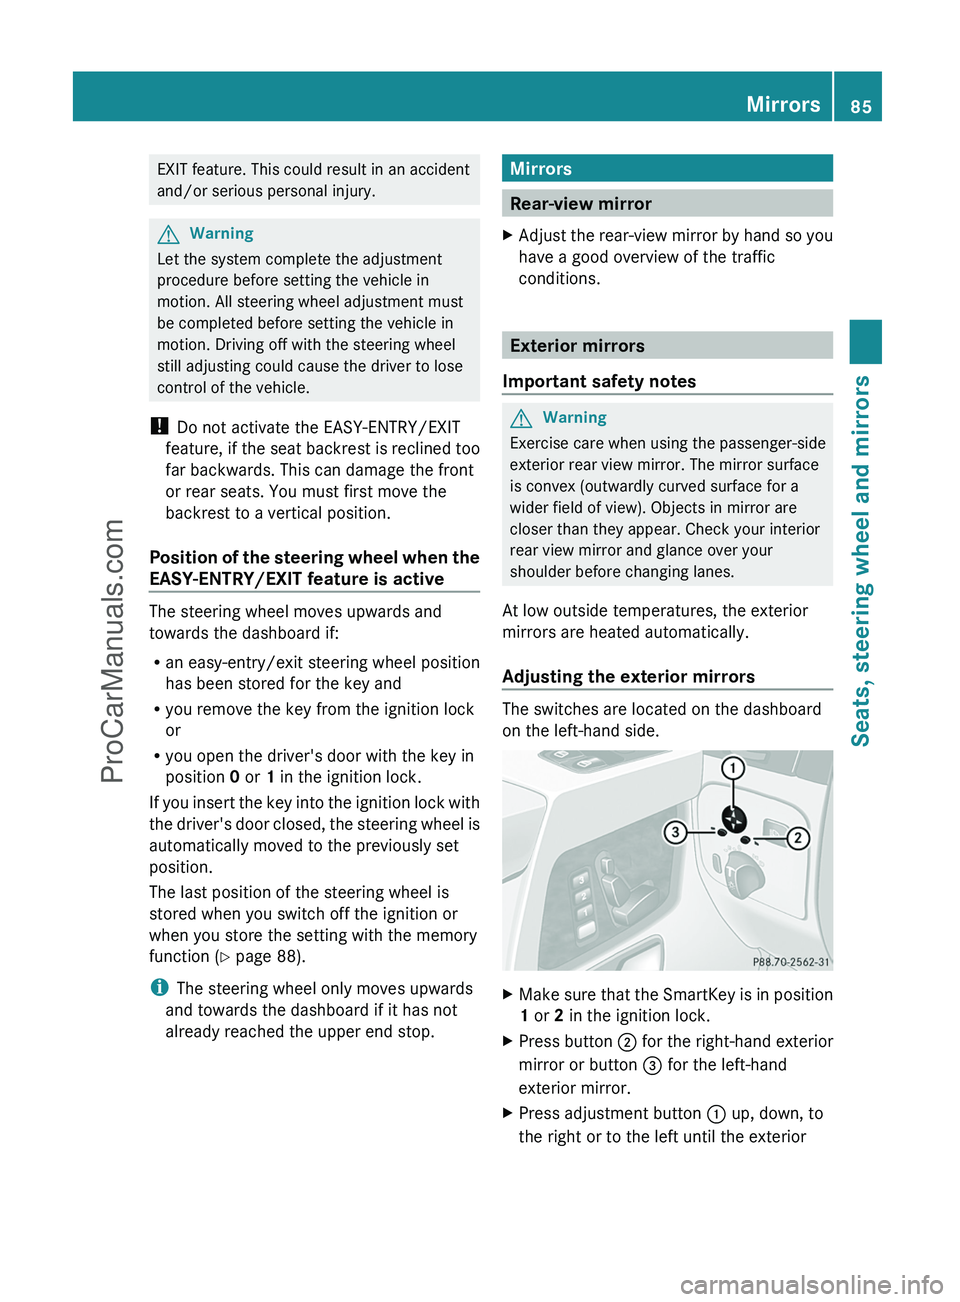
The switches are located on the dashboard
on the left-hand side.
XMake sure that the SmartKey is in position
1 or 2 in the ignition lock.XPress button ; for the right-hand exterior
mirror or button = for the left-hand
exterior mirror.XPress adjustment button : up, down, to
the right or to the left until the exteriorMirrors85Seats, steering wheel and mirrorsZProCarManuals.com
Page 88 of 288
mirror is set to a position that provides you
with a good overview of traffic conditions.
You will find further information in the
"Storing settings" section ( Y page 88).
Exterior mirror out of position
If an exterior mirror has been pushed out of
position, proceed as follows:
XMove the exterior mirror into the correct
position manually.
The mirror housing is engaged again and
you can adjust the exterior mirrors as usual
( Y page 85).86MirrorsSeats, steering wheel and mirrors
ProCarManuals.com
Page 89 of 288

Problems with the exterior mirrorsProblemPossible causes/consequences and M SolutionsAn exterior mirror has
been pushed out of
position.XMove the exterior mirror into the correct position manually.Automatic anti-glare mirrorsGWarning!
The auto-dimming function does not react if
incoming light is not aimed directly at sensors
in the interior rear view mirror.
The interior rear view mirror and the exterior
rear view mirror on the driver’s side do not
react, for example, when transporting cargo
which covers the rear window.
Light hitting the mirror(s) at certain angles
(incident light) could blind you. As a result,
you may not be able to observe traffic
conditions and could cause an accident.
The rear-view mirror and the exterior mirror
on the driver's side automatically go into anti-
glare mode if the ignition is switched on and
incident light from headlamps strikes the
sensor in the rear-view mirror.
The mirrors do not go into anti-glare mode if
reverse gear is engaged or the interior lighting
is switched on.
Parking position for the exterior
mirror on the front-passenger side
General notes
To make it easier to park, you can store the
front-passenger side exterior mirror position
in such a way that you can see the rear wheel
on that side as soon as you engage reverse
gear R.
Using the memory buttons on the driver's
side, you can store three parking positions
per key.
Setting and storing the parking position:Adjustment button;Right-hand exterior mirror=Left-hand exterior mirror?Memory buttonXMake sure that the vehicle is stationary and
that the key is in position 1 or 2 in the
ignition lock.XPress button ; for the exterior mirror on
the front-passenger side.XEngage reverse gear R.
The exterior mirror on the front-passenger
side moves to the preset parking position.XUse adjustment button : to adjust the
exterior mirror to a position which allows
you to see the rear wheel and the curb.XPress memory button ? and adjustment
button : within three seconds.
The parking position is stored if the exterior
mirror does not move.
i If the mirror moves out of position, repeat
the steps.
i If you shift the transmission to another
position, the exterior mirror on the front-
Mirrors87Seats, steering wheel and mirrorsZProCarManuals.com
Page 90 of 288
passenger side returns to the driving
position.
Calling up a stored parking position
settingXWith the key in position 2 in the ignition
lock and the exterior mirror on the front-
passenger side activated, engage reverse
gear.
The exterior mirror on the front-passenger
side moves to the stored parking position.
The exterior mirror on the front-passenger
side moves back to its original position:
R as soon as you exceed a speed of
10 km/h
R about ten seconds after you have
disengaged reverse gear R
R if you press button = for the exterior
mirror on the driver's side
Memory functions
Storing settings
With the memory function, you can store up
to three different settings, e.g. for three
different people.
The following settings are stored as a single
memory preset:
R position of the seat, backrest and head
restraint
R driver's side: steering wheel position
R driver's side: position of the exterior
mirrors on the driver's and front-passenger
sides
GWarning
Do not activate the memory function while
driving. Activating the memory function while
driving could cause the driver to lose control
of the vehicle.
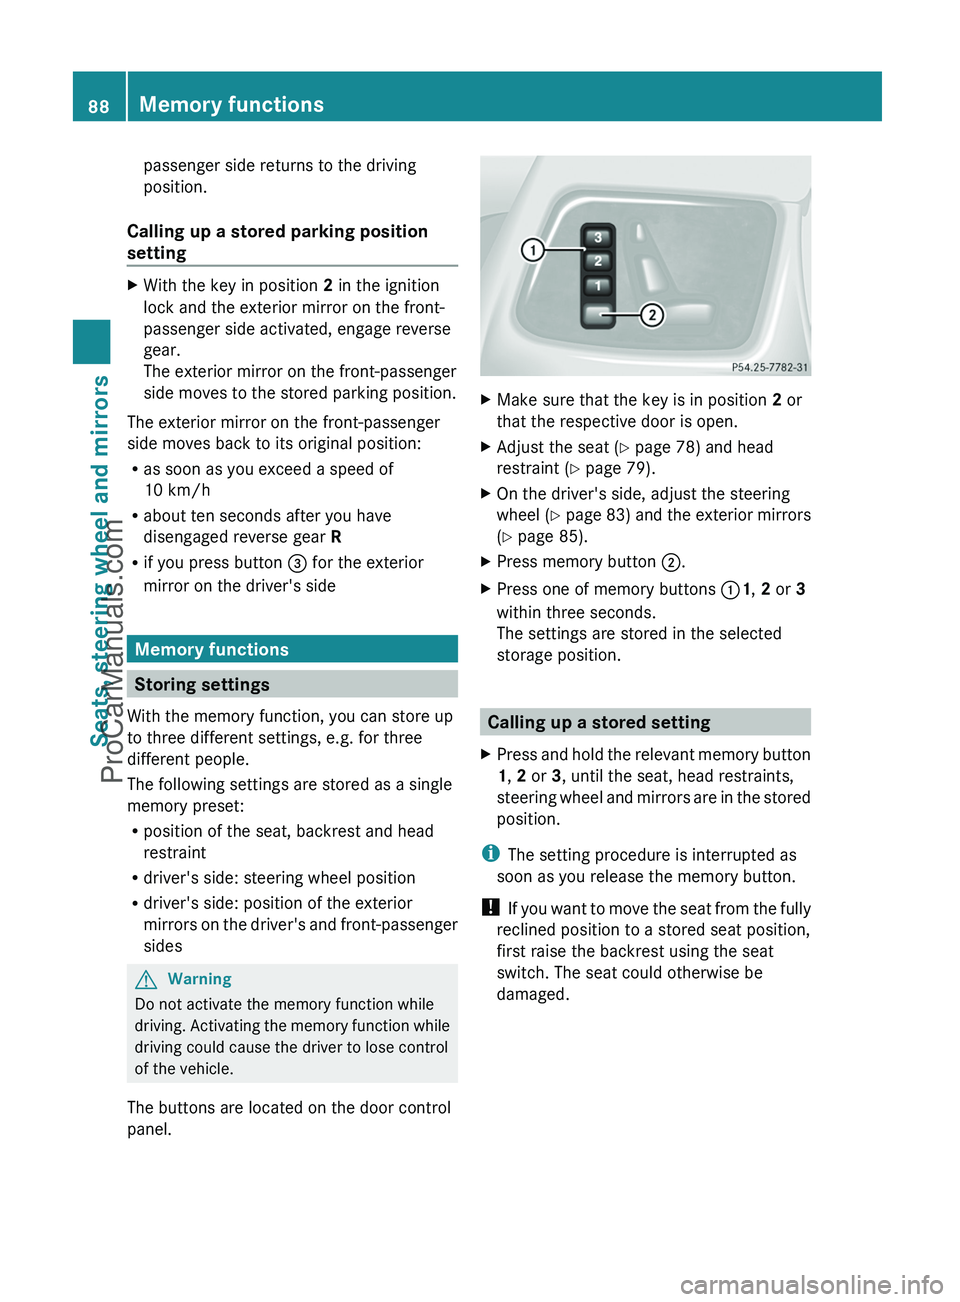
The buttons are located on the door control
panel.
XMake sure that the key is in position 2 or
that the respective door is open.XAdjust the seat ( Y page 78) and head
restraint ( Y page 79).XOn the driver's side, adjust the steering
wheel ( Y page 83) and the exterior mirrors
( Y page 85).XPress memory button ;.XPress one of memory buttons :1, 2 or 3
within three seconds.
The settings are stored in the selected
storage position.
Calling up a stored setting
XPress and hold the relevant memory button
1 , 2 or 3, until the seat, head restraints,
steering wheel and mirrors are in the stored
position.
i The setting procedure is interrupted as
soon as you release the memory button.
! If you want to move the seat from the fully
reclined position to a stored seat position,
first raise the backrest using the seat
switch. The seat could otherwise be
damaged.
88Memory functionsSeats, steering wheel and mirrors
ProCarManuals.com
Page 96 of 288
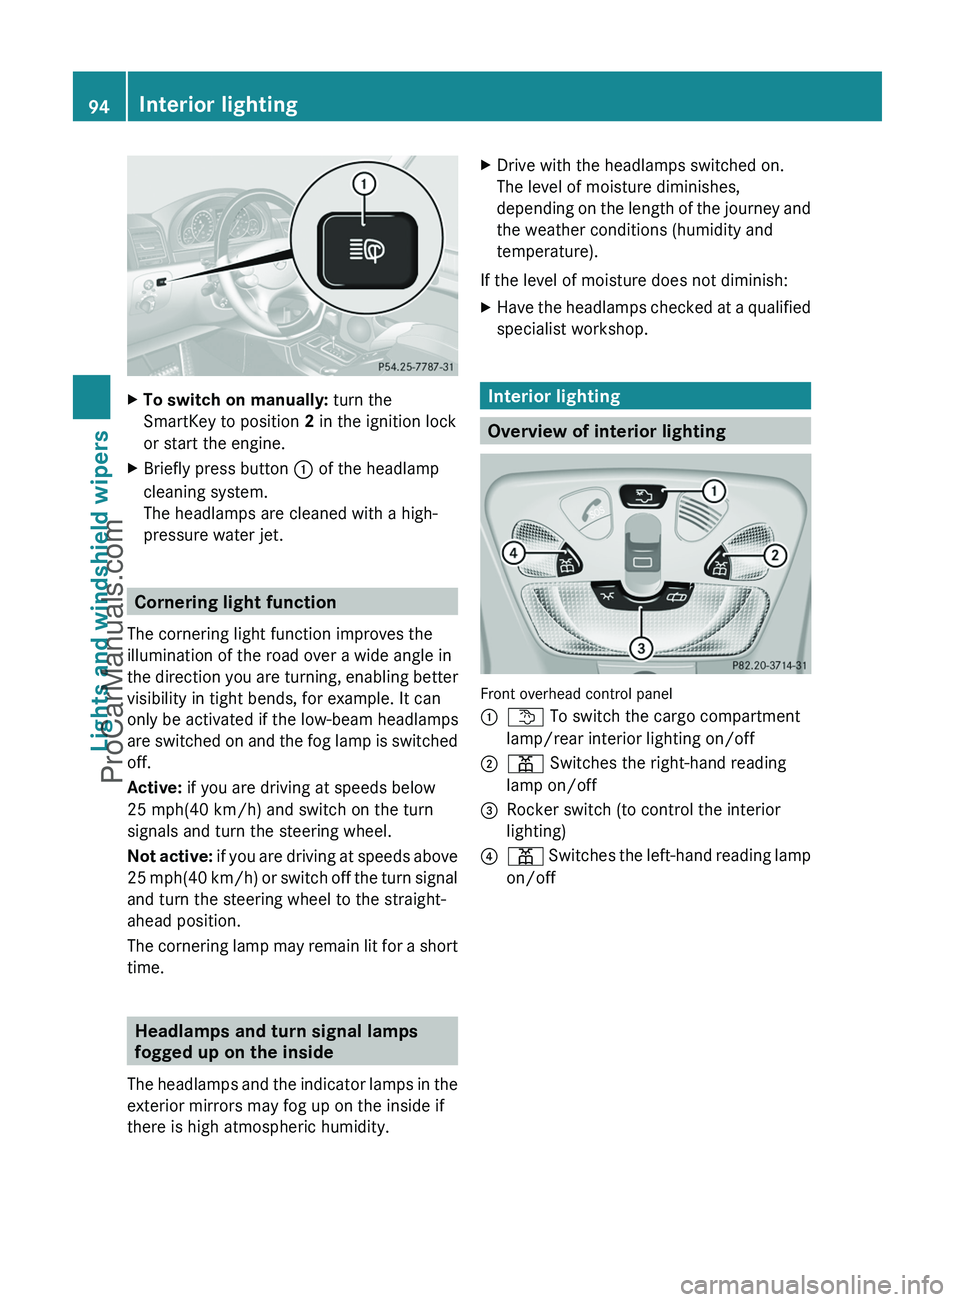
XTo switch on manually: turn the
SmartKey to position 2 in the ignition lock
or start the engine.XBriefly press button : of the headlamp
cleaning system.
The headlamps are cleaned with a high-
pressure water jet.
Cornering light function
The cornering light function improves the
illumination of the road over a wide angle in
the direction you are turning, enabling better
visibility in tight bends, for example. It can
only be activated if the low-beam headlamps
are switched on and the fog lamp is switched
off.
Active: if you are driving at speeds below
25 mph(40 km/h) and switch on the turn
signals and turn the steering wheel.
Not active: if you are driving at speeds above
25 mph (40 km/h) or switch off the turn signal
and turn the steering wheel to the straight-
ahead position.
The cornering lamp may remain lit for a short
time.
Headlamps and turn signal lamps
fogged up on the inside
The headlamps and the indicator lamps in the
exterior mirrors may fog up on the inside if
there is high atmospheric humidity.
XDrive with the headlamps switched on.
The level of moisture diminishes,
depending on the length of the journey and
the weather conditions (humidity and
temperature).
If the level of moisture does not diminish:
XHave the headlamps checked at a qualified
specialist workshop.
Interior lighting
Overview of interior lighting
Front overhead control panel
:t To switch the cargo compartment
lamp/rear interior lighting on/off;p Switches the right-hand reading
lamp on/off=Rocker switch (to control the interior
lighting)?p Switches the left-hand reading lamp
on/off94Interior lightingLights and windshield wipers
ProCarManuals.com