2011 MERCEDES-BENZ G-CLASS lock
[x] Cancel search: lockPage 17 of 288

Uniform Tire Quality Grading
Standards (definition) ....................267
Unladen weight (definition) ............268
Wear indicator (definition) .............269
Wheel rim (definition) ....................267
Top Tether ............................................ 53
Tow-away alarm .................................. 60
Towing ................................................ 242
Important safety guidelines ...........240
Towing eye
Front .............................................. 240
Rear ............................................... 240
Trailer loads and drawbar
noseweights ...................................... 260
Transfer case Display message ............................ 182
Shift ranges ................................... 126
Transmission position display ......... 122
Transmission positions .................... 122
Transporting the vehicle .................. 241
Traveling uphill Brow of hill ..................................... 146
Trip computer (on-board
computer) .......................................... 166
Trip odometer Calling up ....................................... 160
Turn signal
Display message ............................ 172
Turn signals ......................................... 93
TWR (permissible trailer drawbar
noseweight) (definition) ................... 269
Type identification plate see Vehicle identification plate
U
Ultrasonic backing up aid Function/notes ............................. 149
Malfunction .................................... 152
Range of the sensors .....................150
Warning display ............................. 150
Unlocking
Emergency unlocking .......................68
From inside the vehicle (central
unlocking button) ............................. 67
V
Vanity mirror Sun visor ........................................ 198
Vehicle
Data acquisition ............................... 21
Emergency unlocking .......................68
Equipment ....................................... 17
Individual settings (on-board
computer) ...................................... 162
Loading .......................................... 256
Lowering ........................................ 234
Maintenance .................................... 18
Parking up ..................................... 135
Raising ........................................... 233
Reporting problems .........................20
Towing away .................................. 240
Tow-starting ................................... 240
Transporting .................................. 241
Vehicle dimensions
Technical data ............................... 281
Vehicle identification number
see VIN
Vehicle identification number
(VIN) ................................................... 275
Vehicle identification plate .............. 275
Vehicle tool kit .................................. 229
Vehicle weights Technical data ............................... 281
Ventilation
Setting the air distribution .............109
Setting the airflow .........................110
Video (DVD) ........................................ 161
Video DVD (on-board computer) ...... 161
VIN ...................................................... 275
W
Warning and indicator lamps ABS ................................................ 185
Brakes ........................................... 183
Check Engine ................................. 188
ESP ®
OFF ....................................... 186
Fuel tank ........................................ 188
PASSENGER AIRBAG OFF ................39
Reserve fuel ................................... 188
Seat belt ........................................ 184
Index15ProCarManuals.com
Page 27 of 288
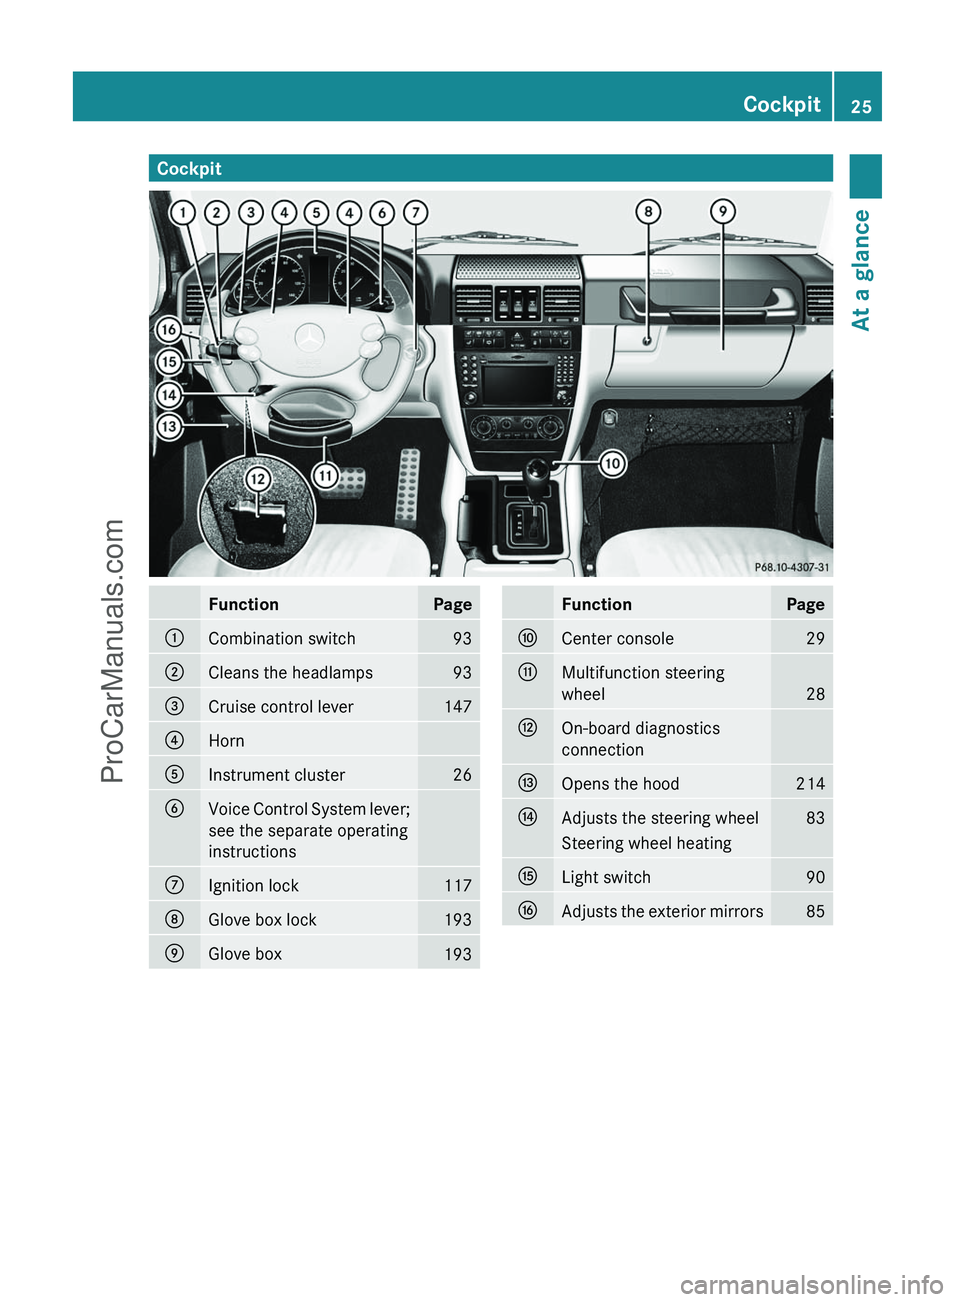
CockpitFunctionPage:Combination switch93;Cleans the headlamps93=Cruise control lever147?HornAInstrument cluster26BVoice Control System lever;
see the separate operating
instructionsCIgnition lock117DGlove box lock193EGlove box193FunctionPageFCenter console29GMultifunction steering
wheel
28
HOn-board diagnostics
connectionIOpens the hood214JAdjusts the steering wheel83Steering wheel heatingKLight switch90LAdjusts the exterior mirrors85Cockpit25At a glanceProCarManuals.com
Page 31 of 288
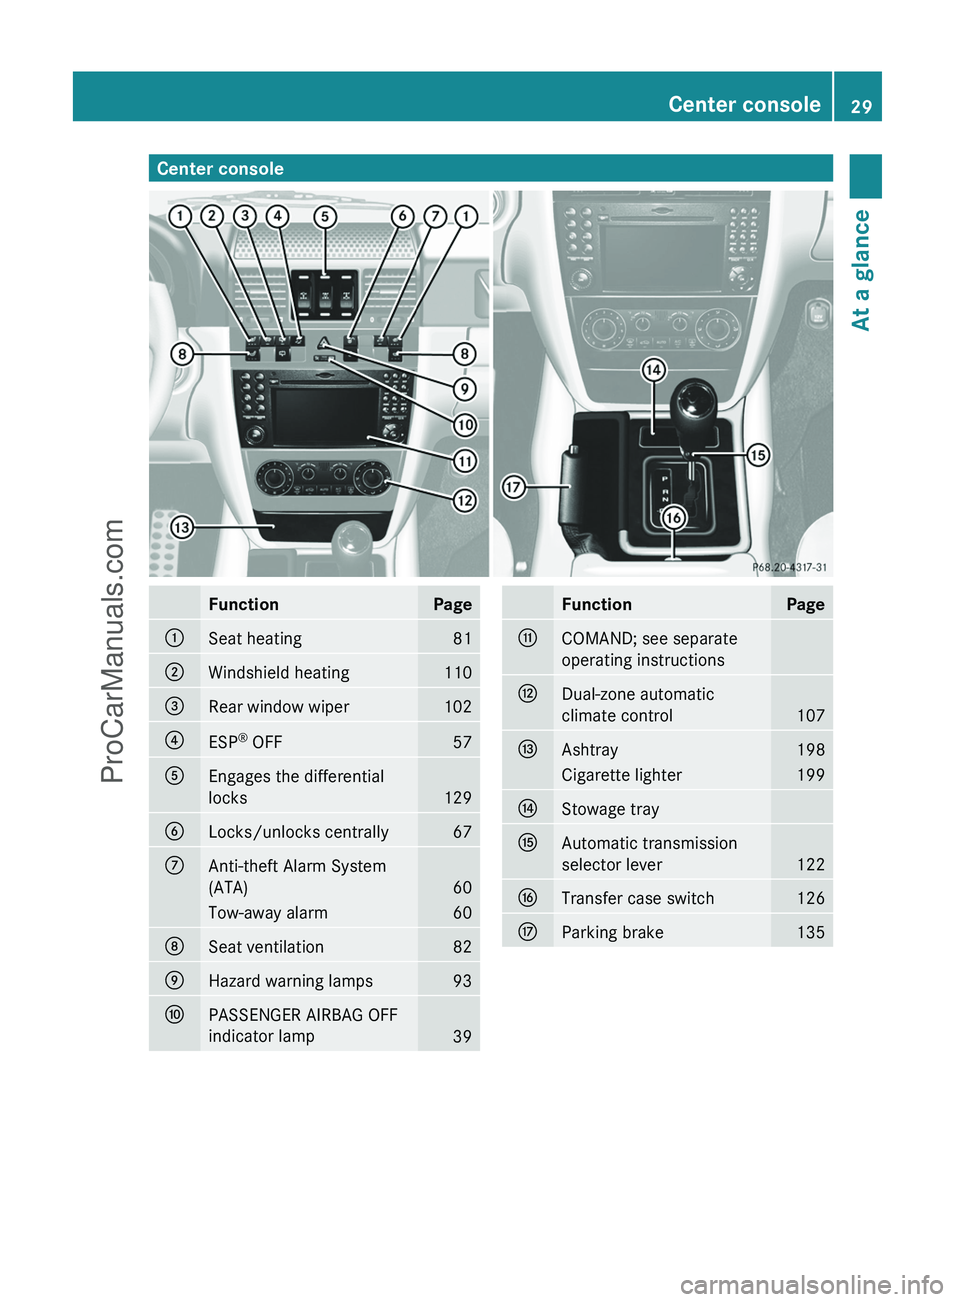
Center consoleFunctionPage:Seat heating81;Windshield heating110=Rear window wiper102?ESP®
OFF57AEngages the differential
locks
129
BLocks/unlocks centrally67CAnti-theft Alarm System
(ATA)
60
Tow-away alarm60DSeat ventilation82EHazard warning lamps93FPASSENGER AIRBAG OFF
indicator lamp
39
FunctionPageGCOMAND; see separate
operating instructionsHDual-zone automatic
climate control
107
IAshtray198Cigarette lighter199JStowage trayKAutomatic transmission
selector lever
122
LTransfer case switch126MParking brake135Center console29At a glanceProCarManuals.com
Page 36 of 288

Vehicle equipment
i This manual describes all the standard
and optional equipment of your vehicle
which was available at the time of
purchase. Country-specific differences are
possible. Please note that your vehicle may
not be equipped with all features
described. This also applies to safety-
relevant systems and functions.
Occupant safety
Overview of occupant safety
In this section you will learn the most
important facts about the restraint system
components of the vehicle.
The restraint system consists of:
R seat belts
R child restraint systems
R ISOFIX child seat securing system
Additional protection is provided by:
R SRS (Supplemental Restraint System)
R NECK-PRO head restraints
R air bag system components with:
- 45 indicator lamp
- front-passenger seat with BabySmart™
automatic child recognition
The different air bag systems work
independently of each other. The protective
functions of the system work in conjunction
with each other. Not all air bags are deployed
in an accident.
GWarning
Modifications to or work improperly
conducted on restraint system components
or their wiring, as well as tampering with
interconnected electronic systems, can lead
to the restraint systems no longer functioning
as intended.
Air bags or Emergency Tensioning Devices
(ETDs), for example, could deploy
inadvertently or fail to deploy in accidents
although the deceleration threshold for air
bag deployment is exceeded. Therefore,
never modify the restraint systems. Do not
tamper with electronic components or their
software.
i See "Children in the vehicle"
( Y page 49) for further information on
infants and children traveling in the vehicle
as well as on child restraint systems.
SRS (Supplemental Restraint System)
Introduction
SRS reduces the risk of occupants coming
into contact with the vehicle's interior in the
event of an accident. It can also reduce the
effect of the forces to which occupants are
subjected during an accident.
SRS consists of:
R the + SRS warning lamp
R air bags
R air bag control unit (with crash sensors)
R belt tensioners
R belt force limiters
SRS warning lamp
The SRS functions are checked regularly
when the SmartKey is in position 1 or 2 in the
ignition lock. Therefore, malfunctions can be
detected in good time.
The + SRS warning lamp in the instrument
cluster lights up:
R for approximately four seconds when you
turn the SmartKey to position 1 in the
ignition lock
This indicates that the restraint systems
are operational.
R permanently when you turn the SmartKey
to position 2 in the ignition lock
This indicates that the + SRS warning
lamp is operational.
34Occupant safetySafety
ProCarManuals.com
Page 40 of 288
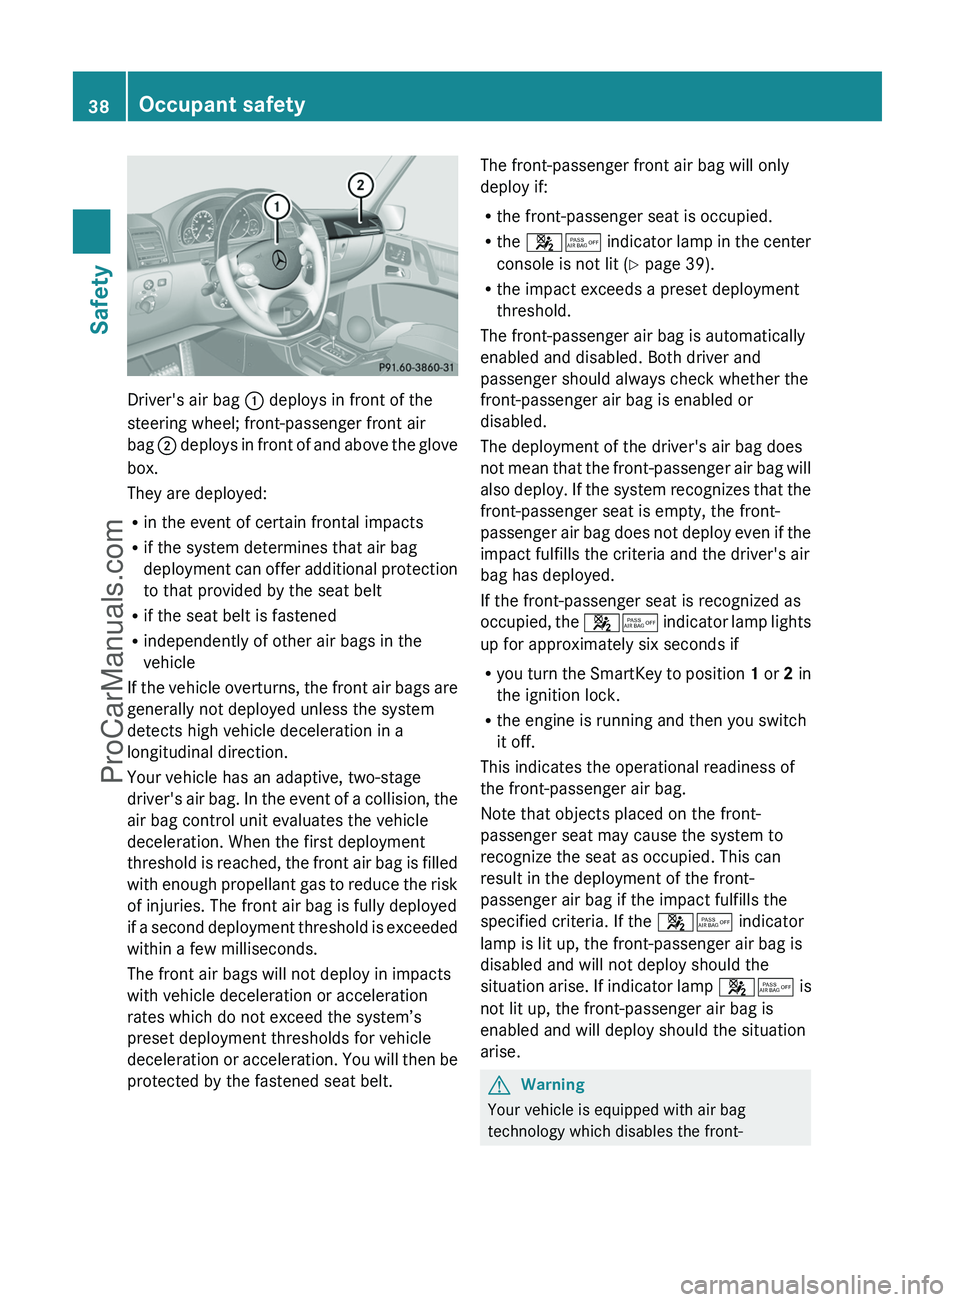
Driver's air bag : deploys in front of the
steering wheel; front-passenger front air
bag ; deploys in front of and above the glove
box.
They are deployed:
R in the event of certain frontal impacts
R if the system determines that air bag
deployment can offer additional protection
to that provided by the seat belt
R if the seat belt is fastened
R independently of other air bags in the
vehicle
If the vehicle overturns, the front air bags are
generally not deployed unless the system
detects high vehicle deceleration in a
longitudinal direction.
Your vehicle has an adaptive, two-stage
driver's air bag. In the event of a collision, the
air bag control unit evaluates the vehicle
deceleration. When the first deployment
threshold is reached, the front air bag is filled
with enough propellant gas to reduce the risk
of injuries. The front air bag is fully deployed
if a second deployment threshold is exceeded
within a few milliseconds.
The front air bags will not deploy in impacts
with vehicle deceleration or acceleration
rates which do not exceed the system’s
preset deployment thresholds for vehicle
deceleration or acceleration. You will then be
protected by the fastened seat belt.
The front-passenger front air bag will only
deploy if:
R the front-passenger seat is occupied.
R the 45 indicator lamp in the center
console is not lit ( Y page 39).
R the impact exceeds a preset deployment
threshold.
The front-passenger air bag is automatically
enabled and disabled. Both driver and
passenger should always check whether the
front-passenger air bag is enabled or
disabled.
The deployment of the driver's air bag does
not mean that the front-passenger air bag will
also deploy. If the system recognizes that the
front-passenger seat is empty, the front-
passenger air bag does not deploy even if the
impact fulfills the criteria and the driver's air
bag has deployed.
If the front-passenger seat is recognized as
occupied, the 45 indicator lamp lights
up for approximately six seconds if
R you turn the SmartKey to position 1 or 2 in
the ignition lock.
R the engine is running and then you switch
it off.
This indicates the operational readiness of
the front-passenger air bag.
Note that objects placed on the front-
passenger seat may cause the system to
recognize the seat as occupied. This can
result in the deployment of the front-
passenger air bag if the impact fulfills the
specified criteria. If the 45 indicator
lamp is lit up, the front-passenger air bag is
disabled and will not deploy should the
situation arise. If indicator lamp 45 is
not lit up, the front-passenger air bag is
enabled and will deploy should the situation
arise.GWarning
Your vehicle is equipped with air bag
technology which disables the front-
38Occupant safetySafety
ProCarManuals.com
Page 43 of 288

Observe the manufacturer's instructions
when installing special child restraint
systems.
Special child restraint systems which are
compatible with BabySmart™ are necessary
for disabling the front-passenger air bag.
When the special BabySmart™-compatible
child restraint system is installed correctly
and is recognized by the sensor system in the
front-passenger seat, the front-passenger air
bag is disabled. In this case, 45
indicator lamp : lights up. If you have any
questions regarding the special BabySmart™-
compatible child restraint systems, consult
an authorized Mercedes-Benz Center.
If the SmartKey has been removed from the
ignition lock or is in position 0, 45
indicator lamp : does not light up.
The system does not disable:
R the window curtain air bag
R the Emergency Tensioning Device
System self-test
The 45 indicator lamp lights up when
the SmartKey is turned to position 1 or 2 in
the ignition lock.
The 45 indicator lamp goes out after
approximately six seconds.
If the 45 indicator lamp does not light
up or is always lit, then the system is
malfunctioning. Have the BabySmart™
system checked at an authorized Mercedes-
Benz Center before transporting a child on
the front-passenger seat.
For further information, see "Problems with
air bag deactivation system" ( Y page 42).GWarning
Do not leave any switched on notebooks,
mobile phones, electronic tags (e.g. a ski
pass) or similar electronic devices on the
front-passenger seat. Signals emitted from
such devices can interfere with the
BabySmart™ air bag deactivation system.
Such interference can lead to the 45
indicator lamp not lighting up during the self-
test.
If the + SRS warning lamp and the
4/ indicator lamp light up
simultaneously in the instrument cluster, the
system is malfunctioning. The front-
passenger air bag could deploy without cause,
or may fail to deploy in the event of an
accident.
Have the system checked as soon as possible
at an authorized Mercedes-Benz Center.
Occupant safety41SafetyZProCarManuals.com
Page 51 of 288
Emergency Tensioning Device, belt
force limiters
The front seat belts and the outer seat belts
in the rear are equipped with ETDs and belt
force limiters.
! If the front-passenger seat is not
occupied, do not engage the seat belt
tongue in the buckle on the front-
passenger seat. Otherwise, the Emergency
Tensioning Device could be triggered in the
event of an accident.
The ETDs tighten the seat belts in an accident,
pulling them close against the body.
The ETDs do not correct incorrect seat
positions or incorrectly fastened seat belts.
The ETDs do not pull vehicle occupants back
towards the backrest.
Belt force limiters, when triggered, help to
reduce the peak force exerted by the seat belt
on the vehicle occupant.
The front belt force limiters are synchronized
with the front air bags, which take on a part
of the deceleration force. Thus, the force
exerted on the occupant is distributed over a
greater area.
The ETDs can only be activated when:
R the SmartKey is in position 1 or 2 in the
ignition lock.
R the restraint systems are operational; see
"SRS warning lamp" ( Y page 34).
R the belt tongue is engaged in the buckle on
each of the lap-shoulder belts in the front.
R the front-passenger seat is occupied and
the belt tongue is engaged in the buckle on
the front-passenger side.
The ETDs are triggered depending on the type
and severity of an accident:
R in the event of a head-on or rear-end
collision if the vehicle decelerates or
accelerates rapidly in a longitudinal
direction during the initial stages of the
impact
R in certain situations if the vehicle overturns
and the system determines that it can
provide additional protection
If the Emergency Tensioning Devices (ETDs)
are triggered, you will hear a bang, and a small
amount of smoke may also be released. Only
in rare cases will the bang affect your hearing.
The smoke that is released generally does not
constitute a health hazard. The + SRS
warning lamp lights up.GWarning
Pyrotechnic ETDs that were activated must be
replaced.
For your safety, when disposing of the
pyrotechnic ETDs always follow our safety
instructions. These are available at any
authorized Mercedes-Benz Center.
Children in the vehicle
Important safety notes
GWarning
When leaving the vehicle, always remove the
SmartKey from the ignition lock. Always take
the SmartKey with you and lock the vehicle.
Do not leave children unattended in the
vehicle, even if they are secured in a child
restraint system, or with access to an
unlocked vehicle. A child's unsupervised
access to a vehicle could result in an accident
and/or serious personal injury. The children
could:
R injure themselves on parts of the vehicle
R be seriously or fatally injured through
excessive exposure to extreme heat or cold
R injure themselves or cause an accident with
vehicle equipment that can be operated
even if the SmartKey is removed from the
ignition lock or removed from the vehicle,
such as seat adjustment, steering wheel
adjustment, or the memory function
Children in the vehicle49SafetyZProCarManuals.com
Page 55 of 288
instructions when installing the ISOFIX
child restraint system.XWhen an ISOFIX child seat securing system
is installed, make sure that the center seat
belt in the rear compartment is fully
functional and can move freely.
Top Tether
GWarning
Observe "Important safety notes"
( Y page 49).
GWarning
Always lock the rear seat backrests in their
upright position when the rear seats are
occupied by passengers. Lock the rear seat
backrests in their upright position before
installing the Top Tether straps or when the
cargo compartment is not in use. Make sure
that rear seat backrests are secured properly
by pushing and pulling on the seat backrests.
If the seat backrest is not locked properly, the
seat backrest could fold forward. The child
restraint system is no longer supported
properly or held in position and can no longer
fulfill its function. This could cause serious or
even fatal injuries.
Top Tether provides an additional connection
between the child restraint system secured
with ISOFIX and the rear seat. It helps reduce
the risk of injury even further.
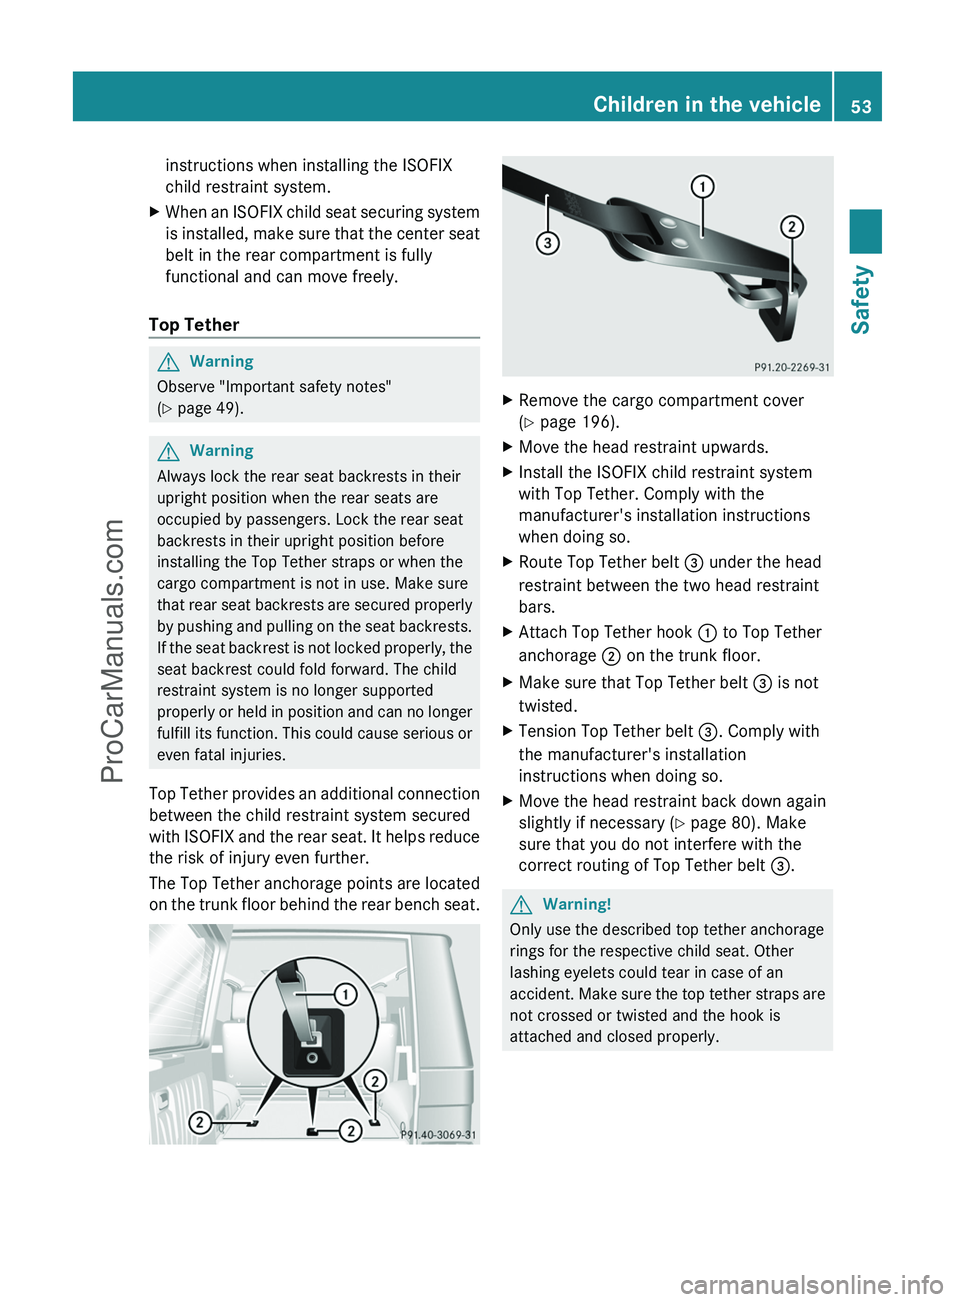
The Top Tether anchorage points are located
on the trunk floor behind the rear bench seat.
XRemove the cargo compartment cover
( Y page 196).XMove the head restraint upwards.XInstall the ISOFIX child restraint system
with Top Tether. Comply with the
manufacturer's installation instructions
when doing so.XRoute Top Tether belt = under the head
restraint between the two head restraint
bars.XAttach Top Tether hook : to Top Tether
anchorage ; on the trunk floor.XMake sure that Top Tether belt = is not
twisted.XTension Top Tether belt =. Comply with
the manufacturer's installation
instructions when doing so.XMove the head restraint back down again
slightly if necessary ( Y page 80). Make
sure that you do not interfere with the
correct routing of Top Tether belt =.GWarning!
Only use the described top tether anchorage
rings for the respective child seat. Other
lashing eyelets could tear in case of an
accident. Make sure the top tether straps are
not crossed or twisted and the hook is
attached and closed properly.
Children in the vehicle53SafetyZProCarManuals.com