2011 MERCEDES-BENZ G-CLASS change time
[x] Cancel search: change timePage 98 of 288
! Switch off the cargo compartment lamp if
you wish to leave the rear door open for a
longer period. The battery may otherwise
discharge.XTo switch on/off: press the t button.
i
If you open the rear door, the cargo
compartment lamp comes on. Then, you
cannot switch it off using the t button.
Switch off the cargo compartment lamp if
you wish to leave the rear door open for a
longer period. This prevents the battery
from discharging.
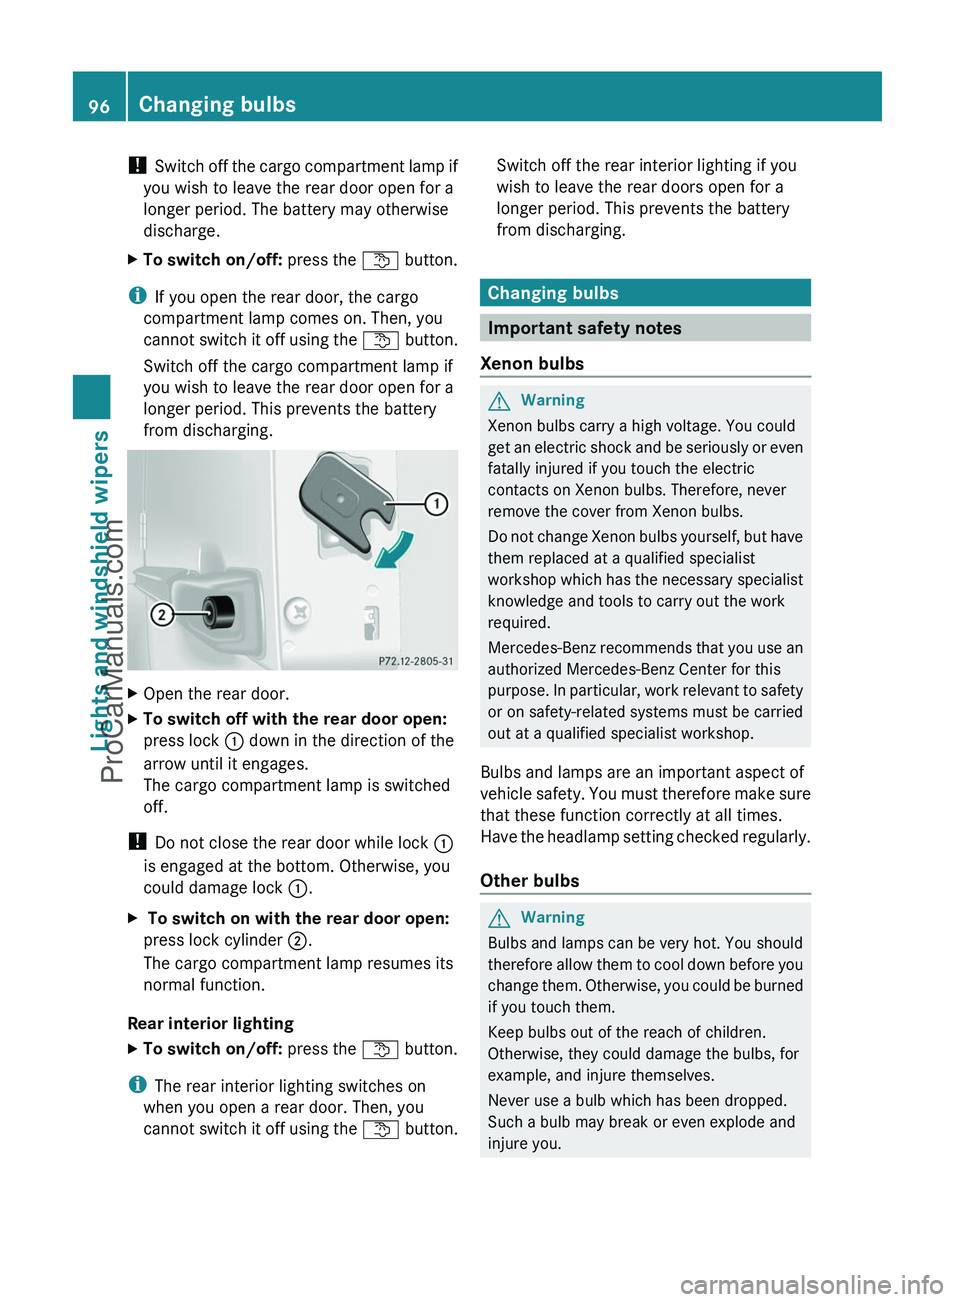
XOpen the rear door.XTo switch off with the rear door open:
press lock : down in the direction of the
arrow until it engages.
The cargo compartment lamp is switched
off.
! Do not close the rear door while lock :
is engaged at the bottom. Otherwise, you
could damage lock :.
X To switch on with the rear door open:
press lock cylinder ;.
The cargo compartment lamp resumes its
normal function.
Rear interior lighting
XTo switch on/off: press the t button.
i
The rear interior lighting switches on
when you open a rear door. Then, you
cannot switch it off using the t button.
Switch off the rear interior lighting if you
wish to leave the rear doors open for a
longer period. This prevents the battery
from discharging.
Changing bulbs
Important safety notes
Xenon bulbs
GWarning
Xenon bulbs carry a high voltage. You could
get an electric shock and be seriously or even
fatally injured if you touch the electric
contacts on Xenon bulbs. Therefore, never
remove the cover from Xenon bulbs.
Do not change Xenon bulbs yourself, but have
them replaced at a qualified specialist
workshop which has the necessary specialist
knowledge and tools to carry out the work
required.
Mercedes-Benz recommends that you use an
authorized Mercedes-Benz Center for this
purpose. In particular, work relevant to safety
or on safety-related systems must be carried
out at a qualified specialist workshop.
Bulbs and lamps are an important aspect of
vehicle safety. You must therefore make sure
that these function correctly at all times.
Have the headlamp setting checked regularly.
Other bulbs
GWarning
Bulbs and lamps can be very hot. You should
therefore allow them to cool down before you
change them. Otherwise, you could be burned
if you touch them.
Keep bulbs out of the reach of children.
Otherwise, they could damage the bulbs, for
example, and injure themselves.
Never use a bulb which has been dropped.
Such a bulb may break or even explode and
injure you.
96Changing bulbsLights and windshield wipers
ProCarManuals.com
Page 99 of 288
Halogen bulbs are pressurized and could
explode when you change them, particularly
if they are very hot. You should therefore wear
eye protection and gloves when you are
changing them.
There are bulbs other than the Xenon bulbs
that you cannot replace. Replace only the
bulbs listed ( Y page 97). Have the bulbs that
you cannot replace yourself changed at a
qualified specialist workshop.
Mercedes-Benz recommends that you use an
authorized Mercedes-Benz Center for this
purpose. In particular, work relevant to safety
or on safety-related systems must be carried
out at a qualified specialist workshop.
If you require assistance changing bulbs,
consult a qualified specialist workshop.
Do not touch the glass tube of new bulbs with
your bare hands. Even minor contamination
can burn into the glass surface and reduce
the service life of the bulbs. Always use a lint-
free cloth or only touch the base of the bulb
when installing.
Only use bulbs of the correct type.
If the new bulb still does not light up, consult
a qualified specialist workshop.
Bulbs and lamps are an important aspect of
vehicle safety. You must therefore make sure
that these function correctly at all times.
Have the headlamp setting checked regularly.
Before changing bulbs
Have the following bulbs changed at a
qualified specialist workshop, e.g. an
authorized Mercedes-Benz Center:
R additional turn signals in the exterior
mirrors
R high-mounted brake lamp
R high-beam/low-beam headlamps (Xenon
bulbs)
R parking lamp/standing lamp
R license plate lamp
i Individual segments of the license plate
lamp LEDs may fail without a display
message appearing in the multifunction
display. Check the license plate lamp
regularly. Consult a qualified specialist
workshop if necessary.
You can replace the following bulbs:
R fog lamp/cornering light with fog lamp
function
R turn signal lamp (front)
R brake/tail lamp
R turn signal lamp (rear)
R tail lamp/standing lamp
R backup lamp
R rear fog lamp
R side marker lamp
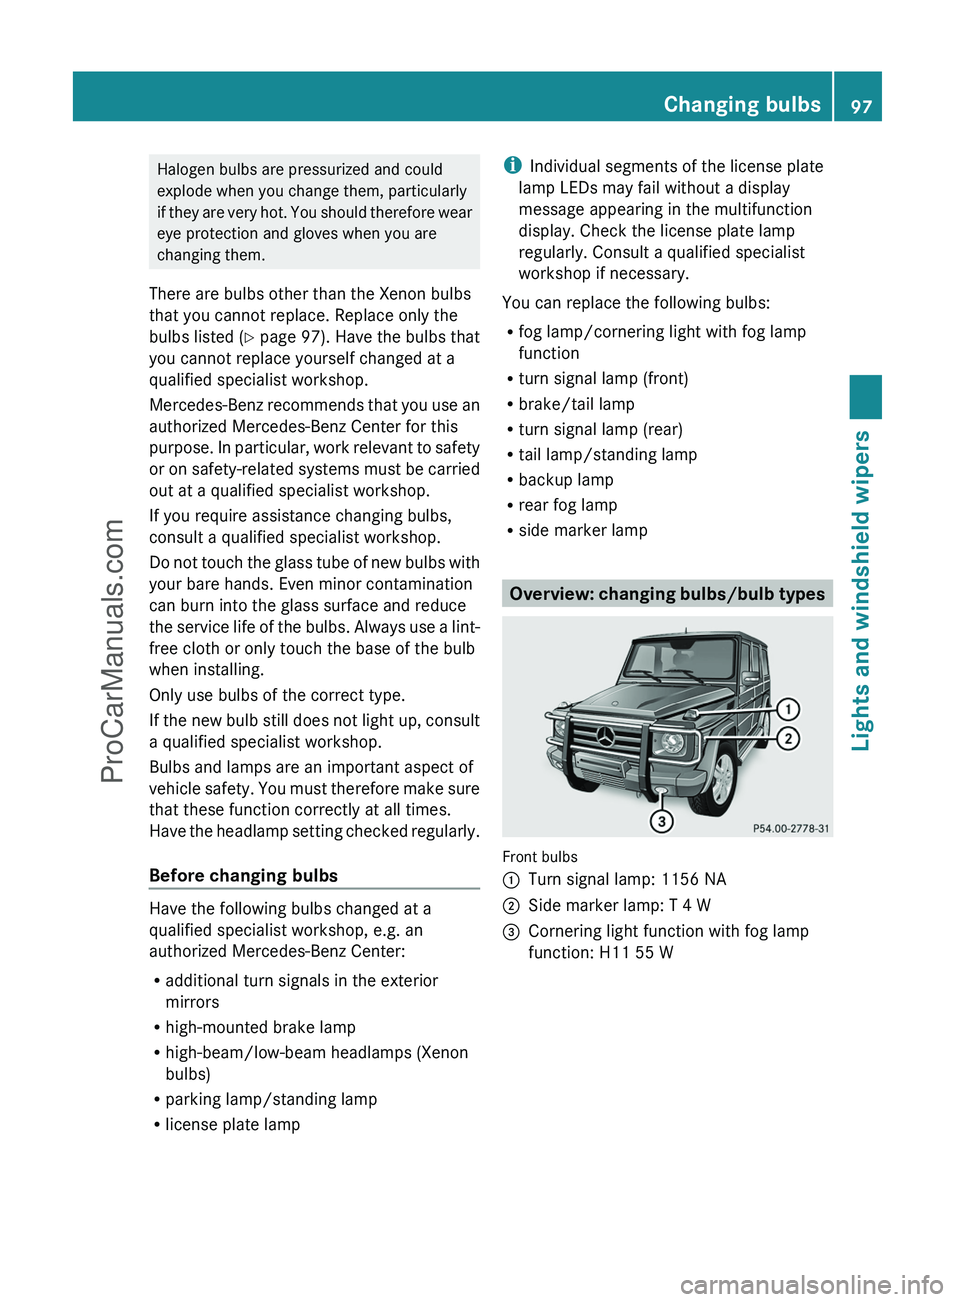
Overview: changing bulbs/bulb types
Front bulbs
:Turn signal lamp: 1156 NA;Side marker lamp: T 4 W=Cornering light function with fog lamp
function: H11 55 WChanging bulbs97Lights and windshield wipersZProCarManuals.com
Page 111 of 288

Problems with the cooling with air
dehumidification function
If the indicator lamp in the Á button does
not go out or flashes when switched on, the
cooling with air dehumidification function is
switched off due to a malfunction. You can no
longer switch on the cooling with air
dehumidification function.
XConsult a qualified specialist workshop.
Setting climate control to automatic
GWarning
If you switch off the cooling function, the
vehicle will not be cooled when weather
conditions are warm. The windows can fog up
more quickly. Window fogging may impair
visibility and endanger you and others.
In automatic mode, the set temperature is
maintained automatically at a constant level.
The system automatically regulates the
temperature of the dispensed air, the airflow
and the air distribution.
Automatic mode will achieve optimal
operation if cooling with air dehumidification
is also activated. If desired, cooling with air
dehumidification can be deactivated.
XTurn the key to position 2 in the ignition
lock.XSet the desired temperature.XTo switch on: press the à button.
The indicator lamp in the à button lights
up. Automatic air distribution and airflow
are activated.XTo switch off: press the à button.
The indicator lamp in the à button goes
out. Automatic air distribution and airflow
are deactivated.
Setting the temperature
Different temperatures can be set for the
driver's and front-passenger sides.
XTurn the key to position 2 in the ignition
lock.XTo increase/reduce: turn controls ; and
= clockwise or counter-clockwise
( Y page 107).
Only change the temperature setting in
small increments. Start at 72 ‡ (22 †).
i If you turn the temperature control on one
side of the vehicle fully clockwise or
counter-clockwise, you will increase or
reduce the temperature on the other side
of the vehicle at the same time.
Setting the air distribution
You can set the air distribution for the entire
vehicle.
The symbols for the air distribution have the
following meanings:
SymbolMeaningMDirects the airflow through the
defroster vents to the
windshield and side windowsQDirects the airflow to the entire
vehicle interiorODirects the airflow through the
footwell and side air ventsPDirects the airflow through the
center and side air ventsXTurn the key to position 2 in the ignition
lock.XPress the à button.
The indicator lamp in the à button goes
out.XTurn control ?(Y page 107) to the
corresponding symbol. The control can
also be turned to the area between two
symbols.Operating the climate control system109Climate controlZProCarManuals.com
Page 118 of 288
Vehicle equipment
i This manual describes all the standard
and optional equipment of your vehicle
which was available at the time of
purchase. Country-specific differences are
possible. Please note that your vehicle may
not be equipped with all features
described. This also applies to safety-
relevant systems and functions.
Breaking-in notes
The first 1000 miles (1500 km)
The more you look after the engine when it is
new, the more satisfied you will be with its
performance in the future.
R Drive at varying vehicle speeds and engine
speeds for the first 1000 miles (1500 km)
for this reason.
R Avoid overstraining the vehicle during this
period, e.g. driving at full throttle.
R Change gear in good time, at the latest
when the tachometer needle is 2
/ 3 of the
way to the red area in the tachometer
display.
R Do not manually shift to a lower gear to
brake the vehicle.
R If possible, do not depress the accelerator
pedal past the point of resistance
(kickdown).
R Only select shift ranges 3, 2 or 1 when
driving slowly, e.g. in mountainous terrain.
After 1000 miles (1500 km), you can increase
the engine speed gradually and bring the
vehicle up to full speed.
Additional breaking-in notes for AMG
vehicles:
R do not drive faster than 85 mph
(140 km/h) in the first 1000 miles
(1500 km).
R only allow the engine to reach a maximum
engine speed of 4500 rpm briefly.
R change gear in good time.
i You should also observe these notes on
running in if the engine or parts of the drive
train on your vehicle have been replaced.
i Always observe the respective speed
restrictions.
Driving
Important safety notes
GWarning
Make sure absolutely no objects are
obstructing the pedals' range of movement.
Keep the driver's footwell clear of all
obstacles. If there are any floormats or
carpets in the footwell, make sure the pedals
still have sufficient clearance.
During sudden driving or braking maneuvers
the objects could get caught between the
pedals. You could then no longer brake or
accelerate. This could lead to accidents and
injury.
GWarning
On slippery road surfaces, never downshift in
order to obtain braking action. This could
result in drive wheel slip and reduced vehicle
control. Your vehicle's ABS will not prevent
this type of loss of control.
GWarning
It is dangerous to shift AUTOTRONIC out of
parking position P or neutral position N if the
engine speed is higher than idle speed. If your
foot is not firmly on the brake pedal, the
vehicle could accelerate quickly forward or in
reverse. You could lose control of the vehicle
and hit someone or something. Only shift into
gear when the engine is idling normally and
when your right foot is firmly on the brake
pedal.
! Warm up the engine quickly. Do not use
the engine's full performance until it has
reached operating temperature.
116DrivingDriving and parking
ProCarManuals.com
Page 120 of 288
iFor further information about the
automatic transmission, see
( Y page 121).
i If you depress the brake when starting the
engine, pedal travel is unusually long and
there is less pedal resistance.XMake sure that the parking brake is
applied.XTurn the SmartKey to position 3 in the
ignition lock (Y page 117) and release it as
soon as the engine is running.
i You can start the engine without preglow
if the engine is warm.
i You can also use the touch-start function.
To do this, turn the SmartKey to position 3
( Y page 117) and release it immediately.
The engine then starts automatically.
Pulling away
Automatic transmission
GWarning
It is dangerous to shift AUTOTRONIC out of
parking position P or neutral position N if the
engine speed is higher than idle speed. If your
foot is not firmly on the brake pedal, the
vehicle could accelerate quickly forward or in
reverse. You could lose control of the vehicle
and hit someone or something. Only shift into
gear when the engine is idling normally and
when your right foot is firmly on the brake
pedal.
! Only shift the automatic transmission to
reverse gear R or park position P when the
vehicle is stationary. Otherwise, the
automatic transmission could be damaged.
i It is only possible to shift the automatic
transmission from position P to a different
position if you depress the brake pedal.
Only then is the selector lever lock
released.
XDepress the brake pedal and keep it
depressed.XShift the automatic transmission to
position D or R.
i
Before driving off, wait until the gear
change is fully completed.
XRelease the parking brake ( Y page 135).XRelease the brake pedal.XCarefully depress the accelerator pedal.
!
Do not depress the accelerator pedal
while depressing the brake pedal. This
impairs engine performance and results in
premature wear on the brake system and
drivetrain.
! If a warning tone sounds and the
Release Park. Brake message appears
in the multifunction display, the parking
brake is still applied. Release the parking
brake.
i The vehicle locks centrally once you have
pulled away. The locking knobs in the doors
drop down.
You can open the doors from the inside at
any time.
You can also deactivate the automatic
locking feature ( Y page 165).
i Upshifts take place at higher engine
speeds after a cold start. This helps the
catalytic converter to reach its operating
temperature more quickly.
Hill start assist
Hill start assist helps you when pulling away
forwards or in reverse on an uphill gradient.
It holds the vehicle for a short time after you
have removed your foot from the brake pedal.
This gives you enough time to move your foot
from the brake pedal to the accelerator pedal
and depress it before the vehicle begins to
roll.
118DrivingDriving and parking
ProCarManuals.com
Page 139 of 288
pedals. You could then no longer brake or
accelerate. This could lead to accidents and
injury.
Rolling with the engine switched offGWarning!
There is no power assistance for the steering
and the brake when the engine is not running.
Steering and braking requires significantly
more effort and you could lose control of the
vehicle and cause an accident as a result.
Do not turn off the engine while the vehicle is
in motion.
Exhaust check
GWarning
Inhalation of exhaust gas is hazardous to your
health. All exhaust gas contains carbon
monoxide (CO), and inhaling it can cause
unconsciousness and possible death.
Do not run the engine in confined areas (such
as a garage) which are not properly ventilated.
If you think that exhaust gas fumes are
entering the vehicle while driving, have the
cause determined and corrected
immediately. If you must drive under these
conditions, drive only with at least one
window fully open at all times.
Certain engine systems are designed to keep
the level of poisonous components in exhaust
fumes within legal limits.
These systems only work at peak efficiency
when they are maintained exactly in
accordance with the manufacturer's
specifications. For this reason, all work on the
engine must be carried out only by qualified
and authorized Mercedes-Benz technicians.
The engine settings must not be changed in
any circumstances. Furthermore, all specific
service work must be carried out at regular
intervals and in accordance with the
Mercedes-Benz service requirements. Details
can be found in the Service Booklet.
Brakes
Important safety notesGWarning!
On slippery road surfaces, never downshift in
order to obtain braking action. This could
result in drive wheel slip and reduced vehicle
control. Your vehicle’s ABS will not prevent
this type of control loss.
Do not engage the transfer case in position
LOW when driving on ice or packed snow. At
speeds below 18 mph (30 km/h) vehicle
steering is adversely affected by the Off-road
ABS.
Downhill gradients
! On long and steep gradients, you must
reduce the load on the brakes by shifting
early to a lower gear. This allows you to take
advantage of the engine braking effect and
helps avoid overheating and excessive
wear of the brakes.
When you take advantage of the engine
braking effect, a drive wheel may not turn
for some time, e.g. on a slippery road
surface. This could cause damage to the
drive train. This type of damage is not
covered by the Mercedes-Benz warranty.
Heavy and light loads
GWarning
Depressing the brake pedal constantly results
in excessive and premature wear to the brake
pads.
It may also cause the brakes to overheat,
seriously impairing their effectiveness. It may
then not be possible to stop the vehicle in
sufficient time to avoid an accident.
If the brakes have been subjected to a heavy
load, do not stop the vehicle immediately, but
drive on for a short while. This allows the
airflow to cool the brakes more quickly.
Driving tips137Driving and parkingZProCarManuals.com
Page 149 of 288
Driving systems
Cruise control
Important safety notes
Cruise control maintains a constant road
speed for you. On long and steep downhill
gradients, especially if the vehicle is laden,
you must select shift range 1, 2 or 3 in good
time. By doing so, you will make use of the
braking effect of the engine, which relieves
the load on the brake system and prevents
the brakes from overheating and wearing too
quickly.
Use cruise control only if road and traffic
conditions make it appropriate to maintain a
steady speed for a prolonged period. You can
store any road speed above 20 mph
(30 km/h).
GWarning
The cruise control is a convenience system
designed to assist the driver during vehicle
operation. The driver is and must always
remain responsible for the vehicle's speed
and for safe brake operation.
Only use the cruise control if the road, traffic,
and weather conditions make it advisable to
travel at a constant speed.
R The use of the cruise control can be
dangerous on winding roads or in heavy
traffic because conditions do not allow safe
driving at a constant speed.
R The use of the cruise control can be
dangerous on slippery roads. Rapid
changes in tire traction can result in wheel
spin and loss of control.
R Deactivate the cruise control when driving
in fog.
The "Resume" function should only be
operated if the driver is fully aware of the
previously set speed and wishes to resume
this particular preset speed.
Cruise control lever:To store the current speed or a higher
speed;To store the current speed or a lower
speed=To deactivate cruise control?To call up the last speed stored
When you activate cruise control, the stored
speed is shown in the multifunction display
for five seconds.
If an DEF ®
display message is shown in the
multifunction display, you will no longer be
able to use the full range of cruise control
functions.
The full range of cruise control functions will
become available again once you confirm the
DEF ®
display message:
XBriefly press the V, U , & or
* button on the multifunction steering
wheel.
or
XBriefly press the reset button on the
instrument cluster.
Storing and maintaining the current
speed
You can store the current speed if you are
driving faster than 20 mph (30 km/h).
Driving systems147Driving and parkingZProCarManuals.com
Page 155 of 288
The rear view camera does not relieve you of
the responsibility to be cautious. Take care
and pay careful attention. The rear view
camera may not show objects which are
R very close to the rear bumper
R under the rear bumper
R under the spare wheel
R nearby behind the spare wheel
You are responsible for safety at all times and
must continue to pay attention to the
immediate surroundings when parking and
maneuvering. This includes the area behind,
in front of, and beside the vehicle. Otherwise
you could endanger yourself and/or others.GWarning!
The rear view camera either will not function
or will not function to its full capability if
R the tailgate is open
R it is raining very hard, snowing or foggy
R it is night or you are parking/maneuvering
your vehicle in an area where it is very dark
R the camera is exposed to a very bright white
light
R the immediate surroundings are
illuminated with fluorescent light (the
display may flicker)
R there is a sudden change in temperature,
e.g. if you drive into a heated garage from
the cold (lens condensation)
R the camera lens is dirty or covered
R the rear of your vehicle is damaged
In this case, have the position and setting
of the camera checked by a qualified
specialist workshop. Mercedes-Benz
recommends that you contact a Mercedes-
Benz Center for this purpose.
Do not use the rear view camera in these
situations. Otherwise you could injure
yourself or others and/or damage property
including your vehicle while parking/
maneuvering.
Activating the rear view cameraXMake sure that the SmartKey is in
position 2 in the ignition lock.XMake sure that the "rear view camera"
function is selected in COMAND (see the
separate operating instructions for
COMAND).XEngage reverse gear.
The area behind the vehicle is shown in the
COMAND display.Driving systems153Driving and parkingZProCarManuals.com