2011 MERCEDES-BENZ E63AMG hood open
[x] Cancel search: hood openPage 12 of 400

Fuel levelCalling up the range (on-board
computer) ...................................... 220
Fuses
Fuse allocation chart .....................345
Fuse box in the cargo
compartment ................................. 346
Fuse box in the engine
compartment ................................. 346
Fuse box in the trunk .....................346
Notes ............................................. 345
G
Garage door opener Clearing the memory .....................303
Notes ............................................. 300
Opening/closing the garage door ..303
Programming the remote control ...301
Gear indicator (on-board
computer) .......................................... 221
Gear or selector lever (cleaning
guidelines) ......................................... 319
Genuine Mercedes-Benz parts ......... 384
Genuine wood trim and trim strips
(cleaning instructions) ...................... 319
Glove box ........................................... 274
H
Headlamp cleaning system .............. 122
Adding washer fluid .......................312
Notes ............................................. 393
Headlamp mode (daytime driving)
see Daytime running lamps
Headlamps
Cleaning ......................................... 317
Misting up ...................................... 123
Head restraints
Adjusting (angle) ............................ 105
Adjusting (electrically) ...................105
Adjusting (rear) .............................. 105
Installing/removing (rear) ..............106
Luxury ............................................ 105
see NECK-PRO head restraints
Heating
see Climate control
High beam flasher ............................. 122
Hill start assist .................................. 152
HOLD function Display message ............................ 251
Function/notes ............................. 188
Hood
Closing ........................................... 309
Display message ............................ 259
Opening ......................................... 308
Hydroplaning ..................................... 175
I
Immobilizer .......................................... 73
Indicator and warning lamps DISTRONIC PLUS ........................... 270
Insect protection on the radiator .... 309
Instrument cluster Overview .......................................... 28
Submenu (on-board computer) ......229
Warning and indicator lamps ...........29
Instrument cluster lighting ................ 28
Instrument lighting see Instrument cluster lighting
Interior lighting
Automatic control ..........................124
Delayed switch-off (on-board
computer) ...................................... 231
Emergency lighting ........................124
Manual control ............................... 124
Reading lamp ................................. 123
Setting ambient lighting (on-board
computer) ...................................... 230
J
Jack Storage location ............................ 324
Using ............................................. 333
Jump-starting ..................................... 341
K
KEYLESS-GO Button ............................................ 150
Convenience closing feature ............94
Display message ............................ 260
Locking ............................................ 77
10IndexBA 212 USA, CA Edition B 2011; 1; 5, en-USdimargiVersion: 3.0.3.62010-05-20T13:33:46+02:00 - Seite 10
Page 28 of 400

Exterior viewFunctionPage:Trunk lid/tailgateVehicle tool kit324;Rear window defroster142=Lights124?Fuel filler flap162ADefrosting the windshield141Cleaning the windows316BSliding sunroof95FunctionPageCExterior mirrors113DWindshield wipers127EOpening the hood308Engine oil309Coolant311FTowing343GTires and wheels350Flat tire32626Exterior viewAt a glance
BA 212 USA, CA Edition B 2011; 1; 5, en-USdimargiVersion: 3.0.3.62010-05-20T13:33:46+02:00 - Seite 26
Page 29 of 400

CockpitFunctionPage:Steering wheel paddle
shifters
159
;Cruise control lever178=Instrument cluster28?HornADIRECT SELECT lever155BPARKTRONIC warning
display
194
COverhead control panel32DOperates the automatic
climate control system
132
EIgnition lock149Start/Stop button150FunctionPageFAdjusts the steering wheel
electrically
111
Steering wheel heating112GCombination switch120HParking brake170IOn-board diagnostic socketJOpens the hood308KReleases the parking brake170LLight switch118MNight View Assist Plus202Cockpit27At a glanceBA 212 USA, CA Edition B 2011; 1; 5, en-USdimargiVersion: 3.0.3.62010-05-20T13:33:46+02:00 - Seite 27
Page 76 of 400

iThe immobilizer is always deactivated
when you start the engine.
In the event that the engine cannot be
started when the starter battery is fully
charged, the immobilizer may be faulty.
Contact an authorized Mercedes-Benz
Center or call 1-800-FOR-MERCedes (in
USA) or 1-800-387-0100 (in Canada).
ATA (Anti-Theft Alarm system)
A visual and audible alarm is triggered if the
alarm system is armed and you open:
Ra door
Rthe vehicle with the mechanical key
Rthe trunk lid/tailgate
Rthe hood
The alarm is not switched off, even if you
close the open door that has triggered it, for
example.
iIf the alarm stays on for more than 30
seconds, the emergency call system
mbrace (USA only) or TELEAID (Canada
only) initiates a call to the Customer
Assistance Center automatically. The
emergency call system initiates the call
provided that:
Ryou have subscribed to the mbrace/
TELEAID service.
Rthe mbrace/TELEAID service has been
activated properly.
Rthe required mobile phone, power supply
and GPS are available.
XTo arm: lock the vehicle with the SmartKey
or KEYLESS-GO.
Indicator lamp : flashes. The alarm
system is armed after approximately 15
seconds.
XTo deactivate: unlock the vehicle using the
SmartKey or KEYLESS-GO.
XTo stop the alarm using the SmartKey:
insert the SmartKey into the ignition lock.
The alarm is switched off.
or
XPress the % or & button on the
SmartKey.
The alarm is switched off.
XTo stop the alarm using KEYLESS-GO:
grasp the outside door handle. The key
must be outside the vehicle.
The alarm is switched off.
or
XPress the Start/Stop button on the
dashboard. The key must be inside the
vehicle.
The alarm is switched off.
74Anti-theft systemsSafety
BA 212 USA, CA Edition B 2011; 1; 5, en-USdimargiVersion: 3.0.3.62010-05-20T13:33:46+02:00 - Seite 74
Page 128 of 400

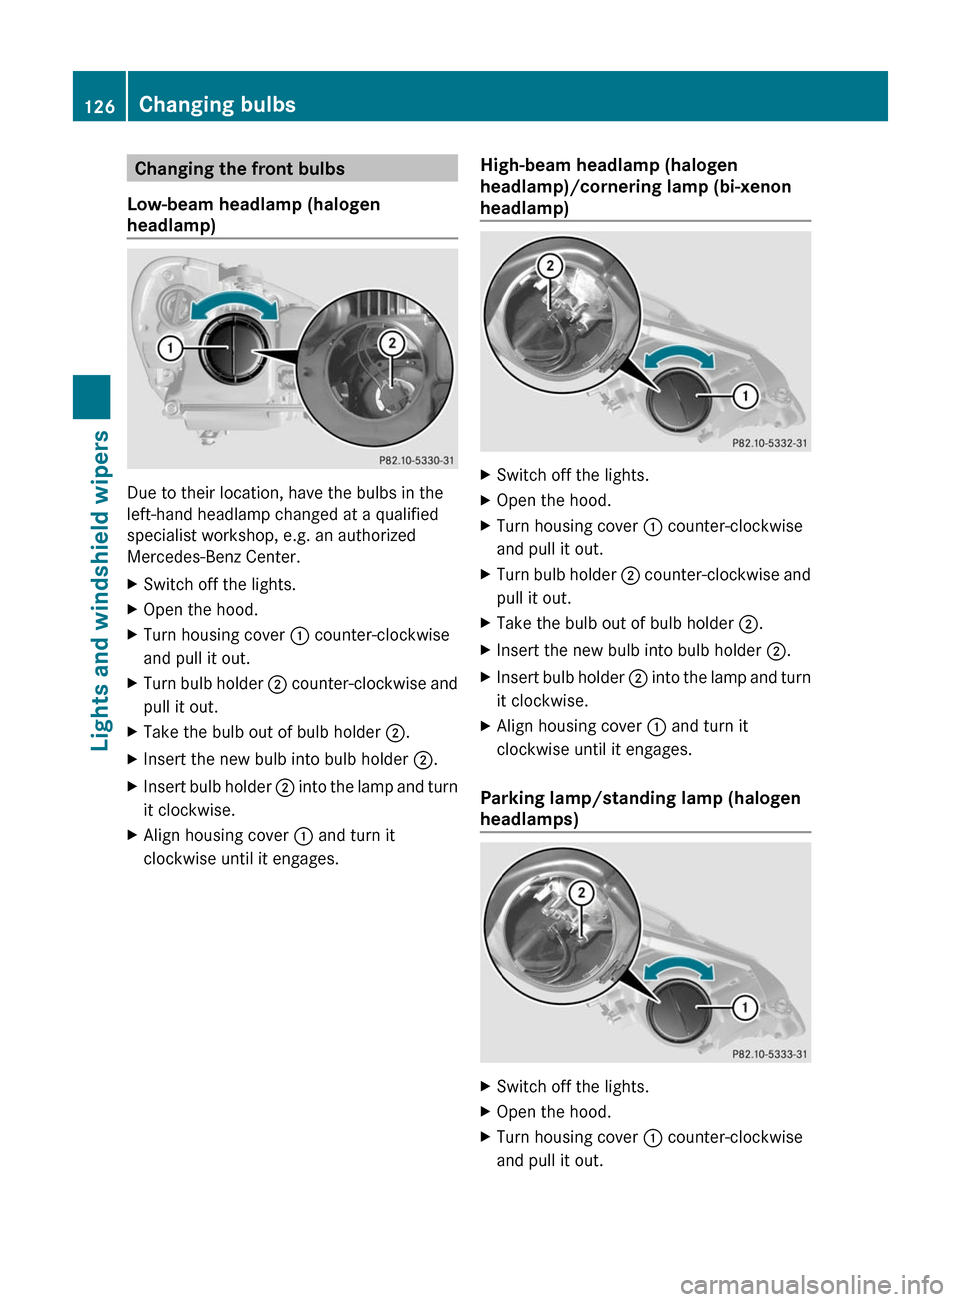
Changing the front bulbs
Low-beam headlamp (halogen
headlamp)
Due to their location, have the bulbs in the
left-hand headlamp changed at a qualified
specialist workshop, e.g. an authorized
Mercedes-Benz Center.
XSwitch off the lights.XOpen the hood.XTurn housing cover : counter-clockwise
and pull it out.
XTurn bulb holder ; counter-clockwise and
pull it out.
XTake the bulb out of bulb holder ;.XInsert the new bulb into bulb holder ;.XInsert bulb holder ; into the lamp and turn
it clockwise.
XAlign housing cover : and turn it
clockwise until it engages.
High-beam headlamp (halogen
headlamp)/cornering lamp (bi-xenon
headlamp)
XSwitch off the lights.XOpen the hood.XTurn housing cover : counter-clockwise
and pull it out.
XTurn bulb holder ; counter-clockwise and
pull it out.
XTake the bulb out of bulb holder ;.XInsert the new bulb into bulb holder ;.XInsert bulb holder ; into the lamp and turn
it clockwise.
XAlign housing cover : and turn it
clockwise until it engages.
Parking lamp/standing lamp (halogen
headlamps)
XSwitch off the lights.XOpen the hood.XTurn housing cover : counter-clockwise
and pull it out.
126Changing bulbsLights and windshield wipers
BA 212 USA, CA Edition B 2011; 1; 5, en-USdimargiVersion: 3.0.3.62010-05-20T13:33:46+02:00 - Seite 126
Page 129 of 400

XPull out bulb holder ;.XTake the bulb out of bulb holder ;.XInsert the new bulb into bulb holder ;.XInsert bulb holder ;.XAlign housing cover : and turn it
clockwise until it engages.
Infrared light (Night View Assist Plus)
XSwitch off the lights.XOpen the hood.XTurn housing cover : counter-clockwise
and pull it out.
XTurn bulb ; counter-clockwise and pull it
out.
XInsert new bulb ; and turn it clockwise.XAlign housing cover : and turn it
clockwise until it engages.
Turn signals (halogen headlamps)
Due to their location, have the bulbs in the
left-hand headlamp changed at a qualified
specialist workshop, e.g. an authorized
Mercedes-Benz Center.
XSwitch off the lights.XOpen the hood.XTurn bulb holder : counter-clockwise and
pull it out.
XTurn the bulb counter-clockwise, applying
slight pressure, and remove it from bulb
holder :.
XInsert the new bulb into bulb holder : and
turn it clockwise.
XInsert bulb holder : into the lamp and turn
it clockwise.
Windshield wipers
Important safety notes
GWarning!
Wiper blades are components that are subject
to wear and tear. Replace the wiper blades
twice a year, preferably in the spring and fall.
Otherwise the windows will not be wiped
properly. As a result, you may not be able to
observe surrounding traffic conditions and
could cause an accident.
! Do not operate the windshield wipers
when the windshield is dry, as this could
damage the wiper blades. Moreover, dust
that has collected on the windshield/rear
window can scratch the glass if wiping
takes place when the windshield/rear
window is dry.
If it is necessary to switch on the windshield
wipers in dry weather conditions, always
use washer fluid when operating the
windshield wipers.
Windshield wipers127Lights and windshield wipersBA 212 USA, CA Edition B 2011; 1; 5, en-USdimargiVersion: 3.0.3.62010-05-20T13:33:46+02:00 - Seite 127Z
Page 131 of 400

Replacing the wiper blades
Important safety notes
GWarning
For safety reasons, switch off the windshield
wipers and remove the key from the ignition
lock before changing the wiper blades
(vehicles with KEYLESS-GO: make sure that
the on-board electronics are in state 0).
Otherwise, the wiper motor could be switched
on suddenly and cause injury.
! To avoid damaging the wiper blades,
make sure that you touch only the wiper
arm of the wiper.
! Never open the hood if a windshield wiper
arm has been folded away from the
windshield.
Never fold a windshield wiper arm without
a wiper blade back onto the windshield/
rear window.
Hold the windshield wiper arm firmly when
you change the wiper blade. If you release
the windshield wiper arm without a wiper
blade and it falls onto the windshield, the
windshield may be damaged by the force of
the impact.
Mercedes-Benz recommends that you have
the wiper blades replaced by a qualified
specialist workshop, e.g. at an authorized
Mercedes-Benz Center.
Replacing the windshield wiper blades
Removing the wiper blades
XRemove the key from the ignition lock or
turn the key to position 0 (KEYLESS-GO).
XFold the wiper arm away from the
windshield until it engages.
XSet the wiper blade at right angles to the
wiper arm.
XRemove the wiper blade from the retainer
on the wiper arm in the direction of the
arrow.
Installing the wiper blade
XSlide the new wiper blade into the retainer
on the wiper arm in the opposite direction
to the arrow.
Make sure that the wiper blade slides fully
into the retainer on the wiper arm.
XTurn the wiper blade parallel to the wiper
arm.
XFold the wiper arm back onto the
windshield.
Replacing the rear window wiper blade
GWarning
The wiper arm could be set in motion and
injure you if the windscreen wipers are
switched on.
Remove the key from the ignition lock before
replacing the wiper blade.
Removing the wiper blade
Windshield wipers129Lights and windshield wipersBA 212 USA, CA Edition B 2011; 1; 5, en-USdimargiVersion: 3.0.3.62010-05-20T13:33:46+02:00 - Seite 129Z
Page 146 of 400

iResidual heat is deactivated
automatically:
Rafter about 30 minutes
Rwhen the ignition is switched on
Rif the battery voltage drops
Rif the coolant temperature is too low
Setting the air vents
Important safety notes
GWarning
When operating the climate control, the air
that enters the passenger compartment
through the air vents can be very hot or very
cold (depending on the set temperature). This
could cause burns or frostbite to unprotected
skin in the immediate area of the air vents.
Always keep sufficient distance between
unprotected parts of the body and the air
vents. If necessary, use the air distribution
adjustment to direct the air to air vents in the
vehicle interior that are not in the immediate
area of unprotected skin.
In order to ensure the direct flow of fresh air
through the air vents into the vehicle interior,
please observe the following notes:
Rkeep the air inlet between the windshield
and the hood free of blockages, such as ice,
snow or leaves
Rnever cover the vents or air inlet and outlet
grilles in the vehicle interior.
iFor virtually draft-free ventilation, adjust
the sliders of the air vents to the center
position.
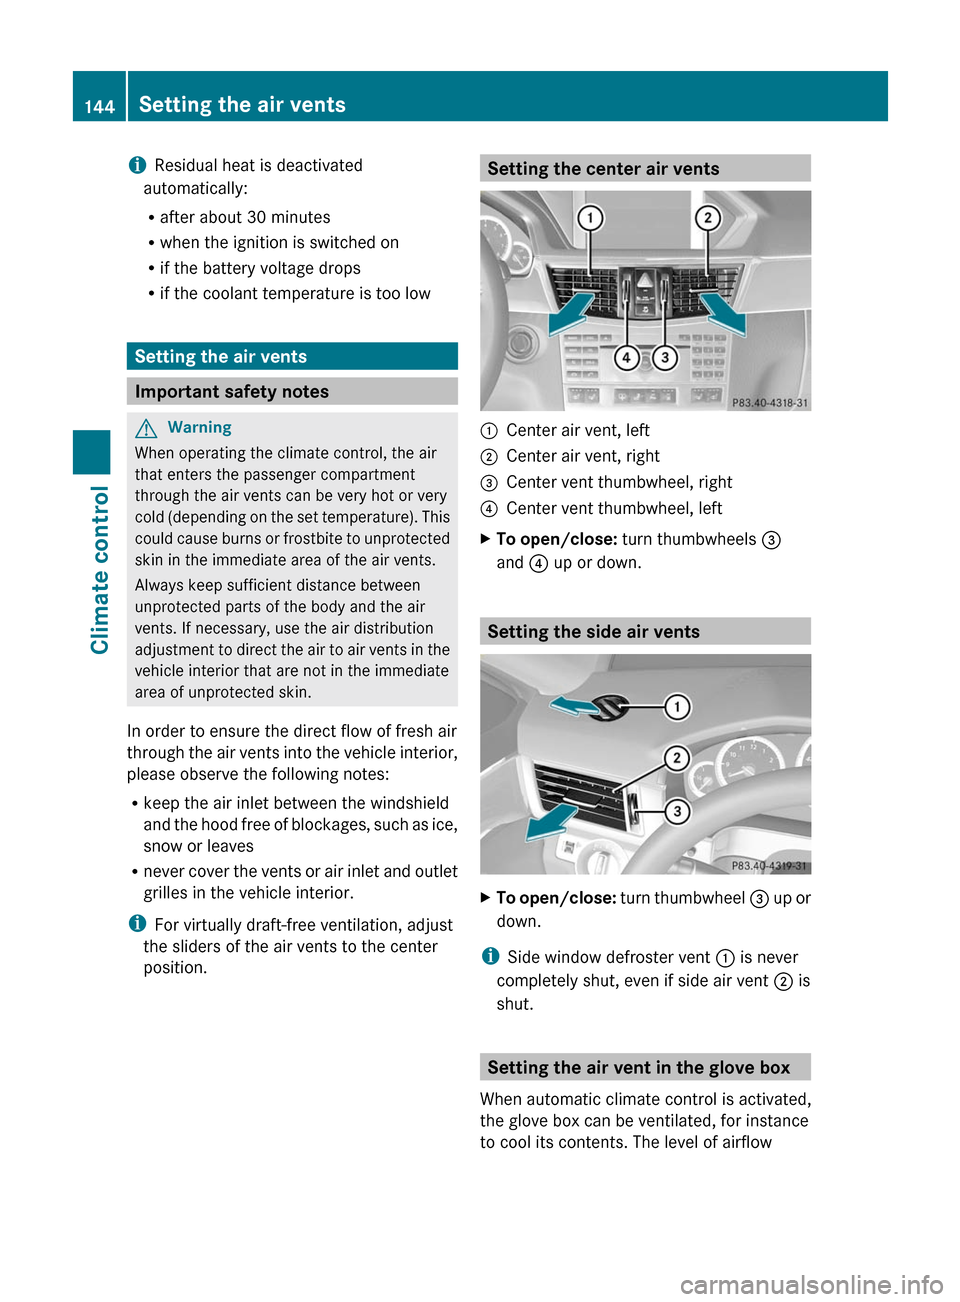
Setting the center air vents:Center air vent, left;Center air vent, right=Center vent thumbwheel, right?Center vent thumbwheel, leftXTo open/close: turn thumbwheels =
and ? up or down.
Setting the side air vents
XTo open/close: turn thumbwheel = up or
down.
iSide window defroster vent : is never
completely shut, even if side air vent ; is
shut.
Setting the air vent in the glove box
When automatic climate control is activated,
the glove box can be ventilated, for instance
to cool its contents. The level of airflow
144Setting the air ventsClimate control
BA 212 USA, CA Edition B 2011; 1; 5, en-USdimargiVersion: 3.0.3.62010-05-20T13:33:46+02:00 - Seite 144