2011 MERCEDES-BENZ E-CLASS ESTATE brake pads
[x] Cancel search: brake padsPage 13 of 409
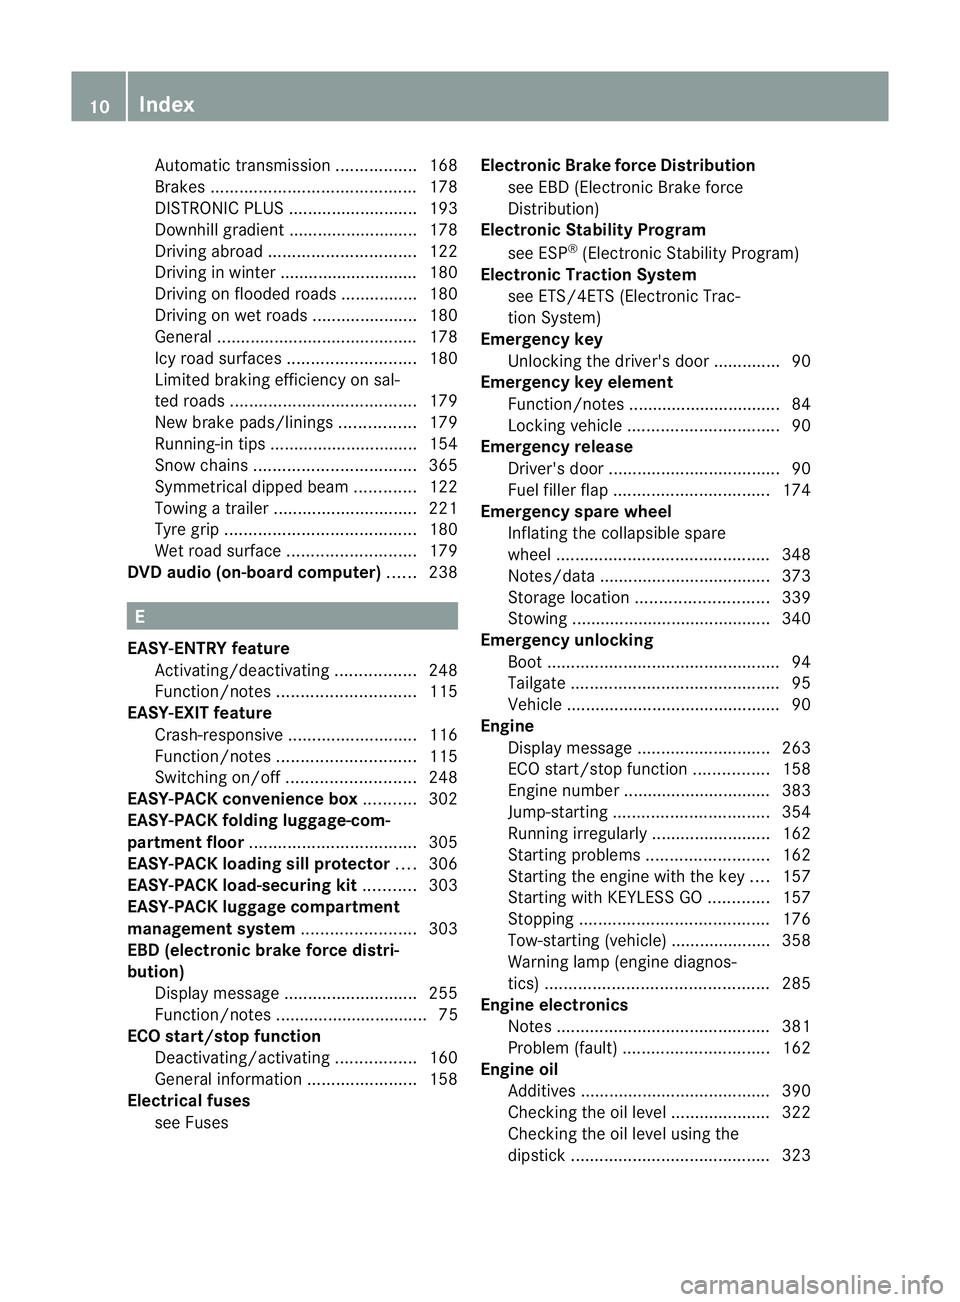
Automatic transmission
.................168
Brakes ........................................... 178
DISTRONI CPLUS ........................... 193
Downhill gradient ........................... 178
Driving abroad ............................... 122
Driving in winter ............................ .180
Driving on flooded road s................ 180
Driving on wet road s...................... 180
General .......................................... 178
Icy road surfaces ........................... 180
Limited braking efficiency on sal-
ted road s....................................... 179
New brake pads/linings ................179
Running-in tips ............................... 154
Snow chains .................................. 365
Symmetrical dipped bea m............. 122
Towing atrailer .............................. 221
Tyr egrip ........................................ 180
Wet road surface ........................... 179
DVD audio (on-board computer) ......238 E
EASY-ENTRY feature Activating/deactivating .................248
Function/notes ............................. 115
EASY-EXIT feature
Crash-responsive ........................... 116
Function/notes ............................. 115
Switching on/off ........................... 248
EASY-PACK convenience box ...........302
EASY-PACK folding luggage-com-
partment floor ................................... 305
EASY-PACK loading sill protector ....306
EASY-PACK load-securing kit ...........303
EASY-PACK luggage compartment
management system ........................303
EBD (electronic brake force distri-
bution)
Display message ............................ 255
Function/notes ................................ 75
ECO start/stop function
Deactivating/activating .................160
General information .......................158
Electrical fuses
see Fuses Electronic Brake force Distribution
see EBD (Electronic Brake force
Distribution)
Electronic Stability Program
see ESP ®
(Electroni cStability Program)
Electronic Traction System
see ETS/4ETS (Electronic Trac-
tionS ystem)
Emergency key
Unlocking the driver's door ..............90
Emergency key element
Function/notes ................................ 84
Locking vehicle ................................ 90
Emergency release
Driver's door .................................... 90
Fuel filler fla p................................. 174
Emergency spare wheel
Inflating the collapsible spare
wheel ............................................. 348
Notes/data .................................... 373
Storage location ............................ 339
Stowing .......................................... 340
Emergency unlocking
Boot ................................................. 94
Tailgate ............................................ 95
Vehicle ............................................. 90
Engine
Display message ............................ 263
ECO start/stop function ................158
Engine number ............................... 383
Jump-starting ................................. 354
Running irregularl y......................... 162
Starting problems ..........................162
Starting the engine with the key ....157
Starting with KEYLESS GO .............157
Stopping ........................................ 176
Tow-starting (vehicle) ..................... 358
Warning lamp (engine diagnos-
tics) ............................................... 285
Engine electronics
Notes ............................................. 381
Problem (fault) ............................... 162
Engine oil
Additives ........................................ 390
Checking the oil level ..................... 322
Checking the oil level using the
dipstick .......................................... 32310
Index
Page 157 of 409
Useful information
i This Owner's Manual describes all models
and all standard and optional equipment
available to your vehicle at the time of pub-
lication of the Owner's Manual. Country-
specific deviations are possible. Please
note that your vehicle may not be equipped
with all features described. This also
applies to safety-relevan tsystems and
functions.
i Please read the information on qualified
specialist workshops (Y page 25).Running-in notes
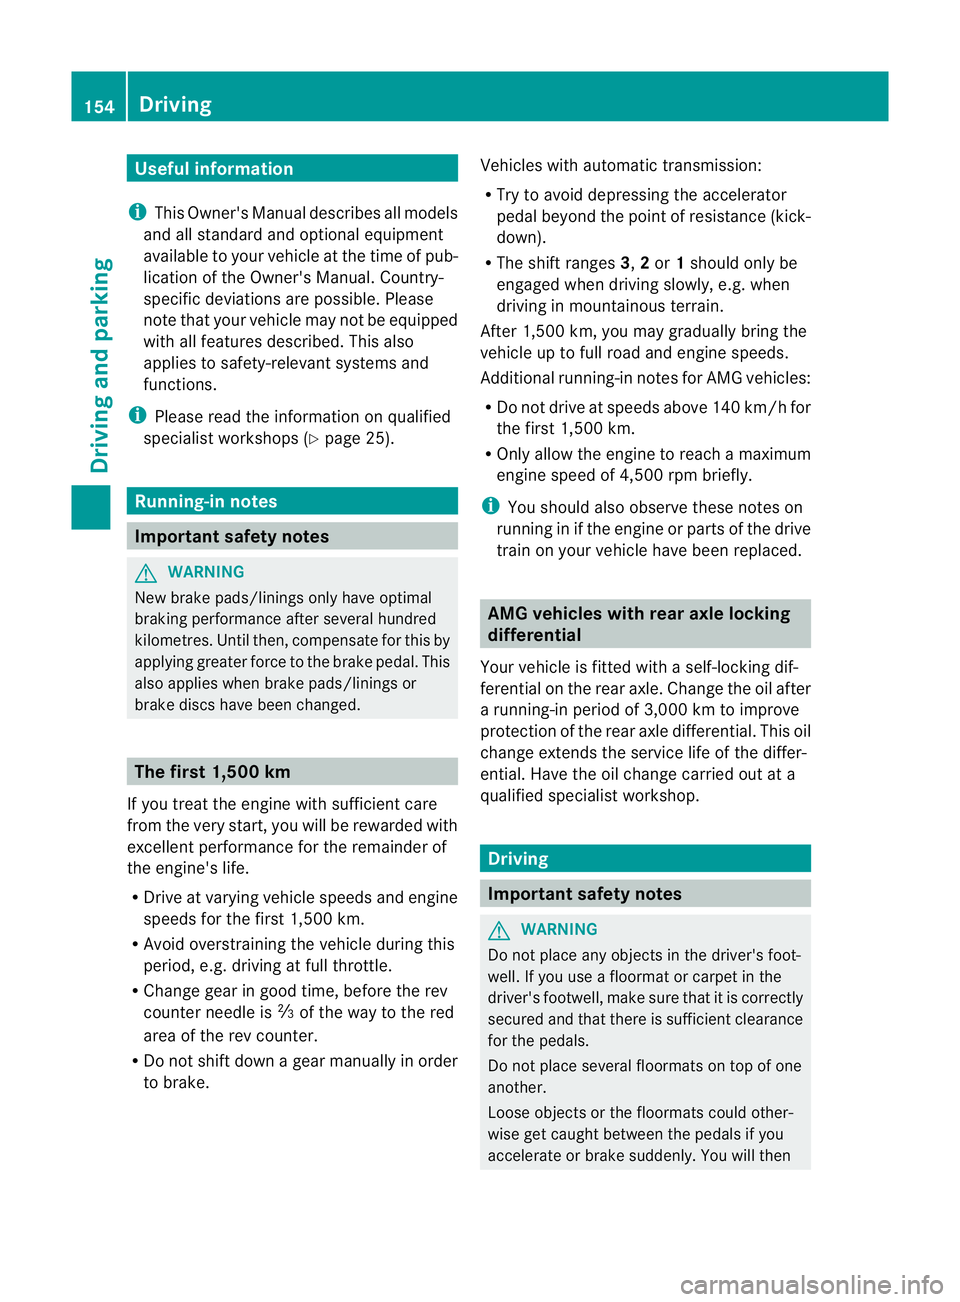
Important safety notes
G
WARNING
New brake pads/linings only have optimal
braking performance after several hundred
kilometres .Until then, compensate for this by
applying greate rforce to the brake pedal. This
also applies when brake pads/linings or
brake discs have been changed. The first 1,500 km
If you treat the engine with sufficient care
from the very start,y ou will be rewarded with
excellent performance for the remainder of
the engine's life.
R Drive at varying vehicle speeds and engine
speeds for the first 1,500 km.
R Avoid overstraining the vehicle during this
period, e.g. driving at full throttle.
R Change gear in good time, before the rev
counter needle is Ôof the way to the red
area of the rev counter.
R Do not shift down a gear manually in order
to brake. Vehicles with automatic transmission:
R
Try to avoid depressing the accelerator
pedal beyond the point of resistance (kick-
down).
R The shift ranges 3,2or 1should only be
engaged when driving slowly, e.g. when
driving in mountainous terrain.
After 1,500 km, you may gradually bring the
vehicle up to full road and engine speeds.
Additional running-in notes for AMG vehicles:
R Do not drive at speeds above 140 km/h for
the first 1,500 km.
R Only allow the engine to reach a maximum
engine speed of 4,500 rpm briefly.
i You should also observe these notes on
running in if the engine or parts of the drive
train on your vehicle have been replaced. AMG vehicles with rear axle locking
differential
Your vehicle is fitted with a self-locking dif-
ferential on the rear axle. Change the oil after
a running-in period of 3,000 km to improve
protection of the rear axle differential. This oil
change extends the service life of the differ-
ential. Have the oil change carried out at a
qualified specialist workshop. Driving
Important safety notes
G
WARNING
Do not place any objects in the driver's foot-
well. If you use a floormat or carpet in the
driver's footwell, make sure that it is correctly
secured and that there is sufficient clearance
for the pedals.
Do not place several floormats on top of one
another.
Loose objects or the floormats could other-
wise get caught between the pedals if you
accelerate or brake suddenly. You will then 154
DrivingDriving and parking
Page 182 of 409
higher speed. This improves the grip of the
brakes.
Wet road surfaces If driving in heavy rain for a prolonged period
of time without braking, there may be a
delayed reaction from the brakes when brak-
ing for the first time. This may also occur after
the vehicle has been washed.
You have to depress the brake pedal more
firmly. Maintain a greater distance from the
vehicle in front.
After driving on a wet road or having the vehi-
cle washed, brake firmly while paying atten-
tion to the traffic conditions. This will warm
up the brake discs, thereby drying them more
quickly and protecting them against corro-
sion.
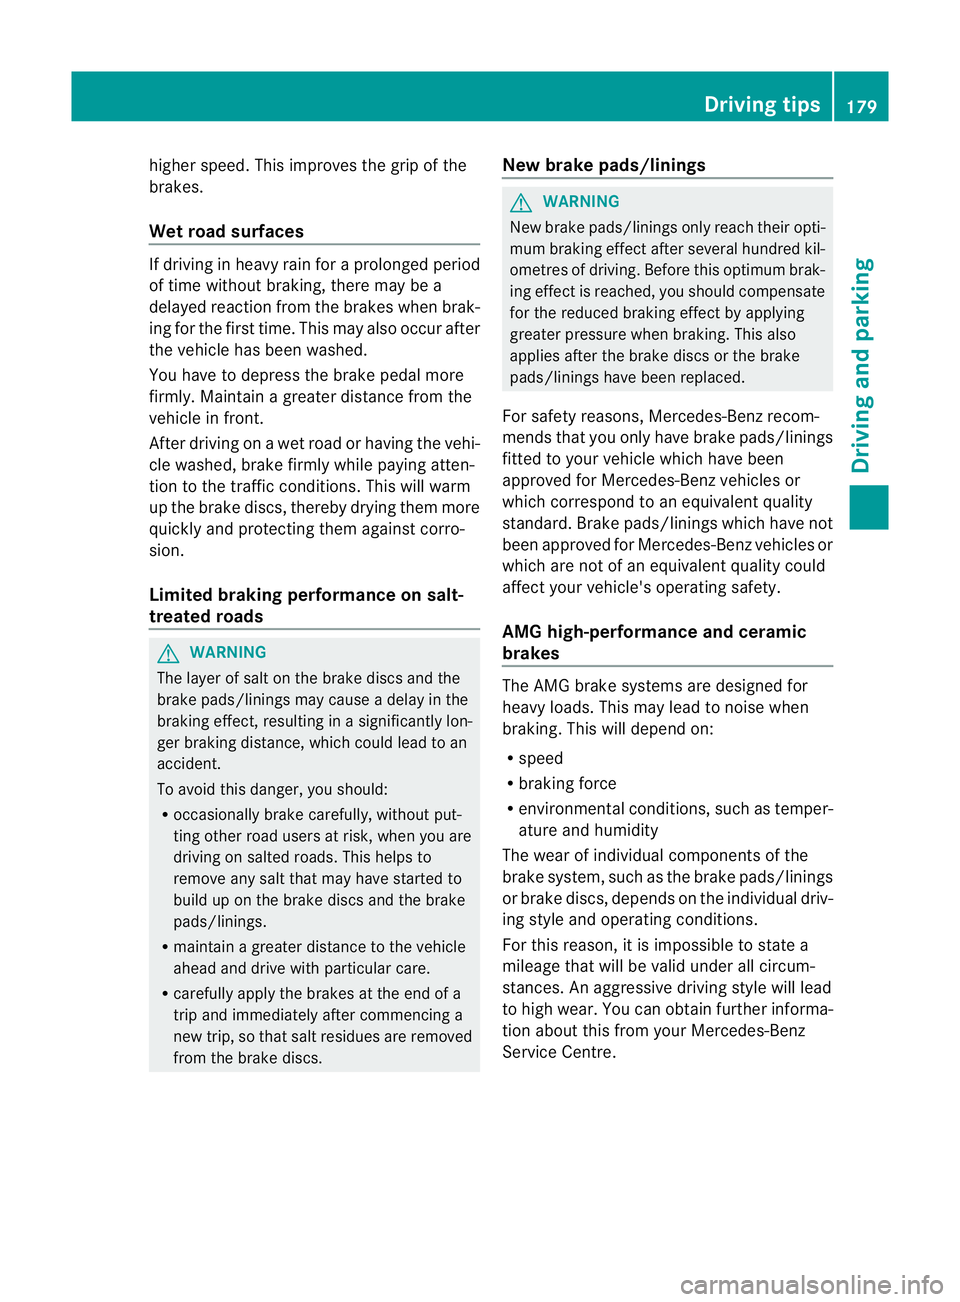
Limited braking performance on salt-
treated roads G
WARNING
The layerofs alt on thebrake discs and the
brake pads/linings may caus eadelay in the
braking effect, resulting in a significantly lon-
ger braking distance, which could lead to an
accident.
To avoid this danger, you should:
R occasionally brake carefully, without put-
ting other road users at risk, when you are
driving on salted roads. This helps to
remove any salt that may have started to
build up on the brake discs and the brake
pads/linings.
R maintain a greater distanc eto the vehicle
ahead and drive with particular care.
R carefully apply the brakes at the end of a
trip and immediately after commencing a
new trip, so that salt residues are removed
from the brake discs. New brake pads/linings G
WARNING
New brake pads/linings only reach their opti-
mum braking effect after several hundred kil-
ometres of driving. Before this optimum brak-
ing effect is reached, you should compensate
for the reduced braking effect by applying
greater pressure when braking. This also
applies after the brake discs or the brake
pads/linings have been replaced.
For safety reasons, Mercedes-Benz recom-
mends that you only have brake pads/linings
fitted to your vehicle which have been
approved for Mercedes-Benz vehicles or
which correspond to an equivalent quality
standard. Brake pads/linings which have not
been approved for Mercedes-Benz vehicles or
which are not of an equivalent quality could
affect your vehicle's operating safety.
AMG high-performance and ceramic
brakes The AMG brake systems are designed for
heavy loads. This may lead to noise when
braking. This will depend on:
R
speed
R braking force
R environmental conditions, such as temper-
ature and humidity
The wear of individual components of the
brake system, such as the brake pads/linings
or brake discs, depends on the individual driv-
ing style and operating conditions.
For this reason, it is impossible to state a
mileage that will be valid under all circum-
stances. An aggressive driving style will lead
to high wear. You can obtain further informa-
tion about this from your Mercedes-Benz
Service Centre. Driving tips
179Driving and parking Z
Page 259 of 409
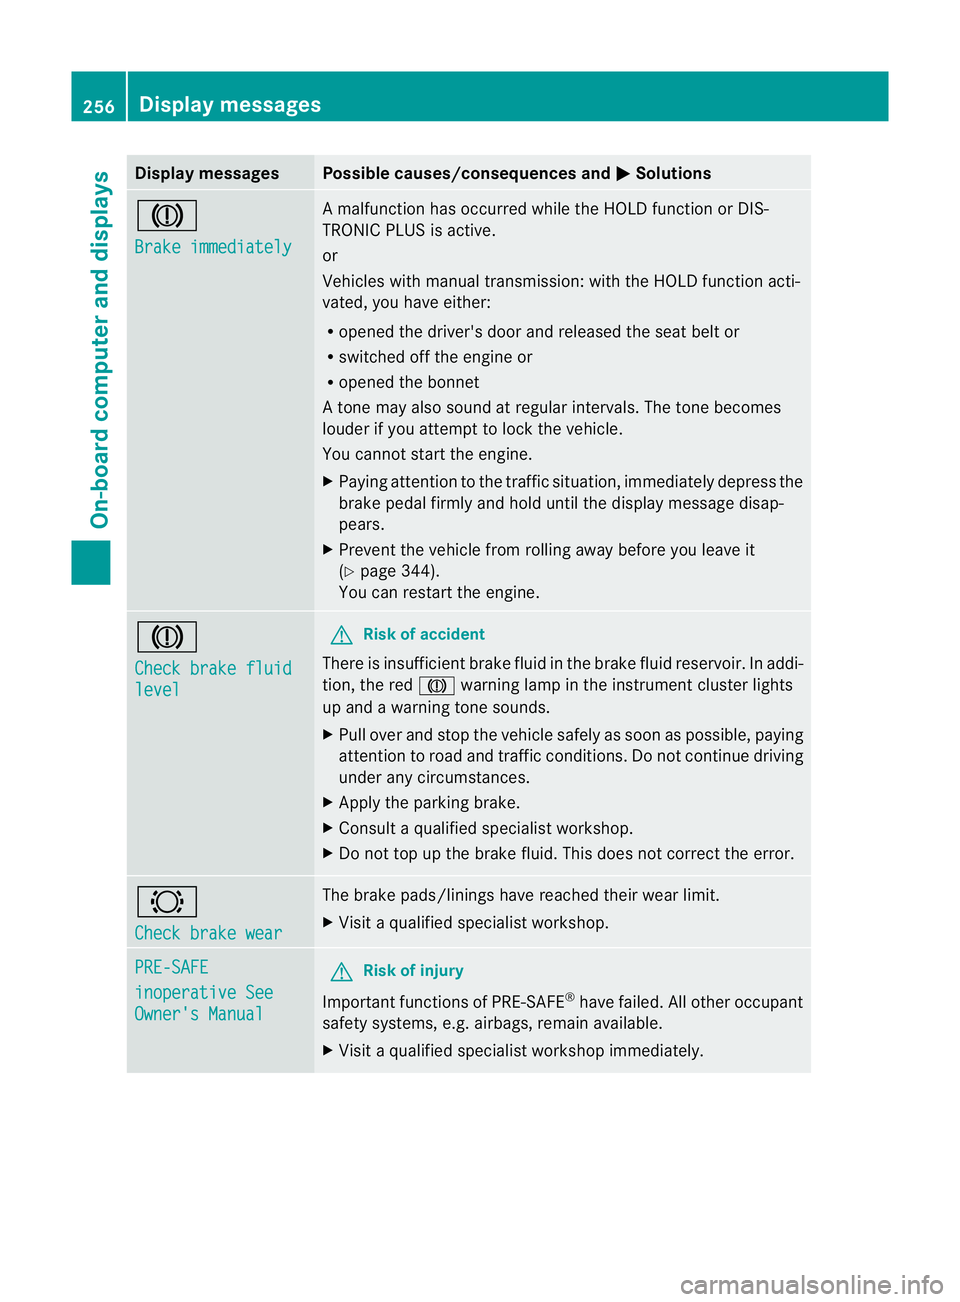
Display messages Possible causes/consequences and
M Solutions
J
Brake immediately A malfunction has occurred while the HOLD function or DIS-
TRONIC PLUS is active.
or
Vehicles with manual transmission: with the HOLD function acti-
vated, you have either:
R
opened the driver's doo rand released the sea tbelt or
R switched off the engine or
R opened the bonnet
At one may also sound at regular intervals. The tone becomes
louder if you attempt to lock the vehicle.
You cannot start the engine.
X Paying attention to the traffic situation, immediately depress the
brake pedal firmly and hold until the display message disap-
pears.
X Prevent the vehicle from rolling away before you leave it
(Y page 344).
You can restart the engine. J
Check brake fluid
level G
Risk of accident
There is insufficien tbrake fluid in the brake fluid reservoir. In addi-
tion, the red Jwarning lamp in the instrument cluster lights
up and a warning tone sounds.
X Pull over and stop the vehicle safely as soon as possible, paying
attention to road and traffic conditions. Do not continue driving
under any circumstances.
X Apply the parking brake.
X Consult a qualified specialist workshop.
X Do not top up the brake fluid. This does not correct the error. #
Check brake wear The brake pads/linings have reached their wearl
imit.
X Visit a qualified specialist workshop. PRE-SAFE
inoperative See
Owner's Manual G
Risk of injury
Important function sof PRE-SAFE ®
have failed .All other occupant
safety systems, e.g. airbags, remain available.
X Visit a qualified specialist workshop immediately. 256
Display messagesOn-board computer and displays
Page 329 of 409
ting can be corrected at a Mercedes-Benz
Service Centre.
Have service work carried ou
tas described
in the Service Booklet. This may otherwise
lead to increased wear and damage to the
major assemblies or the vehicle.
Driving abroad
An extensive Mercedes-Benz Service network
is also available in other countries. The
Service Hotline's current telephone numbers
for use when you are abroad are to be found
in the "Mercedes-Benz Service24h" section
of the Service Booklet. AdBlue
®
service indicator
i For BlueTEC vehicles only.
The BlueTEC exhaust gas aftertreatment
must be operated with a reducing agent
(AdBlue ®
)i n order for it to function correctly.
AdBlue ®
is topped up as part of the service.
Unde rnormal operating conditions, a full tank
of AdBlue ®
should last until the next service
due date.
Depending on how and where the vehicle is
used, there may be an increase in the
AdBlue ®
consumption, resulting in the next
service due date being brought forward.
Certain display messages show that
AdBlue ®
must be topped up, e.g.
Refill AdBlue at workshop See Own‐ er's Manual
Refill AdBlue at workshop No start
in .. km
You can no longer start the engine when the
AdBlue
®
supply has been used up
(Y page 265).
Before taking a trip with your vehicle outside
Europe, have the AdBlue ®
supply checked at
a qualified specialist workshop. If necessary,
have the AdBlue ®
topped up. Before using
your vehicle for an extended period in coun-
tries outside Europe, contact a qualified spe-
cialist workshop. !
Have the AdBlue ®
tank topped up at a
qualified specialist workshop only. The
vehicle may otherwise be damaged or
soiled.
Observe the notes on AdBlue ®
(Y page 388).
You can obtain further information about
BlueTEC exhaust gas aftertreatmen tand
AdBlue ®
from any Mercedes-Benz Service
Centre. Care
Notes on care
Regula rcare of your vehicle is a condition for
retaining the quality in the long term.
Use care products and cleaning agents rec-
ommended and approved by Mercedes-Benz.
! For cleaning your vehicle, do no tuse any
of the following:
R dry, rough or hard cloths
R abrasive cleaning agents
R solvents
R cleaning agents containing solvents
Do not scrub.
Do not touch the surfaces or protective
films with hard objects, e.g. a ring or ice
scraper. You could otherwise scratch or
damage the surfaces and protective film. H
Environmental note
Dispose of empty packaging and cleaning
cloths in an environmentally responsible man-
ner.
! Do not park up the vehicle for an extended
period straight after cleaning it, particularly
after having cleaned the wheels with wheel
cleaner. Wheel cleaners could cause
increased corrosion of the brake discs and
brake pads/linings. For this reason, you
should drive for a few minutes after clean-
ing. Braking heats the brake discs and the
brake pads/linings, thus drying them. The
vehicle can then be parked up. 326
CareMaintenance and care
Page 331 of 409
X
Rinse the vehicle with clean water and dry
thoroughly with a chamois.
X Do not let the cleaning agent dry on the
paintwork.
Whe nusing the vehicle in winter, remove all
traces of road salt deposits carefully and as
soon as possible.
High-pressure cleaning equipment G
WARNING
Do not use high-pressure cleaners with circu-
lar-jet nozzles (dirt grinders) to clean your
vehicle, in particular the tyres. You could oth-
erwise damage the tyres and cause an acci-
dent.
! Always maintain a distance of at least
30 cm between the vehicle and the high-
pressure cleaner nozzle. Information about
the correct distance is available from the
equipment manufacturer.
Move the high-pressure cleaner nozzle
around when cleaning your vehicle.
Do not aim directly at any of the following:
R tyres
R door gaps, roof gaps, joints etc.
R electrical components
R battery
R connectors
R lights
R seals
R trim elements
R ventilation slots
Damaged seals or electrical components
can lead to leaks or failures.
Cleaning the wheels !
Do not use acidic wheel cleaning products
to remove brake dust. This could damage
wheel bolts and brake components.
! Do not park up the vehicle for an extended
period straight after cleaning it, particularly
after having cleaned the wheels with wheel cleaner. Wheel cleaners could cause
increased corrosion of the brake discs and
brake pads/linings. For this reason, you
should drive for a few minutes after clean-
ing. Braking heats the brake discs and the
brake pads/linings, thus drying them. The
vehicle can then be parked up.
Cleaning the paintwork Scratches, corrosive deposits, areas affected
by corrosion and damage caused by inade-
quate care cannot always be completely
repaired. In such cases, visit a qualified spe-
cialist workshop.
X
Remove impurities immediately,w here
possible, whilst avoiding rubbing too hard.
X Soak insect remains with insect remover
and rinse off the treated areas afterwards.
X Soak bird droppings with water and rinse
off the treated areas afterwards.
X Remove coolant, brake fluid, tree resin,
oils, fuels and greases by rubbing gently
with a cloth soaked in petroleum ether or
lighter fluid.
X Use tar remover to remove tar stains.
X Use silicone remover to remove wax.
! Do not affix:
R stickers
R films
R magnetic plates or similar items
to painted surfaces. You could otherwise
damage the paintwork.
Care and treatment of matt paintwork If your vehicle has a clear matt finish, observe
the following instructions in order to avoid
damage to the paintwork due to incorrect
care.
These notes also apply to light-alloy wheels
with a clear matt finish.
!
Never polish the vehicle or the light alloy
wheels. Polishing makes the paintwork
shiny. 328
CareMaintenance and care