2011 MERCEDES-BENZ E-CLASS ESTATE battery
[x] Cancel search: batteryPage 180 of 409
Vehicles with automatic transmission
X
Standard vehicles: shift the transmission
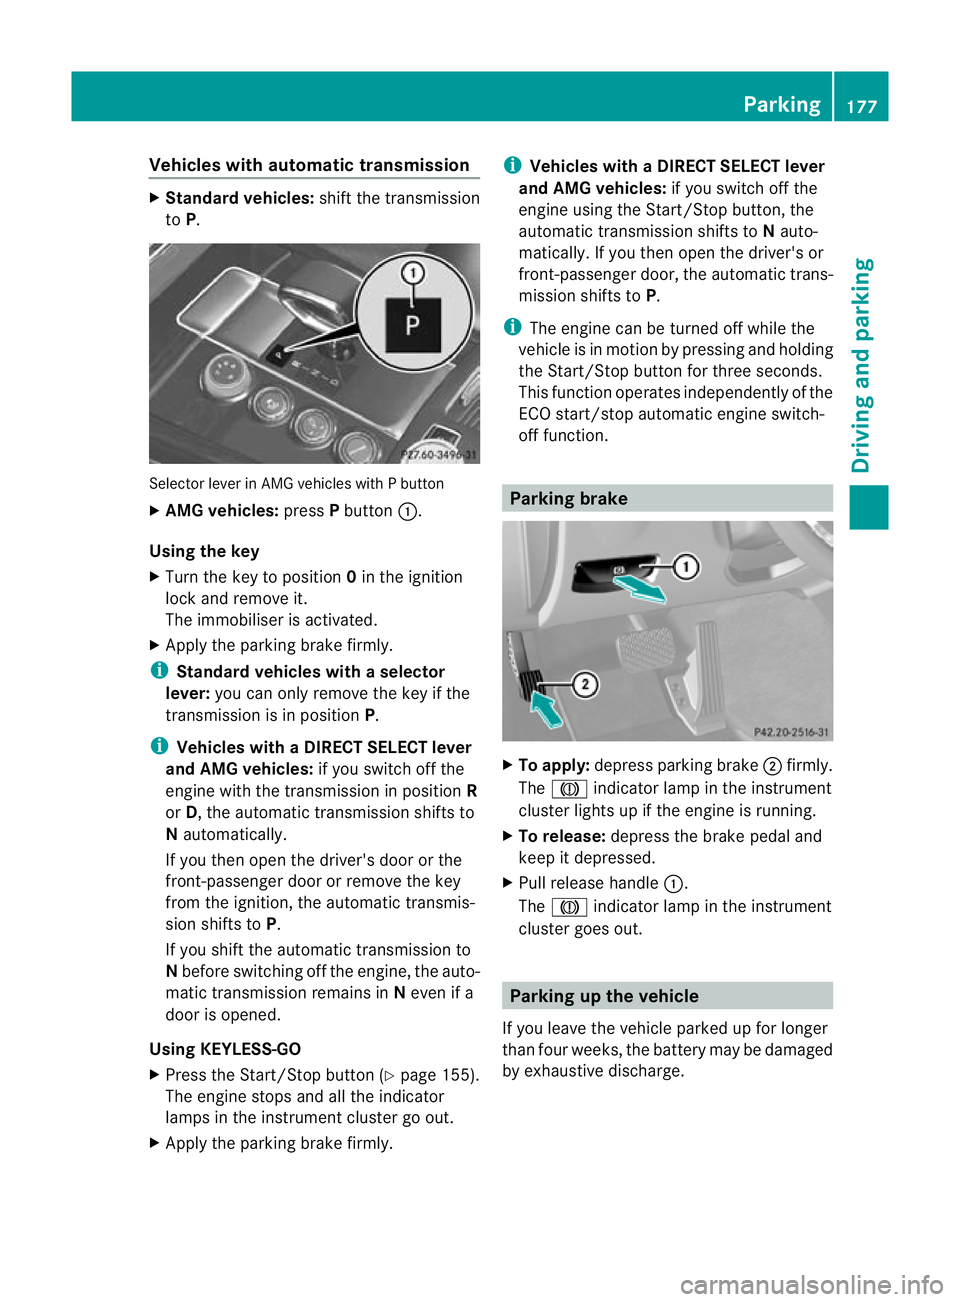
to P. Selecto
rlever in AMG vehicles with P button
X AMG vehicles: pressPbutton :.
Using the key
X Turn the key to position 0in the ignition
lock and remove it.
The immobiliser is activated.
X Apply the parking brake firmly.
i Standard vehicles with aselector
lever: you can only remove the key if the
transmission is in position P.
i Vehicles with aDIRECT SELECT lever
and AMG vehicles: if you switch off the
engine with the transmission in position R
or D, the automatic transmission shifts to
N automatically.
If you then open the driver's door or the
front-passenger door or remove the key
from the ignition, the automatic transmis-
sion shifts to P.
If you shift the automatic transmission to
N before switching off the engine, the auto-
matic transmission remains in Neven if a
door is opened.
Using KEYLESS-GO
X Press the Start/Stop butto n(Ypage 155).
The engine stops and all the indicator
lamps in the instrument cluster go out.
X Apply the parking brake firmly. i
Vehicles with aDIRECT SELECT lever
and AMG vehicles: if you switch off the
engine using the Start/Stop button, the
automatic transmission shifts to Nauto-
matically. If you then open the driver's or
front-passenger door, th eautomatic trans-
mission shifts to P.
i The engine can be turned off while the
vehicle is in motion by pressing and holding
the Start/Stop button for three seconds.
This function operates independently of the
ECO start/stop automatic engine switch-
off function. Parking brake
X
To apply: depress parking brake ;firmly.
The J indicator lamp in the instrument
cluste rlights up if the engine is running.
X To release: depress the brake pedal and
keep it depressed.
X Pull release handle :.
The J indicator lamp in the instrument
cluster goes out. Parking up the vehicle
If you leave the vehicle parked up for longer
than four weeks, the battery may be damaged
by exhaustive discharge. Parking
177Driving and parking Z
Page 181 of 409
X
Disconnect the battery ( Ypage 352) or
connect it to a trickle charger.
i You can obtain information about trickle
chargers fro maqualified specialist work-
shop.
If you leave the vehicle parked up for longer
than six weeks, the vehicle may suffer dam-
age as a result of lack of use.
X Visit a qualified specialist workshop and
seek advice. Driving tips
General driving tips
Rolling with the engine switched off G
WARNING
Never switch the engine off while the vehicle
is in motion.
There is no power assistance for the steering
and the service brake when the engine is not
running.
You will require considerably more effor tto
steer and brake, and you could therefore lose
control of the vehicle and cause an accident. Driving short distances
! Vehicles with adiesel particle filter: if
the vehicle is mostly driven for short dis-
tances, it is possible that malfunctions may
occur during the automatic cleaning of the
diesel particle filter. This may lead to fuel
collecting in the engine oil and cause
engine failure. Therefore, if you frequently
drive short distances, you should take a 20
minute trip on a motorway or rural road at
least every 500km. Brakes
Important safety notes G
WARNING
Do not change down for additional engine
braking on a slippery road surface. This could
cause the drive wheels to lose their grip and
the vehicle could skid. G
WARNING
Make sure that other road users are not
endangered by your braking.
Downhill gradients On long and steep downhill gradients, espe-
cially if the vehicle is laden or towing a trailer,
you must shift to a lower gear in good time or,
on vehicles with automatic transmission,
select shift range 1,2or 3.
i This also applies if you have activated
cruise control, SPEEDTRONIC or DIS-
TRONIC PLUS.
This will use the braking effect of the engine,
so less braking will be required to maintain
the speed. This relieves the load on the brake
system and prevents the brakes from over-
heating and wearing too quickly.
Heavy and light loads G
WARNING
Never depress the brake pedal continuously
while the vehicle is in motion, e.g. never cause
the brakes to rub by applying constan tslight
pedal pressure. This causes the brake system
to overheat, increases the braking distance
and can lead to the brakes failing completely.
If the brakes have been subjected to a heavy
load, do not stop the vehicle immediately, but
drive on for a shor twhile. This allows the air-
flow to cool the brakes more quickly.
If the brakes have been used only moderately,
you should occasionally test their effective-
ness. To do this, brake more firmly from a 178
Driving tipsDriving and parking
Page 192 of 409
Vehicles with COMAND APS/
Audio 50 APS
i
The following function is not operational
in all countries.
DISTRONIC PLU Suses additional information
from your navigation system so that it can
adaptt o certain traffic situations. This is the
case if, while following a vehicle, DISTRONIC
PLUS is active and you:
R approach or drive around a roundabout
R approach a T junction
R turn off at a motorway exit
Even if the vehicle in front leaves the detec-
tion range, DISTRONIC PLUS temporarily
maintains the current driving speed and does
not accelerate. This is based on the current
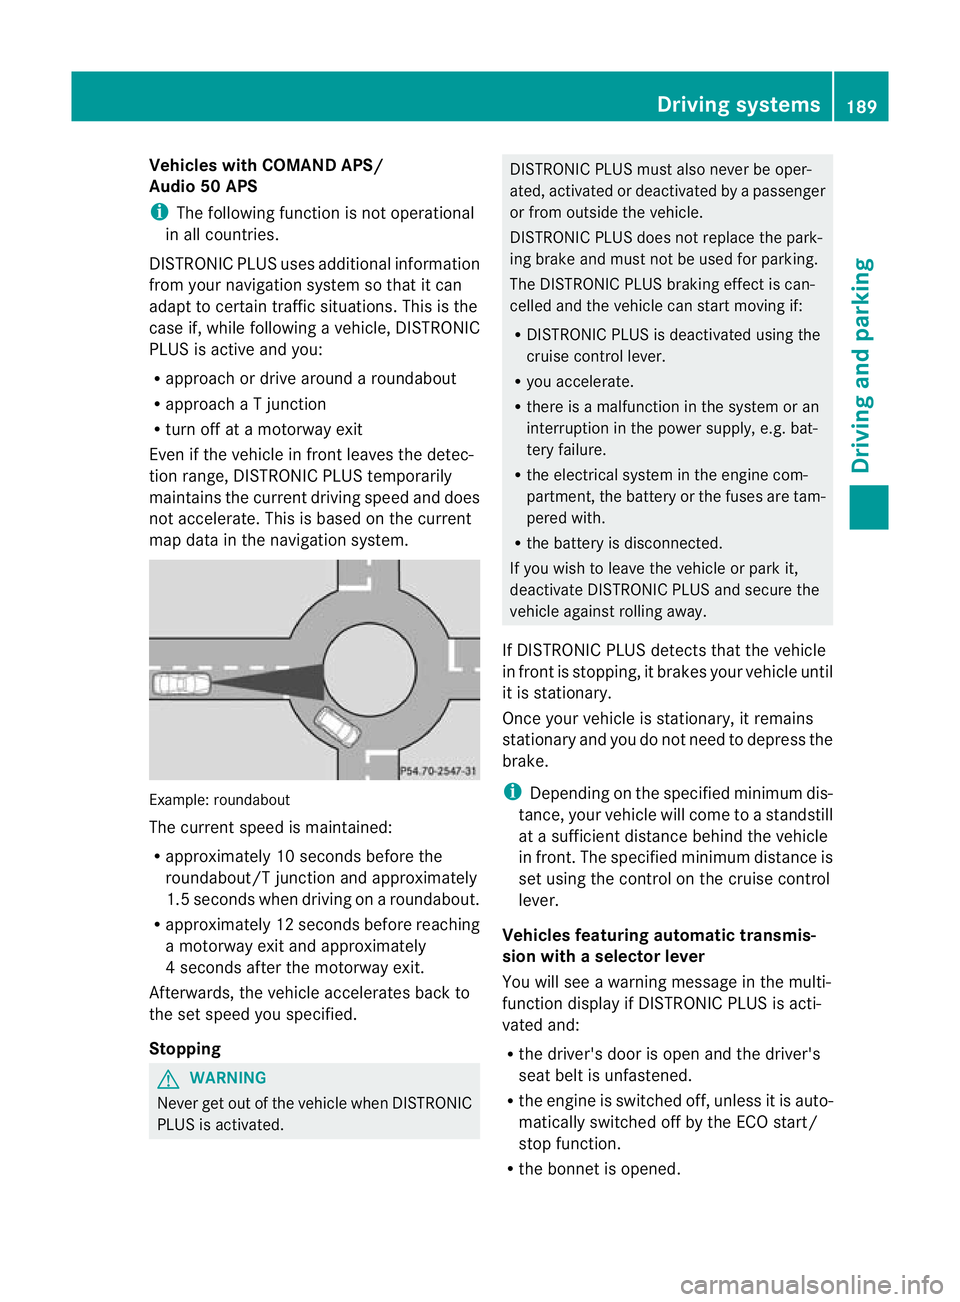
map data in the navigation system. Example: roundabout
The current speed is maintained:
R
approximately 10 seconds before the
roundabout/T junction and approximately
1.5 seconds when driving on a roundabout.
R approximately 12 seconds before reaching
a motorway exit and approximately
4 seconds after the motorway exit.
Afterwards, the vehicle accelerates back to
the set speed you specified.
Stopping G
WARNING
Never get out of the vehicle when DISTRONIC
PLUS is activated. DISTRONIC PLUS must also never be oper-
ated, activated or deactivated by a passenger
or from outside the vehicle.
DISTRONIC PLUS does not replace the park-
ing brake and must not be used for parking.
The DISTRONIC PLUS braking effect is can-
celled and the vehicle can start moving if:
R
DISTRONIC PLUS is deactivated using the
cruise control lever.
R you accelerate.
R there is a malfunction in the system or an
interruption in the power supply, e.g. bat-
tery failure.
R the electrical system in the engine com-
partment, the battery or the fuses are tam-
pered with.
R the battery is disconnected.
If you wish to leave the vehicle or park it,
deactivate DISTRONIC PLUS and secure the
vehicle against rolling away.
If DISTRONIC PLUS detects that the vehicle
in front is stopping, it brakes your vehicle until
it is stationary.
Once your vehicle is stationary, it remains
stationary and you do not need to depress the
brake.
i Depending on the specified minimum dis-
tance, your vehicle will come to a standstill
at a sufficient distance behind the vehicle
in front.T he specified minimum distance is
set using the control on the cruise control
lever.
Vehicles featuring automatic transmis-
sion with aselector lever
You will see a warning message in the multi-
function display if DISTRONIC PLUS is acti-
vated and:
R the driver's door is open and the driver's
seat belt is unfastened.
R the engine is switched off, unless it is auto-
matically switched off by the ECO start/
stop function.
R the bonnet is opened. Driving systems
189Driving and parking Z
Page 198 of 409
G
WARNING
The vehicle's brakes are applied when the
HOLD function is activated. For this reason,
deactivate the HOLD function if the vehicle is
to be set in motion by other means (e.g. in a
car wash or by towing).
Deactivating the HOLD function The HOLD function is deactivated automati-
cally if:
R
you accelerate. On vehicles with automatic
transmission: only when the transmission
is in position Dor R.
R you shift the transmission to position Pon
vehicles with automatic transmission.
R you apply the brakes again with a certain
amount of pressure until ëdisappears
from the multifunction display.
R you activate DISTRONIC PLUS. G
WARNING
Never get out of the vehicle when the HOLD
function is activated.
The HOLD function must never be operated
or deactivated by a passenger or from outside
the vehicle.
The HOLD function does not replace the park-
ing brake and must not be used for parking.
The braking effect of the HOLD function is
cancelled and the vehicle could roll away if:
R the HOLD function is deactivated by
depressing the accelerator peda lorthe
brake pedal.
R there is a malfunction in the system or an
interruption in the power supply, e.g. bat-
tery failure.
R the electrical system in the engine com-
partment, the battery or the fuses are tam-
pered with.
R the battery is disconnected.
If you leave the vehicle or park it, deactivate
the HOLD function and secure the vehicle
against rolling away. On vehicles with automatic transmission and
a DIRECT SELECT lever, the transmission is
automatically shifted to
Pif the HOLD func-
tion is activated and:
R the driver's door is open and the driver's
seat belt is unfastened.
R the engine is switched off, unless it is auto-
matically switched off by the ECO start/
stop function.
R the bonnet is opened.
R a system fault occurs.
R the power supply is not sufficient.
In vehicles with manual transmission or auto-
matic transmission with a selector lever, you
see a warning message in the multifunction
display if the HOLD function is activated and:
R the driver's door is open and the driver's
seat belt is unfastened.
R the engine is switched off, unless it is auto-
matically switched off by the ECO start/
stop function.
R the bonnet is opened.
For vehicles with manual transmission:
Brake immediately X
Immediately depress the brake pedal firmly
until the warning message in the multifunc-
tion display goes out. This deactivates the
HOLD function.
In vehicles featuring automatic transmission
with a gear selector lever: Select Park (P)
X
Move the selector lever to Pto prevent the
vehicle from rolling away.
The HOLD function is deactivated. The
warning message in the multifunction dis-
play disappears.
Ah orn will also sound at regular intervals if
the HOLD function is activated and you:
R switch the engine off, open the driver's
door and take off your seat belt
R open the bonnet
The sounding of the horn alerts you to the fact
that the vehicle has been parked while the
HOLD function is still activated. If you attempt Driving systems
195Driving and parking Z
Page 229 of 409
X
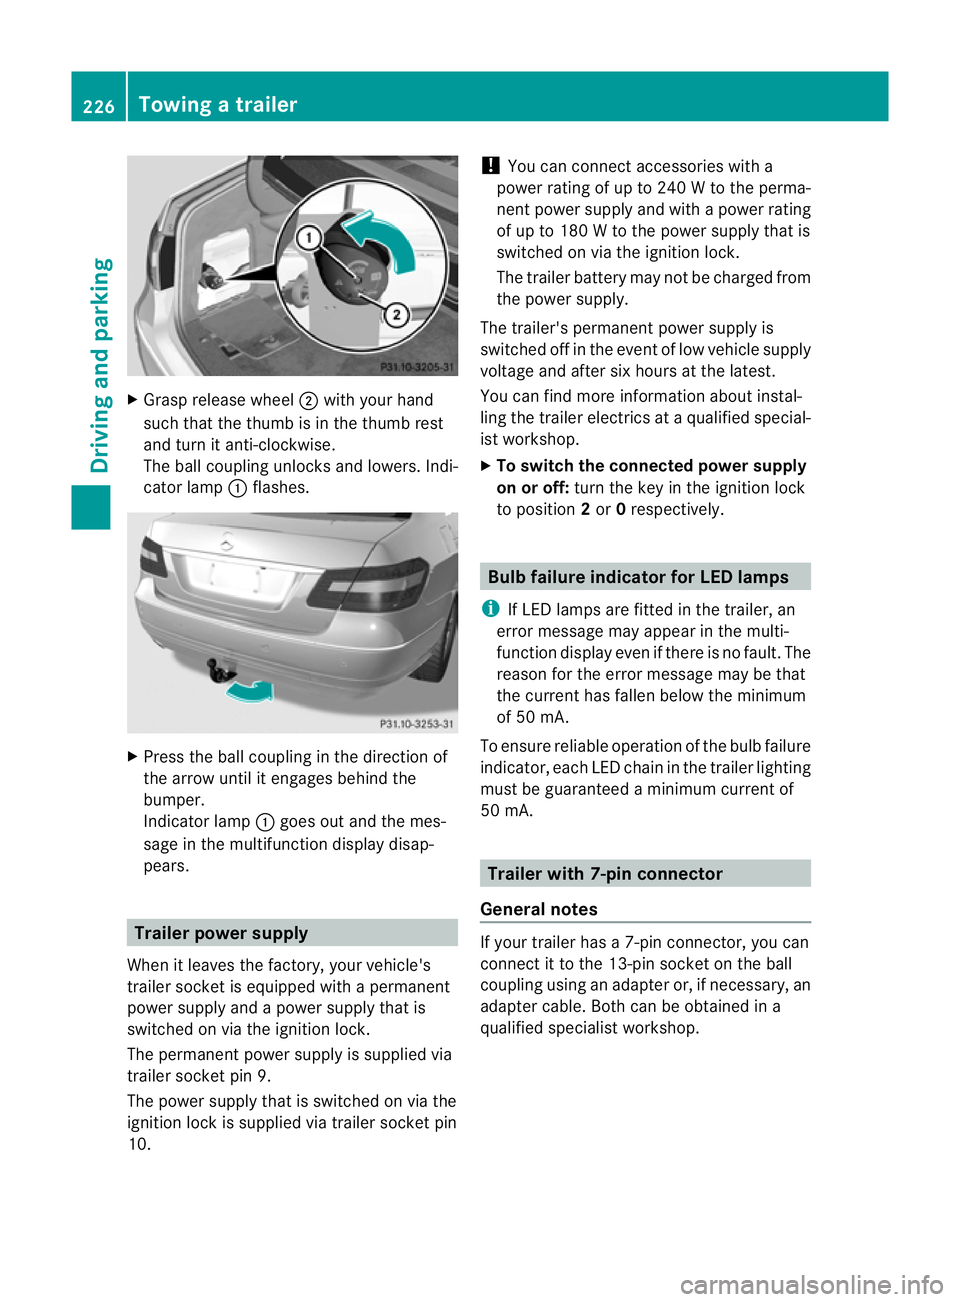
Grasp release wheel ;with your hand
such that the thumb is in the thumb rest
and turn it anti-clockwise.
The ball coupling unlocks and lowers. Indi-
cator lamp :flashes. X
Press the ball coupling in the direction of
the arrow until it engages behind the
bumper.
Indicato rlamp :goes out and the mes-
sage in the multifunction display disap-
pears. Trailer power supply
When it leaves the factory, your vehicle's
trailer socke tis equipped with a permanent
power supply and a power supply that is
switched on via the ignition lock.
The permanent power supply is supplied via
trailer socket pin 9.
The power supply that is switched on via the
ignition lock is supplied via trailer socket pin
10. !
You can connect accessories with a
power rating of up to 240 W to the perma-
nent power supply and with a power rating
of up to 180 W to the power supply that is
switched on via the ignition lock.
The trailer battery may not be charged from
the power supply.
The trailer's permanent power supply is
switched off in the event of low vehicle supply
voltage and after six hours at the latest.
You can find more information abouti nstal-
ling the trailer electrics at a qualified special-
is tw orkshop.
X To switch the connected power supply
on or off: turn the key in the ignition lock
to position 2or 0respectively. Bulb failure indicator for LED lamps
i If LED lamps are fitted in the trailer, an
error message may appear in the multi-
function display even if there is no fault. The
reason for the error message may be that
the current has fallen below the minimum
of 50 mA.
To ensure reliable operation of the bulb failure
indicator, each LED chain in the trailer lighting
must be guaranteed a minimum current of
50 mA. Trailer with 7-pin connector
General notes If your trailer has a 7-pin connector, you can
connect it to the 13-pin socket on the ball
coupling using an adapter or, if necessary, an
adapter cable. Both can be obtained in a
qualified specialist workshop.226
Towing
atrailerDriving an d parking
Page 251 of 409
confined spaces withou
tanextraction sys-
tem, e.g. a garage. G
WARNING
Whe noperating the auxiliary heating parts of
the vehicle can get very hot. Make sure that
the exhaust system does not under any cir-
cumstances come into contact with easily
ignitable material such as dry grass or fuels.
The material could otherwise ignite and set
the vehicle alight. Choose your parking spot
accordingly.
Operating the auxiliary heating is thus pro-
hibited at filling stations or when your vehicle
is being refuelled. You must therefore switch
off the auxiliary heating at filling stations.
! Operating the auxiliary heating/ventila-
tion draws on the vehicle battery. After you
have heated or ventilated the vehicle a
maximum of two times, drive for a longer
distance.
i Switch the auxiliary heating on regularly
once a month for about ten minutes.
Selecting the departure time or deactivat-
ing a selected departure time
X Press the =or; buttononthe steer-
ing wheel to select the Settings menu.
X Press the :or9 button to select the
Heating submenu.
X Press the abutton to confirm.
You will see the selected setting.
X Press the abutton to confirm.
X Press the :or9 button to select
one of the three departure times or Timeroff (no timer active).
X Press the abutton to confirm.
When a departure time is selected, the yel-
low indicator lamp lights up on the auxiliary
heating button. Changing the departure time
X
Press the =or; button on the steer-
ing wheel to select the Settings menu.
X Press the :or9 button to select the
Heating submenu.
X Press the abutton to confirm.
You will see the selected setting.
X Press the abutton to confirm.
X Press the :or9 button to select
Change A ,
B or
C .
X Press the abutton to confirm.
You can now change the departure time.
X Press the =or; button to select the
display to be changed: hours, minutes.
X Press the :or9 button to set the
selected display.
X Press the abutton to store the entry.
The yellow indicator lamp on the auxiliary
heating button lights up.
Convenience Activating/deactivating the EASY-
ENTRY/EXIT feature
You can use the
Easy Entry/Exit: function
to activate or deactivate the EASY ENTRY/
EXIT feature (Y page 115). G
WARNING
The steering wheel moves when the EASY-
ENTRY/EXIT feature is active. There is a risk
of occupants becoming trapped. Before acti-
vating the EASY-ENTRY/EXIT feature, make
sure that nobody can become trapped.
Do not leave children unsupervised in the
vehicle, even if they are secured in a child
restraint system. The children could open the
driver's door and thereby unintentionally acti-
vate the EASY-ENTRY/EXIT feature and
become trapped.
X Press the =or; button on the steer-
ing wheel to select the Settings menu.
X Press the :or9 button to select the
Convenience submenu.248
Menus and submenusOn-board computer and displays
Page 267 of 409
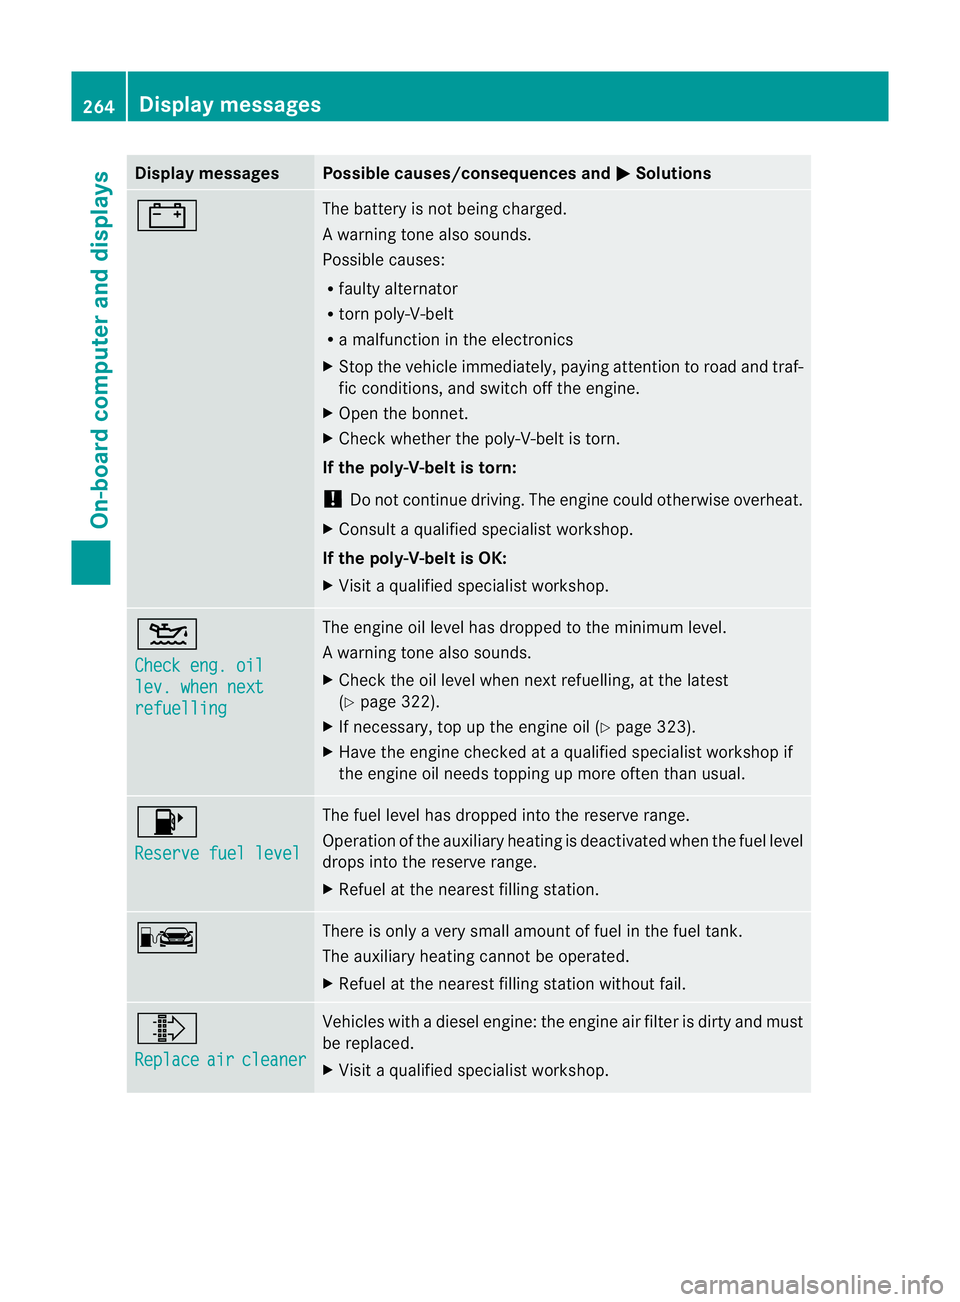
Display messages Possible causes/consequences and
M Solutions
# The battery is no
tbeing charged.
Aw arning tone also sounds.
Possible causes:
R faulty alternator
R torn poly-V-belt
R a malfunction in the electronics
X Stop the vehicle immediately, paying attentio ntoroad and traf-
fic conditions, and switch off the engine.
X Open the bonnet.
X Check whether the poly-V-belt is torn.
If the poly-V-belt is torn:
! Do not continue driving. The engine could otherwise overheat.
X Consult a qualified specialist workshop.
If the poly-V-belt is OK:
X Visit a qualified specialist workshop. 4
Check eng. oil
lev. when next
refuelling The engine oil level has dropped to the minimum level.
Aw
arning tone also sounds.
X Chec kthe oil level when next refuelling, at the latest
(Y page 322).
X If necessary, top up the engine oil (Y page 323).
X Have the engine checked at a qualified specialist workshop if
the engine oil needs topping up more often than usual. 8
Reserve fuel level The fuel level has dropped into the reserve range.
Operation of the auxiliary heating is deactivated when the fuel level
drops into the reserve range.
X
Refuel at the nearest filling station. C There is only a very small amount of fuel in the fuel tank.
The auxiliary heating cannot be operated.
X
Refuel at the nearest filling station without fail. ¸
Replace
air cleaner Vehicles with a diesel engine: the engine air filter is dirty and must
be replaced.
X
Visit a qualified specialist workshop. 264
Display messagesOn-board computer and displays
Page 278 of 409
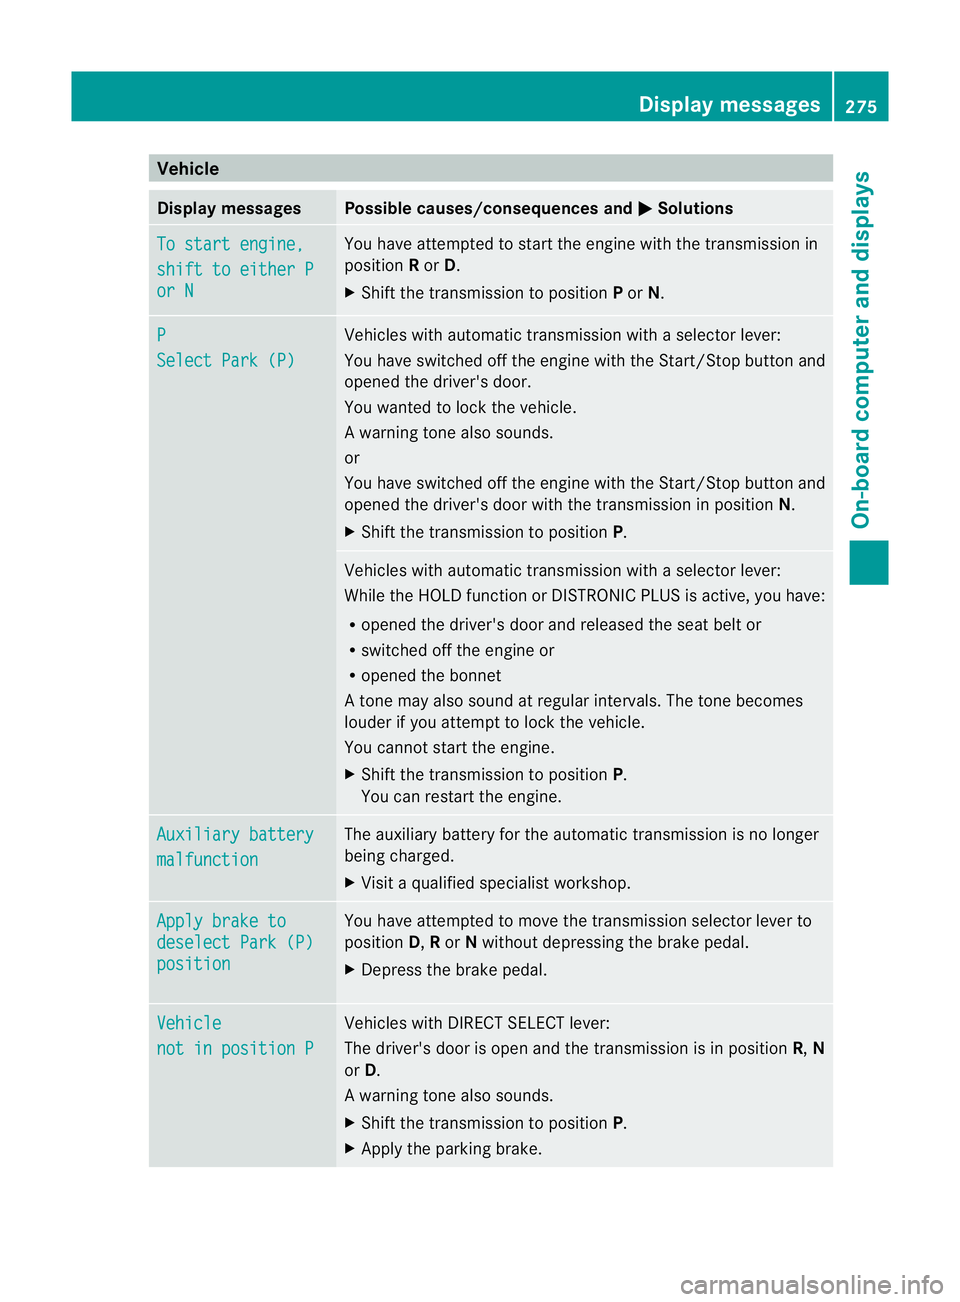
Vehicle
Display messages Possible causes/consequences and
M Solutions
To start engine,
shift to either P
or N You have attempted to start the engine with the transmission in
position
Ror D.
X Shift the transmission to position Por N. P
Select Park (P) Vehicles with automatic transmission with a selector lever:
You have switched off the engine with the Start/Stop button and
opened the driver's door.
You wanted to lock the vehicle.
Aw arning tone also sounds.
or
You have switched off the engine with the Start/Stop butto nand
opened the driver's door with the transmission in position N.
X Shift the transmission to position P. Vehicles with automatic transmission with a selecto
rlever:
While the HOLD function or DISTRONIC PLUS is active, you have:
R opened the driver's door and released the seat belt or
R switched off the engine or
R opened the bonnet
At one may also sound at regular intervals. The tone becomes
louder if you attempt to lock the vehicle.
You cannot start the engine.
X Shift the transmission to position P.
You can restart the engine. Auxiliary battery
malfunction The auxiliary battery for the automatic transmission is no longer
being charged.
X
Visit a qualified specialist workshop. Apply brake to
deselect Park (P)
position You have attempted to move the transmission selector lever to
position D,Ror Nwithout depressing the brake pedal.
X Depress the brake pedal. Vehicle
not in position P Vehicles with DIRECT SELECT lever:
The driver's door is open and the transmission is in position
R,N
or D.
Aw arning tone also sounds.
X Shift the transmission to position P.
X Apply the parking brake. Display messages
275On-board computer and displays Z