2011 MERCEDES-BENZ E-CLASS ESTATE battery
[x] Cancel search: batteryPage 280 of 409
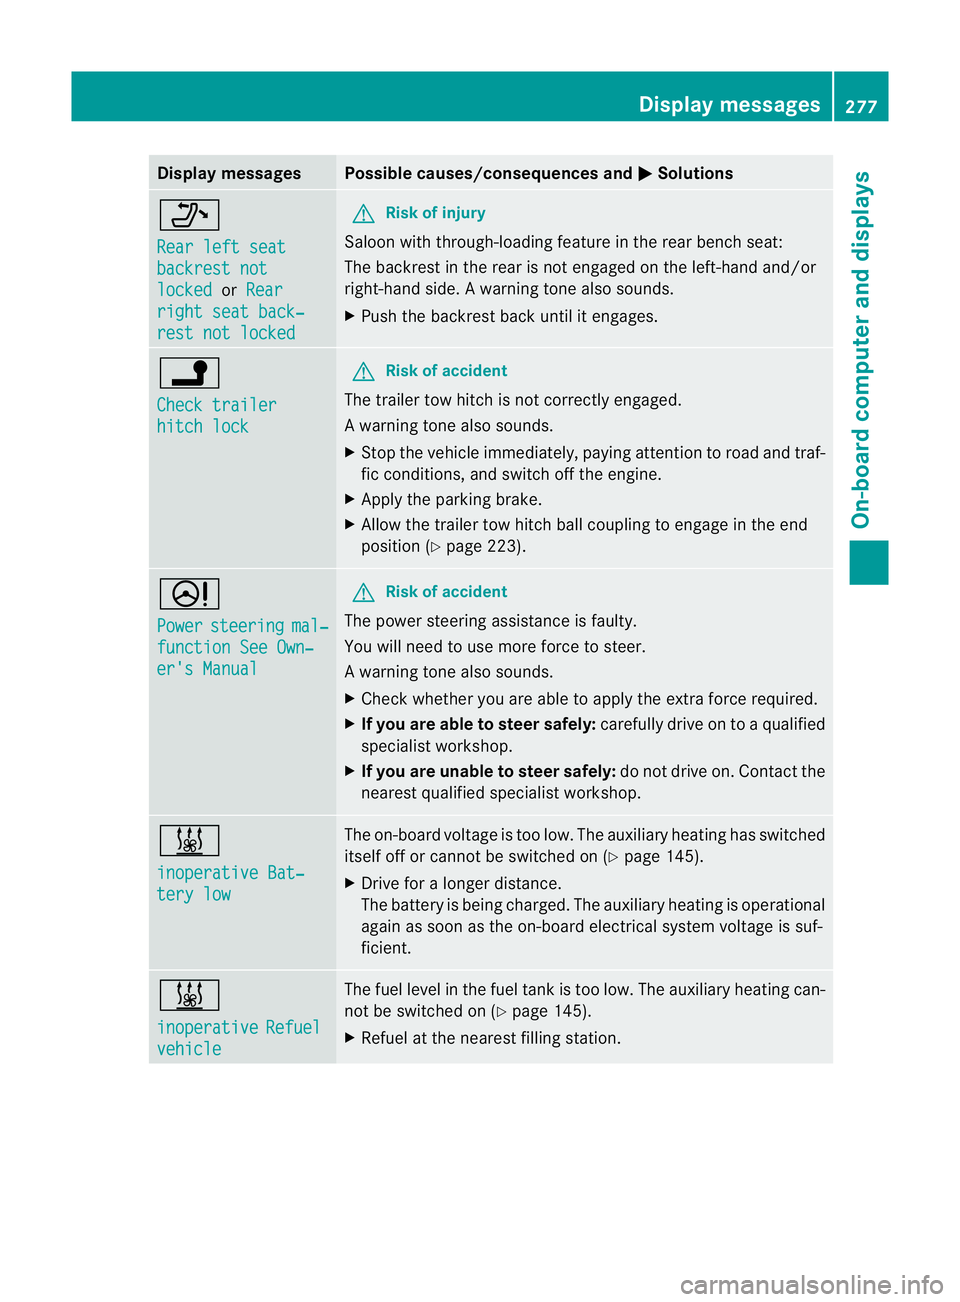
Display messages Possible causes/consequences and
M Solutions
_
Rear left seat
backrest not
locked or
Rear right seat back‐
rest not locked G
Risk of injury
Saloon with through-loading feature in the rear bench seat:
The backrest in the rear is no tengaged on the left-hand and/or
right-hand side .Awarning tone also sounds.
X Push the backres tback until it engages. j
Check trailer
hitch lock G
Ris
kofa ccident
The trailer tow hitch is no tcorrectly engaged.
Aw arning tone also sounds.
X Stop the vehicle immediately, paying attentio ntoroad and traf-
fic conditions, and switch off the engine.
X Apply the parking brake.
X Allow the trailer tow hitch ball coupling to engage in the end
position (Y page 223). D
Power
steering mal‐
function See Own‐
er's Manual G
Risk of accident
The power steering assistance is faulty.
You will need to use more force to steer.
Aw arning tone also sounds.
X Chec kwhether you are able to apply the extra force required.
X If you are able to steer safely: carefully drive on to a qualified
specialist workshop.
X If you are unable to steer safely: do not drive on. Contact the
nearest qualified specialist workshop. &
inoperative Bat‐
tery low The on-board voltage is too low. The auxiliary heating has switched
itself off or cannot be switched on (Y page 145).
X Drive for a longer distance.
The battery is being charged. The auxiliary heating is operational
again as soon as the on-board electrical system voltage is suf-
ficient. &
inoperative
Refuel
vehicle The fuel level in the fuel tank is too low. The auxiliary heating can-
not be switched on (Y page 145).
X Refuel at the nearest filling station. Display messages
277On-board computer and displays Z
Page 314 of 409
X
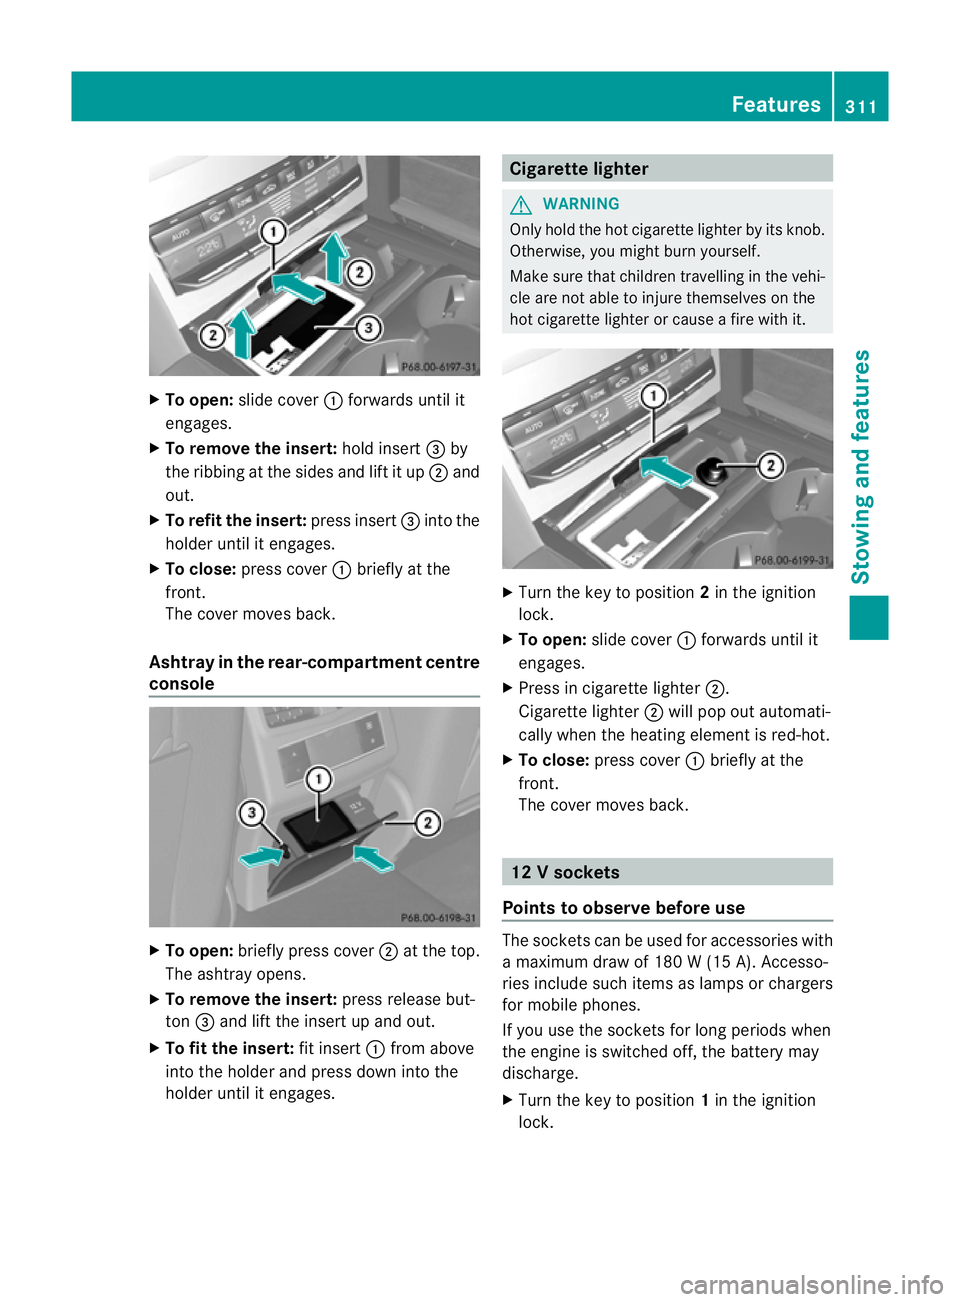
To open: slide cover :forwards until it
engages.
X To remove the insert: hold insert=by
the ribbing at the sides and lift it up ;and
out.
X To refi tthe insert: press insert =into the
holder until it engages.
X To close: press cover :briefly at the
front.
The cover moves back.
Ashtray in the rear-compartment centre
console X
To open: briefly press cover ;at the top.
The ashtray opens.
X To remove the insert: press release but-
ton =and lift the insert up and out.
X To fit the insert: fit insert:from above
into the holder and press dow ninto the
holde runtil it engages. Cigarette lighter
G
WARNING
Only hold the hot cigarette lighte rby its knob.
Otherwise, you might burn yourself.
Make sure that children travelling in the vehi-
cle are no table to injure themselves on the
hot cigarette lighter or cause a fire with it. X
Turn the key to position 2in the ignition
lock.
X To open: slide cover :forwards until it
engages.
X Press in cigarette lighter ;.
Cigarette lighter ;will pop out automati-
cally when the heating element is red-hot.
X To close: press cover :briefly at the
front.
The cover moves back. 12
Vsockets
Points to observe before use The sockets can be used for accessories with
a maximum draw of 180 W (15 A). Accesso-
ries include such items as lamps or chargers
for mobile phones.
If you use the sockets for long periods when
the engine is switched off
,the battery may
discharge.
X Turn the key to position 1in the ignition
lock. Features
311Stowing and features Z
Page 328 of 409
The washer fluid reservoir is used for both the
windscreen washer system and the headlamp
cleaning system.
For further information on windscreen
washer fluid/antifreeze (Y page 391).Maintenance
ASSYST PLUS service interval display
Service messages Information on the type of service and service
intervals (see separate Service Booklet).
You can obtain further information from a
Mercedes-Benz Service Centre.
The ASSYST PLUS service interval display
informs you when the next service is due.
If a service due date has been exceeded, you
also hear an acoustic signal.
The multifunction display shows a service
message for a few seconds, e.g.
Next service A due in .. days Service A due
Service A overdue by ... days
The letter indicates which service is due.
Astands for a minor service and
B for a major
service. A number or another letter may be
displayed after the letter .This figure indicates
any necessary additional maintenance work
to be performed.
If you report this displayed information to a
qualified specialist workshop, for example a
Mercedes-Benz Service Centre, they can
inform you of the costs the service will incur.
The ASSYST PLUS service interval display
does not take into account any periods of
time during which the battery is disconnec-
ted. Maintaining the time-dependent service
schedule:
X
Note down the service due date displayed
in the multifunction display before discon-
necting the battery.
or
X Subtract the battery disconnection periods
from the service date shown on the display
after reconnecting the battery.
i The ASSYST PLUS service interval display
does not show any information on the
engine oil level. Observe the notes on the
engine oil level (Y page 322).
Hiding aservice message X
Press the %ora button on the steer-
ing wheel.
Displaying service messages X
Switch on the ignition.
X Press =or; on the steering wheel
to selec tthe Serv. menu.
X Press 9or: to select the ASSYST PLUS submenu and press
ato confirm.
The service due date appears in the multi-
function display.
Points to remember Resetting the ASSYST PLUS service inter-
val display
Aq
ualified specialist workshop, e.g. a
Mercedes-Ben zService Centre, will reset the
ASSYST PLUS service interval display after
the necessary service work has been carried
out.
You can obtain further information, e.g.
regarding service work, from a Mercedes-
Benz Service Centre or directly from
Mercedes-Benz.
! If the ASSYST PLUS service interval dis-
play has been inadvertently reset, this set- Maintenance
325Maintenance and care Z
Page 331 of 409
X
Rinse the vehicle with clean water and dry
thoroughly with a chamois.
X Do not let the cleaning agent dry on the
paintwork.
Whe nusing the vehicle in winter, remove all
traces of road salt deposits carefully and as
soon as possible.
High-pressure cleaning equipment G
WARNING
Do not use high-pressure cleaners with circu-
lar-jet nozzles (dirt grinders) to clean your
vehicle, in particular the tyres. You could oth-
erwise damage the tyres and cause an acci-
dent.
! Always maintain a distance of at least
30 cm between the vehicle and the high-
pressure cleaner nozzle. Information about
the correct distance is available from the
equipment manufacturer.
Move the high-pressure cleaner nozzle
around when cleaning your vehicle.
Do not aim directly at any of the following:
R tyres
R door gaps, roof gaps, joints etc.
R electrical components
R battery
R connectors
R lights
R seals
R trim elements
R ventilation slots
Damaged seals or electrical components
can lead to leaks or failures.
Cleaning the wheels !
Do not use acidic wheel cleaning products
to remove brake dust. This could damage
wheel bolts and brake components.
! Do not park up the vehicle for an extended
period straight after cleaning it, particularly
after having cleaned the wheels with wheel cleaner. Wheel cleaners could cause
increased corrosion of the brake discs and
brake pads/linings. For this reason, you
should drive for a few minutes after clean-
ing. Braking heats the brake discs and the
brake pads/linings, thus drying them. The
vehicle can then be parked up.
Cleaning the paintwork Scratches, corrosive deposits, areas affected
by corrosion and damage caused by inade-
quate care cannot always be completely
repaired. In such cases, visit a qualified spe-
cialist workshop.
X
Remove impurities immediately,w here
possible, whilst avoiding rubbing too hard.
X Soak insect remains with insect remover
and rinse off the treated areas afterwards.
X Soak bird droppings with water and rinse
off the treated areas afterwards.
X Remove coolant, brake fluid, tree resin,
oils, fuels and greases by rubbing gently
with a cloth soaked in petroleum ether or
lighter fluid.
X Use tar remover to remove tar stains.
X Use silicone remover to remove wax.
! Do not affix:
R stickers
R films
R magnetic plates or similar items
to painted surfaces. You could otherwise
damage the paintwork.
Care and treatment of matt paintwork If your vehicle has a clear matt finish, observe
the following instructions in order to avoid
damage to the paintwork due to incorrect
care.
These notes also apply to light-alloy wheels
with a clear matt finish.
!
Never polish the vehicle or the light alloy
wheels. Polishing makes the paintwork
shiny. 328
CareMaintenance and care
Page 338 of 409
Useful information
............................336
Where will I find...? ...........................336
Flat tyre ............................................. 340
Battery ............................................... 350
Jump-starting .................................... 354
Towing and tow-starting ..................355
Electrical fuses ................................. 359 335Breakdown assistance
Page 353 of 409
G
WARNING
When driving in emergency mode, the driving
characteristics deteriorate, e.g. when corner-
ing, accelerating quickly and when braking.
There is a risk of accident.
Do not exceed the stated maximu mspeed.
Avoid abrupt steering and driving manoeu-
vres, and driving over obstacles (kerbs, pot-
holes, off-road). This applies in particular to a
laden vehicle.
Stop driving in emergency mode if:
R you hear banging noises.
R the vehicle starts to shake.
R you see smoke and smell rubber.
R ESP ®
is intervening constantly.
R there are tears in the sidewalls of the tyre.
After driving in emergency mode, have the
wheel rims checked at a qualified specialist
workshop with regard to their further use. The
faulty tyre must be replaced.
i When replacing one or all tyres, make
sure that you only use tyres marked
MOExtended. Also ensure that they are of
the specified size for the vehicle.
i Vehicles with MOExtended tyres are not
equipped with a TIREFIT kit at the factory.
It is therefore recommended that you addi-
tionally equip your vehicle with a TIREFIT kit
if you fit tyres that do not feature run-flat
characteristics, e.g. winter tyres. A TIREFIT
kit can be obtained from a qualified spe-
cialist workshop. Battery
Important safety notes
In order for the battery to achieve the maxi-
mum possible service life, it must always be
sufficiently charged.
Have the battery charge checked more fre-
quently if you use the vehicle mainly for short
trips or if you leave it standing idle for a
lengthy period. Only replace a battery with a battery that has
been recommended by Mercedes-Benz.
Consult a qualified specialist workshop if you
wish to leave your vehicle parked up for a long
period of time. G
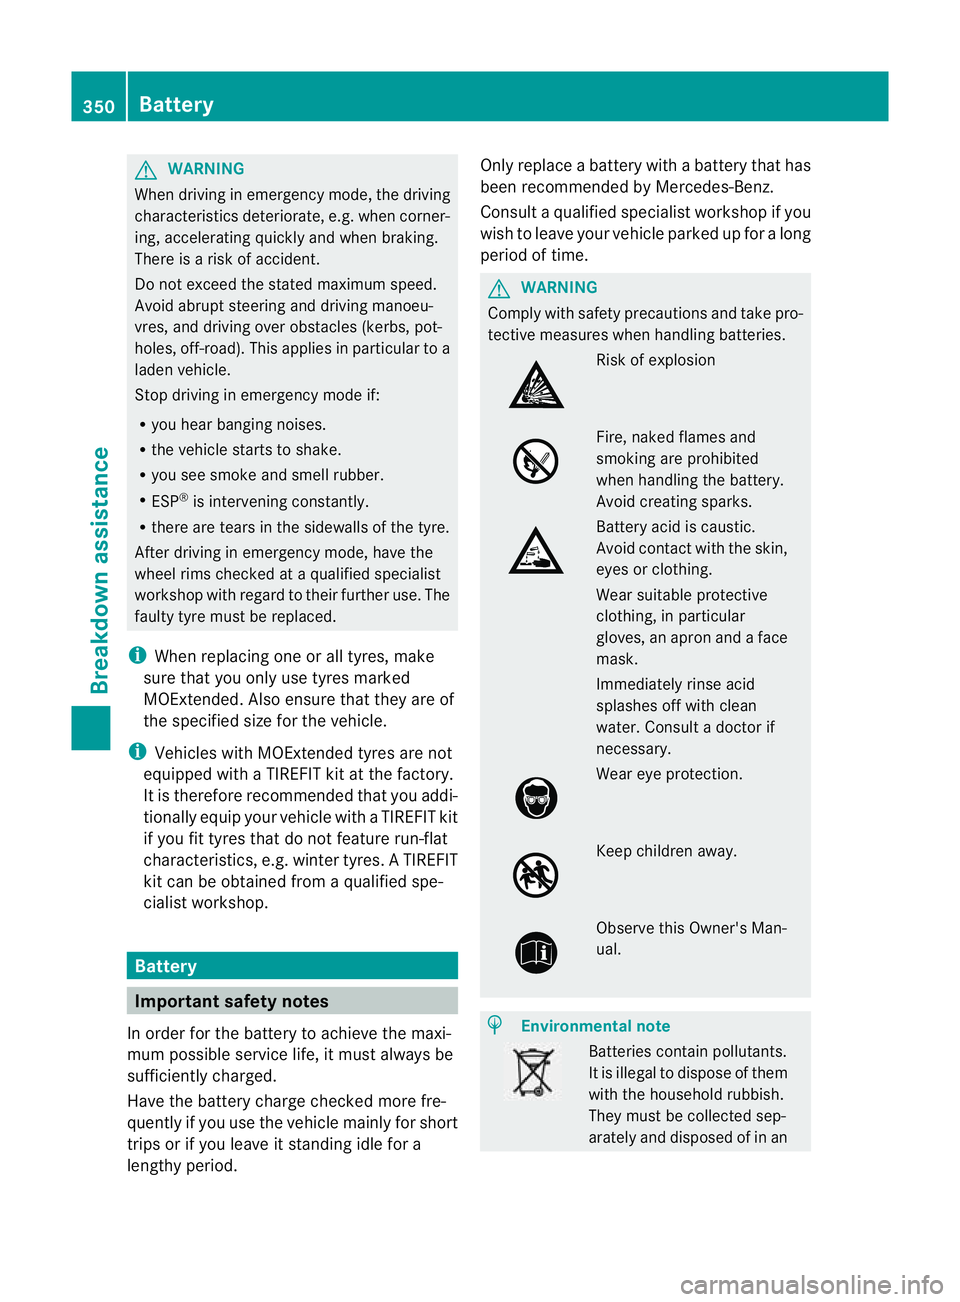
WARNING
Comply with safety precautions and take pro-
tective measures when handling batteries. Risk of explosion
Fire, naked flames and
smoking are prohibited
when handling the battery.
Avoid creating sparks.
Battery acid is caustic.
Avoid contact with the skin,
eyes or clothing.
Wear suitable protective
clothing, in particular
gloves, an apron and a face
mask.
Immediately rinse acid
splashes off with clean
water. Consult a doctor if
necessary.
Wear eye protection.
Keep children away.
Observe this Owner's Man-
ual.
H
Environmental note Batteries contain pollutants.
It is illegal to dispose of them
with the household rubbish.
They must be collected sep-
arately and disposed of in an 350
BatteryBreakdown assistance
Page 354 of 409
environmentally responsible
recycling system.
Dispose of batteries in an
environmentally responsible
manner. Take discharged
batteries to a qualified spe-
cialist workshop or to a col-
lection point for used batter-
ies.
G
WARNING
For safety reasons, Mercedes-Benz recom-
mends that you only use batteries which have
been tested and approved for your vehicle by
Mercedes-Benz .These batteries provide
increased impact protection to prevent vehi-
cle occupants from suffering acid burns
should the battery be damaged in the event
of an accident.
To prevent acid burns, observe the following
safety notes when handling batteries:
R do not lean over the battery.
R do not place any metal objects on a battery.
Otherwise, you could cause a short circuit
and the battery's gas mixture could ignite.
R make sure that you do not create an elec-
trostatic charge, e.g. by wearing synthetic
clothing or as a result of friction on fabrics.
Therefore, you should not pull or slide the
battery over carpets or other synthetic
materials.
R never touch the battery first. To discharge
a possible electrostatic charge, step out of
the vehicle first and touch the bodywork.
R do not wipe the battery using a cloth. The
battery may explode as a result of electro-
static charge or due to flying sparks.
! Switch off the engine and remove the key
before disconnecting the terminal clamps
from the battery. On vehicles with KEY-
LESS-GO, make sure that the ignition is
switched off. Check that all the indicator
lamps in the instrumentc luster are off.You
may otherwise destroy electronic compo-
nents, such as the alternator. i
When you park the vehicle, remove the
key if you do not require any electrical con-
sumers. The vehicle will then use very little
energy, thus conserving battery power.
Mercedes-Benz recommends that you do not
carry out work on batteries yourself, e.g.
removing or charging. Have this work per-
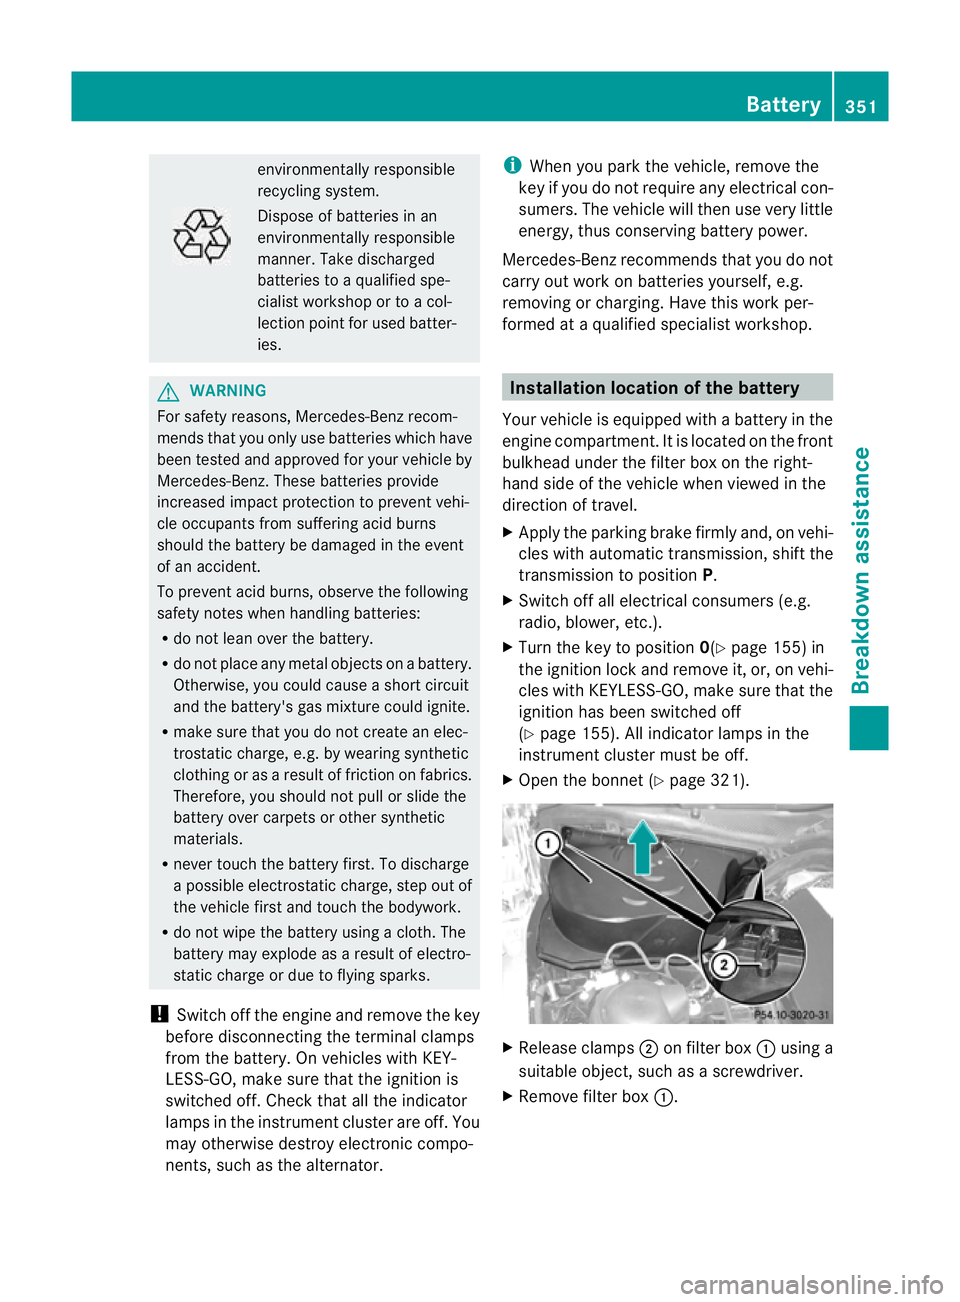
formed at a qualified specialist workshop. Installation location of the battery
Your vehicle is equipped with a battery in the
engine compartment.Iti s located on the front
bulkhead under the filter box on the right-
hand side of the vehicle when viewed in the
direction of travel.
X Apply the parking brake firmly and, on vehi-
cles with automatic transmission, shift the
transmission to position P.
X Switch off all electrical consumers (e.g.
radio, blower, etc.).
X Turn the key to position 0(Ypage 155) in
the ignition lock and remove it, or, on vehi-
cles with KEYLESS-GO, make sure that the
ignition has been switched off
(Y page 155). All indicator lamps in the
instrument cluster must be off.
X Open the bonnet (Y page 321). X
Release clamps ;on filter box :using a
suitable object, such as a screwdriver.
X Remove filter box :. Battery
351Breakdown assistance Z
Page 355 of 409
Disconnecting the battery
! Always disconnec tthe battery in
the order described below. Never swap the
terminal clamps. You may otherwise dam-
age the vehicle electronics.
In vehicles with automatic transmission,
the transmission is locked in position P
after disconnecting the battery. The vehicle
is secured against rolling away.Y ou can
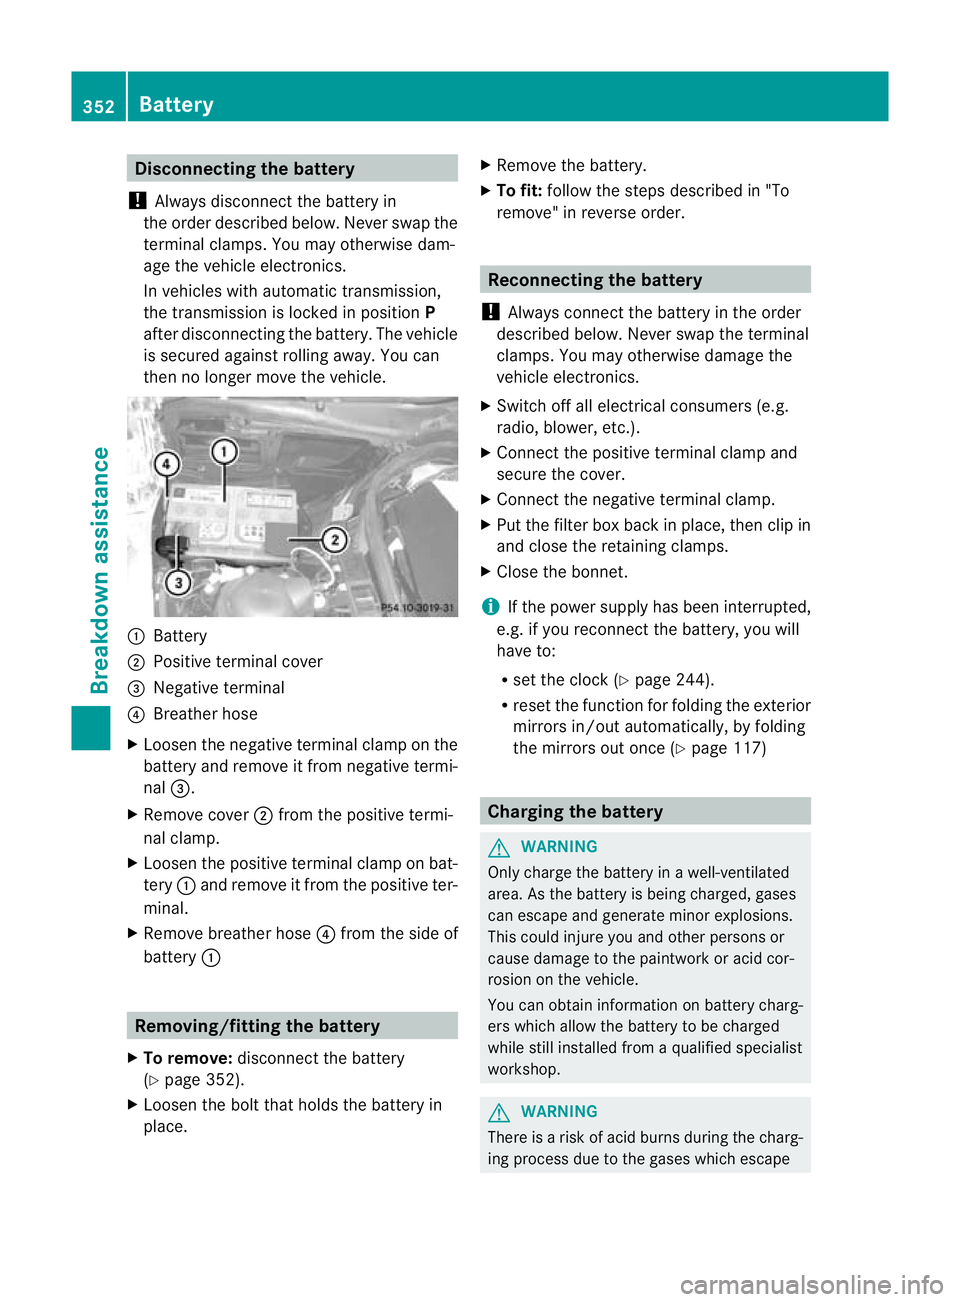
then no longer move the vehicle. :
Battery
; Positive terminal cover
= Negative terminal
? Breather hose
X Loosen the negative terminal clamp on the
battery and remove it from negative termi-
nal =.
X Remove cover ;from the positive termi-
nal clamp.
X Loosen the positive terminal clamp on bat-
tery :and remove it from the positive ter-
minal.
X Remove breather hose ?from the side of
battery : Removing/fitting the battery
X To remove: disconnect the battery
(Y page 352).
X Loosen the bolt that holds the battery in
place. X
Remove the battery.
X To fit: follow the steps described in "To
remove" in reverse order. Reconnecting the battery
! Always connect the battery in the order
described below. Never swap the terminal
clamps. You may otherwise damage the
vehicle electronics.
X Switch off all electrical consumers (e.g.
radio, blower, etc.).
X Connect the positive terminal clamp and
secure the cover.
X Connect the negative terminal clamp.
X Put the filter box back in place, then clip in
and close the retaining clamps.
X Close the bonnet.
i If the power supply has been interrupted,
e.g. if you reconnect the battery, you will
have to:
R set the clock (Y page 244).
R reset the function for folding the exterior
mirrors in/out automatically, by folding
the mirrors out once (Y page 117) Charging the battery
G
WARNING
Only charge the battery in a well-ventilated
area. As the battery is being charged, gases
can escape and generate minor explosions.
This could injure you and other persons or
cause damage to the paintwork or acid cor-
rosion on the vehicle.
You can obtain information on battery charg-
ers which allow the battery to be charged
while still installed from a qualified specialist
workshop. G
WARNING
There is a risk of acid burns during the charg-
ing process due to the gases which escape 352
BatteryBreakdown assistance