2011 MERCEDES-BENZ E-CLASS ESTATE coolant
[x] Cancel search: coolantPage 233 of 409
Useful information
i This Owner's Manual describes all models
and all standard and optional equipment
available to your vehicle at the time of pub-
lication of the Owner's Manual. Country-
specific deviations are possible. Please
note that your vehicle may not be equipped
with all features described. This also
applies to safety-relevan tsystems and
functions.
i Please read the information on qualified
specialist workshops (Y page 25).Important safety notes
You will find an illustration of the instrument
cluster in the "At a glance" section
(Y page 30). G
WARNING
Only use the on-board computer when road
and traffic conditions permit .You would oth-
erwise be distracted and unable to concen-
trate properly on driving, and could cause an
accident. G
WARNING
No messages will be displayed if either the
instrument cluster or the multifunction dis-
play is inoperative.
As a result, you will not be able to see infor-
mation about your driving conditions, such as
speed, outside temperature, warning and indi-
cator lamps, display messages or system fail-
ures. Driving characteristics may be impaired.
Adjust your driving style and vehicle speed
accordingly.
Contact a qualified specialist workshop
immediately. G
WARNING
The on-board computer only records and dis-
plays malfunctions and warnings from certain
systems. For this reason, you should always make sure that your vehicle is safe to use. You
could otherwise cause an accident by driving
an unsafe vehicle.
G
WARNING
The operating safety of your vehicle could be
impaired if maintenance work is carried out
incorrectly. This could cause you to lose con-
trol of your vehicle and cause an accident.
Moreover, the safety systems may no longer
be able to protect you or others as they are
designed to do.
Always have service work carried out at a
qualified specialist workshop. Displays and operation
Coolant temperature gauge
The coolant temperature gauge is in the
instrument cluster on the right-hand side.
The reading may rise up to 120 †undernor-
mal driving conditions if the coolant has been
filled correctly.
At high outside temperatures and when driv-
ing uphill, the coolant temperature may rise
to the end of the scale. Rev counter
The red band in the rev counter indicates the
engine's overrevving range.
! Do not drive in the overrevving range.
Doing so will damage the engine.
The fuel supply is interrupted to protec tthe
engine when the red band is reached. Outside temperature display
The outside temperature displayi s in the mul-
tifunction display (Y page 232). G
WARNING
At temperatures just above freezing point, the
street may be icy, especially in wooded areas 230
Displays and operationOn-board computer and displays
Page 253 of 409
=
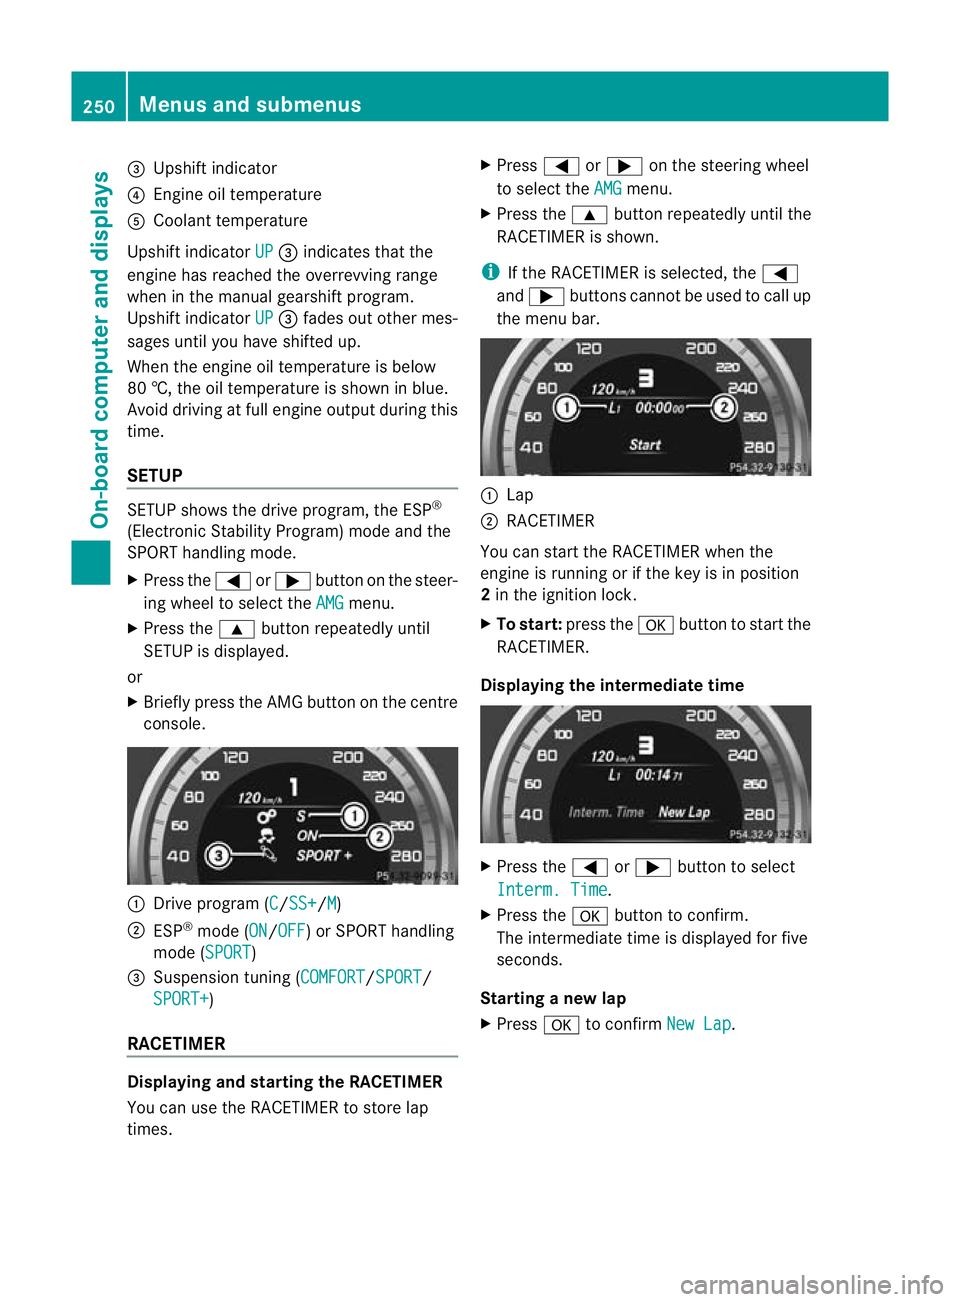
Upshift indicator
? Engine oil temperature
A Coolant temperature
Upshift indicator UP =
indicates that the
engine has reached the overrevving range
when in the manual gearshift program.
Upshift indicator UP =
fades out other mes-
sages until you have shifted up.
When the engine oil temperature is below
80 †, the oil temperature is shown in blue.
Avoid driving at full engine output during this
time.
SETUP SETUP shows the drive program, the ESP
®
(Electronic Stability Program) mode and the
SPORT handling mode.
X Press the =or; button on the steer-
ing wheel to select the AMG menu.
X Press the 9button repeatedly until
SETUP is displayed.
or
X Briefly press the AMG button on the centre
console. :
Drive program (C /SS+ /M )
; ESP ®
mode (ON /OFF ) or SPORT handling
mode (SPORT )
3 Suspension tuning (COMFORT /SPORT /
SPORT+ )
RACETIMER Displaying and starting the RACETIMER
You can use the RACETIMER to store lap
times. X
Press =or; on the steering wheel
to select the AMG menu.
X Press the 9button repeatedly until the
RACETIMER is shown.
i If the RACETIMER is selected, the =
and ; buttons cannot be used to call up
the menu bar. :
Lap
; RACETIMER
You can start the RACETIMER when the
engine is running or if the key is in position
2 in the ignition lock.
X To start: press the abutton to start the
RACETIMER.
Displaying the intermediate time X
Press the =or; button to select
Interm. Time .
X Press the abutton to confirm.
The intermediate time is displayed for five
seconds.
Starting a new lap
X Press ato confirm New Lap .250
Menus and submenusOn-board computer and displays
Page 266 of 409
Engine
Display messages Possible causes/consequences and
M Solutions
+
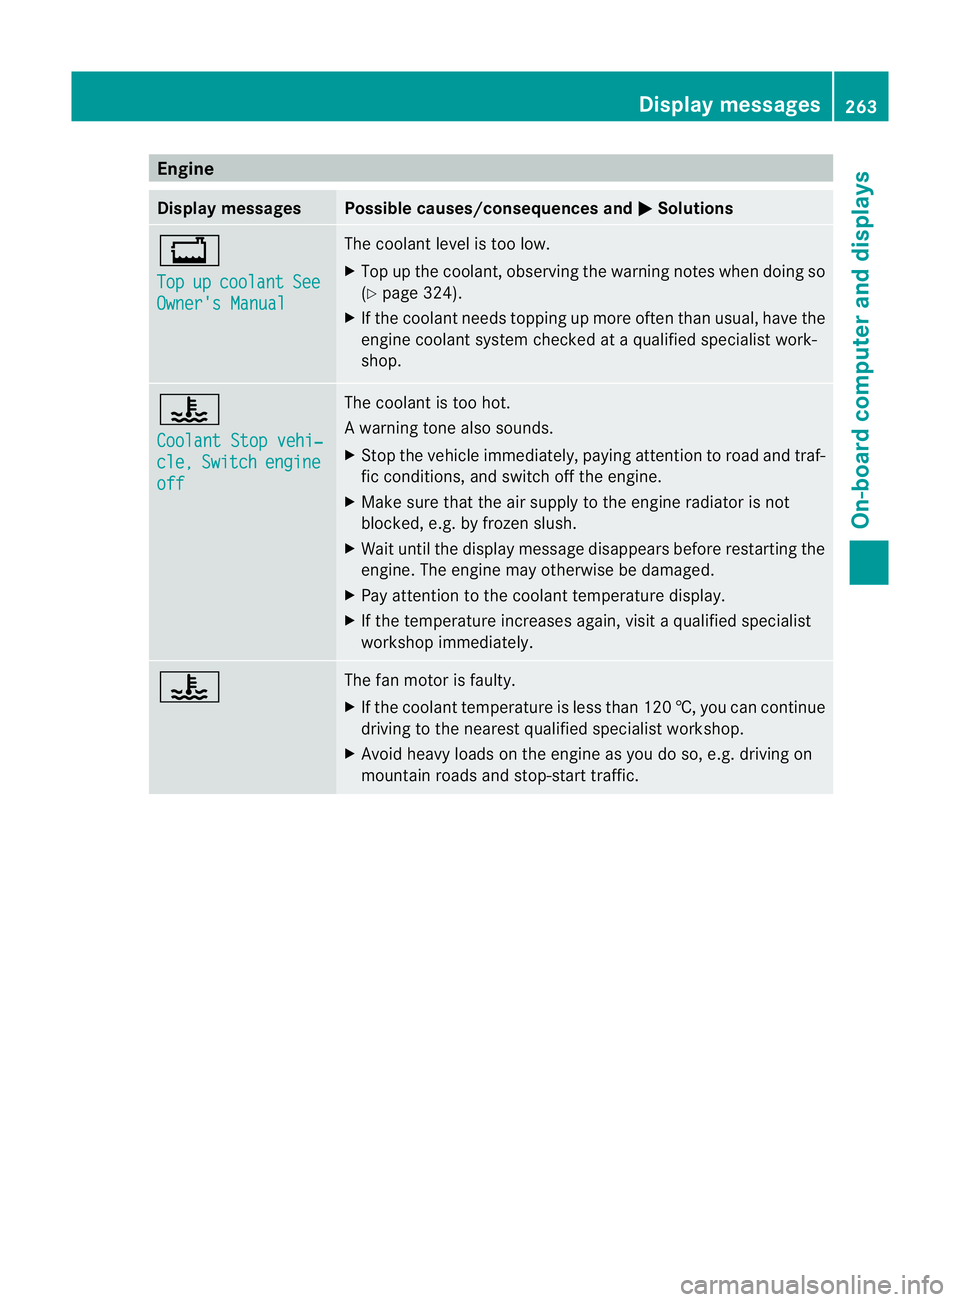
Top
up coolant See
Owner's Manual The coolant level is too low.
X
Top up the coolant, observing the warning notes when doing so
(Y page 324).
X If the coolant needs topping up more often than usual, have the
engine coolant system checked at a qualified specialist work-
shop. ?
Coolant Stop vehi‐
cle, Switch engine
off The coolant is too hot.
Aw
arning tone also sounds.
X Stop the vehicle immediately, paying attentio ntoroad and traf-
fic conditions, and switch off the engine.
X Make sure that the air supply to the engine radiator is not
blocked, e.g. by frozen slush.
X Wait until the display message disappears before restarting the
engine. The engine may otherwise be damaged.
X Pay attention to the coolant temperature display.
X If the temperature increases again, visit a qualified specialist
workshop immediately. ? The fan motor is faulty.
X
If the coolant temperature is less than 120 †, you can continue
driving to the nearest qualified specialist workshop.
X Avoid heavy loads on the engine as you do so, e.g. driving on
mountain roads and stop-start traffic. Display messages
263On-board computer and displays Z
Page 288 of 409
Engine
Problem Possible causes/consequences and
M Solutions
;
The yellow engine diag-
nostics warning lamp
lights up while the
engine is running.
There may be a fault, for example:
R in the engine management
R in the fuel injection system
R in the exhaust system
R in the ignition system (for vehicles with petrol engines)
R in the fuel system
The emission limit values may be exceeded and the engin emay
be running in emergency mode.
X Have the vehicle checked as soon as possible at a qualified
specialist workshop. Vehicles with a diesel engine: the fuel tan
khas been run dry
(Y page 175).
X Start the engine three to four times after refuelling.
If the yellow engine diagnostics warning lamp goes out, emer-
gency running mode is cancelled. The vehicle need no tbe
checked. 8
The yellow reserve fuel
warning lamp lights up
while the engine is run-
ning.
The fuel level has dropped into the reserve range.
Operation of the auxiliary heating is deactivated when the fuel level
drops into the reserve range.
X
Refuel at the nearest filling station. ?
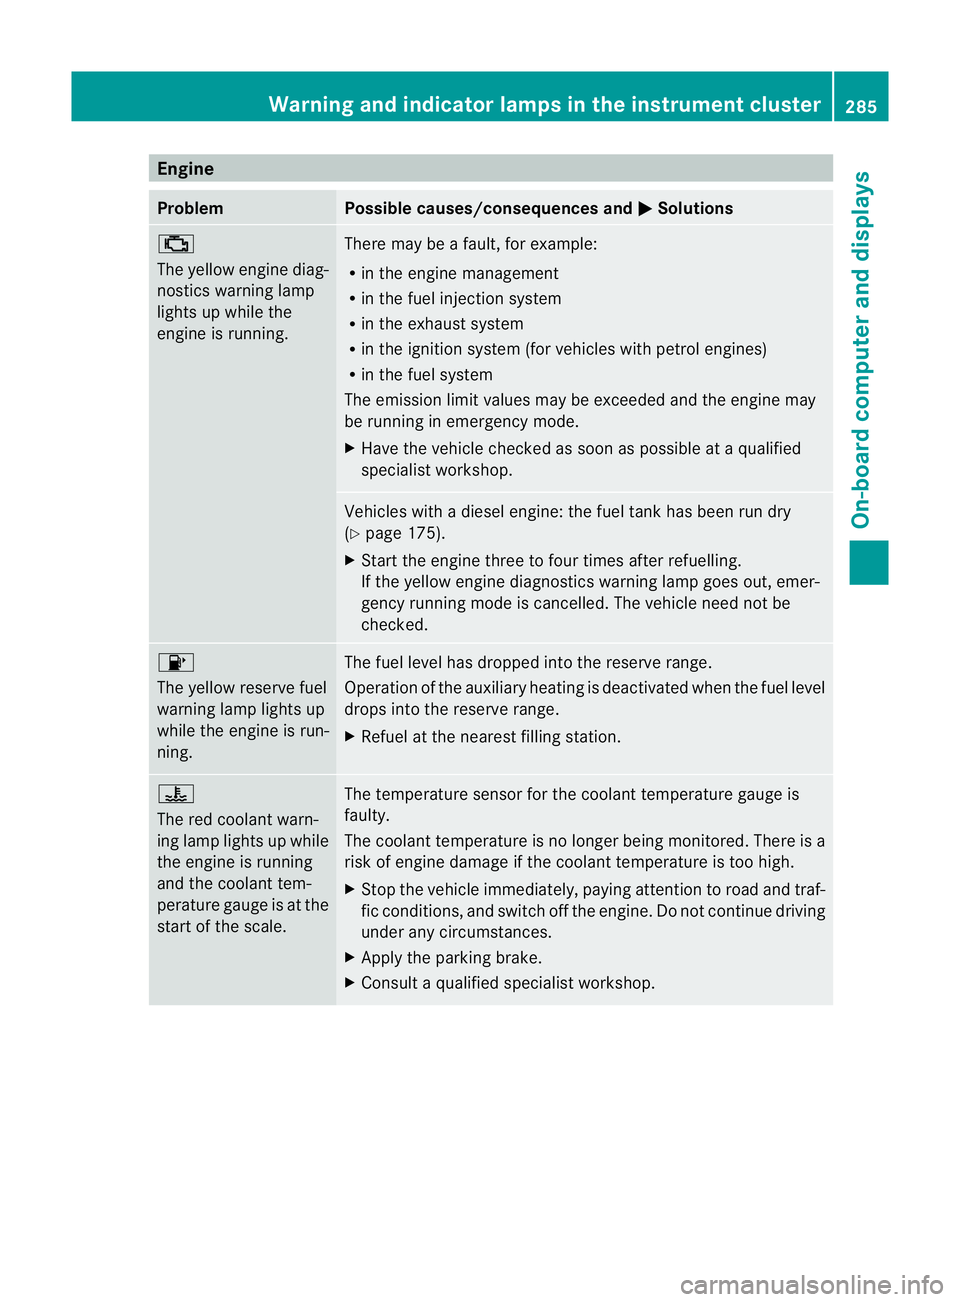
The red coolant warn-
ing lamp lights up while
the engine is running
and the coolant tem-
perature gauge is at the
star toft he scale. The temperature sensor for the coolant temperature gauge is
faulty.
The coolant temperature is no longer being monitored. There is a
risk of engine damage if the coolant temperature is too high.
X Stop the vehicle immediately, paying attention to road and traf-
fic conditions, and switch off the engine. Do not continue driving
under any circumstances.
X Apply the parking brake.
X Consult a qualified specialist workshop. Warning and indicator lamps in the instrument cluster
285On-board computer and displays Z
Page 289 of 409
Problem Possible causes/consequences and
M Solutions
?
The red coolant warn-
ing lamp comes on
while the engine is run-
ning.
The coolant level is too low.
If the coolant level is correct, the airflow to the engine radiator
may be blocked or the electric engine radiator fan may be mal-
functioning.
The coolant is too hot and the engine is no longer being cooled
sufficiently.
X
Observe the additional display messages in the multifunction
display.
X Stop the vehicle immediately, paying attention to road and traf-
fic conditions, and switch off the engine.
X Let the engine and coolant cool down.
X Check the coolant level and top up the coolant (Y page 324).
Observe the warning notes as you do so.
X If you have to top up the coolant frequently, have the engine
cooling system checked.
X Make sure that the air supply to the engine radiator is not
blocked, e.g. by frozen slush.
X If the coolant temperature is less than 120 †, you can continue
driving to the nearest qualified specialist workshop.
X Avoid heavy loads on the engine as you do so, e.g. driving on
mountain roads and stop-start traffic. ?
The red coolant warn-
ing lamp comes on
while the engine is run-
ning. A warning tone
also sounds.
The coolant temperature has exceeded 120 †. The airflow to the
engine radiator may be blocked or the coolant level may be too
low.
The engine is not being cooled sufficiently and may be damaged.
X Observe the additional display messages in the multifunction
display.
X Stop the vehicle immediately, paying attention to road and traf-
fic conditions, and switch off the engine.
X Let the engine and coolant cool down.
X Check the coolant level and top up the coolant (Y page 324).
Observe the warning notes as you do so.
X If you have to top up the coolant frequently, have the engine
cooling system checked.
X Make sure that the air supply to the engine radiator is not
blocked, e.g. by frozen slush.
X If the coolant temperature is less than 120 †, you can continue
driving to the nearest qualified specialist workshop.
X Avoid heavy loads on the engine as you do so, e.g. driving on
mountain roads and stop-start traffic. 286
Warning and indicator lamps in the instrument clusterOn-board computer and displays
Page 327 of 409
X
Replace cap :on the filler neck and turn
clockwise.
Make sure that the cap locks into place
securely.
X Chec kthe oil level again with the oil dip-
stick (Y page 323).
Further information on engine oil
(Y page 388). Checking and adding other service
products
Checking the coolant level G
WARNING
The cooling system is pressurised. Therefore,
only unscrew the cap once the engine has
cooled down. The coolant temperature gauge
must display less than 70 †.Otherwise, you
could be scalded if hot coolant escapes. X
Park the vehicle on a level surface.
Only check the coolant level if the vehicle
is on a level surface and the engine has
cooled down.
X Turn the key to position 2in the ignition
lock (Y page 155).
On vehicles with KEYLESS-GO, press the
Start/Stop button twice (Y page 155).
X Check the coolant temperature display in
the instrument cluster.
The coolant temperature must be below
70 †.
X Turn the key to position 0(Ypage 155) in
the ignition lock. X
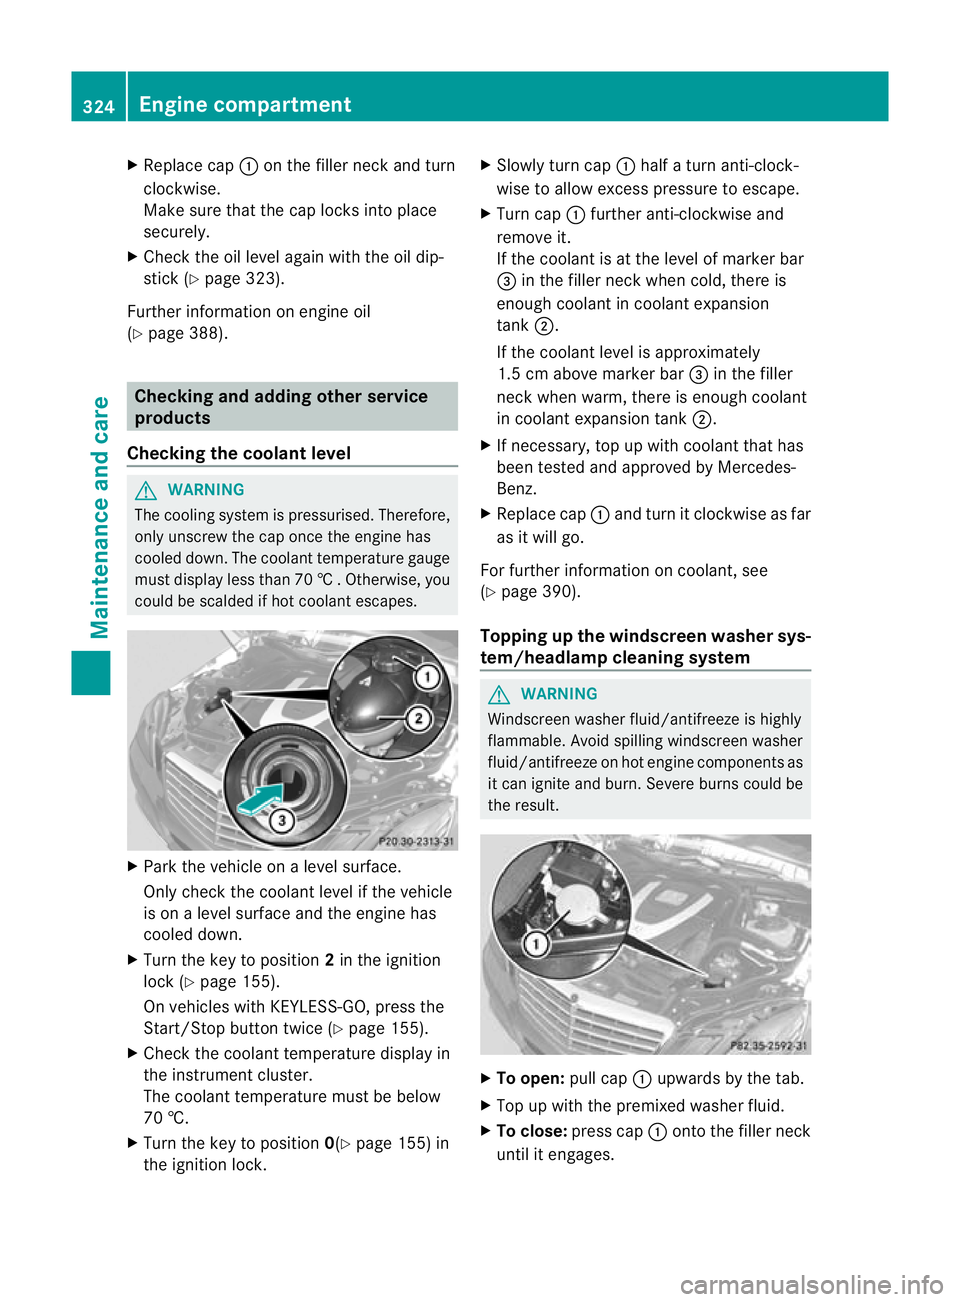
Slowly tur ncap : half a turn anti-clock-
wise to allow excess pressure to escape.
X Turn cap :further anti-clockwise and
remove it.
If the coolant is at the level of marker bar
= in the fille rneck when cold, there is
enough coolant in coolant expansion
tank ;.
If the coolant level is approximately
1.5 cm above marker bar =in the filler
neckw hen warm, there is enough coolant
in coolant expansion tank ;.
X If necessary, top up with coolant that has
been tested and approved by Mercedes-
Benz.
X Replace cap :and turn it clockwise as far
as it will go.
For further information on coolant, see
(Y page 390).
Topping up the windscreen washer sys-
tem/headlampc leaning system G
WARNING
Windscreen washer fluid/antifreeze is highly
flammable. Avoid spilling windscreen washer
fluid/antifreeze on hot engine components as
it can ignite and burn. Severe burns could be
the result. X
To open: pull cap:upwards by the tab.
X Top up with the premixed washer fluid.
X To close: press cap :onto the filler neck
until it engages. 324
Engine compartmentMaintenance and care
Page 331 of 409
X
Rinse the vehicle with clean water and dry
thoroughly with a chamois.
X Do not let the cleaning agent dry on the
paintwork.
Whe nusing the vehicle in winter, remove all
traces of road salt deposits carefully and as
soon as possible.
High-pressure cleaning equipment G
WARNING
Do not use high-pressure cleaners with circu-
lar-jet nozzles (dirt grinders) to clean your
vehicle, in particular the tyres. You could oth-
erwise damage the tyres and cause an acci-
dent.
! Always maintain a distance of at least
30 cm between the vehicle and the high-
pressure cleaner nozzle. Information about
the correct distance is available from the
equipment manufacturer.
Move the high-pressure cleaner nozzle
around when cleaning your vehicle.
Do not aim directly at any of the following:
R tyres
R door gaps, roof gaps, joints etc.
R electrical components
R battery
R connectors
R lights
R seals
R trim elements
R ventilation slots
Damaged seals or electrical components
can lead to leaks or failures.
Cleaning the wheels !
Do not use acidic wheel cleaning products
to remove brake dust. This could damage
wheel bolts and brake components.
! Do not park up the vehicle for an extended
period straight after cleaning it, particularly
after having cleaned the wheels with wheel cleaner. Wheel cleaners could cause
increased corrosion of the brake discs and
brake pads/linings. For this reason, you
should drive for a few minutes after clean-
ing. Braking heats the brake discs and the
brake pads/linings, thus drying them. The
vehicle can then be parked up.
Cleaning the paintwork Scratches, corrosive deposits, areas affected
by corrosion and damage caused by inade-
quate care cannot always be completely
repaired. In such cases, visit a qualified spe-
cialist workshop.
X
Remove impurities immediately,w here
possible, whilst avoiding rubbing too hard.
X Soak insect remains with insect remover
and rinse off the treated areas afterwards.
X Soak bird droppings with water and rinse
off the treated areas afterwards.
X Remove coolant, brake fluid, tree resin,
oils, fuels and greases by rubbing gently
with a cloth soaked in petroleum ether or
lighter fluid.
X Use tar remover to remove tar stains.
X Use silicone remover to remove wax.
! Do not affix:
R stickers
R films
R magnetic plates or similar items
to painted surfaces. You could otherwise
damage the paintwork.
Care and treatment of matt paintwork If your vehicle has a clear matt finish, observe
the following instructions in order to avoid
damage to the paintwork due to incorrect
care.
These notes also apply to light-alloy wheels
with a clear matt finish.
!
Never polish the vehicle or the light alloy
wheels. Polishing makes the paintwork
shiny. 328
CareMaintenance and care
Page 386 of 409
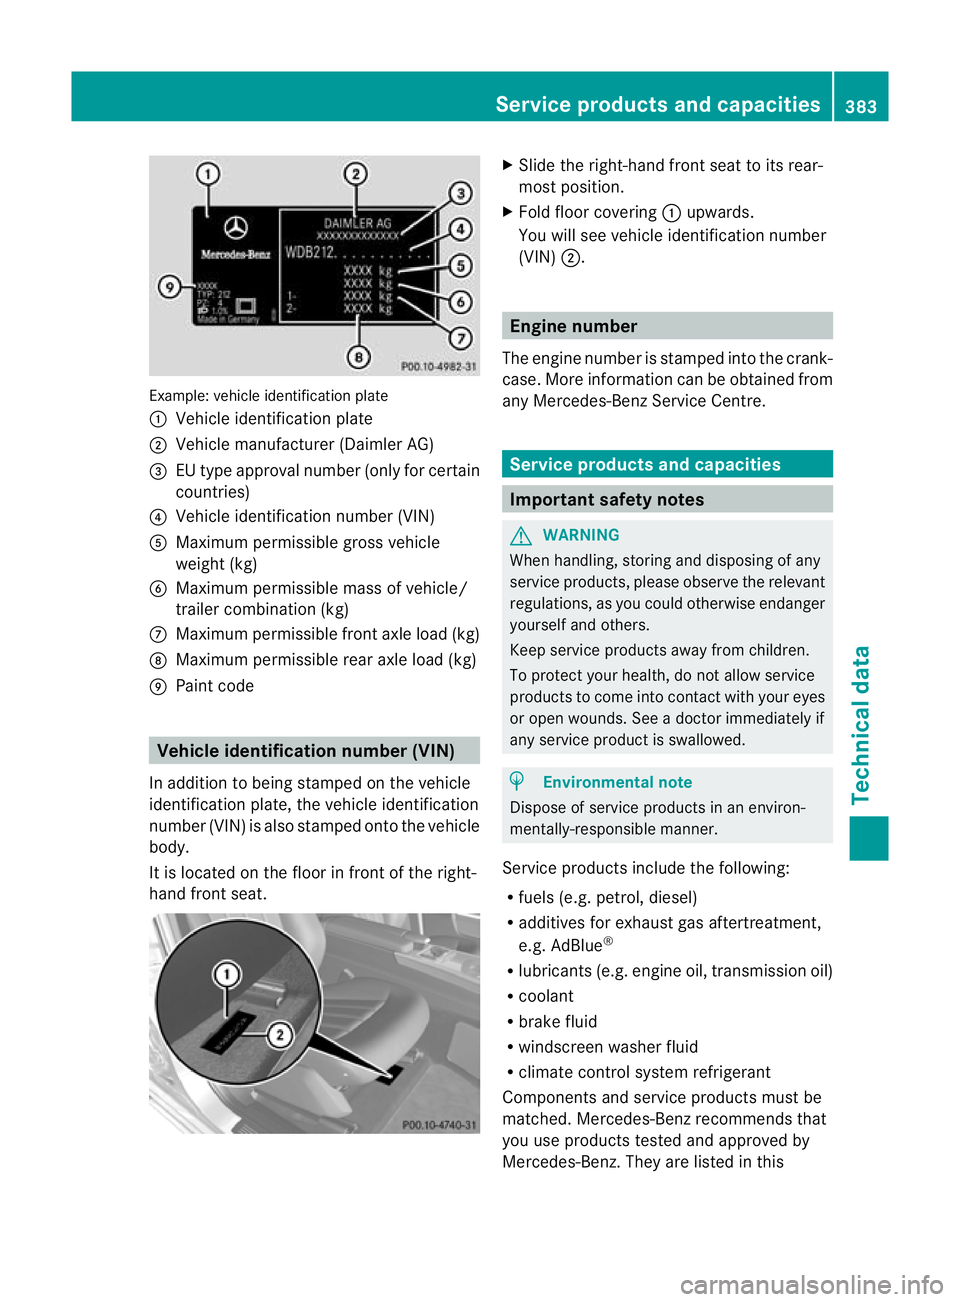
Example: vehicle identification plate
:
Vehicle identificatio nplate
; Vehicle manufacturer (Daimler AG)
= EU type approval number (only for certain
countries)
? Vehicle identification number (VIN)
A Maximum permissible gross vehicle
weight (kg)
B Maximum permissible mass of vehicle/
trailer combination (kg)
C Maximum permissible front axle load (kg)
D Maximum permissible rear axle load (kg)
E Paint code Vehicle identification number (VIN)
In additio nto being stamped on the vehicle
identification plate, the vehicle identification
number (VIN) is also stamped onto the vehicle
body.
It is located on the floor in front of the right-
hand front seat. X
Slide the right-hand front seat to its rear-
most position.
X Fold floor covering :upwards.
You will see vehicle identification number
(VIN) ;. Engine number
The engine number is stamped into the crank-
case. More information can be obtained from
any Mercedes-Benz Service Centre. Service products and capacities
Important safety notes
G
WARNING
When handling, storing and disposing of any
service products, please observe the relevant
regulations, as you could otherwise endanger
yourself and others.
Keep service products away from children.
To protect your health, do not allow service
products to come into contact with your eyes
or open wounds. See a doctor immediately if
any service product is swallowed. H
Environmental note
Dispose of service products in an environ-
mentally-responsible manner.
Service products include the following:
R fuels (e.g. petrol, diesel)
R additives for exhaust gas aftertreatment,
e.g. AdBlue ®
R lubricants (e.g. engine oil, transmission oil)
R coolant
R brake fluid
R windscreen washer fluid
R climate control system refrigerant
Components and service products must be
matched. Mercedes-Benz recommends that
you use products tested and approved by
Mercedes-Benz. They are listed in this Service products and capacities
383Technical data Z