2011 MERCEDES-BENZ E-CLASS ESTATE clock
[x] Cancel search: clockPage 153 of 409
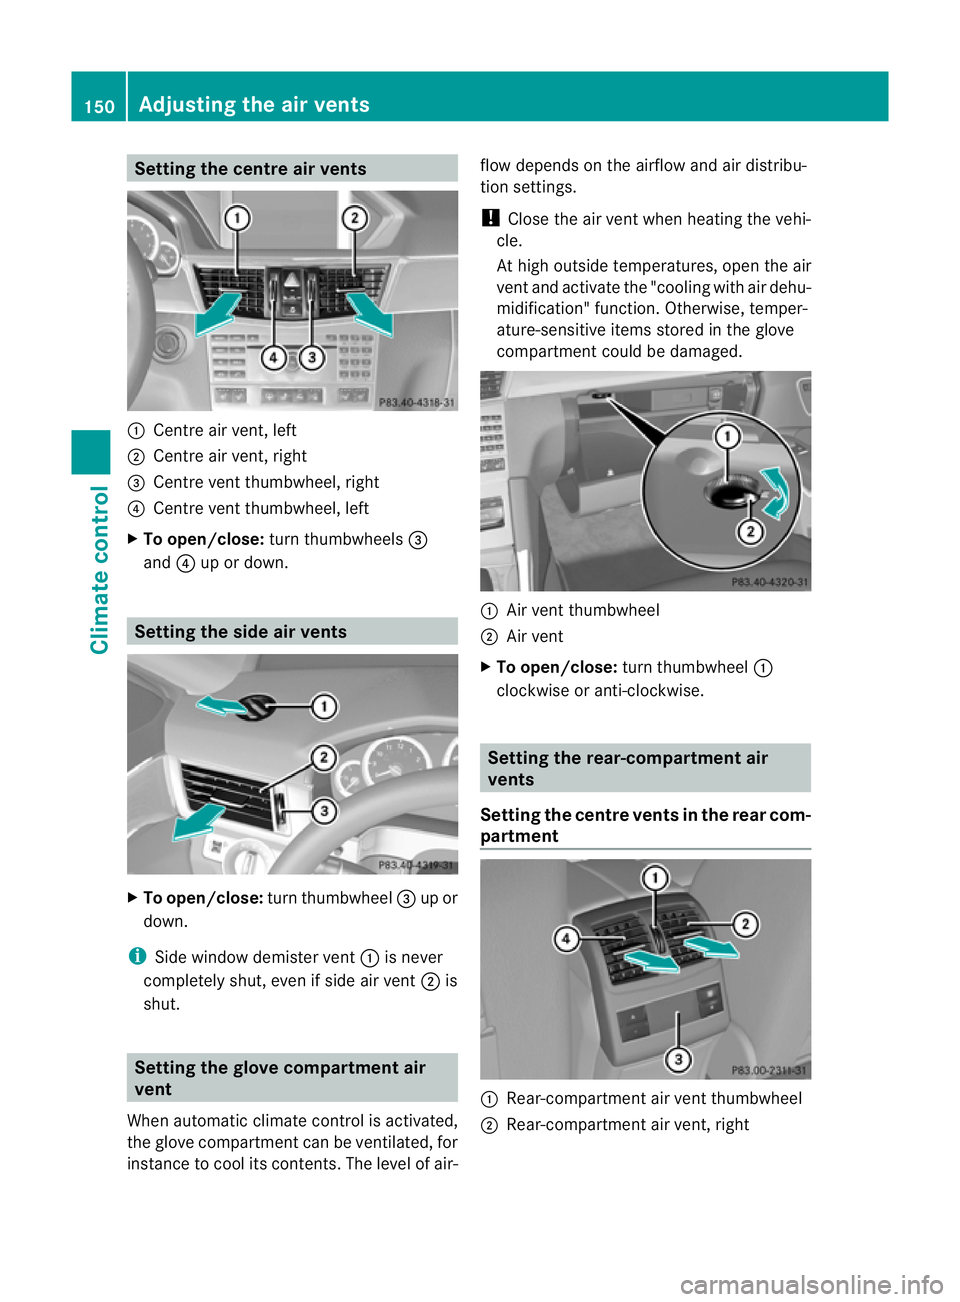
Setting the centre air vents
:
Centre air vent, left
; Centre air vent, right
= Centre vent thumbwheel, right
? Centre vent thumbwheel, left
X To open/close: turn thumbwheels =
and ?up or down. Setting the side air vents
X
To open/close: turn thumbwheel =up or
down.
i Side window demister vent :is never
completely shut, even if side air vent ;is
shut. Setting the glove compartment air
vent
When automatic climate control is activated,
the glove compartmen tcan be ventilated, for
instance to cool its contents .The level of air- flow depends on the airflow and air distribu-
tion settings.
!
Close the air vent when heating the vehi-
cle.
At high outside temperatures, open the air
vent and activate the "cooling with air dehu-
midification" function. Otherwise, temper-
ature-sensitive items stored in the glove
compartmentc ould be damaged. :
Air vent thumbwheel
; Air vent
X To open/close: turn thumbwheel :
clockwise or anti-clockwise. Setting the rear-compartment air
vents
Setting the centre vents in the rear com-
partment :
Rear-compartment air vent thumbwheel
; Rear-compartment air vent, right 150
Adjusting the air ventsClimate control
Page 176 of 409
G
WARNING
Do not use petrol to refuel a diesel tank. Never
mix diesel with petrol. Doing so could damage
the fuel system and the engine. The vehicle
could also catch fire.
! Do not use petrol to refuel vehicles with a
diesel engine. Do not use diesel to refuel
vehicles with a petrol engine. Even small
amounts of the wrong fuel result in damage
to the fuel system and the engine.
! Do not switch on the ignition if you acci-
dentally refuel with the wrong fuel .Other-
wise, the fuel will ente rthe fuel lines. Notify
a qualified specialist workshop and have
the fuel tank and fuel lines drained com-
pletely.
! Overfilling the fuel tank could damage the
fuel system.
! Take care not to spill any fuel on painted
surfaces. You could otherwise damage the
paintwork.
! Use a filter when adding fuel from a fuel
can. The fuel lines and/or the diesel injec-
tion system could otherwise be blocked by
particles from the fuel can.
Further information on fuel and on fuel grades
can be found in the "Fuel" section
(Y page 384). Refuelling
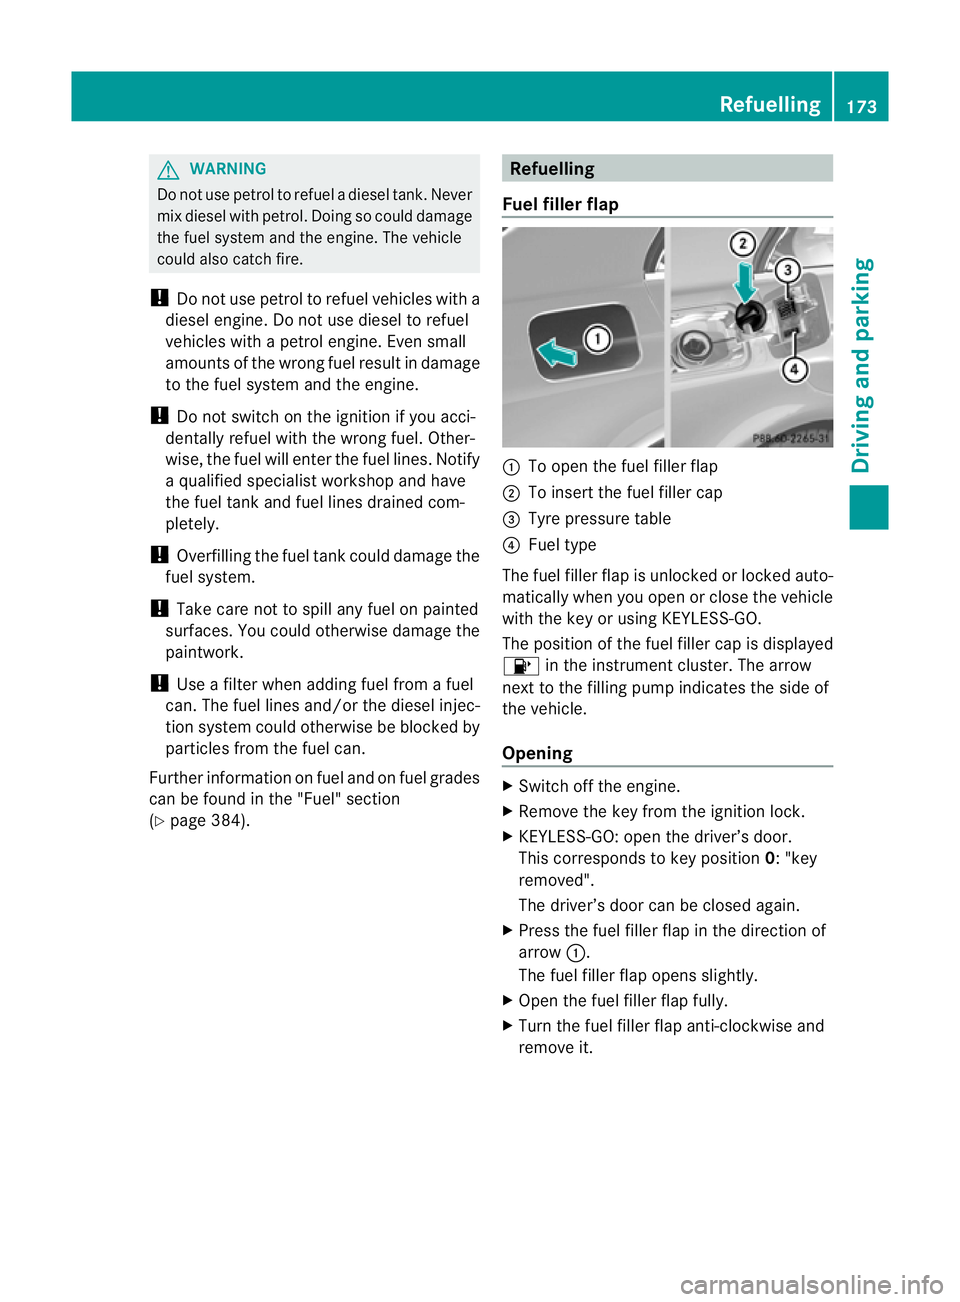
Fuel filler flap :
To open the fuel filler flap
; To insert the fuel filler cap
= Tyre pressure table
? Fuel type
The fuel filler flap is unlocked or locked auto-
matically when you open or close the vehicle
with the key or using KEYLESS-GO.
The position of the fuel filler cap is displayed
8 in the instrument cluster. The arrow
next to the filling pump indicates the side of
the vehicle.
Opening X
Switch off the engine.
X Remove the key from the ignition lock.
X KEYLESS-GO: open the driver’s door.
This corresponds to key position 0: "key
removed".
The driver’s door can be closed again.
X Press the fuel filler flap in the direction of
arrow :.
The fuel filler flap opens slightly.
X Open the fuel filler flap fully.
X Turn the fuel filler flap anti-clockwise and
remove it. Refuelling
173Driving and parking Z
Page 177 of 409
X
Saloon: insert the fuel filler cap into the
bracket on the inside of fuel filler flap ;.
or
X Estate: insert the fuel filler cap into the
recesses in the fuel filler flap hinge arm
horizontally from above.
X Completely insert the filler neck of the fuel
pump nozzle into the tank and refuel.
X Only fill the tank until the pump nozzle
switches off.
i Do not add any more fuel after the pump
stops filling for the first time. Otherwise,
fuel may leak out.
Closing X
Replace the cap on the filler neck and turn
clockwise until it engages audibly.
X Press the fuel filler flap closed until it
engages audibly.
i Close the fuel filler flap before locking the
vehicle. Otherwise, the locking pin of the
central locking prevents the fuel filler flap
from closing. Fuel filler flap emergency release
G
WARNING
The edges on the inside of the vehicle body
can be sharp. You could injure yourself when
using the fuel filler flap emergency release.
Avoid contact with the edges on the inside of
the vehicle body.
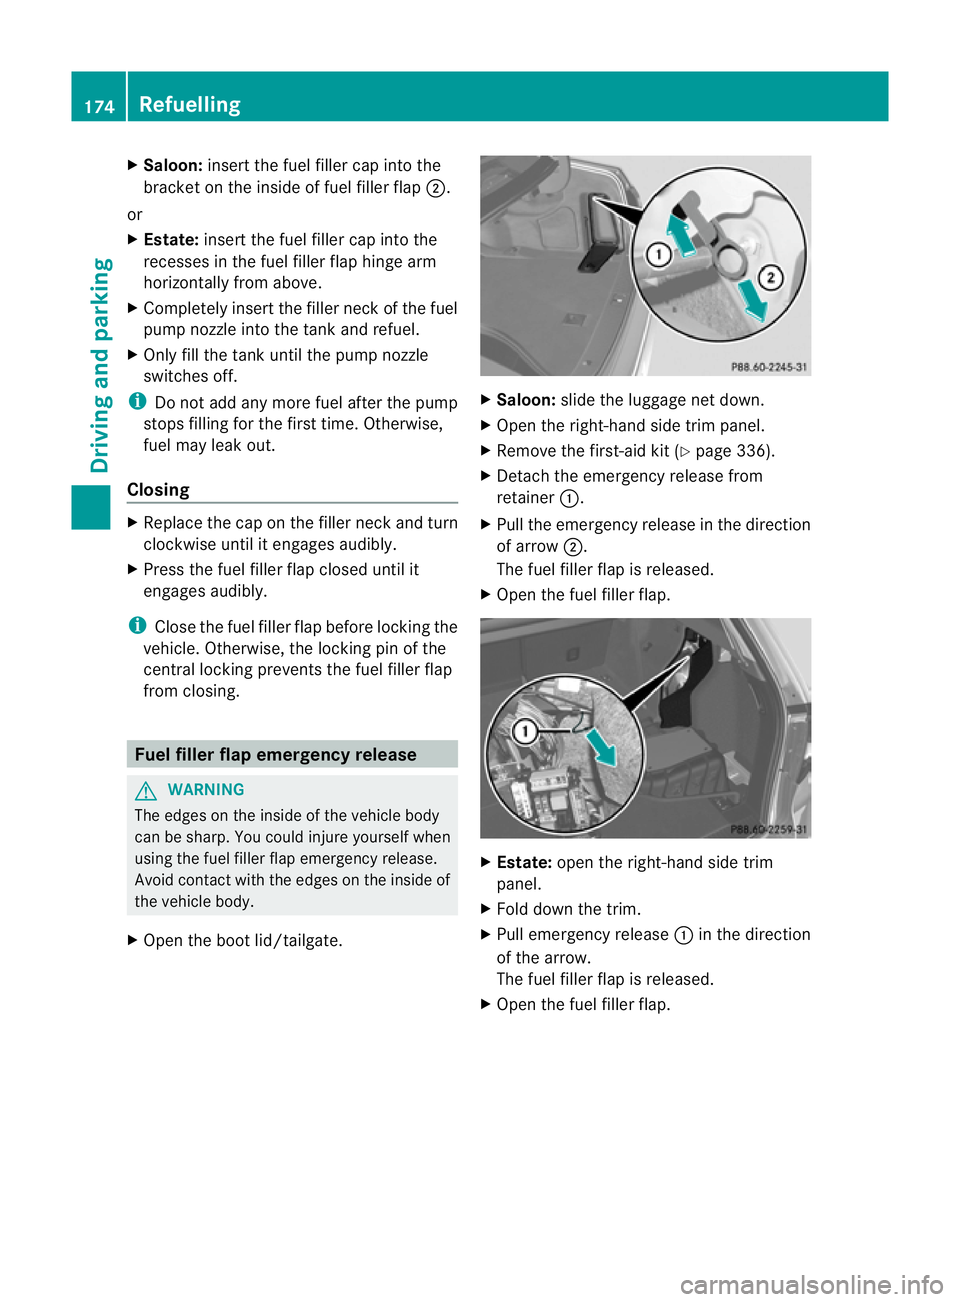
X Open the boot lid/tailgate. X
Saloon: slide the luggage net down.
X Open the right-hand side trim panel.
X Remove the first-aid kit (Y page 336).
X Detach the emergency release from
retainer :.
X Pull the emergency release in the direction
of arrow ;.
The fuel filler flap is released.
X Open the fuel filler flap. X
Estate: open the right-hand side trim
panel.
X Fold down the trim.
X Pull emergency release :in the direction
of the arrow.
The fuel filler flap is released.
X Open the fuel filler flap. 174
RefuellingDriving and parking
Page 199 of 409
to lock the vehicle, the tone becomes louder.
The vehicle is not locked until the HOL Dfunc-
tion is deactivated.
i If the engine has been switched off, it
cannot be started again until the HOLD
function has been deactivated.
If there is a fault in the system or power supply
while the HOLD function is activated, the
Brake immediately message is shown in
the multifunction display. Immediately
depress the brake firmly until the warning
message in the multifunction display goes
out.
On vehicles with automatic transmission, you
can also shif tinto position P.This deactivates
the HOLD function. RACE START
Important safety notes i
RACE START is only available in AMG vehi-
cles.
RACE START enables optimal acceleration
from a standing start. The precondition for
this is a suitable high-grip road surface. G
WARNING
RACE START is only available when SPORT
handling mode is activated. SPORT handling
mode will only be able to stabilise the vehicle
to a limited degree if the vehicle starts to skid
or a wheel starts to spin. The vehicle is there-
fore harder to control at the threshold range.
You could lose control of the vehicle and
cause an accident.
RACE START should only be used on closed
off circuits. Always adapt your driving style to
suit the prevailing road and weather condi-
tions. Activation conditions RACE START can be activated when:
R
the doors are closed.
R the engine is running and it has reached an
operating temperature of approximately
80 †. This is the case when the engine oil
temperature in the multifunction display
stops flashing.
R SPORT handling mode is activated.
(Y page 73)
R the steering wheel is in the straight-ahead
position.
R the vehicle is stationary and the brake
pedal is depressed (left foot).
R the transmission is in position D.
Activating RACE START X
Depress the brake pedal with your left foot,
and keep it depressed.
X Turn the drive program selector clockwise
(Y page 168) until the RSlamp lights up.
The multifunction display shows the RACE START Confirm: Paddle UP Cancel:
Paddle DOWN message.
i If the activation conditions are no longer
fulfilled, RACE START is cancelled. The mul-
tifunction display shows the RACE START cancelled message.
X To cancel: pull the left steering wheel shift
paddle (Y page 169).
or
X To confirm:p ull the right steering wheel
shif tpaddle (Y page 169).
The multifunction display shows the RACE START available Depress accelera‐
tor. message.
i If you do no tdepress the accelerator
pedal fully within two seconds, RACE
START is cancelled. The multifunction dis-
play shows the RACE START not possi‐ ble See Owner's Manual message.196
Driving systemsDriving and parking
Page 227 of 409
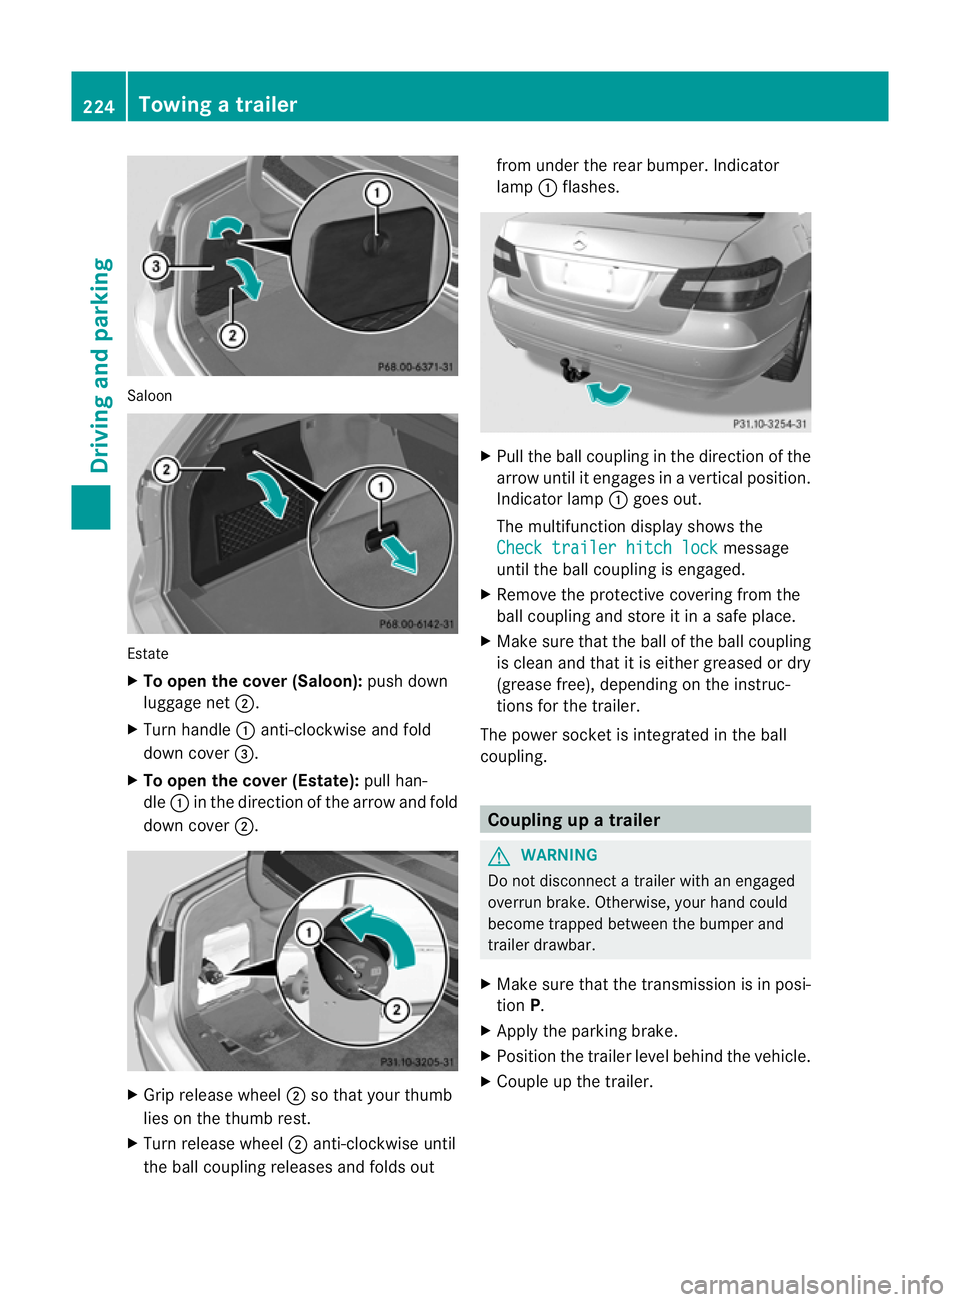
Saloon
Estate
X
To open the cover (Saloon): push down
luggage net ;.
X Turn handle :anti-clockwise and fold
dow ncover =.
X To open the cover (Estate): pull han-
dle :in the direction of the arrow and fold
down cover ;. X
Grip release wheel ;so that your thumb
lies on the thumb rest.
X Turn release wheel ;anti-clockwise until
the ball coupling releases and folds out from under the rear bumper. Indicator
lamp
:flashes. X
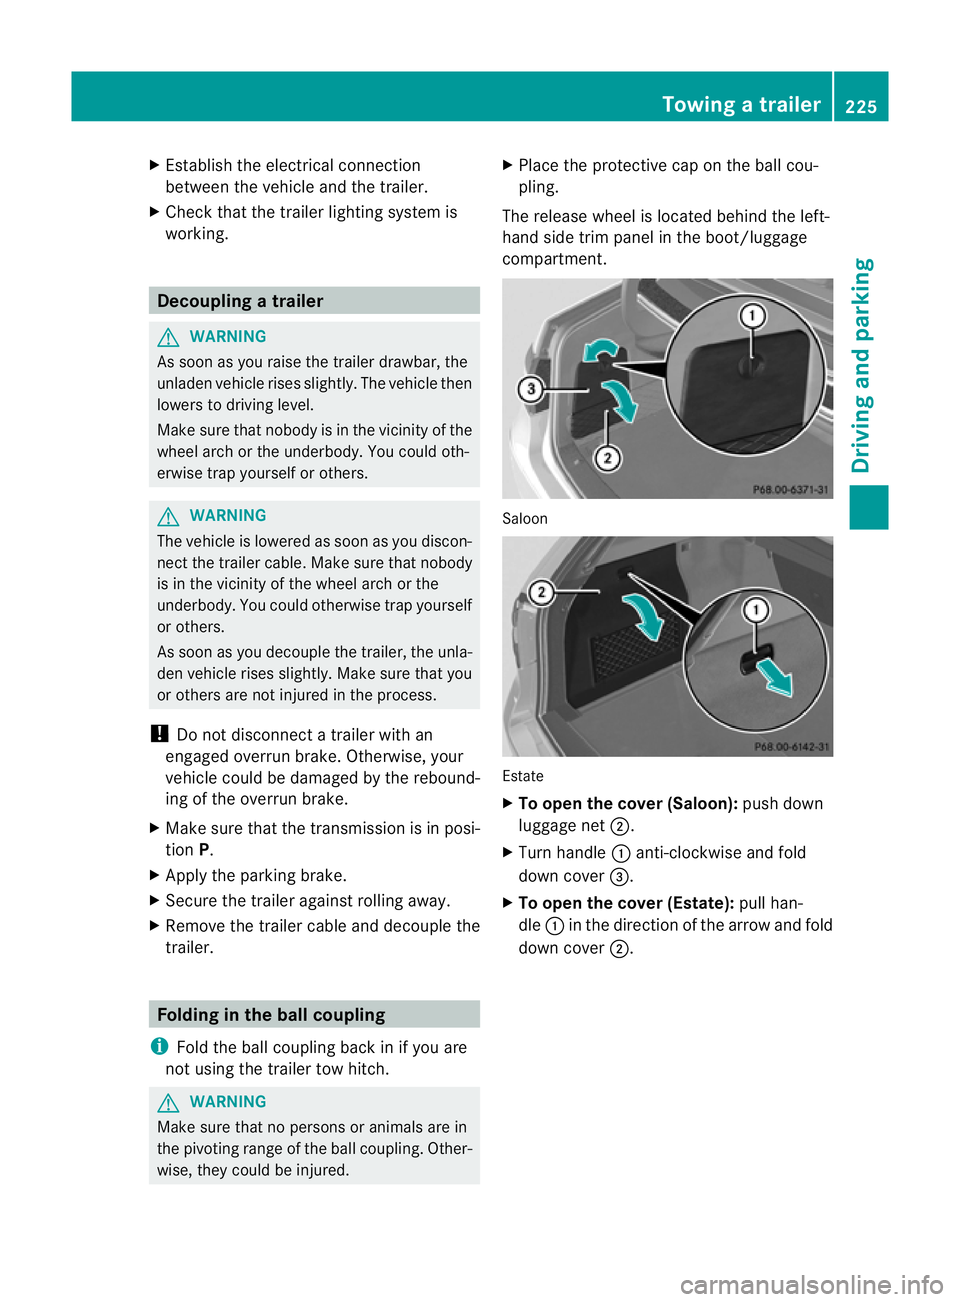
Pull the ball coupling in the direction of the
arrow until it engages in a vertical position.
Indicator lamp :goes out.
The multifunction display shows the
Check trailer hitch lock message
until the ball coupling is engaged.
X Remove the protective covering from the
ball coupling and store it in a safe place.
X Make sure that the ball of the ball coupling
is clean and that it is either greased or dry
(grease free), depending on the instruc-
tions for the trailer.
The power socket is integrated in the ball
coupling. Coupling up a trailer
G
WARNING
Do not disconnect a trailer with an engaged
overrun brake. Otherwise, your hand could
become trapped between the bumper and
trailer drawbar.
X Make sure that the transmission is in posi-
tion P.
X Apply the parking brake.
X Position the trailer level behind the vehicle.
X Couple up the trailer. 224
Towing
atrailerDriving an d parking
Page 228 of 409
X
Establish the electrical connection
between the vehicle and the trailer.
X Check tha tthe trailer lighting system is
working. Decoupling
atrailer G
WARNING
As soon as you raise the trailer drawbar, the
unladen vehicle rises slightly. The vehicle then
lowers to driving level.
Make sure tha tnobody is in the vicinity of the
wheel arch or the underbody. You could oth-
erwise trap yourself or others. G
WARNING
The vehicle is lowered as soon as you discon-
nect the trailer cable. Make sure that nobody
is in the vicinity of the wheel arch or the
underbody. You could otherwise trap yourself
or others.
As soon as you decouple the trailer, the unla-
den vehicle rises slightly. Make sure that you
or others are not injured in the process.
! Do not disconnect a trailer with an
engaged overrun brake. Otherwise, your
vehicle could be damaged by the rebound-
ing of the overrun brake.
X Make sure that the transmission is in posi-
tion P.
X Apply the parking brake.
X Secure the trailer against rolling away.
X Remove the trailer cable and decouple the
trailer. Folding in the ball coupling
i Fold the ball coupling back in if you are
not using the trailer tow hitch. G
WARNING
Make sure that no persons or animals are in
the pivoting range of the ball coupling. Other-
wise, they could be injured. X
Place the protective cap on the ball cou-
pling.
The release wheel is located behind the left-
hand side trim panel in the boot/luggage
compartment. Saloon
Estate
X
To open the cover (Saloon): push down
luggage net ;.
X Turn handle :anti-clockwise and fold
down cover =.
X To open the cover (Estate): pull han-
dle :in the direction of the arrow and fold
down cover ;. Towing
atrailer
225Driving an d parking Z
Page 229 of 409
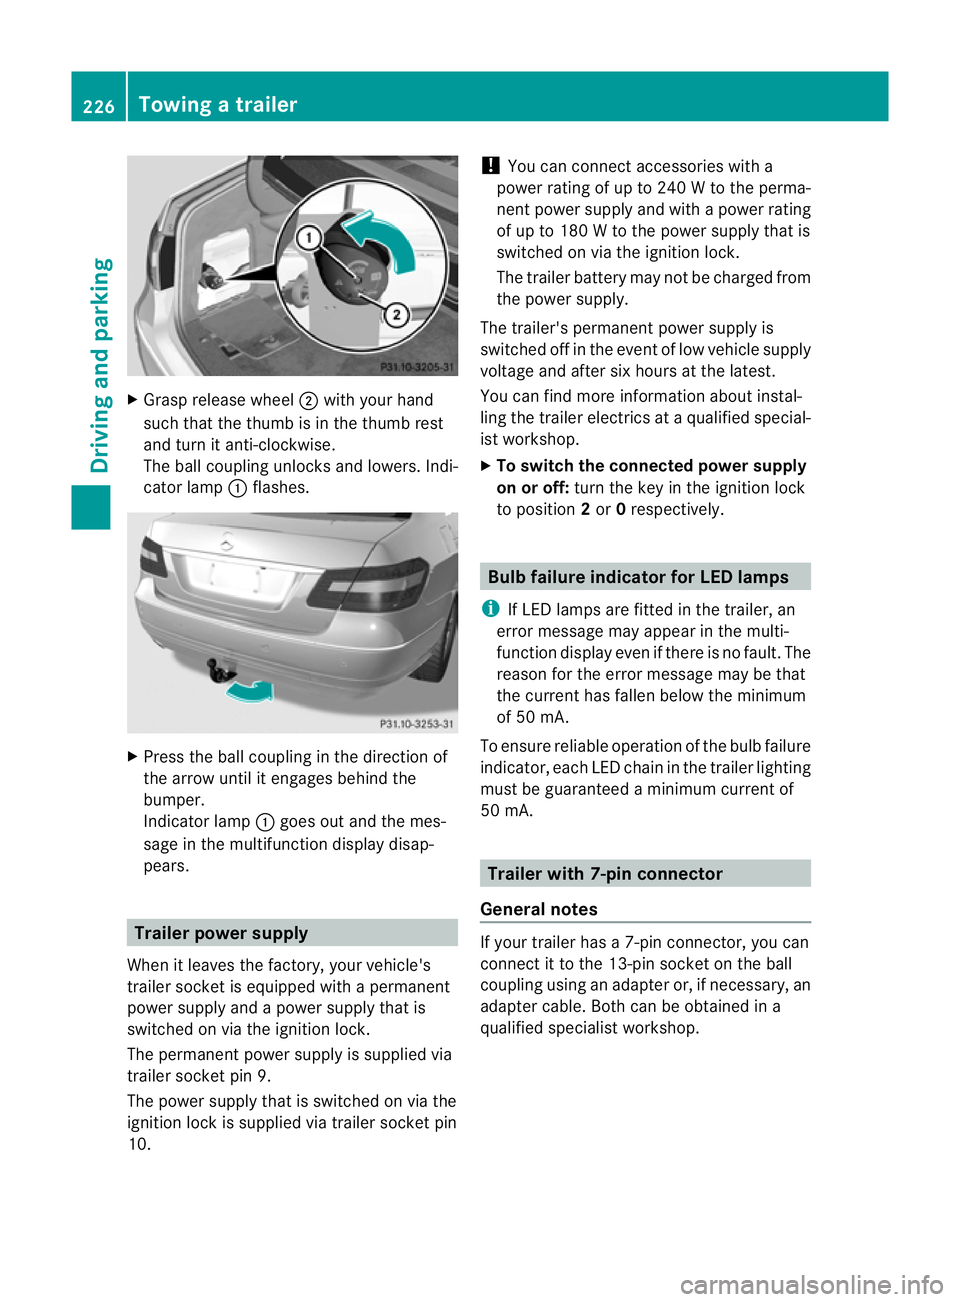
X
Grasp release wheel ;with your hand
such that the thumb is in the thumb rest
and turn it anti-clockwise.
The ball coupling unlocks and lowers. Indi-
cator lamp :flashes. X
Press the ball coupling in the direction of
the arrow until it engages behind the
bumper.
Indicato rlamp :goes out and the mes-
sage in the multifunction display disap-
pears. Trailer power supply
When it leaves the factory, your vehicle's
trailer socke tis equipped with a permanent
power supply and a power supply that is
switched on via the ignition lock.
The permanent power supply is supplied via
trailer socket pin 9.
The power supply that is switched on via the
ignition lock is supplied via trailer socket pin
10. !
You can connect accessories with a
power rating of up to 240 W to the perma-
nent power supply and with a power rating
of up to 180 W to the power supply that is
switched on via the ignition lock.
The trailer battery may not be charged from
the power supply.
The trailer's permanent power supply is
switched off in the event of low vehicle supply
voltage and after six hours at the latest.
You can find more information abouti nstal-
ling the trailer electrics at a qualified special-
is tw orkshop.
X To switch the connected power supply
on or off: turn the key in the ignition lock
to position 2or 0respectively. Bulb failure indicator for LED lamps
i If LED lamps are fitted in the trailer, an
error message may appear in the multi-
function display even if there is no fault. The
reason for the error message may be that
the current has fallen below the minimum
of 50 mA.
To ensure reliable operation of the bulb failure
indicator, each LED chain in the trailer lighting
must be guaranteed a minimum current of
50 mA. Trailer with 7-pin connector
General notes If your trailer has a 7-pin connector, you can
connect it to the 13-pin socket on the ball
coupling using an adapter or, if necessary, an
adapter cable. Both can be obtained in a
qualified specialist workshop.226
Towing
atrailerDriving an d parking
Page 230 of 409
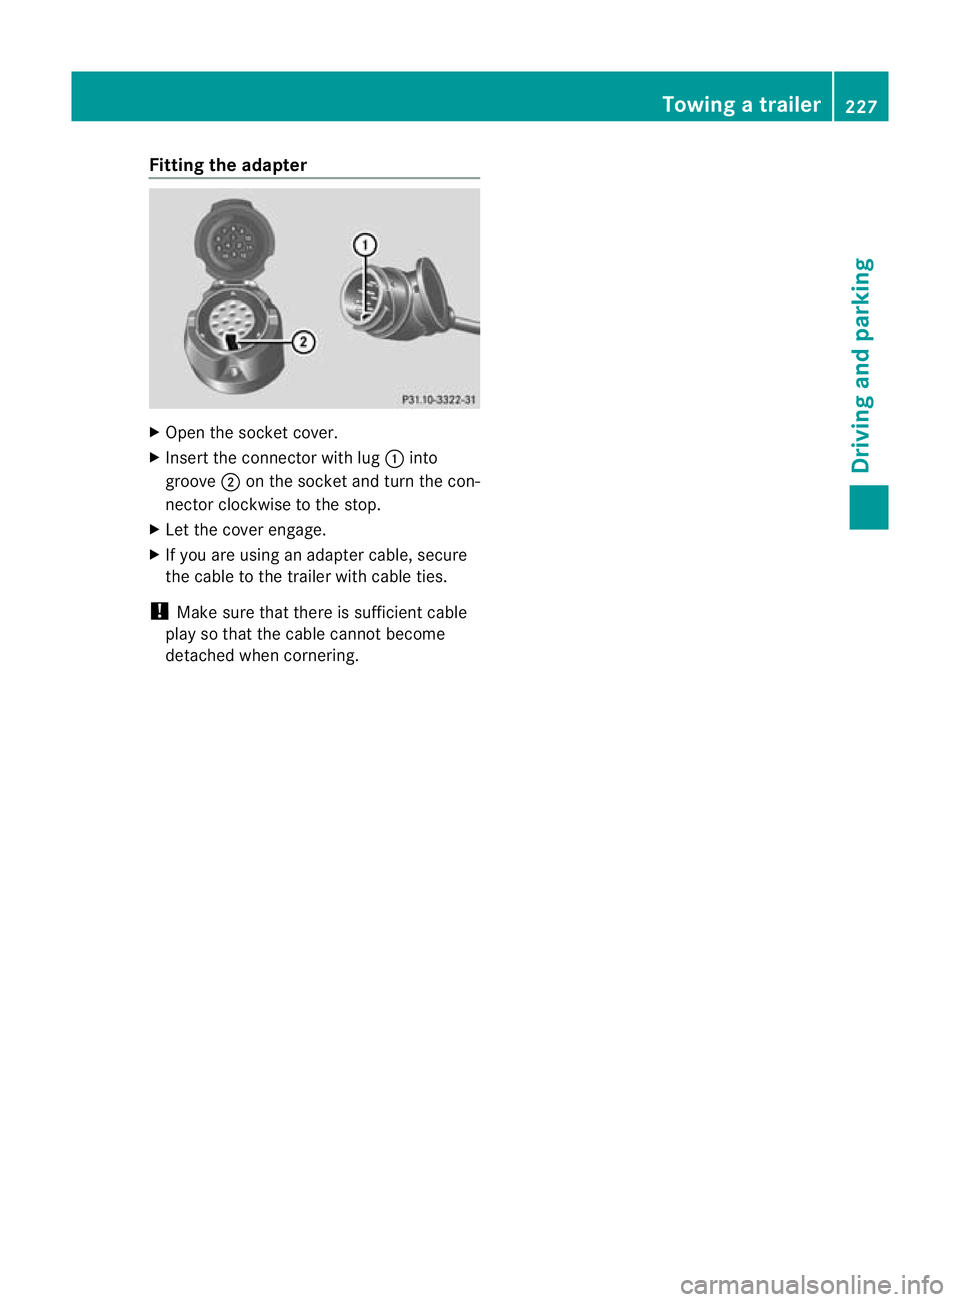
Fitting the adapter
X
Open the socket cover.
X Insert the connector with lug :into
groove ;on the socket and turn the con-
nector clockwise to the stop.
X Let the cover engage.
X If you are using an adapter cable, secure
the cable to the trailer with cable ties.
! Make sure that there is sufficien tcable
play so that the cable canno tbecome
detached when cornering. Towing
atrailer
227Driving an d parking Z