2011 MERCEDES-BENZ E-Class COUPE glove box
[x] Cancel search: glove boxPage 6 of 344

1, 2, 3 ...
12 V socket ........................................ 258
A
ABS (Anti-lock Braking System) Display message ............................ 220
Function/notes ................................ 64
Warning lamp ................................. 243
Accident (notes) ................................ 287
Active light function (display
message) ............................................ 225
Active service system see Service interval display
ADAPTIVE BRAKE ................................. 68
Adaptive Highbeam Assist Display message ............................ 226
Switching on/off ........................... 123
Switching on/off (on-board
computer) ...................................... 209
Air bags
Display message ............................ 218
Front air bag (driver, front
passenger) ....................................... 37
Important safety notes ....................36
Knee bag .......................................... 38
PASSENGER AIRBAG OFF
indicator lamp (only Canada) ...........47
PASSENGER AIRBAG OFF
indicator lamp (only USA) ................42
Pelvis air bag ................................... 40
Safety guidelines ............................. 35
Side impact air bag ..........................39
Window curtain air bag ....................41
AIRCAP ................................................. 97
AIRCAP (cleaning instructions) ........ 280
Air-conditioning system see Climate control
Air dehumidification
Activating/deactivating with
cooling ........................................... 139
Air distribution
Setting ........................................... 141
Airflow
Setting ........................................... 142
Air nozzles
see Air vents .................................. 145
Air pressure
see Tire pressure
Air-recirculation mode
Activating/deactivating .................144
AIRSCARF ........................................... 112
Setting the vents ........................... 147
Air vents ............................................. 145
Glove box ....................................... 146
Important safety information .........145
Rear ............................................... 146
Setting the AIRSCARF vents ..........147
Setting the center air vents ...........145
Setting the side air vents ...............146
Switching AIRSCARF on/off ..........112
Alarm system
see ATA
Alertness Assistant
see ATTENTION ASSIST
Anti-lock Braking System
see ABS
Anti-Theft Alarm system
see ATA
Anti-theft system
ATA (Anti-Theft Alarm system) .........71
Ashtray ............................................... 257
Assistance menu (on-board
computer) .......................................... 206
ATA (Anti-Theft Alarm system) Activating/deactivating ...................71
Function ........................................... 71
Switching off the alarm ....................71
ATTENTION ASSIST
Activating/deactivating (on-
board computer) ............................ 207
Display message ............................ 229
Function/notes ............................. 193
Audio menu (on-board computer) .... 204
AUTO lights see Light sensor
Automatic car wash .......................... 277
Automatic transmission Display message ............................ 236
Driving tips .................................... 158
Emergency running mode ..............162
Kickdown ....................................... 158
Malfunction .................................... 162
Program selector button ................1584IndexBA 207 USA, CA Edition B 2011; 1; 3, en-USd2sboikeVersion: 3.0.3.62010-05-20T10:38:09+02:00 - Seite 4
Page 11 of 344

Premium-grade unleaded gasoline . 336
Refueling ........................................ 162
Specifications ................................ 336
Troubleshooting ............................. 165
Fuel consumption
Current (on-board computer) .........202
Notes ............................................. 167
Fuel filler cap (display message) ..... 229
Fuel filler flap Opening/closing ....... 163
Fuel level Calling up the range (on-board
computer) ...................................... 202
Fuses
Dashboard fuse box .......................300
Fuse allocation chart .....................300
Fuse box in the engine
compartment ................................. 301
Fuse box in the trunk .....................301
Notes ............................................. 300
G
Garage door opener Clearing the memory .....................268
Notes ............................................. 265
Opening/closing the garage door ..267
Programming the remote control ...265
Gear or selector lever (cleaning
guidelines) ......................................... 283
Genuine Mercedes-Benz parts ......... 332
Genuine wood trim and trim strips
(cleaning instructions) ...................... 283
Glove box ........................................... 250
H
Head bags ............................................ 40
Head bags ........................................ 40
Headlamp cleaning system .............. 124
Adding washer fluid .......................275
Notes ............................................. 339
Headlamp mode (daytime driving)
see Daytime running lamps
Headlamps
Cleaning ......................................... 282
Misting up ...................................... 125
Head level heating
AIRSCARF ...................................... 112
Head restraint
Lowering manually (rear) ...............109
Head restraints
Adjusting (electrically) ...................108
Adjusting (rear) .............................. 109
see NECK-PRO head restraints
Heating
see Climate control
High beam flasher ............................. 124
Hill start assist .................................. 154
HOLD function Display message ............................ 229
Function/notes ............................. 184
Hood
Closing ........................................... 273
Display message ............................ 237
Opening ......................................... 272
Hydroplaning ..................................... 170
I
Immobilizer .......................................... 70
Indicator and warning lamps DISTRONIC PLUS ........................... 247
Installing/removing the AIRCAP
wind screen ......................................... 98
Instrument cluster Overview .......................................... 26
Submenu (on-board computer) ......208
Warning and indicator lamps ...........27
Instrument cluster lighting ................ 26
Instrument lighting see Instrument cluster lighting
Interior lighting
Automatic control ..........................125
Delayed switch-off (on-board
computer) ...................................... 210
Emergency lighting ........................126
Manual control ............................... 126
Reading lamp ................................. 125
J
Jack Storage location ............................ 287
Using ............................................. 290
Jump-starting ..................................... 296
Index9BA 207 USA, CA Edition B 2011; 1; 3, en-USd2sboikeVersion: 3.0.3.62010-05-20T10:38:09+02:00 - Seite 9
Page 16 of 344

Refrigerant (air-conditioning
system) .......................................... 337
Washer fluid ................................... 339
Settings
Factory (on-board computer) .........212
On-board computer .......................208
Shift ranges ....................................... 160
Showing the distance display (on-
board computer) ............................... 206
Side impact air bag ............................. 39
Side marker lamp (display
message) ............................................ 225
Side windows Convenience closing feature ............87
Convenience opening feature ..........87
Important safety information ...........85
Opening/closing .............................. 86
Resetting ......................................... 88
Troubleshooting ............................... 89
Side windows (Cabriolet)
Opening/closing all .........................87
Sliding sunroof
Important safety information .........101
Troubleshooting ............................. 103
see Panorama roof with power
tilt/sliding panel
SmartKey
Changing the battery .......................78
Changing the programming .............77
Checking the battery .................74, 78
Convenience closing feature ............87
Convenience opening feature ..........87
Display message ............................ 238
Important safety notes ....................74
Malfunction ...................................... 79
Starting the engine ........................153
Snow chains ...................................... 170
Socket ................................................ 258
Dashboard ..................................... 259
Rear compartment .........................259
Soft top
AIRCAP ............................................ 97
Cleaning ......................................... 279
Closing manually in an emergency ... 91
Display message ............................ 238
Important safety information ...........89
Installing/removing the AIRCAP
wind screen ..................................... 98Opening/closing (with key) .............. 91
Opening/closing (with soft-top
switch) ............................................. 90
Relocking ......................................... 95
Troubleshooting ............................. 100
Wind screen ..................................... 96
Soft-top switch .................................... 90
SOS see mbrace
Spare wheel
Notes/data .................................... 329
Storage location ............................ 288
see Emergency spare wheel
Speedometer
Additional speedometer (on-
board computer) ............................ 202
Segments ...................................... 199
Setting the unit (on-board
computer) ...................................... 208
SRS (Supplemental Restraint
System) Display message ............................ 216
Introduction ..................................... 34
Warning lamp ................................. 244
Warning lamp (function) ................... 34
Standard display (on-board
computer) .......................................... 202
Starting the engine Important safety notes ..................152
Station
see Radio
Steering (display message) .............. 237
Steering wheel Adjusting (electrically) ...................113
Buttons (on-board computer) ......... 199
Cleaning ......................................... 283
Important safety notes ..................113
Memory function (storing
settings) ......................................... 113
Storing settings (memory
function) ........................................ 116
Steering wheel paddle shifters ........ 159
Stowage compartments Armrest (under) ............................. 251
Glove box ....................................... 250
Stowage space
Cup holders ................................... 255
Important safety information .........25014IndexBA 207 USA, CA Edition B 2011; 1; 3, en-USd2sboikeVersion: 3.0.3.62010-05-20T10:38:09+02:00 - Seite 14
Page 40 of 344

The front air bags increase protection for the
driver's and front-passenger's head and
chest.
Driver's air bag : deploys in front of the
steering wheel; front-passenger air bag ;
deploys in front of and above the glove box.
They are deployed:
Rin the event of certain frontal impacts
Rif the system determines that air bag
deployment can offer additional protection
to that provided by the seat belt
Rif the seat belt is fastened
Rindependently of other air bags in the
vehicle
If the vehicle overturns, the front air bags are
generally not deployed unless the system
detects high vehicle deceleration in a
longitudinal direction.
Your vehicle has adaptive, two-stage front air
bags. In the event of a collision, the air bag
control unit evaluates the vehicle
deceleration. When the first deployment
threshold is reached, the front air bag is filled
with enough propellant gas to reduce the risk
of injuries. The front air bag is fully deployed
if a second deployment threshold is exceeded
within a few milliseconds.
Vehicles with OCS (USA only): front-
passenger front air bag deployment is also
influenced by the passenger's weight
category as identified by the Occupant
Classification System (OCS) (Y page 42).
Vehicles with OCS (USA only): the lighter the
passenger side occupant, the higher the
vehicle deceleration rate required for second
stage inflation of the front-passenger front air
bag. In the second stage, the front air bags
are inflated with the maximum amount of
propellant gas available.
In impact situations with deceleration or
acceleration values lower than the vehicle
deceleration or acceleration values preset in
the system, the front air bags are not
deployed. You will then be protected by the
seat belt.
! Vehicles with BabySmart™ (Canada only):
do not place any objects which weigh more
than 20 lb (9 kg) on the front-passenger
seat. This could cause the system to
identify the seat as being occupied. In the
event of an accident, the restraint systems
on the front-passenger side are triggered.
Have restraint systems that have been
triggered replaced.
The front-passenger air bag will only deploy
if:
Rthe system, based on the OCS weight
sensor readings, detects that the front-
passenger seat is occupied (USA only).
Rthe 45 indicator lamp in the center
console is not lit, USA: (Y page 42),
Canada: (Y page 47).
Rthe impact exceeds a preset deployment
threshold.
Driver's knee bag
GWarning
Observe "Important safety notes"
(Y page 36).
38Occupant safetySafety
BA 207 USA, CA Edition B 2011; 1; 3, en-USd2sboikeVersion: 3.0.3.62010-05-20T10:38:09+02:00 - Seite 38
Page 148 of 344

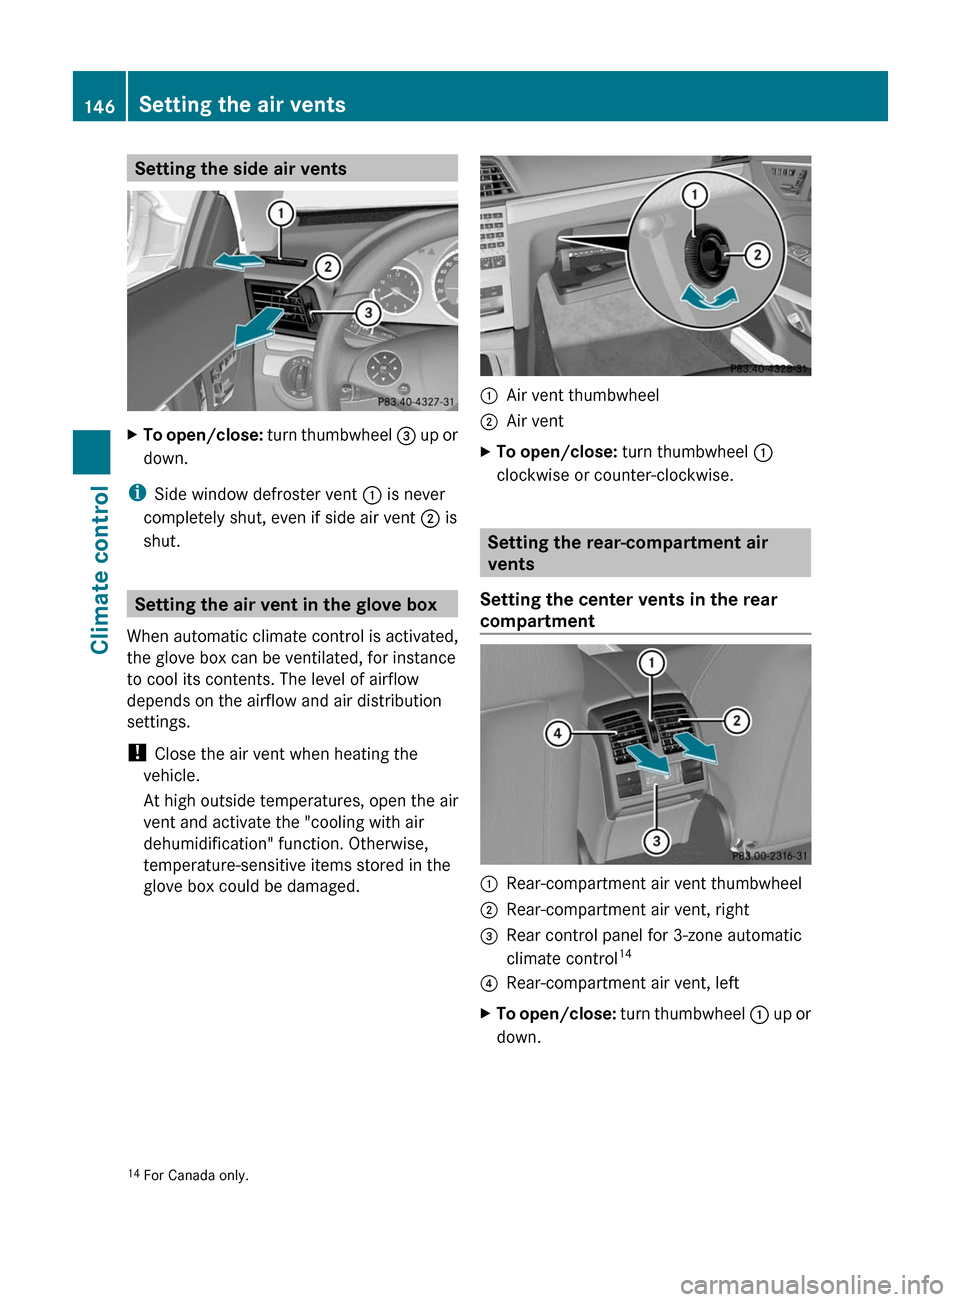
Setting the side air ventsXTo open/close: turn thumbwheel = up or
down.
iSide window defroster vent : is never
completely shut, even if side air vent ; is
shut.
Setting the air vent in the glove box
When automatic climate control is activated,
the glove box can be ventilated, for instance
to cool its contents. The level of airflow
depends on the airflow and air distribution
settings.
! Close the air vent when heating the
vehicle.
At high outside temperatures, open the air
vent and activate the "cooling with air
dehumidification" function. Otherwise,
temperature-sensitive items stored in the
glove box could be damaged.
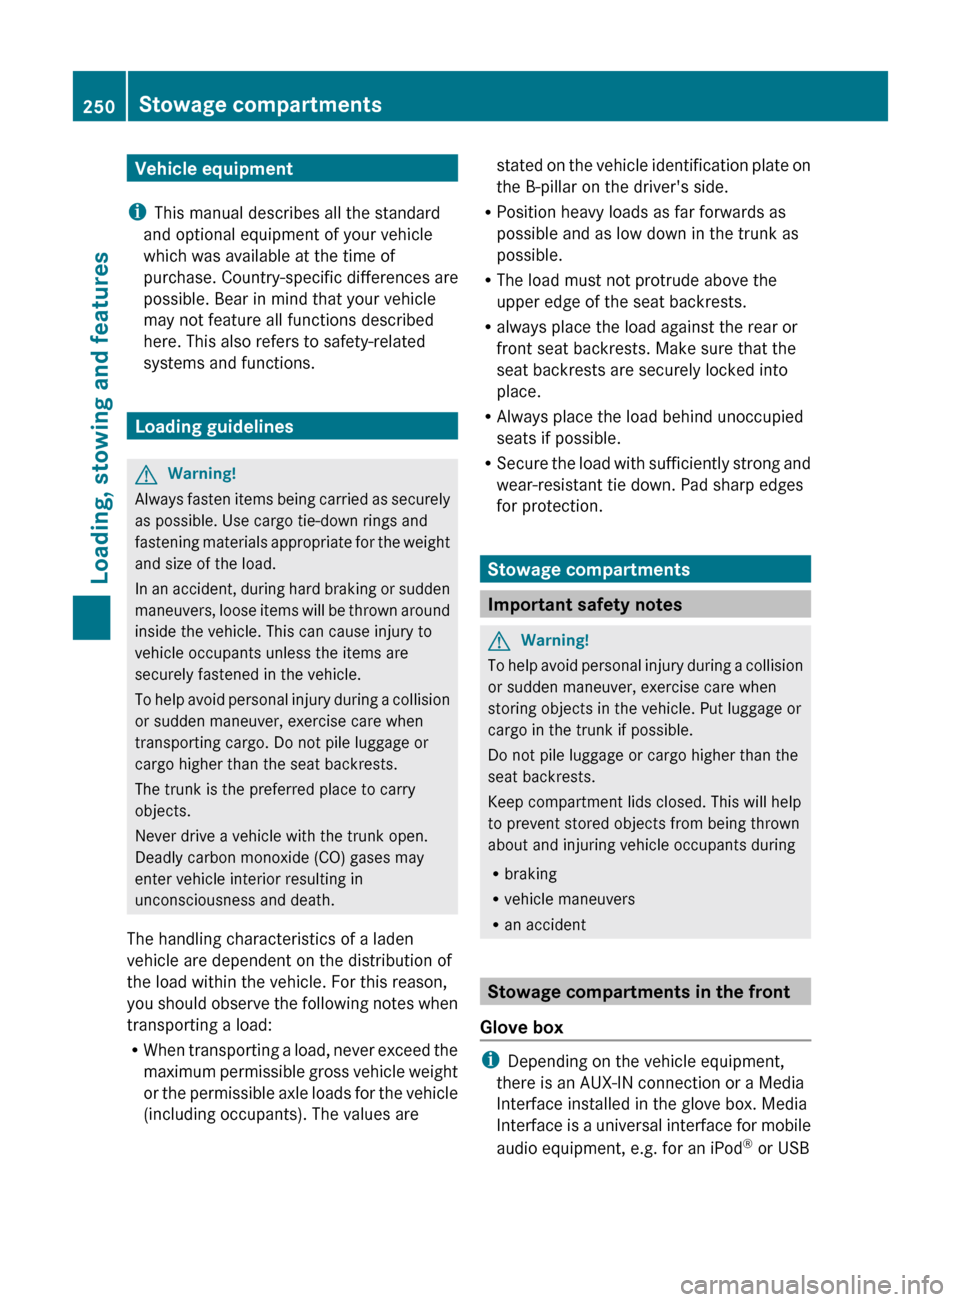
:Air vent thumbwheel;Air ventXTo open/close: turn thumbwheel :
clockwise or counter-clockwise.
Setting the rear-compartment air
vents
Setting the center vents in the rear
compartment
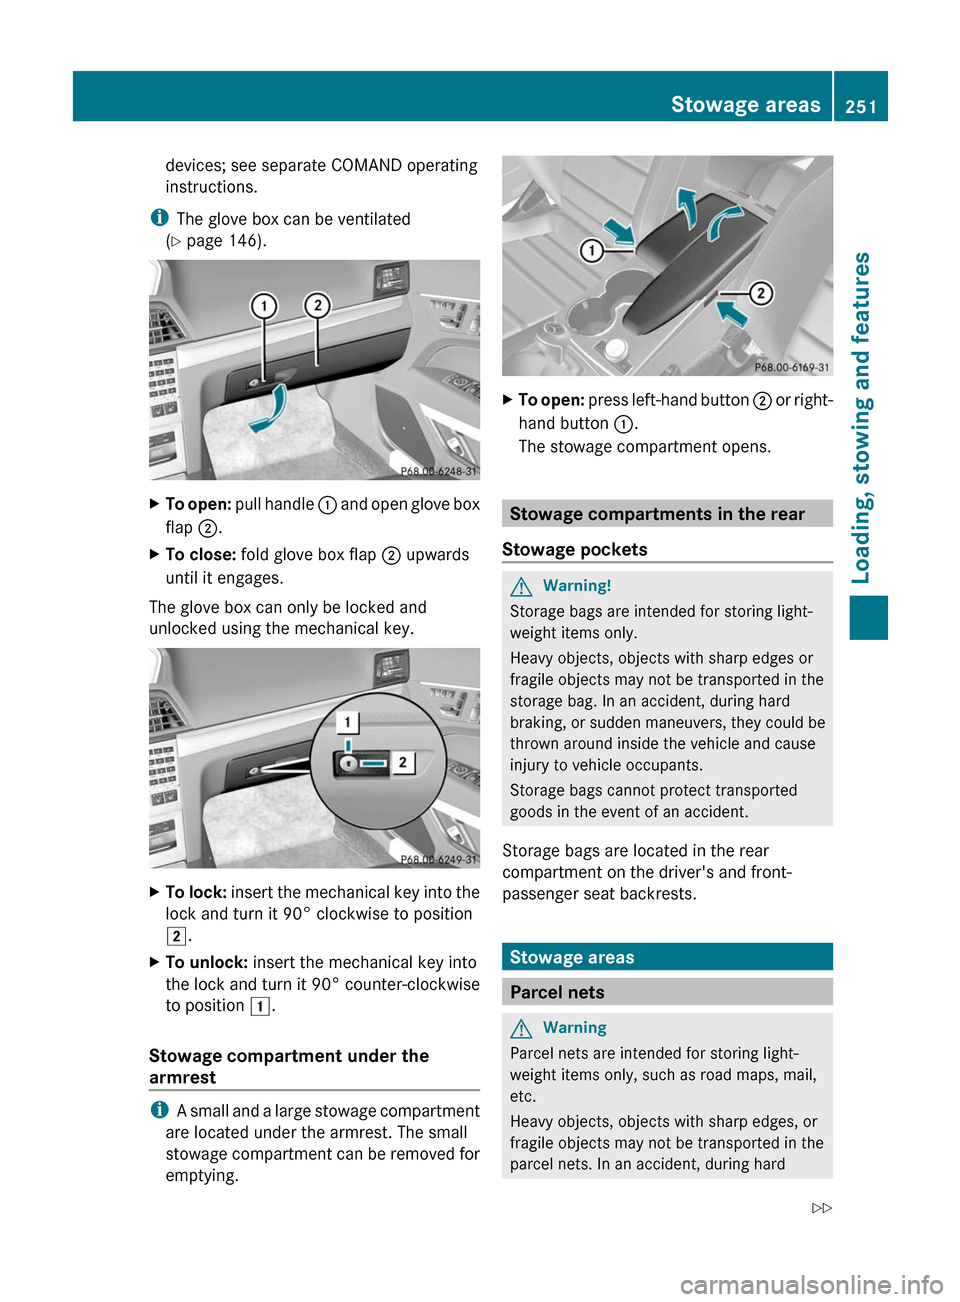
:Rear-compartment air vent thumbwheel;Rear-compartment air vent, right=Rear control panel for 3-zone automatic
climate control14?Rear-compartment air vent, leftXTo open/close: turn thumbwheel : up or
down.14For Canada only.146Setting the air ventsClimate control
BA 207 USA, CA Edition B 2011; 1; 3, en-USd2sboikeVersion: 3.0.3.62010-05-20T10:38:09+02:00 - Seite 146
Page 252 of 344

Vehicle equipment
i This manual describes all the standard
and optional equipment of your vehicle
which was available at the time of
purchase. Country-specific differences are
possible. Bear in mind that your vehicle
may not feature all functions described
here. This also refers to safety-related
systems and functions.
Loading guidelines
GWarning!
Always fasten items being carried as securely
as possible. Use cargo tie-down rings and
fastening materials appropriate for the weight
and size of the load.
In an accident, during hard braking or sudden
maneuvers, loose items will be thrown around
inside the vehicle. This can cause injury to
vehicle occupants unless the items are
securely fastened in the vehicle.
To help avoid personal injury during a collision
or sudden maneuver, exercise care when
transporting cargo. Do not pile luggage or
cargo higher than the seat backrests.
The trunk is the preferred place to carry
objects.
Never drive a vehicle with the trunk open.
Deadly carbon monoxide (CO) gases may
enter vehicle interior resulting in
unconsciousness and death.
The handling characteristics of a laden
vehicle are dependent on the distribution of
the load within the vehicle. For this reason,
you should observe the following notes when
transporting a load:
R When transporting a load, never exceed the
maximum permissible gross vehicle weight
or the permissible axle loads for the vehicle
(including occupants). The values are
stated on the vehicle identification plate on
the B-pillar on the driver's side.
R Position heavy loads as far forwards as
possible and as low down in the trunk as
possible.
R The load must not protrude above the
upper edge of the seat backrests.
R always place the load against the rear or
front seat backrests. Make sure that the
seat backrests are securely locked into
place.
R Always place the load behind unoccupied
seats if possible.
R Secure the load with sufficiently strong and
wear-resistant tie down. Pad sharp edges
for protection.
Stowage compartments
Important safety notes
GWarning!
To help avoid personal injury during a collision
or sudden maneuver, exercise care when
storing objects in the vehicle. Put luggage or
cargo in the trunk if possible.
Do not pile luggage or cargo higher than the
seat backrests.
Keep compartment lids closed. This will help
to prevent stored objects from being thrown
about and injuring vehicle occupants during
R braking
R vehicle maneuvers
R an accident
Stowage compartments in the front
Glove box
i Depending on the vehicle equipment,
there is an AUX-IN connection or a Media
Interface installed in the glove box. Media
Interface is a universal interface for mobile
audio equipment, e.g. for an iPod ®
or USB
250Stowage compartmentsLoading, stowing and features
BA 207 USA, CA Edition B 2011; 1; 3, en-USd2sboikeVersion: 3.0.3.62010-05-20T10:38:09+02:00 - Seite 250
Page 253 of 344

devices; see separate COMAND operating
instructions.
iThe glove box can be ventilated
(Y page 146).
XTo open: pull handle : and open glove box
flap ;.
XTo close: fold glove box flap ; upwards
until it engages.
The glove box can only be locked and
unlocked using the mechanical key.
XTo lock: insert the mechanical key into the
lock and turn it 90° clockwise to position
2.
XTo unlock: insert the mechanical key into
the lock and turn it 90° counter-clockwise
to position 1.
Stowage compartment under the
armrest
iA small and a large stowage compartment
are located under the armrest. The small
stowage compartment can be removed for
emptying.
XTo open: press left-hand button ; or right-
hand button :.
The stowage compartment opens.
Stowage compartments in the rear
Stowage pockets
GWarning!
Storage bags are intended for storing light-
weight items only.
Heavy objects, objects with sharp edges or
fragile objects may not be transported in the
storage bag. In an accident, during hard
braking, or sudden maneuvers, they could be
thrown around inside the vehicle and cause
injury to vehicle occupants.
Storage bags cannot protect transported
goods in the event of an accident.
Storage bags are located in the rear
compartment on the driver's and front-
passenger seat backrests.
Stowage areas
Parcel nets
GWarning
Parcel nets are intended for storing light-
weight items only, such as road maps, mail,
etc.
Heavy objects, objects with sharp edges, or
fragile objects may not be transported in the
parcel nets. In an accident, during hard
Stowage areas251Loading, stowing and featuresBA 207 USA, CA Edition B 2011; 1; 3, en-USd2sboikeVersion: 3.0.3.62010-05-20T10:38:09+02:00 - Seite 251Z
Page 261 of 344

Dashboard socketXOpen the glove box (Y page 250).XLift up the cover of socket :.
An additional socket is installed in the center
console on vehicles without an ashtray with
cigarette lighter.
XTo open: slide cover : forwards until it
engages.
XLift up the cover of socket ;.XTo close: press cover : briefly at the
front.
The cover moves back.
Socket in the rear compartment
A socket is installed in the center console in
the rear compartment in vehicles with an
ashtray and a cigarette lighter.
XPull cover ; out by its top edge.XLift up the cover of socket :.
mbrace20
Important safety notes
! A license agreement must exist in order
to activate the mbrace service. Make sure
that your system is activated and ready for
use, and press the ï MB info call button
to register. If you cannot carry out any of
the steps mentioned, the system may not
be activated.
If you have any questions concerning
activation, please contact one of the
following service hotlines:
RUSA: Response Center under
866-990-9007
RCanada: Customer Service under
1-888-923-8367
Shortly after successfully registering with the
mbrace service, a user ID and password will
be sent to you by post. You can use this
password to log in to the mbrace section
under "Owners Online" at http://
www.mbusa.com21.
The mbrace system is available if:
Rit has been activated and is operational.
Activation requires an available cellular
phone network, a valid SIM card and a
20The system is called TELEAID in Canada.21USA only.
Features259Loading, stowing and featuresBA 207 USA, CA Edition B 2011; 1; 3, en-USd2sboikeVersion: 3.0.3.62010-05-20T10:38:09+02:00 - Seite 259Z