2011 MERCEDES-BENZ E-Class COUPE ECO mode
[x] Cancel search: ECO modePage 8 of 344

CD player/CD changer (on-board
computer) .......................................... 205
Center console ..................................... 29
Central locking Automatic locking (on-board
computer) ...................................... 210
SmartKey ......................................... 74
Changing bulbs
Headlamps ..................................... 126
Changing gears .................................. 158
Changing the programming SmartKey ......................................... 77
Children
In the vehicle ................................... 58
Restraint systems ............................ 59
Child seat
Automatic recognition .....................47
Automatic recognition/air bag
deactivation, self-test ......................49
Display message ............................ 215
LATCH-type (ISOFIX ) child seat
anchors ............................................ 61
Special seat belt retractor ...............61
Top Tether ....................................... 62
Troubleshooting ............................... 50
Cigarette lighter ................................ 258
Classification system for
occupants (OCS) Faults ............................................... 46
Operation ......................................... 42
System self-test ............................... 45
Climate control
3-zone automatic climate control ..137
Activating/deactivating .................139
Activating/deactivating air-
recirculation mode .........................144
Controlling automatically ...............140
Cooling with air dehumidification ..139
Defrosting the windshield ..............142
Demisting the windows .................. 143
Dual-zone automatic climate
control ........................................... 135
Important safety information .........134
Indicator lamp ................................ 140
Maximum cooling .......................... 143
Problems with "cooling with air
dehumidification" ........................... 140Problems with the rear window
heating .......................................... 144
Rear control panel .........................139
Refrigerant ..................................... 337
Setting the air distribution .............141
Setting the airflow .........................142
Setting the air vents ......................145
Setting the temperature ................141
Setting the temperature (rear
compartment) ................................ 141
Switching the rear window
heating on/off ............................... 144
Switching the residual heat
function on/off .............................. 144
Switching the ZONE function on/
off .................................................. 142
Cockpit ................................................. 25
Combination switch .......................... 122
Compass ............................................ 268
Consumption statistics (on-board
computer) .......................................... 202
Convenience closing feature .............. 87
Convenience opening feature ............ 87
Coolant (engine) Checking the level .........................274
Display message ............................ 226
Notes ............................................. 338
Temperature gauge ........................ 198
Warning lamp ................................. 246
Cooling
see Climate control
Cornering light (display message) ... 223
Crash-responsive emergency
lighting ............................................... 126
Cruise control Cruise control lever .......................172
Display message ............................ 233
Function/notes ............................. 172
Cup holder ......................................... 255
Center console .............................. 255
Rear compartment .........................255
Current fuel consumption (on-
board computer) ............................... 202
Customer Assistance Center (CAC) ............................................... 21
Customer Relations Department ....... 216IndexBA 207 USA, CA Edition B 2011; 1; 3, en-USd2sboikeVersion: 3.0.3.62010-05-20T10:38:09+02:00 - Seite 6
Page 9 of 344

D
Dashboard see Cockpit
Daytime running lamps
Display message ............................ 225
Switching on/off (on-board
computer) ...................................... 209
Delayed switch-off
Exterior lighting (on-board
computer) ...................................... 209
Interior lighting (on-board
computer) ...................................... 210
Digital speedometer ......................... 202
Display (cleaning instructions) ........ 282
Display messages Brakes ........................................... 220
Calling up (on-board computer) .....213
Clearing (on-board computer) ........213
Driving systems ............................. 229
Engine ............................................ 226
KEYLESS-GO .................................. 239
Lamps ............................................ 222
Safety systems .............................. 214
Service interval display ..................276
SmartKey ....................................... 238
Tires ............................................... 233
Vehicle ........................................... 236
Distance recorder ............................. 202
Distance warning lamp ..................... 247
DISTRONIC PLUS Deactivating ................................... 181
Display message ............................ 232
Displays in the multifunction
display ........................................... 180
Driving tips .................................... 182
Function/notes ............................. 174
Setting the specified minimum
distance ......................................... 179
Warning lamp ................................. 247
Door
Automatic locking ............................ 81
Automatic locking (on-board
computer) ...................................... 210
Display message ............................ 237
Emergency locking ........................... 82
Emergency unlocking .......................82
Opening (from inside) ......................81Door control panel
Overview .......................................... 32
Doors
Important safety notes ....................80
Drinking and driving ......................... 167
Drinks holder see Cup holder
Drive program
Automatic ...................................... 159
Manual ........................................... 160
Drive program display ...................... 157
Driving abroad ................................... 171
Driving on flooded roads .................. 170
Driving safety system BAS PLUS (Brake Assist System
PLUS) ............................................... 65
EBD (Electronic Brake force
Distribution) ..................................... 68
ESP ®
(Electronic Stability
Program) .......................................... 66
Important safety information ...........64
Driving safety systems
ABS (Anti-lock Braking System) .......64
ADAPTIVE BRAKE ............................. 68
BAS (Brake Assist System) ..............65
ETS (Electronic Traction System) .....67
Overview .......................................... 64
PRE-SAFE ®
Brake ............................. 68
Driving systems
ATTENTION ASSIST ........................193
Blind Spot Assist ............................ 194
Cruise control ................................ 172
DISTRONIC PLUS ........................... 174
Dynamic handling package with
sports mode .................................. 183
HOLD function ............................... 184
Parking Guidance ........................... 189
PARKTRONIC ................................. 186
Rear view camera .......................... 192
Driving tips ........................................ 158
DISTRONIC PLUS ........................... 182
Downhill gradients .........................168
Driving on flooded roads ................170
Wet road surface ........................... 168
Winter ............................................ 171
DVD audio (on-board computer) ...... 205Index7BA 207 USA, CA Edition B 2011; 1; 3, en-USd2sboikeVersion: 3.0.3.62010-05-20T10:38:09+02:00 - Seite 7
Page 20 of 344
Product information
We recommend using genuine Mercedes-
Benz parts as well as conversion parts and
accessories explicitly approved by us for your
vehicle model.
We have tested these parts to determine their
reliability, safety and special suitability for
Mercedes-Benz vehicles. Despite ongoing
market research, Mercedes-Benz is unable to
assess other parts. We cannot therefore be
held responsible for them, even if in individual
cases an official approval or authorization by
governmental or other agencies should exist.
The use of non-approved parts could affect
your vehicle's operating safety. Mercedes-
Benz therefore recommends that you use
genuine Mercedes-Benz parts, conversion
parts and accessories that have been
approved for the type of vehicle. Genuine
Mercedes-Benz parts, approved conversion
parts and accessories are available from any
authorized Mercedes-Benz Center. In
addition, you will receive advice about
permissible technical modifications, and the
parts will be professionally installed.
Operator's Manual
Notes on the Operator's Manual
This Operator's Manual contains a great deal
of helpful information. We urge you to read it
carefully and familiarize yourself with the
vehicle before driving.
For your own safety and longer service life of
the vehicle, we urge you to follow the
instructions and warnings contained in this
Operator's Manual. Ignoring them could
result in damage to the vehicle or personal
injury to you or others. Vehicle damage
caused by failure to follow instructions is not
covered by the Mercedes-Benz Limited
Warranty.
Vehicle equipment
This manual describes all the standard and
optional equipment of your vehicle available
at the time of publication of the Operator's
Manual. Country-specific differences are
possible. Note that your vehicle may not be
equipped with all functions described. This
also refers to safety-related systems and
functions. The equipment in your vehicle may
therefore differ from that shown in the
descriptions and illustrations. All the systems
found in your vehicle are listed in the original
purchase agreement of your vehicle. Should
you have any questions concerning
equipment and operation, please consult an
authorized Mercedes-Benz Center.
The Operating Instructions and the
Maintenance Booklet are important
documents and should be kept in the vehicle.
Service and vehicle operation
Service and literature
The Service and Warranty Information
booklet contains detailed information about
the warranties covering your vehicle. Your
authorized Mercedes-Benz Center will
replace and repair any factory-fitted parts
based on the terms and conditions of the
following warranties:
R New Vehicle Limited Warranty
R Emission System Warranty
R Emission Performance Warranty
R California, Connecticut, Maine,
Massachusetts, New York, Pennsylvania,
Rhode Island and Vermont
R State Warranty Enforcement Laws (Lemon
Laws)
18IntroductionBA 207 USA, CA Edition B 2011; 1; 3, en-USd2sboikeVersion: 3.0.3.62010-05-20T10:38:09+02:00 - Seite 18
Page 54 of 344
the NECK-PRO head restraints may not
function properly, or in the event of a rear-end
collision may not be able offer the level of
protection they are designed to provide.
GWarning
Only use seat covers/head restraint covers
that have been tested and approved by
Mercedes-Benz for your model.
Using seat covers and head restraint covers
other than those recommended may cause a
malfunction when NECK-PRO head restraints
are triggered or front side impact air bags/
pelvis air bags may be prevented from
deploying.
Contact an authorized Mercedes-Benz Center
for availability.
If the NECK-PRO head restraints have been
triggered in an accident, you must reset the
NECK-PRO head restraints on the driver's and
front-passenger seat (Y page 52).
Otherwise, the additional protection will not
be available in the event of another rear-end
collision. You can recognize that NECK-PRO
head restraints have been triggered by the
fact that they have moved forwards and can
no longer be adjusted.
GWarning!
For your protection, drive only with properly
positioned head restraints.
Adjust the head restraint so that it is as close
to the head as possible and the center of the
head restraint supports the back of the head
at eye level. This will reduce the potential for
injury to the head and neck in the event of an
accident or similar situation.
Resetting triggered NECK-PRO head
restraints
GWarning
For safety reasons, have the NECK-PRO head
restraints checked at an authorized
Mercedes-Benz Center after a rear-end
collision.
GWarning
When pushing back the NECK-PRO head
restraint cushion, make sure your fingers do
not become caught between the head
restraint cushion and the cover. Failure to
observe this could result in injuries.
iResetting the NECK-PRO head restraints
requires a lot of strength. If you have
difficulty resetting the NECK-PRO head
restraints, have this work carried out at a
qualified specialist workshop, e.g. an
authorized Mercedes-Benz Center.
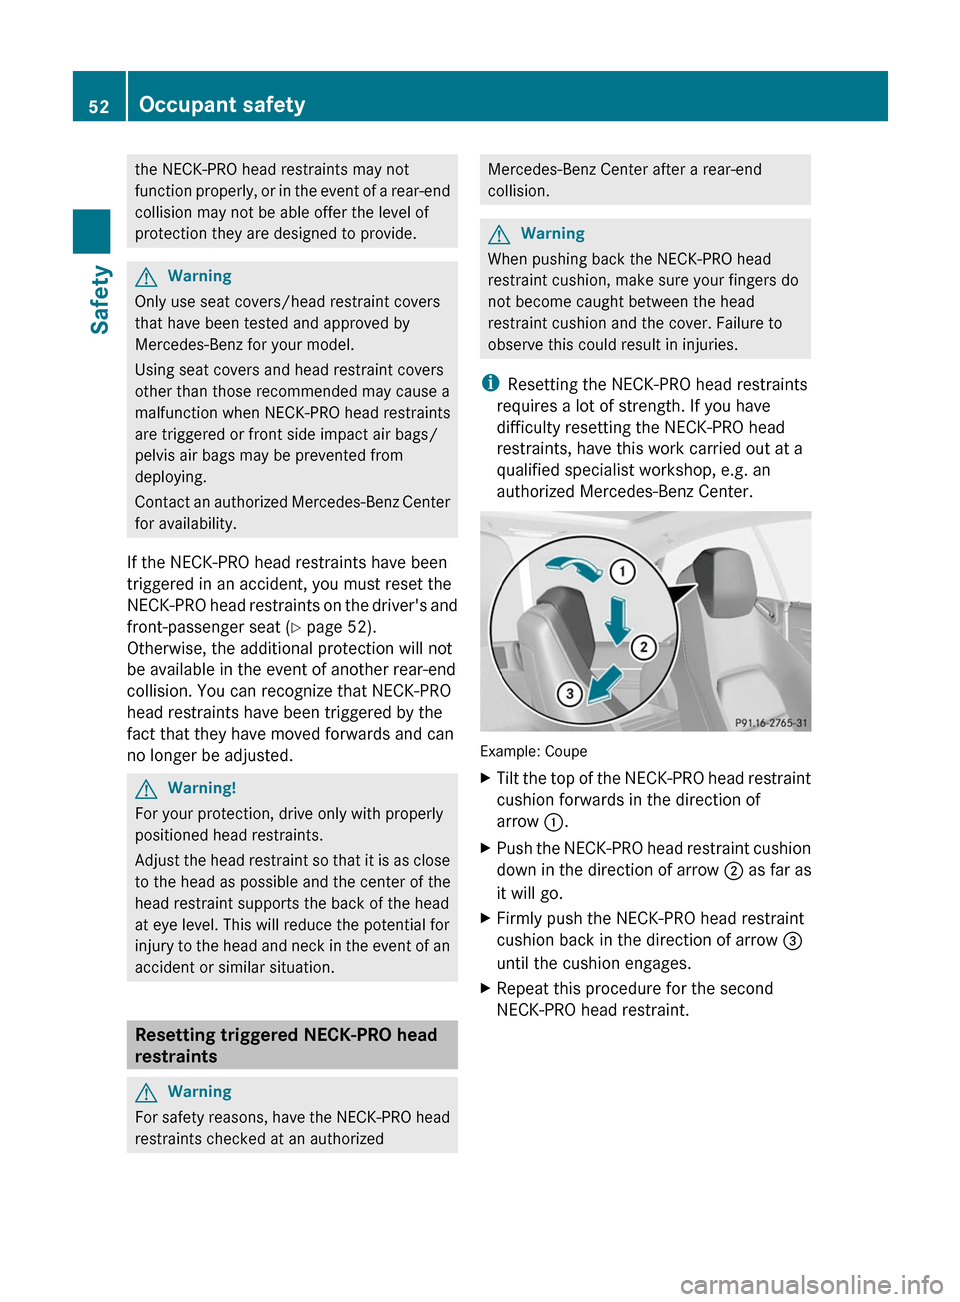
Example: Coupe
XTilt the top of the NECK-PRO head restraint
cushion forwards in the direction of
arrow :.
XPush the NECK-PRO head restraint cushion
down in the direction of arrow ; as far as
it will go.
XFirmly push the NECK-PRO head restraint
cushion back in the direction of arrow =
until the cushion engages.
XRepeat this procedure for the second
NECK-PRO head restraint.
52Occupant safetySafety
BA 207 USA, CA Edition B 2011; 1; 3, en-USd2sboikeVersion: 3.0.3.62010-05-20T10:38:09+02:00 - Seite 52
Page 65 of 344
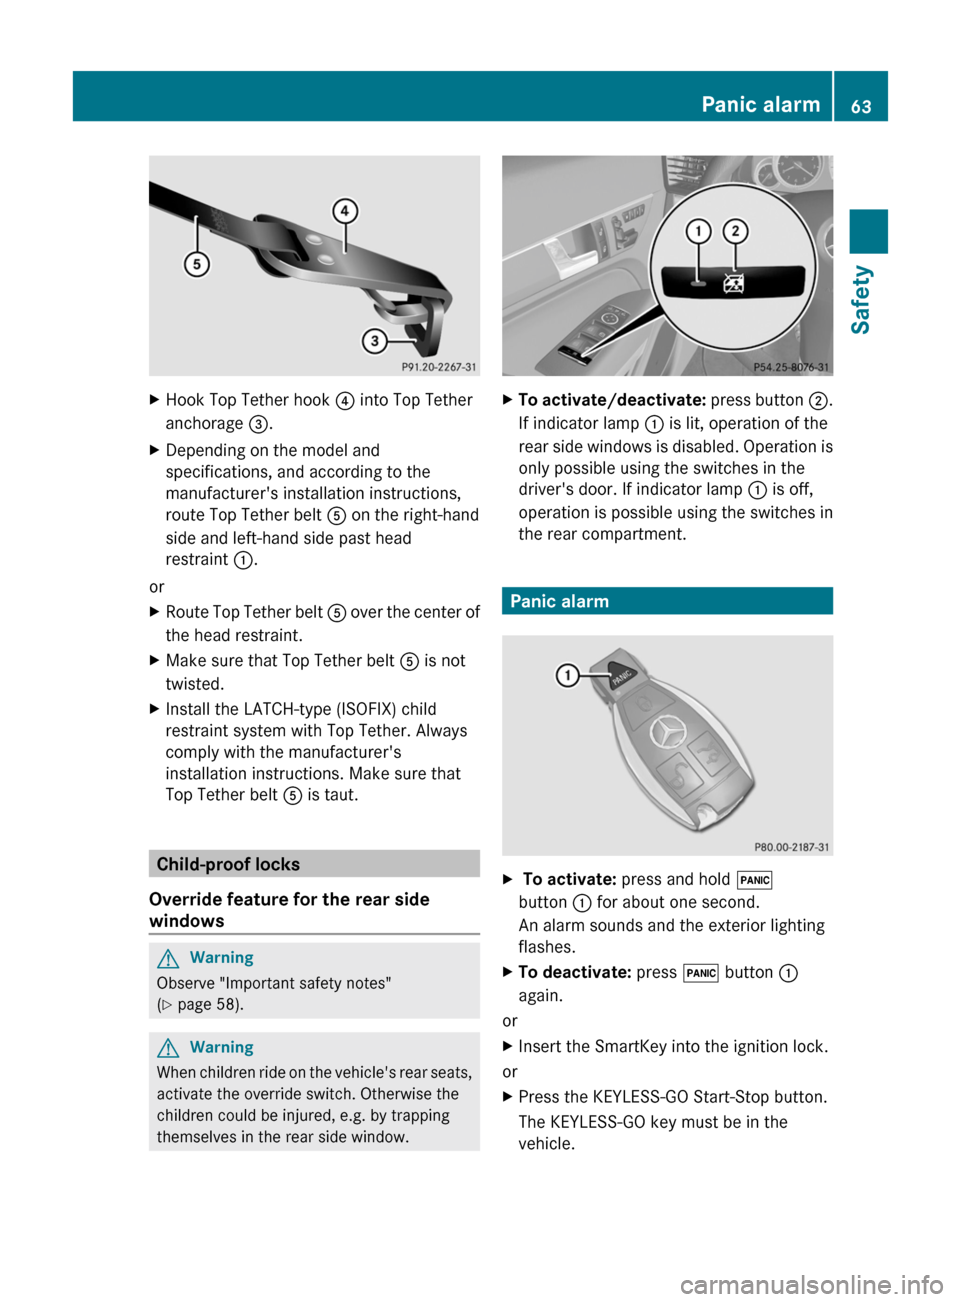
XHook Top Tether hook ? into Top Tether
anchorage =.
XDepending on the model and
specifications, and according to the
manufacturer's installation instructions,
route Top Tether belt A on the right-hand
side and left-hand side past head
restraint :.
or
XRoute Top Tether belt A over the center of
the head restraint.
XMake sure that Top Tether belt A is not
twisted.
XInstall the LATCH-type (ISOFIX) child
restraint system with Top Tether. Always
comply with the manufacturer's
installation instructions. Make sure that
Top Tether belt A is taut.
Child-proof locks
Override feature for the rear side
windows
GWarning
Observe "Important safety notes"
(Y page 58).
GWarning
When children ride on the vehicle's rear seats,
activate the override switch. Otherwise the
children could be injured, e.g. by trapping
themselves in the rear side window.
XTo activate/deactivate: press button ;.
If indicator lamp : is lit, operation of the
rear side windows is disabled. Operation is
only possible using the switches in the
driver's door. If indicator lamp : is off,
operation is possible using the switches in
the rear compartment.
Panic alarm
X To activate: press and hold !
button : for about one second.
An alarm sounds and the exterior lighting
flashes.
XTo deactivate: press ! button :
again.
or
XInsert the SmartKey into the ignition lock.
or
XPress the KEYLESS-GO Start-Stop button.
The KEYLESS-GO key must be in the
vehicle.
Panic alarm63SafetyBA 207 USA, CA Edition B 2011; 1; 3, en-USd2sboikeVersion: 3.0.3.62010-05-20T10:38:09+02:00 - Seite 63Z
Page 88 of 344
metal parts, for example, could become very
hot, and the child could be burned by these
parts.GWarning!
Do not carry heavy or hard objects in the
passenger compartment or trunk unless they
are firmly secured in place.
Unsecured or improperly positioned cargo
increases a child's risk of injury in the event
of
R strong braking maneuvers
R sudden changes of direction
R an accident
GWarning!
When opening or closing the windows, make
sure there is no danger of anyone being
harmed by the opening/closing procedure.
The door windows are equipped with the
express operation and automatic reversal
function. If in express operation mode a door
window encounters an obstruction that
blocks its path, the automatic reversal
function will stop the door window and open
it slightly.
The windows operate differently when the
switch is pulled and held. See the "Closing
when a window is blocked" section in this
chapter for details.
The closing of the door windows can be
immediately halted by releasing the switch or,
if the switch was pulled past the resistance
point and released, by either pressing or
pulling the respective switch.
The closing of the rear side windows can be
immediately halted by releasing the switch.
Activate the override switch when children
are riding in the back seats of the vehicle. The
children may otherwise injure themselves,
e.g. by becoming trapped in the window
opening.
GWarning!
Do not keep any part of your body up against
the window pane when opening a window. The
downward motion of the pane may pull that
part of your body down between the window
pane and the door frame and trap it there. If
there is a risk of entrapment, release the
switch and pull it to close the window.
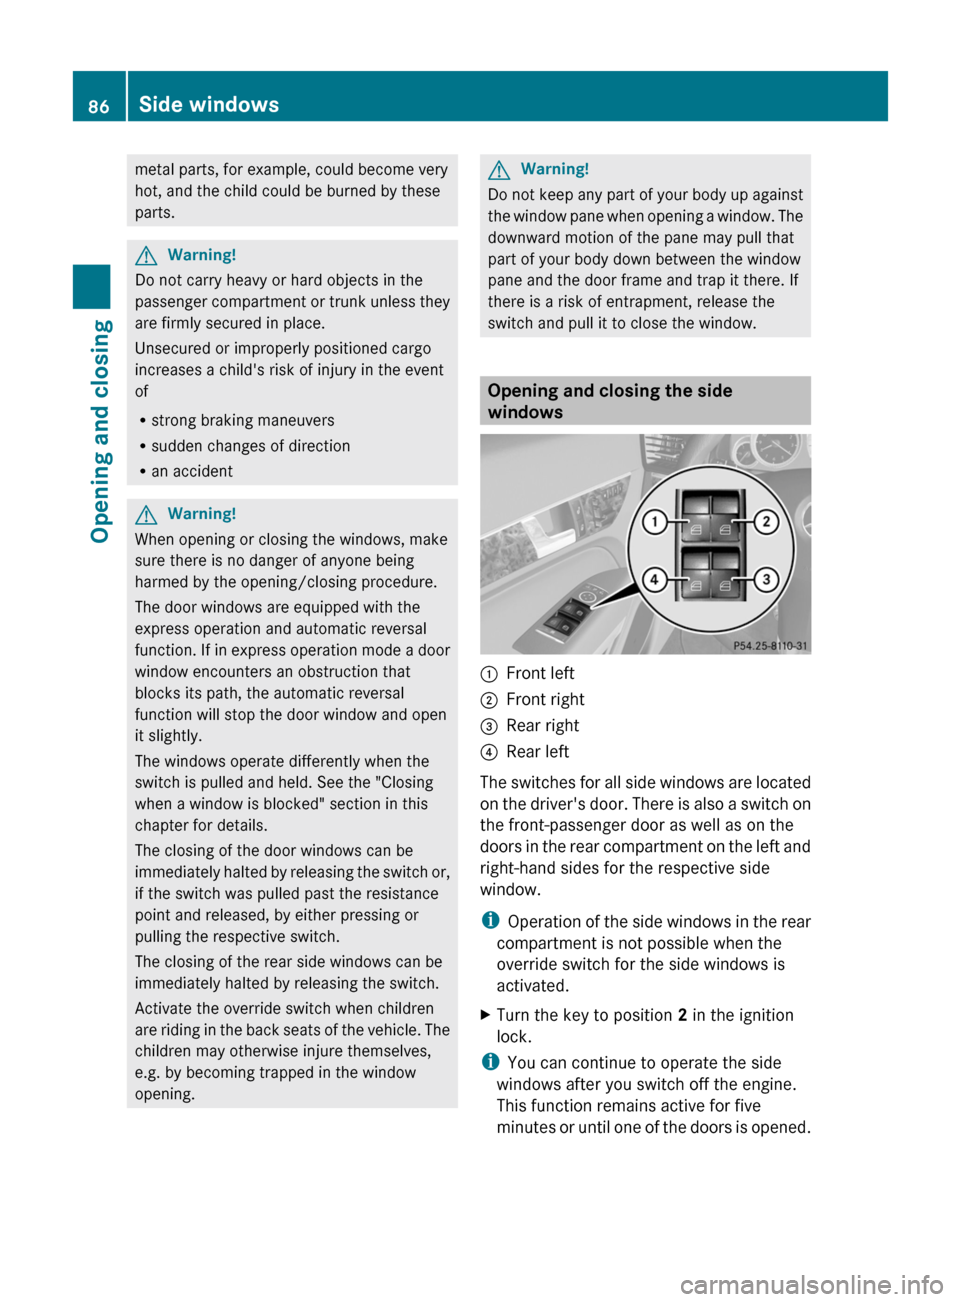
Opening and closing the side
windows
:Front left;Front right=Rear right?Rear left
The switches for all side windows are located
on the driver's door. There is also a switch on
the front-passenger door as well as on the
doors in the rear compartment on the left and
right-hand sides for the respective side
window.
i Operation of the side windows in the rear
compartment is not possible when the
override switch for the side windows is
activated.
XTurn the key to position 2 in the ignition
lock.
i You can continue to operate the side
windows after you switch off the engine.
This function remains active for five
minutes or until one of the doors is opened.
86Side windowsOpening and closing
BA 207 USA, CA Edition B 2011; 1; 3, en-USd2sboikeVersion: 3.0.3.62010-05-20T10:38:09+02:00 - Seite 86
Page 122 of 344

Vehicle equipment
i This manual describes all the standard
and optional equipment of your vehicle
which was available at the time of
purchase. Country-specific differences are
possible. Bear in mind that your vehicle
may not feature all functions described
here. This also refers to safety-related
systems and functions.
Exterior lighting
Important safety notes
For reasons of safety, Mercedes-Benz
recommends that you drive with the lights
switched on even during the daytime. In some
countries, operation of the headlamps varies
due to legal requirements and self-imposed
obligations. In these countries, the daytime
running lamps are automatically switched on
when the engine is started.
Notes on driving abroad
Converting to symmetrical low beam
when driving abroad: switch the headlamps
to symmetrical low beam in countries in
which traffic drives on the opposite side of the
road to the country where the vehicle is
registered. This prevents oncoming traffic
from being dazzled. Symmetrical lights do not
illuminate as large an area of the edge of the
road.
Have the headlamps converted at a qualified
specialist workshop, e.g. an authorized
Mercedes-Benz Center, as close to the border
as possible before driving in these countries.
Converting to asymmetrical low beam
after returning: have the headlamps
converted back to asymmetrical low beam at
a qualified specialist workshop, e.g. an
authorized Mercedes-Benz Center, as soon as
possible after crossing the border when
returning.
Light switch
Operation1 WLeft-hand standing lamps2XRight-hand standing lamps3TParking lamps, license plate and
instrument lighting4 cAutomatic headlamp mode/daytime
running lamps5 LLow-beam/high-beam headlampsBRRear fog lampCNFront fog lamps
The turn signals, high-beam headlamps and
the high beam flasher are operated using the
combination switch ( Y page 122).
! Switch off the parking lamps and standing
lamps when you leave the vehicle. This
prevents the battery from discharging.
The exterior lighting (except the parking
lamps/standing lamps) switches off
automatically if you:
R remove the key from the ignition lock
R open the driver's door with the key in
position 0
If you hear a warning tone when you leave the
vehicle, the lights may still be switched on.
XTurn the light switch to c.120Exterior lightingLights and windshield wipers
BA 207 USA, CA Edition B 2011; 1; 3, en-USd2sboikeVersion: 3.0.3.62010-05-20T10:38:09+02:00 - Seite 120
Page 140 of 344
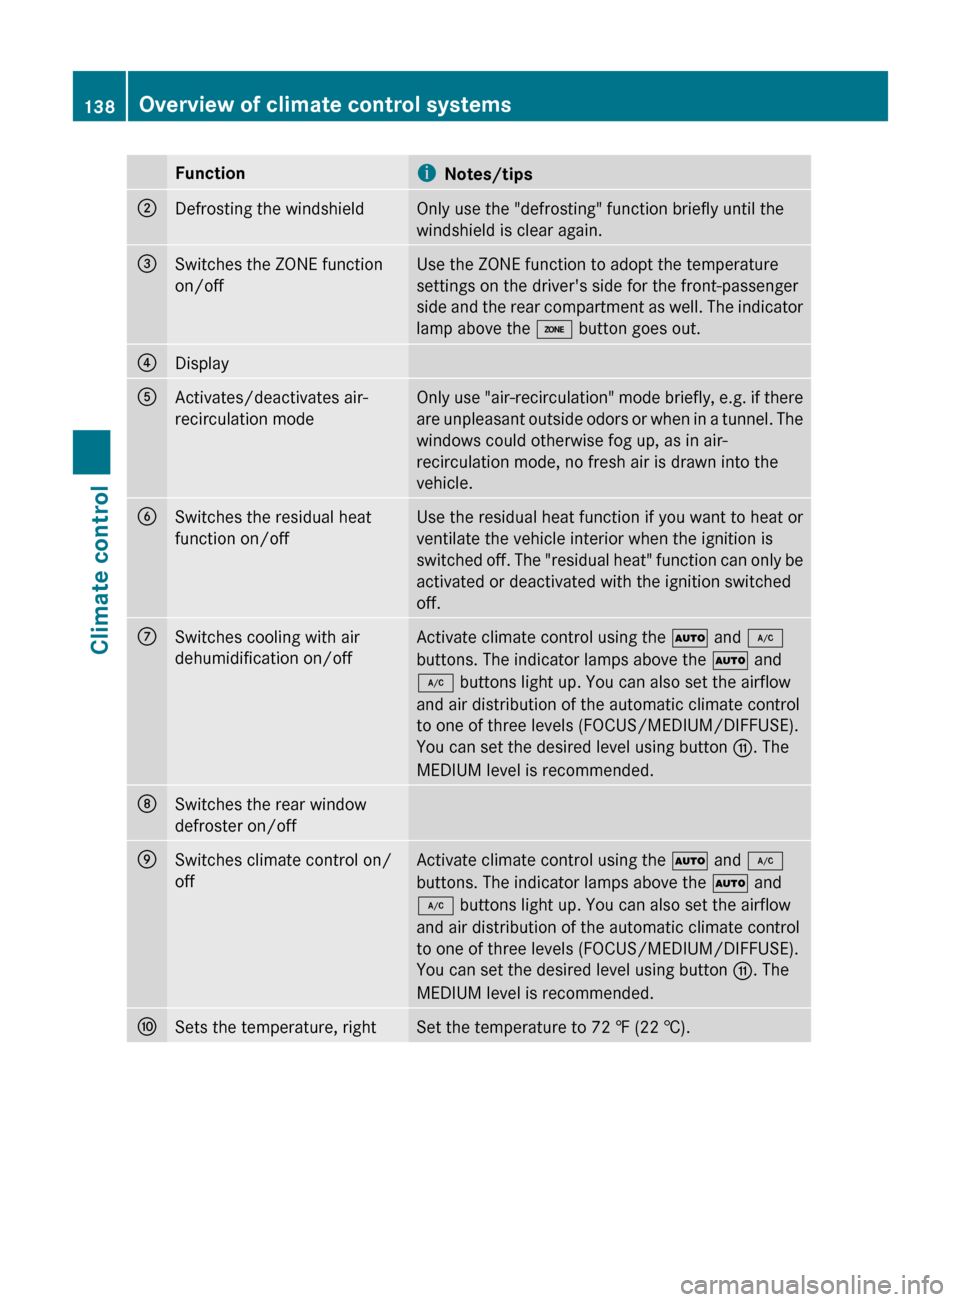
FunctioniNotes/tips;Defrosting the windshieldOnly use the "defrosting" function briefly until the
windshield is clear again.=Switches the ZONE function
on/offUse the ZONE function to adopt the temperature
settings on the driver's side for the front-passenger
side and the rear compartment as well. The indicator
lamp above the á button goes out.?DisplayAActivates/deactivates air-
recirculation modeOnly use "air-recirculation" mode briefly, e.g. if there
are unpleasant outside odors or when in a tunnel. The
windows could otherwise fog up, as in air-
recirculation mode, no fresh air is drawn into the
vehicle.BSwitches the residual heat
function on/offUse the residual heat function if you want to heat or
ventilate the vehicle interior when the ignition is
switched off. The "residual heat" function can only be
activated or deactivated with the ignition switched
off.CSwitches cooling with air
dehumidification on/offActivate climate control using the à and ¿
buttons. The indicator lamps above the à and
¿ buttons light up. You can also set the airflow
and air distribution of the automatic climate control
to one of three levels (FOCUS/MEDIUM/DIFFUSE).
You can set the desired level using button G. The
MEDIUM level is recommended.DSwitches the rear window
defroster on/offESwitches climate control on/
offActivate climate control using the à and ¿
buttons. The indicator lamps above the à and
¿ buttons light up. You can also set the airflow
and air distribution of the automatic climate control
to one of three levels (FOCUS/MEDIUM/DIFFUSE).
You can set the desired level using button G. The
MEDIUM level is recommended.FSets the temperature, rightSet the temperature to 72 ‡ (22 †).138Overview of climate control systemsClimate control
BA 207 USA, CA Edition B 2011; 1; 3, en-USd2sboikeVersion: 3.0.3.62010-05-20T10:38:09+02:00 - Seite 138